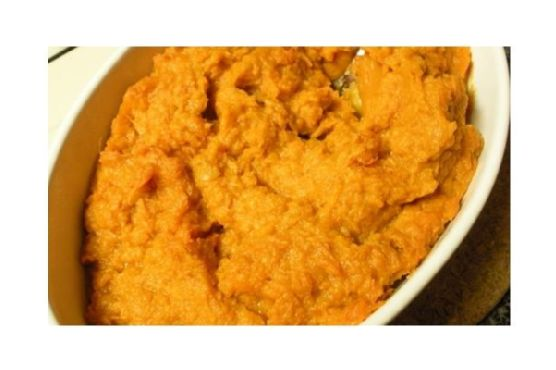
Mashed Sweet Potatoes
Intro
There’s something undeniably comforting about a warm bowl of mashed sweet potatoes. For me, it evokes memories of family gatherings during the fall, where the air was crisp, and the leaves painted the landscape in shades of gold and crimson. I remember standing on a stool in my grandmother’s kitchen, peeking over the countertop as she worked her magic with sweet potatoes. The aroma of spices and the sweet notes of maple syrup filled the air, wrapping us all in a blanket of warmth and nostalgia. It’s this treasured memory that inspires this recipe, a dish that I hope will bring the same joy and warmth to your home as it has to mine.
Why You’ll Love It
This mashed sweet potatoes recipe is a delightful twist on a classic side dish. Here’s why you’ll fall in love with it:
- Rich and Creamy: The addition of cream and butter makes these sweet potatoes irresistibly smooth and luxurious.
- Flavorful Spices: A blend of cinnamon, cardamom, and cayenne pepper adds a comforting warmth with a hint of spice.
- Perfectly Sweet: Brown sugar and maple syrup enhance the natural sweetness of the potatoes without overpowering them.
- Versatile: Suitable for any meal, these mashed sweet potatoes are perfect for holiday feasts or as a comforting weeknight side.
Ingredients
- 5 large sweet potatoes, peeled and chopped
- 2 tablespoons brown sugar
- 1/4 cup butter
- 1 teaspoon ground cardamom
- 1/4 teaspoon cayenne pepper
- 1 teaspoon ground cinnamon
- 1/3 cup cream
- 1 teaspoon kosher salt, or to taste
- 2 tablespoons maple syrup
- Zest of 1 orange
- 1 teaspoon vanilla extract
Instructions
- Begin by boiling the sweet potatoes in a large pot of salted water until they are tender, about 20-25 minutes. Drain them well and return them to the pot.
- Mash the sweet potatoes until they are well broken up, or use an electric mixer for a smoother texture.
- In a small bowl, mix together the cinnamon, cayenne pepper, cardamom, orange zest, and brown sugar. Set aside.
- Add the butter, cream, vanilla, and maple syrup to the mashed sweet potatoes. Mix well to combine.
- Sprinkle in the cinnamon-sugar mixture, stirring until all the ingredients are well incorporated and the mixture is smooth.
- Season with kosher salt to taste, adjusting as needed.
- Serve warm and enjoy!
Tips
For the best results, use fresh sweet potatoes and ensure they are all similar in size for even cooking. When mashing, aim for a texture that suits your preference, whether it be slightly chunky or completely smooth. Don’t hesitate to adjust the seasoning according to your taste—sweet potatoes can handle a bit of experimentation!
Variations & Substitutions
This recipe is highly adaptable to suit your taste preferences:
- Dairy-Free Option: Substitute the butter with a plant-based alternative and use coconut milk instead of cream for a dairy-free version.
- Extra Spice: If you love a bit more heat, increase the amount of cayenne pepper.
- Nutty Twist: Add a handful of toasted pecans or walnuts for a crunchy texture.
- Less Sweet: Reduce the amount of brown sugar and maple syrup if you prefer a more savory dish.
Storage
Store any leftovers in an airtight container in the refrigerator for up to 3 days. To reheat, simply microwave or warm on the stovetop, adding a splash of cream or milk if needed to restore the creamy texture.
FAQ
Can I make this recipe ahead of time?
Absolutely! You can prepare the mashed sweet potatoes a day in advance. Simply reheat them on the stovetop over low heat, stirring occasionally, and add a little extra cream or milk to bring back their smooth consistency.
What can I serve with mashed sweet potatoes?
Mashed sweet potatoes are incredibly versatile and pair well with a variety of main courses. They’re a fantastic side for roasted turkey, glazed ham, or even a hearty lentil loaf for a vegetarian option.
Nutrition
This recipe is not only delicious but also provides a good source of vitamins A and C, thanks to the sweet potatoes. The addition of spices and orange zest offers antioxidants, making this dish a nutritious choice for any meal.
Conclusion
Mashed sweet potatoes are more than just a side dish; they’re a celebration of flavors and memories, a dish that embodies warmth and comfort. Whether you’re serving them at a festive holiday table or alongside a simple weeknight dinner, these mashed sweet potatoes are sure to delight everyone at the table. I hope this recipe brings as much joy to your home as it has to mine, creating new memories and cherished moments. Enjoy every flavorful bite!
Related update: Mashed Sweet Potatoes