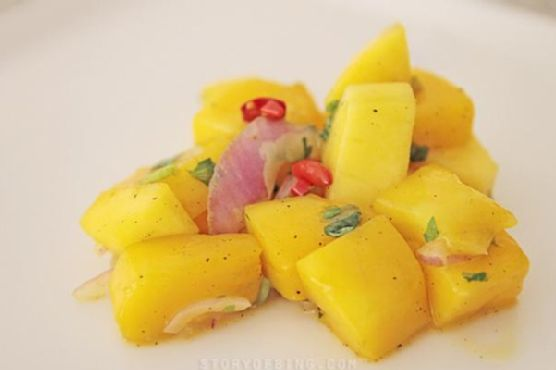
I remember the first time I tried to make Bing’s Mango Salsa. It was one of those sweltering summer days where the air conditioner is doing its best but you’re still considering just living in the fridge. I was craving something refreshing yet spicy to liven up my grilled chicken, and I had a bunch of mangoes sitting on the counter looking a bit too ripe. So, I dove into making this salsa, which turned out to be not only insanely delicious but also incredibly easy to whip up. It’s the kind of recipe you love because it makes you look like a culinary rock star with minimal effort—and it’s perfect for those last-minute BBQ invites. The combination of the sweet mangoes, zesty lime, and spicy chilis is like a little tropical vacation in a bowl. You know you need this in your life.
Jump to Recipe
What You’ll Need
The best part? Chances are you already have most of these ingredients, and they’re all about celebrating fresh, vibrant flavors.
- Sweet mangoes — the star of the show, ripe but not mushy
- Lime zest and juice — for that zesty punch
- A handful of mint leaves — or swap with coriander if you’re feeling rebellious
- 1-2 shallots or a small red onion — sliced paper-thin
- Salt and black pepper — to taste
- A sprinkle of sugar — just a pinch to balance things out
- Fresh chili — dial up the heat as per your taste
How to Make Bing’s Mango Salsa
- Start by dicing the mangoes into small cubes, about 1.5cm each. This size is perfect for ensuring every bite is juicy and flavorful.
- Toss the mango cubes into a large mixing bowl and grate the zest of one lime over them. The fragrance will hit you immediately — heaven!
- Squeeze the juice from half a lime into the bowl. Stir well, and remember, a little more lime juice can be added later if needed.
- Finely chop a bunch of mint leaves (or coriander if you’re in that camp). Add these to the bowl and give it a good mix.
- Slice the shallots or red onion as thin as you can and mix them into the mango concoction. Stir after each addition, trust me, it’s magical.
- Season with 1/2 teaspoon of salt and black pepper. Add 1 teaspoon of sugar, then stir and taste. Adjust these to your liking — it should be a delightful balance of savory, sweet, and tangy.
- Finally, chop the chillis and add them cautiously. Mix well, and taste as you go to achieve your preferred spice level.
- Cover the bowl with cling wrap and let it chill in the fridge for at least 30 minutes. This chilling time lets the flavors meld beautifully.
- Keep it chilled until you’re ready to serve. It’s best enjoyed fresh!
Cook’s Notes
Here’s a few things I’ve learned along the way:
- If you make this ahead of time, give it a good stir before serving as the juices tend to settle at the bottom.
- Leftovers can be stored in the fridge for up to 2 days, but trust me, it rarely lasts that long!
- Be mindful of the type of chili you use. Some can be much spicier than others, so add them slowly until you reach your desired heat level.
- This salsa is versatile. While it’s heavenly with grilled chicken or fish, it also makes a fantastic topping for tacos or a dip with tortilla chips.
Make It Your Own
Want to switch things up? Here are some fun variations:
- Swap the mint leaves with cilantro if you’re a fan of its bold flavor.
- Try adding some diced avocado for an extra creamy texture.
- Use pineapple or peach instead of mango for a different sweet twist.
- If you’re not a fan of heat, replace chilis with bell peppers for a milder version.
If you try this, I’d love to hear how it turns out—drop a comment or tag me! Let’s keep the kitchen adventures going. 🍍🌶️
Related update: Bing's Mango Salsa
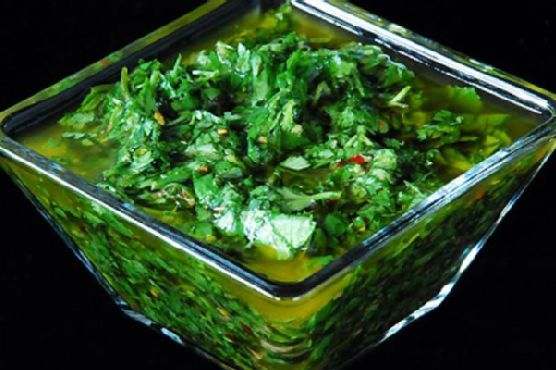
It was one of those evenings when the fridge light flickers on to reveal a collection of *almosts* — almost enough of this, almost enough of that. As I stood there contemplating the remnants of the weekend’s cooking adventures, the memory of a tangy, herby sauce came to mind, something quick yet transformative: Chimichurri. Perfect for those nights when you crave something more than just a meal — a bright, green punch of flavor to enliven whatever protein you can scrounge up. Plus, it’s one of those recipes that’s practically foolproof and endlessly adaptable. Trust me, your taste buds will thank you, and your fridge’s odds and ends might just disappear in the best way.
Jump to Recipe
What You’ll Need
I love this ingredient list because chances are, you already have most of these lying around! Here’s what you’ll need to whip up some magic:
- Parsley – the base of our green goodness
- Cilantro – for that citrusy zing
- Garlic cloves – because what’s a sauce without garlic?
- Red wine vinegar – sharp and tangy
- Olive oil – rich and smooth
- Salt – to balance and enhance
- Black fresh ground pepper – for a touch of warmth
- Red pepper flakes – a hint of heat
- Capers – optional, but they add a lovely brininess
How to Make Chimichurri
- Chop the parsley and cilantro until they’re finely minced, releasing a vibrant, fresh aroma. Toss them into a medium mixing bowl.
- Mince the garlic cloves and add them to the bowl, stirring until these aromatic delights are evenly distributed among the greenery.
- Pour in the red wine vinegar, then sprinkle in the salt, black pepper, and red pepper flakes. Stir gently, letting the fragrance of the vinegar meld with the herbs.
- Slowly drizzle in the olive oil, stirring as you go, until everything is well-coated and glistening. The mixture should be thick, not soupy, holding together beautifully.
- Let the chimichurri sit for about 30 minutes. As it rests, the flavors will meld together, creating that punchy, tangy blend that’s oh-so-addictive.
Cook’s Notes
Chimichurri is all about balance and personal preference. If you find the sauce too tangy, add a bit more olive oil. Too mild? A pinch more salt might do the trick. I like to make it ahead of time and let it sit in the fridge overnight — the flavors just seem to get better. Store any leftovers in a tightly sealed jar in the refrigerator; it should stay fresh for about a week. Just give it a good stir before using it again. And remember, this isn’t just a sauce for meats; drizzle it over roasted veggies or even mix it into your scrambled eggs for a herby twist.
Make It Your Own
- Swap the cilantro for fresh mint for a refreshing spin that’s perfect over lamb.
- Add a teaspoon of lemon zest for a citrusy burst that pairs beautifully with grilled fish.
- Incorporate some finely chopped shallots for a subtle sweetness and depth.
- Replace red wine vinegar with apple cider vinegar for a slightly sweeter, fruitier undertone.
If you try this, I’d love to hear how it turns out — drop a comment or tag me in your photos! Let’s see those creative tweaks and the delicious results. Happy saucing!
Related update: Chimichurri
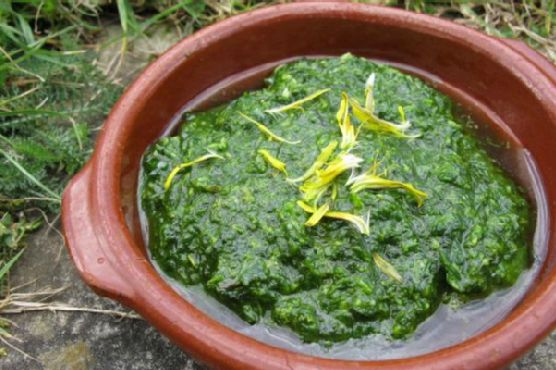
Picture this: it’s a sunny Saturday morning, and I’m wandering through my backyard, coffee in hand, when I notice these bright, cheerful dandelion heads smiling up at me. Normally, I’d think of them as weeds, but today, they spark an idea. What if I harness their vibrant energy into something delicious? That’s how I stumbled upon the magic of dandelion pesto. It’s one of those recipes that sounds a bit daring, but trust me, it’s a total game-changer. Perfect for when you want something quick but with a twist of the unexpected. The fresh bite of dandelion greens mixed with the nutty richness of pine and macadamia nuts, rounded off with a zesty lemon kick—seriously, you’ve got to try this.
Jump to Recipe
What You’ll Need
I love this recipe because it’s both adventurous and practical. Chances are, you’ll already have most of these ingredients hanging out in your kitchen or garden, just waiting to show off.
- Dandelion greens — freshly foraged, if you can!
- Fresh basil leaves
- Spinach
- The petals from dandelion flowers
- Garlic — the more, the merrier!
- Sea salt — to taste
- Pine nuts
- Macadamia nuts — they add a buttery smoothness
- Enough extra virgin olive oil to bind the sauce together
- Lemon — juice, not zest
- Nutritional yeast flakes — for that cheesy vibe without the cheese
How to Make Dandelion Pesto
- Start by washing the dandelion greens well in a solution of water and raw cider vinegar. Use a couple of tablespoons of vinegar to about a litre of water. This will help remove any lingering bitterness.
- Wash and spin dry all the greens. You want them dry enough to not water down your pesto but still glistening with freshness.
- Pop all the ingredients into a pestle and mortar or, for a quicker route, a food processor. Blitz until nearly smooth, but I like to leave it a bit chunky. The texture gives it a homemade charm.
- Taste and adjust the seasoning. Maybe a pinch more salt or a drop more lemon juice? It’s all about finding that balance that dances on your tongue.
- And that’s it! It’s simple, a little bit scrummy, and oh so rewarding.
Cook’s Notes
Here’s the deal with dandelions: you want them young and tender. As they age, they can turn bitter, and no one wants that. Also, make sure you’re picking from areas that aren’t sprayed with pesticides—keep it organic! If you’re making this ahead, store your pesto in the fridge in an airtight container with a slick of olive oil on top to keep it from browning. It’ll last about a week, but I doubt it’ll stay uneaten for that long. And if you have leftovers, toss it with pasta, spread it on a sandwich, or even swirl it into soup for an herby punch.
Make It Your Own
- Swap the pine nuts for walnuts if you want a more robust, earthy flavor.
- Add a handful of parmesan if you’re not keeping it vegan—it adds a creamy depth.
- If you’re out of spinach, arugula can step in for a peppery twist.
- Feeling spicy? Throw in a pinch of red pepper flakes for a little heat.
If you try this, I’d love to hear how it turns out—drop a comment or tag me in your pesto adventures! Happy foraging and blending!
Related update: Dandelion pesto

Last Tuesday, I found myself in need of a pick-me-up. It was one of those dreary afternoons when everything seemed to drag. The sky was grey, the email inbox was overflowing, and honestly, I just wanted something sweet and gooey to make it all better. That’s when I remembered these Chocolate Chip Peanut Butter Mallow Dessert Bars. Trust me, they’re the kind of treat that can turn any day around. Quick to whip up, using ingredients you likely already have kicking around your pantry, these bars are a perfect mix of chocolatey, peanut buttery magic with a delightful marshmallow surprise. They’re everything you didn’t know you needed.
Jump to Recipe
What You’ll Need
This is one of those recipes where a quick pantry dive will probably yield most of what you need. The combination of these ingredients is pure joy.
- 1 package of chocolate chip cookie mix
- 1 egg
- 3 tablespoons of milk
- 1/2 cup of butter, melted
- 1/2 cup of peanut butter
- 1 cup of marshmallows
- Drizzle of chocolate syrup
How to Make Chocolate Chip Peanut Butter Mallow Dessert Bars
- Preheat your oven to 375°F (190°C). While it warms, grab a mixing bowl and stir together the chocolate chip cookie mix, egg, milk, and melted butter until smooth. It should be creamy and thick but pliable enough to spread.
- Grease an 8×8 baking pan well. Trust me, you’ll thank yourself later. Spread the cookie mixture evenly into the bottom of the pan. The more even, the better it’ll bake.
- Pop the pan into the oven for 15-20 minutes. You’ll know it’s ready when the edges are golden and the center looks set and slightly puffed. Your kitchen will smell like heaven by now.
- Take the pan out and immediately spread the peanut butter evenly over the hot cookie base. The warmth will help it glide smoothly.
- Top the peanut butter layer with marshmallows. Feel free to sneak a few into your mouth — I won’t tell.
- Return the pan to the oven for a few more minutes, just until the marshmallows start to melt and get a little golden on the tips.
- Remove from the oven and use a spatula to spread the marshmallows evenly over the peanut butter layer, creating a gooey, sticky blanket.
- Drizzle the chocolate syrup over the top. Let it cool to set completely before cutting into squares. This is the hardest part — waiting! But I promise it’s worth it.
Cook’s Notes
Keep an eye on the marshmallows when you pop the pan back in the oven. They can go from beautifully melted to burnt in a blink. If you’re making these ahead, let them cool completely before storing them in an airtight container at room temperature. They’ll keep for about 3-4 days, not that they’ll last that long! For leftovers, a quick zap in the microwave will bring back that gooey goodness.
Make It Your Own
- Nut Swap: Substitute the peanut butter with almond or cashew butter for a different nutty twist.
- S’mores Style: Add a layer of crushed graham crackers in between the peanut butter and marshmallows for a classic s’mores flavor.
- Extra Chocolatey: Mix in a handful of chocolate chips into the cookie dough batter for extra bursts of chocolate with every bite.
- Spice It Up: Stir a teaspoon of cinnamon into the cookie mix for a warm, spiced undertone.
If you try this, I’d love to hear how it turns out — drop a comment or tag me! There’s nothing like sharing a good recipe and seeing everyone’s delicious results. Happy baking, and may your days be as sweet as these bars!
Related update: Chocolate Chip Peanut Butter Mallow Dessert Bars
Related update: Valentine's Day Potted Plant Ice-Cream Desserts