
Picture this: it’s a busy weeknight, the kind where everything that could go wrong does—my cat decided to knock over a plant, and I swear the vacuum cleaner is giving me side-eye for not using it. That’s when I remember the bundle of asparagus I impulsively bought at the market, and suddenly, the night doesn’t seem so impossible. This Flemish Style Asparagus Side Dish is everything you need it to be—quick, comforting, and just fancy enough to make you feel like you’ve got things under control. It’s got that buttery, lemony vibe that I can’t get enough of, and it’s one of those dishes that somehow manages to elevate your mood and your meal. So, let’s dive in and get cooking!
Jump to Recipe
What You’ll Need
You’re going to love how simple and stress-free this ingredient list is. Chances are, you already have most of these goodies lounging in your kitchen:
- Green and white fresh asparagus
- Butter
- Hardboiled eggs
- Italian flat parsley
- Lemon (just the juice!)
- Salt and pepper
How to Make Flemish Style Asparagus Side Dish
- Start by peeling the asparagus at their ends, leaving their heads untouched. This helps with texture and makes them more palatable.
- Place the asparagus in a large saucepan and cover them with boiling water. Add a pinch of salt. Let them simmer until they’re tender—about 3 to 4 minutes. You’ll know they’re perfect when they turn a vibrant green and are fork-tender.
- While the asparagus is cooking, chop the flat parsley into fine bits. Trust me, this will add a fresh, herby kick that’s just perfect.
- Boil three eggs till they’re hard, then peel them. Use a fork to mash them into fine crumbs—they should resemble coarse sand.
- In a separate saucepan, melt the butter over medium heat. Add the juice of half a lemon, and whisk constantly. It should smell like heaven and have a smooth, silky texture.
- Stir in the mashed eggs into your butter-lemon mixture. The mixture should be thick and luscious. Add the chopped parsley and stir to combine.
- Plate the dish by laying a few stalks of cooked asparagus on a plate and drizzling the sauce generously over the stalk ends. Season with salt and pepper to taste. Serve warm and enjoy every bite!
Cook’s Notes
Okay, real talk: the key to nailing this dish is all about timing. Make sure your asparagus is not overcooked—aim for that sweet spot where it’s tender but still has a bit of crunch. If you’re prepping in advance, you can boil the eggs and chop the parsley earlier in the day. The sauce, however, is best fresh. Leftovers are rare because it’s just that good, but if you find yourself with any, store the asparagus and sauce separately. The asparagus can go in an airtight container, and you can reheat the sauce gently on the stove. It keeps well for up to two days.
Make It Your Own
Want to put your personal spin on this dish? Here are a few variations to consider:
- Swap the butter for ghee if you’re feeling adventurous—it adds a nutty richness.
- Try adding a pinch of smoked paprika or cayenne to the sauce for a little heat.
- If parsley isn’t your thing, fresh dill or chives would also be delightful.
- For a bit of extra texture, toss in some toasted pine nuts or almonds before serving.
If you try this, I’d love to hear how it turns out—drop a comment or tag me! Whether you’re having a chaotic day or just need a little culinary pick-me-up, this dish is your new best friend.
Related update: Flemish Style Asparagus Side Dish

I was knee-deep in a midwinter slump, the kind where you just crave a burst of sunshine, when I stumbled upon this idea: Braid sweet citrus-flavored licorice. It’s a bit of a departure from your typical licorice, and honestly, it’s more of a pastry with a playful twist. Picture this: a light, flaky puff pastry with a zesty citrus glaze that dances on your taste buds. Perfect for those days when you need a little joy but aren’t in the mood for anything too fussy or time-consuming.
One of the best things about this recipe is its versatility. It’s a delightful treat that can play the part of a breakfast snack, a tea-time companion, or the unexpected star of a dessert platter. The secret weapon here is the citrus glaze, which brings this pastry to life with a sweet-tart zing. If you’ve got some puff pastry lingering in the freezer and a stash of citrus in the fruit bowl, you’re basically halfway there.
Jump to Recipe
What You’ll Need
Chances are you already have most of this sitting in your kitchen. Let’s keep it simple, shall we?
- Puff pastry Buitoni – the flaky base of our braids
- Fresh cream – to add richness to the glaze
- Grand cru muscovado sugar – for that deep, molasses-like sweetness
- Lemon – zest and juice will do wonders here
- Lime – for that extra citrus punch
- Orange – more zest, more flavor
How to Make Braid Sweet Citrus Flavored Licorice
- Roll out the puff pastry and use a sharp knife to etch designs of strips about 10 cm high and 1 cm wide. Precision isn’t key here, just have fun with it.
- Gently twist each strip on itself. It doesn’t have to be perfect; the twists will bake into beautiful, rustic braids.
- Place the twisted strips spaced apart on a sheet of parchment paper. This prevents them from sticking together as they bake.
- Bake in a preheated oven at 200°C for about 12 minutes, or until they’re golden brown and your kitchen smells like heaven.
- While the braids cool on a wire rack, zest your citrus fruits, and set the zest aside.
- Juice the lime, half of the orange, and half of the lemon. Boil the juices until you reduce it down to about two tablespoons of liquid.
- Remove from heat and stir in the cream and brown sugar until it’s well mixed and dreamy.
- Let the glaze cool until it thickens, then brush it generously over the cooled braids.
- Sprinkle the reserved citrus zest over the glazed braids while they’re still a bit wet to ensure it sticks well.
- Allow the glaze to dry on the wire rack until it hardens slightly. Then, go ahead and devour them!
Cook’s Notes
Don’t stress if your twists aren’t perfect—imperfections add character! Make sure to space them well on the parchment paper to allow for expansion. If your glaze seems too runny, let it cool a bit more; it thickens as it cools. Want to save time? You can make the glaze ahead of time and refrigerate it for up to two days. Just warm it slightly before using. Leftovers can be stored in an airtight container for a couple of days, but honestly, they probably won’t last that long.
Make It Your Own
- Try using blood orange instead of the regular orange for a more intense flavor and color.
- Add a splash of vanilla extract to the glaze for a warm, comforting undertone.
- For a spiced twist, sprinkle a little ground cardamom in with your citrus zest.
- If you’re feeling adventurous, drizzle a bit of melted white chocolate over the top once the glaze has set.
If you try this, I’d love to hear how it turns out—drop a comment or tag me! Enjoy the bright and citrusy vibes these braids bring, no matter what the weather outside is doing. Happy baking!
Related update: Braid sweet citrus flavored licorice
Related update: Basil Coconut Ice Cream
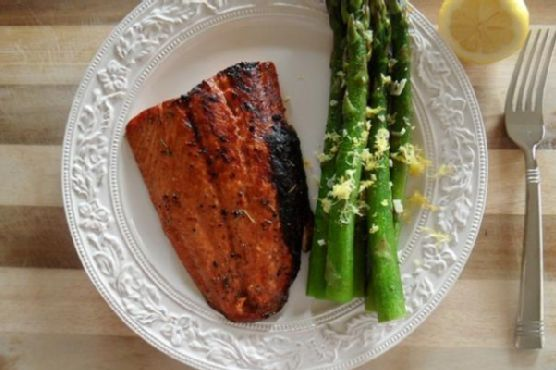
Picture this: It’s Tuesday evening, and you just got home from a day that felt longer than it had any right to be. You’re staring into the fridge, willing it to offer up some inspiration. Then, like a beacon of hope, you spot a lonely salmon fillet tucked behind last night’s leftovers. A lightbulb moment strikes: Balsamic & Honey Glazed Salmon with Lemony Asparagus. Deliciously sweet and tangy salmon, paired with asparagus that’s just the right amount of zesty. It’s the perfect blend of “fancy enough for company” and “easy enough for a weeknight.” This dish is a favorite because it’s quick yet feels special, and it hits all the right notes from tangy to savory. Trust me, your taste buds will thank you.
Jump to Recipe
What You’ll Need
You probably have most of these at home already, with maybe just a quick spice cabinet dive for a few aromatics. Here’s the lineup for this easy-peasy dinner:
- Salmon fillet
- Balsamic vinegar
- Apple cider vinegar
- Honey
- Dried dill
- Herbs de Provence
- Salt and pepper
- Grapeseed oil
- Lemon (juice and zest)
- Asparagus
- Garlic
- Vegetable stock
How to Make Balsamic & Honey Glazed Salmon with Lemony Asparagus
- In a small mixing bowl or blender, throw together all the balsamic marinade ingredients except the lemon juice: balsamic vinegar, apple cider vinegar, 1 tablespoon grapeseed oil, honey, dried dill, herbs de Provence, salt, and pepper. Whisk or blend until the mixture loses its vinegar-and-oil identity crisis.
- Lay the salmon fillet in a cozy little baking dish — I usually opt for a small casserole dish. Pour your freshly mingled marinade over the salmon, letting it settle in for at least 15 minutes. If patience is your virtue, up to 24 hours in the fridge is even better.
- Crank your oven to high broil. Just before the salmon gets its turn in the oven spotlight, drizzle the lemon juice over the top for that extra zing.
- Slide the salmon onto the top rack and broil for 10 to 12 minutes. You’re looking for glazed, browned, and a sizzle that says, “Dinner is almost ready!”
- While the salmon works its magic, prep your asparagus. Wash and trim off the tough ends — about an inch and a half will do. Lay them in a large skillet, as if sunbathing.
- Drizzle grapeseed oil over the asparagus, and use your hands to ensure every stalk gets some love. Sprinkle with salt and pepper, then sauté over medium heat for about 5 minutes.
- Add 2 tablespoons of vegetable stock, cover, and let them steam for 4 minutes. Lift the lid, introduce the minced garlic, and cover again. Let cook for another 3 to 5 minutes, just until tender but with a little bite.
- Finish with a flourish of freshly grated lemon zest over the asparagus, adding a citrusy brightness that ties the whole dish together.
Cook’s Notes
Let’s talk salmon: It should flake easily with a fork when it’s done. If you’re new to broiling, remember that it’s super quick and can go from perfect to overdone in a flash. As for leftovers (if there are any!), this dish reheats beautifully. Store the salmon and asparagus separately in airtight containers for up to two days. Reheat gently, so you don’t dry out that beautiful fish. If you’re meal prepping, the marinade is a fantastic make-ahead step. Whip it up and keep it in the fridge for when inspiration (or hunger) strikes.
Make It Your Own
Here are a few ways to switch things up:
- Swap salmon for crispy tofu if you’re going plant-based. Marinate and bake it the same way for a protein-packed treat.
- Try maple syrup instead of honey for a deeper, earthier sweetness.
- Substitute broccoli for asparagus if that’s more your jam — just adjust the cooking time to keep it crisp-tender.
- Add a sprinkle of red pepper flakes to the marinade for a little heat if you like things spicy.
Hey, if you try this, I’d love to hear how it turns out for you! Drop a comment below or tag me in your delicious photos. Happy cooking!
Related update: Balsamic & Honey Glazed Salmon with Lemony Asparagus
Related update: Yogurt Marinated Lamb Skewers

It was one of those freakishly warm spring afternoons when I first craved something light but satisfying. You know, when the sun teases you into thinking it’s okay to pack away your sweaters, only for the evening chill to remind you it’s not quite summer yet. I was rummaging through my fridge, hoping for inspiration, when I stumbled upon some swai fillets tucked behind the carton of eggs. Cue lightbulb moment: ceviche. Fresh, tangy, and with a bit of a kick, this swai ceviche is the kind of dish that feels fancy but comes together with minimal effort. Perfect for those nights when you want to impress without breaking a sweat. Jump to Recipe
What You’ll Need
Most of these ingredients are things you might already have lounging around in your kitchen. The magic is in the freshness and the little kick of spice.
- 1 pound of diced swai fillets
- Lime juice from about 4-5 limes
- 1 red diced shallot
- 1 cup of diced avocado
- 1 tomato, diced
- 1 tablespoon of chile-garlic paste
- 2 tablespoons of olive oil
- 1/4 cup of cilantro, chopped
- Salt and pepper to taste
How to Make Fresh and Simple Swai Ceviche
- Place the diced swai fillets in a bowl and cover them with half of the lime juice. Make sure each piece is submerged, then cover and pop it in the fridge for at least 3 hours. This allows the fish to “cook” in the acidity of the lime juice. You’re looking for it to turn opaque and tender.
- Once the fish is ready, strain it to remove excess lime juice. Don’t rush this step; too much moisture will make the ceviche soupy.
- In another bowl, combine the diced tomato, red shallot, and avocado with the remaining lime juice. Toss gently, so the avocado stays in lovely chunks.
- Stir in the swai and chopped cilantro. Give it all a good, gentle mix.
- Drizzle with olive oil and add the chile-garlic paste. The sauce gives it that spicy, garlicky punch that makes you go back for more.
- Season with salt and pepper to taste. Remember, a little goes a long way, so keep tasting as you go.
- Serve immediately with tortilla chips or over a fresh salad. Enjoy the vibrant flavors in every bite!
Cook’s Notes
Don’t skimp on the lime juice – it’s both the cooking agent and flavor base. If you’re not a fan of too much heat, start with half the amount of chile-garlic paste and adjust. This ceviche is best enjoyed fresh, but if you have leftovers, store them in an airtight container for up to a day. The avocado might brown slightly, but the taste will still be lovely.
Make It Your Own
- Swap the swai for shrimp or scallops if you’re feeling fancy.
- Add some diced cucumber for extra crunch and freshness.
- If cilantro isn’t your thing, try using fresh mint or basil for a different herbal note.
- For a sweeter twist, toss in some diced mango or pineapple.
If you try this, I’d love to hear how it turns out — drop a comment or tag me in your creations! Happy ceviche making!
Related update: Fresh and Simple Swai Ceviche

Imagine this: it’s midweek, and your brain is fried from a day full of emails and Zoom calls. You open the fridge, and there it is, an avocado teetering on the edge of overripeness and a couple of oranges sitting pretty but untouched. Suddenly, inspiration strikes—why not combine these beauties into a refreshing salad that screams “spring” without actually requiring a season change? This Avocado and Orange Salad, dressed with a zingy Orange-Ginger Dressing, is like a mini-vacation for your taste buds. It’s quick, colorful, and destined to make you fall in love with simple ingredients all over again. Jump to Recipe
What You’ll Need
The beauty of this ingredient list is how effortlessly it combines pantry staples with fresh produce to create something magical.
- Avocados – Perfectly ripe.
- Oranges – Sweet and juicy.
- Green onions – For a hint of sharpness.
- Orange juice – Freshly squeezed, for that extra punch.
- Lemon (juice) – To add a bit of zing.
- Fresh ginger paste – Trust me, it’s worth it.
- Agave syrup – For a touch of sweetness.
- Olive oil – Smooth and lush.
- Salt and pepper – To taste.
How to Make Avocado and Orange Salad With Orange-Ginger Dressing
- Begin by slicing your avocados and oranges. Let them overlap on a platter as if they’re chatting at a party.
- Don’t waste that orange carcass! Squeeze its juice over your arranged slices, letting it mingle and soften the edges of the avocado.
- Sprinkle green onions artfully over the top, like confetti, and add a pinch of salt to awaken those flavors.
- Cover the platter with cling film, tucking it into the fridge, so the salad chills out while you prepare the dressing.
- In a blender, combine orange juice, lemon juice, fresh ginger paste, agave syrup, and olive oil. Blend until the mixture is smooth and the ginger’s aroma wafts up deliciously.
- Season the dressing with salt and pepper, tasting it to find your perfect balance of sweet, spicy, and tangy.
- Just before serving, unveil your masterpiece from the fridge and drizzle the dressing generously over the salad.
Cook’s Notes
Here’s the lowdown on making this salad work like a charm:
- Make sure your avocados are ripe but firm enough to hold their shape when sliced.
- If you’re making this ahead, keep the dressing separate until just before serving to prevent the avocados from getting too mushy.
- Leftovers? Unlikely. But if you do have some, store them in an airtight container and consume within a day for best results.
- Be cautious with the salt. Remember, you can always add more, but you can’t take it out!
Make It Your Own
This salad is versatile enough to play with, so go ahead and shake things up:
- Swap the oranges for grapefruit slices if you’re after a slightly more tart flavor.
- Add some toasted almonds or walnuts for a crunchy contrast.
- For a spicy kick, sprinkle in some red pepper flakes to the dressing.
- Try a honey drizzle in place of agave if that’s more your style.
If you try this, I’d love to hear how it turns out—drop a comment or tag me! There’s nothing better than seeing your creations light up someone else’s table. Happy cooking!
Related update: Gluten Free Dairy Free Sugar Free Chinese Chicken Salad

It was one of those early spring afternoons when the sun was just starting to peek through the clouds, promising warmer days ahead. I was rifling through my pantry, craving something sweet but not overly indulgent. You know, a little treat to go with my afternoon tea. That’s when I remembered this Easter Nest Sweet Cake recipe. It’s a delightful blend of flavors and textures — a soft cake topped with a tangy sour cream-royal icing and the crunch of pistachios. Perfect for those days when you want something that feels special but comes together without too much fuss. Plus, it makes for a show-stopping centerpiece at any Easter gathering or spring brunch.
Jump to Recipe
What You’ll Need
You might find that most of these ingredients are already in your kitchen, just waiting to be transformed into something magical. Here’s what you’ll want to gather:
- Unsalted butter – because decadent is the way to go.
- Brown sugar – for that rich, caramel-like sweetness.
- Eggs
- Flour
- Baking powder
- Sour cream – adds a moist and tangy kick to the cake.
- Icing sugar
- Lemon juice – brings brightness to the icing.
- Egg white
- Pistachios, unshelled – for a nutty crunch.
- Green food coloring – optional, but it gives the icing a festive touch.
How to Make Easter Nest Sweet Cake With Sour Cream-Royal Icing and Pistachios
- Preheat your oven to 190°C/375°F. Lightly grease a ring cake pan and set it aside. The anticipation starts here.
- In a medium bowl, use an electric mixer to beat the brown sugar, eggs, and unsalted butter until creamy — think smooth and dreamy. The sugar granules should almost disappear.
- Add the sour cream and flour to the mixture. Beat for a couple of minutes until everything is well combined. The batter should be thick and luscious.
- Pour the batter into your prepared cake pan, smoothing the top with a spatula. Bake for about 20 minutes. The cake should be golden brown and a skewer inserted in the center should come out clean.
- Let the cake cool in the pan for a few minutes, then transfer to a wire rack. The aroma is irresistible, but patience will pay off.
- For the icing, beat the egg white using a standard mixer until soft peaks form. Add lemon juice, icing sugar, and a drop of green food coloring if you’re feeling festive. Beat for a few more seconds until everything is just combined.
- Once the cake is cool, pour the royal icing generously over the top, letting it cascade down the sides. There’s something so satisfying about this step.
- Sprinkle with chopped pistachios, and get creative with your decorations. The crunch and subtle saltiness of the pistachios are a game-changer.
Cook’s Notes
Here’s the thing about this cake — it’s quite forgiving. If you find yourself without a ring pan, a regular cake pan or even a loaf pan will do in a pinch. Just keep an eye on the baking time. Store leftovers (if there are any!) in an airtight container at room temperature for up to three days. The icing may lose a little of its shine, but the flavor remains on point. If you’re planning ahead, bake the cake a day before and ice it on the day of serving for maximum freshness.
Make It Your Own
With a few tweaks, you can tailor this cake to suit different tastes or occasions:
- Swap the pistachios for toasted almonds for a different nutty flavor.
- If you’re not a fan of sour cream, try using Greek yogurt for a similar tanginess.
- Feeling adventurous? Add a tablespoon of shredded coconut to the batter for extra texture.
- For a citrus twist, incorporate the zest of one lemon into the cake batter.
If you try this, I’d love to hear how it turns out — drop a comment or tag me! And if you have any creative twists on this recipe, don’t keep it to yourself; I’m always on the lookout for new ideas. Happy baking!
Related update: Pumpkin Pecan Streusel Cake - gluten free, soy free, vegan

On one of those bustling weekday evenings when time seems to slip away faster than you can say “dinner,” I found myself staring into the fridge, hoping for a miracle. What I really wanted was something fresh and light but also satisfying. That’s when I remembered these Easy To Make Spring Rolls. They’re perfect for those nights when you want something delicious and impressive-looking without the fuss. Plus, they have this uncanny ability to make you feel like you’ve got your life together. Not bad for a dish that’s ready in under 30 minutes!
Jump to Recipe
What You’ll Need
This recipe is the epitome of a grab-and-go grocery list. Most of these ingredients are probably already lounging in your kitchen. Here’s what you’ll need to whip up these fresh bites of joy:
- Rice paper wrappers
- Cooked shrimp, halved
- Boston lettuce leaves
- Fresh basil, mint, and coriander leaves
- Red bell pepper, sliced into thin strips
- Chili pepper, thinly sliced (optional for a kick)
- Garlic, minced
- Fresh lime juice
- Nuoc cham for dipping
- Fish sauce
- Rice vinegar
- Sugar
- Water
How to Make Easy To Make Spring Rolls
- First, get all your ingredients prepped and within arm’s reach. Trust me, this will save you a lot of scrambling later.
- Fill a large bowl with warm water. Dip a rice paper wrapper in the water just until it softens—this means a couple of swishes should do it. It might feel slightly stiff as you take it out, but don’t worry.
- Lay the softened wrapper flat on a clean surface. In the center, line up two shrimp halves. It’s like creating a little shrimp runway!
- Top the shrimp with a few leaves of basil, mint, and cilantro. Add a layer of Boston lettuce, and maybe some red bell pepper strips and a slice of chili if you’re feeling spicy.
- Fold the sides of the wrapper inward over the filling. Start rolling from the end with the lettuce, tucking in the filling as you go for a snug little spring roll.
- Repeat with the remaining wrappers and ingredients. Once you’ve got your little spring roll soldiers lined up, cut them in half for easy handling.
- Serve them at room temperature with some nuoc cham for dipping. Don’t skip the dipping sauce—it’s the secret weapon!
Cook’s Notes
Dealing with rice paper wrappers can be a bit like handling a delicate flower. Too much time in the water and they’ll become a soggy mess. Not enough and they’ll tear when you try to roll. My trick? A quick dip and a confident hand. They’ll soften up perfectly by the time you start rolling. These rolls are best enjoyed fresh, but you can prepare all the components ahead of time and roll them just before serving. If you have leftovers, wrap them tightly in plastic wrap to keep them from drying out.
Make It Your Own
Feel free to get creative with these spring rolls. Here are some variations to consider:
- Swap the shrimp for crispy tofu to make it vegetarian-friendly.
- Add in slivers of cooked pork or chicken for a meatier bite.
- Include julienned carrots for an extra crunch and pop of color.
- Spice things up by adding a dash of Sriracha to the dipping sauce.
If you try this, I’d love to hear how it turns out—drop a comment or tag me on social media! Whether you’re a spring roll pro or a first-timer, I hope these become a fun and tasty part of your meal rotation. Enjoy every bite!
Related update: Easy To Make Spring Rolls

Picture this: it’s midweek, and I’ve just wrapped up a marathon day of work calls and last-minute errands. The fridge is looking a bit sparse, and my energy levels are even lower. I need something quick and bright to lift my spirits and keep me from calling for takeout. Enter my Radish and Watercress Salad. This dish is like a little burst of sunshine — crisp, peppery, and so darn easy to throw together that it almost feels like cheating. It’s the kind of salad that makes you feel like you’ve got your life together, even when you really don’t. It’s refreshing and light, yet robust in flavor, making it the perfect pick-me-up any day of the week.
Jump to Recipe
What You’ll Need
This recipe is all about fresh, vibrant flavors, and chances are, you’ve got most of these ingredients hanging around already. Here’s what you’ll need:
- Salt
- Garlic powder
- Dijon mustard — the kickstarter of flavor here
- Red wine vinegar — for that tangy bite
- Olive oil
- Lemon juice
- Watercress — peppery and fresh, the star of the salad
- Red radishes — crisp and colorful
How to Make Radish and Watercress Salad
- In a screw-top jar, combine a pinch of salt and a sprinkle of garlic powder. Add in the Dijon mustard, red wine vinegar, olive oil, and a dash of lemon juice. Secure the lid and give it a vigorous shake until everything is well blended and the dressing looks smooth and slightly thickened.
- Rinse the watercress thoroughly under cool, running water. Pat it dry with a clean kitchen towel or paper towels — no one likes a soggy salad, right?
- Thinly slice the red radishes. You want them to be thin enough to be translucent but still have a good crunch.
- In a large salad bowl, toss the watercress and sliced radishes together. Pour your freshly shaken dressing over the top, and toss again gently until everything is evenly coated.
Cook’s Notes
This salad is as straightforward as it gets, but a few tips can make it even better. When shaking the dressing, make sure the jar is sealed tight, or you’ll end up with a vinegar-scented kitchen. If you’re making this ahead, keep the dressing and salad separate until just before serving to prevent the greens from wilting. Leftovers can be stored in the fridge for a day, but honestly, this salad is best enjoyed fresh. The peppery bite of the watercress and the crunch of the radishes are what make it sing.
Make It Your Own
- Swap the watercress for arugula if you want a slightly milder peppery flavor.
- Add sliced almonds or walnuts for some extra crunch and protein.
- Throw in some crumbled feta or goat cheese for a creamy contrast.
- Mix in some thinly sliced cucumbers or avocados for additional freshness and creaminess.
If you try this, I’d love to hear how it turns out — drop a comment or tag me! Your midweek dinner game is about to get a whole lot brighter and a little bit fancier. Happy cooking!
Related update: Radish and Watercress Salad

Picture this: it’s a sunny Saturday morning, and I’m wandering through my backyard, coffee in hand, when I notice these bright, cheerful dandelion heads smiling up at me. Normally, I’d think of them as weeds, but today, they spark an idea. What if I harness their vibrant energy into something delicious? That’s how I stumbled upon the magic of dandelion pesto. It’s one of those recipes that sounds a bit daring, but trust me, it’s a total game-changer. Perfect for when you want something quick but with a twist of the unexpected. The fresh bite of dandelion greens mixed with the nutty richness of pine and macadamia nuts, rounded off with a zesty lemon kick—seriously, you’ve got to try this.
Jump to Recipe
What You’ll Need
I love this recipe because it’s both adventurous and practical. Chances are, you’ll already have most of these ingredients hanging out in your kitchen or garden, just waiting to show off.
- Dandelion greens — freshly foraged, if you can!
- Fresh basil leaves
- Spinach
- The petals from dandelion flowers
- Garlic — the more, the merrier!
- Sea salt — to taste
- Pine nuts
- Macadamia nuts — they add a buttery smoothness
- Enough extra virgin olive oil to bind the sauce together
- Lemon — juice, not zest
- Nutritional yeast flakes — for that cheesy vibe without the cheese
How to Make Dandelion Pesto
- Start by washing the dandelion greens well in a solution of water and raw cider vinegar. Use a couple of tablespoons of vinegar to about a litre of water. This will help remove any lingering bitterness.
- Wash and spin dry all the greens. You want them dry enough to not water down your pesto but still glistening with freshness.
- Pop all the ingredients into a pestle and mortar or, for a quicker route, a food processor. Blitz until nearly smooth, but I like to leave it a bit chunky. The texture gives it a homemade charm.
- Taste and adjust the seasoning. Maybe a pinch more salt or a drop more lemon juice? It’s all about finding that balance that dances on your tongue.
- And that’s it! It’s simple, a little bit scrummy, and oh so rewarding.
Cook’s Notes
Here’s the deal with dandelions: you want them young and tender. As they age, they can turn bitter, and no one wants that. Also, make sure you’re picking from areas that aren’t sprayed with pesticides—keep it organic! If you’re making this ahead, store your pesto in the fridge in an airtight container with a slick of olive oil on top to keep it from browning. It’ll last about a week, but I doubt it’ll stay uneaten for that long. And if you have leftovers, toss it with pasta, spread it on a sandwich, or even swirl it into soup for an herby punch.
Make It Your Own
- Swap the pine nuts for walnuts if you want a more robust, earthy flavor.
- Add a handful of parmesan if you’re not keeping it vegan—it adds a creamy depth.
- If you’re out of spinach, arugula can step in for a peppery twist.
- Feeling spicy? Throw in a pinch of red pepper flakes for a little heat.
If you try this, I’d love to hear how it turns out—drop a comment or tag me in your pesto adventures! Happy foraging and blending!
Related update: Dandelion pesto

It was one of those indecisive spring days, warm enough in the sun to consider a picnic, but with a breeze that still held a whisper of winter. The rhubarb in my garden had just started to show its rosy stalks, and I felt the irresistible urge to bake something that straddled the seasons just as beautifully. Enter the German Rhubarb Cake with Meringue. It’s the kind of bake that’s both a showstopper and a comfort food, with its tart rhubarb base and fluffy, cloud-like meringue topping. I promise, it’s simpler than it looks, and you probably have most of the ingredients already lounging in your pantry.
Jump to Recipe
What You’ll Need
Trust me, the ingredient list might seem a tad long, but it’s mostly the usual suspects in your kitchen. Plus, the bold flavors that rhubarb and almonds bring to the party are well worth it!
- Rhubarb – Fresh and tart, the star of our cake!
- Sugar – For sweetening everything up.
- Vanilla extract
- Salt
- Eggs – We’ll use both yolks and whites, no waste here!
- Flour
- Roasted almonds
- Baking powder
- Egg whites
- Almonds
How to Make German Rhubarb Cake with Meringue
- First things first, preheat your oven to 350°F convection. It’s the secret to getting that perfect bake.
- Grease a round 26 cm (9 1/2 inch) springform pan. We don’t want any sticking mishaps later!
- Wash, dry, and peel your rhubarb. Slice it into small pieces, sprinkle with 2 tablespoons of sugar, and let it sit for at least half an hour. This draws out the excess water, keeping our cake from getting soggy.
- Once that’s done, give the rhubarb a good pat dry. Prepping well now means a tastier cake later.
- In your trusty kitchen machine, beat together the butter, sugar, and vanilla extract until the mixture is fluffy and the sugar is dissolved. It should look creamy and pale.
- Crack in the eggs, one at a time, mixing well after each addition. We want a silky smooth batter here.
- In a separate bowl, sift together the flour, ground almonds, salt, and baking powder. Slowly incorporate this into the egg mixture. Be gentle; we don’t want to over-mix.
- Pour the dough into your prepared springform pan, smoothing the top. Layer on the rhubarb pieces evenly.
- Pop it in the oven for 25 minutes. Your kitchen will start to smell heavenly about halfway through.
- While the cake is baking, it’s time to whip up the meringue topping. Beat the egg whites until stiff peaks form, then gradually add in the sugar until your meringue is glossy.
- Spread the meringue over the baked cake and decorate with almond slices.
- Return it to the oven for 15 more minutes. Check after 5 minutes and cover with foil if the meringue is getting too toasty.
- Let the cake cool completely before you attempt the big reveal from the springform pan. Patience, my friend, is key!
Cook’s Notes
This cake is a dream to make ahead. Once cooled, it keeps well at room temperature for a day or two, though the meringue might soften a bit. For longer storage, refrigerate it—just let it come back to room temp before serving for the best texture. A common mistake is skipping the step where you let the sugared rhubarb sit. Don’t rush it! Draining the rhubarb is essential for avoiding a watery cake base. Also, if you’re worried about your meringue browning too quickly, keep that aluminum foil close at hand.
Make It Your Own
- Squeeze in some citrus: Add lemon zest to the cake batter for a zingy twist.
- Swap the nuts: Use pistachios instead of almonds for a delightful green contrast and rich flavor.
- Go berry: Sub half the rhubarb with strawberries for a classic combo.
- Spice it up: Add a pinch of cinnamon to the cake batter for a warm, spicy note.
If you give this German Rhubarb Cake with Meringue a spin, I’d love to hear how it turns out! Drop a comment or tag me in your culinary masterpieces. Happy baking! 🌟
Related update: German Rhubarb Cake with Meringue
Related update: Cheesecake with cranberries

It was one of those early spring evenings when the air is crisp enough to hint at winter’s end but not quite warm enough to ditch the cozy layers. I found myself staring into the fridge, hunting for something more exciting than a leftover salad or a reheated pizza slice. Then, inspiration struck — I had smoked salmon tucked away and a craving for something creamy yet light. Enter Bigoli with smoked salmon — a dish that feels fancy, but not in that “I’ve been cooking for hours” kind of way. It’s the kind of meal that impresses your taste buds without demanding too much attention, perfect for those nights when you want flavor without fuss.
Jump to Recipe
What You’ll Need
This recipe is a delightful mix of pantry staples and a few fresh ingredients. Chances are you already have most of this on hand, and trust me, the flavors come together in a way that feels oh-so-gourmet.
- Pine nuts – these bring a nutty richness that complements the salmon.
- Fresh bigoli pasta – if you can’t find it, a similar hearty pasta works.
- Olive oil
- Onion, chopped
- Garlic, minced
- Dry white wine – adds depth; nothing too sweet, please.
- Lemon juice
- Lemon zest – divided into 1 tablespoon + 1 tablespoon for that zesty zing.
- Cream – ensures everything is luscious and rich.
- Fresh chives, parsley, or dill, chopped
- Smoked salmon, cut into bite-sized pieces
- Black pepper
How to Make Bigoli with Smoked Salmon
- Toast the pine nuts in a dry skillet over medium heat. Keep them moving until they’re golden and fragrant, about 3-4 minutes. Set aside.
- Cook the bigoli pasta according to package instructions until al dente. Drain and drizzle with a little olive oil to prevent sticking.
- In a large pan, heat the olive oil over medium heat. Add the onion and sauté until it’s soft and translucent, about 5 minutes.
- Add the garlic and cook for another 30 seconds, just until fragrant.
- Pour in the dry white wine and let it simmer until reduced by half, about 2 minutes.
- Stir in the lemon juice and 1 tablespoon of lemon zest, followed by the cream. Let it gently simmer until slightly thickened, usually 3-4 minutes.
- Reduce the heat to low and add the smoked salmon and drained pasta to the pan, tossing everything to coat well in the creamy sauce.
- Toss in the chives and toasted pine nuts, stirring gently to combine.
- Finish with a generous sprinkle of black pepper and the remaining tablespoon of lemon zest. Serve immediately and savor the blend of textures and flavors.
Cook’s Notes
This dish is best enjoyed fresh, but if you have leftovers, store them in an airtight container in the fridge for up to two days. Reheat gently on the stove with a splash of cream or water to bring back its saucy glory. Avoid overcooking the salmon in the reheating process, as it can become tough. If you’re thinking ahead, you can prep the sauce components — the onion, garlic, and wine — a day in advance, making the final cooking a breeze.
Make It Your Own
- Switch up the protein by swapping the smoked salmon for crispy tofu or grilled chicken.
- If you’re out of bigoli pasta, any robust pasta like linguine or fettuccine will do the trick.
- For a dairy-free twist, substitute the cream with coconut cream and omit the parmesan.
- Introduce a veggie boost with a handful of fresh spinach or peas added in with the salmon.
If you try this, I’d love to hear how it turns out — drop a comment or tag me! It’s amazing how some simple ingredients can transform into something special. Enjoy every bite!
Related update: Bigoli with smoked salmon

It was one of those drizzly, stay-inside afternoons when a sudden craving hit me — something sweet but tangy, with a satisfying crunch. My pantry didn’t offer much in the way of excitement, but there was rhubarb in the fridge and an untouched packet of phyllo dough languishing in the freezer. That’s when the idea for Crispy Rhubarb Pockets was born. Trust me, this dish is worth making not just because it’s the perfect balance of tart and sweet, but also because it’s beautifully rustic and so very satisfying. It’s the kind of dessert that looks like you’ve put in a lot of effort when really, it’s just a clever little trick. Plus, who doesn’t love a crispy bite-sized treat?
Jump to Recipe
What You’ll Need
Honestly, you probably have most of these ingredients at home. It’s a grab-and-go situation, making it perfect for those spontaneous baking whims.
- Diced rhubarb – the heart of our pockets, bringing the tangy goodness
- Granulated sugar – to sweeten the deal
- Cornstarch – our trusty thickener
- Salt – just a pinch to balance flavors
- Vanilla extract – a splash for that warm, comforting aroma
- Phyllo sheets – the secret to crispy, flaky pockets
- Melted butter – for brushing, because butter makes everything better
- Water – to help seal those delicious pockets
How to Make Crispy Rhubarb Pockets
- In a medium saucepan, toss in the diced rhubarb, sugar, cornstarch, and salt. Set it over medium-low heat. As it warms up, stir occasionally. You’ll know it’s ready when the rhubarb releases its liquid and starts breaking down into a thick, chunky sauce — give it about 10 minutes.
- Take the pan off the heat and stir in the vanilla extract. Let this mixture cool to room temperature. The vanilla will mingle with the rhubarb, creating a divine aroma that fills the kitchen.
- Grab your phyllo sheets and layer four of them, brushing each layer with melted butter. Phyllo is delicate, so handle with care, and don’t skimp on the butter — it’s key to that golden crunch.
- Preheat your oven to 350 degrees F. While it warms up, cut four 4-inch squares from your buttered phyllo stack. Precision isn’t necessary; rustic is charming.
- Spoon 2 teaspoons of the rhubarb filling into the center of each square. Now, brush from the edge of the filling to each point of the square lightly with water. This is the part where you channel your inner artist.
- Gather the points of the square and pinch them together just above the filling, forming a little pouch. Brush it all over with more butter. Repeat this artistic process for all four pouches.
- Arrange the pouches on an ungreased cookie sheet or baking pan, spacing them at least an inch apart. Into the preheated oven they go for 12 to 15 minutes, or until they’re golden brown and begging to be devoured.
- Remove the pouches from the oven and let them cool on a wire rack for about 5 minutes. They’re equally delightful warm or at room temperature, so serve according to your patience level!
Cook’s Notes
So, a few things to keep in mind: first, don’t rush the rhubarb cooking process; it needs time to release its magic. Phyllo can be a bit tricky since it dries out quickly, so keep it covered with a damp cloth while you work. If you make these ahead of time, you can store them in an airtight container for up to two days. Just pop them back in a warmed oven to re-crisp them. Leftovers (if there are any) are wonderful with a dollop of vanilla ice cream.
Make It Your Own
There’s plenty of room to play around with this recipe:
- Swap the rhubarb for diced apples and add a sprinkle of cinnamon for a fall vibe.
- If you’re a fan of berries, mix in some strawberries with the rhubarb for a sweeter, juicier filling.
- Try adding a handful of chopped nuts to the filling for some extra crunch and depth.
- If vanilla isn’t your thing, lemon zest can add a zesty twist to the filling.
If you try this, I’d love to hear how it turns out — drop a comment or tag me! Whether you stick to the original recipe or venture into variations, these little pockets are sure to delight. Happy baking!
Related update: Crispy Rhubarb Pockets
Related update: 10 Minute Brownies

It was one of those unpredictable spring mornings where the sky couldn’t decide if it wanted to rain or shine. I found myself craving something that felt like a warm hug, something that would fill the house with the spicy sweet scent of comfort. Enter Hot Cross Buns. They’re perfect for those “in-between” days, bridging the gap between winter’s end and spring’s full bloom. What I adore about these buns is how deceptively simple they are to make; they sound fancy, but they’re actually pretty forgiving. You just mix, knead, roll, and bake. They’re like little pillows of happiness, complete with a sweet cross on top that’s practically begging to be photographed. Trust me, once you try them, these buns will become a regular request in your household.
Jump to Recipe
What You’ll Need
There’s a good chance you already have most of these ingredients lurking in your pantry. The combination of spices gives the buns their signature warmth, and the sour milk keeps them tender.
- Flour
- Sugar
- Baking powder
- Baking soda
- Salt
- Cinnamon
- Nutmeg
- Shortening
- Raisins
- Sour milk (or add a splash of vinegar or lemon juice to regular milk)
How to Make Hot Cross Buns
- Sift the flour once, then measure it out into a large bowl. Add the baking soda, baking powder, salt, sugar, and spices. Trust me, the double sifting might sound extra, but it makes the buns incredibly light.
- Cut in the shortening. You want to mix until the flour looks like coarse crumbs. This is your time to channel the patient, zen gardener within.
- Stir in the raisins. These little gems add pockets of sweetness in every bite.
- Add enough sour milk to create a stiff dough. You want it just moist enough to hold together without being sticky.
- Turn the dough onto a floured board and knead it slightly—just enough to bring it all together. Don’t overdo it!
- Roll the dough out to about 1/2 inch thickness. Use a 2-inch cutter to cut out your buns. It’s oddly satisfying, like cutting out cookies.
- Place the buns close together in a shallow pan. With a sharp knife, cut a cross into the top of each bun. This is where the magic happens.
- Brush the tops with a mixture of milk and sugar. This will give them a lovely gloss and help them brown beautifully.
- Bake in a hot oven at 475 degrees for 20 minutes. You’ll know they’re done when they’re golden and fragrant.
- Once out of the oven, brush them again with the milk and sugar solution. Fill the cross with plain frosting if desired. Serve them warm and watch them disappear.
Cook’s Notes
Here’s the scoop: these buns are best served warm, fresh out of the oven, but they do reheat well if you find yourself with leftovers (unlikely, but possible). Just pop them in the oven for a few minutes, wrapped in foil, to refresh them. You can make the dough ahead and keep it in the fridge overnight if you want to do the hard part in advance. Just be sure to let it come back to room temperature before rolling and cutting.
Make It Your Own
Feel free to play around with the recipe a bit. Here are some variations to consider:
- Swap raisins for dried cranberries for a tart twist.
- Add orange zest to the dough for a citrusy zing.
- Replace the frosting with a cream cheese glaze for a tangy finish.
- Throw in some chopped nuts if you’re in the mood for a bit of crunch.
If you try these Hot Cross Buns, I’d absolutely love to hear how they turn out for you! Drop a comment below or tag me on social media with your bun pics. Happy baking!
Related update: Hot Cross Buns
Related update: Xocai Oatmeal Dark Chocolate No-Bake Cookies
Related update: Simply Amazing Cinnamon Swirl Wheat Bread