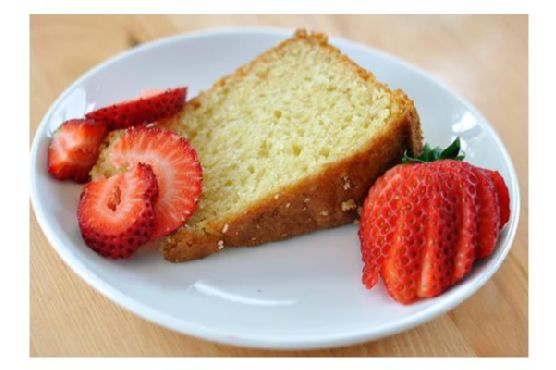
Picture this: It’s a crisp Saturday morning in late October, and the air smells like fallen leaves and the promise of something delicious bubbling on the stove. I’d just come back from the local farmers’ market with a basket full of honeycrisp apples and ripe pears, when I had this sudden inspiration to make something that feels like a warm hug for your taste buds. That’s how this Fall Fruit Compote came to life! It’s the perfect combination of sweet and tangy with a hint of spice from the cinnamon, making it a cozy companion for just about any dish. Whether you’re spooning it over pancakes, pairing it with savory potato latkes, or just nibbling it straight from the jar (guilty as charged), this compote is a must-try for the season.
Jump to Recipe
What You’ll Need
This recipe is all about embracing the flavors of fall, with ingredients that are probably hanging out in your pantry already or easy to snag at the store.
- Butter – for that rich, dreamy base
- Diced honeycrisp apples – sweet and crispy, the star of this show
- Diced pears – a soft, juicy partner for the apples
- Dried cherries – they add a pop of color and tartness
- Apple cider vinegar – just a splash to bring out the flavors
- Apple juice – keeps everything juicy and flavorful
- Brown sugar – for a deep, molasses-y sweetness
- Cinnamon stick – the essential fall spice
How to Make Fall Fruit Compote
- Melt the butter in a medium saucepan over high heat until it starts to bubble and sizzle. You want that nutty aroma to fill the air.
- Toss in the diced apples, pears, and dried cherries, followed by the apple cider vinegar, apple juice, brown sugar, and cinnamon stick. Give it all a good stir to make sure everyone’s getting along in the pot.
- Cook this fruit medley for about 5 minutes. The apples and pears should start to soften, and the cherries will begin plumping up.
- Lower the heat to medium. Let it cook for a few minutes more, keeping a watchful eye as the liquid reduces and the fruit becomes tender. Stir occasionally to prevent sticking.
- If the mixture looks like it’s drying out too quickly, trickle in a bit more apple juice. You want the fruit tender and the liquid mostly gone, leaving a thick, syrupy goodness.
Cook’s Notes
Alright, here’s the scoop on perfecting this compote. First off, keep an eye on your heat levels. It’s easy for the sugars to burn if the heat’s too high, especially towards the end when the liquid is nearly evaporated. If you’re making this ahead, know that it keeps wonderfully in the fridge for up to a week. Just pop it in a jar or airtight container. When you’re ready for a warm serving, a quick zap in the microwave or a gentle reheat on the stove works like a charm. And remember, if you find yourself with leftovers (rare, but it happens), this compote is a dream swirled into yogurt or spread over toast.
Make It Your Own
Get creative and switch things up with these ideas:
- Swap the dried cherries for dried cranberries for a tarter twist.
- Add a splash of bourbon or rum for a grown-up, boozy version.
- For a spicier kick, throw in a pinch of ground ginger or nutmeg with the cinnamon.
- Use maple syrup instead of brown sugar for a different layer of sweetness.
If you try this, I’d love to hear how it turns out — drop a comment or tag me! Enjoy the cozy vibes, and happy cooking! 🍎🍐
Related update: Fall Fruit Compote
Related update: Ginger Cookies- gluten free, soy free, vegan
I remember that evening vividly. It was a Wednesday, and the kind of humid that makes your hair curl up at the edges. I was standing in my kitchen, staring at the half-empty fridge, and wondering what on earth I could throw together without making a trip to the grocery store. That’s when I spotted the zucchini and eggplant I’d been meaning to use. The idea clicked like a lightbulb switching on—vegetarian ratatouille! It’s the kind of dish that feels like a warm hug at the end of a long day: rustic, hearty, and packed with seasonal veggies. Plus, it’s surprisingly simple, with most ingredients already hanging out in the pantry or crisper drawer. Let’s dive in!
Jump to Recipe
What You’ll Need
This recipe is blessedly straightforward. Chances are, you already have most of these in your kitchen. Here’s what you’ll gather:
- 1 eggplant, diced
- 2 zucchinis, sliced
- 1 yellow squash, sliced
- 3 large tomatoes, chopped
- 1 red bell pepper, diced
- 1 orange bell pepper, diced
- 1 onion, finely chopped
- 3 cloves of garlic, minced
- A handful of fresh basil leaves, torn
- 1 tsp thyme
- 1 tsp dried oregano
- 2 tbsp extra virgin olive oil
- Sea salt, to taste
How to Make Vegetarian Ratatouille
- Heat the extra virgin olive oil in a large saucepan over medium-low heat. Toss in the chopped onion and minced garlic. Sauté until the onions turn translucent and the garlic is fragrant, about 5 minutes.
- Add the chopped tomatoes to the pan and give it a good stir, letting them meld with the onion and garlic for about 2 minutes.
- Add the diced eggplant, zucchini, yellow squash, and both bell peppers to the pan. Stir everything together and lower the heat to low.
- Sprinkle in the thyme, dried oregano, and sea salt. Stir to coat all the veggies in the herby goodness.
- Cover the saucepan and let it all simmer for about 30 minutes, stirring occasionally. You’ll know it’s ready when the eggplant is tender and the flavors have melded beautifully.
- Finish it off with those fresh torn basil leaves right before serving, for a burst of fresh flavor.
Cook’s Notes
Here’s the thing about ratatouille — it’s a forgiving dish. You can let it simmer a bit longer if you prefer your veggies softer, just keep an eye on the moisture level. If it starts to dry out, add a splash of water or stock. Store any leftovers in an airtight container in the fridge, and they’ll be even more flavorful the next day. Just reheat on the stove over low heat or enjoy it cold as a salad topping — it’s surprisingly versatile. If you’re planning ahead, you can chop the veggies the night before and store them in the fridge, so you just have to toss them in the pan when you’re ready.
Make It Your Own
Feeling adventurous or just need a change? Here are a few ways to mix things up:
- Add some heat: Throw in a pinch of red pepper flakes when adding the spices for a little kick.
- Protein punch: Toss in a can of drained chickpeas with the tomatoes for extra protein and heartiness.
- Herb swap: If you’re out of fresh basil, a touch of fresh parsley or even cilantro can give it a unique twist.
- Cheesy finish: Sprinkle some crumbled feta or grated Parmesan on top when serving for a tangy finish.
If you try this, I’d love to hear how it turns out — drop a comment or tag me! Whether you stick to the basics or put your own spin on it, I hope this ratatouille brings a little warmth and simplicity to your table. Enjoy!
Related update: Vegetarian Ratatouille
Related update: Fall Fruit Compote
It was one of those indecisive spring days, warm enough in the sun to consider a picnic, but with a breeze that still held a whisper of winter. The rhubarb in my garden had just started to show its rosy stalks, and I felt the irresistible urge to bake something that straddled the seasons just as beautifully. Enter the German Rhubarb Cake with Meringue. It’s the kind of bake that’s both a showstopper and a comfort food, with its tart rhubarb base and fluffy, cloud-like meringue topping. I promise, it’s simpler than it looks, and you probably have most of the ingredients already lounging in your pantry.
Jump to Recipe
What You’ll Need
Trust me, the ingredient list might seem a tad long, but it’s mostly the usual suspects in your kitchen. Plus, the bold flavors that rhubarb and almonds bring to the party are well worth it!
- Rhubarb – Fresh and tart, the star of our cake!
- Sugar – For sweetening everything up.
- Vanilla extract
- Salt
- Eggs – We’ll use both yolks and whites, no waste here!
- Flour
- Roasted almonds
- Baking powder
- Egg whites
- Almonds
How to Make German Rhubarb Cake with Meringue
- First things first, preheat your oven to 350°F convection. It’s the secret to getting that perfect bake.
- Grease a round 26 cm (9 1/2 inch) springform pan. We don’t want any sticking mishaps later!
- Wash, dry, and peel your rhubarb. Slice it into small pieces, sprinkle with 2 tablespoons of sugar, and let it sit for at least half an hour. This draws out the excess water, keeping our cake from getting soggy.
- Once that’s done, give the rhubarb a good pat dry. Prepping well now means a tastier cake later.
- In your trusty kitchen machine, beat together the butter, sugar, and vanilla extract until the mixture is fluffy and the sugar is dissolved. It should look creamy and pale.
- Crack in the eggs, one at a time, mixing well after each addition. We want a silky smooth batter here.
- In a separate bowl, sift together the flour, ground almonds, salt, and baking powder. Slowly incorporate this into the egg mixture. Be gentle; we don’t want to over-mix.
- Pour the dough into your prepared springform pan, smoothing the top. Layer on the rhubarb pieces evenly.
- Pop it in the oven for 25 minutes. Your kitchen will start to smell heavenly about halfway through.
- While the cake is baking, it’s time to whip up the meringue topping. Beat the egg whites until stiff peaks form, then gradually add in the sugar until your meringue is glossy.
- Spread the meringue over the baked cake and decorate with almond slices.
- Return it to the oven for 15 more minutes. Check after 5 minutes and cover with foil if the meringue is getting too toasty.
- Let the cake cool completely before you attempt the big reveal from the springform pan. Patience, my friend, is key!
Cook’s Notes
This cake is a dream to make ahead. Once cooled, it keeps well at room temperature for a day or two, though the meringue might soften a bit. For longer storage, refrigerate it—just let it come back to room temp before serving for the best texture. A common mistake is skipping the step where you let the sugared rhubarb sit. Don’t rush it! Draining the rhubarb is essential for avoiding a watery cake base. Also, if you’re worried about your meringue browning too quickly, keep that aluminum foil close at hand.
Make It Your Own
- Squeeze in some citrus: Add lemon zest to the cake batter for a zingy twist.
- Swap the nuts: Use pistachios instead of almonds for a delightful green contrast and rich flavor.
- Go berry: Sub half the rhubarb with strawberries for a classic combo.
- Spice it up: Add a pinch of cinnamon to the cake batter for a warm, spicy note.
If you give this German Rhubarb Cake with Meringue a spin, I’d love to hear how it turns out! Drop a comment or tag me in your culinary masterpieces. Happy baking! 🌟
Related update: German Rhubarb Cake with Meringue
Related update: Cheesecake with cranberries
I remember the evening perfectly. It was one of those chilly Tuesday nights when you feel like you’ve barely survived the day and the only thing that could possibly make it better is a big bowl of something soul-warming. I opened my fridge and, like a miracle, the ingredients for this Kale and Chickpea Soup with Lemon seemed to jump out at me. The magic of this soup is in its simplicity. It’s the kind of dish that feels like a hug in a bowl, yet it’s deceptively easy to throw together. A few fresh ingredients, a touch of blending, and you’ve got yourself a soup that’s both nourishing and comforting. Plus, it’s the perfect excuse to use that crusty bread you’ve been meaning to finish.
Jump to Recipe
What You’ll Need
I bet you’ve got most of these lying around already. This list is all about those everyday heroes that transform humble into heartwarming.
- 2 banana shallots
- 1 bay leaf
- 2 cans chickpeas, drained and rinsed
- 2 stalks of celery
- 1/2 teaspoon of chilli flakes
- 1 loaf of crusty bread
- 1 garlic clove
- Lemon (juice of half, plus slices for garnish)
- 1 bunch of kale, stems removed, roughly chopped
- 2 tablespoons of olive oil
- Parmesan cheese, for topping
- 1 sprig of rosemary
- Salt, to taste
- 1.5 liters of stock (vegetable or chicken)
How to Make Kale and Chickpea Soup with Lemon
- Set a Dutch oven or large saucepan over medium heat and pour in the olive oil. Let it warm slightly until it shimmers.
- Finely dice the banana shallots and toss them in, stirring to coat them in the oil. Let them sizzle and become translucent.
- Slice the celery stalks horizontally into long strips, then chop them into small pieces. Add these to the shallots, stirring occasionally.
- Finely chop the rosemary leaves and add them to the pan, along with the bay leaf and chilli flakes. Wait for the fragrance to hit you – it’s a good sign.
- Smash the garlic clove using the flat of your knife and your palm, then toss it in whole. No need to fuss over chopping here.
- Rinse and drain the chickpeas and add them to the pan along with the kale. Stir everything together until it’s all coated nicely.
- Pour in the hot stock and bring it all to a gentle boil, then reduce the heat and let it simmer for about 20 minutes, until the kale is beautifully tender.
- Squeeze in the juice of half a lemon, stirring to blend. Taste and adjust the seasoning with more lemon or salt, depending on your stock.
- Using either a stick blender in the pan or in batches in a regular blender, blitz the soup to your desired texture. I like to set aside a ladleful or two before blending so there are still some chickpeas and kale for texture.
- Serve hot, with a couple of lemon slices floating on top of each bowl, and pass around the parmesan cheese for everyone to sprinkle to their heart’s content. Pair with toasted crusty bread for dipping.
Cook’s Notes
Okay, here’s the lowdown. If you’re planning ahead, this soup is a fantastic make-ahead option. It actually tastes even better the next day once the flavors have had time to marry. Just store it in an airtight container in the fridge for up to three days. Reheat gently on the stove, adding a splash of water if it’s thickened up too much. You can also freeze this soup for up to three months, though I’d recommend freezing before adding the lemon juice to prevent bitterness. Defrost it overnight in the fridge and add the lemon after reheating.
Watch your salt! If your stock is already salted, you might want to wait until the end of cooking to adjust the seasoning. It’s always easier to add than to take away.
Make It Your Own
The beauty of this soup is its flexibility. Here are a few of my favorite variations:
- Swap the chickpeas for white beans: Cannellini or Great Northern beans work beautifully here, offering a creamier texture.
- Add protein with chicken: Shredded rotisserie chicken stirred in at the end makes this a heartier meal.
- Spice it up with chorizo: Cook some diced chorizo in the pan before the shallots and let the spicy oil enrich the soup.
- Go green with spinach or Swiss chard: If kale isn’t your thing, these leafy greens make a great substitute.
If you try this, I’d love to hear how it turns out — drop a comment or tag me! Your feedback is the best part of sharing recipes. Happy cooking!
Related update: Kale and Chickpea Soup with Lemon
Picture this: It’s a chilly Tuesday evening, and I’m staring at the contents of my fridge, wondering what in the world to make for dinner. My eyes land on a pork tenderloin, and I remember that bottle of Marsala that’s been collecting dust on the shelf. Suddenly, the idea of a Stuffed Pork Tenderloin with Marsala-Port Sauce sounds like the perfect blend of comforting yet impressive. It’s the kind of dish that feels a bit fancy but is deceptively easy to whip up. As the aroma of Marsala and sautéed onions fills the kitchen, I can’t help but feel a little proud of the culinary magic happening right at my stove.
Jump to Recipe
What You’ll Need
The beauty of this dish is in its simplicity and the likelihood that you already have most of these ingredients tucked away in your pantry or fridge. We’re talking about a few surprises that elevate the dish, like dried fruits and Marsala wine.
- 1 pork tenderloin
- 1 shallot, finely diced
- 1 small yellow onion, diced
- 8 oz mushrooms, chopped
- 1/4 cup dried apricots
- 1/4 cup raisins
- 1/4 cup dried cranberries
- 1/4 cup flat-leaf parsley, chopped
- 1/2 cup Marsala wine
- 1/2 cup Port wine
- 2 tablespoons butter
- 1/4 cup heavy cream
- 2 tablespoons olive oil
- Salt and pepper to taste
How to Make Stuffed Pork Tenderloin with Marsala-Port Sauce
- Preheat your oven to 450°F (230°C). The key to a crispy outside and juicy inside is starting with a hot oven.
- In a large skillet over medium heat, warm up 1 tablespoon of olive oil. Toss in the diced onions, shallots, and mushrooms. Cook these until the onions turn translucent, and your kitchen smells like heaven.
- Remove the skillet from heat. In a small food processor, combine the cooked onion mixture, dried apricots, raisins, cranberries, and parsley. Pulse until everything is minced and well combined. This mixture will be your delectable stuffing.
- Take the pork tenderloin and cut it in half crosswise. Butterfly each section carefully, ensuring not to cut all the way through. Season both sides generously with salt and pepper.
- Spread the stuffing over one side of each butterflied pork piece. Lay the other half of the meat on top and secure the edges with toothpicks. Don’t be shy with the salt and pepper here — it’s the secret to bringing out all those flavors.
- In the same skillet you used earlier, heat another teaspoon of olive oil. Sear the pork tenderloin on each side for about 3-5 minutes. You’re looking for a lovely golden crust.
- Transfer the pork to the oven and let it roast for 20 to 30 minutes, until there’s no pink and the juices run clear. Internal temperature should hit 145°F (63°C).
- Once done, remove the pork from the oven, place it on a dish, and tent it with aluminum foil to rest while you make the sauce.
- Pour off any fat from the skillet. Add the Marsala and Port wines, scraping up any browned bits with a spatula as you bring it to a boil. Let this bubble away until reduced to about 1/2 cup.
- Remove from heat and swirl in the butter and cream. You’ll know it’s perfect when the butter is completely melted and the sauce is just thick enough to coat the back of a spoon.
- Remove the toothpicks, slice the pork tenderloin into rounds, and drizzle with that luscious sauce. Serve immediately and prepare to wow your taste buds.
Cook’s Notes
When stuffing the tenderloin, ensure the filling is well minced so it stays snugly inside as it cooks. If you don’t have a small food processor, chopping everything by hand works too — just takes a little more elbow grease. I recommend letting the meat rest for at least 5 minutes before slicing; this keeps it juicy. In terms of leftovers, this dish keeps well in the fridge for up to 3 days. Reheat gently with a splash of water or stock to keep it moist.
Make It Your Own
- Try swapping the pork for a boneless chicken breast. Just pound it to an even thickness and proceed with stuffing and cooking as directed.
- For a vegetarian twist, replace the pork with large portobello mushrooms. Use the same stuffing and bake them until tender, about 15 minutes.
- Substitute the Marsala for sherry or white wine if you prefer a different flavor profile.
- Add a sprinkle of crushed pistachios or walnuts to the stuffing for a delightful crunch.
If you try this, I’d love to hear how it turns out — drop a comment or tag me on social media! Your kitchen adventures make my day. Happy cooking!
Related update: Stuffed Pork Tenderloin with Marsala-Port Sauce
Related update: Vegan Taco bowls with Cilantro Lime Cauliflower Rice
One rainy Tuesday night, I found myself staring at an almost-empty fridge, pondering what kind of magic I could muster up. You know those evenings when you’re craving something sweet but don’t want to fuss around with a dozen ingredients? Enter: Baked Caramel Custard. It’s that classy, melt-in-your-mouth treat that feels like a hug after a long day. The best part? You probably have most of what you need in your pantry already. Plus, it’s secretly impressive — looks like a million bucks, but simple enough for a weeknight adventure. Trust me, this is one of those desserts you’ll keep coming back to whenever you need a little pick-me-up.
Jump to Recipe
What You’ll Need
This recipe is all about simplicity with a touch of elegance. No need to run to a fancy gourmet store, just grab these from your kitchen:
- Egg substitute
- 1 egg yolk
- 1 can of evaporated skim milk
- Sugar (plus a little extra for that rich caramel)
- 1 cup skim milk
- 2 tablespoons port wine
- 1 teaspoon vanilla extract
How to Make Baked Caramel Custard
- Preheat your oven to 350 degrees. Get it nice and toasty for the custards.
- In a heavy saucepan, scald the evaporated skim milk and skim milk together. You’ll know it’s ready when tiny bubbles start forming around the edges—don’t let it boil!
- Meanwhile, in a skillet over medium heat, caramelize the sugar. Watch closely as it melts and transforms into a golden brown liquid; don’t let it burn.
- Carefully pour the warm milk into the caramelized sugar, stirring constantly. Keep stirring until the sugar is completely dissolved into the milky mixture.
- In a medium bowl, beat the egg substitute and yolk together. Aim for that dreamy lemon color.
- Slowly add the sugary milk mixture to the eggs, whisking constantly to avoid scrambling. Add in the port and vanilla, and give it a good stir.
- Divide the mixture evenly into 6 custard cups. Place them in a baking dish.
- Pour boiling water into the baking dish until it reaches halfway up the sides of the cups. This water bath will ensure the custards cook gently and evenly.
- Bake for 35 to 40 minutes until the custards are set. You’ll know they’re done when a gentle jiggle in the center is all that remains.
- Once out of the oven, let them cool completely in the refrigerator. When chilled, invert each onto a dessert plate and serve immediately.
Cook’s Notes
Don’t rush the caramelizing process! It’s a bit of a dance and takes patience, but it’s worth every second. If your caramel starts to smell burnt, toss it and start again. Trust me, burnt sugar is not what you want here.
- Make these ahead of time and store them in the fridge – they’ll keep beautifully for up to three days. Perfect for a make-ahead dessert when entertaining.
- For leftovers (if you have any!), keep them covered in the fridge, but let’s be honest, you’ll be sneaking spoonfuls until they’re gone.
Make It Your Own
- Swap the port wine for a splash of your favorite rum or bourbon for an adult-only twist.
- Add a pinch of cinnamon or nutmeg to the milk mixture for a warm, spiced note.
- For a dairy-free option, use coconut milk instead of skim milk and evaporated milk. Bonus: It’ll add a lovely tropical flavor.
- If you like your custard with a bit of crunch, sprinkle some crushed pistachios or almonds on top before serving.
If you try this, I’d love to hear how it turns out — drop a comment or tag me! Enjoy the creamy, caramel goodness, friends!
Related update: Baked Caramel Custard
Related update: Raw Carrot Cake
Last Saturday, I found myself staring at a stubborn box of dark chocolate in my pantry, trying to decide what to do with it. It was one of those rainy afternoons when all you want is something rich and comforting. The kind of day where you get cozy in your leggings, the playlist is just right, and you’re itching to bake something indulgent. That’s how my Chocoholic’s Deep Dark Dream Chiffon Cake came to life. It’s heaven in cake form—moist, fluffy, and oh-so-decadent. The secret? It’s a magical combo of creamy chocolate layers and velvety ganache. Perfect for impressing guests or just treating yourself because, let’s be honest, we all deserve a slice of chocolate bliss every now and then.
Jump to Recipe
What You’ll Need
You might already have most of these ingredients tucked away in your kitchen, which makes this cake even more tempting to whip up on a whim. Trust me, it’s worth checking your cupboards for these beauties:
- 1 cup all-purpose flour
- 1 cup sugar
- 1/3 cup sugar (for meringue)
- 2 tablespoons baking powder
- 1/2 teaspoon salt
- 6 tablespoons butter
- 5% cream – you’ll need this twice!
- 2/3 cup dark Dutch cocoa
- 2/3 cup dark Belgian chocolate
- 1 tablespoon cream of tartar
- 6 large egg whites
- 6 large egg yolks
- 1/2 cup water
- 1 teaspoon vanilla extract
- 1/2 cup icing sugar
- 1/3 cup vegetable oil
How to Make Chocoholic’s Deep Dark Dream Chiffon Cake
- Start by mixing your cocoa with boiling water until smooth, then let it cool. This is where the cake’s deep chocolate flavor begins.
- In a large bowl, whisk together flour, 1 cup of sugar, baking powder, and salt. These dry ingredients set the foundation for your cake batter.
- In another bowl, beat egg whites and cream of tartar with an electric mixer until soft peaks form. Gradually add 1/3 cup sugar and continue beating until peaks are firm but not dry.
- Make a well in your dry ingredients. Add vegetable oil, egg yolks, vanilla, and that decadent cooled cocoa mixture. Beat until smooth and luscious.
- Gently fold a quarter of the egg whites into the batter to lighten it, then carefully fold in the remaining whites. This step ensures a light, airy texture.
- Divide the batter between two 8-inch prepared cake pans and bake in a preheated oven at 350°F for 30-35 minutes. You’ll know it’s ready when a wooden skewer comes out clean.
- For the filling, blend sugar, cocoa, and butter with an electric mixer. Add vanilla and cream, adjusting cream to reach your desired texture.
- For the topping, heat cream until just below boiling. Stir in chocolate pieces and butter until smooth. Allow to cool, thickening into a rich ganache.
- To assemble, slice each cake in half horizontally, creating four layers. Sprinkle your favorite liqueur on the first layer, spread with filling, then arrange raspberry halves for a tart contrast. Repeat for remaining layers, finishing with ganache on top.
Cook’s Notes
This cake might seem a little fancy, but I promise it’s totally doable. Make sure those egg whites are at room temp before you whip them. It makes all the difference for volume and stability. And speaking of stable, be gentle when folding them into the batter. You want to keep that air in there! Store the cake in an airtight container to keep it moist, though honestly, it never lasts long enough for leftovers in my house. If you do have any left, it’s even better the next day as the flavors meld together perfectly. You can make the cake layers a day ahead, just wrap them tightly in plastic wrap.
Make It Your Own
Here’s where you can put your own spin on it:
- Spice it up: Add a teaspoon of cinnamon or cayenne to the dry ingredients for a spicy kick.
- Nutty twist: Swap raspberries for toasted hazelnuts between the layers.
- Mocha love: Stir a teaspoon of instant coffee into the boiling water for a mocha-flavored cake.
- Berry blast: Use a mix of berries instead of just raspberries for a burst of color and flavor.
Baking this cake feels like giving yourself a big chocolaty hug. If you try it, I’d love to hear how it turns out. Drop a comment or tag me in your cake photos—I can’t wait to see your dreamy creations!
Related update: Chocoholic’s Deep Dark Dream Chiffon Cake
Related update: Baked Caramel Custard
Picture this: It’s a chilly Wednesday evening, and I’ve had one of those days where I needed something more than just food—I needed comfort on a plate. In moments like these, I often find myself reaching for my trusty Dutch oven and a bottle of red wine to whip up my favorite Beef Braised In Red Wine. This dish is my go-to because it hits all the right notes: it’s rich, savory, and cozy, but doesn’t require babysitting on the stove. Plus, it fills the house with the kind of aroma that makes you feel wrapped in a warm hug. Trust me, this is the kind of dish that can turn any mundane weeknight into something special.
Jump to Recipe
What You’ll Need
What I love about this recipe is how unfussy it is. Chances are you already have most of these ingredients lounging in your pantry or fridge. Let’s gather up all the deliciousness:
- Olive oil
- Bacon, chopped
- Boneless beef chuck roast
- Salt
- Pepper
- 1 large onion, chopped
- 2 carrots, peeled and chopped
- 2 celery stalks, chopped
- 4 garlic cloves, minced
- 1 tablespoon tomato paste
- 2 cups dry red full-bodied wine
- 2 cups water
- 1 teaspoon fresh thyme leaves
- 1 teaspoon fresh rosemary, chopped
How to Make Beef Braised In Red Wine
- Place the oven rack in the middle position and preheat your oven to 325°F. This will give us that perfect low and slow heat we need for tender meat.
- In a large Dutch oven, heat a splash of olive oil until it’s shimmering but not smoking. This is where the magic begins!
- While the oil heats, pat your beef chuck roast dry with a paper towel, then season generously with salt and pepper. You want a nice crust when you sear it.
- Brown the beef on both sides for about 10 minutes total. Get it nice and golden—this is where flavor builds. If the pan gets too hot and things start to scorch, turn down the heat a bit.
- Remove the beef and let it rest on a plate, letting all those yummy juices hang out. We’ll need them later.
- In the same pot, toss in the bacon. Sauté until it’s browned and crisp. The smell will make you want to dive right in, but hold tight!
- Add the onion, carrots, and celery to the bacon and cook until they’re softened and golden brown. Think of this as the cozy base of your dish.
- Stir in the garlic, thyme, and rosemary, sautéing for just a minute until fragrant. Then add the tomato paste, cooking for another minute to caramelize those flavors.
- Pour in the wine and bring it to a boil. Let it bubble away until reduced by half, concentrating all that deliciousness.
- Add the water and bring everything to a simmer. This is the luxurious bath your beef will cook in.
- Return the beef and any accumulated juices to the pot, nestling it in with all the flavors. Cover with a lid and transfer to the oven.
- Let it cook in the oven for 2 1/2 to 3 hours, or until the meat is fall-apart tender. Your patience will be rewarded!
- Once done, remove the beef and slice it across the grain. Serve it atop fluffy mashed potatoes or creamy grits, spooning that gorgeous sauce over the top.
Cook’s Notes
Here’s the thing: you don’t have to be a culinary master to nail this dish. The key is in the low and slow cooking. If you rush it, the meat might not be as tender, so patience is your friend here. Also, feel free to experiment with the type of wine you use, but stick to something you enjoy drinking for the best results.
- Leftovers will keep beautifully in the fridge for up to 3 days. Just warm them gently on the stove or in the microwave.
- This is a great make-ahead dish. The flavors only get better after a day or two in the fridge.
Make It Your Own
- Go Mediterranean by swapping out the rosemary and thyme for oregano and adding a handful of olives when you add the wine.
- For a mushroom lover’s twist, add a cup of sliced mushrooms along with the veggies.
- Substitute the beef with lamb for a different depth of flavor—just as delicious and maybe even more luxurious!
- Skip the bacon for a leaner version and use a tablespoon of butter with the olive oil for browning.
If you try this, I’d love to hear how it turns out—drop a comment or tag me! It’s always a joy to see your creations and hear about any delicious twists you might have added. Happy cooking, friends!
Related update: Beef Braised In Red Wine
Related update: Guinness and Brats
It was one of those rainy Tuesday evenings when the thought of another takeout meal just didn’t appeal. You know those nights, right? When you crave something warm and comforting that feels like a hug on a plate? That’s when this Hard-Boiled Egg Gratin in a Béchamel Sauce came to life in my kitchen. It’s the kind of dish that’s deceptively simple yet incredibly satisfying, with a creamy sauce and a crispy, cheesy top. It’s perfect for when you want something a bit special but don’t want to spend hours in the kitchen. Plus, chances are, you already have most of the ingredients lurking in your pantry or fridge.
Jump to Recipe
What You’ll Need
Imagine pulling together a dish without a last-minute grocery run. That’s the beauty of this recipe. Here’s what you’ll need:
- Eggs – the stars of the show, of course!
- Butter – for that rich, comforting flavor.
- Flour – to thicken up our luscious sauce.
- Gruyère cheese – because what’s a gratin without a cheesy top?
- Milk – to create the creamy béchamel.
- Nutmeg – just a dash for warmth.
- Onion – adds a subtle sweetness.
- White salt and pepper – to season everything just right.
How to Make Hard-Boiled Egg Gratin In A Bechamel Sauce
Ready to dive in? Here’s how to bring this cozy dish to life:
- Start by hard-boiling the eggs. Bring a saucepan of salted water to a rolling boil, then gently add the eggs. Lower the heat and let them simmer for 10 minutes.
- Once the eggs are done, place them into cold water until they’re just cool enough to handle. Here’s a little trick: roll them with your palm on a hard surface to crack the shell, then peel under a slow stream of running water. It works like a charm!
- In a small frying pan, melt some butter over low heat. Add the onion and cook, stirring frequently, until they’re tender but not browned. Set aside.
- Next, let’s make the béchamel sauce. In a medium heavy-bottomed saucepan, melt more butter over low heat. Stir in the flour and whisk for around 2 minutes without letting it color.
- Whisk in the milk, bringing it to a boil while whisking constantly to avoid lumps. Season with nutmeg, salt, and pepper, then reduce the heat and let it simmer for 10 minutes. Keep whisking and scraping the pan to ensure nothing sticks.
- Stir the cooked onions into the béchamel and let it all cook together for an additional 5 minutes.
- Preheat your grill. Slice the eggs into 1 cm (0.4 inch) slices and start assembling. Spread a thin layer of the béchamel sauce at the bottom of your gratin dish.
- Layer the egg slices over this sauce, covering them with the remaining béchamel. Sprinkle generously with grated Gruyère cheese.
- Place the dish under the grill. Keep an eye on it and turn the dish if necessary to ensure an evenly golden, bubbly top. Serve immediately and enjoy the deliciousness!
Cook’s Notes
Let’s talk practical tips. First, don’t rush the béchamel sauce; whisk it patiently to avoid lumps. If you find the bechamel is too thick, a splash more milk can help loosen it up. This dish is best served right away when the cheese is melty and gooey, but if you do have leftovers, they can be stored in an airtight container in the fridge for up to two days. Reheat gently in the oven or microwave until warmed through.
Make It Your Own
This recipe is delicious as is, but here are a few ways to make it your own:
- Swap the Gruyère cheese for sharp cheddar for a more pronounced flavor.
- Add a layer of sautéed spinach between the eggs and the sauce for some greens.
- Substitute half of the milk with cream for an even richer béchamel.
- Sprinkle some crispy bacon bits on top before grilling for a smoky kick.
If you try this, I’d love to hear how it turns out — drop a comment or tag me! Whether it’s your first time making a gratin or you’re an old pro, I hope this becomes a comforting staple in your kitchen. Happy cooking!
Related update: Hard-Boiled Egg Gratin In A Bechamel Sauce
Related update: Caramelised Onion and Mushroom Quiche
Alright, picture this: It’s Wednesday evening, halfway through a week that feels like it’s been two weeks long, and you’re in dire need of something indulgent but not overly complicated. That’s the exact moment I found myself in last week when I decided to whip up a Banana Pudding Cake. This isn’t just any banana dessert; it’s got layers of moist cake, creamy custard, and a light-as-air whipped cream topping that makes it feel like a hug on a plate. Plus, it’s a great way to use up those slightly too-ripe bananas staring you down on the counter. The best part? You probably have most of the ingredients already lying around. Trust me, this is the dessert you deserve after adulting so hard all week. Jump to Recipe
What You’ll Need
This isn’t your typical mile-long ingredient list. Chances are you already have most of this.
- Bananas
- Vanilla wafers
- Egg yolks
- Eggs
- Flour
- Sugar
- Baking powder
- Cocoa powder
- Milk
- Salt
- Pudding
- Vanilla extract
- Heavy whipping cream
- Powdered sugar
- Whipped cream
How to Make Banana Pudding Cake
- Preheat your oven to 350°F (175°C). In a large bowl, beat the egg yolks with sugar until the mixture gets that pale, creamy consistency, and set it aside.
- In the bowl of an electric mixer, whip the egg whites until they form stiff peaks that hold their shape like a dream.
- Gently add the baking powder, processed wafers, and cocoa to the egg yolk mixture. It gets a bit thick and fudgy here; you’re on the right track.
- Drop about 1/4 of the whipped egg whites into the larger bowl and fold lightly to get things started. Then fold in the remaining whites carefully until no streaks remain.
- Line a jellyroll sheet pan with parchment paper, ensuring it covers all sides, and spray the paper with non-stick floured baking spray.
- Spread the cake batter evenly over the paper, making sure it covers the entire pan, and bake it in your preheated oven for 15-20 minutes. The cake should feel springy to the touch.
- Let the cake cool completely on the sheet—this will take at least 30 minutes to an hour, so patience, my friend.
- Meanwhile, mix sugar, flour, and salt in the top of a double boiler. If you don’t have one, improvise with a saucepan over another with boiling water.
- Blend in the egg yolks and milk, then cook uncovered while stirring constantly for 10 to 12 minutes, or until the mixture thickens nicely. Remove from heat and stir in the vanilla extract.
- Once your cake is cooled, carefully lift the parchment paper, remove the cake from the pan, and place it on a flat surface. Starting from the short end, cut into three even pieces.
- Assemble your masterpiece by placing the first layer of cake on a serving platter. Spread half of the custard over the top, then cover with a third of the banana slices and a third of the crumbled wafers.
- Top with the next piece of cake and repeat, making sure to reserve a few bananas and crumbled cookies for later. Spread the final amount of custard onto the top layer of cake.
- Refrigerate the whole cake for at least 2 hours or until you’re ready to serve. This chill time is crucial for the flavors to really meld together.
- Just before serving, whip up the cream topping. Combine all ingredients in a large mixing bowl and beat until the cream thickens and becomes stiff.
- Spread the whipped cream over the cake and top with the reserved banana slices and wafers right before serving to keep everything fresh and delightful.
Cook’s Notes
This cake is best made ahead, allowing time for the flavors to develop in the fridge. Just keep the final toppings off until serving time to avoid any sad, brown bananas. Store leftovers in an airtight container in the fridge for up to 3 days, though the bananas might start to look a little tired by then. Don’t worry, the taste will still be on point!
- If you’re in a hurry, ready-made pudding can be used in place of homemade custard, but honestly, the homemade is worth the little extra effort.
- To avoid the dreaded banana browning, toss the slices in a bit of lemon juice before layering them in the cake.
Make It Your Own
- Go chocolatey: Sprinkle some mini chocolate chips between the layers for a chocolate-banana twist.
- Nutty buddy: Add a layer of crushed pecans or walnuts for a bit of crunch.
- Berry bliss: Substitute half of the banana slices with fresh strawberries for a fruity variation.
- Gluten-free: Use gluten-free vanilla wafers and your favorite gluten-free flour blend for the cake.
If you try this, I’d love to hear how it turns out—drop a comment or tag me! Happy baking, friends. Let’s make mid-week desserts a thing, because why not?
Related update: Banana Pudding Cake
Related update: Crispy Rhubarb Pockets
I recently found myself staring at a couple of Honeycrisp apples on my kitchen counter, feeling the first whispers of autumn in the air. You know the days when you can finally break out your sweaters but you still need sunglasses? That’s when my mind started tiptoeing towards something warm and cozy. I mean, what could be better than making a quick, delightful fall fruit compote that ties together all the best flavors of the season? The best part? You don’t need a culinary degree to whip this up. It’s a simple, heart-warming recipe that gives you that “kitchen hero” feeling without the sweat. Plus, it pairs perfectly with so many things, like crispy potato latkes or a dollop of ice cream.
Jump to Recipe
What You’ll Need
Trust me, chances are you already have most of this in your pantry or fridge. The real stars here are the cozy, autumnal ingredients that just sing when they’re together.
- 2 tablespoons of butter
- 2 cups of diced honeycrisp apples
- 1 cup of diced pears
- 1/2 cup of dried cherries
- 1/4 cup of brown sugar
- 1 tablespoon of apple cider vinegar
- 1 cup of apple juice
- 1 cinnamon stick
How to Make Fall Fruit Compote
- Start by melting the butter in a medium-sized saucepan over high heat. You’ll know it’s ready when it starts to smell nutty and divine.
- Once the butter is melted, toss in those diced apples, pears, dried cherries, vinegar, apple juice, brown sugar, and the cinnamon stick. Give it a good stir to coat everything in buttery goodness.
- Let it cook for about 5 minutes. You want the mixture to start bubbling, and the smell will be pure fall magic.
- Turn the heat down to medium and let it simmer for a few more minutes, just until the fruit is tender and the syrupy liquid has mostly reduced. If things start to stick, splash in a little more apple juice to keep it all juicy and lush.
- Once it’s all tender and gorgeous, you’re done! Serve warm and enjoy the fruit-laden spoonfuls of autumn joy.
Cook’s Notes
Let’s chat about some practical tidbits to make your compote experience as smooth as butter. First off, don’t forget that compote thickens as it cools, so don’t worry if it looks a little saucy at first. If you’re planning to serve it later, just warm it up slightly before serving to get back that perfect consistency. If you find yourself with leftovers, pop them in a sealed container in the fridge, and it will stay happy for about a week. This compote is perfect to make ahead of time, especially if you’re planning to dazzle some guests a day or two later.
Make It Your Own
Let’s play around with this compote base because, trust me, versatility is its middle name.
- Swap out the apples for ripe peaches if they’re still in season. They add a lovely, juicy dimension.
- Try cranberries instead of dried cherries for a tarter twist. A little zing never hurt anyone!
- For a boozy touch, replace half the apple juice with a splash of bourbon or rum. It makes things just a little more grown-up.
- Add a pinch of ground ginger or nutmeg for extra warmth and spice. Your taste buds will thank you.
If you give this autumnal delight a go, I’d love to hear how it turns out — drop a comment or tag me in your fall feasting pics! Happy cooking, friend!
Related update: Fall Fruit Compote
Related update: Chocolate Chip Peanut Butter Mallow Dessert Bars
A few weekends ago, I found myself with a bowl of ripe pears staring back at me from the counter, practically begging to be transformed into something special. It was one of those blustery autumn afternoons where the leaves were doing their dance down the street, and all I wanted was a cozy dessert that felt both comforting and indulgent. Enter Oven Roasted Pears with Blackberry Sauce—a dish that marries the rich sweetness of roasted fruit with the tangy brightness of blackberries. It sounds fancy but is as easy as pie (actually, even easier since there’s no crust to wrestle with!). This little number is perfect for impressing your dinner guests or just treating yourself on a Tuesday night. Jump to Recipe
What You’ll Need
Chances are, you already have most of these hanging out in your pantry and fridge. This recipe is all about letting a few simple ingredients shine.
- Pears (ripe but firm)
- Unsalted butter
- Blackberries (fresh and juicy)
- Juice from a lemon
- Powdered sugar
- Confectioners sugar
- Cream of tartar
- Egg whites
- Granulated sugar
- Bittersweet chocolate
How to Make Oven Roasted Pears With Blackberry Sauce
- Preheat your oven to 450°F. Begin by peeling, coring, and quartering the pears. Melt the unsalted butter in a large casserole or baking dish over high heat. A 10-quart Dutch oven works perfectly for this.
- Once the butter is melted and sizzling, add the pear quarters. Cook them for about 10 minutes, stirring occasionally, until they’re golden brown all over. The aroma will be absolutely irresistible.
- Transfer your dish to the oven and let the pears roast for another 7 to 10 minutes. You’ll know they’re ready when a paring knife easily pierces through. Once done, take them out of the oven and let them cool to room temperature.
- As the pears cool, wash and dry the blackberries—my salad spinner is a lifesaver for this! Reserve a handful for garnishing later.
- In a food processor, blend 3 cups of blackberries with powdered sugar and lemon juice until smooth. Pour this vibrant sauce into a bowl and set aside.
- Now, for the meringue kisses! Preheat the oven to 275°F. Line a full-size sheet pan with a silpat mat or parchment paper lightly sprayed with cooking spray.
- In a food processor, give the granulated sugar a blitz for about a minute until it’s superfine. Transfer it to a bowl. Next, process the confectioners sugar and bittersweet chocolate together until the chocolate is reduced to tiny flecks.
- Using a mixer, beat the egg whites at a slow speed until they start to froth. Add the cream of tartar and crank up the speed to high, beating until stiff peaks form.
- Gradually add the superfine sugar, continuing to beat for another two minutes. Transfer this fluffy mixture to a pastry bag fitted with a star tip.
- Pipe out little meringue kisses onto the lined baking sheet, giving each a small peak by pushing the tip into the dollop and pulling away quickly.
- Place the meringues in the oven for an hour and a half. They’re done when they feel hard to the touch, perfectly dried out.
- To serve, spoon the blackberry sauce onto each plate, arrange 3 or 4 pear quarters on top, add a few meringue kisses, and garnish with those reserved whole blackberries.
Cook’s Notes
Here’s the thing, timing is everything with this dessert. You want the pears to still have a bit of bite, so don’t over-roast them. The meringue kisses can be made ahead of time and stored in an airtight container for up to a week. If you’re prepping the blackberry sauce ahead, keep it in the fridge for a day or two, but don’t add the lemon juice until just before serving to keep that bright flavor.
Make It Your Own
- Swap the blackberries for raspberries for a different berry twist.
- Add a splash of vanilla extract to the meringue mixture for a subtle aromatic boost.
- For a dairy-free option, use coconut oil instead of butter when roasting the pears.
- Garnish with some toasted chopped nuts (like hazelnuts or almonds) for a crunchy contrast.
If you try this recipe, I’d love to hear how it turns out—drop a comment below or tag me on social media with your delicious creations!
Related update: Oven Roasted Pears With Blackberry Sauce
Related update: Fall Fruit Compote
I’ve got to tell you about this time when I found myself staring into the abyss of my pantry, a little uninspired and a lot hungry. It was one of those dreary afternoons where the rain just wouldn’t let up, and all I craved was something rich and comforting to fill the house with warmth — and let’s be honest, something that would have me coming back for seconds. That’s when I remembered the oxtails tucked away in the freezer, just waiting for their moment. A few hours later, my kitchen was filled with the deep, savory aroma of Oxtail Ragout simmering away, and let me tell you, it was glorious. This recipe is the kind of comfort food that hugs you from the inside out, and while it might sound fancy, it’s pretty straightforward and oh-so-worth it.
Jump to Recipe
What You’ll Need
This ingredient list is a pantry’s best friend. You’re likely to have most of this stuff already, and the flavors all come together to create something magical.
- Oxtails
- Flour
- Salt
- Pepper
- Paprika
- Hot fat (like vegetable oil or lard)
- Onion, chopped
- Garlic, minced
- Bell pepper, diced
- Whole allspice
- Whole bay leaf
- Tomato juice
- Water
- Lemon juice
How to Make Oxtail Ragout
- In a small bowl, mix together 1 teaspoon of salt, some freshly cracked pepper, paprika, and enough flour to lightly coat the oxtails. Roll the oxtails in this seasoned flour mixture until they are fully covered.
- Heat some hot fat in a heavy-bottomed pot over medium-high heat. Add the floured oxtails and brown them thoroughly on all sides. You’re looking for a deep, golden crust that’s almost irresistible.
- Once browned, toss in the chopped onion, minced garlic, and diced bell pepper. Stir everything around until the onions are translucent and the garlic is fragrant but not burned.
- Add in the whole allspice and bay leaf, followed by the tomato juice and enough water to cover the oxtails. Give everything a good stir to combine.
- Bring the pot to a gentle simmer, then cover it up and let it do its thing for about 3 hours. You’re aiming for the kind of tenderness where the meat practically falls off the bone.
- Once the oxtails are melt-in-your-mouth tender, fish out the allspice and bay leaf. Stir in a splash of lemon juice to brighten the flavors, and you’re done!
Cook’s Notes
I’ve learned a few things the hard way, so here are some tips to keep in mind. Be patient with the browning process; it’s where a lot of the flavor develops. Don’t rush it! If you want to make this ahead, the ragout tastes even better the next day once the flavors have had a chance to deepen. Just store it in the fridge and reheat gently. Leftovers can be kept in an airtight container for up to 3 days, or frozen if you want to hoard this goodness for a rainy day.
Make It Your Own
Here are a few variations to keep things interesting or to cater to different tastes:
- Swap the tomato juice for red wine if you’re looking for a richer, more robust flavor.
- Add diced carrots and celery for a bit more veggie goodness and texture.
- Try using smoked paprika for a deeper, smokier flavor profile.
- If you’re feeling adventurous, throw in a dash of hot sauce for a little heat.
If you try this, I’d love to hear how it turns out — drop a comment or tag me on social media. Your kitchen adventures are half the fun for me!
Related update: Oxtail Ragout
It was one of those chilly fall afternoons when the leaves were swirling outside, and my pantry was looking a bit sparse. I was craving something cozy but hadn’t done a proper grocery run. Luckily, I did have a few seasonal staples on hand, including a couple of butternut squashes that had been staring at me every time I opened the pantry door. A quick rummage through the fridge and spice rack, and voilà! This Roasted Butternut Squash and Sage Dip was born. It’s a creamy, savory dip with just a hint of sweetness from the roasted squash and an earthy touch from the sage. Perfect for those moments when you want to impress without the fuss. Plus, it makes your kitchen smell divine.
Jump to Recipe
What You’ll Need
The beauty of this dip is that it relies on simple, fresh ingredients that you might already have. The key is in the roasting, which brings out all the deep, wonderful flavors.
- Two butternut squash
- Olive oil
- Fresh sage
- Garlic powder
- Fresh ground pepper
- Sea salt
- Onion
- Garlic
- Anchovy (trust me on this one!)
- Goat cheese
How to Make Roasted Butternut Squash and Sage Dip
- Preheat your oven to 350 degrees. This is the perfect time to cozy up and let your kitchen get warm and inviting.
- In a big bowl, mix together some olive oil, fresh sage, a few dashes of salt, pepper, and garlic powder. Toss in the butternut squash cubes, making sure each piece is well-coated with the herby goodness.
- Spread the squash out on a large baking sheet. You want them in a single layer, so they roast up nice and caramelized. Bake for about 30 minutes, or until they are tender and golden at the edges.
- While the squash is doing its thing, sauté chopped onion, anchovy fillets, and garlic in a bit of extra virgin olive oil. Cook them until the onion is soft and the anchovy has melted into the mix. The aroma is heavenly.
- Once the squash is done, let it cool just enough to handle. This way, you’re not nuking your fingers when you move to the next step.
- In a food processor, combine the roasted squash, onion mixture, and about 1/4 cup of crumbled goat cheese. Blend until smooth and creamy. You may need to scrape down the sides a couple of times to get everything evenly mixed.
- Transfer the dip into a pretty bowl because presentation matters! Serve it up with pita wedges, breadsticks, or a colorful array of veggies.
Cook’s Notes
This dip is pretty forgiving and flexible, perfect for those “let’s wing it” cooking sessions. If you’re prepping in advance, you can roast the squash and make the sautéed onion mixture the day before. Just keep them in separate containers in the fridge and blend them up with the cheese when you’re ready to serve. It will keep well in the fridge for about 3 days, though it never lasts that long at my house! If the dip thickens too much after chilling, a splash of olive oil or a bit of warm water stirred in should bring it back to life.
Make It Your Own
This is where the fun begins—don’t be afraid to play around with this recipe!
- Swap the goat cheese for feta if you want a saltier, tangier vibe.
- For a vegan version, skip the anchovy and goat cheese, subbing in roasted red peppers for extra depth.
- Add a pinch of red pepper flakes to the roasting mix for a bit of heat.
- Use sweet potatoes instead of butternut squash for an earthier sweetness.
If you try this, I’d love to hear how it turns out—drop a comment or tag me! Nothing makes me happier than seeing all the delicious ways you bring these recipes to life. Enjoy!
Related update: Roasted Butternut Squash and Sage Dip
Related update: Breaded Shrimp and Spicy Mayo Appetizer
It was one of those chilly evenings when the wind seemed to sneak its way into my kitchen despite all the windows being tightly shut. I had a craving for something sweet but not overly indulgent, the kind of dessert that feels luxurious without leaving you with a sugar hangover. Rummaging through my pantry and fridge, I realized I had everything I needed to make this Baked Caramel Custard. It’s one of those recipes that sounds fancy enough to impress but is simple enough to whip up on a weeknight. A little bit of whisking, a touch of caramelizing, and you’ve got yourself a smooth, silky dessert that hits the spot.
Jump to Recipe
What You’ll Need
Trust me, you might already have most of these ingredients lounging around in your kitchen. Here’s what you’ll need to gather:
- Egg substitute
- 1 egg yolk
- Evaporated skim milk
- Port wine
- Skim milk
- Sugar plus extra for caramelizing
- Vanilla extract
How to Make Baked Caramel Custard
- First things first, preheat your oven to 350 degrees. Your kitchen will be all toasty and inviting in no time.
- In a heavy saucepan, scald the evaporated skim milk and skim milk together. You’ll want to heat them until tiny bubbles form around the edge — don’t let it boil!
- Now, let’s get caramelizing. In a skillet over medium heat, let the extra sugar melt until it becomes a golden brown liquid, like liquid gold. Keep an eye on it so it doesn’t burn.
- Slowly add your scalded milk to the caramel. Stir constantly until the sugar is completely dissolved. The mixture will bubble and foam a bit, just keep stirring until it calms down.
- In a medium bowl, beat together the egg substitute and egg yolk until they’re a lovely lemon color. This is where the magic begins!
- Pour the milk mixture into the bowl with the eggs. Add in the port wine and vanilla extract, mixing until smooth and well combined.
- Divide this creamy dream into six custard cups. Place the cups in a baking dish, then pour boiling water into the dish until it reaches halfway up the sides of the cups.
- Bake the custard in the oven for about 35 to 40 minutes. You’ll know it’s done when you give a little jiggle to the cups, and the centers just barely wobble.
- Remove the custard cups from the oven and let them cool completely in the refrigerator. Patience is key here — you want them nice and chilled.
- When ready to serve, place a dessert plate on top of each custard cup, then boldly invert. The custard should slide out with a little coaxing, revealing its luscious caramel top.
Cook’s Notes
Want to make this ahead of time? You totally can! This custard keeps well in the fridge for up to two days, which makes it a perfect make-ahead dessert for entertaining. Just remember to pop them out of their cups right before serving. And hey, don’t rush the caramelizing process — it’s tempting to crank up the heat, but slow and steady wins the race here. If your caramel seizes up when you add the milk, just return it to the heat and stir until smooth.
Make It Your Own
Feel like switching things up? Here are a few variations to try:
- Swap the port wine for a splash of rum for a slightly different boozy note.
- For a non-alcoholic version, omit the port wine and add a teaspoon of orange zest for a citrusy kick.
- Use whole milk instead of skim for a richer custard if you’re feeling indulgent.
- For a nutty twist, sprinkle the top with toasted chopped hazelnuts before serving.
If you try this, I’d love to hear how it turns out — drop a comment or tag me on social media! Happy baking, and may your custard always be silky and your caramel perfectly golden.
Related update: Lemon Bars
It was one of those Wednesday evenings when the fridge was looking particularly uninspiring, and the clock was ticking towards dinner time. My mind was juggling between making something quick, comforting, and, above all, something that wouldn’t require a trip to the store. That’s when I decided to whip up some Lebanese Kibbeh. With its flavorful layers and aromatic spices, it’s like a warm hug on a plate — quick to assemble but impressive enough to make you feel like a culinary genius. Plus, the way the kitchen smells when the Kibbeh is baking — it’s like a magical invitation for everyone to gather around the table.
Jump to Recipe
What You’ll Need
This recipe is all about transforming simple pantry staples into something extraordinary. Chances are you already have most of these ingredients in your kitchen:
- Bulgur wheat
- Lean lamb or veal
- Onion
- Butter
- Salt & fresh ground pepper
- Sprig of mint
- Oil
- Pine nuts
- Ground allspice
- Greek yogurt
- Garlic
- Fresh mint for garnish
How to Make Lebanese Kibbeh
- Preheat your oven to 375°F. This way, it’ll be all set to go once your Kibbeh is assembled.
- Rinse the bulgur wheat in a sieve, giving it a good shake to remove excess moisture. You want it just damp enough to blend easily.
- In a large bowl, mix the lean lamb, onion, and a generous seasoning of salt and pepper. Roll up your sleeves and knead until you get a thick, cohesive paste.
- Add the rinsed bulgur wheat into this meaty mix and blend until it’s all one happy family.
- For the filling, warm up the oil in a frying pan over medium heat. Toss in the onion and cook until golden — your kitchen should start smelling amazing right about now.
- Add the lamb (or veal) to the pan, stirring occasionally until the meat is evenly browned. Mix in the pine nuts, allspice, and another hit of salt and pepper.
- Oil up a large baking dish and spread half of the lamb and bulgur mix over the bottom, pressing it down to form an even layer.
- Spoon the flavorful filling over this layer, then top it with the remaining lamb and bulgur mix. Press down firmly using the back of a spoon for a neat finish.
- Pour melted butter over the top. Trust me, this is the magic touch that will make the top irresistibly crispy and golden.
- Slide the dish into the oven and let it bake for 40-45 minutes, until the top is beautifully browned.
- While the Kibbeh bakes, whip up a quick yogurt dip by blending Greek yogurt with crushed garlic. Spoon it into a bowl and finish with a sprinkle of chopped mint.
- Once your Kibbeh is done, let it rest for a few minutes before cutting into squares or rectangles. Serve it up with the yogurt dip and garnish with fresh mint.
Cook’s Notes
Making Kibbeh is quite forgiving if you keep a few things in mind. First, if your bulgur wheat seems too wet, squeeze it out well; excess moisture can make the layers soggy. When layering in the baking dish, press down firmly to avoid any air pockets. If you’re making this ahead, you can easily assemble the dish a few hours earlier, refrigerate it, and pop it in the oven when you’re ready. Leftovers are delightful for lunch the next day — simply reheat in a low oven until warm.
Make It Your Own
- Switch up the protein: Try using ground beef or turkey for a different twist on the classic.
- Nutty variation: Substitute the pine nuts with chopped walnuts for a different crunch.
- Spice it up: Add a pinch of cayenne pepper to the filling if you like a bit of heat.
- Herbaceous twist: Mix in some chopped parsley or cilantro into the bulgur mix for extra freshness.
If you try this, I’d love to hear how it turns out — drop a comment or tag me on social media! Cooking is all about sharing the love, after all. Let me know what variations you come up with. Happy cooking!
Related update: Lebanese Kibbeh
Related update: Japanese Chicken Donburi
It was one of those unpredictable spring mornings where the sky couldn’t decide if it wanted to rain or shine. I found myself craving something that felt like a warm hug, something that would fill the house with the spicy sweet scent of comfort. Enter Hot Cross Buns. They’re perfect for those “in-between” days, bridging the gap between winter’s end and spring’s full bloom. What I adore about these buns is how deceptively simple they are to make; they sound fancy, but they’re actually pretty forgiving. You just mix, knead, roll, and bake. They’re like little pillows of happiness, complete with a sweet cross on top that’s practically begging to be photographed. Trust me, once you try them, these buns will become a regular request in your household.
Jump to Recipe
What You’ll Need
There’s a good chance you already have most of these ingredients lurking in your pantry. The combination of spices gives the buns their signature warmth, and the sour milk keeps them tender.
- Flour
- Sugar
- Baking powder
- Baking soda
- Salt
- Cinnamon
- Nutmeg
- Shortening
- Raisins
- Sour milk (or add a splash of vinegar or lemon juice to regular milk)
How to Make Hot Cross Buns
- Sift the flour once, then measure it out into a large bowl. Add the baking soda, baking powder, salt, sugar, and spices. Trust me, the double sifting might sound extra, but it makes the buns incredibly light.
- Cut in the shortening. You want to mix until the flour looks like coarse crumbs. This is your time to channel the patient, zen gardener within.
- Stir in the raisins. These little gems add pockets of sweetness in every bite.
- Add enough sour milk to create a stiff dough. You want it just moist enough to hold together without being sticky.
- Turn the dough onto a floured board and knead it slightly—just enough to bring it all together. Don’t overdo it!
- Roll the dough out to about 1/2 inch thickness. Use a 2-inch cutter to cut out your buns. It’s oddly satisfying, like cutting out cookies.
- Place the buns close together in a shallow pan. With a sharp knife, cut a cross into the top of each bun. This is where the magic happens.
- Brush the tops with a mixture of milk and sugar. This will give them a lovely gloss and help them brown beautifully.
- Bake in a hot oven at 475 degrees for 20 minutes. You’ll know they’re done when they’re golden and fragrant.
- Once out of the oven, brush them again with the milk and sugar solution. Fill the cross with plain frosting if desired. Serve them warm and watch them disappear.
Cook’s Notes
Here’s the scoop: these buns are best served warm, fresh out of the oven, but they do reheat well if you find yourself with leftovers (unlikely, but possible). Just pop them in the oven for a few minutes, wrapped in foil, to refresh them. You can make the dough ahead and keep it in the fridge overnight if you want to do the hard part in advance. Just be sure to let it come back to room temperature before rolling and cutting.
Make It Your Own
Feel free to play around with the recipe a bit. Here are some variations to consider:
- Swap raisins for dried cranberries for a tart twist.
- Add orange zest to the dough for a citrusy zing.
- Replace the frosting with a cream cheese glaze for a tangy finish.
- Throw in some chopped nuts if you’re in the mood for a bit of crunch.
If you try these Hot Cross Buns, I’d absolutely love to hear how they turn out for you! Drop a comment below or tag me on social media with your bun pics. Happy baking!
Related update: Hot Cross Buns
Related update: Xocai Oatmeal Dark Chocolate No-Bake Cookies
Last Wednesday, as the rain tapped against my kitchen window, a sudden craving for something rich, chocolatey, and indulgent hit me hard. It was one of those evenings where comfort food felt less like an option and more of a necessity. I rifled through my pantry, feeling the urge to concoct something that was both decadent and a tad boozy—a treat just for me. That’s when the idea of Fudgy Chocolate Cream Cheese Brownies with Baileys popped into my head. This is the kind of recipe that turns a gloomy night into a cozy one, with swirls of cream cheese dancing through the chocolate, accented by the warmth of Baileys. It’s not just dessert; it’s the dessert you make when you want to treat yourself to something special.
Jump to Recipe
What You’ll Need
Before you start, take a quick peek in your pantry. You might already have most of what you need. This ingredient list is straightforward, with a couple of stars to give it that wow factor.
- Bittersweet chocolate
- Butter
- Cream cheese
- Eggs
- Flour
- Espresso powder (optional, but it does wonders to elevate the chocolate flavor!)
- Sugar
- Vanilla extract
- Baileys Irish Cream
- Non-stick spray or butter and flour for the pan
How to Make Fudgy Chocolate Cream Cheese Brownies with Baileys
Let’s get down to business! Here’s how to bring this luscious creation to life:
- To whip up the chocolate layer, toss your bittersweet chocolate and butter into a large glass dish. Microwave them for about 1.5 minutes. Don’t panic if the chocolate looks like it hasn’t melted; give it a good stir, and it will melt into a velvety pool. If it’s still stubbornly chunky, give it a few more seconds in the microwave. Just avoid overheating—it’s a slippery slope to a burnt mess.
- Once your chocolate is all dreamy and melted, stir in the sugar and vanilla extract with a whisk. Let it cool down a tad; you don’t want scrambled eggs in your brownies.
- Now, beat in the eggs, one at a time, making sure each is well incorporated before adding the next. This is where the magic begins.
- Sift the flour over the chocolate mixture slowly, mixing as you go. The batter will start to look like a chocolate lover’s dream. Set this chocolatey goodness aside for a moment.
- For the cream cheese layer, pop the cream cheese in a bowl and give it a whirl with a hand mixer until it’s smooth and ready to mingle. Add sugar and mix again until it’s sweet and creamy.
- Beat in an egg and give it a splash of Baileys. Mix until everything’s just right.
- Prep your baking pan. Spray it with non-stick spray or butter and flour it. You can line it with parchment for easy lifting later—trust me, you’ll want to.
- Pour the chocolate mixture evenly into the pan, then drizzle the cream cheese mixture over it. Use a fork to create swirls so the cream cheese peeks through the chocolate. Don’t overdo it; you want distinct marbled patterns.
- Pop the pan into your preheated 350°F oven. Let it bake for about 35 minutes or until a knife comes out clean. The aroma will drive you wild, but patience, my friend—it’ll be worth it.
- Once baked, let it cool before slicing into perfect squares of indulgence. Enjoy!
Cook’s Notes
Here’s the inside scoop on making sure these brownies come out just right. Be patient with the chocolate melting process; stirring is your friend. If you rush and overheat, you’ll get a grainy texture—not cool. When blending the batters, gentle swirling is key for that beautiful marbled look. These brownies store well in an airtight container at room temperature for up to three days, but let’s be honest—they won’t last that long. If you’re thinking ahead, they freeze beautifully too. Just wrap them tightly in parchment and foil.
Make It Your Own
Want to add your own twist? Here are a few ideas:
- Swap the Baileys for your favorite flavored liqueur like Kahlua or Amaretto for a different, yet delightful, boozy touch.
- Add a handful of crushed nuts to the chocolate layer for a crunchy surprise in every bite.
- Mix in a teaspoon of cinnamon into the chocolate for a warm, spicy note that pairs beautifully with the Baileys.
- Looking for a non-alcoholic version? Use a splash of coffee instead of Baileys to deepen the chocolate flavor without the booze.
If you give this a go, I’d love to hear how it turns out for you. Drop me a comment or tag me with your brownie pics. Let’s share the love and the chocolate!
Related update: Fudgy chocolate cream cheese brownies with Baileys
Related update: Hot Cross Buns
It was one of those hectic Tuesday nights when my brain was fried from work, and the fridge seemed like a barren wasteland. I needed something easy yet satisfying, and I really didn’t want to run to the store. Enter: chia seed pudding. This little gem is like a miracle in a bowl — crazy simple to whip up with stuff you probably have on hand, and it feels like a little treat when you need it most. Plus, it’s perfect if you’re like me and need a grab-and-go breakfast or a midnight snack that doesn’t involve cookies (well, not always). Trust me, once you try this, you’ll wonder how you managed without it.
Jump to Recipe
What You’ll Need
Chances are you already have most of these ingredients lounging in your pantry or fridge, just waiting to become something delicious.
- Black chia seeds
- Almond milk
- Raw agave syrup
- Vanilla extract
- Salt
- Fresh raspberries for garnish (or any berries you adore)
How to Make Chia Seed Pudding
- In a small bowl, mix together the black chia seeds and almond milk until the seeds are evenly dispersed and not clumpy.
- Add in a dash of salt, a splash of vanilla extract, and drizzle in the raw agave syrup to sweeten things up. Stir until everything is well combined and the syrup has dissolved.
- Cover the bowl and pop it in the fridge overnight or for at least 4 hours. You’ll know it’s ready when the mixture has thickened and resembles a pudding-like consistency.
- Before diving in, give it a good stir and top with fresh raspberries. The chill and sweetness from the berries are going to be a game-changer.
Cook’s Notes
Here’s a little secret: the longer the chia seeds soak, the creamier your pudding will be. They need time to absorb the liquid, so patience is key. If you find it too thick in the morning, just stir in a splash more almond milk to reach your desired consistency.
- Store any leftovers in an airtight container in the fridge, and they’ll keep for up to five days. Perfect if you want to meal prep!
- Don’t stress if you don’t have almond milk; any milk (or milk substitute) works fine. Each brings a slightly different vibe to the pudding.
- Be sure to stir well after it’s set. Chia seeds have a habit of clumping together, and a good stir smooths it all out.
Make It Your Own
- Swap out the almond milk for coconut milk for a tropical twist that pairs beautifully with mango chunks.
- Use maple syrup instead of agave if that’s what you have — it gives a warm, rich sweetness that’s divine.
- For a chocolatey version, stir in a tablespoon of cocoa powder with the seeds and milk.
- Add a sprinkle of cinnamon or nutmeg for a cozy, spiced-up flavor.
If you try this, I’d love to hear how it turns out — drop a comment or tag me! Your version might just inspire my next kitchen adventure.
Related update: Chia Seed Pudding
Related update: Fudgy chocolate cream cheese brownies with Baileys
Picture this: it’s a drizzly Tuesday evening, and you’ve just returned from a long day that felt like a relentless blur of meetings and errands. You’re craving something comforting and hearty, yet adventurous enough to pull you out of the weekday monotony. Enter Khachapuri — the pillowy, cheese-filled bread boat that hails from Georgia (the country, not the state). I’ve always found Khachapuri to be the perfect marriage of comfort and culinary curiosity, with its gooey center and golden, flaky crust. Making it is like giving yourself a cozy hug in bread form, and it’s surprisingly doable even when you’re running on fumes. Let’s dive into creating this cheesy delight that’s sure to warm your soul.
Jump to Recipe
What You’ll Need
What’s fantastic about this recipe is that you might already have most of these ingredients lounging in your pantry or fridge. Let’s get you prepped:
- Dry yeast
- Sugar
- Water
- Milk
- Butter
- Salt
- White Swiss cheese – 8 ounces
- Cheddar
- 2 eggs
- Muenster cheese
- Parsley
- White pepper
How to Make Khachapuri
- Dissolve the yeast and 1 teaspoon of sugar in 1/4 cup of warm water. Let it stand for 5-10 minutes until it becomes foamy and alive with little yeast bubbles.
- In a mixing bowl, combine the proofed yeast with milk, 2 tablespoons of sugar, butter, and salt. Gradually mix in enough flour to form a soft, slightly tacky dough.
- Transfer the dough to a greased bowl, turning it so it’s coated on all sides. Cover with a damp cloth and let it rise in a warm spot until it doubles in size — about an hour.
- While your dough is having its beauty rest, shred the cheeses and mix them with the eggs, parsley, and a pinch of white pepper. Pop this filling in the fridge to chill and mingle.
- Grease a 9-inch springform pan generously. Punch down the risen dough, shape it into a ball, and roll it out to a 20-inch circle.
- Gently fold the dough circle in half to lift it, then unfold it into the pan, allowing the edges to drape over. Pile the cheese filling into the dough-lined pan.
- Bring the draped edges of the dough up and over the filling, creating 8-12 evenly spaced pleats around the perimeter. Twist and pinch the ends together in the center to form a rustic knob.
- Cover the loaf with a buttered square of waxed paper and let it rise again until doubled in bulk.
- Preheat your oven to 375°F. Brush the top with a glaze made of 1 egg white mixed with 1 tablespoon of water, or simply use margarine.
- Bake for 40-50 minutes until the Khachapuri is deeply golden brown. Remove from the pan and place directly on the oven rack for an additional 5 minutes to crisp the bottom crust.
- Let it cool on a rack for about 45 minutes before slicing into wedges and basking in all the cheesy goodness.
Cook’s Notes
Here’s where the magic and little nuances come into play:
- Proofing patience: If your yeast doesn’t foam, give it another try with fresh yeast and slightly warmer water. It’s worth the wait to get that dough rising right!
- Cheese choices: Feel free to tailor the cheese mix to your liking. I find the combination of Swiss, Cheddar, and Muenster to be a dreamy balance between sharp and creamy.
- Leftovers: Khachapuri does great as leftovers. Wrap it tightly in foil and reheat it in the oven at 350°F for about 10-15 minutes to refresh that crispy crust.
- Make-ahead: You can prepare the dough and filling up to a day in advance — just keep them chilled and separate until you’re ready to assemble and bake.
Make It Your Own
- Herb It Up: Add fresh dill or cilantro to the filling for an herbal twist.
- Meaty Marvel: Toss in crispy bacon bits or diced ham for a protein-packed version.
- Spice Things Up: Mix in a pinch of red pepper flakes into the cheese for a touch of heat.
- Go Green: Layer in some sautéed spinach or kale for a veggie boost.
If you try this Khachapuri recipe, I’d love to hear all about your cheesy adventures! Drop me a comment or tag me on social media with your delicious creations. Let’s connect over this cozy, cheesy masterpiece!
Related update: Khachapuri