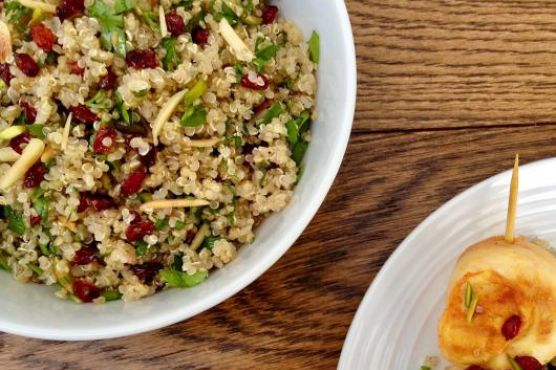
Picture this: It’s a Tuesday evening, and I’ve just emerged from a whirlwind day of meetings and errands. My energy is zapped, but my taste buds are clamoring for something a bit more exciting than my standard, last-minute pasta. I glance at my pantry, and there it is—a trusty bag of quinoa. This little grain (or seed, to be precise) is my go-to for nights like these when I want something nourishing yet packed with flavor. That’s where my Quinoa Salad with Barberries & Nuts comes into play. It’s a delightful dance of textures and tastes—fluffy quinoa, tangy barberries, and crunchy nuts, all mingling with fresh herbs. Bonus: It’s ready in a flash and makes me feel like a kitchen wizard every single time.
Jump to Recipe
What You’ll Need
Trust me, most of these ingredients are likely chilling in your pantry or fridge already. It’s the *bold* ones that make this dish pop, so don’t skip those!
- Quinoa – the base of our salad
- Water
- Salt
- Olive oil
- Barberries – these little gems add a tart kick
- Slivered almonds
- Slivered pistachios
- Coriander
- Mint
How to Make Quinoa Salad with Barberries & Nuts
- Start by rinsing the quinoa thoroughly in a sieve under cold running water. This step is crucial to remove that pesky bitterness. Drain well.
- Next, pour boiling water over the drained quinoa in a medium saucepan. Add a good pinch of salt, give it a stir, and cook over medium-low heat. You’re looking for the quinoa to be tender but with a slight bite. Drain it again using the sieve.
- While your quinoa is doing its thing, pick over the barberries, rinse them gently in a sieve, and dry them on some kitchen paper. Easy peasy.
- Now, let’s get those nuts toasted. Heat a tablespoon of olive oil in a saucepan over medium heat. Toss in the almond slivers first until they’re a light golden hue—then add the pistachios.
- With the nuts nicely toasted, add the rest of your olive oil and throw in the rinsed barberries. Cook them just until they’re shiny and looking a bit puffed up, which is when they release their tangy aroma.
- Reserve a tablespoon of the barberry and nut mixture, along with a tablespoon of the chopped coriander and mint, for our final flourish.
- Mix the remaining nut and barberry blend with the quinoa and herbs. Pop it all back into the pot and place over low heat. Cover it up and let it cook for about ten minutes until it’s steaming and thoroughly heated.
- Finally, turn your quinoa creation into a serving dish. Fluff it up with a fork, add a drizzle of olive oil, and a twist of black pepper if you’re feeling it. Sprinkle with the reserved barberry-nut mix and herbs. Serve it up either as a main or a side—your choice!
Cook’s Notes
Here’s the thing about this salad: it’s super forgiving and versatile. If you’ve never worked with barberries before, you might find them at a specialty grocery store or online. They’re worth the hunt, trust me. When it comes to leftovers, this salad holds up well for up to three days in the fridge. Just be sure to store it in an airtight container. If you’re planning to make it ahead, keep the garnish separate and mix it in just before serving to maintain that fresh, crunchy vibe.
Make It Your Own
Customizing this salad is a breeze. Here are a few ideas to get you started:
- Swap the barberries for dried cranberries or cherries if you prefer something sweeter.
- Try adding crispy tofu to make it a more filling main dish.
- Substitute the almonds and pistachios with hazelnuts and walnuts for a different nutty profile.
- If you’re into greens, throw in a handful of arugula or baby spinach for extra color and nutrients.
If you try this, I’d love to hear how it turns out—drop a comment or tag me! Let’s get cooking and make the everyday extraordinary.
Related update: Quinoa Salad with Barberries & Nuts
Related update: Brussels Sprouts with Bacon and Shallots
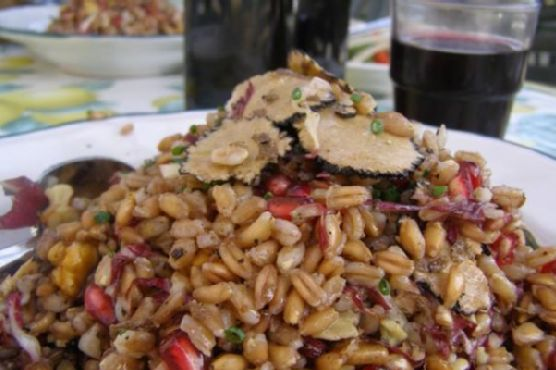
It was one of those evenings when the crisp air makes you crave something grounded yet bright—think cozy sweater vibes but on a plate. I had just returned from the farmers market, pomegranates in hand, and a desire for something different but not overly complicated. That’s how this Fall Farro Salad with Pomegranate, Walnut & Truffles was born. It’s the kind of dish that combines hearty farro with the tangy pop of pomegranate seeds, and the rich aroma of truffles—a little bit of everything deliciously fall. It’s a perfect weeknight meal that’s just as impressive for a weekend get-together, and the best part is how ridiculously easy it is to put together. I mean, we’re talking about strong flavors that do all the heavy lifting for you. Jump to Recipe
What You’ll Need
This salad’s ingredient list is refreshingly straightforward, yet it packs a punch with gourmet vibes. Chances are you already have most of these at home, except maybe the truffle mushroom, but trust me, it’s worth the small trip.
- Extra virgin olive oil
- Farro
- Parmesan (shaved into ribbons)
- Pomegranate (seeds)
- Radicchio (thinly sliced)
- Salt and pepper
- Truffle mushroom
- Vinegar
- Walnuts
How to Make Fall Farro Salad with Pomegranate, Walnut & Truffles
- Begin by rinsing the farro under cold water. In a large pot, bring plenty of cold water to a boil. Add a good pinch of salt along with the farro. If you have any vegetable scraps handy, toss them in for extra flavor. Cook until al dente, about 20-35 minutes. Taste a grain—it should be tender with a slight chew.
- While the farro cooks, prep the other ingredients. Shave the parmesan into delicate ribbons, thinly slice the radicchio, and remove the pomegranate seeds. You know you’re doing it right when your cutting board looks like a painter’s palette.
- In a small skillet, toast the walnuts over medium-low heat until they’re golden and fragrant. Keep an eye on them—they can go from toasty to burnt in a blink.
- Once the farro is ready, drain and let it cool slightly. Toss it into a big bowl with the radicchio, pomegranate seeds, walnuts, and parmesan ribbons.
- Drizzle with extra virgin olive oil, a splash of good vinegar, and season with salt and pepper. Mix gently, ensuring everything is well coated but not bruised.
- Finally, thinly slice the truffle mushroom and gently fold it into the salad. The aroma should start to bloom, lacing through the entire dish.
Cook’s Notes
Farro can be cooked ahead of time, making this salad a great option for meal prep. Just cool it completely before storing it in an airtight container in the fridge. When ready to assemble, allow it to return to room temperature for the best texture.
Watch out for overcooking the farro—it should retain some chewiness to balance the other textures of the salad. And remember, a little truffle goes a long way. You want it to complement, not overpower.
If you have leftovers, store the salad and dressing separately for up to two days to keep everything fresh and crunchy.
Make It Your Own
- Swap the truffle mushroom for a sprinkle of truffle oil if you’re in a pinch—it gives a similar aroma boost.
- Use feta cheese instead of parmesan for a tangier bite.
- Not a fan of radicchio? Substitute with baby kale or arugula.
- For a heartier version, add roasted butternut squash or sweet potato cubes.
If you give this recipe a whirl, I’d love to hear how it turned out—or any fun twists you added! Drop a comment or tag me on your food adventures. Happy cooking!
Related update: Fall Farro Salad with Pomegranate, Walnut & Truffles
Related update: Cauliflower and Broccoli Gratin With Camembert Cheese

So, picture this: It’s a Tuesday evening, and I’m standing in my kitchen feeling utterly uninspired. You know those days when you’ve got a fridge full of nothing and everything? Yeah, that was me. The weather hinted at the first signs of fall, and my lazy bones craved something cozy yet bright—something that would wrap me up like a warm blanket but not put me in a food coma. Enter this Lemon Chickpea & Tomato Stew. It’s the kind of dish that checks all the boxes: fast (you’ll have it on the table in under an hour), flavorful (hello, lemon zest), and so satisfying you’d think it took all day. Trust me, once you make it, your taste buds will thank you, and you might just find a new weeknight staple.
Jump to Recipe
What You’ll Need
This stew is a pantry hero—you probably have most of the ingredients hiding in your kitchen already.
- 2 tablespoons of olive oil
- 1 large shallot, chopped
- 3 garlic cloves, minced
- 2 cans of chickpeas, drained and rinsed
- 1 jalapeno chili, sliced
- 1 teaspoon of dried oregano
- 2 bay leaves, broken
- 1/2 teaspoon of crushed red pepper
- Salt & pepper to taste
- 4 cups of chicken broth
- Zest and juice of 1 fresh lemon
- 1 cup of dried oven tomatoes
- 2 cups of fresh spinach, loosely packed
How to Make Lemon Chickpea & Tomato Stew
- In a large saucepan, heat the olive oil over medium heat. You’ll know it’s ready when the oil starts shimmering like a mirage.
- Add the shallot and garlic, stirring them into the warm oil until they soften and become fragrant, about 5 minutes.
- Toss in the chickpeas, jalapeno, oregano, bay leaves, and crushed red pepper. Season with salt and pepper. Stir frequently, letting those chickpeas get a little crispy and golden, about 5-7 minutes. Keep an eye out—they might try to escape the pan!
- Pour in the chicken broth, lemon zest, and lemon juice. Bring everything to a happy boil, then reduce the heat and let it simmer until the broth is reduced by half, around 20 minutes.
- Stir in the oven-dried tomatoes, garlic, and spinach. Simmer for another 5 minutes, just until the spinach wilts into the stew. Goodbye, bay leaves—you’ve done your job, so remove them.
- Give it one last taste for seasoning, adjust if necessary, and serve hot with warm crusty bread to soak up every last drop.
Cook’s Notes
First things first, don’t rush the browning of your chickpeas. That’s where a lot of the flavor magic happens. If you can, make sure the broth you’re using is low-sodium so you can control the salt levels. This stew is even better the next day, so feel free to make it ahead and store it in the fridge for up to 3 days. Just reheat it gently on the stovetop. If it’s a bit too thick, splash in a little extra broth or water.
Make It Your Own
- Vegetarian version: Swap the chicken broth for vegetable broth, and you’re good to go.
- Spicy kick: Double the jalapeno if you’re feeling bold. You can also add a dash of cayenne.
- Protein boost: Stir in some cooked shredded chicken or crispy tofu just before serving.
- Herbal twist: Add fresh basil or cilantro at the end for an extra layer of flavor.
And there you have it! If you try this, I’d love to hear how it turns out—drop a comment or tag me. Enjoy your cozy bowl of goodness!
Related update: Lemon Chickpea & Tomato Stew
Related update: Enchiladas Verdes (Green Enchiladas)
Related update: Carrot and Coriander Soup
Related update: Cauliflower Chickpea Stew

Picture this: It’s a blustery Tuesday evening, and you’ve just gotten home from a day that was long enough to make watching paint dry sound thrilling. You’re craving something that’s easy enough to not require a kitchen degree, but still feels like a cozy hug in a bowl. Enter my Cavatappi pasta with salmon crab surimi. This dish is a delightful tangle of flavors that hits the sweet spot between comfort food and seafood sophistication. The pasta’s curly tubes are perfect for catching all the saucy goodness, and the combination of salmon and surimi gives you that savory, oceanic touch without the need for a second mortgage. It’s a recipe that comes together in a flash, so you can have your taste of the Mediterranean with just a little bit of kitchen magic and minimal fuss. Curious yet?
Jump to Recipe
What You’ll Need
The best part about this ingredient list is that it’s likely you’ve already got most of these at your disposal. A few pantry staples, a couple of fresh herbs, and you’re in business.
- 8 oz Cavatappi pasta
- 2 tablespoons olive oil
- 2 cloves garlic, minced
- 1 can (6 oz) salmon fillets, drained
- 4 oz surimi crab sticks, sliced
- 2 plum tomatoes, chopped
- 2 tablespoons tomato puree
- 1 tablespoon red wine
- 1 teaspoon dried basil
- 2 tablespoons fresh basil, chopped
- 2 tablespoons fresh parsley, chopped
- 1 teaspoon sugar
- Salt and pepper to taste
- Grated Parmesan cheese for serving
How to Make Cavatappi pasta with salmon crab surimi
- First, get that pasta going. Cook the Cavatappi according to the package instructions until it’s al dente. Drain it, but don’t be too hasty — reserve a bit of that starchy cooking water like the little secret weapon it is.
- In a large skillet, heat up the olive oil over medium heat. Add the minced garlic and sauté it for about a minute. Keep an eye out – you want it just fragrant, not the golden brown of regret.
- Add the canned salmon and surimi crab sticks to the pan. Stir them gently, and let them simmer together for just a couple of minutes, like a friendly neighborhood chat.
- Time for the juicy bits: toss in the chopped tomatoes, tomato puree, dried basil, and red wine. Mix everything so it all gets to know each other, and let it simmer gently. You should start seeing those edges bubble in about 2-3 minutes.
- Sprinkle in the sugar, and season with salt and pepper. Stir it all together, letting the flavors meld into a harmonious sauce.
- Now, bring the pasta back into the fold. Add the Cavatappi to your sauce, turning it through until everything is well coated. If things look a bit too thick, a spoonful of that reserved pasta water will smooth it out beautifully.
- Serve immediately, with a generous sprinkle of Parmesan cheese and a touch of fresh, chopped basil for that finishing flair.
Cook’s Notes
Don’t be tempted to rush the garlic; it can go from golden to bitter in the blink of an eye. When simmering the sauce, keep it gentle—you’re coaxing out flavors, not boiling them away. This pasta dish is best enjoyed fresh, but if you happen to have leftovers, they’ll keep well in the fridge for up to two days. Just reheat gently, adding a splash of water if needed to get the sauce back to its luscious texture.
Make It Your Own
- Want to mix up the protein? Try swapping the salmon for some succulent shrimp or even crispy tofu for a vegetarian twist.
- If you’re a spice lover, a pinch of red pepper flakes tossed in with the garlic can add a nice kick.
- No wine on hand? A splash of chicken or vegetable broth works in a pinch and still adds depth.
- For a creamier version, stir in a splash of cream or a dollop of mascarpone cheese just before serving.
So there you have it! This Cavatappi pasta with salmon crab surimi is a surefire way to elevate any evening with minimal effort. If you try this, I’d love to hear how it turns out — drop a comment or tag me! Happy cooking! 🍝
Related update: Cavatappi pasta with salmon crab surimi

Last Wednesday, I found myself staring into the depths of my fridge, contemplating a lonely eggplant and a couple of sad zucchinis. It was one of those evenings when inspiration was as low as my vegetable crisper’s contents. But then, a little spark hit me—why not whip up a colorful and cozy Vegetarian Ratatouille? It’s one of those dishes that feels like a warm hug after a long day. Plus, it’s a melody of summer veggies that’s simple to throw together, making it a perfect midweek hero. Loaded with fresh flavors, it’s hearty without being heavy, and best of all, it can transform fridge odds and ends into something spectacular. So, if you’re ready to turn that produce drawer into a work of art, keep reading. Or, if you’re raring to get started—Jump to Recipe
What You’ll Need
This ingredient list is refreshingly straightforward. Chances are you already have most of these in your kitchen. Here’s what you’ll need for this vibrant veggie medley:
- Eggplant
- Zucchini
- Yellow squash
- Tomato
- Red bell pepper
- Orange bell pepper
- Onion
- Garlic
- Fresh basil
- Thyme
- Dried oregano
- Extra virgin olive oil
- Sea salt
How to Make Vegetarian Ratatouille
- Start by heating a good glug of extra virgin olive oil in a large saucepan over medium-low heat. Toss in the diced onion and minced garlic. Stir them around until the onions are translucent and the whole kitchen smells like a dream.
- Next, add in the chopped tomatoes. Give them a gentle stir and let them mingle with the onions and garlic until the flavors start to blend together.
- Now, it’s time to add the rest of the gang. Introduce the chopped eggplant, zucchini, yellow squash, red and orange bell peppers to the party. Sprinkle in some sea salt, a few sprigs of thyme, and a pinch of dried oregano.
- Lower the heat and let everything simmer gently for about 30 minutes. Stir occasionally, keeping an eye on the eggplant. You’ll know it’s done when it’s tender and the edges of the vegetables are starting to caramelize a bit.
- Before serving, toss in some freshly torn basil leaves for a burst of freshness. Give everything one last stir and get ready to dig in!
Cook’s Notes
Here’s the deal: Ratatouille is incredibly forgiving. If you have extra veggies on hand, like mushrooms or carrots, feel free to toss them in. Just keep an eye on the cooking time; firmer veggies might need a bit more time to tenderize.
- Worried about mushy vegetables? Make sure your heat is low enough to allow them to cook slowly and evenly.
- This dish can easily be made ahead of time. Store it in an airtight container in the fridge for up to three days. The flavors only deepen as it sits, making it an excellent leftover choice.
- If you’re serving this to guests, you can prepare it in advance and simply reheat gently on the stove before serving.
Make It Your Own
- For a protein boost, add in some chickpeas or white beans during the last 10 minutes of cooking.
- Swap the fresh basil for a handful of chopped parsley if that’s what you have on hand.
- Spice things up with a pinch of red pepper flakes for some heat.
- Transform it into a heartier meal by serving it over a bed of fluffy quinoa or couscous.
If you try this, I’d love to hear how it turns out — drop a comment or tag me! Your feedback means the world to me and keeps the inspiration flowing.
Related update: Vegetarian Ratatouille
Related update: Wildwood Ovens Bourbon Apple Glazed Cedar Plank Salmon

It was one of those chilly Tuesday evenings when the sun decided to call it quits early, and the only way to combat the creeping cold was with something warm and comforting. As I rummaged through my pantry, I stumbled upon a bag of carrots that had been waiting patiently for their turn to shine. It struck me right then — Moroccan Carrot Soup! A bowlful of this would feel like a cozy hug, yet it’s surprisingly easy to whip up on a weeknight when you’re not in the mood for fussing over a stove. This soup is perfect for those nights when you want something hearty but can’t be bothered with a long list of ingredients or complicated steps. Stick with me here, and you’ll be ladling this aromatic beauty in no time.
Jump to Recipe
What You’ll Need
Chances are, you already have most of this. It’s all about letting just a few ingredients shine.
- 2 tablespoons of butter
- 1 yellow onion, chopped
- 6 cups of carrots, peeled and chopped
- 4 cups of low sodium chicken stock
- 1 tablespoon of cumin seeds
- 1 tablespoon of honey
- 1 tablespoon of fresh lemon juice
- 1/4 teaspoon of allspice
- Salt and pepper to taste
- 1/2 cup of sour plain yogurt
How to Make Moroccan Carrot Soup
- In a large saucepan, melt the butter over medium-high heat. Once it’s bubbly and aromatic, toss in the chopped onion. Sauté for about 2 minutes until the onion starts turning translucent and your kitchen smells heavenly.
- Add the carrots and pour in the chicken stock. Bring this orange-hued mixture to a boil. Then, reduce the heat to low, cover the pot, and let it simmer. In about 20 minutes, the carrots should be tender enough to yield to a fork.
- Meanwhile, grab a small skillet and toast the cumin seeds over medium-high heat. Keep an eye on them, stirring occasionally, until they are golden and releasing their nutty aroma — about 4 to 5 minutes.
- Once toasted, finely grind the cumin seeds in a spice mill or with a mortar and pestle. The fresh grind makes a world of difference, trust me!
- Remove the soup from the heat. Carefully, in batches, purée it in a blender until it’s silky smooth. Return the blended soup to the saucepan.
- Whisk in the honey, lemon juice, and allspice, stirring until everything is well combined. Give it a taste and season with salt and pepper to your liking.
- To serve, ladle the soup into bowls. You can either sprinkle the ground cumin on top or, for an extra creamy finish, mix the cumin with sour cream and dollop that goodness right in the center of the soup. Enjoy!
Cook’s Notes
Let’s talk storage first: This soup keeps like a champ. Store it in an airtight container in the fridge, and you’ve got a delicious lunch or dinner for up to 4 days. If you’re meal prepping or just want to savor the flavors later, it freezes beautifully for up to 3 months. Just thaw and reheat gently on the stove.
Avoid the temptation to add the honey and lemon while it’s still boiling — you don’t want to lose those delicate flavors. And when blending the hot soup, please be cautious; do not overfill the blender as the steam can cause it to splatter. Patience is key here!
Make It Your Own
- Spice it up: Add a pinch of cayenne pepper or a swirl of harissa for a bit of heat.
- Veggie twist: Swap half of the carrots for sweet potatoes. It gives the soup an even richer texture.
- Herbaceous hit: Stir in some fresh chopped cilantro or mint just before serving for a fresh burst of flavor.
- Vegan swap: Use coconut oil instead of butter and vegetable broth in place of chicken stock. Skip the yogurt or use a plant-based alternative.
If you try this, I’d love to hear how it turns out — drop a comment or tag me! Happy cooking, and may your kitchen be filled with the warmth of this delightful Moroccan Carrot Soup.
Related update: Moroccan Carrot Soup
Related update: Spicy Lemongrass Soup

There I was, standing in my tiny kitchen on a Tuesday afternoon, staring at a leg of lamb I’d ambitiously bought during my last grocery run. It was one of those moments where you think, “What have I gotten myself into?” But then inspiration hit me like a delicious lightning bolt: Yogurt Marinated Lamb Skewers. It’s one of those recipes that sounds fancy enough to impress a dinner guest but is secretly simple enough for a weeknight. The magic is all in the marinade, full of spices that soak into the lamb, turning it tender and flavorful. So if you’re looking to impress someone (or just yourself), keep reading.
Jump to Recipe
What You’ll Need
I’m willing to bet you’ve already got most of this stuff hanging out in your pantry. The marinade is what truly makes this dish shine, infusing the lamb with a fragrant mix of spices and creamy yogurt.
- Vegetable oil
- Cumin
- Leg of lamb
- Nutmeg
- Paprika
- Plain yogurt
- Salt
- Turmeric
How to Make Yogurt Marinated Lamb Skewers
- Start by boning the leg of lamb, if it isn’t already done, and cut it into 1-inch cubes. This size is perfect for skewers and ensures even cooking.
- In a large bowl, combine the vegetable oil, cumin, nutmeg, paprika, plain yogurt, salt, and turmeric. Mix until everything is nicely blended and the mixture is aromatic.
- Add the lamb cubes to the marinade. Toss them until they’re well-coated. Cover the bowl and pop it into the refrigerator overnight. This is where the magic happens, as the lamb soaks up all those wonderful flavors.
- The next day, thread the marinated lamb cubes onto skewers. If you’re using wooden skewers, don’t forget to soak them in water for at least 30 minutes to prevent burning.
- Grill the skewers over charcoal, which gives them that beautiful smoky flavor. Cook them for about 7 minutes on each side, until they’re a rich, golden-brown and fragrant.
Cook’s Notes
So, here’s the thing: patience is key! Letting the lamb marinate overnight is what makes it so tender and flavorful. If you’re in a rush, a few hours will do, but try not to skimp on marinating time. As for grilling, charcoal gives the best flavor, but a grill pan on the stovetop works in a pinch. Once cooked, these skewers are best enjoyed fresh, but any leftovers can be stored in an airtight container in the fridge for up to three days. Reheat them gently to avoid drying out the meat.
Make It Your Own
Want to put your own spin on these skewers? Here are some ideas:
- Swap out the lamb for chicken thighs if you’re looking for a more budget-friendly option.
- Add a little lemon juice to the marinade for a citrusy kick that pairs beautifully with the spices.
- Try tossing in some fresh herbs like mint or cilantro at the end for a fresh pop of flavor.
- For a vegetarian twist, use crispy tofu instead of lamb, letting it marinate just as you would the meat.
If you give these Yogurt Marinated Lamb Skewers a go, I’d love to hear how they turned out for you. Drop a comment or tag me on social media. Let’s make deliciousness together!
Related update: Yogurt Marinated Lamb Skewers
Related update: Knockwurst with sauerkraut

It was one of those weeks where everything felt like a mad dash. The kind where your to-do list is longer than your patience, and the only thing you’re craving is something that feels like a warm hug on a plate. Enter: Moroccan Spiced Chicken Under A Brick. It sounds fancy, right? But trust me, it’s deceptively simple and perfect for when you want to impress without the stress. Plus, there’s something deeply satisfying about the way the flavors meld together, transporting you somewhere far more exotic than your messy kitchen. This dish is all about that crispy skin and bold, aromatic spices. You’ll see why it’s become a favorite weeknight escape for me.
Jump to Recipe
What You’ll Need
Let’s talk about the ingredient list. It’s one of those recipes where you’re likely to have most items already. And the ones you don’t? Well, they’re worth the trip to the store because they pack a punch.
- Whole chicken
- 3-4 garlic cloves
- Fresh cilantro leaves
- Sea salt
- Lemon zest
- Saffron threads
- Olive oil
- Paprika
- Ground cumin
- Black pepper
- Cayenne (if you like a little heat)
How to Make Moroccan Spiced Chicken Under A Brick
- First, grab your mortar and pestle. Combine the garlic, a handful of cilantro leaves, one teaspoon of salt, lemon zest, and a pinch of saffron. Smash it all into a fragrant paste. It should smell like a garden in full bloom.
- Stir in about 3 tablespoons of olive oil until everything is beautifully combined. This is your flavor-packed paste of dreams.
- Take your chicken and rub it all over with the paste. Don’t be shy — get it everywhere, even between the skin and breast meat. This is where the magic happens.
- Place the chicken on a tray or platter, skin side up, and cover it loosely with plastic wrap. Refrigerate for at least 2 hours. If you’ve got the time, let it go up to 6 hours. This step lets the flavors really sink in.
- About 30 minutes before you’re ready to roast, take the chicken out of the fridge. Let it come to room temperature; this helps it cook evenly.
- Preheat your oven to 450°F (230°C). While it heats, place a heavy pan (like cast iron) on top of the chicken to press it down. This is the “brick” part — it ensures that golden crispy skin you’re after.
- Roast the chicken for about 35-45 minutes. You’ll know it’s done when the skin is a deep, enticing golden brown, and the kitchen smells like you’ve been transported to the heart of a Moroccan spice market.
Cook’s Notes
Let’s keep it real: the saffron might be a splurge, but it’s worth it for that unique, earthy aroma. If you don’t have a mortar and pestle, a small food processor will do in a pinch. Just don’t overblend — we want a paste, not a smoothie! Store any leftovers in an airtight container in the fridge for up to 3 days. Reheat gently in the oven to keep that skin crisp. Pro tip: You can make the paste the day before, which is a real time-saver on a busy day.
Make It Your Own
- Swap the chicken for crispy tofu for a vegetarian take. Just press the tofu to remove excess water before marinating.
- Out of cilantro? Try parsley or even mint for a different herbaceous twist.
- If saffron’s not your thing, a pinch of turmeric will give you that lovely color and an earthy flavor.
- Want more heat? Double up on the cayenne or add a bit of smoked paprika for a smoky kick.
If you try this, I’d love to hear how it turns out — drop a comment or tag me! Cooking is all about sharing and experimenting, so let me know how you make this dish your own. Enjoy every bite!
Related update: Moroccan Spiced Chicken Under A Brick
Related update: Beef, Poblano & Cheese Tamales

Picture this: it’s a lazy Sunday afternoon, and I’m in my kitchen staring down a couple of eggplants that have been lounging in my crisper drawer for a bit too long. It’s one of those days where I desperately want something crispy and satisfying, but without the guilt that comes with a giant bowl of fries. Enter: Eggplant Fries with Tzatziki Sauce. These little guys are a revelation—they’re crunchy, flavorful, and come with a cool, tangy dipping sauce that just hits the spot. The best part? They’re baked, not fried, so you get all the crunch with none of the extra oil. They’re also perfect for when you’re hosting friends and need an appetizer that’s impressively delicious yet deceptively simple to make. Seriously, your friends will be raving about these.
Jump to Recipe
What You’ll Need
What’s great about this recipe is that it’s likely you already have most of these ingredients lounging in your pantry. The secret is in the mix of spices and the creamy yogurt that coats the eggplant before it bakes to crispy perfection. Here’s the crew you’ll need:
- Eggplants – the star of the show!
- Italian seasoning mix – for that herby kick.
- Bread crumbs – to give our fries that crispy crunch.
- Low fat plain yogurt – adds creaminess and tang.
- Egg – helps bind everything together.
How to Make Eggplant Fries with Tzatziki Sauce
- Preheat your oven to 450°F. This is key for achieving that glorious crunchy exterior on the fries. Trust me, a hot oven is your best friend here.
- Mix together a pinch of salt, garlic powder, Italian seasonings, and a dash of paprika in a bowl. This mixture will become your flavor-packed coating.
- In another bowl, whisk together the yogurt and egg until you have a smooth mixture. This will act as the glue to hold those delicious breadcrumbs.
- Slice your eggplants into strips—think classic fry shape. Dunk each strip into the yogurt and egg mix, allowing any excess to drip off.
- Roll the coated eggplant strips in the breadcrumb mix, making sure each piece is covered well. This is what’s going to give you that irresistible crunch.
- Place the breaded eggplant strips onto a parchment-lined or greased baking pan, making sure they have some breathing room. You want them to bake, not steam.
- Pop them into the oven and bake for about 10-15 minutes, rotating once halfway through. They’re done when they’re slightly brown and smell absolutely divine.
Cook’s Notes
- Don’t overcrowd your baking sheet. The eggplant needs space to crisp up, so if you’re making a big batch, use two sheets or bake in batches.
- If you find your eggplant fries aren’t browning as much as you’d like, you can pop them under the broiler for a minute or two—just keep a close eye to prevent burning.
- These fries are best enjoyed fresh out of the oven, but if you have leftovers, they can be stored in an airtight container in the fridge for up to two days. To reheat, just pop them back into the oven at 400°F for a few minutes.
Make It Your Own
- Want to go gluten-free? Swap out the bread crumbs for a gluten-free variety, or try crushed cornflakes for an extra crunch.
- For a spicy twist, add a teaspoon of cayenne pepper to the breadcrumb mix. It’ll give your fries a nice kick.
- If you’re out of Italian seasoning, get creative with what you have on hand—oregano, thyme, or even a hint of rosemary can work wonders.
- No yogurt? No problem. Buttermilk or a splash of milk with a squeeze of lemon can substitute in a pinch.
If you try this, I’d love to hear how it turns out—drop a comment or tag me! Your kitchen adventures always make my day. Happy cooking, friends!
Related update: Eggplant Fries with Tzatziki Sauce
Related update: Breaded Shrimp and Spicy Mayo Appetizer
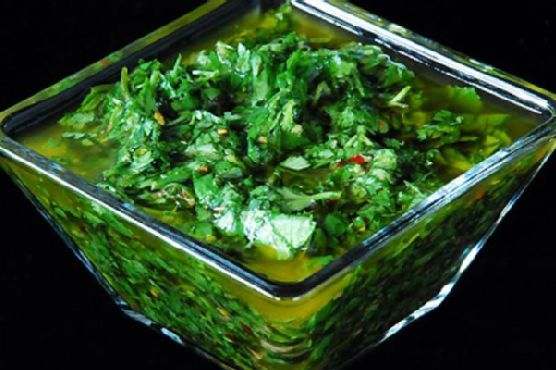
It was one of those evenings when the fridge light flickers on to reveal a collection of *almosts* — almost enough of this, almost enough of that. As I stood there contemplating the remnants of the weekend’s cooking adventures, the memory of a tangy, herby sauce came to mind, something quick yet transformative: Chimichurri. Perfect for those nights when you crave something more than just a meal — a bright, green punch of flavor to enliven whatever protein you can scrounge up. Plus, it’s one of those recipes that’s practically foolproof and endlessly adaptable. Trust me, your taste buds will thank you, and your fridge’s odds and ends might just disappear in the best way.
Jump to Recipe
What You’ll Need
I love this ingredient list because chances are, you already have most of these lying around! Here’s what you’ll need to whip up some magic:
- Parsley – the base of our green goodness
- Cilantro – for that citrusy zing
- Garlic cloves – because what’s a sauce without garlic?
- Red wine vinegar – sharp and tangy
- Olive oil – rich and smooth
- Salt – to balance and enhance
- Black fresh ground pepper – for a touch of warmth
- Red pepper flakes – a hint of heat
- Capers – optional, but they add a lovely brininess
How to Make Chimichurri
- Chop the parsley and cilantro until they’re finely minced, releasing a vibrant, fresh aroma. Toss them into a medium mixing bowl.
- Mince the garlic cloves and add them to the bowl, stirring until these aromatic delights are evenly distributed among the greenery.
- Pour in the red wine vinegar, then sprinkle in the salt, black pepper, and red pepper flakes. Stir gently, letting the fragrance of the vinegar meld with the herbs.
- Slowly drizzle in the olive oil, stirring as you go, until everything is well-coated and glistening. The mixture should be thick, not soupy, holding together beautifully.
- Let the chimichurri sit for about 30 minutes. As it rests, the flavors will meld together, creating that punchy, tangy blend that’s oh-so-addictive.
Cook’s Notes
Chimichurri is all about balance and personal preference. If you find the sauce too tangy, add a bit more olive oil. Too mild? A pinch more salt might do the trick. I like to make it ahead of time and let it sit in the fridge overnight — the flavors just seem to get better. Store any leftovers in a tightly sealed jar in the refrigerator; it should stay fresh for about a week. Just give it a good stir before using it again. And remember, this isn’t just a sauce for meats; drizzle it over roasted veggies or even mix it into your scrambled eggs for a herby twist.
Make It Your Own
- Swap the cilantro for fresh mint for a refreshing spin that’s perfect over lamb.
- Add a teaspoon of lemon zest for a citrusy burst that pairs beautifully with grilled fish.
- Incorporate some finely chopped shallots for a subtle sweetness and depth.
- Replace red wine vinegar with apple cider vinegar for a slightly sweeter, fruitier undertone.
If you try this, I’d love to hear how it turns out — drop a comment or tag me in your photos! Let’s see those creative tweaks and the delicious results. Happy saucing!
Related update: Chimichurri
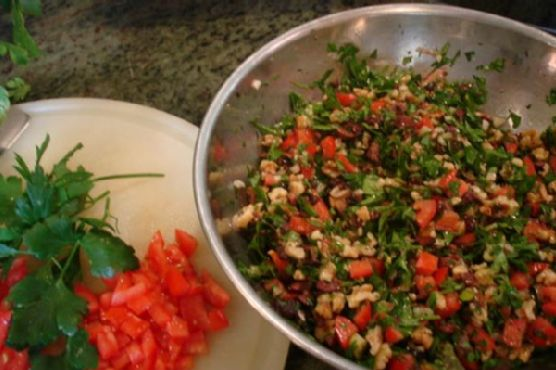
Oh, let me tell you about last Thursday. I was knee-deep in emails, the dog barking at god-knows-what, and all I could think about was how much I didn’t want to spend hours in the kitchen. You know those days, right? So, I opened the fridge and saw a half-empty bunch of parsley and some lonely tomatoes — the lightbulb went off. Middle Eastern Chopped Salad. Crisp, refreshing, and quick to throw together, it’s the perfect escape from the chaos. With the zesty lemon and a hint of cumin, this salad is a breath of fresh air on a hectic day. Ideal for those nights when you want something nourishing but can’t be bothered with a long recipe.
Jump to Recipe
What You’ll Need
The beauty of this salad is how simple and versatile it is. You might have most of these in your kitchen already:
- Walnuts – for a lovely crunch.
- Italian parsley – the star of the show, make sure it’s fresh!
- Niçoise olives – bring a briny depth.
- Scallion – adds a mild onion flavor.
- Tomato – adds juiciness and color.
- Extra virgin olive oil – for that luscious texture.
- Fresh squeezed lemon juice – a must for that zesty punch.
- Cumin powder – just a touch for warmth.
- Red chili flake – for a subtle kick.
- Black kosher salt and coarsely ground pepper – to taste.
How to Make Middle Eastern Chopped Salad
- Preheat your oven to 325°F and place the walnuts on a baking sheet. Toast them for about 10 minutes until you catch that delicious nutty aroma wafting through your kitchen. Let them cool completely before chopping.
- While the nuts are cooling, prep your parsley. Remove the stems and finely mince the leaves. If you’re using a food processor, pulse gently — we want fluffy, not mushy.
- Chop the niçoise olives, cooled walnuts, and scallions into a rough dice. This isn’t about perfection, it’s rustic and charming with its rough edges.
- Dice your tomatoes and give them a quick drain to avoid a watery salad. No soggy salads here!
- In a large wooden bowl (or any roomy bowl you’ve got), combine all your chopped ingredients. The colors should already be making you smile.
- Drizzle in olive oil and fresh lemon juice, then sprinkle with cumin and red chili flakes. Give it a gentle toss until everything’s coated and shiny.
- Finally, season to your liking with kosher salt and black pepper. Taste and adjust — don’t be shy!
Cook’s Notes
Okay, a few things I’ve learned making this salad a million times. First, don’t skip toasting the walnuts. It deepens their flavor and adds that wow factor. The parsley is the foundation, so fresh and finely minced is key. And, if you find your salad is a bit too lemony, balance it with a tad more olive oil. Leftovers? They hold up well for a day but are best fresh. If making ahead, keep the dressing and chopped ingredients separate until just before serving to keep it crisp.
Make It Your Own
Here’s where the fun begins. This salad is a canvas waiting for your personal touch:
- Swap the walnuts for almonds or pistachios for a different nutty vibe.
- If you’re not into olives, try diced cucumbers for a fresh crunch.
- Replace red chili flakes with smoked paprika for a smoky warmth.
- Add a sprinkle of feta cheese for a creamy, tangy finish.
So there you have it, a delightful salad that’s both a sidekick and a star on its own. If you try this, I’d love to hear how it turns out — drop a comment or tag me! Enjoy the little escape this salad offers, even if life’s a bit chaotic.
Related update: Middle Eastern Chopped Salad

Imagine this: it’s midweek, and your brain is fried from a day full of emails and Zoom calls. You open the fridge, and there it is, an avocado teetering on the edge of overripeness and a couple of oranges sitting pretty but untouched. Suddenly, inspiration strikes—why not combine these beauties into a refreshing salad that screams “spring” without actually requiring a season change? This Avocado and Orange Salad, dressed with a zingy Orange-Ginger Dressing, is like a mini-vacation for your taste buds. It’s quick, colorful, and destined to make you fall in love with simple ingredients all over again. Jump to Recipe
What You’ll Need
The beauty of this ingredient list is how effortlessly it combines pantry staples with fresh produce to create something magical.
- Avocados – Perfectly ripe.
- Oranges – Sweet and juicy.
- Green onions – For a hint of sharpness.
- Orange juice – Freshly squeezed, for that extra punch.
- Lemon (juice) – To add a bit of zing.
- Fresh ginger paste – Trust me, it’s worth it.
- Agave syrup – For a touch of sweetness.
- Olive oil – Smooth and lush.
- Salt and pepper – To taste.
How to Make Avocado and Orange Salad With Orange-Ginger Dressing
- Begin by slicing your avocados and oranges. Let them overlap on a platter as if they’re chatting at a party.
- Don’t waste that orange carcass! Squeeze its juice over your arranged slices, letting it mingle and soften the edges of the avocado.
- Sprinkle green onions artfully over the top, like confetti, and add a pinch of salt to awaken those flavors.
- Cover the platter with cling film, tucking it into the fridge, so the salad chills out while you prepare the dressing.
- In a blender, combine orange juice, lemon juice, fresh ginger paste, agave syrup, and olive oil. Blend until the mixture is smooth and the ginger’s aroma wafts up deliciously.
- Season the dressing with salt and pepper, tasting it to find your perfect balance of sweet, spicy, and tangy.
- Just before serving, unveil your masterpiece from the fridge and drizzle the dressing generously over the salad.
Cook’s Notes
Here’s the lowdown on making this salad work like a charm:
- Make sure your avocados are ripe but firm enough to hold their shape when sliced.
- If you’re making this ahead, keep the dressing separate until just before serving to prevent the avocados from getting too mushy.
- Leftovers? Unlikely. But if you do have some, store them in an airtight container and consume within a day for best results.
- Be cautious with the salt. Remember, you can always add more, but you can’t take it out!
Make It Your Own
This salad is versatile enough to play with, so go ahead and shake things up:
- Swap the oranges for grapefruit slices if you’re after a slightly more tart flavor.
- Add some toasted almonds or walnuts for a crunchy contrast.
- For a spicy kick, sprinkle in some red pepper flakes to the dressing.
- Try a honey drizzle in place of agave if that’s more your style.
If you try this, I’d love to hear how it turns out—drop a comment or tag me! There’s nothing better than seeing your creations light up someone else’s table. Happy cooking!
Related update: Gluten Free Dairy Free Sugar Free Chinese Chicken Salad
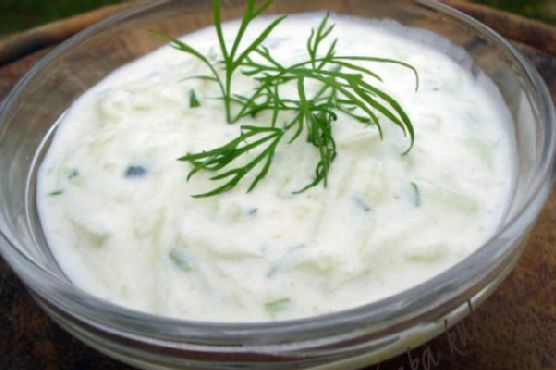
Oh, the joys of summer! Last week, I found myself standing in the kitchen, windows wide open, a warm breeze sneaking in with the scent of freshly cut grass. It was the kind of day that begged for something cool, creamy, and refreshing. That’s when it hit me—I needed tzadziki in my life, like, immediately. This is the kind of dish that doesn’t just fill your belly; it feels like a mini-vacation to the Mediterranean. It’s quick and straightforward but has that “made from scratch” vibe that’ll make you feel like a kitchen wizard. Seriously, if you’re looking for something to dollop on just about anything, tzadziki is your go-to. Jump to Recipe
What You’ll Need
You might already have most of these on hand, especially if you’re a fan of Greek cooking. Here’s what you’ll need:
- Cucumbers – The crunchy base of our dip.
- Sea salt – To draw out that extra moisture from the cuke.
- Yogurt – The creamy heart of the tzadziki.
- Sour cream – Adds a little tang and extra creaminess.
- Olive oil – Just a drizzle for richness.
- Vinegar – A splash to brighten up the flavors.
- Garlic – Because what’s tzadziki without garlic?
- White pepper – For a subtle heat that doesn’t overpower.
- Fresh dried dill – The herb that ties it all together.
How to Make Tzadziki
- Start by lightly salting the cucumbers. This isn’t just seasoning; it’ll help draw out the water. Let them sit for about 5 minutes.
- Once they’ve had a good cry, take small handfuls of the cucumbers and squeeze out as much water as you can. You’ll be surprised how much comes out!
- In a bowl, mix the yogurt, sour cream, olive oil, vinegar, garlic, and white pepper. You’re looking for a smooth, creamy blend here.
- Add the drained cucumbers and dill to your creamy mixture. Give it a good stir until everything’s well combined.
- Taste and adjust the seasoning. It might need a pinch more salt or a dash of vinegar to suit your taste.
- Chill the tzadziki in the fridge for at least two hours. This is where the magic happens as the flavors meld together.
Cook’s Notes
Ah, the art of tzadziki making! It’s all about getting those cucumbers nice and dry, so don’t skimp on the squeezing. Trust me, the less water, the creamier your dip. And while you’re at it, make sure you let it chill long enough. The flavors need time to develop, and patience is key here. Planning ahead? Make it the day before your gathering, and it’ll be even better! Store any leftovers in an airtight container in the fridge, and they’ll last a good three days. Just give it a stir before serving because the water might separate a bit.
Make It Your Own
- Spicy Kick – Add a pinch of cayenne pepper for a hint of heat.
- Herb Swaps – Try mint or parsley instead of dill for a different herbal note.
- Extra Creamy – Use full-fat Greek yogurt for an even richer texture.
- Vegan Twist – Swap the yogurt and sour cream for coconut yogurt to make it vegan-friendly.
If you give this a whirl, I’d absolutely love to hear how it turns out for you. Drop a comment or tag me in your creations. Happy dipping!
Related update: Tzadziki

Picture this: It’s a Wednesday evening, and I’m staring at a couple of eggplants sitting forlornly in my fridge. They’re giving me that “use us before we wilt away” look. I had originally bought them with grand plans of making something elaborate, but let’s be real, life happened, and here we are. So, in the spirit of keeping things simple yet utterly delicious, I decided to whip up my go-to Mediterranean eggplants. This dish is like a warm hug—comforting yet bright, with the kind of flavors that make you feel like you’ve just dined at a cozy little seaside café. Plus, it’s a one-pan wonder that’ll save you from a pile of dish-nightmares.
Jump to Recipe
What You’ll Need
Chances are you already have most of this lying around, which is perfect because who wants to make a grocery run for a weeknight meal?
- Eggplants – the stars of the show, make sure they’re fresh and firm.
- Fresh sausage without the casing – it adds savoriness and richness.
- Almonds – for that unexpected crunch.
- Egg – to bring everything together.
- Feta cheese – for that tangy creaminess we all love.
- Mozzarella cheese – because melted cheese is life.
- Pepper – freshly ground, of course.
- Bread crumbs – gets all crispy and delightful on top.
- Olive oil – don’t skimp on this, it’s the liquid gold that makes everything better.
- Fresh dill – for a pop of freshness to finish.
How to Make Mediterranean Eggplants
- Start by washing the eggplants thoroughly. Cut off the stems and slice them in half lengthwise. You’ll want to scoop out the middle, leaving about a half-inch shell. It’s like carving a little canoe for all the tasty fillings.
- In a mixing bowl, combine the sausage meat, egg, feta cheese, mozzarella, almonds, and a few cracks of pepper. Use your hands to mix it all up until everything is just combined. It should smell irresistible already.
- With a spoon, generously stuff this mixture into your eggplant halves. Don’t worry about being too precise; rustic is charming, right?
- Sprinkle each stuffed eggplant with breadcrumbs, about a tablespoon each, then drizzle with olive oil. This will give your eggplants a delectable golden crust.
- Place them all on a baking sheet lined with parchment paper. Bake in a preheated oven at 230°C (that’s about 450°F) for 25 minutes. You’re looking for bubbling cheese, golden tops, and the edges of the eggplant to be slightly charred.
- Serve hot, sprinkled with fresh, chopped dill, or if you’ve got some chives or basil hanging out, they’ll work beautifully too.
Cook’s Notes
A couple of things to keep in mind: When scooping out the eggplant, don’t take too much flesh out, or else you’ll end up with a floppy mess. If you scoop out a bit of extra flesh, you can mix it into the sausage filling for zero waste. These eggplants are best eaten fresh out of the oven, but if you’ve got leftovers, store them in an airtight container in the fridge. They’ll keep for about 2-3 days, and you can reheat them in the oven or a skillet to keep that delightful crispiness intact.
Make It Your Own
- Swap the sausage for crispy tofu if you’re going the vegetarian route. Just crumble and sauté it with some smoked paprika for extra flavor.
- Switch out the almonds for walnuts if that’s what you have on hand. They add a lovely depth of flavor.
- If you’re out of feta, try using goat cheese for a similarly tangy kick.
- No dill? No worries! Parsley or cilantro can step in as a fresh finisher.
If you try this, I’d love to hear how it turns out — drop a comment or tag me! Happy cooking, and may your eggplants never languish in the fridge again. 🌿
Related update: Mediterranean eggplants
Related update: How Sweet It Is Sweet Potato Lasagne

I found myself in the kitchen on one of those unexpectedly chilly evenings, the kind that sneaks up on you after a week of golden autumn days. As I rummaged through the pantry, I came across a can of cannellini beans tucked away behind the lentils – a forgotten gem in my usual dinner rotation. The scene was set: I had a craving for something warm and comforting, yet light enough not to tip into winter stews. A quick glance in the fridge revealed a bulb of fennel and a red onion that had been waiting patiently for their moment to shine. In no time, I whipped up this Cannellini Bean Side Dish with Fennel, Red Onion, and Saffron. It’s a dish that’s as fragrant as it is colorful, and blissfully easy to pull together. It’s perfect for a weeknight, yet elegant enough to grace a dinner party table.
Jump to Recipe
What You’ll Need
The magic of this dish is that it leans heavily on pantry staples, with just a few fresh ingredients to elevate the flavors. Chances are you already have most of this on hand!
- Cannellini beans – cooked and ready to go
- Extra virgin olive oil – for a rich, flavorful base
- Fennel – adds a lovely anise flavor
- Flat parsley – for a fresh, herby finish
- Red onion – brings sweetness and color
- Saffron threads – a pinch of luxury
- Black salt and pepper – to season
- Vegetable broth – to adjust consistency
- Water – for soaking the saffron
How to Make Cannellini Bean Side Dish With Fennel, Red Onion, and Saffron
- Start by combining the saffron threads with a few tablespoons of boiling water in a small, heat-proof bowl or measuring cup. Let this steep for about 5 minutes. You’ll notice the water turning a lovely golden hue.
- In a large nonstick skillet, heat the extra virgin olive oil over medium heat. Toss in the fennel and red onion, and cook them, stirring occasionally, until they’re tender and the kitchen smells like heaven – about 5 minutes.
- Add the cannellini beans and the saffron water to the skillet. Stir everything together until the beans are coated with that gorgeous saffron color.
- Season to taste with black salt and freshly cracked pepper. If the mixture starts to look a bit dry, splash in some vegetable broth or the liquid from the beans until you achieve the consistency you like.
- Finish by sprinkling freshly chopped flat parsley or fennel fronds over the top. Serve immediately while it’s still gloriously warm.
Cook’s Notes
This dish is forgiving and flexible, which is part of its charm. If you don’t have saffron, don’t panic – just add a pinch of turmeric for a hint of color. Store any leftovers in an airtight container in the fridge for up to three days. To reheat, simply add a splash of broth or water to loosen everything back up. This dish is also perfect for making ahead; the flavors deepen as they sit, so it tastes even better the next day.
Make It Your Own
Here are a few ways to switch things up and make this dish your own:
- Swap the cannellini beans for chickpeas or butter beans for a different texture.
- Replace the fennel with celery if you prefer a milder flavor.
- For a protein boost, add crispy tofu cubes or cooked shredded chicken towards the end of cooking.
- Sprinkle some crumbled feta or goat cheese on top for a creamy finish.
If you try this, I’d love to hear how it turns out — drop a comment or tag me! There’s nothing better than seeing a little corner of my kitchen magic make its way into another home. Enjoy!
Related update: Cannellini Bean Side Dish With Fennel, Red Onion, and Saffron

I remember that evening vividly. It was a Wednesday, and the kind of humid that makes your hair curl up at the edges. I was standing in my kitchen, staring at the half-empty fridge, and wondering what on earth I could throw together without making a trip to the grocery store. That’s when I spotted the zucchini and eggplant I’d been meaning to use. The idea clicked like a lightbulb switching on—vegetarian ratatouille! It’s the kind of dish that feels like a warm hug at the end of a long day: rustic, hearty, and packed with seasonal veggies. Plus, it’s surprisingly simple, with most ingredients already hanging out in the pantry or crisper drawer. Let’s dive in!
Jump to Recipe
What You’ll Need
This recipe is blessedly straightforward. Chances are, you already have most of these in your kitchen. Here’s what you’ll gather:
- 1 eggplant, diced
- 2 zucchinis, sliced
- 1 yellow squash, sliced
- 3 large tomatoes, chopped
- 1 red bell pepper, diced
- 1 orange bell pepper, diced
- 1 onion, finely chopped
- 3 cloves of garlic, minced
- A handful of fresh basil leaves, torn
- 1 tsp thyme
- 1 tsp dried oregano
- 2 tbsp extra virgin olive oil
- Sea salt, to taste
How to Make Vegetarian Ratatouille
- Heat the extra virgin olive oil in a large saucepan over medium-low heat. Toss in the chopped onion and minced garlic. Sauté until the onions turn translucent and the garlic is fragrant, about 5 minutes.
- Add the chopped tomatoes to the pan and give it a good stir, letting them meld with the onion and garlic for about 2 minutes.
- Add the diced eggplant, zucchini, yellow squash, and both bell peppers to the pan. Stir everything together and lower the heat to low.
- Sprinkle in the thyme, dried oregano, and sea salt. Stir to coat all the veggies in the herby goodness.
- Cover the saucepan and let it all simmer for about 30 minutes, stirring occasionally. You’ll know it’s ready when the eggplant is tender and the flavors have melded beautifully.
- Finish it off with those fresh torn basil leaves right before serving, for a burst of fresh flavor.
Cook’s Notes
Here’s the thing about ratatouille — it’s a forgiving dish. You can let it simmer a bit longer if you prefer your veggies softer, just keep an eye on the moisture level. If it starts to dry out, add a splash of water or stock. Store any leftovers in an airtight container in the fridge, and they’ll be even more flavorful the next day. Just reheat on the stove over low heat or enjoy it cold as a salad topping — it’s surprisingly versatile. If you’re planning ahead, you can chop the veggies the night before and store them in the fridge, so you just have to toss them in the pan when you’re ready.
Make It Your Own
Feeling adventurous or just need a change? Here are a few ways to mix things up:
- Add some heat: Throw in a pinch of red pepper flakes when adding the spices for a little kick.
- Protein punch: Toss in a can of drained chickpeas with the tomatoes for extra protein and heartiness.
- Herb swap: If you’re out of fresh basil, a touch of fresh parsley or even cilantro can give it a unique twist.
- Cheesy finish: Sprinkle some crumbled feta or grated Parmesan on top when serving for a tangy finish.
If you try this, I’d love to hear how it turns out — drop a comment or tag me! Whether you stick to the basics or put your own spin on it, I hope this ratatouille brings a little warmth and simplicity to your table. Enjoy!
Related update: Vegetarian Ratatouille
Related update: Fall Fruit Compote

Picture this: It’s midweek, I’ve worked the whole day, and the fridge is looking thin. I peek inside to find some fish fillets, a lonely bell pepper, and a crumbling block of feta cheese. The usual dinner panic begins to set in, but then I remember this Greek-Style Baked Fish recipe. It’s my go-to for those days when I want something fresh and flavorful without the fuss. The beauty of this dish is that it’s both light and deeply satisfying, perfect for when you want a bit of sunshine on your plate, no matter the season. Plus, it comes together faster than you can say “Saganaki!”.
Jump to Recipe
What You’ll Need
This recipe shines with its simplicity and the ingredients you probably already have on hand. Here’s what you’ll need:
- Fish fillets – Choose your favorite white fish.
- Red onion – Adds a sweet crunch.
- Bell pepper – The more colorful, the better.
- Feta cheese – Crumbly and tangy goodness.
- Tomato – Juicy and adds a touch of acidity.
- White wine – For that hint of sophistication.
- Olive oil – The Greek staple.
- Dried basil and oregano
- Salt & pepper
- Cooked rice – To serve alongside.
How to Make Greek-Style Baked Fish: Fresh, Simple, and Delicious
- Preheat your oven to 450 degrees F. You want it hot so the fish cooks quickly and stays tender.
- Grab an oven-proof baking dish that will snugly fit your fish fillets without them overlapping. Give it a light spray with cooking spray to prevent sticking.
- Lay the fish fillets in the dish in a single layer. Season them generously with salt and pepper, because who likes bland fish?
- Top the fish with slices of red onion and bell pepper. The colors should already start to cheer you up.
- Sprinkle dried basil and oregano over the top, followed by diced tomato and crumbled feta cheese. The feta will melt slightly and get creamy in the oven.
- Drizzle the white wine and olive oil over everything. This is the magic moment that brings it all together.
- Finish with a grind of fresh pepper, just before putting it in the oven.
- Bake uncovered for about 12 – 15 minutes. You’ll know it’s done when the fish flakes easily with a fork and the kitchen smells heavenly.
- Once out of the oven, squeeze some lemon wedges over the fish, and if you have fresh basil or oregano, now’s the time to sprinkle them on. Serve immediately with hot cooked rice.
Cook’s Notes
A few things to keep in mind: First, if your fish fillets are particularly thick, you might need a minute or two more in the oven. But keep a watchful eye, overcooked fish is a tragedy! As for leftovers, they’re rare, but if you do have any, this dish microwaves well. Just be gentle, so the fish doesn’t dry out.
If you’re planning ahead, you can chop the vegetables and crumble the feta in advance. Just keep them in the fridge until you’re ready to assemble. This makes an already quick recipe even speedier.
Make It Your Own
This dish is wonderfully versatile. Here are a few ideas to make it your own:
- Switch the fish fillets for chicken breast. Just adjust the cooking time until the chicken is cooked through.
- Try tofu instead of fish for a vegetarian twist. Use firm tofu and bake until it’s golden.
- Throw in some kalamata olives for an extra punch of Mediterranean flavor.
- Use quinoa instead of rice to up your protein and fiber game.
If you try this, I’d love to hear how it turns out — drop a comment or tag me in your photos. Here’s to less dinner panic and more delicious moments!
Related update: Greek-Style Baked Fish: Fresh, Simple, and Delicious
Related update: Stir Fried Cabbage and Tomatoes

It was one of those nights where everything seemed to take forever. My hair was doing its own thing, there was a pile of laundry giving me the evil eye, and I had exactly zero patience left for the day. You know the feeling? That’s when Moroccan Chicken Tagine decided to swoop in and save my evening. With its warm spices and a touch of sweetness, it felt like a cozy hug in a bowl. This dish comes together quicker than you’d think, especially with the help of my trusty pressure cooker. I promise, it’s the kind of meal that makes you look forward to leftovers.
Jump to Recipe
What You’ll Need
Honestly, you’ve probably got most of this stuff hanging out in your pantry already, and that’s the beauty of it. Just a few special touches make this dish sing.
- Moroccan spice mixture
- Almond slivers
- Dried apricot halves
- Canned chickpeas
- Whole canned tomatoes
- Cilantro
- Extra virgin olive oil
- Fat-free chicken broth
- Flour
- Fresh ginger root
- Garlic clove
- Black salt and ground pepper
- Honey
- Onion
- Skinless boneless chicken breasts
How to Make Moroccan Chicken Tagine
- In a pie plate, mix together the flour and Moroccan spice mixture. Toss the chicken pieces in this mixture until they’re well coated.
- Heat some olive oil in your pressure cooker over medium-high heat. When it’s nice and hot, add the chicken pieces. Let them brown for about one minute per side, absorbing all that fragrant goodness.
- Take the chicken out and set it aside. Lower the heat to medium, then toss in the ginger and onions. Saute for about three minutes until the onions start looking semi-translucent and glossy.
- Add the garlic to the pot and cook for another minute. The aroma should fill your kitchen like a dream.
- Introduce the apricots, whole tomatoes, chicken broth, and the browned chicken back into the pot. Cover and bring it to low pressure over medium-high heat.
- Once you’ve reached pressure, cook for about eight minutes. Then, carefully release the pressure using the quick release method. Open the steam valve and be cautious!
- Stir in the chickpeas, almonds, and honey. Let everything warm through for a few minutes, allowing the almonds to soften slightly.
- Check the chicken for doneness and taste your tagine. This is your moment to adjust the salt and pepper to perfection. Serve it over fluffy couscous and sprinkle with fresh cilantro leaves for that extra pop of color and flavor.
Cook’s Notes
If you’re using a Dutch oven instead of a pressure cooker, follow steps 1-4 as described. Then bring the mixture to a boil, reduce to a simmer, and let it cook for 20-25 minutes, or until the apricots are tender. Continue with step 6.
- Feel free to prep some ingredients ahead. You can chop onions and garlic, or even coat the chicken earlier in the day.
- Leftovers are a dream. Store them in an airtight container in the fridge and savor them for up to three days. The flavors only deepen and become more delicious.
- Be adventurous with your spice mix. Play around with the ratios to suit your taste, just remember that a little goes a long way.
Make It Your Own
- Swap the chicken for crispy tofu: A perfect vegetarian option that still holds up to the hearty flavors.
- Try dried figs instead of apricots: They add a slightly different sweetness and pair wonderfully with the spices.
- Use quinoa instead of couscous: It offers a lovely, nutty texture and is gluten-free.
- Add some heat with chili flakes: If you like a bit of spice, a sprinkle of chili flakes will do the trick.
If you try this, I’d love to hear how it turns out — drop a comment or tag me on social media! Cooking is all about sharing and I’d be thrilled to know how this Moroccan Chicken Tagine fits into your week. Enjoy every bite!
Related update: Moroccan Chicken Tagine
Related update: Greek-Style Baked Fish: Fresh, Simple, and Delicious

On a chilly Tuesday evening, I found myself rummaging through my pantry, desperate for something that felt like a hug in a bowl but wouldn’t keep me hostage in the kitchen. I wanted something earthy yet vibrant, complex but not fussy. That’s when a bag of quinoa caught my eye, nestled behind a family of lentils. With a little inspiration from the tangy barberries I’d recently discovered at the market and a stash of nuts that begged to be toasted to life, this Quinoa Salad with Barberries & Nuts was born. It’s the kind of dish that fills the kitchen with warm, toasty aromas and feels fancy enough to impress, but is simple enough to whip up on a weeknight.
Jump to Recipe
What You’ll Need
There’s a good chance you already have most of these ingredients hanging around, just waiting for a chance to shine. Here’s what you’ll gather:
- Quinoa – the blank canvas for all the flavor.
- Water – to cook the quinoa to fluffy perfection.
- Salt – always the unsung hero.
- Olive oil – for toasting and dressing.
- Barberries – those tangy pops of flavor.
- Slivered almonds – for that nutty crunch.
- Slivered pistachios – because why not double down on nuts?
- Coriander – a fresh, herby kick.
- Mint – because everything deserves a little minty brightness.
How to Make Quinoa Salad with Barberries & Nuts
- Start by rinsing the quinoa under cool running water using a sieve. This little bath removes any bitterness. Once rinsed, drain thoroughly.
- In a medium saucepan, pour boiling water over the quinoa. Add a generous pinch of salt, stir, and cook over medium-low heat. You’re looking for the quinoa to be tender yet retain a slight bite. Drain again in a sieve if needed.
- While the quinoa is doing its thing, turn your attention to the barberries. Pick them over, rinse them clean in a sieve, and let them dry a bit on some kitchen paper.
- In another saucepan, heat 1 tablespoon of olive oil over medium heat. Toss in the slivered almonds and toast them lightly. When they’re golden and fragrant, add the pistachios. Keep an eye on them; nuts can burn quickly!
- Add the rest of the olive oil and the rinsed barberries to the pan with the nuts. Cook briefly until the barberries are shiny and slightly puffed. Remove from heat.
- Save a tablespoon of the nut and barberry mixture for garnish later. Combine the remaining nut-barberry mixture with the cooked quinoa along with the chopped coriander and mint.
- Return the quinoa mixture to the pot. Cover with a lid and let it sit over low heat for about ten minutes until everything is well heated and steam is rising. The aroma will make it hard to wait!
- Fluff the quinoa with a fork, drizzle a little extra olive oil, give it a twist of black pepper if you’re feeling it, and then sprinkle over the reserved nut-barberry mix and herbs.
- Serve this beauty as a star on its own or let it play the perfect sidekick to any main dish.
Cook’s Notes
I won’t lie, this dish is forgiving. Quinoa can be prepped a day ahead and kept in the fridge, making this a great make-ahead option. If you end up with leftovers (lucky you!), it holds up well in the fridge for up to 3 days. Just give it a gentle reheat on the stove or enjoy it cold—it’s pretty versatile. Be mindful when toasting the nuts; they love to go from golden to charred in a heartbeat.
Make It Your Own
- Swap the barberries for dried cranberries if they’re more readily available. The sweetness will complement the nuts beautifully.
- Not a fan of pistachios? Use toasted hazelnuts instead for an equally delicious crunch.
- For a protein boost, toss in some shredded cooked chicken or crispy tofu cubes.
- If coriander and mint aren’t your jam, try parsley and basil for a different herby note.
If you try this, I’d love to hear how it turns out—drop a comment or tag me on social media! It’s always a joy to see your creations and hear your twists on the recipe. Enjoy the journey from pantry to plate!
Related update: Quinoa Salad with Barberries & Nuts
Related update: Garlic Lime Grilled Chicken Salad
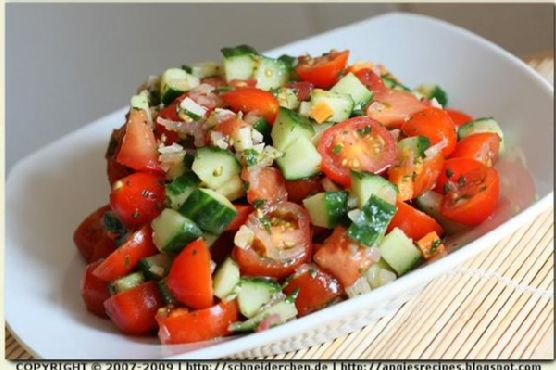
It was one of those hectic Tuesday evenings, you know the kind where the laundry is beckoning, emails are piling up, and yet your stomach still somehow wants to be fed. There I was, standing in front of my refrigerator, hoping for some culinary inspiration to jump out and save me from splurging on takeout for the third night in a row. My eyes landed on that lonely basket of cherry tomatoes and a half-used cucumber. Suddenly, a memory of a zesty Tomato Cucumber Salad from a sunlit café popped into my head. The beauty of this dish is its simplicity and the fact that it’s much more than the sum of its parts: refreshing yet satisfying, quick yet elegantly reminiscent of summer picnics. It’s the kind of dish that comes together with a handful of pantry staples, a little bit of chopping, and a splash of creativity. Easy enough to whip up in under 30 minutes, and impressive enough to make you feel like a culinary genius.
Jump to Recipe
What You’ll Need
This Tomato Cucumber Salad is all about letting simple ingredients shine. Chances are you already have most of this hanging around in your kitchen.
- Cherry tomatoes – the sweeter, the better!
- Diced cucumber – refreshing crunch is a must.
- Sliced garlic
- Lemon juice
- Olive oil – go for the good stuff if you can.
- Black salt and pepper
- Shallot – for a hint of sweet oniony goodness.
- Fresh parsley
How to Make Tomato Cucumber Salad
- Start by heating a splash of olive oil in a skillet over medium heat. When the oil shimmers, toss in the chopped shallot and sliced garlic. Stir-fry gently, keeping an eye out for a lightly golden hue. The kitchen should start smelling divine right about now.
- Remove the skillet from the heat and introduce a bright splash of lemon juice to the mix. The sizzle will tell you the dressing is coming together beautifully. Season with a sprinkle of black salt and a few cracks of pepper to taste.
- As the dressing takes a moment to cool, cut your cherry tomatoes into halves and dice the cucumber into cheerful 1cm cubes. Toss them both into a salad bowl, ready to soak up all the goodness.
- Pour the warm dressing over the tomato and cucumber combo, and toss gently. The fresh parsley should be added last, offering a vibrant pop of color and flavor.
- Cover the bowl and let the salad chill in the fridge for about an hour. This helps the flavors to meld into a harmonious chorus of tangy, sweet, and savory.
Cook’s Notes
This salad is as forgiving as it is delicious. If you’re running short on time, you can skip the chilling, but letting it sit in the fridge does wonders for flavor mingling. If you’ve got leftovers, they’ll keep in an airtight container in the fridge for a day or two, though the tomatoes may soften slightly. Avoid over-stirring after refrigeration if you prefer your salad to stay crisp.
Make It Your Own
- Swap the cucumber for crisp, thinly sliced fennel for an aromatic twist.
- Add a handful of crumbled feta for a creamy contrast.
- Throw in some roasted chickpeas for extra protein and crunch.
- Use fresh basil leaves instead of parsley for a fragrant, pesto-esque vibe.
If you try this, I’d love to hear how it turns out — drop a comment or tag me! This salad is a little taste of sunshine on your plate, and I hope it brings a bright spot to your day, just like it did for mine. Enjoy!
Related update: Tomato Cucumber Salad
Related update: Quinoa Salad with Barberries & Nuts