
It was one of those Tuesday evenings when everything seemed to be spinning at a million miles an hour. You know the vibe — the kind of chaos where the idea of cooking dinner feels like a Herculean task. I peeked into my pantry, hoping for inspiration, and that’s when it hit me: Thai Savory Brown Fried Rice. A dish that’s quick to whip up but feels like a comforting hug in a bowl. It’s packed with flavor and gives off that takeout vibe without the takeout guilt. Plus, there’s something about the combination of spicy chili, crunchy cashews, and zesty lime that just sings. Let me tell you, this is a dish that transforms ordinary brown rice into something worth savoring.
Jump to Recipe
What You’ll Need
A lot of this stuff is pantry-friendly, which means you can dodge a grocery trip. You’ll likely have most of these ingredients lounging around already.
- Extra virgin olive oil
- 3 garlic cloves, minced
- 2 red fresh chili peppers, sliced
- Raw cashew nuts
- 1/4 cup dry unsweetened shredded coconut, toasted
- 1 teaspoon stevia powder
- 2 tablespoons Bragg Liquid Aminos
- 1 tablespoon apple cider vinegar
- 1 flax egg (1 tablespoon flaxseed meal + 2.5 tablespoons water)
- 1 cup fresh green beans, trimmed and cut into pieces
- 2 cups shredded regular bok choy
- 2 cups cooked brown rice
- Lime wedges for serving
How to Make Thai Savory Brown Fried Rice
- Start by making my Perfect Brown Rice. In a pot, sauté 1 cup of uncooked brown rice in 1 teaspoon of olive oil until it’s lightly browned. Toss in 2 basil leaves, then pour in 2 cups of filtered water. Quickly cover, bring to a boil, then simmer until all water has evaporated, about 40 minutes.
- As the rice cooks, heat a splash of olive oil in a wok or large frying pan. Add the minced garlic and sizzle until it’s lightly golden and fragrant. Be careful not to burn it — nobody likes bitter garlic.
- Toss in the sliced chili peppers, raw cashews, and toasted coconut. Let them dance around in the pan and get cozy for a good minute.
- In a small bowl, whisk together the stevia powder, Bragg Liquid Aminos, and apple cider vinegar. Pour this into the pan, blending it into your aromatic mix.
- Push everything to one side of the pan, making space for the flax egg. Pour it in and stir, cooking for about a minute until it firms up a bit, then mix it back into the stir-fry party.
- Add the green beans, bok choy, and your cooked brown rice to the pan. Stir well on medium heat for another minute. You want the bok choy wilted but those green beans still a bit snappy.
- Spoon your creation into a serving dish, and don’t forget to add a lime wedge on the side for that final zing.
Cook’s Notes
This dish is a lifesaver on busy nights! Toast the shredded coconut beforehand in a dry pan over low heat — trust me, it’s worth the extra step for that nutty aroma. If you’re prepping ahead, cook the brown rice the day before and keep it in the fridge. Cold rice works wonders for fried rice, soaking up all those flavors. Leftovers? They make for a fantastic lunch the next day. Just reheat in a pan with a splash of water to revive its moist goodness.
Make It Your Own
- Swap the green beans for crispy tofu if you’re feeling a plant-based protein moment.
- Throw in some sliced bell peppers for a pop of color and sweetness.
- Want it extra spicy? Add more chili peppers or a drizzle of sriracha at the end.
- Feel free to switch out the lime for lemon if that’s what you have on hand.
If you try this, I’d love to hear how it turns out — drop a comment or tag me! This dish is a little escape to Thailand in your own kitchen, without the need for a passport. Enjoy!
Related update: Thai Savory Brown Fried Rice
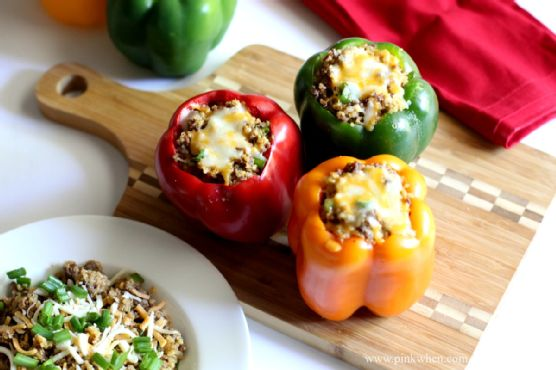
It was one of those weeknights where everything seemed to demand my attention at once. You know the kind, right? The kind where your inbox is overflowing, the laundry pile is ominously high, and all you want to do is eat something comforting that doesn’t involve a microwave pizza. So there I was, staring into my fridge, hoping for inspiration to leap out at me. That’s when I spotted the bell peppers chilling out in the crisper drawer, looking like they needed a purpose. The chorizo and ground beef were sitting in the fridge too, probably whispering that they’d be amazing together. And just like that, dinner was decided. These Chorizo and Beef Quinoa Stuffed Peppers are a satisfying blend of rich, spicy flavors and textures, and they come together quicker than you’d think. Plus, they’re perfect for those nights when you need something a bit more special without all the hassle.
Jump to Recipe
What You’ll Need
If you’re like me, you probably have most of these ingredients already lounging around your pantry and fridge. Here’s what you’ll want to gather:
- Bell peppers (any color you love)
- 1 cup quinoa
- Water (for quinoa)
- Chorizo, 250g
- Lean ground beef, 250g
- Mixed Monterey Jack and Cheddar cheese, 1 cup shredded
- 2 tablespoons green onion tops, chopped
- 1 teaspoon cumin
- 1/2 teaspoon cayenne
- 1 teaspoon chili powder
How to Make Chorizo and Beef Quinoa Stuffed Pepper
- Preheat your oven to 350°F (175°C). While you’re at it, bring a pot of water to boil for the quinoa. The goal is to get these started simultaneously to save time.
- In a skillet over medium heat, brown the chorizo and ground beef together. Stir occasionally until the mixture is golden and fragrant, around 6-8 minutes. Once cooked, drain the excess fat thoroughly and transfer the meat to a medium mixing bowl.
- Once your quinoa is fully cooked and fluffy, add it to the bowl with your meat mixture. This is where it starts to get exciting!
- Add the chopped green onion tops, cumin, cayenne, chili powder, and the shredded Monterey Jack and Cheddar cheese to the bowl. Mix everything well until it’s all happily combined.
- Prepare your bell peppers by cutting off the tops and removing any seeds. You want them to be ready to receive all that deliciousness.
- Stuff each bell pepper generously with your meat and quinoa mixture. Don’t be shy — pack it in there.
- Place your stuffed peppers in a baking dish, sprinkle a little more cheese on top for good measure, and bake in the preheated oven for about 10 minutes. You’ll know they’re done when the peppers have softened slightly and the cheese on top is melty and golden.
- Serve immediately and enjoy the awesome combination of flavors. Trust me, these are worth every bite.
Cook’s Notes
If you’re looking to make these ahead (and who doesn’t love a little meal prep?), you can absolutely prepare the filling in advance. Just store it in an airtight container in the fridge for up to two days. When you’re ready to eat, stuff the peppers and proceed with baking. As for leftovers, they keep well in the fridge for up to three days. Just reheat them gently in the oven or microwave until warmed through. A quick tip: make sure to drain the meat well after browning to avoid a greasy filling. Oh, and don’t skip the step of softening the peppers in the oven; it makes them easier to cut and eat!
Make It Your Own
Feel free to get creative with these stuffed peppers. Here are a few swap ideas to make them suit your taste:
- Swap the quinoa for cooked rice or couscous for a different texture experience.
- If you’re not into beef, try using ground turkey or chicken instead for a lighter option.
- Make it vegetarian by using crumbled tofu or tempeh in place of the meat. Just add a bit more spice to keep the flavor bold.
- Switch up the cheese with crumbled feta or a smoky gouda to add a unique twist.
If you try this, I’d love to hear how it turns out — drop a comment or tag me on your food pics! These stuffed peppers are a personal favorite, and I can’t wait to see your take on them. Happy cooking!
Related update: Chorizo and Beef Quinoa Stuffed Pepper
Related update: Crawfish Cake Sliders

One chilly evening last fall, I found myself in the kitchen, craving something warm and comforting. My cupboard was a bit of a disaster, full of bits and bobs from baking adventures past. A half-used bag of gluten-free flour, some chocolate chips I had been furtively snacking on, and a nearly empty jar of pecans were calling to me. It was definitely a “use what you have” kind of night. As I pulled ingredients together, a gluten-free chocolate-pecan quickbread was born — a delightful mix of melty chocolate and crunchy pecans, wrapped in a tender, slightly sweet loaf. The best part? It made my entire kitchen smell like a cozy bakery on a crisp autumn day. If you’re looking for something that’s both indulgent and easy to whip up, this quickbread might just be your new favorite.
Jump to Recipe
What You’ll Need
The beauty of this quickbread lies in its simplicity. You likely have most of these ingredients on hand:
- Butter, for that irresistible richness
- Gluten-free flour, to keep things friendly for all tummies
- Sugar and brown sugar, for sweetness and a hint of molasses flavor
- Baking soda, to give our loaf a little lift
- Salt, to balance everything out
- Semi-sweet chocolate chips, because chocolate makes everything better
- Pecans, for that nutty crunch
- Eggs, to bind and add moisture
- Unsweetened applesauce, a sneaky moisture-hero
- Vanilla-honey Greek yogurt, for tang and tenderness
- Vanilla extract, because why not double down on vanilla goodness?
How to Make Gluten-Free Chocolate-Pecan Quickbread
- First things first, preheat your oven to 350 degrees Fahrenheit. Butter your trusty 5″x9″ loaf pan and set it aside.
- Gently heat the butter until it’s just melted. Set it aside to cool — you don’t want scrambled eggs in your bread!
- In a large bowl, combine the gluten-free flour, sugar, brown sugar, baking soda, and salt. Give it a good whisk to break up any lumps.
- Stir in the semi-sweet chocolate chips and pecans. This is starting to look delicious already, isn’t it?
- In a separate bowl, whisk together the eggs, applesauce, yogurt, vanilla extract, and the cooled melted butter.
- Pour the wet mixture into the dry ingredients and stir until just combined. Be gentle here; over-mixing is not our friend.
- Pour the batter into the prepared loaf pan, smoothing out the top with a spatula.
- Bake in your preheated oven for about an hour, or until a toothpick inserted into the center comes out clean. The top should be golden and your kitchen will smell heavenly.
- Allow the loaf to cool in the pan for 10 minutes before transferring it to a wire rack to cool completely. Patience, my friend!
Cook’s Notes
Let’s talk about some little tips that make a big difference. First, feel free to use whatever gluten-free flour blend you love; they all work here. Just make sure it has xanthan gum in it, or add a teaspoon if it doesn’t. If your loaf turns out a bit too crumbly, you may have over-mixed, which is easy to do. Treat the batter gently! As for storage, keep your quickbread in an airtight container at room temperature for up to three days. It also freezes beautifully — just slice and wrap individual pieces for easy snacking later.
Make It Your Own
Here’s where you get to play around:
- Swap the pecans for walnuts if you’re feeling nutty.
- Use dark chocolate chips for a more intense chocolate experience.
- Add a teaspoon of cinnamon to the dry mix for a warm, spicy touch.
- Substitute the vanilla-honey Greek yogurt for plain Greek yogurt and an extra teaspoon of honey if that’s what you have on hand.
If you try this, I’d love to hear how it turns out — drop a comment or tag me! Happy baking, and may your kitchen be filled with the sweet aroma of chocolate-pecan goodness.
Related update: Gluten-Free Chocolate-Pecan Quickbread
Related update: Candy Cane Chocolate Marshmallows
Related update: Braised Pork: Filipino Humba

Imagine it’s one of those mornings where you’ve hit snooze one too many times, and now you’re racing through your kitchen in a flurry of panic. Your brain is still in bed but your body is desperately trying to catch up with the clock. It’s on these mornings that my Protein Strawberry Smoothie saves the day. It’s a quick, delicious way to fuel up, with a creamy texture that feels indulgent but is packed with goodness. And let’s be real, anything that helps you avoid a hangry rage before your first meeting is worth its weight in gold. Plus, it’s got that perfect balance of sweet strawberries and the smooth richness of almond milk, making it a versatile favorite you’ll find yourself coming back to again and again.
Jump to Recipe
What You’ll Need
This ingredient list is short and sweet, with a few pantry staples you probably already have on hand. Here’s what you’ll need:
- 1 cup of almond milk
- 1 banana
- 1/2 cup of fat-free Greek yogurt
- 1 tablespoon of honey
- 1 cup of ice
- 1 cup of fresh strawberries
How to Make Protein Strawberry Smoothie
- Toss your strawberries, banana, and Greek yogurt into the blender. The fruit should be fresh and ripe, which will give you that vibrant flavor burst.
- Pour in the almond milk, which adds a nutty base that balances the sweetness from the fruit.
- Add the honey. You’ll want just enough for a hint of sweetness without overpowering the strawberries.
- Throw in the ice. This will give your smoothie that chilly, refreshing feel that’s perfect for a morning pick-me-up.
- Blend everything on high until it’s smooth and creamy. You’ll know it’s ready when you see a beautifully pink, frothy mixture without any lumps.
Cook’s Notes
Don’t get too caught up in exact measurements here. This smoothie is pretty forgiving, so feel free to adjust based on what you have. If your bananas are smaller, use two. If your strawberries are extra-large, maybe go a bit shy on the cup measurement. Also, I recommend using fresh strawberries, but if you only have frozen, that’s totally fine—just skip the ice so it doesn’t turn into a frozen block! If you’ve got a busy morning ahead, you can prep the fruit the night before and store it in the fridge, then just throw it all in the blender when you’re ready. Leftovers can be stored in the fridge for a day, but be sure to give it a good stir before drinking.
Make It Your Own
- Swap the almond milk for coconut milk for a tropical twist.
- Add a tablespoon of your favorite nut butter for some extra protein and a richer flavor.
- If you’re not a fan of honey, replace it with a splash of maple syrup or agave nectar.
- For a green boost, toss in a handful of spinach. It won’t change the taste much but will kick up the nutrition!
If you try this, I’d love to hear how it turns out — drop a comment or tag me in your smoothie pics! Nothing makes my day more than seeing someone enjoy a recipe that’s made their morning just a bit brighter. Enjoy, and here’s to more deliciously lazy mornings!
Related update: Protein Strawberry Smoothie
Related update: Caramelized cranberries coconut pancakes
Related update: Green Tea Fruit Medley Smoothie

It was one of those dreary Tuesday afternoons when the sky couldn’t decide whether to rain or shine, so it just hovered in a blah gray. The kind of day that demands something bright and cheerful to rescue you from the monotony. I found myself in the kitchen, eyeing a lonely lemon on the counter. It hit me – pressed lemon butter cookies! They’re the perfect pick-me-up: buttery, zesty, and just the right amount of sweet, without the gluten. These cookies are impressive enough for a tea party yet simple enough for a midweek treat. If you, like me, need a little sunshine on a plate, these cookies are your answer.
Jump to Recipe
What You’ll Need
I bet you’ve got most of these tucked away in your pantry and fridge. It’s a short, sweet list that’s all about that lemony punch and buttery goodness. Here’s what you’ll need:
- Unsalted butter
- White sugar
- Egg yolks
- Lemon extract
- Lemon zest
- Fresh lemon juice
- Gluten-free flour
- Xanthan gum
How to Make Gluten-Free Pressed Lemon Butter Cookies
- Preheat your oven to 350°F (175°C). This is the perfect moment to get cozy with that mixing bowl and let the anticipation build.
- In a world where flour can be tricky, whisk or sift your gluten-free flour with the xanthan gum. This step ensures everything blends smoothly, trust me.
- Grab your standing mixer with the paddle attachment and cream the unsalted butter until it’s fluffy and inviting. The butter should look like a pillowy cloud.
- Add in the white sugar and continue to cream until the mixture is light and airy. You’re looking for that dreamy consistency.
- Introduce the egg yolks to the party, one at a time, making sure each is fully incorporated before adding the next.
- Now for the zesty kick: add the lemon zest, lemon extract, and fresh lemon juice. Mix them in until the batter sings with lemony aroma.
- Slowly fold in the flour mixture at a gentle speed, then increase the speed until it’s all well-incorporated. Your dough should be soft, but firm enough to hold its shape.
- Load your cookie press with the dough and press onto ungreased cookie sheets. This is where the magic happens – each press is a little masterpiece.
- Bake one sheet at a time, for about 12-15 minutes, until the edges are lightly browned and your kitchen smells like a citrus grove.
- Patience, my friend. Let them cool completely on the sheets before gingerly using a thin spatula to lift them. They’ll be delicate but oh-so-worth-it.
Cook’s Notes
Here’s a little insider scoop: when working with gluten-free flour, sifting is your best friend for a smooth texture. These cookies keep well in an airtight container for up to a week, but let’s be real, they’ll probably disappear way before that. If you’re planning ahead, the dough can be made a day in advance and refrigerated. Just let it come to room temperature before pressing. And whatever you do, don’t skip the cooling step – they’re fragile when fresh out of the oven.
Make It Your Own
With a recipe like this, there’s room to play around. Here are a few ideas to shake things up:
- Swap the lemon for orange zest and juice for a sweet, floral twist.
- Add a teaspoon of vanilla extract alongside the lemon for a more rounded flavor.
- Sprinkle a little coarse sugar on top before baking for a touch of sparkle and crunch.
- Mix in a tablespoon of poppy seeds for a delightful texture and a nod to classic lemon-poppy duo.
If you try this, I’d love to hear how it turns out — drop a comment or tag me! Knowing these cookies brought a little sunshine to your day would make mine. Enjoy each zesty bite!
Related update: Gluten-Free Pressed Lemon Butter Cookies
Related update: Dried Cranberry Chocolate Cookies
It was one of those weeks where everything seemed a bit too chaotic, and the weather was veering into that crisp, cozy fall vibe that just screams for comfort food. I was rummaging through my pantry, trying to figure out what on earth I could throw together without needing a last-minute grocery run. There it was, a can of chickpeas and some cauliflower that had been patiently waiting for their moment to shine. Enter the Cauliflower Chickpea Stew: a dish that’s hearty, full of flavor, and surprisingly easy to whip up. It’s one of those recipes that feels like a warm hug after a long day, plus it’s packed with spices that make your kitchen smell absolutely divine. Definitely a go-to for those nights when you need something nourishing but not overwhelming to make.
Jump to Recipe
What You’ll Need
I love this recipe because it relies on pantry staples but still feels a bit exotic thanks to the spices. Chances are you already have most of this hanging around your kitchen.
- Olive oil
- Brown rice
- Twice the amount of water to rice
- Garlic cloves
- Turmeric
- Salt & pepper
- Onion
- Canned tomatoes
- Tomato puree
- Fresh cm ginger
- Fresh chili
- Cinnamon
- Garam masala
- Paprika
- Sweet potatoes
- Lemon (juice)
- Additional water
- Cauliflower
- Canned chickpeas
How to Make Cauliflower Chickpea Stew
- Start by heating some olive oil in a large saucepan over high heat. You’ll want it shimmering but not smoking.
- Crush your garlic cloves and toss them in the pan with a generous pinch of turmeric, salt, and pepper. Fry for about a minute until everything is golden and fragrant.
- Add the brown rice, stirring occasionally. Let it fry for 4-5 minutes until the grains become slightly translucent.
- Pour in water (twice the amount of your rice) and bring it to a boil. Once boiling, reduce the heat to low-medium and let it simmer for 30 minutes. The rice should be tender and the water absorbed.
- While the rice does its thing, chop your onion, sweet potatoes, and cauliflower into bite-sized pieces. Grate the ginger and finely slice the chili.
- In another pot, heat more olive oil and sauté the onion until it’s soft and just starting to brown.
- Add the canned tomatoes, tomato puree, grated ginger, chili, cinnamon, garam masala, and paprika. Stir this mix for a couple of minutes until it’s well blended and aromatic.
- Throw in the sweet potatoes and stir them to coat in the sauce. Let them cook for about 5 minutes.
- Add the cauliflower and canned chickpeas, followed by a splash of water to help everything come together. Simmer for about 15 minutes until the veggies are tender but not mushy.
- Squeeze in the juice of a lemon, give it one last stir, and taste to adjust the seasoning as needed.
- Serve the stew over the cooked brown rice, and you’re ready to dig in!
Cook’s Notes
This stew is pretty forgiving, which is what makes it perfect for busy weeknights. A couple of things to keep in mind:
- Be sure not to rush cooking the garlic and spices at the beginning. This step is key for building flavor.
- Leftover stew keeps beautifully in the fridge for up to three days. Just reheat gently on the stove or microwave.
- If you’re prepping ahead, you can chop the veggies and have them ready to go in the fridge—makes the actual cooking a breeze!
- Remember that simmering times can vary depending on the size of your veggie chunks, so keep an eye on them to achieve that perfect tender texture.
Make It Your Own
This stew is a canvas for your creativity. Here are a few ways to switch it up:
- Swap the sweet potatoes for butternut squash if that’s more your style.
- Use coconut milk instead of water for a creamier, richer stew.
- Add spinach or kale at the end for some extra greens.
- Top with a dollop of Greek yogurt for a tangy finish.
If you try this, I’d love to hear how it turns out—drop a comment or tag me! Your feedback makes my day and helps others find their new favorite cozy meal. Happy cooking!
Related update: Cauliflower Chickpea Stew
Related update: Classic Boeuf Bourguignon
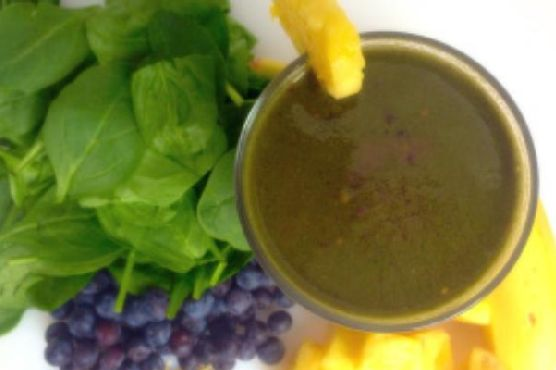
Okay, picture this: It’s a Wednesday morning, you hit snooze one too many times, and now you’re rushing around trying to make it out the door on time. You want something quick, healthy, and delicious to kick-start your day. That’s exactly how I stumbled upon this Tropical Banana Green Smoothie. I was in dire need of something refreshing and energizing, yet easy enough to throw together in less than five minutes. This smoothie checks all those boxes and more. It’s like a mini tropical vacation in a glass, and while it sounds fancy, it’s really just a few simple ingredients blended into creamy perfection. Trust me, one sip of this and you’ll forget all about your hectic morning. Jump to Recipe
What You’ll Need
This smoothie is all about using what you have on hand and embracing the refreshing flavors of the tropics. Chances are you already have most of this in your kitchen.
- 1 ripe banana
- 1 cup pineapple, fresh or frozen
- 1 cup coconut water
- 1/2 cup blueberries, fresh or frozen
- 1 scoop protein powder (vanilla works great!)
- 1 handful mixed spinach
How to Make TROPICAL BANANA GREEN SMOOTHIE
- Peel and slice the banana. If you’re using frozen pineapple, you can skip this step for now. If fresh, chop it into chunks. This will add to the creaminess.
- In a blender, add the banana slices and pineapple chunks. Pour in the coconut water. This will be the base of your smoothie, giving it that tropical flair.
- Throw in the blueberries and the scoop of protein powder. The blueberries add a pop of color and a hint of sweetness that complements the tropical vibes.
- Top it off with a generous handful of mixed spinach. Don’t worry; the taste is so mild, you won’t even notice it’s there (your body will, though!).
- Blend on high until the mixture is smooth and creamy. You’ll know it’s ready when there are no more visible chunks and the blend is a beautiful, vibrant green.
- Pour into your favorite glass, pop in a fun straw, and savor your mini-vacation in a cup.
Cook’s Notes
This smoothie is incredibly forgiving, so feel free to adjust the ingredient quantities to suit your taste. If you prefer a thicker smoothie, use frozen fruit or add a couple of ice cubes before blending. For those with a sweet tooth, a splash of honey or agave nectar can take it to another level.
It’s best enjoyed fresh, but if you’re in a time crunch, you can make it the night before. Just give it a quick stir or shake in the morning. As for leftovers, store in an airtight container in the fridge for up to one day; beyond that, it tends to lose its vibrancy and freshness.
Make It Your Own
- Swap the coconut water with almond milk for a creamier texture and a nutty undertone.
- Add a tablespoon of chia seeds before blending for an extra boost of fiber and omega-3s.
- Replace the spinach with kale for a more robust green flavor.
- For a tropical twist, throw in a few mint leaves during blending.
If you try this, I’d love to hear how it turns out — drop a comment or tag me! Let’s turn those chaotic mornings into something a bit more delightful, one smoothie at a time!
Related update: TROPICAL BANANA GREEN SMOOTHIE
Related update: Protein Strawberry Smoothie

It was one of those mornings where I woke up, looked in the fridge, and realized I was running late for everything. My mind was a blur, but my stomach was loud and clear: it needed something quick, filling, and delicious. Enter the Protein Strawberry Smoothie. It’s like a breakfast hug in a glass, bursting with fruity freshness and a protein punch to keep you going. Plus, it comes together in minutes — perfect for the days when your to-do list is longer than your patience.
Jump to Recipe
What You’ll Need
I bet you already have most of these ingredients in your kitchen, which means you’re just minutes away from sipping on this creamy delight. Here’s what you’ll need:
- 1 cup almond milk
- 1 banana
- 1/2 cup fat-free Greek yogurt
- 1 tablespoon honey
- 1 cup ice
- 1 cup fresh strawberries
How to Make Protein Strawberry Smoothie
- Start by grabbing your blender and pouring in the almond milk. This will be the liquid base that helps everything blend smoothly.
- Peel the banana and break it into chunks, tossing them into the blender. Bananas add natural sweetness and a creamy texture.
- Add the fat-free Greek yogurt next. This is where the protein magic happens, making your smoothie satisfying and rich.
- Drizzle in the honey. Adjust the sweetness to your taste, but remember, the strawberries will add their own sweetness too.
- Throw in the ice to make it nice and frosty. No one likes a warm smoothie!
- Top it all off with the fresh strawberries. They bring a bright, berry flavor that’s completely irresistible.
- Blend on high until everything is smooth and the color is a lovely pink. It should only take about a minute. Taste and adjust if needed — maybe a bit more honey or a splash of almond milk if it’s too thick.
- Pour into your favorite glass and enjoy immediately. It’s best when fresh and frothy!
Cook’s Notes
So, a few quick things to make sure your smoothie game is on point. If your smoothie ends up too thick, just add a bit more almond milk to loosen it up. Too thin? A few more ice cubes will do the trick. I love using fresh strawberries when they’re in season, but frozen will work in a pinch and will make your smoothie even thicker — just reduce the ice a bit. As for storing it, well, this smoothie is really best made fresh. If you do have leftovers, pop them in the fridge for a few hours, but know they might separate a bit (just give it a good shake or stir before drinking).
Make It Your Own
Here are a few fun ways to switch things up:
- Swap the almond milk for coconut milk for a tropical twist.
- Replace the banana with a ripe avocado for a lower-sugar, extra creamy version.
- Add a tablespoon of chia seeds before blending for an extra boost of fiber and omega-3s.
- Throw in a handful of spinach to sneak in some greens — you won’t even taste it!
If you try this, I’d love to hear how it turns out — drop a comment or tag me! Whether you’re sipping this on a bustling morning or a lazy afternoon, I hope it adds a bit of joy to your day. Cheers to easy, tasty nutrition!
Related update: Protein Strawberry Smoothie
Related update: TROPICAL BANANA GREEN SMOOTHIE
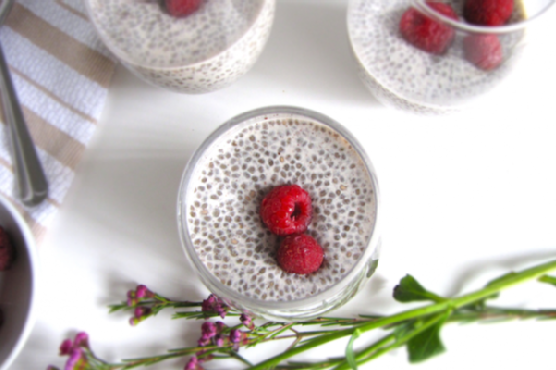
So there I was, rummaging through my pantry on a Sunday night, searching for something—anything—that could pass as a make-ahead breakfast for the hectic week ahead. You know how it is, right? That moment when you realize you’ve spent a little too much time on the couch binge-watching your favorite series and now the thought of meal-prepping feels like climbing Everest. Enter: chia seed pudding. Honestly, it’s like a little miracle in a bowl. Quick to put together, almost zero cleanup, and it somehow feels like a treat even though it’s packed with all the good stuff. And did I mention it requires zero effort in the morning? Just grab and go. Trust me, once you try this, you’ll wonder how you ever lived without it.
Jump to Recipe
What You’ll Need
This chia seed pudding is all about simplicity, and chances are you already have most of these in your kitchen.
- 2 tablespoons black chia seeds
- 1 cup almond milk
- 1 tablespoon raw agave syrup
- 1/4 teaspoon vanilla extract
- Pinch of salt
- Garnish: raspberries or your favorite berries
How to Make Chia Seed Pudding
- Start by grabbing a small bowl or a mason jar—whatever works for you. Pour in the almond milk, then add the chia seeds, giving them a gentle stir to ensure they begin to soak up the liquid.
- Add the raw agave syrup to the mix. Stirring slowly, add the vanilla extract and a pinch of salt. The salt might seem odd, but trust me, it balances the sweetness perfectly.
- Keep stirring until everything’s combined and the chia seeds are evenly distributed. Cover the bowl or jar, and place it in the fridge overnight. This is when the magic happens—let the chia seeds work their gelling wonder.
- In the morning, check the consistency. If it’s too thick for your liking, stir in a bit more almond milk. Top with fresh raspberries or any berries you fancy, and voilà—breakfast is served!
Cook’s Notes
Here’s the deal: chia seeds can be a little finicky when it comes to absorbing liquid. If you find your pudding too runny, just add a bit more chia seed, stir, and let it sit for another hour. For those of us who love a thicker consistency, you might try reducing the almond milk slightly. And if mornings are as hectic for you as they are for me, make a couple of these at once—they keep well in the fridge for up to four days.
Make It Your Own
- Coconut Dream: Swap almond milk for coconut milk and top with shredded coconut and pineapple chunks.
- Chocolate Indulgence: Mix in a tablespoon of cocoa powder and finish with dark chocolate shavings on top.
- Nutty Flavor: Replace almond milk with cashew milk and add a handful of chopped nuts on top.
- Berry Bonanza: Go wild with mixed berries for a burst of color and flavor.
If you try this, I’d love to hear how it turns out—drop a comment or tag me! Can’t wait to see your delicious creations and don’t forget to enjoy every spoonful. Happy breakfast prepping!
Related update: Chia Seed Pudding
Related update: Dried Fruit and Ginger Scones
Related update: Baked Oatmeal with Dried Cranberries

Last Tuesday, I found myself staring at a pair of plantains languishing on my counter, ripe and just waiting for their moment in the culinary sun. You know those evenings when you’re craving something salty, crunchy, and just a tad spicy, but the thought of another bowl of popcorn just seems so… meh? Enter: Garlic & Spice Plantain Chips. They come together ridiculously fast, are addictive in the best way, and bring the heat without sending you running for a glass of milk. They’re perfect for those late-evening cravings or to impress your friends at a casual get-together. Trust me, once you’ve made them, you’ll be hooked.
Jump to Recipe
What You’ll Need
These ingredients are simple yet punchy. Chances are, you already have most of these sitting in your pantry, just waiting to shine.
- 2 plantains – Look for ones that are more yellow than green for that perfect balance of sweetness and starch.
- 2 tablespoons olive oil – A good drizzle will coat the plantains perfectly.
- 1 teaspoon garlic powder – This adds a savory depth without being overpowering.
- 1 teaspoon paprika
- ½ teaspoon cumin
- ¼ teaspoon cayenne pepper – Adjust to your heat preference, but don’t skip it entirely. It’s the kick you didn’t know you needed.
- Salt, to taste
How to Make Garlic & Spice Plantain Chips
- Preheat your oven to 400°F (205°C). This is the magic temperature where the plantains get crispy but not burnt.
- Line a baking sheet with parchment paper or silicone mats to ensure nothing sticks and cleanup is a breeze.
- Take each plantain and cut off both ends. Make a slit along the entire length of the plantain, and peel off the skin. Don’t worry if it gets a little messy.
- Slice the plantains into thin rounds. Aim for consistency, but don’t stress if they’re not perfect. It adds character!
- In a medium-sized bowl, toss the plantain slices with olive oil, garlic powder, paprika, cumin, cayenne pepper, and a good pinch of salt. Stir until every slice is well-coated with this aromatic mixture.
- Lay the plantain slices on the baking sheets in a single layer. Overlapping leads to chewy rather than crispy chips.
- Bake for 15-20 minutes, flipping them at around 8 or 9 minutes. They’re done when the edges turn a nice golden brown. I like to swap the baking sheets between the top and bottom racks halfway through for even crispiness.
- Remove from the oven and let them cool slightly before diving in. The cooling process is where they really crisp up.
Cook’s Notes
A few things I’ve learned along the way:
- If your plantains are too green, they’ll be tough to peel and less sweet. Too ripe (almost black), and they’ll be overly sweet and not crisp up as much.
- If you’re making a large batch, work in batches so every slice gets proper attention in the oven. Overcrowding is the enemy of crispy chips.
- These chips are best enjoyed fresh, but if you need to store them, let them cool completely and keep in an airtight container. They’ll last for a couple of days, but who am I kidding—they never last that long in my house.
Make It Your Own
Here are a few ways to tweak the basic recipe and make it sing for your taste buds:
- Sweet and Spicy: Add a teaspoon of brown sugar to the spice mix for a sweet heat combo.
- Herbaceous Twist: Swap out the cumin for dried oregano or thyme for a herby hint.
- Citrus Zing: A little lime zest added before baking can give these chips a fresh twist.
- Cheesy Delight: Sprinkle some nutritional yeast for a cheesy flavor without the cheese.
If you give these a try, I’d love to hear how they turn out for you! Drop a comment or tag me in your crunchy chip moments. Enjoy every spicy, crispy bite!
Related update: Garlic & Spice Plantain Chips
Related update: Party Sausage Bites With Pine Nuts

I was having one of those days where everything seemed to go sideways. You know the kind — you spill your morning coffee, forget your umbrella, and then it starts pouring on your way home. I needed a pick-me-up, pronto. That’s when I remembered these Flour-Less Peanut Butter Cookies. They’re everything I needed: sweet, comforting, and ridiculously easy to make. The best part? You can whip them up with just a few pantry staples, and they’re done in under 20 minutes. Perfect for those days when you need a win, no matter how small.
Jump to Recipe
What You’ll Need
The beauty of these cookies lies in their simplicity. Chances are you have these ingredients tucked away in your kitchen already. Here’s what you need:
- Peanut butter – smooth or chunky, your call
- Honey – adds the perfect sweetness
- Egg – binds it all together
- Baking soda – gives them a little lift
- Vanilla extract – just a splash for depth
How to Make Flour-Less Peanut Butter Cookies
- Preheat your oven to 350°F (175°C). This is crucial to get that perfectly soft center.
- In a large mixing bowl, combine the peanut butter, honey, egg, baking soda, and vanilla extract. Stir until everything is smooth and well-blended.
- Using a spoon, drop dollops of the dough onto a lightly greased cookie sheet. Keep them about 2 inches apart since they’ll spread a little.
- Bake for about 12 minutes. You’ll know they’re ready when the edges are set but the centers are still soft to the touch.
- Let the cookies cool on the sheet for a few minutes, then transfer them to a rack to cool completely. They’ll firm up as they cool, so resist the urge to eat them straight away!
Cook’s Notes
These cookies are incredibly forgiving, but a few tips can ensure they turn out perfect every time. If your peanut butter is particularly oily, give it a good stir before measuring. When mixing, ensure everything is well-combined but don’t overdo it; overmixing can make the cookies tough. If you like your cookies on the sweeter side, you can increase the honey slightly or add a touch of sugar.
Store these cookies in an airtight container at room temperature for up to a week — if they last that long! You can also freeze the dough balls to bake later; just add a couple of minutes to the baking time.
Make It Your Own
Want to mix things up? Here are some tasty variations:
- Chocolate Lovers: Stir in some chocolate chips or chunks before baking for a rich, decadent treat.
- Nuts About Nuts: Swap half the peanut butter for almond butter for a nutty twist.
- Spice It Up: Add a sprinkle of cinnamon or a pinch of cayenne for a warm, spicy note.
- Salty Sweet: Top each cookie with a sprinkle of sea salt right before baking for that perfect salty-sweet balance.
If you try this, I’d love to hear how it turns out — drop a comment or tag me! There’s nothing better than sharing a little cookie joy. Happy baking!
Related update: Flour-Less Peanut Butter Cookies

It was one of those chilly evenings when I was ransacking through my pantry and fridge, desperately trying to piece together something warm and spicy. You know the feeling, right? When you want something cozy but you’re in no mood to go out for groceries. That’s when this Spicy Lemongrass Soup was born. It’s a comforting bowl that’s surprisingly easy to whip up with just a few special ingredients, like the invigorating lemongrass and bold red dried peppers. The process might seem like a little kitchen adventure, but I promise, it’s one worth embarking on.
Jump to Recipe
What You’ll Need
If you’re anything like me, you’ll be thrilled to find that you probably have most of the ingredients already lounging in your kitchen. The stars of the show are these bold, aromatic components that bring a delightful zing to this dish.
- Fresh lemongrass – gives it that unmistakable citrusy aroma
- Red dried peppers – these pack the punch
- Ginger – fresh is best for that sharp, spicy edge
- Garlic – because when is garlic not invited?
- Vegetable broth – the canvas for all those flavors
- Canned fresh coconut milk – if you can find it, it’s game-changing
- Tofu cubes – protein power
- Snow peas – for a bit of crunch and color
- Mushrooms – umami goodness
- Rice noodles – the slurp factor
- Lime (juice) – the zesty finish
How to Make Spicy Lemongrass Soup
- Start by chopping the lemongrass into 2-inch pieces. Slice each piece down the center. This will release the oils that give the soup its signature fragrance.
- In a large soup pot, combine the lemongrass, vegetable broth, coconut milk, garlic, and ginger. Bring it to a boil over medium-high heat. You’ll know it’s ready when the aroma makes you want to dive right in.
- Once boiling, reduce the heat to low and let it simmer for 30 minutes. The broth should become a golden, aromatic bath of deliciousness.
- After simmering, strain the broth through a cheesecloth to remove the lemongrass stalks. Trust me, they’re not the chewable kind!
- Return the strained broth to a simmer. Add the tofu, mushrooms, snow peas, and rice noodles. Stir them gently so they mingle and absorb all that flavor.
- Squeeze in the lime juice whenever the mood strikes—early on for a tangy infusion, or at the end for a fresh kick. I like a bit at the start and a bit at the end.
- Simmer until the noodles are soft and the snow peas still have a slight crunch. You’ll see the edges of the pot starting to bubble as the aroma fills the room.
- Serve hot, garnishing with a sprinkle of grated ginger or some fresh scallions if you have them.
Cook’s Notes
Oh, the lemongrass! It’s the heart and soul but remember, it’s not meant to be chewed. Straining it out is crucial unless you enjoy a mouthful of fibrous stalks. This soup can be prepped a day ahead; just store the broth separately and add the noodles when reheating. Leftovers? They keep well in the fridge for a couple of days, but the noodles will get softer, so maybe add those fresh if you’re planning a day-two soup fest.
Make It Your Own
- Swap the tofu for crispy tofu or even shredded cooked chicken for a different texture.
- Throw in some sliced bell peppers for extra color and crunch.
- Use zucchini noodles instead of rice noodles for a lighter, veggie-packed version.
- If you love heat, add an extra handful of red dried peppers or a dash of chili oil on top before serving.
So, there you have it! If you try this Spicy Lemongrass Soup, I’d love to hear how it turns out—drop a comment below or tag me on social media. Happy cooking, my kitchen adventurers!
Related update: Spicy Lemongrass Soup
Related update: Thai Coconut Curry Soup
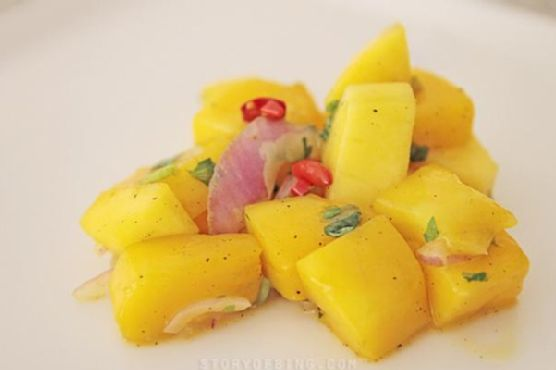
I remember the first time I tried to make Bing’s Mango Salsa. It was one of those sweltering summer days where the air conditioner is doing its best but you’re still considering just living in the fridge. I was craving something refreshing yet spicy to liven up my grilled chicken, and I had a bunch of mangoes sitting on the counter looking a bit too ripe. So, I dove into making this salsa, which turned out to be not only insanely delicious but also incredibly easy to whip up. It’s the kind of recipe you love because it makes you look like a culinary rock star with minimal effort—and it’s perfect for those last-minute BBQ invites. The combination of the sweet mangoes, zesty lime, and spicy chilis is like a little tropical vacation in a bowl. You know you need this in your life.
Jump to Recipe
What You’ll Need
The best part? Chances are you already have most of these ingredients, and they’re all about celebrating fresh, vibrant flavors.
- Sweet mangoes — the star of the show, ripe but not mushy
- Lime zest and juice — for that zesty punch
- A handful of mint leaves — or swap with coriander if you’re feeling rebellious
- 1-2 shallots or a small red onion — sliced paper-thin
- Salt and black pepper — to taste
- A sprinkle of sugar — just a pinch to balance things out
- Fresh chili — dial up the heat as per your taste
How to Make Bing’s Mango Salsa
- Start by dicing the mangoes into small cubes, about 1.5cm each. This size is perfect for ensuring every bite is juicy and flavorful.
- Toss the mango cubes into a large mixing bowl and grate the zest of one lime over them. The fragrance will hit you immediately — heaven!
- Squeeze the juice from half a lime into the bowl. Stir well, and remember, a little more lime juice can be added later if needed.
- Finely chop a bunch of mint leaves (or coriander if you’re in that camp). Add these to the bowl and give it a good mix.
- Slice the shallots or red onion as thin as you can and mix them into the mango concoction. Stir after each addition, trust me, it’s magical.
- Season with 1/2 teaspoon of salt and black pepper. Add 1 teaspoon of sugar, then stir and taste. Adjust these to your liking — it should be a delightful balance of savory, sweet, and tangy.
- Finally, chop the chillis and add them cautiously. Mix well, and taste as you go to achieve your preferred spice level.
- Cover the bowl with cling wrap and let it chill in the fridge for at least 30 minutes. This chilling time lets the flavors meld beautifully.
- Keep it chilled until you’re ready to serve. It’s best enjoyed fresh!
Cook’s Notes
Here’s a few things I’ve learned along the way:
- If you make this ahead of time, give it a good stir before serving as the juices tend to settle at the bottom.
- Leftovers can be stored in the fridge for up to 2 days, but trust me, it rarely lasts that long!
- Be mindful of the type of chili you use. Some can be much spicier than others, so add them slowly until you reach your desired heat level.
- This salsa is versatile. While it’s heavenly with grilled chicken or fish, it also makes a fantastic topping for tacos or a dip with tortilla chips.
Make It Your Own
Want to switch things up? Here are some fun variations:
- Swap the mint leaves with cilantro if you’re a fan of its bold flavor.
- Try adding some diced avocado for an extra creamy texture.
- Use pineapple or peach instead of mango for a different sweet twist.
- If you’re not a fan of heat, replace chilis with bell peppers for a milder version.
If you try this, I’d love to hear how it turns out—drop a comment or tag me! Let’s keep the kitchen adventures going. 🍍🌶️
Related update: Bing's Mango Salsa
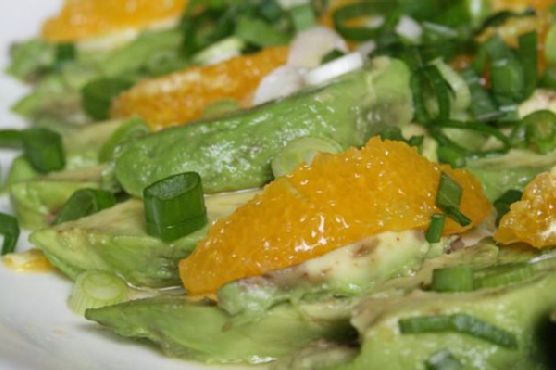
It was one of those days where I stood in front of the open fridge, hoping dinner would magically appear. You know the type, right? The sun had made a surprise appearance after a string of dreary days, and suddenly all I wanted was something fresh, vibrant, and maybe a little unexpected. That’s when the neglected oranges rolled into view, nestled next to a couple of perfectly ripe avocados. Bingo! Avocado and Orange Salad with Orange-Ginger Dressing was on the menu. It’s a salad that feels like sunshine on a plate — quick to prepare, yet impressive enough that you’ll feel like you’ve done something special. It’s got that killer combo of creamy and tangy, with the zing of ginger giving it an extra twist. Seriously, this salad is a game-changer for those nights when you want something different but can’t be bothered with too much fuss.
Jump to Recipe
What You’ll Need
This salad is all about the ingredients speaking for themselves. Chances are you already have most of this hanging around your kitchen.
- Avocados – ripe but still firm
- Oranges – sweet and juicy
- Green onions
- Orange juice – fresh is best
- Lemon juice
- Fresh ginger paste
- Agave syrup
- Olive oil
- Salt and pepper
How to Make Avocado and Orange Salad With Orange-Ginger Dressing
- Start by peeling your oranges. Cut them into segments, saving any extra juice for the dressing. Arrange the orange segments and avocado slices so they’re overlapping slightly on a platter. It should look effortlessly gorgeous.
- Take the leftover orange carcass and give it a good squeeze all over the salad, letting that sweet juice mingle with the creamy avocado. This is what dreams are made of.
- Next, slice up some green onions and sprinkle them over the salad. A pinch of salt here too to bring everything together.
- Cover the platter with cling film and pop it in the fridge. Let it chill out until you’re ready to serve.
- For the dressing, blend together orange juice, lemon juice, fresh ginger paste, agave syrup, and olive oil. Make sure to taste it — you want it balanced, so add salt and pepper as needed.
- Right before serving, pour the dressing generously over the salad. Watch as it glistens and coats everything beautifully, inviting you to dig in.
Cook’s Notes
If you’re prepping this ahead of time, keep the salad and dressing separate until you’re ready to serve. The citrus will keep the avocados from browning, but it’s always best fresh. Leftovers can be stored in the fridge for a day, but the avocados might get a bit soft. I recommend making just enough for the meal to keep everything at its peak. One more tip: make sure the ginger paste is as fresh as possible — it’s key to that lovely zing!
Make It Your Own
- Swap out the green onions for thinly sliced red onions if you prefer a bit more bite and color.
- Add some toasted almonds or walnuts for crunch. They pair beautifully with the creamy avocado.
- If you’re feeling adventurous, try adding thin slices of fennel for a mild anise flavor and an extra bit of crunch.
- For a bit of spice, sprinkle some chili flakes over the salad before drizzling with the dressing.
If you try this, I’d love to hear how it turns out — drop a comment or tag me! There’s something about this salad that just feels like a little bit of sunshine in a bowl, and I hope it brings some brightness to your table too. Enjoy, friends!
Related update: Avocado and Orange Salad With Orange-Ginger Dressing
Related update: Citrus Arugula Salad with Seared Scallops
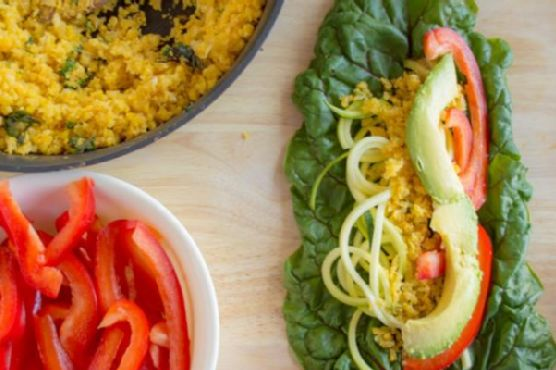
Last Tuesday was one of those days. You know the kind—when work drags, the laundry pile is a mountain, and the fridge looks like a post-apocalyptic wasteland. I needed something quick, fresh, and healthy, but my brain was too fried to concoct anything elaborate. As I rummaged through the crisper drawer, I found some vibrant swiss chard and an orange cauliflower that had somehow survived the week. With a handful of other ingredients, I whipped up some Swiss Chard Wraps. They were the perfect antidote to a hectic day: simple, fresh, and surprisingly satisfying. Plus, they look as good as they taste, which is always a bonus when you’re trying to convince your family (or yourself) to eat more greens.
Jump to Recipe
What You’ll Need
Chances are you already have most of this, but there are a few stars that make all the difference.
- Dried swiss chard leaves
- Orange cauliflower (it’s just a bit sweeter and cuter)
- Olive oil
- Garlic
- Salt
- Fresh basil
- Zucchini
- Red bell pepper
- Avocado
- Trader Joe’s spicy peanut vinaigrette
How to Make Swiss Chard Wraps
- Begin by chopping off the stems of the swiss chard right where they meet the leaf. I like to leave a bit of stem for extra crunch and structure, but feel free to stem them entirely if that’s your jam.
- Chop the cauliflower into small bits and toss them into a food processor. Give it a few pulses until it resembles rice. Yes, even the stalks!
- Heat up some olive oil in a sauté pan over medium-high heat. Once it’s shimmering, add the garlic and let it sizzle for a minute or two, until you can smell its toasty aroma.
- Add the cauliflower rice to the pan. Cook it for about 2-3 minutes until it turns a bright, cheerful orange. Stir in a pinch of salt and some chopped basil, letting the flavors mingle.
- Spiralize the zucchini using Blade B to make noodles. No spiralizer? No problem—use a vegetable peeler to create ribbons.
- To assemble, lay a swiss chard leaf flat. Pile on a bit of the sautéd cauliflower, zucchini noodles, slices of red bell pepper, and creamy avocado along the stalk.
- Drizzle some spicy peanut vinaigrette over everything (don’t be shy!) and wrap it all up snugly.
Cook’s Notes
Here’s the thing with these wraps: they really shine fresh. The swiss chard will wilt if you let it sit too long, so try to make just what you’ll eat in one go. However, if you find yourself with leftovers, pop them in an airtight container and store them in the fridge. They’ll last a day or two, but the flavors will meld and mellow a bit.
- Make the cauliflower rice a day ahead if you’re in a time crunch!
- If you’re not into raw red bell peppers, give them a quick sauté with the cauliflower rice to soften them up.
- Be generous with the vinaigrette; it’s the secret sauce that ties everything together.
Make It Your Own
- Swap the avocado: If you’re not an avocado fan, try hummus or a dollop of Greek yogurt for creaminess.
- Spice it up: Add some sliced jalapeños or a sprinkle of chili flakes to give your wraps a kick.
- Change up the greens: If you can’t find swiss chard, collard greens or large kale leaves work as excellent substitutes.
- Protein punch: Add grilled chicken, tofu, or shrimp for a more filling meal.
If you try this, I’d love to hear how it turns out—drop a comment or tag me on social media! Your kitchen adventures always brighten my day, and who knows? You might inspire the next variation. Enjoy your leafy, crunchy bites of happiness!
Related update: Southern 7 Layer Salad in a Mason Jar
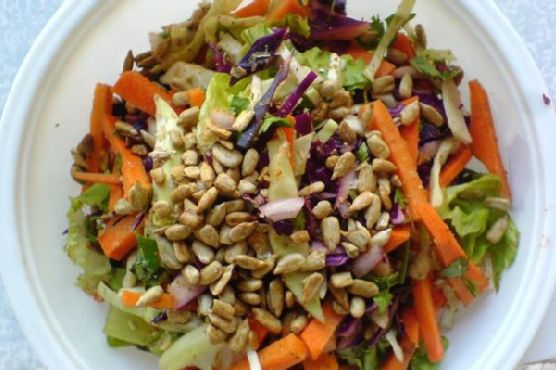
So there I was, standing in the kitchen, mid-week with a craving for something fresh yet satisfying. I’d just finished a long day of work, and the idea of a heavy meal felt like too much. My fridge had the usual suspects: a couple of carrots and half a cabbage from my last attempt at being super healthy. That’s when I remembered this Carrot and Cabbage Salad With Coriander+cumin Dry Rub. It’s one of those recipes that’s surprisingly easy and hits that magical spot between simplicity and flavor explosion. The combination of earthy spices and crunchy vegetables makes it refreshing and comforting at the same time. And the best part? It’s perfect for when you need to throw something together quickly but still feel like a kitchen wizard.
Jump to Recipe
What You’ll Need
You’re in luck because this ingredient list is all about basics that pack a punch. Chances are you already have most of this hanging out in your pantry and fridge.
- Carrots
- Green cabbage
- Red cabbage
- Cumin seed powder
- Ground coriander
- Fresh coriander
- Lime juice
- Olive oil
- Sunflower seeds
How to Make Carrot and Cabbage Salad With Coriander+cumin Dry Rub
- Start by chopping up the carrots and both the green and red cabbage into thin slivers. Aim for uniformity here so every bite is a perfect mix.
- In a large bowl, add the chopped veggies, then sprinkle in the ground coriander and cumin seed powder.
- Pour in the lime juice and olive oil. Now, roll up your sleeves and massage the spices into the veggies. You’ll know you’re done when everything’s lightly coated and you can smell the spices waking up.
- Finish by tossing in the fresh coriander and sunflower seeds. Give it a final stir to distribute these goodies evenly.
- Let the salad sit for a couple of hours. This waiting game is crucial for the spices to seep into the veggies, enriching the flavors.
Cook’s Notes
Don’t skip the resting period. This gives the spices a chance to penetrate the veggies, making them more flavorful. If you’re planning ahead, you can even prepare this salad the day before and let it sit in the fridge overnight. Just give it a quick toss before serving. Leftovers hold up surprisingly well too, so pack some for lunch the next day!
- Be sure to chop the vegetables evenly to ensure each bite is well-balanced.
- Feel free to adjust the lime juice to taste. More lime will give it a zestier kick!
Make It Your Own
- Switch out the sunflower seeds for pumpkin seeds for a different crunch.
- Add thinly sliced red onion or scallions for an extra layer of flavor.
- Replace the olive oil with avocado oil for a different, slightly nuttier taste.
- If you prefer a bit of heat, toss in some thinly sliced chili or a pinch of chili flakes.
If you try this, I’d love to hear how it turns out — drop a comment or tag me! Your variations and tweaks are always inspiring, and who knows, you might come up with the next favorite twist on this dish! 🌿🥕
Related update: Carrot and Cabbage Salad With Coriander+cumin Dry Rub
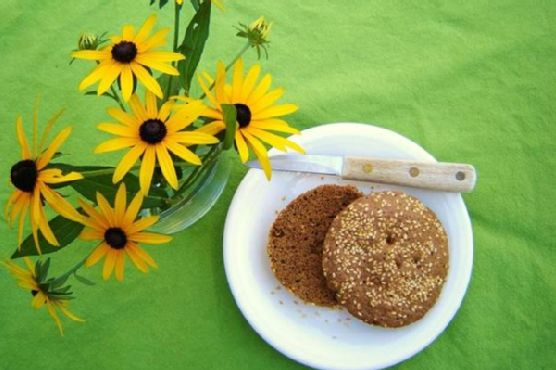
It was one of those days where I had absolutely nothing planned for dinner. You know the kind — when you open the fridge door for the third time hoping something magical will appear? Well, inspiration didn’t strike until I dug through my pantry and found a bag of sorghum flour tucked behind the lentils. It was like a lightbulb went off. I needed something quick and easy, and what’s better than a warm, freshly made bun that’s gluten-free and takes just five minutes? This recipe is not only a lifesaver for those rushed evenings but also a bit like magic in a mug. It’s comforting, satisfying, and, let’s be honest, it feels like a tiny victory to whip up bread in mere minutes.
Jump to Recipe
What You’ll Need
The beauty of these buns lies in their simplicity. Most of these ingredients are likely sitting in your pantry already, making this recipe a great go-to without a trip to the store. Here’s what you’ll gather:
- Almond meal
- Baking powder
- Cocoa powder
- Egg
- Ground flax seed
- Molasses
- Salt
- Sesame seeds
- Sorghum flour
How to Make 5 Minute Gluten Free Wonder Buns
- In a small bowl, crack open an egg and whisk it together with the molasses until well combined. You’ll smell the sweet earthy aroma of molasses starting to come through.
- In another small bowl, combine the sorghum flour, almond meal, ground flax seed, baking powder, and cocoa powder. Stir thoroughly, ensuring the mixture is even and free of clumps. The last thing you want is a surprise burst of bitter baking soda or unmixed cocoa powder.
- Pour the whisked eggs into the dry ingredient mixture and stir until the batter is smooth and glossy.
- Grab a 10 oz Pyrex custard cup, oil it lightly, and sprinkle sesame seeds on the bottom and sides. This not only prevents sticking but also adds a delightful nutty crunch to every bite.
- Pour the batter into the prepared cup, smoothing the top with a spoon. Sprinkle more sesame seeds on top for good measure.
- Pop the cup into the microwave and cook for 90 seconds. Watch as the batter rises and sets, emitting a warm and inviting aroma. Once done, let it cool for a moment before diving in.
Cook’s Notes
This recipe is pretty forgiving, but here are a few tips to keep in mind. Make sure your baking powder is fresh; otherwise, your buns won’t rise as much. If you don’t have a Pyrex custard cup, any microwave-safe mug should work, though cooking times may vary a bit. Feel free to experiment with the amount of molasses if you prefer a sweeter or less sweet bun. As for storage, these buns are best enjoyed fresh out of the microwave, but they can be stored in an airtight container for up to a day. Reheat them in the microwave for a few seconds to bring back that fresh-baked warmth.
Make It Your Own
These wonder buns are a blank canvas, ready for your culinary creativity. Here are a few ideas:
- Swap the cocoa powder for cinnamon to create a spiced bun that pairs beautifully with morning coffee.
- Add a tablespoon of grated cheese to the batter for a savory twist.
- Replace sesame seeds with sunflower seeds for a different crunch and flavor.
- For a sweeter treat, add a handful of chocolate chips before microwaving.
If you try this, I’d love to hear how it turns out — drop a comment or tag me! Whether you stick to the original recipe or put your spin on it, these wonder buns are sure to become a staple in your gluten-free recipe repertoire. Enjoy every bite!
Related update: 5 Minute Gluten Free Wonder Buns
Related update: Stuffed Pork Tenderloin with Marsala-Port Sauce

The first time I made this Strawberry-Mango Quinoa Salad, it was one of those chaotic weeknights where I just wanted something fresh and easy. You know the kind—work had run late, the fridge was a bit empty, and the idea of ordering takeout was so tempting. But then I remembered the sweet mangoes I had picked up on a whim, and the lonely strawberries sitting in the fridge. That’s when the idea hit me—what if I threw together a salad that was not only refreshing but also filled with vibrant, zesty flavors? This salad is the kind of dish that makes you feel like you’ve got it all together, even when life is a little messy. Plus, it’s super quick to whip up.
Jump to Recipe
What You’ll Need
This salad’s beauty lies in its simplicity and the burst of flavors from super fresh ingredients. Chances are you already have most of these in your kitchen:
- Quinoa – Nutty and satisfying, the base of our salad.
- Water
- Salt
- Fresh strawberries – Sweet, juicy, and perfect for adding a pop of color.
- Ripe mango – For that tropical twist.
- Cucumber – Crunchy and refreshing.
- Fresh mint – Bright and aromatic.
- Lime juice and zest – To give that zesty zing.
- Honey – For a touch of sweetness.
- Canned sour plain cream – Adds a creamy tang.
- Olive oil – Smooth and rich, tying it all together.
- Bell pepper – For some extra crunch and color.
How to Make Strawberry-Mango Quinoa Salad
- In a medium saucepan, combine the quinoa, water, and a pinch of salt. Bring it to a boil over medium-high heat. Once it starts bubbling, lower the heat and let it simmer. Cover the pan and let it cook for about 15 minutes, until the liquid is just absorbed. You’ll know it’s done when you see those little quinoa tails unfurling.
- Spread the cooked quinoa out on a baking sheet. Let it cool for about 20 minutes. It should be warm to the touch but not steaming hot—perfect for absorbing all the dressing goodness later.
- While the quinoa is cooling, grab a large bowl. Whisk together the lime juice, lime zest, honey, sour cream, and olive oil. The mixture should be smooth and slightly thick, with a lovely citrusy aroma.
- Add the cooled quinoa to the bowl. Then toss in the strawberries, mango, cucumber, and mint. Toss everything well to make sure each bite is balanced.
- Season with a pinch of salt and a grind of pepper to taste. Give it one last gentle toss, and you’re ready to serve immediately.
Cook’s Notes
This salad is as forgiving as they come. If your quinoa isn’t quite cool when you mix it with the dressing, don’t sweat it—just let it sit a little longer before adding the other ingredients. Also, always taste as you go; if your mangoes are particularly sweet, you might want to dial back a bit on the honey. Leftovers can be stored in an airtight container in the fridge for up to two days. But let’s be real, it rarely lasts that long!
Make It Your Own
Here’s where you can get playful with it:
- Swap the mango for juicy pineapple if that’s what’s on hand or in season.
- For a bit of nuttiness, toss in a handful of toasted almonds or cashews.
- Add a spicy kick by mixing in some finely chopped jalapeños or a dash of chili flakes.
- If you’re a cheese lover, crumble some feta or goat cheese on top before serving.
If you try this, I’d love to hear how it turns out—drop a comment or tag me! Whether you stick to the original or put your own twist on it, this salad is sure to bring a bit of sunshine to your table. Enjoy!
Related update: Strawberry-Mango Quinoa Salad
Related update: Carrot and Cabbage Salad With Coriander+cumin Dry Rub

Picture this: it’s a sweltering summer afternoon, and you’re yearning for something refreshing yet a little out of the ordinary. You’ve already got one foot in the kitchen, rifling through the freezer, when you stumble upon a forgotten stash of frozen raspberries. Suddenly, inspiration hits you like a cool breeze. Why not whip up a sorbet that’s as tart as your mood and just a tad mischievous, with a spicy kick to keep things interesting? This Tart Raspberry Sorbet with a Hint of Heat is exactly what you need. It’s the kind of recipe that doesn’t just cool you down but also gives your taste buds a little wake-up call. Plus, it’s ridiculously easy to make—perfect for those moments when you want to impress but can’t be bothered with a culinary masterpiece.
Jump to Recipe
What You’ll Need
You might already have most of these tucked away in your pantry and freezer, which makes this sorbet a breeze to throw together on a whim.
- Frozen raspberries – The star of the show, bringing their tart and vibrant flavor.
- Raspberry jam – For an extra burst of raspberry goodness and a bit of sweetness.
- White grape juice – To lend a subtle sweetness and some liquid gold.
- Cardamom powder – Adds an exotic warmth that pairs beautifully with the raspberries.
- Green chili – Just a little, for that unexpected kick.
- Lime juice – To enhance the tartness and add a citrusy zing.
How to Make Tart Raspberry Sorbet with a Hint of Heat
- In your food processor, combine the frozen raspberries, raspberry jam, and white grape juice. Add a pinch of cardamom powder, a small piece of green chili, and a generous squeeze of lime juice.
- Process the mixture until it’s smooth and vibrant. Listen for the change in sound as the chunks of raspberry become a luscious puree.
- Push the mixture through a fine strainer to remove most of the seeds. This part might seem tedious, but trust me, your teeth will thank you later.
- Transfer the silky mixture to a container, cover, and pop it in the freezer. Every couple of hours, check on it and give it a good stir. This keeps the texture smooth and prevents large ice crystals from forming.
- As the sorbet nears the end of its freezing journey, consider shaping it into enticing balls using an ice cream scoop or a large spoon. It’s not just about looks—it helps the sorbet melt evenly when served.
- Once frozen, let your sorbet thaw for a few minutes before serving. This little pause is crucial, especially if your freezer tends to be overzealous.
Cook’s Notes
Let’s talk about some nuances that can take this sorbet from good to unforgettable. First off, if you’re worried about the heat, start by adding just a sliver of green chili. You can always add more, but you can’t take it out. As for storage, this sorbet keeps well in the freezer for up to two weeks, though it’s best enjoyed within the first few days when the flavors are at their peak.
If you’re planning ahead, make the sorbet the day before you want to serve it. This allows it to firm up perfectly. If you end up with leftovers (unlikely, but it happens), let them soften a bit before diving back in.
Make It Your Own
This sorbet is a canvas for your creativity. Here are a few ideas to make it uniquely yours:
- Swap the raspberries for frozen strawberries for a sweeter, less tart version.
- If you’re a mint fan, add a handful of fresh mint leaves to the food processor for a refreshing twist.
- Looking for an adult-only version? Replace the white grape juice with a splash of Prosecco or a sweet white wine.
- For a nutty contrast, sprinkle a handful of toasted pistachios over your sorbet before serving.
If you try this, I’d love to hear how it turns out—drop a comment or tag me! Your adventures in sorbet-land might just inspire someone else to give it a whirl. Enjoy your chill time!
Related update: Tart Raspberry Sorbet with a Hint of Heat
Related update: S’mores-n-berry Bars for National S’mores Day – August 10
Related update: Pumpkin gnocchi with basil and Parmesan
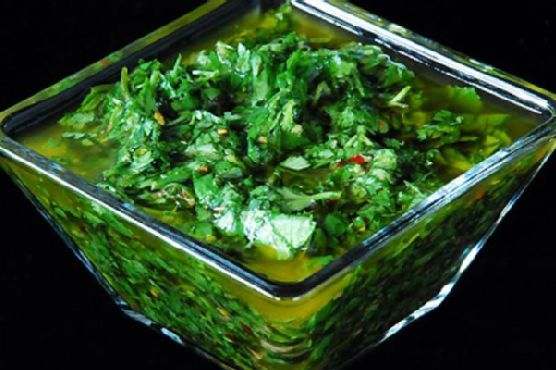
It was one of those evenings when the fridge light flickers on to reveal a collection of *almosts* — almost enough of this, almost enough of that. As I stood there contemplating the remnants of the weekend’s cooking adventures, the memory of a tangy, herby sauce came to mind, something quick yet transformative: Chimichurri. Perfect for those nights when you crave something more than just a meal — a bright, green punch of flavor to enliven whatever protein you can scrounge up. Plus, it’s one of those recipes that’s practically foolproof and endlessly adaptable. Trust me, your taste buds will thank you, and your fridge’s odds and ends might just disappear in the best way.
Jump to Recipe
What You’ll Need
I love this ingredient list because chances are, you already have most of these lying around! Here’s what you’ll need to whip up some magic:
- Parsley – the base of our green goodness
- Cilantro – for that citrusy zing
- Garlic cloves – because what’s a sauce without garlic?
- Red wine vinegar – sharp and tangy
- Olive oil – rich and smooth
- Salt – to balance and enhance
- Black fresh ground pepper – for a touch of warmth
- Red pepper flakes – a hint of heat
- Capers – optional, but they add a lovely brininess
How to Make Chimichurri
- Chop the parsley and cilantro until they’re finely minced, releasing a vibrant, fresh aroma. Toss them into a medium mixing bowl.
- Mince the garlic cloves and add them to the bowl, stirring until these aromatic delights are evenly distributed among the greenery.
- Pour in the red wine vinegar, then sprinkle in the salt, black pepper, and red pepper flakes. Stir gently, letting the fragrance of the vinegar meld with the herbs.
- Slowly drizzle in the olive oil, stirring as you go, until everything is well-coated and glistening. The mixture should be thick, not soupy, holding together beautifully.
- Let the chimichurri sit for about 30 minutes. As it rests, the flavors will meld together, creating that punchy, tangy blend that’s oh-so-addictive.
Cook’s Notes
Chimichurri is all about balance and personal preference. If you find the sauce too tangy, add a bit more olive oil. Too mild? A pinch more salt might do the trick. I like to make it ahead of time and let it sit in the fridge overnight — the flavors just seem to get better. Store any leftovers in a tightly sealed jar in the refrigerator; it should stay fresh for about a week. Just give it a good stir before using it again. And remember, this isn’t just a sauce for meats; drizzle it over roasted veggies or even mix it into your scrambled eggs for a herby twist.
Make It Your Own
- Swap the cilantro for fresh mint for a refreshing spin that’s perfect over lamb.
- Add a teaspoon of lemon zest for a citrusy burst that pairs beautifully with grilled fish.
- Incorporate some finely chopped shallots for a subtle sweetness and depth.
- Replace red wine vinegar with apple cider vinegar for a slightly sweeter, fruitier undertone.
If you try this, I’d love to hear how it turns out — drop a comment or tag me in your photos! Let’s see those creative tweaks and the delicious results. Happy saucing!
Related update: Chimichurri