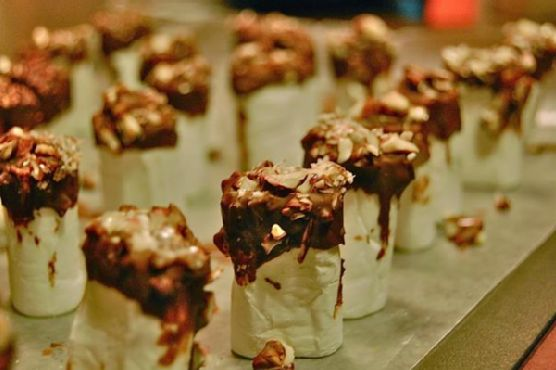
I was in the middle of a marathon of holiday movies when I realized my sweet tooth was acting up. You know that moment when the snow is falling on screen, and you just want something warm and chocolaty to match the vibe? That was me. But I didn’t want just another hot chocolate; I needed something extra special. Enter my Candy Cane Chocolate Marshmallows. These babies are the perfect combination of sweet, crunchy, and gooey goodness, and the best part? They’re super easy to make! Imagine enjoying these with friends, exchanging gifts, or just treating yourself on a chilly night—total bliss.
Jump to Recipe
What You’ll Need
Alright, here’s the good news: you probably have most of this stuff already lurking in your pantry. These marshmallows are all about the simple joys of the holiday season.
- Candy canes – grab a few from your tree or stash!
- Dark chocolate – for that rich, decadent coating.
- Milk chocolate – adds a creamy sweetness.
- Marshmallows – the stars of the show.
How to Make Candy Cane Chocolate Marshmallows
- First, let’s smash those candy canes! Place them in a zip-top bag and use the bottom of a glass or a mallet to crush them into small pieces. You want a mix of dust and tiny chunks.
- Now, set up a double boiler on your stove. If you don’t have one, just place a heatproof bowl over a pot of simmering water. Make sure the bowl doesn’t touch the water.
- Add the dark chocolate and milk chocolate to the bowl. Stir occasionally until the chocolate is fully melted and smooth. Inhale deeply—the smell is pure heaven.
- Grab a marshmallow, dip it halfway into the melted chocolate, spinning it slightly to get a good coat.
- Immediately dip the chocolate-covered marshmallow into the crushed candy canes. Press gently so the pieces stick to the chocolate, creating a crunchy layer.
- Place the marshmallows on a sheet of wax paper. Let them chill in the fridge for at least an hour, or until the chocolate hardens.
Cook’s Notes
Okay, a few tips from my kitchen to yours. First, make sure your chocolate doesn’t scorch; keep the heat low and steady. If you’re planning to make these ahead, they store beautifully in an airtight container for up to a week. Just keep them in a cool spot to prevent any accidental melting. Also, if you find your candy canes getting sticky, toss them back into the fridge for a bit—they’ll be easier to work with when they’re cool and crisp.
Make It Your Own
Here are some fun twists you can try:
- Swap out the candy canes for crushed pretzels if you prefer a salty-sweet combo.
- Use white chocolate instead of milk chocolate for a different flavor profile.
- Roll the marshmallows in crushed nuts for extra crunch and a nutty flavor.
- Add a sprinkle of sea salt on top of the chocolate layer for an elevated touch.
If you try this, I’d love to hear how it turns out—drop a comment or tag me in your photos! These little treats are sure to spread some holiday cheer in your home. Enjoy every bite!
Related update: Candy Cane Chocolate Marshmallows
Related update: Vegetarian Scotch Eggs
Related update: Frozen Mojito Pie
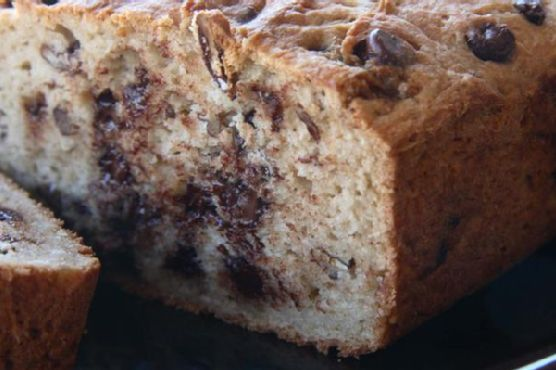
One chilly evening last fall, I found myself in the kitchen, craving something warm and comforting. My cupboard was a bit of a disaster, full of bits and bobs from baking adventures past. A half-used bag of gluten-free flour, some chocolate chips I had been furtively snacking on, and a nearly empty jar of pecans were calling to me. It was definitely a “use what you have” kind of night. As I pulled ingredients together, a gluten-free chocolate-pecan quickbread was born — a delightful mix of melty chocolate and crunchy pecans, wrapped in a tender, slightly sweet loaf. The best part? It made my entire kitchen smell like a cozy bakery on a crisp autumn day. If you’re looking for something that’s both indulgent and easy to whip up, this quickbread might just be your new favorite.
Jump to Recipe
What You’ll Need
The beauty of this quickbread lies in its simplicity. You likely have most of these ingredients on hand:
- Butter, for that irresistible richness
- Gluten-free flour, to keep things friendly for all tummies
- Sugar and brown sugar, for sweetness and a hint of molasses flavor
- Baking soda, to give our loaf a little lift
- Salt, to balance everything out
- Semi-sweet chocolate chips, because chocolate makes everything better
- Pecans, for that nutty crunch
- Eggs, to bind and add moisture
- Unsweetened applesauce, a sneaky moisture-hero
- Vanilla-honey Greek yogurt, for tang and tenderness
- Vanilla extract, because why not double down on vanilla goodness?
How to Make Gluten-Free Chocolate-Pecan Quickbread
- First things first, preheat your oven to 350 degrees Fahrenheit. Butter your trusty 5″x9″ loaf pan and set it aside.
- Gently heat the butter until it’s just melted. Set it aside to cool — you don’t want scrambled eggs in your bread!
- In a large bowl, combine the gluten-free flour, sugar, brown sugar, baking soda, and salt. Give it a good whisk to break up any lumps.
- Stir in the semi-sweet chocolate chips and pecans. This is starting to look delicious already, isn’t it?
- In a separate bowl, whisk together the eggs, applesauce, yogurt, vanilla extract, and the cooled melted butter.
- Pour the wet mixture into the dry ingredients and stir until just combined. Be gentle here; over-mixing is not our friend.
- Pour the batter into the prepared loaf pan, smoothing out the top with a spatula.
- Bake in your preheated oven for about an hour, or until a toothpick inserted into the center comes out clean. The top should be golden and your kitchen will smell heavenly.
- Allow the loaf to cool in the pan for 10 minutes before transferring it to a wire rack to cool completely. Patience, my friend!
Cook’s Notes
Let’s talk about some little tips that make a big difference. First, feel free to use whatever gluten-free flour blend you love; they all work here. Just make sure it has xanthan gum in it, or add a teaspoon if it doesn’t. If your loaf turns out a bit too crumbly, you may have over-mixed, which is easy to do. Treat the batter gently! As for storage, keep your quickbread in an airtight container at room temperature for up to three days. It also freezes beautifully — just slice and wrap individual pieces for easy snacking later.
Make It Your Own
Here’s where you get to play around:
- Swap the pecans for walnuts if you’re feeling nutty.
- Use dark chocolate chips for a more intense chocolate experience.
- Add a teaspoon of cinnamon to the dry mix for a warm, spicy touch.
- Substitute the vanilla-honey Greek yogurt for plain Greek yogurt and an extra teaspoon of honey if that’s what you have on hand.
If you try this, I’d love to hear how it turns out — drop a comment or tag me! Happy baking, and may your kitchen be filled with the sweet aroma of chocolate-pecan goodness.
Related update: Gluten-Free Chocolate-Pecan Quickbread
Related update: Candy Cane Chocolate Marshmallows
Related update: Braised Pork: Filipino Humba
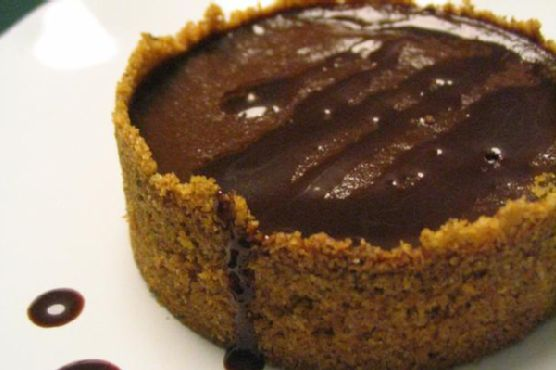
I was standing barefoot in my kitchen, staring down a can of pumpkin puree with the kind of resolve usually reserved for epic culinary battles. It was mid-October, and my house was awash with the smell of burning leaves from the neighborhood bonfires. I craved something cozy yet indulgent, and not just another pumpkin pie — no, this had to be something with a little extra pizzazz. Enter the Triple Chocolate Pumpkin Pie. It’s the perfect treat for when you need to impress without stress. It’s rich, a bit decadent, and just when everyone thinks they’ve guessed the flavor, the trio of chocolates takes them by surprise. Trust me, this isn’t your average pumpkin dessert.
Jump to Recipe
What You’ll Need
I bet you have most of these ingredients lounging in your pantry already. This pie brings together the familiar comforts of fall spices with the irresistible pull of chocolate.
- Ground graham cracker crumbs – the base of our crust
- Unsalted butter
- Granulated sugar
- Light-brown sugar
- Coarse salt
- Ground cinnamon
- Bittersweet chocolate
- Semisweet chocolate
- Canned solid-pack pumpkin
- Canned evaporated milk
- Eggs
- Cornstarch
- Vanilla extract
- Ground ginger
- Ground nutmeg
- Milk chocolate – for that final drizzle
How to Make Triple Chocolate Pumpkin Pie
- Preheat your oven to 350 degrees. In a bowl, mix together the graham cracker crumbs, butter, sugars, salt, and cinnamon until it resembles wet sand.
- Press this crumbly mixture firmly into the bottom and up the sides of a deep, 9 1/2-inch pie dish. It should feel like you’re building a sandy fortress.
- Bake the crust until it’s firm, about 8 to 10 minutes. Once done, take it out and immediately sprinkle the bittersweet chocolate over the bottom. Pop it back in the oven for just a minute more to melt.
- Spread the melted chocolate in a thin layer along the bottom and up the sides. Let this cool on a wire rack while you move on to the filling.
- Reduce the oven temperature to 325 degrees. Set up a double boiler and melt the semisweet chocolate with butter, stirring until smooth and glossy.
- In a separate bowl, mix together the pumpkin, evaporated milk, brown sugar, eggs, cornstarch, vanilla, salt, cinnamon, ginger, and nutmeg. This is your spicy pumpkin concoction.
- Whisk about a third of the pumpkin mix into the melted chocolate. Once smooth, whisk in the remaining pumpkin mixture until fully combined.
- Place your pie dish on a rimmed baking sheet, then pour the pumpkin-chocolate mix into the crust. The anticipation should be building right about now.
- Bake until the center is set but still slightly wobbly, roughly 55 to 60 minutes. Let it cool on a wire rack, then refrigerate for at least 8 hours or overnight for best results.
- Before serving, melt the milk chocolate and drizzle it over the chilled pie, creating tempting ribbons of sweetness. Serve immediately and watch the magic unfold.
Cook’s Notes
This pie is a breeze, but here are a few thoughts to keep in mind. When pressing the crust into the pie dish, make sure you really pack it down to avoid crumbling later. Letting the pie chill overnight isn’t just a suggestion — it’s a non-negotiable. The flavors deepen, and the texture becomes perfectly set. If your pie cracks a little, don’t sweat it. That chocolate drizzle will cover a multitude of sins, plus a little imperfection just adds to the homemade charm.
Make It Your Own
Here are a few twists to make this pie uniquely yours:
- Swap the graham cracker crumbs for gingersnaps to add an extra spicy kick.
- For a nutty twist, add a thin layer of chopped pecans on top of the melted chocolate layer in the crust.
- Replace semisweet chocolate with dark chocolate for a more intense cocoa hit.
- Sprinkle a bit of sea salt over the milk chocolate drizzle for a sweet-salty combo.
If you try this, I’d love to hear how it turns out — drop a comment or tag me! I’m already dreaming about that first bite.
Related update: Triple Chocolate Pumpkin Pie
Related update: Gluten-Free Pressed Lemon Butter Cookies
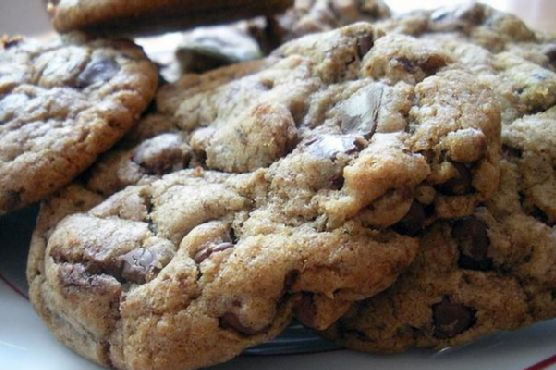
It was one of those chaotic Tuesday afternoons when everything seemed to be happening all at once. My inbox was overflowing, the laundry was threatening to become a second couch, and the dog was doing her best to convince me that she hadn’t been fed in weeks with those soulful eyes. As I rummaged through my pantry, I stumbled upon a forgotten stash of chocolate chips and suddenly, the only logical thing to do was to bake. Enter: Neiman Marcus Oatmeal Chocolate Chip Cookies. This recipe is that perfect balance between a comforting classic and a little twist that makes it feel special. It’s the kind of cookie that makes a regular Tuesday feel like a mini celebration. And the best part? These cookies are incredibly easy to whip up, even when life feels a bit like a juggling act.
Jump to Recipe
What You’ll Need
Trust me, chances are you already have most of these hanging out in your kitchen, just waiting to become something amazing.
- 1 cup unsalted butter, softened
- 1 cup granulated sugar
- 1 cup brown sugar, packed
- 2 large eggs
- 1 teaspoon vanilla extract
- 2 cups all-purpose flour
- 2 ½ cups blended oatmeal (measure before blending)
- ½ teaspoon salt
- 1 teaspoon baking powder
- 1 teaspoon baking soda
- 12 ounces chocolate chips
- 1 4-ounce chocolate bar, grated
- 1 ½ cups chopped walnuts
How to Make Neiman Marcus Oatmeal Chocolate Chip Cookies
- Preheat your oven to 375 degrees F. The anticipation of warmth is part of the magic.
- In a large bowl, cream together the butter, granulated sugar, and brown sugar until the mixture is light and fluffy. You’re aiming for a dreamy, creamy consistency here.
- Add in the eggs, one at a time, and beat until just incorporated. Don’t forget the vanilla — it’s the unsung hero that ties everything together.
- Gradually mix in the flour, blended oatmeal, salt, baking powder, and baking soda. The dough will start to smell like a promise of good things to come.
- Fold in the chocolate chips, grated chocolate bar, and walnuts. You’ll want to use a spatula to make sure everything is evenly distributed and each scoop is a treasure trove of goodies.
- Roll the dough into balls and place them about two inches apart on a cookie sheet. This gives them room to spread and become their best cookie selves.
- Bake for about 10 minutes. Keep an eye out for those edges to turn golden and the aroma to fill your kitchen. That’s when you know they’re ready.
Cook’s Notes
Let’s be real — these cookies are hard to mess up. But here are a few thoughts to keep in mind. If your butter isn’t soft enough, you can microwave it for a few seconds, but watch closely — nobody wants half-melted butter. When blending your oatmeal, aim for a texture that’s slightly coarser than flour; it adds a delightful chewiness to the cookies. These cookies are at their most divine fresh out of the oven, but they’ll keep well in an airtight container for up to a week, if they last that long. You can even freeze the dough balls to bake later. Just add a couple of minutes to the bake time.
Make It Your Own
- Swap the walnuts for pecans or almonds if that’s your jam. Each nut brings its own character to the party.
- If you’re not a fan of oats, try substituting with crushed cornflakes for a different kind of crunchy texture.
- Go wild and use white chocolate chips instead of the regular ones if you’re feeling fancy.
- Add a teaspoon of cinnamon or espresso powder for a little extra depth in flavor. It’s like giving your cookies a secret superpower.
If you try this, I’d love to hear how it turns out — drop a comment or tag me! Happy baking, and may your Tuesday be as sweet as these cookies.
Related update: Neiman Marcus Oatmeal Chocolate Chip Cookies
Related update: Fall Fruit Compote

It was a typical Wednesday evening, and I found myself rummaging through the pantry, desperately seeking something to satisfy my sweet tooth. The weather outside was chilly, the kind of evening that begged for something cozy and chocolatey. In the midst of my search, I stumbled upon a forgotten container of dark cocoa powder wedged between bags of flour and sugar. It was then that the idea struck me — Chocolate Crinkle Cookies. These cookies are like a warm hug: comforting, slightly crunchy on the outside, chewy on the inside, and oh-so-chocolaty. Perfect for a spontaneous midweek baking session, especially when they’re this easy to make. Within an hour, my kitchen was filled with the scent of rich cocoa, and I knew I’d found my new favorite go-to treat for those cold, restless evenings.
Jump to Recipe
What You’ll Need
Imagine the delight of realizing that you already have most of these ingredients lounging in your pantry. Here’s what you need to create these delightful cookies:
- Vegetable oil – keeps the cookies moist
- Sugar – for sweetness and texture
- Vanilla extract – adds a lovely aroma
- Eggs – the glue that binds
- Dark cocoa powder – the heart of the chocolatey goodness
- Flour – the base of any good cookie
- Baking powder – gives those crinkles their puff
- Confectioners’ sugar – for that signature snowy look
How to Make Chocolate Crinkle Cookies
Ready to dive into the wonderful world of crinkly cookies? Here’s the step-by-step:
- Start by mixing the vegetable oil, sugar, and vanilla extract in a mixing bowl. You’ll know it’s right when the mixture looks like wet sand glistening in the sun.
- Add the eggs one at a time, mixing well after each addition until the batter is silky and smooth.
- Incorporate the dark cocoa powder into the mixture, slowly stirring until it turns into a rich, dark chocolate color.
- Combine the flour and baking powder with the wet ingredients. Continue mixing until you have a smooth dough that’s slightly thicker than cake batter.
- Chill the dough in the refrigerator for at least 4 hours. This step isn’t just a suggestion — it’s crucial for achieving perfect crinkles.
- When you’re ready, preheat your oven to 350°F. Line a cookie sheet with greaseproof paper or a nonstick silicone mat.
- Using an ice cream scooper, scoop out the dough and roll each ball generously in confectioners’ sugar. Make sure they’re well-coated for that iconic crinkle effect.
- Place the dough balls on the cookie sheet, leaving about 2 inches of space between each to allow for spreading.
- Bake for 12 minutes. You’ll know they’re done when the edges are firm and the tops have a cracked, powdered sugar crust.
- Let the cookies cool on the sheet initially, then transfer them to a wire rack to finish cooling completely. This helps them firm up nicely.
Cook’s Notes
Let’s chat kitchen wisdom for a second. The dough is sticky, and that’s normal — resist the urge to add more flour! Chilling the dough helps it firm up enough to handle, so don’t skip that step. If you’re in a pinch, you can speed-chill in the freezer for about 30 minutes. These cookies are best enjoyed fresh, but they’ll keep in an airtight container for about a week. To revive day-old cookies, zap them in the microwave for a few seconds — they’ll taste freshly baked!
Make It Your Own
Feeling adventurous? Here are a few ways to tweak these cookies to suit your mood:
- Swap out the dark cocoa powder for regular cocoa powder if you prefer a milder chocolate flavor.
- Add a teaspoon of espresso powder to the dough for a subtle coffee kick that pairs beautifully with the cocoa.
- Fold in some chocolate chips or chunks just before chilling for an extra burst of chocolate in every bite.
- For a festive twist, mix in a teaspoon of peppermint extract or a handful of crushed candy canes.
If you try this, I’d love to hear how it turns out — drop a comment or tag me! Whether you’re indulging alone or sharing with loved ones, these Chocolate Crinkle Cookies are sure to bring a smile. Happy baking!
Related update: Chocolate Crinkle Cookies
Related update: Mangoes with Rum and Ice Cream
It was one of those days where the clouds just wouldn’t quit, and the afternoon seemed to stretch on forever. I was staring at a ridiculously overripe banana when inspiration struck — not banana bread, but something unexpected, and maybe even a little healthier. That’s when I thought of these Whole Wheat Blueberry Brownies. They’re the perfect mix of indulgence and nourishment, with a tangy twist thanks to the blueberries. A little dense, definitely chocolaty, and oh-so-simple to whip up. You’re gonna love the way the whole wheat adds a subtle nuttiness, and if you happen to have a pint of fresh blueberries sitting around, well then, my friend, you’re in for a treat.
Jump to Recipe
What You’ll Need
Most of these goodies are probably hanging out in your pantry already, just waiting to become besties in this delightful treat. Let’s make it happen:
- 1 cup whole wheat pastry flour
- 1/2 cup cocoa powder
- 1/2 teaspoon salt
- 1/2 teaspoon baking powder
- 1/4 teaspoon baking soda
- 1/2 teaspoon cinnamon
- 1/2 cup sugar
- 1/2 cup brown sugar
- 1 large egg
- 1/2 cup low fat sour cream
- 1/4 cup almond milk
- 1 teaspoon vanilla extract
- 1 cup fresh blueberries
How to Make Whole Wheat Blueberry Brownies
- Preheat your oven to a cozy 350 degrees Fahrenheit. While it warms up, grab an 8 x 8 x 2-inch baking pan and give it a good coat of cooking spray. You don’t want these beauties sticking!
- In one bowl, whisk together the dry stuff: whole wheat pastry flour, cocoa powder, salt, baking powder, baking soda, and cinnamon. Take a moment to marvel at the chocolatey goodness forming already.
- In a separate bowl, beat the egg, then mix in the low fat sour cream, almond milk, and vanilla extract. It should be smooth and slightly glossy.
- Now, gently fold the wet ingredients into the dry mix. Stir until you can no longer see streaks of flour, and everything looks like a harmonious, silky batter.
- Time to bring in the stars of the show — fold in those plump blueberries with the same care you’d show a friend running a relay race. You want them evenly distributed but not squished.
- Pour the batter into your prepared pan, spreading it with a spatula so it’s nice and even. Slide it into your preheated oven and let it bake for 20-25 minutes. You’ll know it’s ready when a toothpick inserted in the center comes out clean.
- Let them cool in the pan for a bit. The waiting is hard, but trust me, it’s worth it for that first bite that won’t burn your tongue.
Cook’s Notes
These brownies are a bit more rustic (in a good way) due to the whole wheat flour. If your taste buds are a little shy of tang, swap the low fat sour cream for full-fat or even Greek yogurt. They’ll keep in an airtight container for about four days, assuming there are any leftovers. If you’re planning ahead, you can make the batter the night before and bake them fresh in the morning. Just fold in the blueberries right before you bake!
Make It Your Own
- For a more decadent treat, replace the almond milk with full-fat coconut milk and get a subtle tropical twist.
- Substitute the fresh blueberries with raspberries for a tart and tangy variation that cuts through the chocolate beautifully.
- If you’re feeling nutty, toss in a handful of chopped walnuts or pecans for some extra crunch.
- For a touch of spice, add a pinch of cayenne pepper to the mix. Chocolate and spice are a match made in dessert heaven.
If you try this, I’d love to hear how it turns out — drop a comment or tag me! There’s nothing better than sharing a sweet success. Enjoy every chewy, blueberry-filled bite!
Related update: Whole Wheat Blueberry Brownies
Related update: Chocolate Crinkle Cookies

It was one of those random Tuesday nights when my sweet tooth orchestrated a full-blown coup d’état. You know the kind—no amount of Netflix snacking could quell the uprising. I needed something decadent, something with a little kick. Enter: Chocolate and Szechuan Peppercorn Brownies. These brownies aren’t just another chocolate fix; they dance on your taste buds with a spicy, aromatic surprise. Imagine the rich, fudgy goodness of classic brownies with a cheeky Szechuan twist. Intrigued? You should be.
Jump to Recipe
What You’ll Need
When I say you probably have most of this already, I mean it. The secret stars here are the **Szechuan peppercorns** and **cinnamon stick**. Trust me; they make all the difference.
- 1 cup **brown sugar**
- 1/2 cup **butter**
- 1 **cinnamon stick**
- 3 **eggs**
- 1 tablespoon **espresso** (brewed or powder)
- 3/4 cup **flour**
- 1/2 cup granulated sugar
- 1/2 cup **heavy cream**
- 1 teaspoon **kosher salt**
- 1/4 cup milk
- 1 tablespoon **Szechuan peppercorns**
- 1 cup semisweet chocolate chips
- 4 ounces **unsweetened chocolate**
- 1/4 cup unsweetened cocoa powder
- 1 teaspoon **vanilla extract**
How to Make Chocolate and Szechuan Peppercorn Brownies
- Preheat your oven to 350°F (175°C) and grease an 8×8 baking dish.
- In a large sauté pan over medium heat, melt the butter. Add the **Szechuan peppercorns** and **cinnamon stick**. You’ll know it’s ready when the butter stops foaming and you see those lovely browned bits at the bottom—around 5 minutes.
- Meanwhile, in a double boiler or microwave, melt the **unsweetened chocolate** and semisweet chocolate together. Stir in the **espresso** for that extra depth.
- Remove the peppercorns and cinnamon stick from the butter (straining works wonders). Return the butter to the pan and stir in the sugars, milk, vanilla, and salt. Then mix in the chocolate-espresso concoction along with the cocoa powder.
- Beat in the eggs one at a time, ensuring each is well incorporated. Finally, fold in the flour gently until the batter is just mixed.
- Pour the batter into your prepared dish and bake for 25-30 minutes. A tester should come out mostly clean—feel free to underbake for extra gooeyness.
- Once the brownies are cooled, it’s ganache time! Simmer the heavy cream and peppercorns in a small pot. Strain out the peppercorns and stir in the semisweet chocolate chips until you’ve got a silky ganache. Spread this over the brownies and, for pro-level firmness, refrigerate them until the ganache sets.
Cook’s Notes
These brownies are best enjoyed the day they’re made, but let’s be real—brownies never last long, do they? If they somehow do, keep them in an airtight container in the fridge for up to a week. The ganache will harden a bit, but it just adds to the chewy texture when you bite into them. If you’re a make-ahead kind of person, you can make the brownies a day in advance and ganache them right before serving.
If you find your brownies a bit too spicy or not spicy enough, play around with the amount of Szechuan peppercorns next time. Some like it hot!
Make It Your Own
- **Nutty Variation**: Swap half the flour for almond meal for a nutty, chewy twist.
- **Milk Chocolate Fans**: Use milk chocolate chips in the ganache instead of semisweet for a creamier topping.
- **Coffee Lovers**: Double the espresso for an intensely rich mocha brownie.
- **Spice It Up**: Toss a pinch of cayenne into the batter for those who crave a more pronounced kick.
If you try this, I’d love to hear how it turns out—drop a comment or tag me! And remember, life is too short to skip dessert. Enjoy every fudgy, peppery bite!
Related update: Chocolate and Szechuan Peppercorn Brownies
Related update: Homemade Banana Bread
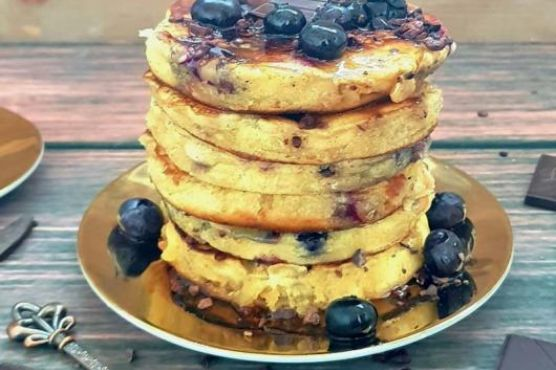
Last Tuesday morning was one of those days where I just needed a little something extra to kickstart the day. You know the ones — when your brain is stuck somewhere between sleep and waking, your mug of coffee is feeling more like a warm hug than a caffeine fix, and breakfast needs to be something special but not overly demanding. That’s when these Blueberry, Chocolate & Cacao Superfood Pancakes came to the rescue. They’re those perfect pancakes that feel like you’re treating yourself to something really indulgent, yet they’re totally guilt-free. Plus, they’re gluten-free, paleo, and vegan! It’s like a breakfast trifecta. Ready to dive in? Trust me, these are worth the short time it takes to whip them up.
Jump to Recipe
What You’ll Need
Here’s the best part: chances are you already have most of these goodies hanging out in your pantry. No need for a special trip to the store when the craving hits!
- Almond flour
- Coconut flour
- Tapioca or arrowroot flour
- Nut, hemp, or coconut milk
- Baking powder
- Vanilla bean paste or extract
- Himalayan sea salt
- Frozen blueberries
- Cacao nibs
- Dark chocolate
How to Make Blueberry, Chocolate & Cocao Superfood Pancakes – Gluten-Free/Paleo/Vegan
- Grab a mixing bowl and combine the almond flour, coconut flour, and tapioca or arrowroot flour with the baking powder and a pinch of Himalayan sea salt. Give it a good mix until everything is nicely blended.
- Pour in the nut, hemp, or coconut milk along with the vanilla bean paste or extract, and whisk it all together until you have a smooth, dreamy batter. Let this beauty sit for 10-15 minutes. It’s like letting the batter take a mini-vacation to thicken up.
- Heat a smidge of coconut oil in your favorite skillet over medium heat. Once it’s warm and cozy, pour just enough batter into the center to form a pancake.
- Cook until the edges start to brown and you see bubbles gracing the surface. This is your cue to sprinkle a few blueberries on the pancake.
- Flip the pancake with confidence, cook for another minute or two, then immediately sprinkle cacao nibs and dark chocolate on the top. Let them melt and meld into pure bliss.
- Remove the pancake once fully cooked and repeat with the rest of the batter. Stack them up, drizzle with a little agave if you’re feeling it, and savor the moment!
Cook’s Notes
These pancakes are wonderfully adaptable, so don’t stress if you’re missing an ingredient. You can even mix the dry ingredients the night before to save a few precious minutes in the morning rush. Storing leftovers? Just pop them in an airtight container in the fridge, and they’re good for a couple of days. Reheat in a skillet over low heat or simply enjoy them cold. Making a larger batch and freezing them is also an option; just layer parchment paper between each pancake to keep them from sticking together.
Make It Your Own
- Swap out the frozen blueberries for fresh raspberries or chopped strawberries for a berry twist.
- Substitute the cacao nibs with crushed pecans or walnuts for a nutty crunch.
- If you’re not strictly vegan, a spoonful of Greek yogurt with honey makes an unbeatable topping.
- For a tropical flair, toss in a handful of shredded coconut before flipping.
If you try this, I’d love to hear how it turns out — drop a comment or tag me! Enjoy every delicious bite of these pancakes, knowing you’re starting the day in the best way possible. 😊
Related update: Blueberry, Chocolate & Cocao Superfood Pancakes – Gluten-Free/Paleo/Vegan
Related update: Breakfast Biscuits and Gravy

Thanksgiving at my place is never complete without a little bit of chaos and a lot of laughter. One year, I thought I’d try my hand at a new dessert after we had a bit of a mishap with the pumpkin pie (don’t ask!). In the spirit of whimsy and fun, I concocted these adorable little OREO Turkeys that not only saved the day but also became a family favorite. These treats are deceptively simple to make and a delightful project to get kids involved in. Plus, who can resist the combination of OREO cookies and chocolate? Trust me, once you try them, they’ll be a staple at every Thanksgiving feast. Jump to Recipe
What You’ll Need
This ingredient list is a breeze, and chances are you’re already stocked up on most of it, especially if you’ve got a sweet tooth like me!
- OREO cookies (3 cups, crushed)
- Cream cheese (softened)
- Sweet semi baking chocolate (melted)
- Candy corn
- Candy eyes
- Icing (as glue)
How to Make OREO Turkeys for Thanksgiving
- First up, grab a package of OREO cookies and crush them up finely. We’re talking almost powdery, so they mix well.
- Mix the crushed OREO cookies with softened cream cheese until you have a smooth, pliable dough. It should feel like a rich, chocolatey clay.
- Roll this mixture into one-inch balls. They should be small enough to handle easily but big enough to hold their own as a turkey body.
- Pop those balls into the freezer for a quick chill — about 10 minutes should do the trick. This helps them firm up for the chocolate dip.
- Dip each ball into the melted chocolate, making sure it’s completely coated, and place them on a cookie sheet lined with wax paper. The chocolate should be smooth and glossy.
- Refrigerate the chocolate-coated balls for 15 minutes to an hour. This gives them a nice, firm shell.
- Now the fun part: decorating! Stick 5 candy corn pieces into the back of each ball to create colorful tail feathers.
- Use icing as glue to attach candy eyes towards the front top of the ball. We want those eyes peering out cutely!
- For the finishing touch, take a candy corn and cut it into pieces. Use the white tip for a nose and stick it under the eyes, then use the orange pieces as feet. Your turkey should look absolutely adorable!
Cook’s Notes
If your cookie balls are too sticky to roll, try chilling the mixture for a bit longer. It should be firm yet pliable. Don’t worry if your OREO Turkeys aren’t perfect; their charm is in their handmade look! You can make these a day ahead and store them in the refrigerator to keep the chocolate nice and solid. Leftovers (if there are any) can be kept in an airtight container for up to a week.
Make It Your Own
- Swap the candy eyes with mini chocolate chips. They’re just as cute and give a different texture.
- Use white chocolate instead of semi-sweet for a sweeter, more vibrant look.
- Try using different flavored OREOs, like mint or peanut butter, for a twist on the classic flavor.
- Add a dash of cinnamon to the cream cheese mixture for a subtle, warm hint of spice.
If you try this recipe, I’d love to hear how it turns out — drop a comment or tag me on social media! Your feedback and creativity always make my day. Happy Thanksgiving, and may your kitchen be filled with delightful chaos!
Related update: How to Make OREO Turkeys for Thanksgiving

Last winter, I found myself staring down a half-eaten box of candy canes—a festive gift from my overly enthusiastic neighbor. I adore peppermint, but there’s only so much peppermint tea one can drink! Desperate to create something my friends and family would devour, it hit me: those candy canes needed a sweet partner. Enter my Candy Cane Chocolate Marshmallows. Perfect for a cozy evening in your favorite fuzzy socks, these treats are surprisingly easy to make and look infinitely more impressive than the effort they require. They’re the kind of thing you whip up to wow guests during holiday gatherings or to simply satisfy that post-dinner sweet tooth while binge-watching your favorite show. Trust me, they’re a hit! Jump to Recipe
What You’ll Need
This recipe is like a scavenger hunt in your pantry; chances are you already have most of the goodies tucked away. Here’s what you’ll need:
- Candy canes – the stars of the show!
- Dark chocolate – for that rich, bittersweet contrast.
- Marshmallows – go for the big, fluffy kind.
- Milk chocolate – adds a creamy sweetness to balance the dark chocolate.
How to Make Candy Cane Chocolate Marshmallows
- First, let’s get those candy canes ready. Grab a few and crush them using the bottom of a sturdy glass or a mallet. You want pieces small enough to stick but not so tiny that they turn to dust. Set them aside.
- Set up a double boiler by placing a heat-safe bowl over a pot of simmering water. Make sure the bottom of the bowl doesn’t touch the water. Add the dark and milk chocolate to the bowl, stirring occasionally until the mixture is smooth and glossy.
- Now for the fun part—dip each marshmallow into the melted chocolate, ensuring it’s nicely coated but not drowning. Let the excess drip off back into the bowl.
- Immediately roll the chocolate-dipped marshmallow into the crushed candy canes. The pieces should stick to the chocolate, creating a delightful crunchy coating.
- Place each finished marshmallow on a sheet of wax paper. They’ll need to chill in the fridge for at least an hour, or until the chocolate has fully hardened.
Cook’s Notes
These little delights are pretty forgiving, so don’t stress if things get a bit messy. Here are a few pointers to keep you on track:
- If you don’t have a double boiler, don’t sweat it. Use a microwave in short bursts to melt the chocolate, stirring in between.
- Store your marshmallows in an airtight container in a cool, dry place. They should last up to a week, but honestly, they’ll probably disappear much sooner!
- To make ahead, prepare them up to two days in advance. They’re the perfect treat to have waiting for last-minute guests or unexpected sweet cravings.
Make It Your Own
- Try using white chocolate for a sweeter, milder twist. It pairs beautifully with peppermint!
- For a nutty crunch, roll the chocolate-coated marshmallows in finely chopped hazelnuts instead of candy canes.
- If you’re feeling adventurous, add a pinch of cayenne pepper to the melted chocolate for a spicy kick.
- Not a fan of peppermint? Substitute with crushed graham crackers and sprinkle with a touch of cinnamon for a s’mores vibe.
If you try this, I’d love to hear how it turns out—drop a comment or tag me in your marshmallow masterpiece! Happy indulging, and may your winter be as sweet as these treats!
Related update: Candy Cane Chocolate Marshmallows
Related update: Grandma Inez’s Pineapple Pie
Related update: Tuna and Tofu Cold Dish
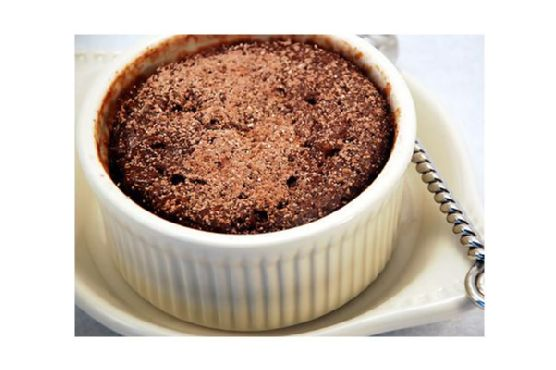
It was one of those evenings where you stare into your pantry hoping for a miracle, and it just magically happens! I had a sweet tooth that just wouldn’t quit, but the thought of baking a whole cake felt like running a marathon in heels. Ever been there? Enter: the 2 Minute Chocolate Yum. It’s that indulgent treat that saves you from dessert FOMO when you’re short on time and ingredients. Seriously, it’s like a chocolate hug in a mug. Imagine something that’s as easy as making a cup of coffee but infinitely more rewarding. Just a quick whip and zap, and you’ve got a dessert that feels like it took way more effort than it did. Also, if you’ve got a sudden guest or a cranky kid demanding sweets, this is your lifesaver.
Jump to Recipe
What You’ll Need
This recipe is a pantry hero; chances are, you’ve got most of these on hand. Here’s what you’ll need to whip up some chocolate magic:
- Cocoa powder
- Egg
- Flour
- Milk
- Oil
- Salt
- Sugar
- Vanilla
How to Make 2 Minute Chocolate Yum
- In a small mixing bowl, combine the cocoa powder, egg, flour, milk, oil, salt, sugar, and vanilla. Whip them together until the mixture is smooth and glossy, much like a velvety chocolate drizzle.
- Divide the batter evenly between two 6-8 oz. ramekins. Fill them a little over halfway full so they have room to puff up in the microwave.
- Microwave one ramekin at a time for about 2 minutes. You’ll know it’s done when the cake is puffed and looks like it’s ready to burst with chocolatey goodness.
- Serve immediately. Top with a scoop of ice cream, a dollop of whipped cream, or just a sprinkle of powdered sugar and cocoa for that minimalist vibe.
Cook’s Notes
Let’s keep it real: microwaves vary, so you might need to adjust the cooking time based on your machine’s mood swings. Start with 90 seconds if you’re unsure and then zap it in 10-second intervals until perfect. If you want to save some batter for later, it holds up well covered in the fridge for a day. Just give it a good stir before microwaving. Stuck with leftovers? Unlikely, but if that happens, you can refrigerate and reheat gently. The texture might change a bit, but it’ll still hit the spot.
Make It Your Own
- Black Forest Twist: Add a spoonful of cherry pie filling in the middle of the batter before cooking for a luscious surprise.
- Nutty Buddy: Stir in a tablespoon of peanut butter for a chocolate-peanut butter dream.
- Minty Fresh: A few drops of peppermint extract can turn this into a festive treat.
- Spice It Up: Add a pinch of cinnamon or chili powder for a surprising kick.
If you try this, I’d love to hear how it turns out! Drop a comment or tag me on social media with your chocolatey creations. Keep those sweet moments coming!
Related update: 2 Minute Chocolate Yum
Related update: Candy Cane Chocolate Marshmallows

I once found myself in the middle of a weeknight conundrum—my sweet tooth was hollering louder than a toddler missing nap time, and my pantry was looking a little sparse. Cue the genius idea: Bacon Brownie Cupcakes. This is the kind of recipe that was born out of necessity, a craving, and a little slice of bacon heaven left over from breakfast. What’s better than combining the gooey richness of brownies with the savory crunch of bacon? This dish dances the line between dessert and daring, and let me tell you, it’s worth every single bite. Plus, it’s all done using familiar pantry staples, so you’ll feel like a kitchen wizard in no time.
Jump to Recipe
What You’ll Need
When I say this ingredient list will make you feel like you’ve hit the jackpot, I mean it. With just a few special touches, you’ll be whipping up a treat that feels both classic and adventurous.
- Unsweetened chocolate
- Sweetened chocolate
- Butter
- Sugar
- Salt
- Eggs
- All-purpose flour
- Cocoa powder
- Bacon
How to Make Bacon Brownie Cupcakes
- Preheat your oven to 350°F, and let’s get that muffin pan greased well. Trust me, you want these to come out looking fab, not stuck like a toddler’s fist in a cookie jar.
- Fry up your bacon until it’s crispy perfection, but avoid any charred bits. You want that savory crunch without the burnt taste. Pat it dry and crumble it up, discarding any overly fatty pieces.
- In a double boiler, melt the unsweetened chocolate and butter together. Stir occasionally until smooth, then let it cool slightly. This mixture will become the soul of your brownie cupcakes.
- Whisk in the sugar and salt into the melted chocolate. Add the eggs one at a time, making sure each is fully incorporated before adding the next. This gives them that fudgy texture we adore.
- Sift the flour and cocoa powder together, then gently fold it into the chocolate mixture. This is where the magic happens—don’t rush this step!
- Stir in the bacon pieces and sweetened chocolate bits. Pour the batter into your prepared muffin pan, filling each cup about ¾ full.
- Bake for around 30 minutes. You’ll know they’re ready when a toothpick inserted in the center comes out with a few moist crumbs. Let them cool before attempting to remove them from the pan.
Cook’s Notes
These little beauties can be stored in an airtight container for up to four days, but let’s be real—they’ll probably vanish much sooner. If you’re making them ahead for a party or just because, you can prepare the batter and refrigerate it for up to 24 hours before baking. Just bring it to room temperature before popping it in the oven. Sometimes the bacon can be a bit tricky; ensure it’s well-drained so you don’t end up with greasy cupcakes. And whatever you do, resist the urge to gobble them up straight from the oven—you’ll want them to firm up a bit first.
Make It Your Own
- Feeling nutty? Swap out half the bacon for toasted walnuts for a crunchy twist.
- Prefer a spicy kick? Add a pinch of cayenne pepper to the batter for a surprising heat that pairs beautifully with the chocolate.
- Not a fan of bacon (gasp!)? Substitute with crispy tofu bits seasoned with smoked paprika for a vegetarian-friendly version.
- Craving a bit of extra sweetness? Sprinkle some sea salt caramel bits on top before baking for a salty-sweet sensation.
If you try this, I’d love to hear how it turns out—drop a comment or tag me! Whether you stick to the script or put your own twist on it, these Bacon Brownie Cupcakes are bound to be a story in the making. Happy baking!
Related update: Bacon Brownie Cupcakes
Related update: Hard-Boiled Egg Gratin In A Bechamel Sauce
Related update: Cheesecake with cranberries

Picture this: It’s a chilly February evening, and my kitchen is filled with the aroma of something sweet and promising. I had just returned from a hectic day at work, my scarf still draped haphazardly around my neck, when I realized Valentine’s Day was a mere twenty-four hours away. Inspired by the spirit of love and a bit of a sweet tooth, I decided to whip up something special yet uncomplicated — Valentine Hearts. These delightful little treats are the perfect blend of flaky, creamy, and fruity, with a touch of chocolate for good measure. They’re not just easy on the eyes, but they’re a breeze to make — perfect for those of us who don’t have hours to spend in the kitchen. Whether you’re planning a romantic dinner or just want to indulge yourself, these hearts are bound to win over anyone’s heart.
Jump to Recipe
What You’ll Need
Trust me, you probably have most of this in your pantry already. Just a quick trip to the store for a couple of fresh items, and you’re ready to go.
- Puff pastry – store-bought is perfect for this quick recipe.
- 1 egg – for that perfect golden glaze.
- Castor sugar – for a touch of sweetness on the crust.
- Canned crème fraiche – this creamy goodness holds everything together.
- Fresh strawberries – because what’s a Valentine treat without a bit of berry love?
- Plain chocolate – for drizzling on top. Decadent and delightful!
How to Make Valentine Hearts
- Preheat your oven to 220°C (425°F). Trust me, this is the sweet spot for puff pastry perfection.
- Thaw the puff pastry sheet according to the package instructions. You don’t want it too soft, just enough to handle.
- Unroll the pastry sheet gently. Use a medium-sized heart-shaped cookie cutter to cut out about 8 hearts. Go ahead, it’s okay to indulge in a little love here.
- Prick each heart with a fork to prevent them from puffing up too much. This step is crucial to keep them in shape.
- Brush each heart with beaten egg, then sprinkle lightly with castor sugar. This will give them a beautiful golden shine and a touch of sweetness.
- Place the hearts on a greased baking sheet and pop them in the oven for about 10 minutes, or until they’re risen and golden brown. Your kitchen will start smelling absolutely heavenly, I promise.
- Let them cool completely. Patience, my friend, patience.
- Slice the strawberries while the hearts cool. Once cooled, carefully split each heart horizontally using a sharp knife.
- Sandwich each heart with a generous dollop of crème fraiche and a few slices of strawberry.
- Finally, drizzle melted plain chocolate over the top and dust with a little more castor sugar. Voilà! Your Valentine Hearts are ready to impress.
Cook’s Notes
Here’s a little wisdom from my kitchen to yours. Keeping the pastry cold is key to achieving that flaky texture, so don’t let it sit out for too long. If you see the pastry getting sticky, pop it back in the fridge for a few minutes. When slicing the hearts, be gentle to avoid breaking them; a serrated knife usually does the trick. If you’re making these in advance, you can prepare the puff pastry hearts and store them in an airtight container for up to two days. Just assemble with strawberries and crème fraîche right before serving for the freshest taste.
Make It Your Own
Feeling adventurous? Here are some fun variations:
- Swap the strawberries with raspberries or blueberries for a different fruity twist.
- Use lemon curd instead of crème fraiche for a tangy surprise.
- Try white chocolate drizzle instead of plain for a sweeter, creamier finish.
- Add a pinch of cinnamon to the sugar before sprinkling on the pastry for a warm, spicy note.
If you try this, I’d love to hear how it turns out — drop a comment or tag me in your pictures! Whether you’re sharing with a loved one or treating yourself, these Valentine Hearts are sure to bring a smile. Enjoy every flaky, creamy, chocolaty bite!
Related update: Valentine Hearts
Related update: The BEST Sweet Potato Casserole
Related update: Peach Pie
It was one of those weeks where everything felt like a bit too much—work stress, social commitments, and a never-ending to-do list. I wanted to treat myself and my family to something indulgent but didn’t have the energy for an elaborate dessert. That’s when I remembered my Oreo Cake recipe, the ultimate no-bake comfort food that feels like a hug on a plate. It’s like having a sundae in cake form, with layers of creamy vanilla ice cream and that iconic Oreo crunch. Plus, it’s a crowd-pleaser with minimal effort. Win-win, right?
Jump to Recipe
What You’ll Need
This ingredient list is a dream come true for those last-minute dessert cravings. Chances are you already have most of this delightful ensemble in your pantry or freezer.
- 1/2 cup butter
- 1 can chocolate syrup
- 1 container Cool Whip
- 1 package Oreo cookies
- 1 gallon vanilla bean ice cream
How to Make Oreo Cake
- Crumble the entire package of Oreo cookies. Keep about 1/3 of the crumbs aside for the topping.
- In a mixing bowl, combine the melted butter with the remaining 2/3 of the cookie crumbs. Stir until the mixture resembles wet sand.
- Press this buttery Oreo mixture firmly into the bottom of a long cake pan. This will be your deliciously crunchy crust.
- Scoop out half a gallon of vanilla bean ice cream and spread it evenly over the crust. Let it sit for a minute or two to soften a bit if needed.
- Pour half the can of chocolate syrup over the ice cream layer, spreading it gently with the back of a spoon.
- Layer on the Cool Whip, smoothing it out into an even layer that reaches all the corners.
- Sprinkle the reserved Oreo crumbs over the top, followed by a drizzle of the remaining chocolate syrup.
- Cover the cake pan with foil or plastic wrap and freeze it overnight, or for at least 12 hours, to ensure it sets beautifully.
Cook’s Notes
Here’s a little tip: this cake is best served with a bit of time out of the freezer, about 10-15 minutes, so it softens just enough to cut easily. If you’re planning to make this in advance, it can be frozen for up to a week—just make sure it’s well-covered to prevent freezer burn. As for leftovers (if there are any!), they keep nicely in the freezer for about another week.
- Ensure the ice cream is slightly softened before spreading it, or you might end up with an uneven layer.
- If you want stronger chocolate flavor, feel free to add more syrup according to your taste.
Make It Your Own
- Swap the vanilla bean ice cream for chocolate or mint chocolate chip for an interesting twist.
- Use peanut butter sandwich cookies instead of Oreos for a nutty flavor that’s simply irresistible.
- Add a layer of sliced bananas between the ice cream and Cool Whip for a fruity surprise.
- If you’re a coffee lover, drizzle some cooled espresso along with the chocolate syrup for a mocha kick.
If you try this Oreo Cake, I’d love to hear how it turns out! Drop a comment below or tag me in your pictures—sharing your sweet creations makes my day!
Related update: Oreo Cake
Related update: Valentine Hearts
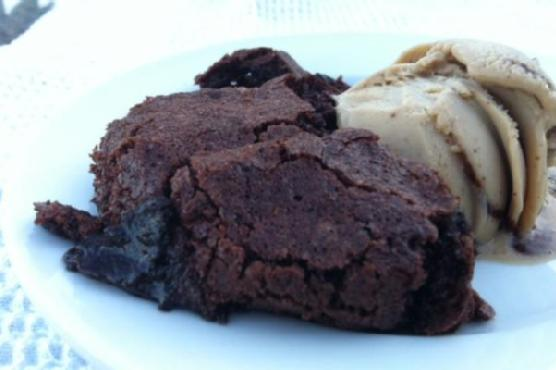
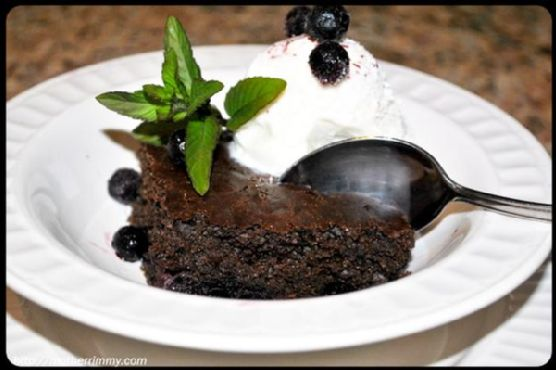
The other day, I found myself staring at a half-eaten bar of dark chocolate, a stray packet of espresso powder, and a whole lot of nothing for dessert. You know those moments when you just need something gooey and comforting but also want to keep it somewhat aligned with your food goals? Enter the Brownie Cake that’s both gluten-free and dairy-free yet decadently delicious. This isn’t just any dessert; it’s an easy weeknight indulgence that feels special enough for company but straightforward enough to whip up with pantry staples. The magic lies in its cake-like exterior giving way to a molten, pudding-like center. It’s the kind of dish that makes you feel like a kitchen wizard with minimal effort.
Jump to Recipe
What You’ll Need
This ingredient list is refreshingly simple, and chances are you already have most of these staples in your kitchen.
- Earth Balance Soy Free Spread (for that buttery richness without the dairy)
- Eggs (they give it that fluffy cake-like lift)
- Cane Sugar (because, duh, brownies need sweetness)
- Red Dark Chocolate (the star of the show)
- Vanilla Paste (adds a luxurious depth)
- Espresso Powder (just a touch for an extra kick)
- White Gluten Free Flour Blend (the base that keeps it light and gluten-free)
- Cocoa Powder (for that intense chocolate punch)
- Coconut Oil (keeps everything moist and lovely)
How to Make Brownie Cake gluten free, dairy free
- Preheat your oven to 325°F. Trust me, this temperature is key to getting that perfect texture.
- Lightly spread coconut oil in a 9x12x2 inch deep oval baking dish. This ensures nothing sticks and makes for easy serving later.
- Grab a bowl, sift together your flour and cocoa powder, and set aside. This little step ensures no lumps and a smooth batter.
- In the bowl of an electric mixer, beat the eggs and sugar on medium-high for about 5 minutes. You’re aiming for a consistency that’s thick, pale yellow, and reminiscent of cake batter.
- Once your egg and sugar mixture is ready, lower the speed to low and add the vanilla paste and espresso powder. It’ll smell heavenly.
- Slowly incorporate the flour and cocoa powder mixture. A handy tip: throw a dish towel over the mixer to avoid cocoa dust everywhere.
- Add in the Earth Balance Spread and mix for another 10 seconds. Just enough to combine.
- Pour the brownie mixture into your prepared dish. Smooth the top, but don’t obsess over it.
- Place this dish into a bigger roasting pan. Carefully fill the roasting pan with very hot tap water, reaching about halfway up the side of your brownie dish. This water bath technique gives it that unique texture.
- Bake for exactly 65 minutes. Patience is a virtue here. The cake will be set on the outside but fabulously gooey on the inside.
- Allow it to cool for 20 minutes before serving. Serve warm for the best experience.
Cook’s Notes
This Brownie Cake is a dreamy blend of textures, but a few tips will ensure it’s perfect every time. Make sure your eggs are at room temperature before starting; this helps them whip up better and combine more smoothly with the sugar. If you’re making this in advance, store it in the fridge and reheat gently in the oven before serving. It keeps well for about 3 days, not that it’ll last that long once your family gets a taste.
Make It Your Own
- Feeling nutty? Toss in a handful of chopped almonds or pecans for a delightful crunch.
- If dark chocolate isn’t your thing, swap it for semi-sweet or even white chocolate chips.
- Add a swirl of peanut butter into the batter before baking for a nutty flavor twist.
- Infuse the batter with a teaspoon of orange zest for a zesty chocolate-orange experience.
If you try this Brownie Cake, I’d love to hear how it turns out — drop a comment or tag me with your creations! Happy baking, friends!
Related update: Brownie Cake gluten free, dairy free
Related update: Vanilla Coconut Snowball Cupcakes
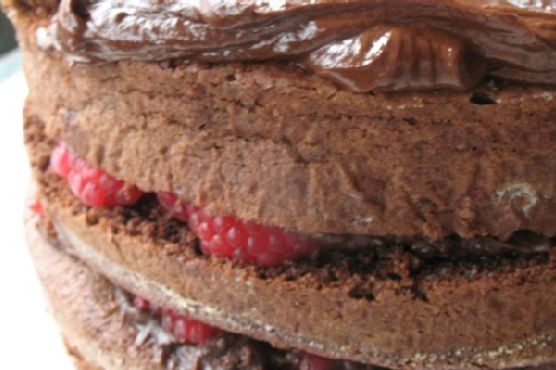
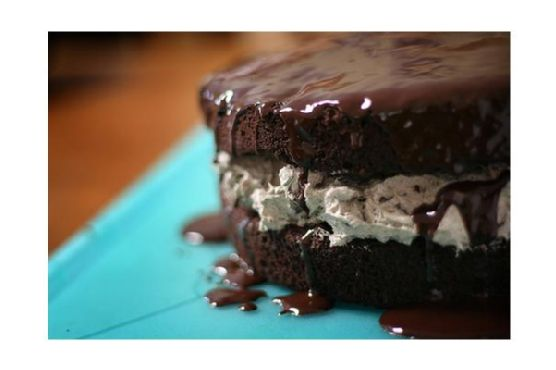
Last Saturday, I found myself staring at a stubborn box of dark chocolate in my pantry, trying to decide what to do with it. It was one of those rainy afternoons when all you want is something rich and comforting. The kind of day where you get cozy in your leggings, the playlist is just right, and you’re itching to bake something indulgent. That’s how my Chocoholic’s Deep Dark Dream Chiffon Cake came to life. It’s heaven in cake form—moist, fluffy, and oh-so-decadent. The secret? It’s a magical combo of creamy chocolate layers and velvety ganache. Perfect for impressing guests or just treating yourself because, let’s be honest, we all deserve a slice of chocolate bliss every now and then.
Jump to Recipe
What You’ll Need
You might already have most of these ingredients tucked away in your kitchen, which makes this cake even more tempting to whip up on a whim. Trust me, it’s worth checking your cupboards for these beauties:
- 1 cup all-purpose flour
- 1 cup sugar
- 1/3 cup sugar (for meringue)
- 2 tablespoons baking powder
- 1/2 teaspoon salt
- 6 tablespoons butter
- 5% cream – you’ll need this twice!
- 2/3 cup dark Dutch cocoa
- 2/3 cup dark Belgian chocolate
- 1 tablespoon cream of tartar
- 6 large egg whites
- 6 large egg yolks
- 1/2 cup water
- 1 teaspoon vanilla extract
- 1/2 cup icing sugar
- 1/3 cup vegetable oil
How to Make Chocoholic’s Deep Dark Dream Chiffon Cake
- Start by mixing your cocoa with boiling water until smooth, then let it cool. This is where the cake’s deep chocolate flavor begins.
- In a large bowl, whisk together flour, 1 cup of sugar, baking powder, and salt. These dry ingredients set the foundation for your cake batter.
- In another bowl, beat egg whites and cream of tartar with an electric mixer until soft peaks form. Gradually add 1/3 cup sugar and continue beating until peaks are firm but not dry.
- Make a well in your dry ingredients. Add vegetable oil, egg yolks, vanilla, and that decadent cooled cocoa mixture. Beat until smooth and luscious.
- Gently fold a quarter of the egg whites into the batter to lighten it, then carefully fold in the remaining whites. This step ensures a light, airy texture.
- Divide the batter between two 8-inch prepared cake pans and bake in a preheated oven at 350°F for 30-35 minutes. You’ll know it’s ready when a wooden skewer comes out clean.
- For the filling, blend sugar, cocoa, and butter with an electric mixer. Add vanilla and cream, adjusting cream to reach your desired texture.
- For the topping, heat cream until just below boiling. Stir in chocolate pieces and butter until smooth. Allow to cool, thickening into a rich ganache.
- To assemble, slice each cake in half horizontally, creating four layers. Sprinkle your favorite liqueur on the first layer, spread with filling, then arrange raspberry halves for a tart contrast. Repeat for remaining layers, finishing with ganache on top.
Cook’s Notes
This cake might seem a little fancy, but I promise it’s totally doable. Make sure those egg whites are at room temp before you whip them. It makes all the difference for volume and stability. And speaking of stable, be gentle when folding them into the batter. You want to keep that air in there! Store the cake in an airtight container to keep it moist, though honestly, it never lasts long enough for leftovers in my house. If you do have any left, it’s even better the next day as the flavors meld together perfectly. You can make the cake layers a day ahead, just wrap them tightly in plastic wrap.
Make It Your Own
Here’s where you can put your own spin on it:
- Spice it up: Add a teaspoon of cinnamon or cayenne to the dry ingredients for a spicy kick.
- Nutty twist: Swap raspberries for toasted hazelnuts between the layers.
- Mocha love: Stir a teaspoon of instant coffee into the boiling water for a mocha-flavored cake.
- Berry blast: Use a mix of berries instead of just raspberries for a burst of color and flavor.
Baking this cake feels like giving yourself a big chocolaty hug. If you try it, I’d love to hear how it turns out. Drop a comment or tag me in your cake photos—I can’t wait to see your dreamy creations!
Related update: Chocoholic’s Deep Dark Dream Chiffon Cake
Related update: Baked Caramel Custard
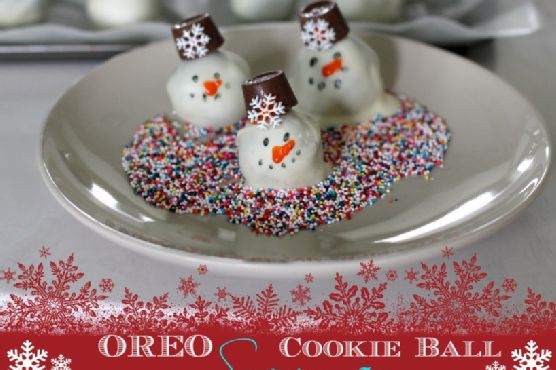
Picture this: It’s a Saturday afternoon, and I’m in the kitchen with my son. We’re both craving something sweet but don’t want to spend hours baking. Suddenly, the idea hits me—OREO Cookie Balls! These aren’t just any cookie balls; we’re going to turn them into adorable snowmen. It feels like the perfect plan for a chilly day when you want something as comforting as a warm sweater but as easy as a quick snack. The best part? You probably already have most of the ingredients in your pantry. Trust me, these little bites are worth making. They’re quick and fun, especially if you have little helpers around.
Jump to Recipe
What You’ll Need
So here’s the deal: These ingredients are as simple as it gets. You might even have them stashed away already. Let’s dive in:
- A full package of OREO Cookies
- One block of cream cheese (softened to room temperature)
- Baker’s chocolate (for melting)
- Rolo chocolate candy
- Black gel icing (for the eyes and buttons)
- Orange gel icing (for the nose)
- Additional supplies to decorate snowmen (think scarves made of licorice or hats from mini peanut butter cups)
How to Make OREO Cookie Balls – Snowman
Ready? Let’s make some magic happen!
- First, grab your package of OREO Cookies. Without removing the filling, crush them up in a large gallon-sized ziplock bag. You want fine crumbs, so give them a good whack!
- Pour your cookie crumbs into a large mixing bowl, and add in the softened cream cheese. Mix these together on medium speed until you have a smooth, dough-like consistency.
- Take a 1-inch cookie scoop (or just eyeball it) to portion out the mixture. Roll each scoop between your palms to form smooth, even balls.
- Place the cookie balls on a cookie sheet and pop them in the freezer for about 10 minutes. This helps them firm up a bit.
- While they’re chilling, melt your Baker’s chocolate according to the package instructions. You want it smooth and glossy, ready for dipping.
- Remove the cookie balls from the freezer and dip each one into the melted chocolate. Use a fork to lift them out, letting any excess chocolate drip off before placing them on a wax paper-lined cookie sheet.
- With a gentle touch, add the Rolo chocolate candy on top for the hat while the chocolate is still wet.
- Chill your snowmen in the refrigerator for about an hour until the chocolate shell is firm and set.
- Now, the fun part—decorate! Use the black gel icing for eyes and buttons, and the orange gel icing for the cute little carrot nose. Let your creativity shine with any additional decorations you like.
Cook’s Notes
Alright, let’s talk strategy. If the OREO dough feels too sticky, chill it in the fridge for a bit. It makes rolling much easier. Regarding the chocolate, avoid overheating it—give it slow, gentle warmth so it won’t seize. For storage, these snowmen can chill out in the fridge for up to a week or stay cozy in the freezer for about a month. Just make sure they’re in an airtight container to keep them fresh. If you’re planning to make these ahead of time, consider doing the base a day in advance to save on last-minute hustle.
Make It Your Own
Feel like changing things up? Here’s how you can shake up the snowman scene:
- Swap the Baker’s chocolate with white chocolate for an even snowier look.
- Use colored gel icing to create vibrant scarves or hats.
- Add crushed peppermint candy to the cookie crumb mixture for a holiday twist.
- Substitute the Rolo candy with a mini marshmallow for a softer hat look.
If you try this, I’d love to hear how it turns out—drop a comment or tag me! Let’s share some sweet little snowmen with the world. Happy decorating!
Related update: OREO Cookie Balls – Snowman
Related update: Chocoholic's Deep Dark Dream Chiffon Cake

Picture this: it’s a late Tuesday night, and I’ve got a serious craving for something sweet. The kind of craving that whispers, “bake something now, or forever hold your peace.” But who has the energy for an elaborate dessert after a long day? I need something quick, comforting, and chocolatey. Enter: my 10 Minute Brownies. This recipe is the superhero of the sweet-tooth world. It’s so simple, you could practically make it with your eyes closed. Plus, it’s got this lush, fudgy texture thanks to a surprising ingredient — unsweetened applesauce. So, if you find yourself in need of a quick chocolate fix that feels both indulgent and guilt-free, these brownies are your answer.
Jump to Recipe
What You’ll Need
You might be surprised at how basic the ingredient list is. Spoiler: you likely have most of these on hand. Here’s what you’ll need to get started:
- Canola oil – for that perfect moist texture.
- Semisweet chocolate chips – because what’s a brownie without chocolate?
- Unsweetened applesauce – our secret for keeping it moist without extra fat.
- Sugar – for that classic brownie sweetness.
- Vanilla extract – for a hint of flavor depth.
- Unbleached flour – a staple!
- Baking powder – gives it that slight lift, so they aren’t bricks.
- Finely-chopped walnuts – optional, but they add a nice crunch.
How to Make 10 Minute Brownies
- Preheat your oven to 350 degrees F. Grab a 6 x 9 inch baking pan, lightly oil it, and set it aside for later.
- In a small saucepan over low heat, combine the canola oil and semisweet chocolate chips. Stir occasionally until the chocolate melts into a silky, smooth mixture. Remove from heat and let it cool slightly.
- In a large bowl, mix the unsweetened applesauce, sugar, and vanilla extract until everything is well blended. You should smell that sweet, vanilla aroma.
- Pour the cooled chocolate mixture into your applesauce blend. Whip it up until it’s smooth and shiny.
- Add in the unbleached flour, baking powder, and finely-chopped walnuts. Stir just until everything is combined; you don’t want to overmix and end up with tough brownies.
- Spoon the batter into your prepared baking pan, smoothing the top with a spatula.
- Bake in the oven for 25 to 30 minutes. You’ll know they’re done when the top springs back gently upon touch. The kitchen will smell like chocolate heaven by now!
- Allow the brownies to cool completely before cutting them into luscious squares. This waiting game is tough, but so worth it.
Cook’s Notes
Let’s be real, these brownies are pretty forgiving. But here are a few tips to ensure you get the best results every time. First, be careful not to overbake them. You’re going for fudgy, not crumbly. They might look a little underdone when you first pull them out, but they’ll firm up as they cool. For storing, keep them in an airtight container in the fridge, and they’ll stay fresh for up to a week — not that they’ll last that long!
Make It Your Own
The beauty of this recipe is its flexibility. Here are some delicious variations you can try:
- Nut-free: Skip the walnuts if you’re not a fan or have allergies. Consider adding a handful of chocolate chips instead for extra gooeyness.
- Gluten-free: Swap the unbleached flour for a gluten-free blend. No one will even know the difference.
- Peanut butter swirls: Dollop some peanut butter over the batter before baking and swirl it in with a knife for a nutty twist.
- Raspberry delight: Throw in a handful of fresh or frozen raspberries for a fruity surprise that pairs beautifully with the chocolate.
If you try this, I’d love to hear how it turns out — drop a comment or tag me! Happy baking, friends. 🍫✨
Related update: 10 Minute Brownies
Related update: OREO Cookie Balls – Snowman

Last Tuesday, I found myself in need of a pick-me-up. It was one of those dreary afternoons when everything seemed to drag. The sky was grey, the email inbox was overflowing, and honestly, I just wanted something sweet and gooey to make it all better. That’s when I remembered these Chocolate Chip Peanut Butter Mallow Dessert Bars. Trust me, they’re the kind of treat that can turn any day around. Quick to whip up, using ingredients you likely already have kicking around your pantry, these bars are a perfect mix of chocolatey, peanut buttery magic with a delightful marshmallow surprise. They’re everything you didn’t know you needed.
Jump to Recipe
What You’ll Need
This is one of those recipes where a quick pantry dive will probably yield most of what you need. The combination of these ingredients is pure joy.
- 1 package of chocolate chip cookie mix
- 1 egg
- 3 tablespoons of milk
- 1/2 cup of butter, melted
- 1/2 cup of peanut butter
- 1 cup of marshmallows
- Drizzle of chocolate syrup
How to Make Chocolate Chip Peanut Butter Mallow Dessert Bars
- Preheat your oven to 375°F (190°C). While it warms, grab a mixing bowl and stir together the chocolate chip cookie mix, egg, milk, and melted butter until smooth. It should be creamy and thick but pliable enough to spread.
- Grease an 8×8 baking pan well. Trust me, you’ll thank yourself later. Spread the cookie mixture evenly into the bottom of the pan. The more even, the better it’ll bake.
- Pop the pan into the oven for 15-20 minutes. You’ll know it’s ready when the edges are golden and the center looks set and slightly puffed. Your kitchen will smell like heaven by now.
- Take the pan out and immediately spread the peanut butter evenly over the hot cookie base. The warmth will help it glide smoothly.
- Top the peanut butter layer with marshmallows. Feel free to sneak a few into your mouth — I won’t tell.
- Return the pan to the oven for a few more minutes, just until the marshmallows start to melt and get a little golden on the tips.
- Remove from the oven and use a spatula to spread the marshmallows evenly over the peanut butter layer, creating a gooey, sticky blanket.
- Drizzle the chocolate syrup over the top. Let it cool to set completely before cutting into squares. This is the hardest part — waiting! But I promise it’s worth it.
Cook’s Notes
Keep an eye on the marshmallows when you pop the pan back in the oven. They can go from beautifully melted to burnt in a blink. If you’re making these ahead, let them cool completely before storing them in an airtight container at room temperature. They’ll keep for about 3-4 days, not that they’ll last that long! For leftovers, a quick zap in the microwave will bring back that gooey goodness.
Make It Your Own
- Nut Swap: Substitute the peanut butter with almond or cashew butter for a different nutty twist.
- S’mores Style: Add a layer of crushed graham crackers in between the peanut butter and marshmallows for a classic s’mores flavor.
- Extra Chocolatey: Mix in a handful of chocolate chips into the cookie dough batter for extra bursts of chocolate with every bite.
- Spice It Up: Stir a teaspoon of cinnamon into the cookie mix for a warm, spiced undertone.
If you try this, I’d love to hear how it turns out — drop a comment or tag me! There’s nothing like sharing a good recipe and seeing everyone’s delicious results. Happy baking, and may your days be as sweet as these bars!
Related update: Chocolate Chip Peanut Butter Mallow Dessert Bars
Related update: Valentine's Day Potted Plant Ice-Cream Desserts
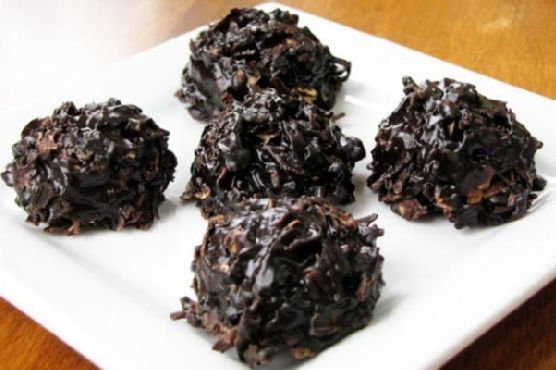
There I was, staring into my pantry on a rainy Wednesday afternoon, feeling the familiar pang of craving something sweet but not wanting to turn on the oven. You know those days when you just need a chocolate fix without all the fuss? That’s when I remembered these delightful little bites of joy: Xocai Oatmeal Dark Chocolate No-Bake Cookies. They’re the perfect balance of chocolatey goodness and wholesome oats, plus a breeze to whip up. What’s not to love about a recipe that feels like a treat but is secretly kind of healthy?
Jump to Recipe
What You’ll Need
This ingredient list is all about simplicity and, chances are, you already have most of these hanging out in your kitchen. Here’s what you’ll need:
- Butter substitute (for that creamy texture without the extra calories)
- Xocai healthy chocolate nugget (the star of the show with its rich, dark chocolate flavor)
- Oats (old-fashioned or quick oats both work perfectly)
- Peanut butter (for that nutty, irresistible taste)
- Soy milk
- Sugar substitute (to keep things sweet but light)
- Vanilla (a splash for that extra depth of flavor)
How to Make Xocai Oatmeal Dark Chocolate No-Bake Cookies
- In a medium saucepan, combine the butter substitute, Xocai chocolate nugget, oats, and peanut butter. Heat this mixture over medium heat, stirring gently to keep things smooth.
- Once everything is well-mixed and starting to melt together, increase the heat slightly and bring the mixture to a gentle boil. Keep stirring, and let it boil for five minutes. The mixture should become glossy and aromatic, like the best kind of hug in a pot.
- Remove the saucepan from the heat and stir in the soy milk, sugar substitute, and vanilla. This is where the mixture starts to transform into cookie magic.
- Finally, fold in the remaining Xocai chocolate nugget pieces. You want them to stay somewhat intact for that delightful chocolate burst in every bite.
- Spoon the mixture onto wax paper or foil, allowing the cookies to cool and harden. They’ll set as they cool, becoming perfectly chewy and rich.
Cook’s Notes
These cookies are incredibly forgiving, but here are a few tips to make them extra perfect:
- Make sure to stir constantly while boiling; this prevents the mixture from sticking to the pan or burning.
- If the cookies aren’t hardening, pop them in the fridge for a quicker set.
- Store the cookies in an airtight container at room temperature for up to a week, but I bet they won’t last that long!
Make It Your Own
- Swap the peanut butter for almond or cashew butter for a different nutty twist.
- Use almond milk instead of soy milk if that’s what you have on hand.
- Add a handful of shredded coconut to the mix for a tropical flair.
- Try adding a pinch of sea salt on top before they set for a sweet and salty combo.
If you try this, I’d love to hear how it turns out — drop a comment or tag me! There’s nothing better than sharing these little pieces of happiness with you all. Happy no-baking!
Related update: Xocai Oatmeal Dark Chocolate No-Bake Cookies
Related update: Cinnamon & Sugar Roasted Chickpeas