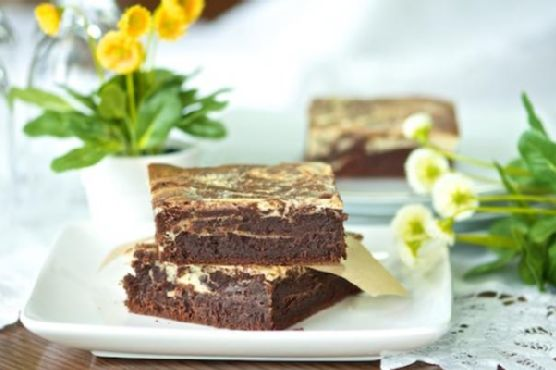
Cherry Coke Float Cupcakes With Chocolate Shell | Made by Meaghan Moineau

Cherry Coke Float Cupcakes With Chocolate Shell

Intro

There’s something undeniably nostalgic about the combination of cherries and cola. It takes me back to those summer afternoons at the local diner, sipping on a Cherry Coke while friends gathered around, sharing stories and laughter. When I first thought of combining this classic drink with the timeless joy of a cupcake, I knew I was onto something special. These Cherry Coke Float Cupcakes, with their delightful chocolate shell, encapsulate that feeling of playful indulgence and bring back those cherished memories with every bite.

Why You’ll Love It

These cupcakes are more than just a treat; they’re an experience. The fizzy sweetness of Coca-Cola, the richness of cocoa, and the surprise of biting into a cherry hidden within are complemented by a decadent chocolate shell. The result is a cupcake that’s both familiar and exciting, perfect for parties, family gatherings, or simply a sweet indulgence at the end of a long day.

Ingredients

  • 1 3/4 cups all-purpose flour
  • 3/4 cup unsweetened cocoa powder
  • 1 1/2 cups sugar
  • 1 teaspoon baking soda
  • 1/2 teaspoon salt
  • 1 cup Coca-Cola
  • 1/2 cup buttermilk
  • 1/2 cup unsalted butter, melted
  • 1 teaspoon vanilla extract
  • 1 large egg
  • 24 maraschino cherries, plus syrup
  • Ice-cream chocolate shell

Instructions

  1. Preheat your oven to 350°F (175°C) and line a cupcake pan with cupcake liners.
  2. In a large bowl, combine the flour, cocoa powder, sugar, baking soda, and salt.
  3. In another bowl, blend the Coca-Cola, buttermilk, melted butter, vanilla extract, and egg.
  4. Pour the liquid ingredients into the dry ingredients.
  5. Stir well with a wooden spoon until everything is blended smoothly.
  6. Spoon the batter into the cupcake liners, about two-thirds full.
  7. Push one maraschino cherry into the center of each cupcake.
  8. Bake for 15 minutes or until a cake tester comes out clean.
  9. Let the cupcakes cool completely on a wire rack.
  10. Once cooled, frost each cupcake with whipped cream.
  11. Drizzle the ice-cream chocolate shell over the whipped cream.
  12. Top each cupcake with a maraschino cherry.

Tips

For the perfect cupcakes, make sure your ingredients are at room temperature before mixing. This ensures they combine more easily and evenly. When adding the cherries, make sure they’re well-drained to prevent the batter from becoming too moist. And remember, the key to a smooth chocolate shell is to be generous with the drizzle and allow it to set completely before serving.

Variations & Substitutions

If you want to mix things up, try using cherry cola instead of regular Coca-Cola for an extra burst of cherry flavor. You can also substitute the cocoa powder for a dark chocolate version for a richer taste. For a dairy-free option, replace the buttermilk with almond milk and the butter with coconut oil. If you prefer a less sweet frosting, a simple cream cheese frosting pairs wonderfully with the cherry and cola flavors.

Storage

These cupcakes are best enjoyed fresh, but they can be stored in an airtight container in the refrigerator for up to three days. If you plan to keep them longer, consider freezing them without the whipped cream and chocolate shell. When you’re ready to serve, thaw them in the refrigerator and add the toppings fresh.

FAQ

Can I make these cupcakes in advance?

Yes, you can make the cupcakes a day or two in advance. Store them in an airtight container at room temperature, and top with whipped cream and chocolate shell just before serving.

Can I use fresh cherries instead of maraschino cherries?

Absolutely! Fresh cherries can add a wonderful natural flavor. Just make sure to pit them before use, and consider cooking them slightly to soften, as they won’t have the syrupy texture of maraschino cherries.

What type of chocolate shell should I use?

Any ice-cream chocolate shell will work, but I recommend one made with real chocolate for the best flavor. You can find these in the ice cream toppings section of most grocery stores.

Nutrition

While these cupcakes are a treat, they’re surprisingly balanced for a dessert. Each cupcake provides a modest serving of indulgence, with the combination of chocolate, cola, and cherries offering a delightful array of flavors without being overly heavy. Remember, moderation is key when enjoying sweets as part of a balanced diet.

Conclusion

Cherry Coke Float Cupcakes with Chocolate Shell are a delightful fusion of classic flavors that are sure to impress. Whether you’re reminiscing about the good old days or creating new memories, these cupcakes are the perfect way to celebrate life’s sweet moments. I hope you enjoy baking and savoring them as much as I do!

Related update: Cherry Coke Float Cupcakes With Chocolate Shell

Related update: Lemon Mint Sorbet

Chocolate Orange Madeleines | Made by Meaghan Moineau

Chocolate Orange Madeleines

Intro

Ah, the aroma of freshly baked Madeleines! It takes me back to Sunday mornings at my grandmother’s house, where the comforting scent of chocolate and citrus wafted through the air. These Chocolate Orange Madeleines are a cherished twist on the classic French treat that my grandmother used to make. With every bite, I’m reminded of those carefree days spent in her cozy kitchen, eagerly waiting for the Madeleines to cool just enough to dip into a glass of milk. Now, I want to share this delightful recipe with you, so you can create your own warm memories with your loved ones.

Why You’ll Love It

These Chocolate Orange Madeleines are a perfect combination of flavors and textures. The subtle citrus from the orange zest and juice complements the rich, dark chocolate beautifully. The madeleines are light and airy, with a delicate crumb that melts in your mouth. Plus, they’re dipped in melted chocolate for an extra touch of indulgence. Whether you’re an experienced baker or a novice, you’ll find this recipe both rewarding and straightforward. They’re great for special occasions or just a sweet afternoon treat with a cup of tea.

Ingredients

  • 1 cup all-purpose flour
  • 1 teaspoon baking powder
  • 1/4 teaspoon sea salt
  • 1/2 cup dark chocolate, melted
  • 2 large eggs
  • 1/2 cup granulated sugar
  • 2 tablespoons orange juice
  • 1 tablespoon orange zest

Instructions

  1. Preheat the oven to 374°F (190°C). Generously grease and liberally flour a madeleine cookie tin.
  2. In a small bowl, combine the flour, baking powder, and sea salt. Whisk together and set aside.
  3. In a medium bowl, beat the sugar and eggs on medium/high speed until the volume triples in size. This may take several minutes, and you should have a beautiful thick ‘ribbon’ of batter when you lift the beaters out of the bowl.
  4. Stir in the orange juice and orange zest.
  5. Beginning with the flour mixture, alternate adding to the egg/sugar batter with the melted butter. Mix only until just combined.
  6. Refrigerate the batter for about 45 minutes to an hour.
  7. Drop by rounded teaspoonfuls into the center of the madeleine molds. Leave the batter mounded; do not spread it out. Adjust the amount of batter depending on your mold size.
  8. Bake for 10-12 minutes or until the edges just start to turn golden and the center of the cookies spring back when lightly touched.
  9. Remove from the oven and immediately tap the tin on the counter to loosen the cookies. Carefully remove the cookies and allow them to cool completely.
  10. Melt the chocolate in a saucepan and pour it into a deep dish or cup with a wide mouth. Dip half or 1/4 of each cookie into the chocolate and place on a piece of parchment paper until the chocolate is set.

Tips

For the best results, make sure your eggs are at room temperature before beating them. This helps them whip up to the right volume. Also, be gentle when folding in the flour to maintain the airiness of the batter. If you don’t have a madeleine pan, mini muffin pans can be a good alternative, though they won’t have the classic shell shape.

Variations & Substitutions

If you’re not a fan of dark chocolate, feel free to substitute it with milk or white chocolate. You could also add a hint of spice by incorporating a pinch of cardamom or cinnamon into the batter. For a nutty twist, sprinkle some finely chopped almonds or pistachios over the chocolate before it sets.

Storage

Store these Chocolate Orange Madeleines in an airtight container at room temperature for up to three days. If you want to keep them longer, you can freeze them for up to a month. Just make sure to place parchment paper between layers to prevent sticking, and allow them to come to room temperature before serving.

FAQ

Can I make these ahead of time?

Yes, you can prepare the batter a day in advance and keep it refrigerated. This makes it even easier to have fresh madeleines whenever you need them.

Do I need a special pan for Madeleines?

While a madeleine pan is ideal for achieving the classic shell shape, you can use a mini muffin tin in a pinch. The texture and taste will remain delightful.

Nutrition

Each madeleine is approximately 90 calories, depending on the exact size and amount of chocolate used. They contain about 4g of fat, 12g of carbohydrates, and 1g of protein each. Perfect for a light indulgence!

Conclusion

Chocolate Orange Madeleines are a delightful treat that combines the best of both worlds: the rich, comforting taste of chocolate with the refreshing zing of orange. Whether you’re making them for a special occasion or just because, they are sure to be a hit. I hope this recipe brings a touch of nostalgia and warmth to your kitchen, just as it does to mine. Happy baking!

Related update: Chocolate Orange Madeleines

Related update: Banana Pudding Cake

Triple Chocolate Whoppers | Made by Meaghan Moineau

Triple Chocolate Whoppers

Intro

There’s something magical about the aroma of freshly baked cookies wafting through the house, transporting us back to simpler times. My grandmother’s kitchen was a haven of warmth and delectable scents, and her Triple Chocolate Whoppers were the stars of many family gatherings. These cookies are an ode to those cherished memories, where the richness of chocolate intertwined with laughter and love. I recall sneaking into the kitchen, hoping to snag a warm cookie before they disappeared into the hands of eager family members. Now, I’m thrilled to share this recipe with you, ensuring that the legacy of these delightful treats continues to bring joy and sweetness to your home.

Why You’ll Love It

This recipe is a chocolate lover’s dream come true! The combination of semisweet baking chocolate, unsweetened chocolate chunks, and semisweet chocolate chips offers a deep and satisfying chocolate flavor that is hard to resist. The added espresso powder enhances the chocolate’s richness, while the pecans and walnuts provide a delightful crunch. These cookies are both gooey and chewy, with a perfect balance of sweet and savory. Perfect for any occasion, they are sure to impress your friends and family.

Ingredients

  • 4 ounces semisweet baking chocolate
  • 1 teaspoon baking powder
  • 1 cup brown sugar
  • 4 ounces unsweetened chocolate, chopped into chunks
  • 2 large eggs
  • 2 teaspoons espresso powder
  • 1/2 cup chopped pecans
  • 1/2 teaspoon sea salt
  • 1 cup semisweet chocolate chips
  • 3/4 cup unbleached all-purpose flour
  • 1/4 cup unsalted butter
  • 1 teaspoon vanilla extract
  • 1/2 cup chopped walnuts

Instructions

  1. Preheat your oven to 325 degrees F (163 degrees C). Lightly grease two baking sheets and set them aside.
  2. In a double boiler, combine the semisweet chocolate, unsweetened chocolate chunks, and butter. Melt the chocolate over low heat, stirring occasionally until just melted. Be careful not to burn the chocolate. Remove from heat and stir to blend the butter and chocolate. Set aside.
  3. In a large bowl, combine the eggs, espresso powder, and vanilla extract. Cream together using an electric mixer. Add the brown sugar and mix until creamy.
  4. In a separate bowl, sift together the flour, baking powder, and sea salt. Set aside.
  5. Add the melted chocolate and butter to the egg mixture and blend together using an electric mixer.
  6. Gently stir in the flour mixture by hand just until the dry ingredients are moist.
  7. Fold in the chopped nuts and chocolate chips into the dough gently. Note that the dough will be relatively soft.
  8. Drop large tablespoonfuls of the dough onto the greased baking sheets, leaving at least 3 inches of space between them. For uniform cookies, use a 2 oz. cookie or ice cream scoop.
  9. Bake immediately to prevent the chocolate from hardening, for 10 to 12 minutes. Rotate the pan halfway through the baking time. The cookies will still be very soft and sticky inside, but do not overcook them; they should remain chewy.
  10. Cool the cookies for 10 minutes on the baking sheets before gently transferring them to a baking rack to cool completely.

Tips

To achieve the best results, use high-quality chocolate for a richer flavor. If possible, allow the eggs and butter to reach room temperature before mixing; this helps in achieving a smooth batter. Be cautious not to over-mix the dough once the flour is added, as this can make the cookies tough. Finally, ensure that the cookies have enough space in between them on the baking sheet to spread evenly.

Variations & Substitutions

Feel free to get creative with these cookies! Substitute the pecans and walnuts with your favorite nuts or omit them altogether if you prefer a nut-free version. For an extra kick, consider adding a pinch of cayenne pepper to the dough. If you’re a fan of white chocolate, replace some of the semisweet chocolate chips with white chocolate chips for a delightful twist. For a gluten-free option, use a 1:1 gluten-free flour blend in place of the all-purpose flour.

Storage

Store your Triple Chocolate Whoppers in an airtight container, separating the layers with wax paper to prevent them from sticking together. They will stay fresh at room temperature for up to a week. For longer storage, freeze the cookies for up to three months. Thaw at room temperature before serving for best results.

FAQ

Can I use regular coffee instead of espresso powder?

While espresso powder intensifies the chocolate flavor, you can substitute it with instant coffee granules. The result will be similar, although the coffee flavor might be slightly less pronounced.

Can I make the dough ahead of time?

Yes, you can prepare the dough ahead of time. Store it in the refrigerator for up to two days. When you’re ready to bake, let the dough sit at room temperature for a few minutes before scooping and baking as directed.

What can I do if I don’t have a double boiler?

If you don’t have a double boiler, you can use a heatproof bowl set over a pot of simmering water, ensuring the bowl does not touch the water. Alternatively, you can melt the chocolate and butter in the microwave, stirring every 15-20 seconds to prevent burning.

Nutrition

Each cookie contains approximately 250 calories, 14g of fat, 30g of carbohydrates, 4g of protein, and 18g of sugar. Please note that these values are estimates and may vary based on specific ingredients used.

Conclusion

These Triple Chocolate Whoppers are a testament to timeless recipes that bring joy to every occasion. The rich chocolate flavor, combined with the perfect chewy texture, makes these cookies irresistible. Whether you’re baking for a family gathering, a special occasion, or simply because you’re craving something sweet, these cookies are sure to delight. I hope they bring as much happiness to your home as they have to mine. Happy baking!

Related update: Triple Chocolate Whoppers

Related update: Dulce De Leche Cheesecake

Related update: Cinnamon & Sugar Roasted Chickpeas

Delicious Triple Chocolate Bundt Cake | Made by Meaghan Moineau

Delicious Triple Chocolate Bundt Cake

Intro

There’s something magical about the aroma of chocolate wafting through the house. It takes me back to my childhood, where Sunday afternoons were dedicated to baking with my grandmother. Her kitchen was a treasure trove of sweet delights, but nothing compared to her decadent chocolate creations. This Delicious Triple Chocolate Bundt Cake is a homage to those cherished memories. Rich, moist, and incredibly chocolaty, it’s a treat that’s sure to win over the hearts of everyone who tastes it. Whether you’re a seasoned baker or a novice, this recipe is simple to follow and guarantees a show-stopping dessert every time.

Why You’ll Love It

This cake is a chocolate lover’s dream come true. Here’s why you’ll fall head over heels for this delightful dessert:

  • Triple Chocolate Goodness: The combination of devil’s food cake mix, chocolate fudge pudding mix, and milk chocolate chips makes this cake irresistibly rich and flavorful.
  • Moist and Tender: The addition of sour cream ensures that every bite is moist and tender, melting in your mouth.
  • Simple and Quick: With just a few ingredients and straightforward steps, you can have this cake ready in no time.
  • Versatile: Perfect for any occasion, whether it’s a family gathering, a birthday celebration, or simply a treat-yourself moment.

Ingredients

  • 1 box devil’s food cake mix
  • 1 package chocolate fudge pudding mix
  • 1 cup milk chocolate chips
  • 1 cup sour cream

Instructions

  1. Preheat your oven to 350 degrees Fahrenheit.
  2. In a large mixing bowl, prepare the devil’s food cake mix as directed on the package.
  3. Add the chocolate fudge pudding mix and sour cream to the bowl. Mix well until the batter is smooth and well combined.
  4. Gently fold in the milk chocolate chips, ensuring they are evenly distributed throughout the batter.
  5. Generously spray a bundt pan with non-stick spray and coat with flour. This will help the cake release easily after baking.
  6. Pour the batter into the prepared bundt pan, smoothing the top with a spatula.
  7. Bake in the preheated oven for 50 minutes or until a toothpick inserted into the center comes out clean.
  8. Allow the cake to cool in the pan for 5 minutes before inverting it onto a cooling rack to cool completely.
  9. Optional: Serve warm slices with a drizzle of Dove milk chocolate ice cream topping and a scoop of vanilla ice cream for an extra indulgent treat.

Tips

  • Coat the Chocolate Chips: Toss the chocolate chips in a little flour before adding them to the batter. This will help prevent them from sinking to the bottom of the cake.
  • Check for Doneness: Every oven is different, so start checking the cake at around 45 minutes. The cake is done when a toothpick comes out with a few moist crumbs.
  • Cooling Time: Allow the cake to cool slightly in the pan before inverting it. This prevents the cake from breaking apart.

Variations & Substitutions

If you’re looking to put your own spin on this classic, here are some variations and substitutions you can try:

  • White Chocolate Chips: Swap out the milk chocolate chips for white chocolate chips for a twist on the original.
  • Dark Chocolate Lovers: Use dark chocolate chips and add a tablespoon of instant espresso powder to the batter for an intensified chocolate flavor.
  • Gluten-Free Option: Use a gluten-free cake mix and pudding mix to accommodate dietary restrictions.

Storage

Store any leftover cake in an airtight container at room temperature for up to three days. If you’d like to keep it fresh for longer, refrigerate it for up to a week. To freeze, wrap the cake tightly in plastic wrap and then in foil. It will keep well in the freezer for up to three months. When ready to enjoy, thaw at room temperature or warm individual slices in the microwave.

FAQ

Can I make this cake ahead of time?

Absolutely! This cake is perfect for making ahead. You can bake it a day or two before serving. Just be sure to store it properly to maintain its freshness.

What can I use instead of sour cream?

If you don’t have sour cream on hand, plain Greek yogurt is a great substitute. It will provide the same moisture and tanginess to the cake.

Nutrition

While this cake is undeniably indulgent, you can enjoy it in moderation. Each serving (without the optional toppings) contains approximately:

  • Calories: 320
  • Fat: 15g
  • Saturated Fat: 8g
  • Carbohydrates: 45g
  • Sugar: 30g
  • Protein: 4g

Conclusion

This Delicious Triple Chocolate Bundt Cake is more than just a dessert; it’s a celebration of flavor and a testament to the simple joys of baking. Whether you’re making it to share with loved ones or to treat yourself, this cake is sure to bring smiles to the table. Happy baking, and may each bite transport you to a world of chocolatey bliss!

Related update: Berry & Ricotta Danishes

Related update: Classic Carrot Cake With Cream Cheese Frosting

Social Security 2026: Payments Arrive | Analysis by Brian Moineau

When your 2026 Social Security check will hit your account — and why the dates matter

You open your bank app, hold your breath, and wait for that familiar deposit. For millions of Americans, Social Security checks aren’t just a convenience — they’re a predictable, often essential part of monthly budgeting. Good news: the Social Security Administration (SSA) has a steady, predictable schedule for 2026. If you were born on the 1st through the 10th of any month, your benefit will arrive on the second Wednesday of every month.

Below I’ll unpack the calendar, why some people get paid on different days, and a few practical tips to make the schedule work for you.

Quick snapshot you can remember

  • Those born on the 1st–10th: payment arrives the second Wednesday of each month.
  • Those born on the 11th–20th: payment arrives the third Wednesday of each month.
  • Those born on the 21st–31st: payment arrives the fourth Wednesday of each month.
  • Exceptions: people who first received Social Security before May 1997 (and some who receive both Social Security and SSI) generally get Social Security on the 3rd of the month; SSI benefits are typically paid on the 1st (or the prior business day if the 1st falls on a weekend/holiday).

(These are the official rules the SSA uses for the 2026 calendar.) (ssa.gov)

Why the schedule looks like this

  • Historically, Social Security payments were issued on the 1st of each month. In 1997 the SSA changed the schedule to spread deposits across the month and reduce processing and banking congestion.
  • The birthday-based Wednesday schedule simplifies processing: three main payment windows each month (second, third, fourth Wednesday) cover nearly all retirement, disability, and survivor beneficiaries. (ssa.gov)

What to watch for in January 2026 and holidays

  • Because of the COLA timing and New Year’s Day, some SSI and early-January payments are adjusted. For example, SSI’s January payment is often issued at the end of December when January 1 falls on a holiday. The SSA also applies the 2026 cost-of-living adjustment (COLA) starting with January 2026 benefits. (ssa.gov)

Practical tips for beneficiaries

  • Check your birth-date group and mark the corresponding Wednesday each month on your calendar so you know when to expect funds.
  • If you get both Social Security and SSI, note that SSI usually arrives on the 1st and Social Security may follow the 3rd-of-the-month rule if you started benefits before May 1997. Plan for those separate dates. (archive.ph)
  • Sign up for a my Social Security account at ssa.gov/myaccount to see personalized notices, COLA letters, and to confirm direct deposit info — especially useful if you travel or worry about mailed notices. (ssa.gov)
  • If a scheduled date falls on a weekend or federal holiday, payments are generally issued on the prior business day. That means you may sometimes see your money a day or two earlier. (money.com)

A few calendar specifics (examples from 2026)

  • January 2026 deposits (typical pattern): Jan. 14 (born 1–10), Jan. 21 (born 11–20), Jan. 28 (born 21–31). SSI payments tied to January may appear Dec. 31, 2025, because Jan. 1 is a holiday. (archive.ph)

Why this still matters beyond convenience

  • For many retirees, survivors, and disabled beneficiaries, Social Security is a primary income source. Knowing exact deposit timing helps with rent/mortgage planning, prescription and medical bills, and avoiding late fees.
  • The 2026 2.8% COLA gives beneficiaries a modest bump, but timing matters: if a payment date shifts because of holidays you may need short-term adjustments to cash flow even with the increase. (ssa.gov)

My take

The SSA’s schedule may sound bureaucratic, but it’s quietly practical: spreading payments across three Wednesdays reduces bottlenecks and keeps deposits predictable. If you rely on these funds, a little calendar work now — marking your “your Wednesday” and setting up online alerts — can remove a lot of month-to-month stress.

Sources


Related update: We recently published an article that expands on this topic: read the latest post.

Chocolate Peppermint Cookies | Made by Meaghan Moineau

Chocolate Peppermint Cookies

Intro

Chocolate Peppermint Cookies are a holiday favorite in my household, a tradition that brings back fond memories of festive gatherings and cozy winter evenings. I remember the first time I baked these delightful treats was with my grandmother, who had a knack for creating magic in the kitchen. The aroma of chocolate and peppermint swirling through the house signaled the beginning of holiday celebrations. As we sat around the fireplace, enjoying these cookies with a cup of hot cocoa, it felt like all was right with the world. Today, I’m excited to share this cherished recipe with you, so you too can create sweet memories with your loved ones.

Why You’ll Love It

These Chocolate Peppermint Cookies are the perfect blend of rich chocolate and refreshing peppermint. They are soft and chewy with a slight crunch on the outside, making them irresistible to both kids and adults. Whether you’re looking to impress at a holiday party or simply want to treat yourself, these cookies are sure to become a staple in your dessert repertoire. With their delightful glaze and festive flavor, they capture the essence of the holiday season in every bite.

Ingredients

  • 1 teaspoon baking soda
  • 1 cup confectioners sugar
  • 2 large eggs
  • 2 cups all-purpose flour
  • 2 tablespoons half and half
  • 1 cup light brown sugar
  • 1 teaspoon peppermint extract
  • 1/2 teaspoon salt
  • 1 cup sweet semi chocolate chips
  • 1 cup granulated sugar
  • 1 cup unsalted butter, softened
  • 1/2 cup unsweetened cocoa powder
  • 1 teaspoon vanilla extract

Instructions

  1. Preheat your oven to 350 degrees F.
  2. In a medium bowl, sift together the flour, cocoa powder, baking soda, and salt. Set this aside.
  3. In a mixer, beat together the butter with the granulated and light brown sugars until fluffy, about 2 minutes.
  4. Add the eggs one at a time, beating until smooth after each addition and scraping the sides of the bowl as necessary.
  5. Add the vanilla extract and mix well.
  6. On a low speed, gradually beat in the flour mixture a little at a time until well combined.
  7. Gently fold in the chocolate chips with a spatula or wooden spoon.
  8. Drop teaspoons of the batter onto an ungreased cookie sheet, spacing them about 2 inches apart.
  9. Bake the cookies until just cracked on top, about 8 minutes, rotating the pan halfway through the cooking time.
  10. Remove from the oven and flatten the cookies slightly with a spatula. Allow them to cool completely on a wire rack.
  11. For the glaze, mix together the confectioners sugar, peppermint extract, and half and half in a small bowl until smooth.
  12. Transfer the glaze mixture to a medium resealable plastic bag and snip off a tiny bit of the corner.
  13. Drizzle the glaze over the cooled cookies and let them stand until set, about 10-20 minutes.

Tips

To ensure your cookies are perfectly soft and chewy, avoid overbaking. They should just be cracked on top when you take them out of the oven. Also, make sure your butter is at room temperature for easy mixing and a smooth batter. Using a cookie scoop can help in creating uniform cookies, ensuring even baking.

Variations & Substitutions

Feel free to experiment with this recipe to suit your preferences. If you prefer a stronger peppermint flavor, you can increase the peppermint extract in the glaze. For a different twist, try adding crushed candy canes on top of the glaze for extra crunch and color. You can also substitute white chocolate chips for the semi-sweet chocolate chips for a different flavor profile.

Storage

These cookies can be stored in an airtight container at room temperature for up to a week. If you want to enjoy them for longer, they freeze beautifully. Simply layer them between sheets of parchment paper in a freezer-safe container and they’ll keep for up to three months. Thaw at room temperature before serving.

FAQ

Can I use dark chocolate chips instead of semi-sweet?

Absolutely! Dark chocolate chips can provide a richer flavor and work wonderfully in this recipe. Adjust according to your taste preference.

Can I make the dough ahead of time?

Yes, you can prepare the dough in advance and refrigerate it for up to 48 hours. This can actually enhance the flavor as the ingredients have more time to meld together. Just be sure to let the dough come to room temperature before baking.

Nutrition

While these cookies are a treat and should be enjoyed in moderation, they do provide some nutritional value. Each cookie contains approximately 150 calories, 8g of fat, 20g of carbohydrates, and 2g of protein. The exact nutritional content can vary based on specific brands and measurements used.

Conclusion

I hope this Chocolate Peppermint Cookies recipe brings as much joy to your family as it does to mine. Whether you’re baking them for a holiday gathering or simply to indulge your sweet tooth, these cookies are sure to be a hit. With their perfect balance of chocolate and peppermint, they encapsulate the spirit of the season in every bite. Happy baking, and may your home be filled with warmth, love, and delicious cookies this holiday season!

Related update: Chocolate Peppermint Cookies

Related update: Dump Cake

5-Minute Rocky Road Fudge | Made by Meaghan Moineau

5-Minute Rocky Road Fudge: A Sweet Shortcut to Delight

Intro

There are few things in life as comforting as a bite of homemade fudge. The rich creaminess of chocolate combined with the nutty crunch of walnuts and the whimsical chew of mini-marshmallows creates a symphony of flavors and textures that can transport you to another time. When I was a child, my grandmother used to make a big batch of rocky road fudge every Christmas. The aroma would fill her cozy kitchen, mingling with the scent of pine from the tree, and the sound of laughter from family gathered around. Today, I’m excited to share a quicker version of this beloved treat—a recipe that takes just five minutes to prepare, yet captures all the nostalgia and warmth of those fond memories.

Why You’ll Love It

Not only does this rocky road fudge recipe bring the classic flavors you love, but it’s also incredibly easy to make. Here’s why you’ll fall head over heels for this quick confection:

  • Time-Saving: With just five minutes of prep time, this fudge is perfect for last-minute dessert needs or a quick treat.
  • Minimal Ingredients: You’ll only need a handful of pantry staples to whip this up.
  • No Stove Required: The microwave does all the heavy lifting, making this a convenient recipe that anyone can make.
  • Perfect for Gifting: Cut into squares, this fudge makes a delightful homemade gift, ideal for holidays or special occasions.

Ingredients

  • Semi-sweet chocolate chips
  • Canned sweetened condensed milk
  • Vanilla extract
  • Salt
  • Mini-marshmallows
  • Walnuts

Instructions

  1. Line a 13×9-inch pan with foil, lightly spray with cooking spray. Set aside.
  2. In a large, microwave-safe bowl, add chocolate chips and condensed milk. Microwave for about 40 seconds, or until the chips are just melted when you stir them. If needed, continue to microwave in 15-second increments until melted. Do not overcook.
  3. Immediately stir in vanilla and salt.
  4. Fold in the marshmallows and walnuts quickly.
  5. Spread and press fudge into the prepared pan swiftly. Refrigerate until completely cooled before cutting into squares.

Tips

To ensure that your fudge turns out perfectly every time, consider these helpful tips:

  • Microwave Caution: Be careful not to overcook the chocolate, as it can seize and become grainy. Stirring frequently helps prevent this.
  • Quick Mixing: Work swiftly when adding the marshmallows and nuts to prevent them from melting too much.
  • Even Spreading: Use a spatula to evenly spread the fudge in the pan, applying gentle pressure to ensure a smooth surface.

Variations & Substitutions

This rocky road fudge is incredibly versatile. Here are some fun ways to switch it up:

  • Nut Alternatives: Swap walnuts for pecans, almonds, or even a mix of your favorite nuts.
  • Chocolate Twist: Try using dark chocolate or milk chocolate chips for a different flavor profile.
  • Add-Ins: For added texture, consider including dried fruit like cranberries or raisins.
  • Vegan Option: Use vegan chocolate chips and a plant-based condensed milk alternative.

Storage

Store your rocky road fudge in an airtight container to maintain freshness. It will keep well in the refrigerator for up to two weeks. If you prefer a softer texture, you can also store it at room temperature for about a week. For long-term storage, consider freezing individual squares wrapped in parchment paper for up to three months. Thaw in the refrigerator before enjoying.

FAQ

Can I make this fudge without nuts?

Absolutely! If you have a nut allergy or simply prefer a nut-free version, you can omit the walnuts. The fudge will still be deliciously rich and satisfying.

How do I prevent the chocolate from seizing?

To prevent seizing, ensure that no water comes into contact with the chocolate. Use a dry, microwave-safe bowl and stir gently. Overheating can also cause seizing, so heat the mixture in short increments.

Is it okay to use flavored chocolate chips?

Yes, flavored chocolate chips, like mint or caramel, can add a unique twist to the traditional rocky road flavor. Experiment to find your favorite combination!

Nutrition

While this fudge is a treat, it’s always beneficial to be mindful of portion sizes. Each square of fudge (assuming 24 squares per batch) contains approximately:

  • Calories: 150
  • Fat: 8g
  • Carbohydrates: 20g
  • Protein: 2g

Remember, moderation is key, especially with such a rich and indulgent dessert.

Conclusion

Our 5-Minute Rocky Road Fudge is a delightful nod to a classic recipe, wrapped in the convenience of modern-day cooking. Whether you’re recreating cherished memories or building new ones, this recipe is sure to become a staple in your dessert repertoire. Easy to make and even easier to enjoy, it’s the perfect blend of tradition and simplicity. Gather your ingredients, take a trip down memory lane, and indulge in the sweet satisfaction of homemade fudge, all in just five minutes.

Related update: 5-Minute Rocky Road Fudge

Related update: Vanilla Cream Cakes, Easy and Fluffy Holiday Cakes

Cacao-Pecan Shortbread Cookies | Made by Meaghan Moineau

Cacao-Pecan Shortbread Cookies: A Delectable Treat for Every Occasion

Intro

There’s something magical about the aroma of freshly baked cookies wafting through the house. It instantly transports me back to my grandmother’s kitchen, where we spent countless afternoons baking and laughing. She had a knack for turning simple ingredients into the most delightful treats, and her shortbread cookies were always my favorite. Inspired by her love for baking and my passion for unique flavors, I’ve crafted these Cacao-Pecan Shortbread Cookies. They combine the rich, nutty aroma of toasted pecans with the sophisticated bitterness of cacao nibs, creating a cookie that’s both nostalgic and modern.

Why You’ll Love It

These cookies are a wonderful blend of textures and flavors. The shortbread’s buttery, melt-in-your-mouth consistency is perfectly complemented by the crunchy pecans and the subtle chocolatey notes of the cacao nibs. Whether you’re enjoying them with a cup of coffee in the morning or as a sweet treat after dinner, these cookies are sure to impress. Plus, they’re incredibly easy to make, making them a perfect recipe for both novice and seasoned bakers alike.

Ingredients

  • 1 cup unsalted butter, softened
  • 1/2 cup cacao nibs
  • 1 cup confectioners’ sugar
  • 1 large egg
  • 2 cups all-purpose flour
  • 1/2 teaspoon kosher salt
  • 1 cup pecans, chopped
  • Seeds from 1 split vanilla bean
  • 1 teaspoon vanilla extract
  • 1/4 cup vanilla sugar
  • 1 tablespoon water

Instructions

  1. Preheat the oven to 350°F (175°C). Set the butter out to soften.
  2. Spread the chopped pecans on a rimmed baking sheet and toast for about 4-6 minutes, until lightly browned and fragrant. Let cool.
  3. In a large bowl, beat the softened butter, confectioners’ sugar, vanilla bean seeds, vanilla extract, and salt at medium speed until fluffy.
  4. Add the flour, mixing in half at a time. Beat at low speed until just incorporated. Stir in the pecans and cacao nibs and mix well.
  5. Transfer the dough to a work surface and roll into a 1 1/2-inch-thick log. Wrap the log in plastic or parchment paper and refrigerate for 1 hour, until chilled.
  6. Line two large baking sheets with parchment paper. Spread the vanilla sugar on a platter.
  7. Mix the egg and water together to create an egg wash. Brush the log with the egg wash and roll in the sugar. Slice the log into 1/2-inch-thick rounds and place them on the prepared baking sheets, about 1 inch apart.
  8. Bake the cookies for about 15 minutes, until the edges are golden. Rotate the baking sheets from top to bottom and front to back halfway through baking. Transfer the cookies to a wire rack and let stand until completely cooled.

Tips

For the best results, make sure your butter is at room temperature before you start baking. This will help the dough come together more easily. Additionally, chilling the dough is key to achieving the perfect shortbread texture, so don’t skip this step! Finally, if you don’t have vanilla sugar, you can make your own by mixing granulated sugar with vanilla bean seeds, or simply use regular sugar in its place.

Variations & Substitutions

If you’re feeling adventurous, try adding some orange zest to the dough for a citrusy twist. You can also substitute walnuts or almonds for the pecans if you prefer a different nut flavor. If cacao nibs are hard to come by, mini chocolate chips make a great alternative, adding a sweeter chocolate note to the cookies.

Storage

These cookies can be stored in an airtight container at room temperature for up to one week. For longer storage, consider freezing the unbaked dough log. When you’re ready to bake, simply slice and bake from frozen, adding a couple of extra minutes to the baking time.

FAQ

Can I make the dough ahead of time?

Yes, you can prepare the dough up to three days in advance. Just keep it wrapped in plastic or parchment paper in the refrigerator until you’re ready to bake.

Are these cookies gluten-free?

As written, this recipe is not gluten-free due to the all-purpose flour. However, you can try substituting a 1:1 gluten-free baking flour for a gluten-free version.

What can I use if I don’t have a vanilla bean?

If you don’t have a vanilla bean, you can increase the vanilla extract to 1 1/2 teaspoons for a similar flavor profile.

Nutrition

While these cookies are an indulgent treat, it’s worth noting that they contain heart-healthy fats from pecans and antioxidants from cacao nibs. Moderation is key, so enjoy a cookie or two with your favorite beverage!

Conclusion

Baking these Cacao-Pecan Shortbread Cookies is not just about creating a delicious treat; it’s about crafting moments and memories that last a lifetime. Whether you’re sharing them with family or enjoying them on your own, these cookies are sure to bring warmth and joy to your day. I hope you find as much comfort and delight in baking and savoring these cookies as I do. Happy baking!

Related update: Cacao-Pecan Shortbread Cookies

Related update: Fat Free Gingerbread Cookies

Chocolate Pavlova with Winter Fruit | Made by Meaghan Moineau

Chocolate Pavlova with Winter Fruit

Introduction

There’s something magical about a pavlova, with its crisp exterior and soft, marshmallow-like center. This Chocolate Pavlova with Winter Fruit is a delightful twist on a classic dessert that’s both elegant and rustic. I remember the first time I made it for a family gathering during the holidays. The house was filled with the warmth of laughter and the aroma of cocoa. My grandmother, a stickler for traditional pavlova, was dubious at first, but after her first bite, she nodded approvingly and asked for seconds. That moment, her approval, made this recipe a cherished family favorite.

Why You’ll Love It

This chocolate pavlova is a showstopper! It’s perfect for impressing guests at any gathering or for a cozy night in. The combination of rich chocolate and the tartness of winter fruits creates a harmonious balance of flavors. The meringue is light and airy, yet decadently chocolatey, making it an indulgent treat without being too heavy. Plus, it’s naturally gluten-free, making it suitable for a variety of dietary needs.

Ingredients

  • 6 large egg whites, room temperature
  • 1/4 teaspoon cream of tartar
  • 1 cup granulated sugar
  • 1 tablespoon dutch process cocoa powder
  • 1 teaspoon tapioca starch
  • 1 teaspoon vanilla bean paste
  • 1 teaspoon white vinegar
  • 2 ounces dark 70% chocolate, finely chopped
  • 1 cup heavy cream
  • 2 tablespoons confectioner’s sugar
  • 1 teaspoon vanilla extract
  • Assorted fresh winter fruit (e.g., pomegranate seeds, kiwi, clementines)

Instructions

  1. Preheat the oven to 225°F convection or 250°F conventional. Line a rimmed baking sheet with a Silpat or parchment paper.
  2. In the bowl of a stand mixer fitted with a whisk attachment, whip the egg whites, vanilla bean paste, and cream of tartar until soft peaks begin to form.
  3. Sift together the sugar, cocoa powder, and tapioca starch. With the motor running at low speed, add the sugar mixture 1 tablespoon at a time to the egg whites.
  4. Add the vinegar and dark chocolate. Whip until fully incorporated and the egg whites hold a stiff peak (the whip attachment will have a sturdy egg white tail when removed).
  5. Scoop the mixture onto the prepared baking sheet. Shape into a 9- to 10-inch circle with a slightly higher edge.
  6. Bake for 1 hour and 15 minutes, then turn off the oven and allow the pavlova to cool completely in the oven with the door slightly ajar.
  7. Just before serving, whip the heavy cream with confectioner’s sugar and vanilla extract until soft peaks form.
  8. Spoon the whipped cream onto the pavlova and top with fresh winter fruit.

Tips

For the fluffiest meringue, ensure your mixing bowl and whisk are clean and free from any grease. Use room temperature egg whites for better volume. When adding sugar, do so gradually to avoid deflating the meringue. Baking the pavlova slowly at a low temperature is key to achieving the perfect texture.

Variations & Substitutions

You can play around with different flavors by adding a pinch of cinnamon or nutmeg to the meringue. For a fruit topping, consider using berries, mango, or passion fruit in the summer months. If you don’t have tapioca starch, cornstarch is an adequate substitute. For a dairy-free version, use coconut cream in place of heavy cream.

Storage

The pavlova is best enjoyed the day it is assembled. However, the meringue base can be made a day in advance and stored in an airtight container at room temperature. Once topped with cream and fruit, it should be consumed within a few hours, as the moisture can soften the meringue.

FAQ

Can I make this recipe ahead of time?

Absolutely! You can prepare the meringue base a day in advance and store it in an airtight container. Assemble with cream and fruit just before serving for optimal texture.

What can I do if my pavlova cracks?

Cracks are common and often add to the rustic charm of a pavlova. If you find the cracks too large, you can use whipped cream as a delicious “glue” to hold pieces together. It will still taste wonderful!

Nutrition

This pavlova is relatively low in calories compared to other desserts, thanks to its light meringue base. The fresh fruit topping adds natural sweetness and vital nutrients. However, as with all treats, moderation is key, especially for those watching their sugar intake.

Conclusion

This Chocolate Pavlova with Winter Fruit is a delightful dessert that brings joy and indulgence to any occasion. Its beautiful presentation and delicious flavors make it a memorable addition to your dessert repertoire. Whether you’re making it for a holiday feast or a simple family dinner, it’s sure to impress and bring smiles to the table. Enjoy this recipe and create sweet memories with your loved ones!

Related update: Chocolate Pavlova with Winter Fruit

Caramel Macchiato Cake | Made by Meaghan Moineau

Caramel Macchiato Cake

Intro

There’s something magical about the aroma of coffee and caramel mingling in the air. It takes me back to lazy Sunday afternoons at my grandmother’s house, where the fragrant scent of freshly brewed coffee and the sweet promise of caramel treats filled the kitchen. Inspired by those cherished memories, this Caramel Macchiato Cake captures the essence of those moments in a delectable dessert that combines the rich flavors of coffee, chocolate, and caramel. Whether you’re a coffee lover or a dessert enthusiast, this cake is designed to bring warmth and joy to your table.

Why You’ll Love It

This Caramel Macchiato Cake is more than just a cake; it’s an experience. Here are a few reasons why you’ll fall head over heels for this delightful dessert:

  • Rich and Flavorful: The combination of chocolate, coffee, and caramel creates a symphony of flavors that dance on your taste buds.
  • Perfect for All Occasions: Whether it’s a birthday, a family gathering, or just a treat for yourself, this cake is sure to impress.
  • Easy to Make: With a few simple ingredients and steps, you’ll have a show-stopping dessert without spending hours in the kitchen.

Ingredients

  • Butter
  • Condensed milk
  • White corn syrup
  • Unflavored gelatin powder
  • Chocolate cake mix
  • Granulated sugar
  • Heavy whipping cream
  • Coffee
  • Powdered sugar
  • Water

Instructions

  1. Make the Cake Layers: Follow the chocolate cake box instructions to make three layers. Add an extra box of mix if needed to ensure you have enough batter for three layers. Add the instant coffee directly to the batter, stir, and let it sit for a few minutes to allow the coffee to dissolve.
  2. Divide the batter evenly into three 8-inch cake pans. Bake according to the box instructions.
  3. Once the cakes are cool, place a large plate on top of each pan and invert so that the plate is on the bottom. Tap the top of the pan a few times and gently wiggle to remove the pan from the cake. Repeat for the other two layers. Wrap the cake layers in plastic wrap and refrigerate for at least 2 hours or overnight.
  4. Make the Caramel: In a small saucepan over medium-low heat, combine the butter, condensed milk, white corn syrup, and granulated sugar. Stir and cook until the mixture reaches a dark golden brown color, stirring frequently to prevent burning.
  5. Once the caramel is ready, let it cool slightly before using it to layer and top the cake.
  6. Layer the cake with caramel and frosting of your choice, and drizzle more caramel on top for a beautiful finish.

Tips

To ensure your Caramel Macchiato Cake turns out perfectly, consider these helpful tips:

  • Chill the Cake Layers: Chilling the cake layers makes them easier to handle and frost.
  • Keep an Eye on the Caramel: Caramel can go from perfect to burnt quickly, so stir continuously and watch for the color change.
  • Use Quality Coffee: The coffee flavor is essential in this cake, so use a good quality coffee for the best results.

Variations & Substitutions

Feel free to make this cake your own by trying out some of these variations and substitutions:

  • Chocolate Variation: Add chocolate chips to the batter for extra chocolatey goodness.
  • Nutty Twist: Sprinkle chopped nuts between the layers for added texture and flavor.
  • Alternative Frosting: Try a cream cheese frosting for a tangy contrast to the sweet caramel.
  • Dairy-Free: Use dairy-free substitutes for butter and cream to make the cake suitable for those with dairy allergies.

Storage

To store your Caramel Macchiato Cake, wrap it tightly in plastic wrap or place it in an airtight container. It can be stored at room temperature for up to 3 days or in the refrigerator for up to a week. For longer storage, wrap the cake in plastic wrap and aluminum foil, then freeze for up to 3 months. Thaw in the refrigerator before serving.

FAQ

Can I use instant coffee instead of brewed coffee?

Yes, you can use instant coffee. Simply dissolve it in a bit of hot water before adding it to the batter for a stronger coffee flavor.

How do I prevent my caramel from burning?

Keep the heat on medium-low and stir the caramel constantly. Watch for the color change to a dark golden brown and remove it from heat immediately once it reaches that point.

Nutrition

This Caramel Macchiato Cake is a decadent treat, perfect for special occasions. While it’s not the lowest in calories, it is certainly rich in flavor and satisfaction. Enjoy a slice in moderation as part of a balanced diet.

Conclusion

The Caramel Macchiato Cake is a celebration of flavors and a delightful nod to the cherished memories of cozy afternoons filled with the aroma of coffee and caramel. Whether you’re making it for a special occasion or simply to enjoy a slice of comfort, this cake is sure to become a favorite. So gather your ingredients, embrace the warmth of your kitchen, and create a dessert that will surely bring smiles and sweet memories to those who share it with you.

Related update: Caramel Macchiato Cake

Valentine Hearts | Made by Meaghan Moineau

Valentine Hearts: A Sweet Treat for Your Loved Ones

Intro

Every Valentine’s Day, my grandmother would bake a special treat that filled the house with the aroma of love and sweetness. As a child, I would watch her gracefully craft heart-shaped pastries, her hands moving with a rhythm that spoke of years of experience and love. Inspired by her legacy, I’ve created my own version of this beloved dessert: Valentine Hearts. These delightful puff pastries, filled with crème fraiche and fresh strawberries, are perfect for sharing with your loved ones. Join me as we bring a touch of nostalgia and romance to your kitchen with this simple yet elegant recipe.

Why You’ll Love It

Valentine Hearts are a beautiful and delicious way to show someone you care. Not only are they visually stunning, but they also combine the flaky, buttery goodness of puff pastry with the creamy richness of crème fraiche and the natural sweetness of strawberries. This dessert is perfect for any occasion where you want to impress with minimal effort. Plus, the aroma of these pastries baking in your oven will fill your home with warmth and love.

Ingredients

  • Puff pastry
  • 1 egg, beaten for glaze
  • Castor sugar
  • Canned crème fraiche
  • Fresh strawberries
  • Plain chocolate

Instructions

  1. Preheat your oven to 220 degrees C (425 F).
  2. Thaw the puff pastry sheet according to the instructions on the box.
  3. Unroll the pastry sheet and cut out around 8 hearts using a heart-shaped cookie cutter.
  4. Prick each heart with a fork, brush with beaten egg, and sprinkle lightly with some castor sugar.
  5. Place these hearts on a greased baking sheet and bake for about 10 minutes until they are risen and golden brown.
  6. Let the pastry hearts cool completely.
  7. Slice the strawberries and split the cooled hearts horizontally using a sharp knife.
  8. Sandwich the heart halves together with crème fraiche and sliced strawberries.
  9. Drizzle melted plain chocolate over the tops and dust with a bit more castor sugar.

Tips

For the best results, ensure the puff pastry is well-chilled before cutting and baking. This helps them puff up beautifully. When slicing the hearts, use a very sharp knife to prevent crumbling. If you’re preparing these ahead of time, keep the components separate and assemble just before serving to maintain the pastry’s crispness.

Variations & Substitutions

If crème fraiche isn’t available, you can substitute it with whipped cream or mascarpone cheese for a similar texture and taste. For a fruity twist, consider adding raspberries or blueberries to the strawberry filling. If you prefer a different kind of chocolate, white chocolate can be a delightful alternative for drizzling.

Storage

Valentine Hearts are best enjoyed fresh on the day they are made. However, if you have leftovers, store them in an airtight container in the refrigerator for up to two days. Keep the pastry and filling separate if possible, and assemble just before serving to preserve the texture.

FAQ

Can I make the pastry hearts in advance?

Yes, you can bake the pastry hearts a day in advance. Store them in an airtight container at room temperature and assemble them with the filling just before serving.

What if I don’t have a heart-shaped cookie cutter?

No worries! You can easily create a heart shape by cutting the pastry into squares and trimming the top corners to form a heart. Alternatively, you can use any other shape cutter you have on hand.

Can I use frozen strawberries instead of fresh ones?

While fresh strawberries are recommended for their texture and flavor, you can use thawed frozen strawberries in a pinch. Just be sure to drain any excess liquid to avoid soggy pastries.

Nutrition

This dessert is meant to be a treat, so indulge in moderation. The combination of puff pastry, crème fraiche, and chocolate provides a rich and satisfying flavor profile, while the strawberries add a fresh and nutritious element. Remember, the joy of sharing these with loved ones is as wholesome as the ingredients themselves.

Conclusion

Valentine Hearts are more than just a dessert; they are a symbol of love and thoughtfulness. Whether you’re sharing them with a romantic partner, family, or friends, these sweet treats are sure to make any occasion special. The simplicity of the recipe allows you to focus on the joy of baking and sharing, creating memories that will last long after the last crumb is gone. So preheat your oven, gather your ingredients, and let the love-filled aroma of Valentine Hearts fill your home. Happy Valentine’s Day!

Related update: Valentine Hearts

Related update: Vegan Strawberry Shortcake served with Vegan Whipped Cream

OREO Cookie Balls – Snowman | Made by Meaghan Moineau

OREO Cookie Balls – Snowman

Intro

As the first snowflakes start to fall, there’s a certain magic that fills the air. Growing up, my siblings and I would rush outside, our noses turning rosy as we built snowmen in the front yard. Those chilly afternoons always ended with us huddled around the kitchen table, indulging in sweet treats that our mom had prepared. One of our favorite snowy day indulgences was her OREO Cookie Balls—transformed into adorable snowmen. These delightful bites encapsulate the joy of winter and the warmth of family gatherings.

Why You’ll Love It

These OREO Cookie Balls are the perfect combination of rich, chocolatey goodness and creamy decadence, all encased in a fun, wintry theme. They’re incredibly easy to make, requiring minimal ingredients, and are an absolute hit at any holiday gathering. Whether you’re hosting a festive party or simply enjoying a cozy night in, these snowman-themed treats will bring smiles to all.

Ingredients

  • 1 package of OREO Cookies
  • 8 oz cream cheese, softened
  • 16 oz Baker’s chocolate, melted
  • Rolo chocolate candy
  • Black gel icing
  • Orange gel icing
  • Additional supplies to decorate snowmen (e.g., mini chocolate chips, pretzel sticks)

Instructions

  1. Take the entire package of OREO Cookies, including the filling, and crush them in a large gallon ziplock bag until you have fine crumbs.
  2. Empty the cookie crumbs into a large mixing bowl.
  3. Add the softened cream cheese to the bowl.
  4. Mix well on medium speed until fully combined and smooth.
  5. Use a 1-inch cookie scoop to portion out the mixture, then roll into balls using the palms of your hands.
  6. Place the cookie balls on a cookie sheet and freeze for about 10 minutes to firm up.
  7. Melt the Baker’s chocolate according to the package instructions.
  8. Dip each cookie ball into the melted chocolate, ensuring it is fully coated, and then place on a wax paper-covered cookie sheet.
  9. Decorate with Rolo candies for hats, and use black and orange gel icing to create eyes and noses. Additional supplies can be used for further decoration, such as mini chocolate chips for buttons or pretzel sticks for arms.
  10. Place the decorated cookie balls in the refrigerator for an hour to harden completely.

Tips

For the best results, ensure your cream cheese is thoroughly softened before mixing. This will help achieve a smooth, homogeneous mixture. When dipping the cookie balls in chocolate, use a fork to lift them out, allowing excess chocolate to drip off for a cleaner finish.

Variations & Substitutions

Feel free to get creative with the decorations! You can use colored sprinkles or edible glitter for added festive flair. If you’re not a fan of Baker’s chocolate, white chocolate can also be used for a different flavor profile. Vegan cream cheese and chocolate alternatives can turn this recipe into a plant-based delight.

Storage

Store these OREO Cookie Balls in an airtight container in the refrigerator for up to a week. If you’d like to make them ahead of time, they can also be frozen for up to a month. Just be sure to thaw them in the refrigerator before serving.

FAQ

Can I use a different type of cookie instead of OREOs?

While OREOs provide the classic taste and texture, you can experiment with other sandwich cookies for different flavors. Just ensure they’re similar in composition for best results.

Is it necessary to freeze the cookie balls before dipping them in chocolate?

Freezing helps the balls hold their shape and makes them easier to dip in chocolate. This step is important for achieving a smooth coating.

How can I make these treats gluten-free?

Simply substitute the OREO Cookies with a gluten-free sandwich cookie option. Ensure all other ingredients, like the chocolate and cream cheese, are also certified gluten-free.

Nutrition

While these treats are indulgent, it’s good to savor them in moderation. Each snowman OREO Cookie Ball is approximately 120 calories, with the majority coming from healthy fats and carbohydrates. Enjoy as a festive treat alongside a balanced diet.

Conclusion

OREO Cookie Balls – Snowman are a whimsical and delicious addition to any winter celebration. They capture the joy of the season and are perfect for sharing with loved ones. Whether you’re reminiscing about childhood snow days or creating new memories with your own family, these treats will warm your heart and delight your taste buds. Gather your ingredients, invite the kids to help with the decorating, and enjoy the magic of creating these sweet little snowmen together!

Related update: OREO Cookie Balls – Snowman

Related update: Valentine Hearts

Chocolate Caramel Cupcakes | Made by Meaghan Moineau

Chocolate Caramel Cupcakes

Intro

Chocolate and caramel have always been a match made in heaven, and these Chocolate Caramel Cupcakes are a testament to that divine pairing. I remember the first time I baked these cupcakes was for a family gathering. The sweet aroma of chocolate and caramel wafting through the house brought everyone to the kitchen, eager for a taste. Watching my family enjoy these cupcakes was a moment of pure joy, and I’m thrilled to share this recipe with you, hoping it brings the same happiness to your table.

Why You’ll Love It

These Chocolate Caramel Cupcakes are the perfect combination of rich, moist chocolate cake and a creamy, dreamy caramel frosting. Whether you’re a seasoned baker or a novice, you’ll appreciate how straightforward this recipe is. The result is an impressive dessert that looks as stunning as it tastes. Every bite offers a beautiful balance of flavors and textures, with a touch of saltiness if you choose to add a sprinkle of sea salt. This recipe is sure to become a favorite in your baking repertoire!

Ingredients

  • 1 3/4 cups all-purpose flour
  • 3/4 cup unsweetened cocoa powder
  • 1 1/2 teaspoons baking soda
  • 1/2 teaspoon salt
  • 3/4 cup unsalted butter, softened
  • 1 3/4 cups sugar
  • 1 teaspoon vanilla extract
  • 2 large eggs
  • 4 ounces semi-sweet chocolate, melted and cooled
  • 1 cup milk
  • 1/2 cup unsalted butter (for frosting)
  • 1 cup brown sugar
  • 1/2 cup milk (for frosting)
  • 3 cups powdered confectioners’ sugar

Instructions

  1. Preheat your oven to 350 degrees Fahrenheit. Prepare the cupcake pans by greasing them or placing paper liners in each well.
  2. In a small bowl, whisk together the flour, cocoa powder, baking soda, and salt; set aside.
  3. In a large bowl, use an electric hand mixer on medium speed to beat the butter until creamy, about 2 minutes.
  4. Gradually add the sugar to the butter, beating until the mixture is light and fluffy, about 3 minutes. Be sure to scrape down the sides of the bowl occasionally.
  5. Beat in the vanilla extract, followed by the eggs, one at a time, ensuring each is fully incorporated before adding the next.
  6. Mix in the cooled, melted chocolate until well combined.
  7. Alternately add the flour mixture to the batter in four additions, beginning and ending with the flour mixture, and alternating with the milk. Beat briefly on low-medium speed until the batter is smooth.
  8. Fill each cupcake well 3/4 of the way full with batter.
  9. Bake for about 22 minutes or until a toothpick inserted into the center of a cupcake comes out with a few moist crumbs attached.
  10. Cool the cupcakes in the pan on a wire rack for 10 minutes, then remove them from the pan and let cool completely on the rack.
  11. To make the frosting, melt the butter in a 2-quart saucepan over medium heat. Stir in the brown sugar and bring to a boil, stirring constantly.
  12. Reduce the heat to low and continue to boil and stir for 2 minutes.
  13. Stir in 1/2 cup of milk and bring back to a boil, then remove from heat and allow to cool to lukewarm, about 30 minutes.
  14. Gradually stir the caramel mixture into a large mixing bowl with powdered sugar and milk. Beat with an electric hand mixer on low speed for about 6 minutes, or until the frosting is light and fluffy.
  15. If the frosting is too stiff, add milk a teaspoon at a time to reach the desired consistency. If too runny, add additional powdered sugar, beating on low until it thickens.
  16. Store the frosting in the refrigerator for 15 minutes before using it to frost the cupcakes to help it firm up.
  17. For a salted caramel twist, sprinkle sea salt on top of the frosting or mix in 1/2 teaspoon of sea salt towards the end of the frosting preparation.

Tips

Here are some helpful tips to ensure your Chocolate Caramel Cupcakes turn out perfectly every time:

  • Ensure all your ingredients are at room temperature before starting. This helps the batter mix more evenly.
  • If you don’t have semi-sweet chocolate on hand, you can use dark chocolate for a richer taste.
  • When melting the chocolate, do so gently in a microwave or double boiler to prevent it from burning.
  • Always allow the cupcakes to cool completely before frosting to prevent the frosting from melting.

Variations & Substitutions

Feel free to get creative with this recipe:

  • Flavor Variations: Add a teaspoon of espresso powder to the batter for a mocha twist.
  • Substitutions: For a dairy-free option, use coconut milk in place of regular milk and dairy-free butter substitutes.
  • Extra Add-ins: Consider folding in mini chocolate chips or chopped nuts into the batter before baking for added texture.

Storage

Store any leftover cupcakes in an airtight container at room temperature for up to 2 days. If you’d like to keep them longer, refrigerate them for up to a week. For longer storage, freeze the cupcakes (without frosting) for up to 3 months. Thaw them in the refrigerator overnight before frosting and serving.

FAQ

Can I make these cupcakes ahead of time?

Yes, you can! You can bake the cupcakes a day in advance and store them in an airtight container. Make the frosting on the day you plan to serve them for the best texture.

What if my frosting is too runny?

If your frosting is too runny, gradually add more powdered sugar, a few tablespoons at a time, while beating on low speed until it reaches your desired consistency.

Can I use store-bought caramel sauce for the frosting?

While homemade caramel provides the best flavor, you can use store-bought caramel sauce in a pinch. Just make sure to adjust the consistency with powdered sugar and milk as needed.

Nutrition

While desserts are meant to be a treat, it’s helpful to know what you’re enjoying. Each cupcake is approximately 320 calories, with the primary nutritional components being carbohydrates and fats. Remember, moderation is key!

Conclusion

These Chocolate Caramel Cupcakes are more than just a dessert; they’re a piece of happiness wrapped in a paper liner. Perfect for any celebration or simply to indulge your sweet tooth, this recipe is sure to become a cherished favorite. Whether you’re sharing them with family or savoring one with a cup of coffee, these cupcakes are a delightful treat that never fails to impress. Enjoy every bite and happy baking!

Related update: Chocolate Caramel Cupcakes

Related update: No-Bake Green Tea Tofu Cheesecake

Gluten And Dairy Free Peanut Butter Cups | Made by Meaghan Moineau

Gluten And Dairy Free Peanut Butter Cups

Intro

There’s something utterly comforting about the combination of chocolate and peanut butter, a pairing as timeless as a warm embrace on a chilly day. Growing up, I fondly remember my grandmother’s kitchen, a treasure trove of sweet aromas and delightful treats. She always had a stash of peanut butter cups tucked away in a tin, ready to be brought out during family gatherings. Over the years, I’ve embraced a gluten and dairy-free lifestyle, but my love for this classic treat remains unchanged. This recipe is my homage to those cherished moments with a modern twist, ensuring that everyone, regardless of dietary restrictions, can indulge in this nostalgic delight.

Why You’ll Love It

If you’re a fan of creamy, nutty flavors encased in rich, velvety chocolate, these gluten and dairy-free peanut butter cups will quickly become a staple in your dessert repertoire. They are simple to make, require minimal ingredients, and are free from gluten and dairy, making them accessible for those with dietary restrictions. More than just a treat, they are a delightful reminder that sometimes, the simplest things in life bring the most joy.

Ingredients

  • 1 cup Enjoy Life semi-sweet chocolate chips
  • 2 tablespoons non-hydrogenated shortening
  • 1/2 cup creamy peanut butter
  • 2 tablespoons agave nectar
  • 1/4 teaspoon salt

Instructions

  1. Line a mini muffin tin with paper liners or spray with cooking oil.
  2. In a small bowl, mix together the creamy peanut butter, agave nectar, and salt. Set aside.
  3. In a heatproof bowl, combine the chocolate chips and shortening. Set the bowl over a pot of simmering water, ensuring that the water does not touch the bottom of the bowl.
  4. Stir the chocolate and shortening gently until fully melted and smooth.
  5. Spoon 1 teaspoon of the melted chocolate into each of the prepared mini muffin cups.
  6. Top the chocolate with a scant teaspoon of the peanut butter mixture.
  7. Finish by topping each cup with another teaspoon of the melted chocolate.
  8. Refrigerate the peanut butter cups until they are set, about 1-2 hours.
  9. Store the set peanut butter cups in an airtight container in the refrigerator.

Tips

For the best results, ensure that the chocolate and shortening are melted gently. Avoid overheating, as this can cause the chocolate to seize. If you don’t have a double boiler, a heatproof bowl over a pot of simmering water works perfectly. Patience is a virtue when it comes to setting these cups, so resist the urge to peek too soon!

Variations & Substitutions

This recipe is wonderfully flexible. If you prefer a different nut butter, almond or cashew butter can be substituted for peanut butter. For a touch of texture, consider mixing in a handful of chopped nuts or seeds into the peanut butter filling. If agave nectar isn’t available, maple syrup or honey (if not strictly vegan) can be used as an alternative sweetener.

Storage

These peanut butter cups are best stored in an airtight container in the refrigerator. They’ll keep well for up to two weeks, making them a perfect make-ahead treat. For longer storage, you can freeze them and enjoy a quick indulgence straight from the freezer.

FAQ

Can I use a different type of chocolate?

Absolutely! While semi-sweet chocolate provides a balanced sweetness, you can opt for dark chocolate if you prefer a richer, more intense flavor. Just ensure it is dairy-free to keep the recipe compliant with dietary needs.

Is there a substitute for shortening?

If you don’t have non-hydrogenated shortening on hand, coconut oil can be a good alternative. It will help the chocolate set with a smooth texture, though it may impart a slight coconut flavor.

Nutrition

These peanut butter cups are rich in flavor and moderately indulgent, making them a treat best enjoyed in moderation. The use of natural ingredients like agave nectar and creamy peanut butter offers a slightly healthier twist on traditional versions, with healthy fats and a touch of protein. As always, it’s important to consider portion sizes to maintain a balanced diet.

Conclusion

Creating these gluten and dairy-free peanut butter cups is more than just a culinary exercise—it’s a way to rekindle the warmth of cherished memories while crafting new ones. Whether you’re preparing them for a family gathering or simply to satisfy a personal craving, their simplicity and rich flavor will undoubtedly make them a favorite. I hope this recipe brings as much joy to your kitchen as it has to mine, and that each bite transports you to your own happy memories of yesteryears.

Related update: Gluten And Dairy Free Peanut Butter Cups

Related update: Crispy Pineapple Fritters

Peppermint Hot Chocolate Cupcakes | Made by Meaghan Moineau

Peppermint Hot Chocolate Cupcakes

Intro

There’s something utterly magical about the combination of chocolate and peppermint, especially when the weather turns chilly, and the air is filled with the scent of pine and fireplaces. These Peppermint Hot Chocolate Cupcakes are a delightful treat that transports me back to cozy winter evenings spent in my grandmother’s kitchen. I remember sitting at her wooden table, the room filled with the warm, sweet aroma of melting chocolate and peppermint candies. She would let me help stir the batter, my small hands barely able to grip the whisk. Those moments were filled with laughter, stories, and the kind of love that only a grandmother can give. Now, I carry on that tradition with these cupcakes, hoping to bring some of that warmth and nostalgia to your home.

Why You’ll Love It

These cupcakes are a perfect blend of rich, chocolatey goodness and refreshing peppermint. The luscious ganache filling adds a decadent surprise, while the marshmallow buttercream frosting with a hint of peppermint creates a festive touch. They’re not only delicious but also visually stunning, making them perfect for holiday gatherings or any winter celebration. Whether you’re serving them to family and friends or enjoying one with a cup of hot cocoa by the fire, these cupcakes are sure to be a hit.

Ingredients

  • 1 cup semisweet chocolate chips
  • 1 cup hot-brewed coffee
  • 2 cups sugar
  • 1 3/4 cups all-purpose flour
  • 3/4 cup unsweetened cocoa powder
  • 1 1/2 teaspoons baking soda
  • 1 1/2 teaspoons baking powder
  • 1 teaspoon salt
  • 2 large eggs
  • 1 cup buttermilk
  • 1/2 cup vegetable oil
  • 2 teaspoons vanilla extract
  • 1/2 cup heavy cream
  • 1/4 cup unsalted butter
  • 8 ounces semisweet chocolate, chopped
  • 1/2 cup unsalted butter, softened
  • 2 cups marshmallow creme
  • 1/2 teaspoon peppermint extract
  • 3-4 cups powdered sugar
  • 2 tablespoons milk
  • Crushed peppermint candies, for garnish

Instructions

  1. Preheat the oven to 350 degrees F. Line a cupcake or muffin pan with 24 regular-size cupcake liners.
  2. Combine the chocolate chips and hot coffee together, stirring occasionally until the chocolate is melted and the mixture is smooth.
  3. In a large bowl, sift together the sugar, flour, cocoa powder, baking soda, baking powder, and salt.
  4. In another bowl, beat the eggs with an electric mixer until thickened slightly. Slowly add the buttermilk, oil, and vanilla.
  5. Add the melted chocolate mixture to the eggs, and combine completely.
  6. Add the sugar mixture and beat on medium speed until well combined.
  7. Fill the prepared cupcake liners three-quarters full with the cupcake batter.
  8. Bake until a toothpick inserted in center comes out clean, 18 to 21 minutes. Cool the cupcakes completely.
  9. While the cupcakes are baking, prepare the Chocolate Ganache and the Peppermint Marshmallow Buttercream Frosting (directions below).
  10. To make the Chocolate Ganache, bring the heavy cream and butter to a simmer in a small saucepan. Turn off the heat and add in the chocolate. Stir the mixture until smooth. Set aside to cool.
  11. To make the Peppermint Marshmallow Buttercream Frosting, whip together the butter and marshmallow creme using an electric mixer fitted with a whisk attachment.
  12. Add the peppermint extract. Slowly add 2 cups of the powdered sugar and continue to mix on a slow speed.
  13. Add the milk and additional powdered sugar, up to 2 cups, until desired consistency is reached.
  14. To assemble cupcakes: Using an apple corer, remove the center of each cupcake. Fill each cupcake with a spoonful of the Chocolate Ganache.
  15. Using the frosting-filled pastry bag, frost the cupcakes and sprinkle with crushed peppermint candies.

Tips

For the best results, ensure all your ingredients are at room temperature before you begin. This helps everything blend together more smoothly. Also, when making the ganache, make sure not to let the cream and butter boil; just simmer them gently to avoid a grainy texture.

Variations & Substitutions

If you’re not a fan of peppermint, you can substitute the peppermint extract with almond or vanilla extract for a different twist. You can also use dark chocolate instead of semisweet for a richer flavor. For a dairy-free version, use coconut milk and a vegan butter substitute.

Storage

These cupcakes can be stored in an airtight container in the refrigerator for up to 5 days. Before serving, let them come to room temperature for the best taste and texture. You can also freeze them without frosting for up to 2 months. Just thaw them overnight in the refrigerator before frosting and serving.

FAQ

Can I make these cupcakes gluten-free?

Yes, you can substitute the all-purpose flour with a gluten-free flour blend. Just make sure it’s a 1:1 substitute for best results.

Do I have to use coffee in the recipe?

If you’re not a fan of coffee, you can substitute it with hot water or hot chocolate. The coffee enhances the chocolate flavor, but it’s not essential.

Nutrition

While these cupcakes are a treat and should be enjoyed in moderation, they do contain some nutritional benefits. The cocoa powder provides antioxidants, and using dark chocolate can add a boost of iron and magnesium. However, they are still high in sugar and fat, so enjoy them as an occasional indulgence.

Conclusion

These Peppermint Hot Chocolate Cupcakes are more than just a dessert; they’re a celebration of flavors and memories. Whether you’re making them for a holiday party or simply to indulge in a bit of winter nostalgia, they’re sure to bring joy and warmth to those who taste them. I hope this recipe becomes a cherished part of your holiday traditions, just as it has in my family. Enjoy every sweet, minty bite!

Related update: Peppermint Hot Chocolate Cupcakes

Related update: Grandma Inez's Pineapple Pie

Candy Cane Chocolate Marshmallows | Made by Meaghan Moineau

Candy Cane Chocolate Marshmallows

Intro

As the holiday season approaches, there’s a unique joy in the air, one that brings with it the aroma of nostalgia and sweet treats. I remember my childhood days when my grandmother would hand us candy canes every Christmas, and we’d spend hours trying to perfect our hot chocolate game. Those candy canes weren’t just sweet delights; they were the essence of our festive spirit. Today, I want to share a recipe that combines those cherished memories with a modern twist: Candy Cane Chocolate Marshmallows. This delicious treat is perfect for sharing with family and friends or simply enjoying alone with a good book by the fireplace.

Why You’ll Love It

This recipe is a delightful fusion of flavors and textures that will take your taste buds on a festive journey. The cool and minty candy canes complement the rich, velvety chocolate, while the fluffy marshmallow center adds a delightful contrast. It’s a simple yet decadent treat that is perfect for gifting or enjoying as a cozy dessert on a chilly evening. Plus, it’s an easy recipe that you can whip up in no time, making it ideal for last-minute holiday preparations.

Ingredients

  • Candy canes
  • Dark chocolate
  • Marshmallows
  • Milk chocolate

Instructions

  1. Crush candy canes using the bottom of a glass, a mallet, or any tool that works for you. Aim for a mix of fine and chunky pieces for a textured coating.
  2. Set up a double boiler to melt the chocolate. If you don’t have one, you can place a heatproof bowl over a pot of simmering water, ensuring the bowl doesn’t touch the water.
  3. Break the dark chocolate and milk chocolate into small pieces and melt them together in the double boiler, stirring occasionally until smooth.
  4. Using a skewer or a fork, dip each marshmallow into the melted chocolate, ensuring it’s evenly coated.
  5. Roll the chocolate-covered marshmallow in the crushed candy cane pieces, pressing slightly to ensure the candy adheres well.
  6. Place the coated marshmallows on a sheet of wax paper to set.
  7. Chill the marshmallows in the refrigerator for at least an hour or until the chocolate has fully hardened.
  8. Store the marshmallows in an airtight container to maintain freshness.
  9. Enjoy these marshmallows on their own or dunk them into a steaming mug of hot chocolate for an extra indulgent treat.

Tips

To make the process even smoother, here are a few tips:

  • Choose high-quality chocolate for the best flavor. A mix of dark and milk chocolate provides a rich and balanced taste.
  • If you’re short on time, you can crush the candy canes in advance and store them in a sealed bag to maintain freshness.
  • To add an extra layer of flavor, consider adding a drop of peppermint extract to the melted chocolate.

Variations & Substitutions

Feel free to get creative with this recipe. Here are some variations and substitutions you might enjoy:

  • Chocolate Variations: Use white chocolate for a sweeter, creamier coating, or try a flavored chocolate bar for a unique twist.
  • Marshmallow Options: Consider using flavored marshmallows, such as peppermint or vanilla, to add an extra dimension of taste.
  • Nutty Crunch: Add chopped nuts, like almonds or pistachios, to the crushed candy canes for a nutty crunch.

Storage

Store your Candy Cane Chocolate Marshmallows in an airtight container in a cool, dry place. They should last for up to two weeks, although they are often too delicious to resist for that long! If you live in a warmer climate, consider storing them in the refrigerator to prevent the chocolate from melting.

FAQ

Can I use regular chocolate chips instead of chocolate bars?

Yes, you can use chocolate chips if you prefer. They melt just as well and are often more convenient. However, be sure to choose high-quality chips for the best flavor.

How can I prevent the chocolate from seizing while melting?

Ensure that no water or steam comes into contact with the chocolate as it melts. Use a dry bowl and utensils, and melt the chocolate slowly over low heat. Stir continuously to promote even melting.

Can I use this recipe for other holidays?

Absolutely! Simply swap the candy cane pieces for other festive toppings. For example, you could use colored sprinkles for Easter or crushed gingerbread cookies for a cozy winter treat.

Nutrition

These Candy Cane Chocolate Marshmallows are a delightful indulgence. While they are a treat best enjoyed in moderation, they offer a moment of festive joy. Remember, the holidays are about balance and enjoyment!

Conclusion

Candy Cane Chocolate Marshmallows are a festive delight that brings together the best of holiday flavors in one delightful treat. Whether you’re sharing them at a holiday gathering, gifting them to friends, or enjoying them on a quiet evening at home, they are sure to bring smiles and warm memories. I hope this recipe adds a touch of sweetness to your holiday season, just as it has to mine. Happy cooking, and enjoy every delicious bite!

Related update: Candy Cane Chocolate Marshmallows

Related update: Coconut Almond Cheesecake

Related update: Cheesy Potato Corn Scones

Chocolate Nutella Walnut Cake | Made by Meaghan Moineau

Chocolate Nutella Walnut Cake

Intro

There’s nothing quite like the smell of a homemade cake wafting through the house. For me, it brings back fond memories of my childhood, sneaking into the kitchen to catch a whiff of whatever my grandmother was baking. One of my all-time favorites was her Chocolate Nutella Walnut Cake, a deliciously rich and nutty treat that always had the family gathered around, forks ready. This cake combines the deep, rich flavors of dark chocolate with the creamy, nutty goodness of Nutella and a satisfying crunch from walnuts. It’s a recipe passed down through generations, and I’m thrilled to share it with you today.

Why You’ll Love It

This Chocolate Nutella Walnut Cake is a dessert lover’s dream. Here are a few reasons why you’ll fall in love with it:

  • Rich and Decadent: The combination of dark chocolate and Nutella creates a luscious, melt-in-your-mouth experience.
  • Textural Delight: The walnuts add a crunchy texture that perfectly complements the soft, moist cake.
  • Simple to Make: With straightforward instructions and common ingredients, this cake is as easy to whip up as it is delicious.
  • Perfect for Any Occasion: Whether it’s a family gathering, a holiday, or a simple weekday treat, this cake is sure to please.

Ingredients

  • 3 large eggs
  • 1 cup sugar
  • 1 cup chopped walnuts
  • 1 cup Nutella
  • 100g dark chocolate, chopped
  • 1/2 cup butter
  • 1 cup all-purpose flour
  • 1 teaspoon baking powder
  • 1/4 teaspoon salt

Instructions

  1. Preheat your oven to 350°F (185°C).
  2. In a large mixing bowl, beat the eggs and sugar together until the mixture is light and fluffy.
  3. In a saucepan over low heat, melt the butter, dark chocolate, and Nutella, stirring constantly until smooth.
  4. Gradually add the melted chocolate mixture to the egg and sugar mixture, stirring continuously to combine.
  5. In a separate bowl, mix together the flour, baking powder, and salt. Gradually fold these dry ingredients into the wet mixture until well combined.
  6. Add the chopped walnuts to the batter and gently fold them in.
  7. Prepare a springform pan by greasing it with butter and lightly dusting it with flour.
  8. Pour the batter into the prepared pan, smoothing the top with a spatula.
  9. Bake in the preheated oven for 40 minutes, or until a toothpick inserted into the center of the cake comes out clean.
  10. Allow the cake to cool in the pan for 10 minutes before transferring it to a wire rack to cool completely.

Tips

To ensure your Chocolate Nutella Walnut Cake turns out perfectly every time, consider these helpful tips:

  • Room Temperature Ingredients: Make sure your eggs and butter are at room temperature before you begin. This helps achieve a smoother batter.
  • Don’t Overmix: When combining the dry ingredients with the wet, be careful not to overmix. This can lead to a dense cake.
  • Chop Walnuts Finely: For a more even distribution of walnuts throughout the cake, chop them finely.

Variations & Substitutions

Feel free to get creative with this recipe! Here are a few variations and substitutions you might like:

  • Nut-Free Option: If you’re not a fan of walnuts or have a nut allergy, you can omit them or substitute with chocolate chips for extra indulgence.
  • Different Nutella Flavors: Try using Nutella’s hazelnut spread with cocoa for a different flavor profile.
  • Gluten-Free Alternative: Substitute the all-purpose flour with a gluten-free flour blend for a celiac-friendly treat.

Storage

Store any leftover cake in an airtight container at room temperature for up to 3 days, or in the refrigerator for up to a week. For longer storage, wrap the cake tightly in plastic wrap and aluminum foil, then freeze for up to three months. Thaw it in the refrigerator overnight before serving.

FAQ

Can I use milk chocolate instead of dark chocolate?

Yes, you can substitute milk chocolate for dark chocolate if you prefer a sweeter taste. However, keep in mind that this will change the overall flavor profile of the cake.

What can I use instead of Nutella?

If you don’t have Nutella on hand, you can use any chocolate hazelnut spread or even a homemade version. Alternatively, peanut butter or almond butter can be used for a different twist.

How do I know when the cake is done?

The best way to check if the cake is done is to insert a toothpick into the center. If it comes out clean or with just a few crumbs, the cake is ready. Be careful not to overbake, as this can dry out the cake.

Nutrition

This cake is a decadent treat, so it’s best enjoyed in moderation. Each slice contains approximately:

  • Calories: 350
  • Fat: 20g
  • Saturated Fat: 9g
  • Cholesterol: 70mg
  • Sodium: 150mg
  • Carbohydrates: 38g
  • Sugar: 25g
  • Protein: 5g

Conclusion

Whether you’re a chocolate lover, a Nutella enthusiast, or simply someone who enjoys baking, this Chocolate Nutella Walnut Cake is sure to become a favorite in your dessert repertoire. It’s a perfect balance of rich flavors and delightful textures that will have you reaching for seconds. Bring a bit of nostalgia and warmth into your kitchen and share this delectable treat with your loved ones. Happy baking!

Related update: Chocolate Nutella Walnut Cake

Related update: Candy Cane Chocolate Marshmallows

Related update: Gluten-Free Tres Leches Cake

Thick, Fudgy, One Bowl Brownies | Made by Meaghan Moineau

Thick, Fudgy, One Bowl Brownies

Intro

There’s a certain magic in the smell of brownies baking that instantly transports me back to my grandmother’s kitchen. As a child, I would sit perched on a stool, eagerly watching her skillfully mix and pour, the sweet aroma enveloping the room. Those moments were pure bliss, punctuated by the heavenly taste of a freshly baked brownie, still warm and gooey from the oven. It’s this nostalgic memory that inspired me to create my own version of thick, fudgy, one bowl brownies—a recipe that’s as simple as it is delicious.

Why You’ll Love It

These brownies are everything a chocolate lover dreams of—rich, fudgy, and oh-so-chocolatey. Made in just one bowl, this recipe is perfect for those who crave indulgence without the fuss. Whether you’re a seasoned baker or a novice in the kitchen, these brownies will win you over with their simplicity and decadence. Plus, they’re versatile enough for any occasion, from a cozy night in to an elegant dinner party dessert. You’ll love how quickly they come together and the pure satisfaction they bring with every bite.

Ingredients

  • Semi-sweet chocolate
  • Unsweetened chocolate
  • Unsalted butter
  • Cocoa powder
  • Eggs
  • Vanilla extract
  • Table salt
  • Flour

Instructions

  1. Adjust an oven rack to the lower-middle position and heat the oven to 350°F.
  2. Line an 8-inch square baking pan with two pieces of foil and spray with vegetable oil spray.
  3. Melt the semi-sweet and unsweetened chocolate and butter in a large heatproof bowl set over a saucepan of barely simmering water, stirring occasionally with a spatula or wooden spoon until smooth.
  4. Remove the bowl from heat and stir in the cocoa powder until smooth. Set aside to cool.
  5. Once the mixture has cooled, stir in the eggs, sugar, vanilla, and salt until combined.
  6. Add flour, stirring until just combined.
  7. Transfer the batter to the prepared pan; spread the batter into the corners and smooth the surface using your spatula.
  8. Bake until slightly puffed and a toothpick or wooden skewer inserted into the center of the brownies comes out with a few moist crumbs attached, about 35-40 minutes.
  9. Cool the brownies on a wire rack to room temperature. If you’re impatient like me, even 5 minutes is enough to satisfy a chocolate craving!
  10. Loosen the edges with a paring knife and lift the brownies from the pan using the foil extensions. Cut the brownies into 1-inch squares and serve.

Tips

For the best results, use high-quality chocolate and cocoa powder. This will enhance the flavor and texture of your brownies. Make sure not to overmix the batter once the flour is added; this can result in a tougher brownie. Also, resist the temptation to cut the brownies too soon after baking; allowing them to cool helps them set properly, making them easier to slice.

Variations & Substitutions

Feel free to customize these brownies to suit your taste. You can add a handful of chopped nuts, such as walnuts or pecans, for some crunch. If you prefer a more intense chocolate flavor, sprinkle some chocolate chips into the batter. For a different twist, try adding a teaspoon of espresso powder to enhance the chocolate flavor. For those who need a gluten-free option, substitute the flour with a gluten-free baking mix.

Storage

Store your brownies in an airtight container at room temperature for up to 4 days. If you want to keep them longer, they can be frozen for up to 3 months. Simply wrap them tightly in plastic wrap and place them in a freezer-safe bag. Thaw at room temperature before serving.

FAQ

Can I double this recipe?

Yes, you can easily double the recipe and bake it in a 9×13-inch pan. Just be sure to adjust the baking time accordingly, checking for doneness around the 45-minute mark.

Can I use milk chocolate instead of semi-sweet?

While you can use milk chocolate, it will result in a sweeter brownie. If you prefer a balanced sweetness, stick with semi-sweet chocolate or adjust the sugar content to taste.

Nutrition

Each serving of these brownies (based on 16 servings) contains approximately:

  • Calories: 200
  • Fat: 12g
  • Saturated Fat: 7g
  • Carbohydrates: 24g
  • Sugar: 18g
  • Protein: 3g

Conclusion

Baking these thick, fudgy, one bowl brownies is not just about indulging in a sweet treat; it’s about creating memories and savoring the joys of homemade comfort food. Whether you’re sharing them with loved ones or enjoying a quiet moment alone, these brownies are sure to bring a smile to your face. So gather your ingredients, roll up your sleeves, and let the magic of baking bring a little warmth to your day.

Related update: Thick, Fudgy, One Bowl Brownies

PB Cup Stuffed Brownie Bites | Made by Meaghan Moineau

PB Cup Stuffed Brownie Bites

Intro

There’s something undeniably magical about the combination of peanut butter and chocolate. It takes me back to my childhood when I would eagerly unwrap peanut butter cups and savor each bite. Fast forward to today, and I’ve found a way to combine that nostalgic flavor with another favorite treat: brownies. These PB Cup Stuffed Brownie Bites are a delightful blend of rich, fudgy brownie with a surprise peanut butter center. They’re perfect for any occasion, whether it’s a simple family gathering or a festive celebration.

Why You’ll Love It

These brownie bites are a surefire hit for several reasons:

  • Easy to Make: No complicated steps or fancy equipment required. Just mix, bake, and enjoy!
  • Irresistibly Delicious: The combination of gooey brownie and creamy peanut butter is simply irresistible.
  • Perfectly Portable: These bites are ideal for parties, picnics, or any time you need a sweet treat on the go.
  • Kid-Friendly: Little hands will love helping to push the peanut butter cups into the brownies!

Ingredients

  • 1 cup granulated sugar
  • 3/4 cup all-purpose flour
  • 2 large eggs
  • 1/2 teaspoon salt
  • 1/2 cup vegetable oil
  • 1 teaspoon vanilla extract
  • 1/3 cup unsweetened cocoa powder
  • 1/2 cup sweet semi chocolate chips
  • 12 Reese’s peanut butter cups

Instructions

  1. Preheat your oven to 350°F (175°C) and prepare a mini muffin pan with cooking spray.
  2. In a medium-sized bowl, whisk together the granulated sugar, flour, eggs, salt, vegetable oil, vanilla extract, and cocoa powder until well combined.
  3. Gently stir in the semi sweet chocolate chips, being careful not to over mix the batter.
  4. Scoop the batter into the prepared mini muffin pan, filling each slot about ¾ of the way full to allow room for rising.
  5. Bake in the preheated oven for 8-10 minutes, or until a toothpick inserted into the center comes out almost clean. It’s okay if they’re slightly underdone.
  6. Once the brownies are done, immediately press a peanut butter cup into the center of each brownie bite.
  7. Let the brownies set in the pan for a couple of minutes before removing them to cool completely on a wire rack.

Tips

  • Ensure the brownie bites are slightly underdone before adding the peanut butter cups for a gooey center.
  • Use a small cookie scoop to evenly distribute the batter into the muffin pan.
  • Allow the brownies to cool completely before storing them to maintain their texture.

Variations & Substitutions

If you want to switch things up a bit, here are some ideas:

  • Nut Butter Cups: Try using almond or cashew butter cups for a different flavor profile.
  • Gluten-Free: Substitute the all-purpose flour with a 1:1 gluten-free flour blend.
  • Dark Chocolate: Replace semi sweet chocolate chips with dark chocolate chips for a richer taste.

Storage

Store these delightful bites in an airtight container at room temperature for up to 3 days. For longer storage, you can refrigerate them for up to a week or freeze them for up to 3 months. Just ensure they are completely cooled before storing to prevent condensation.

FAQ

Can I make these brownie bites ahead of time?

Absolutely! These brownie bites can be made a day in advance and stored in an airtight container. They’re a great option for preparing ahead of time for parties or gatherings.

What if I don’t have a mini muffin pan?

If you don’t have a mini muffin pan, a regular muffin pan will work, though you may need to adjust the baking time. Check the brownies for doneness with a toothpick until it comes out almost clean.

Can I use a different type of chocolate chip?

Yes, you can use milk chocolate or even white chocolate chips if you prefer. Each type will add a unique flavor to the brownie bites.

Nutrition

Please note that nutritional information can vary based on the brands and quantities of ingredients used. Here’s a general idea per brownie bite:

  • Calories: 150
  • Carbohydrates: 18g
  • Protein: 2g
  • Fat: 8g
  • Sugar: 12g

Conclusion

PB Cup Stuffed Brownie Bites are a deliciously indulgent treat that combines the best of both worlds—rich chocolate and creamy peanut butter. They’re easy to make, delightful to share, and sure to become a favorite in your dessert repertoire. Whether you’re baking for a special occasion or just to satisfy a sweet craving, these brownie bites are a perfect choice. Give them a try and watch them disappear in no time!

Related update: PB Cup Stuffed Brownie Bites

10 Minute Brownies | Made by Meaghan Moineau

10 Minute Brownies

Intro

There’s something undeniably comforting about the aroma of freshly baked brownies wafting through the house. It takes me back to lazy Sunday afternoons at my grandmother’s home, where the kitchen was always a flurry of activity and the air was sweet with the scent of chocolate. These 10 Minute Brownies are my homage to those cherished childhood memories, offering a quick and delightful way to indulge in some homemade goodness without spending hours in the kitchen.

Why You’ll Love It

These brownies are a game-changer for dessert lovers. Not only are they incredibly easy to make, but they’re also deliciously rich and fudgy. Perfect for those moments when you’re craving something sweet but don’t have the time or energy to tackle a complex recipe. The combination of semisweet chocolate chips and finely-chopped walnuts provides a wonderful contrast of textures, while the unsweetened applesauce keeps them moist and slightly healthier. Whether you’re an experienced baker or a novice, this recipe is foolproof and sure to become a staple in your dessert repertoire.

Ingredients

  • 1 tablespoon baking powder
  • 1/3 cup canola oil
  • 1/4 cup finely-chopped walnuts
  • 1/2 cup semisweet chocolate chips
  • 1 cup sugar
  • 1 cup unbleached flour
  • 1/2 cup unsweetened applesauce
  • 1 teaspoon vanilla extract

Instructions

  1. Preheat your oven to 350 degrees F. Lightly oil a 6 x 9 inch baking pan and set it aside.
  2. In a small saucepan over low heat, combine the canola oil and semisweet chocolate chips, stirring occasionally until melted. Remove from heat and set aside.
  3. In a large mixing bowl, add the unsweetened applesauce, sugar, and vanilla extract. Blend well until smooth.
  4. Stir in the melted chocolate mixture into the applesauce mixture. Whip and blend until everything is well incorporated.
  5. Add the unbleached flour, baking powder, and finely-chopped walnuts to the mixture. Mix gently just until everything is combined. Be careful not to overmix.
  6. Spoon the brownie batter into the prepared baking pan, spreading it evenly.
  7. Bake in the preheated oven for 25 to 30 minutes, or until the top springs back when lightly touched. Be cautious not to overbake, as this will make the brownies dry.
  8. Let the brownies cool completely in the pan before cutting into squares. This ensures clean cut edges and helps them set properly.
  9. Store the brownies in a covered, airtight container in the refrigerator to maintain their freshness.

Tips

To ensure your brownies turn out perfectly every time, here are a few tips:

  • Always use fresh ingredients, especially the baking powder, for the best rise in your brownies.
  • If you prefer a more intense chocolate flavor, try using dark chocolate chips instead of semisweet.
  • Be patient and allow the brownies to cool completely before cutting. This helps them firm up, making them easier to slice.

Variations & Substitutions

Feel free to get creative with this recipe and make it your own!

  • Nut-Free: If you have a nut allergy, simply omit the walnuts. The brownies will still be deliciously chewy.
  • Vegan Option: Use a plant-based oil and ensure your chocolate chips are dairy-free.
  • Gluten-Free: Substitute unbleached flour with a 1:1 gluten-free flour blend for a celiac-friendly treat.
  • Extra Flavor: Add a teaspoon of instant coffee to enhance the chocolate flavor.

Storage

These brownies are best stored in an airtight container in the refrigerator, where they will stay fresh for up to a week. You can also freeze them for longer storage; just wrap each square in plastic wrap and place them in a freezer-safe bag. Thaw overnight in the refrigerator before eating.

FAQ

Can I use a different type of oil?

Yes, you can substitute canola oil with other neutral oils such as vegetable or sunflower oil. Coconut oil can be used for a slight coconut flavor, but keep in mind it will alter the taste slightly.

Can I make these brownies without sugar?

While sugar contributes to the texture and sweetness, you can experiment with natural sweeteners like honey or maple syrup. However, this will change the consistency of the batter, so adjustments may be needed.

How can I tell when the brownies are done baking?

The best way to check is by gently pressing the top of the brownies. If it springs back and looks set, they are likely done. You can also insert a toothpick; a few moist crumbs are fine, but it shouldn’t come out with wet batter.

Nutrition

While these brownies are a treat, they offer a slightly healthier twist with the use of unsweetened applesauce and walnuts. Each square (assuming 12 squares) contains approximately:

  • Calories: 150
  • Fat: 7g
  • Carbohydrates: 20g
  • Sugar: 12g
  • Protein: 2g

Please note that these values are estimates and can vary based on specific ingredients used.

Conclusion

These 10 Minute Brownies are a delightful, quick, and easy way to satisfy your chocolate cravings. Perfect for any occasion or just a simple weeknight treat, they bring the joy of baking to your kitchen without the hassle. Whether you stick to the classic recipe or decide to try one of the variations, you’re sure to fall in love with these rich, fudgy squares. So gather your ingredients, preheat your oven, and let the nostalgia of homemade brownies fill your home once again.

Related update: 10 Minute Brownies

Related update: Berry & Ricotta Danishes