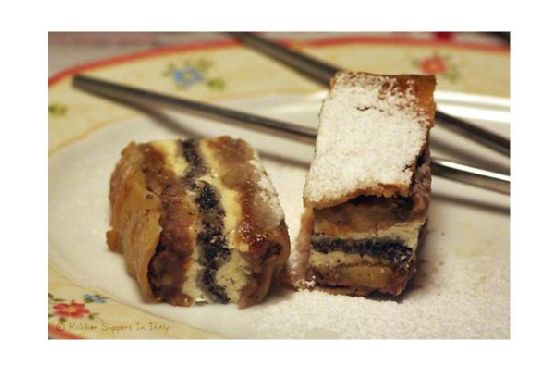
On a particularly rainy Tuesday afternoon, as the water danced against my kitchen window, I found myself craving something both cozy and indulgent. I rummaged through the pantry, hoping for inspiration, and there it was: a can of poppy seed filling. That was all it took to set me on the path toward creating these Layered Poppy Seed Pastries. They’re the perfect blend of buttery layers and rich filling, a treat that feels special but isn’t overly complex to prepare. If you’re like me and love bringing a bit of warmth and comfort on a dreary day, this recipe is a must-try. These pastries are like edible hugs — perfect for impressing friends or just treating yourself.
Jump to Recipe
What You’ll Need
You’d be surprised how many of these ingredients are likely sitting right in your pantry. This recipe doesn’t require anything too exotic, but a few key ingredients really make it shine. Here’s what you’ll need:
- Warm milk – for activating the yeast
- Dry packet yeast – to give our pastries that lovely rise
- Flour – the backbone of our pastry
- Baking powder – adds an extra lift
- Salt and a dash of sugar
- Lemon zest – for a hint of brightness
- Butter – because what’s a pastry without it?
- Whole egg plus an extra yolk for richness
- Vanilla extract – just a splash!
- Canned poppy seed filling – the star of the show
- Ground walnuts – for that nutty crunch
- Water – just a splash to bring it all together
How to Make Layered Poppy Seed Pastries
- Start by mixing the warm milk, dash of sugar, and yeast in a small bowl until the yeast dissolves. Let it sit while you prep the rest.
- In a large mixing bowl, blend the flour, baking powder, salt, and lemon zest. Add the butter and mix until you see a crumbly texture forming.
- In a separate bowl, beat the whole egg and extra yolk with vanilla. Alternate adding this mixture and the yeast mixture to the flour blend, mixing until you have a cohesive dough.
- Transfer your dough to a floured board. Divide it into four parts and knead each into a flat disc. Wrap these in plastic wrap and pop them into the fridge for an hour.
- While the dough chills, spoon your poppy seed filling into a pastry bag. Mix the sugar and ground walnuts in another bowl and set aside.
- Roll each disc into a thin sheet to fit a 13×9-inch baking dish. If you have any trimmings, save them for another pastry adventure.
- Start layering: Place one layer of dough in the baking dish, spread half the poppy seed filling, cover with another dough layer, and sprinkle with the walnut mixture. Repeat once more and top with the final dough layer.
- Let the assembled pastry sit covered with a kitchen towel for 30 minutes, allowing it to rest and rise slightly.
- Brush the top with the egg yolk mixture for a lovely golden finish. Bake at 350°F for around 45 minutes, or until the top is golden brown and the aroma fills your kitchen.
- Once baked, while still hot, cut the pastry into 24 squares. Let them cool in the pan, basking in the glory of your creation.
Cook’s Notes
Always make sure your milk is warm but not hot to the touch, as too much heat can kill the yeast. These pastries freeze beautifully; just wrap them in plastic and then foil, and pop them into a resealable plastic bag. They defrost well and maintain their crispness, tricking everyone into thinking they’re freshly baked. And here’s a tip: when serving, consider making a few extra for your neighbors or friends. Sharing these could easily brighten someone’s day!
Make It Your Own
- Swap out the poppy seed filling with a thick apricot jam for a fruity twist.
- Replace the walnuts with pecans for a sweeter, buttery nut flavor.
- For a citrusy kick, add orange zest instead of lemon zest.
- Want a hint of spice? Add a teaspoon of cinnamon to the walnut mixture.
If you try this, I’d love to hear how it turns out — drop a comment or tag me! These pastries are a rainy day favorite, and I hope they’ll become a part of your kitchen adventures too. Enjoy every flaky, delicious bite!
Related update: Layered Poppy Seed Pastries
Related update: Brandy-Apple Mini Pies With Cornmeal Crust

Last Tuesday, my kitchen was a whirlwind of chaos. It was one of those evenings where craving something decadent and a bit out of the ordinary hit like a freight train, and all I had was a pantry challenge waiting to happen. After digging through the freezer, I found a bag of crawfish tails, and suddenly, a memory of summer seafood boils with friends came flooding back. The tantalizing mix of spices and seafood was exactly what I needed, but in a form that was quick and easy without compromising on flavor. Enter: Crawfish Cake Sliders. These little beauties pack a punch, they’re crispy on the outside yet tender inside, and they’re kind of impressive when you serve them up — like a casual, yet gourmet, hand-held delight. Perfect for a weeknight dinner or to wow your friends at a gathering.
Jump to Recipe
What You’ll Need
Let’s be honest, if you love a good seafood dish, you’ve probably got most of this on hand already. Here’s what you’ll need to whip up these sliders:
- 1 teaspoon oil
- 1 cup chopped red onion
- 1 clove garlic, minced
- 1 teaspoon Creole spice (or to taste)
- 1 pound crawfish tails, thawed if frozen
- 1 large egg
- 1/2 cup bread crumbs
- 8 slider buns
- 1/2 cup tartar sauce
How to Make Crawfish Cake Sliders
- Start by heating 1 teaspoon of oil in a sauté pan over medium heat. Toss in the chopped onion and let it sizzle away with a pop of color from some finely chopped red pepper and celery — sauté these until tender, about 2-3 minutes. The kitchen should start smelling like a savory promise.
- Once the veggies are tender, remove the pan from the heat and add the garlic, crawfish meat, and Creole spice. The residual heat will mellow out the garlic and awaken the spices.
- Transfer this aromatic mixture into a mixing bowl and let it cool just enough so that it doesn’t scramble the egg. Speaking from experience here, oops!
- Mix in the egg and just enough bread crumbs for the mixture to bind together — you’re looking for a consistency that holds but isn’t dry. Taste and adjust the seasonings with salt, pepper, and more Creole spice if you’re feeling bold.
- Form the mixture into 8 equal patties and flatten them to about 3/4-inch thick. They should feel sturdy but not densely packed.
- Heat the remaining oil in the same sauté pan over medium heat. Cook the patties on both sides until they’re brown and crispy, about 3-4 minutes per side. This is where the magic happens — the aroma alone is worth it.
- Once cooked, serve each cake nestled in a slider bun with a generous dollop of tartar sauce. It’s the final touch that brings everything together.
Cook’s Notes
As you embark on this culinary adventure, keep a few things in mind: If using frozen crawfish tails, make sure they’re fully thawed and patted dry to prevent soggy cakes. The mixture should be moist but not wet; too much moisture means your patties might fall apart during cooking. If you need to make these ahead, form the patties and store them covered in the fridge for a few hours. Cooked patties can also be reheated in a 350°F oven until warm.
Make It Your Own
Here’s where you can get creative with these sliders:
- Spice Swap: Try using Old Bay or a Cajun spice mix if Creole isn’t your thing.
- Herb Boost: Add chopped fresh parsley or cilantro to the mixture for a fresh twist.
- Different Sauce: Swap out tartar sauce for a spicy remoulade or even a dollop of garlic aioli for a different flavor profile.
- Gluten-Free Option: Use gluten-free bread crumbs and buns to make this dish suitable for your gluten-sensitive friends.
If you try this, I’d love to hear how it turns out — drop a comment or tag me! Your kitchen stories make this cooking journey so much more fun. Happy cooking!
Related update: Crawfish Cake Sliders
Related update: Ditalini with peas

It all started on a rainy Tuesday afternoon when my snack cravings were at an all-time high. I stared at the bunch of overripe bananas on the counter, contemplating yet another loaf of banana bread, when inspiration struck. What if I could combine the comforting flavors of a peanut butter banana sandwich with the indulgence of a chocolate chip cookie? That’s how these Chocolate Chip Peanut Butter Banana Cookies came to be. They’re a delightful twist on the usual, bringing together the creamy, nutty goodness of peanut butter with the sweet, decadent charm of chocolate chips—all in a soft, banana-infused cookie package. Perfect for a quick treat or a cozy moment with a cup of tea, these cookies hit the sweet spot every time.
Jump to Recipe
What You’ll Need
You won’t need a fancy trip to the grocery store for this recipe. Chances are, you’ve got most of these goodies in your pantry and fridge already. Here’s what you’ll need:
- 2 ripe bananas
- 1/2 cup butter, softened
- 1/2 cup creamy peanut butter
- 1/2 cup brown sugar
- 1/2 cup granulated sugar
- 1 large egg
- 1 teaspoon vanilla extract
- 1 and 1/2 cups flour
- 1 teaspoon baking powder
- 1/2 teaspoon baking soda
- 1/2 teaspoon cinnamon
- 1/4 teaspoon salt
- 1 cup mini chocolate chips
- 1/4 cup sugar (for sprinkling)
- 1/2 teaspoon cinnamon (for sprinkling)
How to Make Chocolate Chip Peanut Butter Banana Cookies
- Preheat your oven to 350°F. This is non-negotiable—no cold oven surprises here!
- In a large mixing bowl, mash the ripe bananas until smooth-ish. Don’t worry about small lumps; they’re just character.
- Add the softened butter, creamy peanut butter, both sugars, egg, and vanilla to the bananas. Stir until everything’s nicely combined and smelling heavenly.
- In a separate bowl, whisk together the flour, baking powder, baking soda, cinnamon, and salt. This dry blend will give our cookies structure and a hint of spice.
- Gently fold the dry ingredients into the banana mixture. Stir just until everything comes together—overmixing makes for tough cookies, and we want these to be soft and tender.
- Toss in those mini chocolate chips and give a few more gentle stirs to distribute them evenly.
- Using a large spoon, drop dollops of dough onto a parchment-lined baking sheet. Aim for about 2 inches apart to avoid cookie collisions.
- In a small bowl, combine the sugar and cinnamon for sprinkling. Give those dough mounds a generous dusting of cinnamon sugar magic.
- Bake in the preheated oven for 10-12 minutes, or until the edges are slightly golden brown and your kitchen smells like a dream. My oven runs hot, so keep an eye out; 10 minutes could be plenty.
Cook’s Notes
These cookies are best enjoyed fresh out of the oven (aren’t they all?), but they do keep well for a couple of days in an airtight container. If you’re planning ahead, you can make the dough and chill it for up to two days before baking. Just remember, cold dough might need an extra minute or two in the oven. And if you end up with leftovers that have lost their day-one freshness, a quick zap in the microwave will revive their warm, gooey glory.
Make It Your Own
Here are a few fun tweaks to shake things up:
- Swap the mini chocolate chips for dark chocolate chunks for a richer, more intense chocolate hit.
- If you’re nuts for nuts, add a handful of chopped walnuts or pecans to the dough for an extra crunch.
- Turn up the tropical vibes by adding a half cup of shredded coconut to the mix.
- For a gluten-free version, use a 1-to-1 gluten-free flour blend. Texture might vary slightly, but the flavor will still be on point.
If you give these cookies a whirl, I’d love to hear about it! Drop a comment below or tag me in your sweet creations. Happy baking, and remember, life’s too short to skip dessert!
Related update: Chocolate Chip Peanut Butter Banana Cookies
Related update: Authentic Mexican Wedding Cookies

Picture this: It’s a lazy Sunday morning, and I’m still in my pajamas with zero plans to change that anytime soon. The weather outside is just right, and there’s a soft playlist humming in the background. Suddenly, a craving hits—something sweet, something warm, something that will make the house smell like a dream. Doughnuts! But not just any doughnuts. These are the kind of doughnuts that make you feel like you’ve conquered a small kingdom right from your kitchen. They’re golden, fluffy, and just the right amount of sweet without veering into dessert territory. Best part? These homemade wonders come together without any fancy equipment or ingredients you don’t already have. So, if you’re ready to make your kitchen smell like a bakery and indulge in some deliciously fluffy doughnuts, let’s get started!
Jump to Recipe
What You’ll Need
Who doesn’t love it when a recipe calls for things you likely already have on hand? We’re talking pantry staples here, folks.
- 2 cups of flour
- 1/4 cup of honey
- 1/4 cup of powdered milk
- 1 teaspoon of salt
- 1 cup of warm water
- 2 1/4 teaspoons of yeast
How to Make Doughnuts
- Start by mixing the warm water with the yeast and honey in a bowl. Whisk it all together and let it sit for about 15 minutes, or until the mixture becomes foamy. This is your yeast proving it’s ready to party!
- In a separate bowl, combine the flour, salt, and powdered milk. Pour the bubbly yeast mixture into this bowl.
- Knead the dough until it feels elastic and not sticky. This is your chance to work out any stress—think of it as dough therapy. Cover the bowl and let the dough rise until it doubles in size, which usually takes 1-2 hours. Patience is key here!
- Once your dough has risen to the occasion, roll it out on a lightly floured surface, but don’t make it too thin—you want them fluffy, not flat. Cut the dough into circles. If you have a doughnut cutter, great! If not, improvise with a small bowl or the mouth of a plastic bottle for the center hole.
- Let these cut-out beauties rise for another 45 minutes. You’re in the home stretch now!
- Heat up your oil to fry the doughnuts until they’re a delicious golden brown on both sides. This is where the magic happens, and your kitchen starts smelling irresistible.
- For a Vanilla Glaze, whisk 1 cup of powdered sugar with 30ml of milk and a teaspoon of vanilla. Drizzle over your doughnuts and add sprinkles if you’re feeling fancy.
- For a Chocolate Glaze, simply drizzle some chocolate sauce over the doughnuts and top with sprinkles. Voilà!
Cook’s Notes
When you’re knee-deep in doughnut making, a few insider tips go a long way. First, make sure your water is warm, not hot, to keep that yeast alive and thriving. If the dough feels too sticky, dust your hands with a bit of flour rather than adding more to the dough itself, which can make the doughnuts tough. These doughnuts are best eaten fresh, but if you have leftovers (lucky you!), store them in an airtight container. Just pop them in the microwave for a few seconds to bring them back to life.
Make It Your Own
The best part about doughnuts? They’re a blank canvas waiting for your creative touch.
- Spiced Doughnuts: Add a teaspoon of cinnamon and a pinch of nutmeg to the flour mixture for a cozy twist.
- Lemon Zest: Mix in a tablespoon of fresh lemon zest to the dough for a zesty kick.
- Coconut Glaze: Use coconut milk instead of regular milk in the glaze and sprinkle shredded coconut on top.
- Maple-Bacon: Drizzle with a maple glaze and top with crispy bacon bits for a sweet and savory delight.
If you try this recipe, I’d love to hear how it turns out—drop a comment or tag me in your doughnut adventures! Trust me, once you start making these at home, you’ll be finding excuses to whip them up just about every weekend. Enjoy the sweet smell of success!
Related update: Doughnuts
Related update: Tropical Breakfast Quinoa

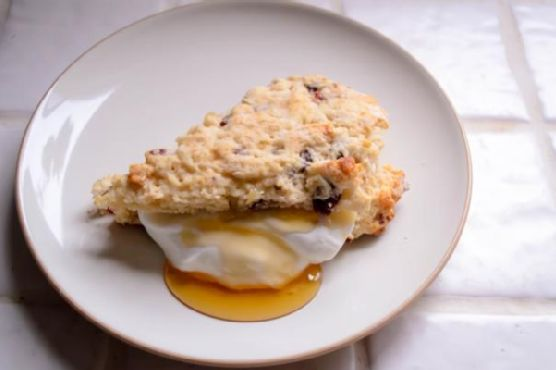
The other day, I found myself on a typical Wednesday evening with a sudden, fierce craving for something warm, cheesy, and a little herby. The kind of comfort food you can savor with a cup of tea while staring out the window on a rainy day. As my pantry was a bit sparse, I knew I needed something quick and easy, yet utterly satisfying. That’s when Savory Cheese Dill Scones came to mind. They’re those magical little bites that feel fancy enough for company but are secretively easy to pull together. The kind of bake that makes you feel like a kitchen genius with minimal effort. So, let’s get scone-ing!
Jump to Recipe
What You’ll Need
You might be surprised how many of these you already have in your kitchen! The usual suspects of baking are here, alongside the stars of the show: cheese and dill. Here’s what you’ll need:
- 2 cups unbleached flour
- 1/2 cup whole wheat flour
- 1 tablespoon baking powder
- 1/4 teaspoon baking soda
- 1/2 teaspoon black pepper
- 1 tablespoon sugar
- 1/2 cup cold butter, cut into small pieces
- 3/4 cup buttermilk
- 1/2 cup coarsely shredded cheddar cheese
- 1/2 cup cottage cheese
- 3 tablespoons chopped fresh dill
- 1 small shallot, finely chopped
How to Make Savory Cheese Dill Scones
- Preheat your oven to 375°F, placing the rack in the middle position. This gives your scones the perfect balance of heat, making them rise nicely while staying tender and light.
- In a large bowl, whisk together the unbleached flour, whole wheat flour, baking powder, baking soda, black pepper, and sugar. This dry mix is your scone foundation.
- Add the chopped butter into the flour mixture. Use your fingers or a pastry cutter to blend until the mix resembles coarse crumbs. You want to see little bits of butter peeking through.
- Stir in both the cheddar and cottage cheese, followed by the fresh dill and shallot. The aroma will start making promises your taste buds will thank you for later.
- Pour in the buttermilk and gently fold the mixture with a spatula until just combined. Avoid overmixing; a rough dough will yield tender scones.
- Turn the dough out onto a floured surface and knead gently, just enough to bring it together — about 4 or 5 times.
- Pat the dough into a circle, approximately 1 inch thick. Cut into 8 wedges and place them on a baking sheet lined with parchment paper.
- Bake in your preheated oven for 20-25 minutes, until the scones are golden and the kitchen smells like heaven. Serve warm and swoon.
Cook’s Notes
These scones are best on the day they’re made, but if you have leftovers (lucky you!), store them in an airtight container for a day or two. They make a delightful breakfast, slightly warmed with a pat of butter. You can also freeze the unbaked scones on a tray, then transfer them to a bag once they’re solid. Bake them from frozen, adding a few extra minutes to the cooking time. Common pitfalls? Overworking the dough or letting the butter soften too much. Keep it chill for the chillest scones!
Make It Your Own
Here are some delicious twists to customize your scones:
- Swap the dill for chopped chives if you’re in a more oniony mood.
- Use gruyere instead of cheddar for a rich, nutty take.
- Add a handful of crispy bacon bits for a savory delight.
- Mix in some sun-dried tomatoes for a Mediterranean vibe.
If you try this, I’d love to hear how it turns out — drop a comment or tag me! Remember, cooking is just like life: best when shared and savored. Enjoy your baking adventure!
Related update: Savory Cheese Dill Scones

Last Tuesday, I found myself in a bit of a culinary pickle. It was one of those chaotic weeknights where all I wanted was something comforting yet not too heavy. But, with my pantry looking a little uninspired, the options seemed limited. As I rummaged through my fridge, I spotted some fresh herbs and eggs. That’s when inspiration struck – Vegetarian Scotch Eggs. They’re not only a playful twist on a classic favorite, but they also satisfy that comforting craving without being overly indulgent. Plus, they’re surprisingly easy to whip up, even when you’re short on time. So, if you’re juggling a busy schedule but still want something delicious, this recipe is your golden ticket.
Jump to Recipe
What You’ll Need
If you’re like me, you probably have most of these ingredients already hanging out in your kitchen. Simple yet flavorful, these are the stars of our dish:
- Fresh breadcrumbs
- Fresh dessert spoon chives
- 5 eggs (4 for boiling, 1 for coating)
- Fresh dessert spoon flat-leaf parsley
- Black salt and pepper
- Vegetable oil
How to Make Vegetarian Scotch Eggs
- Preheat your oven to 325°F (170°C). This step is key to ensure our Scotch eggs are perfectly warm and crisp.
- Place 4 eggs in a medium-sized pan and cover them entirely with cold water. It’s like giving them a little bath before the magic happens.
- Bring the water to a gentle boil, then reduce the heat and let them simmer for exactly 4 minutes. We’re aiming for that slightly soft, golden center.
- Immediately transfer the eggs to a bowl of cold water. This stops the cooking process and makes them easier to peel. Trust me, your fingers will thank you.
- Peel the cooled eggs carefully. It’s like unwrapping a delicate little gift.
- In a small bowl, whisk the remaining egg until it’s all sunshine-y and smooth.
- Mix the chopped chives and parsley with the fresh breadcrumbs. Season with a pinch of black salt and pepper. Feel free to get a little generous here; seasoning is key.
- Gently roll each peeled egg in a bit of flour. This helps the coating stick like a dream.
- Dip the floured eggs in the whisked egg mixture, ensuring they’re well coated. Now, roll them in the herby breadcrumbs. This is where they get their magical cloak of flavor.
- Pour vegetable oil into a pan, about 2 inches deep, and heat it up. You’re looking for it to shimmer slightly – that’s when you know it’s ready.
- Carefully fry the coated eggs in the hot oil. Turn them occasionally to get an even golden color all around. This takes about 2-3 minutes. They’ll start to look irresistibly crunchy.
- Use a slotted spoon to remove the eggs from the oil and place them in an ovenproof dish. Pop them in the oven for another 3-4 minutes to make sure they’re heated through.
Cook’s Notes
Here’s the deal: the fresher your breadcrumbs, the better the crunch you’ll get. If you can make them at home, do it! And when it comes to frying, make sure your oil is hot enough before you lower in the eggs – a little test with a breadcrumb should tell you if it sizzles right. If the coating starts to brown too quickly, the oil is too hot. Just turn down the heat a bit.
Leftovers? Although these are best enjoyed fresh, you can store any extras in the fridge for up to two days. Just pop them in a preheated oven for about 10 minutes to heat them up again – they’ll be almost as delightful as the first time.
Make It Your Own
Here are some fun ways to switch things up and keep it interesting:
- Spicy Kick: Add a teaspoon of crushed red pepper flakes to the breadcrumb mix for a little heat.
- Cheesy Delight: Mix in some grated Parmesan or cheddar with the breadcrumbs for a cheesy crust.
- Herb Lovers: Switch up the herbs – basil and dill can add a fresh twist.
- Vegan Version: Use a flaxseed egg (1 tablespoon flaxseed meal + 2.5 tablespoons water) instead of a regular egg for the coating.
If you try this, I’d love to hear how it turns out — drop a comment or tag me! It’s always a joy to see how my favorite recipes are enjoyed by others. Happy cooking!
Related update: Vegetarian Scotch Eggs

I was in the middle of a marathon of holiday movies when I realized my sweet tooth was acting up. You know that moment when the snow is falling on screen, and you just want something warm and chocolaty to match the vibe? That was me. But I didn’t want just another hot chocolate; I needed something extra special. Enter my Candy Cane Chocolate Marshmallows. These babies are the perfect combination of sweet, crunchy, and gooey goodness, and the best part? They’re super easy to make! Imagine enjoying these with friends, exchanging gifts, or just treating yourself on a chilly night—total bliss.
Jump to Recipe
What You’ll Need
Alright, here’s the good news: you probably have most of this stuff already lurking in your pantry. These marshmallows are all about the simple joys of the holiday season.
- Candy canes – grab a few from your tree or stash!
- Dark chocolate – for that rich, decadent coating.
- Milk chocolate – adds a creamy sweetness.
- Marshmallows – the stars of the show.
How to Make Candy Cane Chocolate Marshmallows
- First, let’s smash those candy canes! Place them in a zip-top bag and use the bottom of a glass or a mallet to crush them into small pieces. You want a mix of dust and tiny chunks.
- Now, set up a double boiler on your stove. If you don’t have one, just place a heatproof bowl over a pot of simmering water. Make sure the bowl doesn’t touch the water.
- Add the dark chocolate and milk chocolate to the bowl. Stir occasionally until the chocolate is fully melted and smooth. Inhale deeply—the smell is pure heaven.
- Grab a marshmallow, dip it halfway into the melted chocolate, spinning it slightly to get a good coat.
- Immediately dip the chocolate-covered marshmallow into the crushed candy canes. Press gently so the pieces stick to the chocolate, creating a crunchy layer.
- Place the marshmallows on a sheet of wax paper. Let them chill in the fridge for at least an hour, or until the chocolate hardens.
Cook’s Notes
Okay, a few tips from my kitchen to yours. First, make sure your chocolate doesn’t scorch; keep the heat low and steady. If you’re planning to make these ahead, they store beautifully in an airtight container for up to a week. Just keep them in a cool spot to prevent any accidental melting. Also, if you find your candy canes getting sticky, toss them back into the fridge for a bit—they’ll be easier to work with when they’re cool and crisp.
Make It Your Own
Here are some fun twists you can try:
- Swap out the candy canes for crushed pretzels if you prefer a salty-sweet combo.
- Use white chocolate instead of milk chocolate for a different flavor profile.
- Roll the marshmallows in crushed nuts for extra crunch and a nutty flavor.
- Add a sprinkle of sea salt on top of the chocolate layer for an elevated touch.
If you try this, I’d love to hear how it turns out—drop a comment or tag me in your photos! These little treats are sure to spread some holiday cheer in your home. Enjoy every bite!
Related update: Candy Cane Chocolate Marshmallows
Related update: Vegetarian Scotch Eggs
Related update: Frozen Mojito Pie

I was standing in my kitchen, staring at an overly ripe banana, when the craving hit me. You know the type: the need for something sweet, quick, and just a little nostalgic. It was one of those almost-summer days that call for a cold treat, but I didn’t want to fuss around with anything too elaborate. Enter the Banana Milo Milkshake — a creamy, chocolatey delight that somehow feels both indulgent and a bit healthy (thanks to that banana). This recipe is a breeze to whip up, and trust me, it’s like sipping on a childhood dream.
Jump to Recipe
What You’ll Need
I bet you have most of this stuff hanging out in your kitchen already. That’s my favorite kind of recipe — no need for a last-minute grocery run.
- Canned almond milk
- Banana – ideally ripe and sweet
- Milo chocolate malt powder – the star of the show
- Vanilla ice-cream – because why not?
- Strawberries – for a pop of color and flavor
- Whipped cream – a fluffy finishing touch
How to Make Banana Milo Milkshake
- In a blender, pour in about a cup of canned almond milk. It’s the creamy base for our shake.
- Add a heaping spoonful of Milo chocolate malt powder. The more, the merrier — but a couple of tablespoons should do the trick.
- Peel your banana and break it into chunks before tossing it into the blender. The riper, the sweeter!
- Scoop in a generous helping of vanilla ice-cream. One or two scoops, depending on how indulgent you’re feeling.
- Blend everything together until it’s smooth and frothy. Listen for that perfect whirring sound and watch as it turns a delightful chocolatey hue.
- Pour the luscious mixture into a tall glass. The anticipation is real!
- Top with a cloud of whipped cream. Don’t be shy; it’s the cherry-on-top moment without the cherry.
- Finally, sprinkle chopped strawberries over the whipped cream. They add a splash of color and a fresh, fruity note.
- Serve immediately, preferably with a straw, and let the cool, creamy goodness wash over you.
Cook’s Notes
If you’re anything like me, you’ll want to make sure your banana is at peak ripeness for the best sweetness. This milkshake is versatile, but using canned almond milk brings a lovely creaminess that other milk might not. You can make the whipped cream yourself or grab some from the store — both work wonders. And if you end up with leftovers (unlikely, but it happens), just cover and pop it in the fridge. Stir it up again before drinking, as it might separate a bit. But honestly, it’s best enjoyed fresh.
Make It Your Own
- For a nutty twist, swap canned almond milk with hazelnut milk.
- Want more chocolate? Add a drizzle of chocolate syrup before blending.
- For a tropical vibe, substitute the strawberries with chopped pineapple.
- Go dairy-free by using coconut milk ice-cream instead of vanilla ice-cream.
If you try this, I’d love to hear how it turns out — drop a comment or tag me! Whether you make it just like this or put your own spin on it, this Banana Milo Milkshake is sure to hit the spot. Stay cool, friends!
Related update: Banana Milo Milkshake
Related update: Protein Strawberry Smoothie
It was one of those rainy Tuesday afternoons where the chilly wind made its way through every crack in my window, and all I could think about was something warm and cozy to fill my kitchen with delicious smells. I found myself rummaging through my pantry, pulling out half-used bags of dried fruits and a forgotten jar of candied ginger. Instantly, the idea of scones popped into my head—specifically, Dried Fruit and Ginger Scones. This recipe is perfect for those moments when you crave a little treat that’s impressively tasty but doesn’t demand hours in the kitchen. The best part? I promise you, they’re so easy to make, you’ll almost feel like you’re cheating.
Jump to Recipe
What You’ll Need
The ingredient list is delightfully simple. Chances are, you already have most of these items tucked away in your kitchen.
- Flour
- Cake flour
- Baking powder
- Butter
- Heavy cream
- Whole milk
- Salt
- Turbinado sugar
- Dried apples
- Dried cranberries
- Candied ginger
How to Make Dried Fruit and Ginger Scones
- Position a rack in the middle of your oven and preheat to 425°F. If you’re feeling fancy and using a pizza stone, pop it in the oven to preheat too. Otherwise, line a cookie sheet with parchment paper—you’re ready to go.
- In a medium bowl, whisk together the flours, baking powder, 3 tablespoons of the sugar, and salt. It should look like a soft, powdery snow drift.
- Cut in the butter using a pastry blender, two knives, or your fingers, until you have pea-sized butter pieces that make the mixture look a bit like coarse sand with pebbles. Don’t worry if it looks a bit odd; this is what you want!
- Pour in the cream and milk (or go all in with just cream if you’re feeling decadent) and stir with a fork. You’re aiming for a sticky, shaggy dough that’s evenly moist.
- Add in the fruits and ginger. Work the mixture just enough to spread the goodies evenly, breaking up any ginger clumps. Expect your hands to get a little messy.
- Turn the sticky dough onto a floured surface, sprinkling a bit more flour on top. Pat it into a circle about 1-inch thick. Resist the urge to over-flour; we don’t want tough scones.
- Flour a pizza cutter or a sharp knife and slice the dough circle into 8 equal wedges. Flour in between cuts if things get sticky.
- With a bench scraper, spatula, or your brave hands, transfer the scones to your baking vessel. Leave a half-inch space between them so they can sashay their way to deliciousness.
- Sprinkle the tops with the remaining tablespoon of sugar. Bake for 13-15 minutes, until the tops are a lovely light golden and the scones smell irresistible.
- Let them cool on the baking sheet for at least 10 minutes—it’s tempting, but worth the wait. Enjoy them warm or after they’ve cooled. Both ways are pure bliss.
Cook’s Notes
These scones are pretty forgiving. The key is not to overwork the dough, which keeps them tender and fluffy. If you don’t have cake flour, all-purpose flour works too—just be a bit gentler when mixing. They’re best the day they’re made, but you can store them in an airtight container for a day or two. Reheat them in a warm oven if you want to revive that fresh-from-the-oven vibe. If you’re prepping ahead, you can freeze the unbaked scones; just add a couple of extra minutes to the baking time.
Make It Your Own
- Nutty Twist: Swap half of the dried fruits for chopped toasted almonds or walnuts for a crunchy surprise.
- Chocolate Indulgence: Substitute the candied ginger with dark chocolate chips for a sweet, rich variation.
- Zesty Citrus: Add finely grated orange or lemon zest to the dough for a refreshing aromatic lift.
- Herbal Infusion: Replace dried cranberries with dried cherries and throw in a teaspoon of dried rosemary for a sweet-herbaceous combo.
If you try this, I’d love to hear how it turns out—drop a comment or tag me! Your kitchen adventures make this foodie journey so much more fun. Happy baking!
Related update: Dried Fruit and Ginger Scones
Related update: Chouquettes

It was one of those busy Thursdays, teetering on the edge of the weekend, where my to-do list was as long as my arm, but I still had friends coming over to my place. I needed something quick, something that could impress without stress, and that’s when I remembered my go-to Party Sausage Bites With Pine Nuts. This little number is a gem; it’s like magic with how it comes together with little effort, yet packs a punch in flavor and charm. Perfect for those days when you need to juggle a hundred things but still want to treat your crew right. Plus, who doesn’t love a flaky, buttery bite filled with savory sausage goodness?
Jump to Recipe
What You’ll Need
If your pantry is anything like mine, you’re probably already stocked with most of these ingredients. Here’s what you’ll need:
- 2 tablespoons butter
- 1 medium onion, finely chopped
- 3 garlic cloves, minced
- 1 pound Italian mild sausage, casings removed
- 1 teaspoon dry thyme
- 1 teaspoon dry basil
- 2 tablespoons fresh dill, chopped
- 1/4 cup pine nuts
- Salt, to taste
- 2 sheets of frozen puff pastry, thawed
- 1/4 cup parmesan, grated
- 1 egg, beaten
- Splash of water
- 1 tablespoon sesame seeds
How to Make Party Sausage Bites With Pine Nuts
- In a skillet, melt the butter over medium heat. Add the chopped onion and minced garlic, and sauté for 5-6 minutes until everything smells heavenly and the onions look translucent.
- Take the skillet off the heat and let that mixture cool just enough so you can handle it without screaming.
- In a mixing bowl, combine the Italian sausage, cooled onion-garlic mix, thyme, basil, fresh dill, salt, and those lovely pine nuts. Mix until everything’s cozy and smooth.
- Lightly flour your kitchen counter and roll out the puff pastry into four strips, each about 3 inches wide and 12 inches long.
- Channel your inner artist and place the sausage mix along the center of each pastry strip, shaping it into a neat 1-inch roll. Go edge to edge with that sausage goodness!
- Sprinkle a little parmesan love on top of the sausage.
- Beat the egg with a splash of water to make an egg wash. Brush it along one long edge of the pastry. Fold the pastry over the filling and press to seal. Roll the whole thing gently to ensure it’s snug and happy.
- Do the same with the rest of the pastry and sausage mixture.
- Once all your rolls are ready, brush the egg wash generously over them and sprinkle sesame seeds as if it’s confetti at a party.
- Preheat your oven to 425°F (220°C). While it warms, cut each pastry roll into 12 cute little bites.
- Place the bites on a baking sheet, leaving a little room between each so they don’t fight for space while baking.
- Bake for about 20 minutes, or until they’re golden and crisp and your kitchen smells like an Italian bistro.
- Let them cool for a minute or two on the sheet before serving them warm to your guests—if they can resist snatching them immediately!
Cook’s Notes
Okay, let’s chat about the nitty-gritty. These bites can be prepped ahead of time. Just assemble them up to the cutting stage, cover them, and store them in the fridge until you’re ready to bake. If you have leftovers (not likely), store them in an airtight container in the fridge. They can be reheated in the oven to bring back some crunch. Watch out for overcooking the sausage filling; it can dry out if you’re not careful. And make sure your puff pastry stays cold until you need it—it’s a flaky game-changer.
Make It Your Own
Feeling creative? Here are some fun twists:
- Swap the Italian sausage for spicy chorizo for a hit of heat.
- Use feta instead of parmesan for a tangy kick.
- Switch out the pine nuts for chopped pistachios if you’re feeling fancy.
- Top with black sesame seeds instead of regular for a striking look.
If you try this, I’d love to hear how it turns out — drop a comment or snap a pic and tag me on social media. Let’s make our kitchens the happiest place to be!
Related update: Party Sausage Bites With Pine Nuts

Last Tuesday, I found myself staring at a pair of plantains languishing on my counter, ripe and just waiting for their moment in the culinary sun. You know those evenings when you’re craving something salty, crunchy, and just a tad spicy, but the thought of another bowl of popcorn just seems so… meh? Enter: Garlic & Spice Plantain Chips. They come together ridiculously fast, are addictive in the best way, and bring the heat without sending you running for a glass of milk. They’re perfect for those late-evening cravings or to impress your friends at a casual get-together. Trust me, once you’ve made them, you’ll be hooked.
Jump to Recipe
What You’ll Need
These ingredients are simple yet punchy. Chances are, you already have most of these sitting in your pantry, just waiting to shine.
- 2 plantains – Look for ones that are more yellow than green for that perfect balance of sweetness and starch.
- 2 tablespoons olive oil – A good drizzle will coat the plantains perfectly.
- 1 teaspoon garlic powder – This adds a savory depth without being overpowering.
- 1 teaspoon paprika
- ½ teaspoon cumin
- ¼ teaspoon cayenne pepper – Adjust to your heat preference, but don’t skip it entirely. It’s the kick you didn’t know you needed.
- Salt, to taste
How to Make Garlic & Spice Plantain Chips
- Preheat your oven to 400°F (205°C). This is the magic temperature where the plantains get crispy but not burnt.
- Line a baking sheet with parchment paper or silicone mats to ensure nothing sticks and cleanup is a breeze.
- Take each plantain and cut off both ends. Make a slit along the entire length of the plantain, and peel off the skin. Don’t worry if it gets a little messy.
- Slice the plantains into thin rounds. Aim for consistency, but don’t stress if they’re not perfect. It adds character!
- In a medium-sized bowl, toss the plantain slices with olive oil, garlic powder, paprika, cumin, cayenne pepper, and a good pinch of salt. Stir until every slice is well-coated with this aromatic mixture.
- Lay the plantain slices on the baking sheets in a single layer. Overlapping leads to chewy rather than crispy chips.
- Bake for 15-20 minutes, flipping them at around 8 or 9 minutes. They’re done when the edges turn a nice golden brown. I like to swap the baking sheets between the top and bottom racks halfway through for even crispiness.
- Remove from the oven and let them cool slightly before diving in. The cooling process is where they really crisp up.
Cook’s Notes
A few things I’ve learned along the way:
- If your plantains are too green, they’ll be tough to peel and less sweet. Too ripe (almost black), and they’ll be overly sweet and not crisp up as much.
- If you’re making a large batch, work in batches so every slice gets proper attention in the oven. Overcrowding is the enemy of crispy chips.
- These chips are best enjoyed fresh, but if you need to store them, let them cool completely and keep in an airtight container. They’ll last for a couple of days, but who am I kidding—they never last that long in my house.
Make It Your Own
Here are a few ways to tweak the basic recipe and make it sing for your taste buds:
- Sweet and Spicy: Add a teaspoon of brown sugar to the spice mix for a sweet heat combo.
- Herbaceous Twist: Swap out the cumin for dried oregano or thyme for a herby hint.
- Citrus Zing: A little lime zest added before baking can give these chips a fresh twist.
- Cheesy Delight: Sprinkle some nutritional yeast for a cheesy flavor without the cheese.
If you give these a try, I’d love to hear how they turn out for you! Drop a comment or tag me in your crunchy chip moments. Enjoy every spicy, crispy bite!
Related update: Garlic & Spice Plantain Chips
Related update: Party Sausage Bites With Pine Nuts

One evening, after a long day of juggling work and kids’ activities, I found myself staring at a couple of lonely zucchinis in the fridge, wondering what on Earth I could make for dinner that everyone would actually eat. There was no time for anything elaborate, and I really didn’t want to resort to cereal again. That’s when it hit me: Mini Zucchini Bites, or as I affectionately call them, Cuadritos De Calabacin. These little guys are a lifesaver — quick to throw together, they make the perfect savory snack or side, and they’ve got enough bacon and cheese to keep the pickiest eaters happy. Plus, I mean, they’re bite-sized, and who doesn’t love a good two-bite treat?
Jump to Recipe
What You’ll Need
Trust me, chances are you already have most of this in your kitchen, which makes it even better for those spontaneous dinner decisions.
- 2 slices of diced bacon
- 1/2 cup white onion, chopped
- 2 cups grated zucchini
- 1 cup grated gouda cheese
- 1/2 cup flour
- 1 teaspoon baking powder
- 1/4 cup vegetable oil
- 2 eggs
- Salt & pepper to taste
- 1 tablespoon butter, melted
- 1/4 cup plain bread crumbs
How to Make Mini Zucchini Bites (Cuadritos De Calabacin)
- Preheat your oven to 375°F, because nothing kills dinner momentum like a cold oven.
- In a sauté pan, cook the diced bacon until it’s perfectly crisp. The goal here is crispy, not soggy, so let it do its thing. Once done, set the bacon aside but don’t ditch the bacon fat.
- With about 2 tablespoons of that glorious bacon fat, sauté the white onion until it turns transparent. You’ll know it’s ready when your kitchen smells heavenly. Set aside.
- In a large mixing bowl, combine the grated zucchini, gouda cheese, flour, baking powder, vegetable oil, eggs, bacon, and onion. Season generously with salt and pepper and mix it until everything is just combined. The mixture will be slightly thick and that’s exactly what you want.
- Grab a 10 x 7-inch baking pan and brush it thoroughly with the melted butter. Then, sprinkle plain bread crumbs to coat — this will give you a nice, crispy edge.
- Pour the zucchini mixture evenly into the prepared pan, spreading it out as needed. Pop it in the oven and let it bake for 45-60 minutes. It’s done when it’s firm and the top is golden brown.
- Once baked, let it rest for about 10 minutes. This resting time is key to letting everything set before you slice them into 2-inch cubes. Serve them warm or cold, they’re delicious either way!
Cook’s Notes
For best results, make sure to squeeze out any excess moisture from your grated zucchini. You want your bites to be perfectly firm, not soggy. If you’re planning ahead, you can mix the ingredients a few hours early, cover it, and keep it in the fridge until you’re ready to bake. As for leftovers, they store well in an airtight container in the fridge for up to 3 days. Just pop them in the oven to reheat, or enjoy them cold, straight from the fridge.
Make It Your Own
- Swap the gouda for sharp cheddar if you’re after a bolder cheese flavor.
- Replace bacon with crispy tofu for a vegetarian twist that’s still hearty and delicious.
- Add a handful of chopped fresh herbs like parsley or dill for an added burst of freshness.
- For a bit of heat, toss in a finely diced jalapeño or a pinch of red pepper flakes.
If you try this, I’d love to hear how it turns out. Drop a comment or tag me in your photos — especially if you’ve made it your own with any fun variations! Enjoy!
Related update: Mini Zucchini Bites (Cuadritos De Calabacin)
Related update: Garlic & Spice Plantain Chips

Picture this: it’s a Wednesday evening, and you just got home, eyes baggy from the day, craving something that feels like a mini-vacation but without the suitcase hassle. Enter Crunchy Prawn Skewers With Lemony Avocado Dip. These little beauties are my go-to when I need something fresh, quick, and so delightful it erases the mundane right off your plate. I love that they’re impressive enough to make my husband think I’ve been slaving away when really, it’s just a fun little dish that comes together quicker than you can say “takeout.” Plus, that avocado dip? Oh, it’s the zingy, creamy goodness that dreams are made of.
Jump to Recipe
What You’ll Need
I bet you already have most of these staples hanging around your kitchen. You might just need to grab some prawns on your way home.
- Prawns – The star of the show, fresh or thawed from frozen.
- Flesh of Avocado – Creamy and ripe, please.
- Crème Fraiche – For that lush, smooth texture in the dip.
- Lemon (juice) – Bright, zesty, and necessary.
- Bread crumbs – I like the panko kind for extra crunch.
- Olive oil – Just a splash to coat those prawns.
- Bamboo skewers – Don’t let them set your kitchen on fire.
How to Make Crunchy Prawn Skewers With Lemony Avocado Dip
- Start by making the dip: throw the avocado flesh, crème fraiche, and lemon juice into a food processor. Blend until silky smooth. Taste, season, and set it aside.
- In a separate bowl, mix your breadcrumbs with a touch of lemon zest, and season generously. It should smell like a fresh, zesty day.
- Now, coat your prawns in a little olive oil. Give them a gentle massage, then toss them into the breadcrumb mixture, ensuring they’re well-coated.
- Thread three prawns onto each skewer. Trust me, this is easier than threading a needle.
- Time to grill! Place the skewers on a preheated grill for about 2 minutes on each side, until they’re golden and crisp. The smell should be irresistible by now.
- Serve immediately with that luscious avocado dip and watch them disappear quickly.
Cook’s Notes
I can’t stress enough the importance of soaking those bamboo skewers beforehand. Give them at least an hour in cold water, and you’ll avoid any unwelcome flare-ups. If you’re planning to make this dish ahead, prep the dip and breadcrumb mixture in advance, but hold off on breading the prawns until you’re ready to cook. Leftovers? Pop them in an airtight container in the fridge — the dip stays good for a couple of days, but the prawns are best enjoyed fresh while they’re crispy.
Make It Your Own
- Instead of prawns, try using tofu cubes for a vegetarian twist. Just press them well to remove excess moisture before coating.
- Add a pinch of smoked paprika to the breadcrumb mix for a smoky kick.
- Swap the crème fraiche with Greek yogurt if you prefer a tangier dip.
- For a little heat, toss a few chili flakes into the breadcrumb mixture.
If you try this, I’d love to hear how it turns out — drop a comment or tag me! Enjoy making these skewers and watch them become a weeknight favorite in no time!
Related update: Crunchy Prawn Skewers With Lemony Avocado Dip
Related update: Mini Zucchini Bites (Cuadritos De Calabacin)

So last Tuesday, I found myself staring at a bowl full of apples on my countertop, leftovers from my overly ambitious farmer’s market haul. My mind was set on something sweet and indulgent, but I didn’t want to spend ages prepping a fancy dessert or making a mess of my kitchen. Enter: Easy Homemade Apple Fritters. These little nuggets of joy are perfect for those times when you need a quick treat that feels special but doesn’t involve a ton of effort. They’re crispy on the outside and filled with warm, cinnamon-spiced apple goodness on the inside. Trust me, they’re like a cozy hug on a plate.
Jump to Recipe
What You’ll Need
You’ll love this recipe because chances are, you already have most of the ingredients in your pantry. Plus, it’s really all about letting those apples shine.
- 1 cup all-purpose flour
- 1 apple, peeled, cored, and diced
- 1 teaspoon baking powder
- 1 teaspoon cinnamon
- 1 egg
- 1/3 cup milk
- 1 tablespoon sugar
- 1/4 teaspoon salt
- Oil, for frying (I used vegetable oil)
- 1 cup powdered sugar
- 2 tablespoons milk (for the glaze)
How to Make Easy Homemade Apple Fritters
- In a mixing bowl, whisk together the flour, sugar, salt, baking powder, and cinnamon. You’ll want to inhale deeply because that cinnamon is going to smell divine.
- Gently stir in the milk and egg until the mixture is just combined. Over-mixing is the enemy here! We want it to stay light and fluffy.
- Fold in the diced apple. Make sure those apple pieces are well distributed—every fritter deserves its apple moment!
- Pour oil into a skillet so that it’s about 1 1/2 inches deep. Heat the oil on high. You’ll know it’s ready when a little dough thrown in pops right back up to the surface.
- Carefully drop heaping teaspoons of the dough into the hot oil. Watch them sizzle! Cook until the fritters are brown, about 2 minutes, then flip. Give them another 1-2 minutes to get golden on the other side.
- Transfer the fritters to paper towels to soak up any excess oil. A quick pit stop before they head to a cooling rack.
- For the glaze, stir the powdered sugar and milk together in a small bowl. It’ll be smooth and silky.
- Drizzle the glaze over the fritters. Wait about 3 minutes for the glaze to harden a bit, flip the fritters, and drizzle over the other side. They’re best served warm, so dive in!
Cook’s Notes
Here’s a few things I learned while making these fritters:
- Keep an eye on your oil temperature. If it’s too hot, your fritters will brown too quickly on the outside and stay raw on the inside.
- If you’re making these ahead of time, store them at room temperature in an airtight container for up to a day. Reheat in the oven to crisp them back up.
- Leftovers can be revived by popping them in a toaster oven for a few minutes. They won’t be as good as fresh, but still tasty.
Make It Your Own
- Swap the apple for another fruit like pears or peaches if you’re feeling adventurous!
- Add a pinch of nutmeg or ginger to the batter for an extra layer of spice.
- Try using maple syrup instead of powdered sugar for the glaze for a deeper, richer sweetness.
- For a savory twist, omit the sugar and cinnamon, and add sharp cheddar cheese and bacon bits to the batter.
If you try this, I’d love to hear how it turns out — drop a comment or tag me! Seriously, nothing makes my day more than seeing your kitchen creations. Enjoy every crispy, warm, and cinnamon-sweet bite!
Related update: Easy Homemade Apple Fritters
Related update: Old Fashioned Vanilla Buttercream Frosting

Picture this: it’s a chilly Tuesday evening, and I’m staring into my fridge, which is looking kind of bare except for a few odds and ends. Ever been there? Yeah, me too. But then, I spot a half-used can of pumpkin puree and some cheese. Suddenly, the idea hits me like a ton of bricks—Pizza Bites with Pumpkin! It’s the ultimate weeknight wonder, combining the cozy vibes of fall with the all-time favorite comfort food: pizza. These little bites are quick, comforting, and yes, they are bound to impress even the pickiest of eaters without much fuss. Plus, they’re made in a muffin tin, which automatically makes them adorable and somehow more delicious. Ready to give it a whirl? Grab your apron!
Jump to Recipe
What You’ll Need
The best part? You probably have most of these in your pantry already.
- 1 cup of pumpkin
- 2 tablespoons of olive oil
- 1/2 cup of feta cheese
- 1/2 cup of mozzarella
- 2 eggs
- 1 teaspoon of dried oregano
- Fresh parsley, chopped, for garnish
- 1 clove of garlic, minced
- Your favorite pizza dough
How to Make Pizza Bites with Pumpkin
- Start by chopping the pumpkin into rice-sized bits using a food processor. This gives you the right texture for the bites.
- Heat up the olive oil in a pan over medium heat. Sauté the pumpkin for about 3 minutes, just until it starts to soften and turns a lovely golden hue. Set it aside to let it cool.
- In a mixing bowl, combine the feta and mozzarella cheeses. Crack in the eggs, one at a time, stirring after each addition until you have a smooth mixture.
- Add the cooled pumpkin and the minced garlic, along with the oregano and parsley. Mix everything until well combined. Your kitchen should start to smell amazing right about now!
- Grease a muffin tin and evenly spoon the mixture into each mold.
- Now, press the pizza dough down evenly and firmly into each mold. This step is crucial to ensure the bites stick together nicely.
- Bake in a preheated oven at 200°C (about 400°F) for 30 minutes, or until the tops are golden brown and the edges are slightly crisp.
- Once done, remove from the oven and let them cool in the pan for 5 to 10 minutes. Trust me, this waiting game is critical so they hold their shape when you take them out.
Cook’s Notes
Okay, let’s talk details. First, make sure to squeeze the pumpkin mixture firmly into the muffin tin. This ensures they hold their cute little bite shape once baked. And seriously, resist the urge to pop them out of the tin too soon. Letting them cool for about 5 to 10 minutes is like letting them gather their strength to hold together.
As for storage, these bites are best enjoyed fresh, but if you have leftovers (unlikely!), pop them in an airtight container in the fridge. Reheat them in the oven to retain that crisp factor.
Make It Your Own
- Swap feta for goat cheese if you’re feeling fancy and want a tangy kick.
- Looking for a veggie boost? Add some finely chopped spinach or kale to the mix.
- For a meatier option, toss in some cooked bacon bits or pepperoni.
- If you’re not a fan of pumpkin, butternut squash is a fantastic alternative.
If you try this, I’d love to hear how it turns out — drop a comment or tag me! Can’t wait to see your pumpkin pizza bite creations. Enjoy every cheesy, pumpkin-y bite!
Related update: Pizza bites with pumpkin
Related update: Bing's Mango Salsa

So, there I was last Tuesday, staring into the fridge, wondering what to make for dinner that wouldn’t take an eternity. You know those days when all you want is something delicious but quick enough that you won’t be stuck in the kitchen all night? Enter: Eggplant pizzette. It’s that magical intersection of pizza cravings and veggie goodness. Plus, it’s one of those recipes that looks fancy enough to impress but is secretly super simple to throw together. Trust me, once you smell that cheese bubbling away, you’re going to thank yourself for making these little guys.
Jump to Recipe
What You’ll Need
Let’s talk about the ingredient list — it’s mercifully short and sweet. Chances are, you already have most of this at home, especially if you’re a basil hoarder like me.
- Round eggplant – the base for our pizzette
- Tomatoes – fresh or canned, your choice!
- Swiss cheese – for that perfect melty goodness
- Fresh basil leaves
- Oregano leaves
- Olive oil
How to Make Eggplant pizzette
- Preheat your oven to 230°C. Trust me, getting this right from the start saves you from impatiently watching the oven later.
- Grab your round eggplant and slice it into rounds, about half an inch thick. You want them thin enough to cook quickly but thick enough to hold all that topping.
- Place the eggplant rounds on a non-stick pan greased with olive oil. A light coating will do; no one wants oily pizzette.
- Bake the eggplant in the oven for about 10 minutes. You’ll know it’s ready for the next step when the edges start looking golden and slightly crispy.
- Carefully remove the pan from the oven — the eggplant stays, so it keeps warm and toasty.
- Spoon a generous amount of chopped tomatoes onto each eggplant round. If you’re using canned, make sure they’re well-drained to avoid sogginess.
- Sprinkle fresh basil and oregano leaves over the tomatoes. The aroma will start to hit you about now, and it’s divine.
- Top everything with grated Swiss cheese. Go ahead and be generous here; a good layer ensures that melty, bubbly finish.
- Pop the pan back in the oven for another 5 minutes. Keep an eye out — you want that cheese to turn a lovely golden brown.
- Remove from the oven and let them cool for a minute or two. These are fab served warm or even cooled down a bit as a snack.
Cook’s Notes
Alright, a few things to keep in mind. First, if you slice the eggplant too thin, it might turn into a mushy mess, so aim for that half-inch thickness. If you’re worried about bitterness, sprinkle a bit of salt on the eggplant slices and let them sit for 10 minutes before rinsing and patting dry. Also, feel free to adjust the herbs based on what you have—dried oregano works if fresh isn’t available. These pizzette can be stored in the fridge for up to two days, though they’re best enjoyed fresh.
Make It Your Own
Want to switch things up? Here are some ideas:
- Swap the Swiss cheese for mozzarella for a more classic pizza flavor.
- Add a layer of pesto under the tomatoes for an herbaceous kick.
- Use zucchini slices instead of eggplant if you prefer a different base.
- Try adding thin slices of pepperoni or mushrooms for extra toppings.
If you try this, I’d love to hear how it turns out — drop a comment or tag me! Happy cooking, and may your kitchen adventures be as tasty as they are fun!
Related update: Eggplant pizzette
Related update: Maple & Curry Acorn Squash
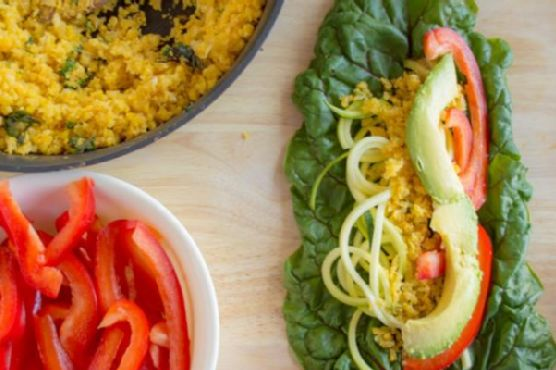
Last Tuesday was one of those days. You know the kind—when work drags, the laundry pile is a mountain, and the fridge looks like a post-apocalyptic wasteland. I needed something quick, fresh, and healthy, but my brain was too fried to concoct anything elaborate. As I rummaged through the crisper drawer, I found some vibrant swiss chard and an orange cauliflower that had somehow survived the week. With a handful of other ingredients, I whipped up some Swiss Chard Wraps. They were the perfect antidote to a hectic day: simple, fresh, and surprisingly satisfying. Plus, they look as good as they taste, which is always a bonus when you’re trying to convince your family (or yourself) to eat more greens.
Jump to Recipe
What You’ll Need
Chances are you already have most of this, but there are a few stars that make all the difference.
- Dried swiss chard leaves
- Orange cauliflower (it’s just a bit sweeter and cuter)
- Olive oil
- Garlic
- Salt
- Fresh basil
- Zucchini
- Red bell pepper
- Avocado
- Trader Joe’s spicy peanut vinaigrette
How to Make Swiss Chard Wraps
- Begin by chopping off the stems of the swiss chard right where they meet the leaf. I like to leave a bit of stem for extra crunch and structure, but feel free to stem them entirely if that’s your jam.
- Chop the cauliflower into small bits and toss them into a food processor. Give it a few pulses until it resembles rice. Yes, even the stalks!
- Heat up some olive oil in a sauté pan over medium-high heat. Once it’s shimmering, add the garlic and let it sizzle for a minute or two, until you can smell its toasty aroma.
- Add the cauliflower rice to the pan. Cook it for about 2-3 minutes until it turns a bright, cheerful orange. Stir in a pinch of salt and some chopped basil, letting the flavors mingle.
- Spiralize the zucchini using Blade B to make noodles. No spiralizer? No problem—use a vegetable peeler to create ribbons.
- To assemble, lay a swiss chard leaf flat. Pile on a bit of the sautéd cauliflower, zucchini noodles, slices of red bell pepper, and creamy avocado along the stalk.
- Drizzle some spicy peanut vinaigrette over everything (don’t be shy!) and wrap it all up snugly.
Cook’s Notes
Here’s the thing with these wraps: they really shine fresh. The swiss chard will wilt if you let it sit too long, so try to make just what you’ll eat in one go. However, if you find yourself with leftovers, pop them in an airtight container and store them in the fridge. They’ll last a day or two, but the flavors will meld and mellow a bit.
- Make the cauliflower rice a day ahead if you’re in a time crunch!
- If you’re not into raw red bell peppers, give them a quick sauté with the cauliflower rice to soften them up.
- Be generous with the vinaigrette; it’s the secret sauce that ties everything together.
Make It Your Own
- Swap the avocado: If you’re not an avocado fan, try hummus or a dollop of Greek yogurt for creaminess.
- Spice it up: Add some sliced jalapeños or a sprinkle of chili flakes to give your wraps a kick.
- Change up the greens: If you can’t find swiss chard, collard greens or large kale leaves work as excellent substitutes.
- Protein punch: Add grilled chicken, tofu, or shrimp for a more filling meal.
If you try this, I’d love to hear how it turns out—drop a comment or tag me on social media! Your kitchen adventures always brighten my day, and who knows? You might inspire the next variation. Enjoy your leafy, crunchy bites of happiness!
Related update: Southern 7 Layer Salad in a Mason Jar

I was knee-deep in a midwinter slump, the kind where you just crave a burst of sunshine, when I stumbled upon this idea: Braid sweet citrus-flavored licorice. It’s a bit of a departure from your typical licorice, and honestly, it’s more of a pastry with a playful twist. Picture this: a light, flaky puff pastry with a zesty citrus glaze that dances on your taste buds. Perfect for those days when you need a little joy but aren’t in the mood for anything too fussy or time-consuming.
One of the best things about this recipe is its versatility. It’s a delightful treat that can play the part of a breakfast snack, a tea-time companion, or the unexpected star of a dessert platter. The secret weapon here is the citrus glaze, which brings this pastry to life with a sweet-tart zing. If you’ve got some puff pastry lingering in the freezer and a stash of citrus in the fruit bowl, you’re basically halfway there.
Jump to Recipe
What You’ll Need
Chances are you already have most of this sitting in your kitchen. Let’s keep it simple, shall we?
- Puff pastry Buitoni – the flaky base of our braids
- Fresh cream – to add richness to the glaze
- Grand cru muscovado sugar – for that deep, molasses-like sweetness
- Lemon – zest and juice will do wonders here
- Lime – for that extra citrus punch
- Orange – more zest, more flavor
How to Make Braid Sweet Citrus Flavored Licorice
- Roll out the puff pastry and use a sharp knife to etch designs of strips about 10 cm high and 1 cm wide. Precision isn’t key here, just have fun with it.
- Gently twist each strip on itself. It doesn’t have to be perfect; the twists will bake into beautiful, rustic braids.
- Place the twisted strips spaced apart on a sheet of parchment paper. This prevents them from sticking together as they bake.
- Bake in a preheated oven at 200°C for about 12 minutes, or until they’re golden brown and your kitchen smells like heaven.
- While the braids cool on a wire rack, zest your citrus fruits, and set the zest aside.
- Juice the lime, half of the orange, and half of the lemon. Boil the juices until you reduce it down to about two tablespoons of liquid.
- Remove from heat and stir in the cream and brown sugar until it’s well mixed and dreamy.
- Let the glaze cool until it thickens, then brush it generously over the cooled braids.
- Sprinkle the reserved citrus zest over the glazed braids while they’re still a bit wet to ensure it sticks well.
- Allow the glaze to dry on the wire rack until it hardens slightly. Then, go ahead and devour them!
Cook’s Notes
Don’t stress if your twists aren’t perfect—imperfections add character! Make sure to space them well on the parchment paper to allow for expansion. If your glaze seems too runny, let it cool a bit more; it thickens as it cools. Want to save time? You can make the glaze ahead of time and refrigerate it for up to two days. Just warm it slightly before using. Leftovers can be stored in an airtight container for a couple of days, but honestly, they probably won’t last that long.
Make It Your Own
- Try using blood orange instead of the regular orange for a more intense flavor and color.
- Add a splash of vanilla extract to the glaze for a warm, comforting undertone.
- For a spiced twist, sprinkle a little ground cardamom in with your citrus zest.
- If you’re feeling adventurous, drizzle a bit of melted white chocolate over the top once the glaze has set.
If you try this, I’d love to hear how it turns out—drop a comment or tag me! Enjoy the bright and citrusy vibes these braids bring, no matter what the weather outside is doing. Happy baking!
Related update: Braid sweet citrus flavored licorice
Related update: Basil Coconut Ice Cream

One chilly Sunday morning, I found myself staring at a nearly empty pantry, craving something cozy and sweet without stepping out into the biting cold. That was the day my homemade organic maple granola was born, and let me tell you, it was like a warm hug in a bowl. There’s just something magical about the way the house smells when this granola is baking—sweet, nutty, and comforting. The best part? It’s ridiculously easy to make. You’ll end up with hearty, golden clusters that are perfect to pair with fresh, juicy fruit. Now, this recipe is a staple in my home, perfect for those days when you want something wholesome and satisfying, without a lot of fuss.
Jump to Recipe
What You’ll Need
The beauty of this granola lies in its simplicity and versatility. You might already have most of these ingredients lurking in your kitchen!
- Rolled oats
- Dark brown sugar
- Maple syrup
- Vegetable oil; peanut oil is preferred
- Salt
- Cashew pieces
- Slivered almonds
- Dried cranberries
- Dried raisins
- Fresh fruit (to serve)
How to Make Home made organic maple granola with fresh fruit
- Preheat your oven to 250°F. This low temperature ensures the granola dries out rather than burns, for that perfect crunch.
- In a large bowl, combine the rolled oats, cashew pieces, slivered almonds, salt, and dark brown sugar. Give it a good stir to distribute the sugar evenly.
- Pour in the maple syrup and vegetable oil. Mix everything until the oats and nuts are well coated. You should be able to smell the sweetness already!
- Spread the mixture thinly and evenly onto two baking sheets with sides about an inch high. Trust me, the thin layer is key for even baking.
- Bake for 45 to 60 minutes, stirring carefully every 15 minutes. Don’t forget to swap the positions of the trays each time you stir them. This little dance ensures even browning.
- You’ll know it’s done when the granola looks tan—not dark—and feels slightly crisp to the touch. It will harden more as it cools.
- Remove the trays from the oven and let the granola cool completely. Once cooled, mix in the dried cranberries and raisins.
- Store your granola in sealed plastic bags or containers. It’ll stay fresh for up to two weeks, unrefrigerated.
- Serve your granola with a handful of fresh fruit. Enjoy every crunchy, sweet bite!
Cook’s Notes
This granola is super forgiving, but here are a few tips to keep it foolproof. Remember to stir it gently to keep those lovely clusters intact. If you don’t have peanut oil, any neutral oil like canola will work in a pinch, but peanut oil does add a subtle, nutty flavor that’s just divine. Make sure to let it cool completely before storing, as any trapped heat can make it soggy. If you somehow don’t finish this in two weeks (but let’s be real, you will), just pop it in an airtight container in the freezer for longer storage.
Make It Your Own
Here are some fun tweaks to make this granola truly yours:
- Swap the cashews and almonds for your favorite nuts like walnuts or pecans for a different flavor profile.
- Add a teaspoon of cinnamon or a pinch of nutmeg to the oat mixture for a warm spice kick.
- Try using honey instead of maple syrup for a different kind of sweetness.
- Sprinkle some coconut flakes into the mix before baking for a tropical twist.
If you try this, I’d love to hear how it turns out — drop a comment or tag me! Happy granola-making, friends!
Related update: Home made organic maple granola with fresh fruit
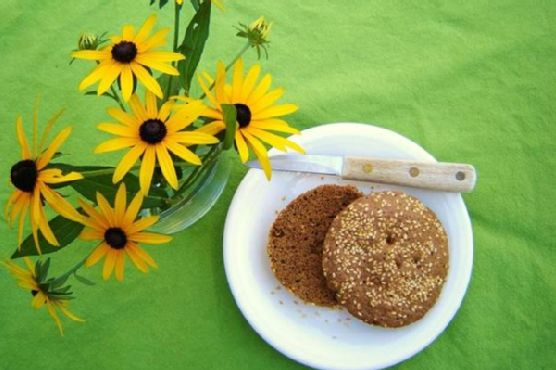
It was one of those days where I had absolutely nothing planned for dinner. You know the kind — when you open the fridge door for the third time hoping something magical will appear? Well, inspiration didn’t strike until I dug through my pantry and found a bag of sorghum flour tucked behind the lentils. It was like a lightbulb went off. I needed something quick and easy, and what’s better than a warm, freshly made bun that’s gluten-free and takes just five minutes? This recipe is not only a lifesaver for those rushed evenings but also a bit like magic in a mug. It’s comforting, satisfying, and, let’s be honest, it feels like a tiny victory to whip up bread in mere minutes.
Jump to Recipe
What You’ll Need
The beauty of these buns lies in their simplicity. Most of these ingredients are likely sitting in your pantry already, making this recipe a great go-to without a trip to the store. Here’s what you’ll gather:
- Almond meal
- Baking powder
- Cocoa powder
- Egg
- Ground flax seed
- Molasses
- Salt
- Sesame seeds
- Sorghum flour
How to Make 5 Minute Gluten Free Wonder Buns
- In a small bowl, crack open an egg and whisk it together with the molasses until well combined. You’ll smell the sweet earthy aroma of molasses starting to come through.
- In another small bowl, combine the sorghum flour, almond meal, ground flax seed, baking powder, and cocoa powder. Stir thoroughly, ensuring the mixture is even and free of clumps. The last thing you want is a surprise burst of bitter baking soda or unmixed cocoa powder.
- Pour the whisked eggs into the dry ingredient mixture and stir until the batter is smooth and glossy.
- Grab a 10 oz Pyrex custard cup, oil it lightly, and sprinkle sesame seeds on the bottom and sides. This not only prevents sticking but also adds a delightful nutty crunch to every bite.
- Pour the batter into the prepared cup, smoothing the top with a spoon. Sprinkle more sesame seeds on top for good measure.
- Pop the cup into the microwave and cook for 90 seconds. Watch as the batter rises and sets, emitting a warm and inviting aroma. Once done, let it cool for a moment before diving in.
Cook’s Notes
This recipe is pretty forgiving, but here are a few tips to keep in mind. Make sure your baking powder is fresh; otherwise, your buns won’t rise as much. If you don’t have a Pyrex custard cup, any microwave-safe mug should work, though cooking times may vary a bit. Feel free to experiment with the amount of molasses if you prefer a sweeter or less sweet bun. As for storage, these buns are best enjoyed fresh out of the microwave, but they can be stored in an airtight container for up to a day. Reheat them in the microwave for a few seconds to bring back that fresh-baked warmth.
Make It Your Own
These wonder buns are a blank canvas, ready for your culinary creativity. Here are a few ideas:
- Swap the cocoa powder for cinnamon to create a spiced bun that pairs beautifully with morning coffee.
- Add a tablespoon of grated cheese to the batter for a savory twist.
- Replace sesame seeds with sunflower seeds for a different crunch and flavor.
- For a sweeter treat, add a handful of chocolate chips before microwaving.
If you try this, I’d love to hear how it turns out — drop a comment or tag me! Whether you stick to the original recipe or put your spin on it, these wonder buns are sure to become a staple in your gluten-free recipe repertoire. Enjoy every bite!
Related update: 5 Minute Gluten Free Wonder Buns
Related update: Stuffed Pork Tenderloin with Marsala-Port Sauce