
Okay, so picture this: It’s a chilly autumn afternoon, and I’ve just returned from the farmer’s market with a bag full of crisp, tart apples. I’m totally in the mood for some fall baking therapy, but I need something that doesn’t have me glued to the oven for hours. Enter these adorable Brandy-Apple Mini Pies with Cornmeal Crust. They’re the perfect mix of cozy and impressive, with a buttery, cornmeal crust that crumbles just right and a filling that’s sweet with a hint of boozy warmth. They’re just the ticket for a quick baking session that still feels special—plus, they make your whole kitchen smell like the best parts of fall. And the best part? They’re mini, so you can totally have more than one. Intrigued? Jump to Recipe
What You’ll Need
You’re in luck, because there’s a good chance you’ve got most of these goodies chilling in your pantry or fridge already. Here’s what you’ll need:
- 1 cup all-purpose flour
- 1/2 cup yellow cornmeal
- 1/4 cup powdered sugar
- 1/2 tsp salt
- 1/4 cup vegetable shortening
- 3-4 Tb. ice water
- 3 cups green diced tart apples (like Granny Smith)
- 1/2 cup unsalted butter
- 2 Tb. brandy
- 1/2 cup brown sugar
- 1 tsp pumpkin pie spice
- 1 Tb. sugar
How to Make Brandy-Apple Mini Pies With Cornmeal Crust
- Start by tossing the flour, cornmeal, powdered sugar, and salt into your food processor. Pulse it a couple of times to mix everything together.
- Cut the shortening into small cubes and add it to the processor. Pulse again until the mixture resembles coarse crumbs.
- Add 3 tablespoons of ice water and pulse until the dough starts to come together. If it looks a little dry, add another tablespoon of water.
- Lay out a sheet of plastic wrap and turn the dough onto it. Divide it into two pieces—one larger and one smaller, about 80/20 split.
- Shape each piece into a disk, wrap them snugly, and pop them into the fridge for at least 30 minutes.
- While the dough chills, peel and dice your apples. Preheat your oven to 425°F.
- In a small saucepan over medium heat, blend together the butter, brandy, brown sugar, pumpkin pie spice, and sugar. Stir until it simmers, then pour this sweet mixture over the apples, tossing to coat.
- Take the larger dough disk out of the fridge and roll it out on a well-floured surface to about 1/8 inch thick.
- Use a drinking glass with a 3-4 inch rim to cut out circles of dough. Press these into your muffin tins. Gather and re-roll the dough scraps to get 14-16 crusts.
- Fill each mini crust with a generous scoop of the apple mixture.
- Roll out the smaller dough piece and use a cute 2-3 inch cookie cutter to make tops. Place these over each pie and brush with any leftover syrup from the apple bowl.
- Bake for 15 minutes, then lower the oven temp to 350°F and bake an additional 15 minutes. If they look perfectly golden after the first 15, cover them with foil to prevent over-browning.
- Cool the pies completely in the muffin tin before attempting to remove them. Trust me, no one wants to see these beauties fall apart!
Cook’s Notes
Silicone muffin pans are your best friend here—they make getting the pies out a breeze. If you’re using metal pans, gently run a sharp knife around the edges, and oh-so-carefully ease each pie out into your hand one at a time. If you’re eyeing a full-size pie instead of minis, just double the apples and syrup. Roll out the dough into a bottom crust and top, bake at 425°F for 30 minutes, then 350°F for another 30.
Make It Your Own
- Swap the brandy for a splash of bourbon or whiskey for a deeper, smokier flavor.
- Try using pears instead of apples for a sweet, juicy twist.
- Add a handful of chopped pecans to the apple mixture for some nutty crunch.
- Sprinkle a little coarse sea salt on top before baking for that sweet-salty combo we all secretly obsess over.
If you give these mini pies a spin, I’d love to hear how they turn out for you! Drop a comment below or tag me in your delicious creations. Happy baking!
Related update: Brandy-Apple Mini Pies With Cornmeal Crust
Related update: Yogurt Cake
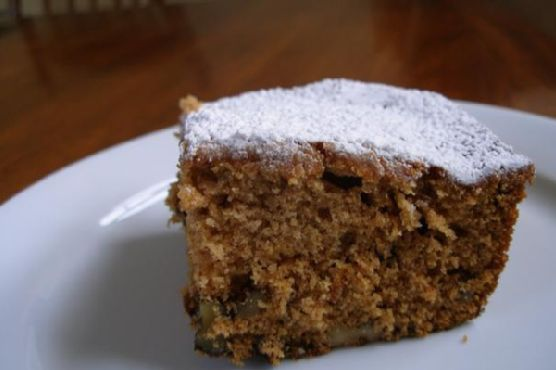
It was one of those chilly fall afternoons where the sky promised a drizzle, but I had a craving that promised warmth—something comforting to fill the kitchen with cozy scents. As I rummaged through my pantry, I found a jar of applesauce that sparked the idea of a nostalgic, spiced cake. This applesauce cake is the kind of recipe that wraps you in a hug from the first bite. It’s ridiculously easy to whip up, and before you know it, your kitchen will smell like pure autumn bliss. Trust me, this cake is the one you’ll want to cozy up with a hot cup of tea.
Jump to Recipe
What You’ll Need
This cake is built on pantry staples, so there’s a good chance you won’t need to run to the store. It’s all about the applesauce and cinnamon—they’re the stars of the show.
- 1 cup brown sugar
- 1 teaspoon cinnamon
- 1 teaspoon baking soda
- 1/2 cup raisins
- 1/2 cup red cherries (reserve some for decoration)
- 1 cup white sugar
- 1 cup butter, softened
- 2 eggs
- 2 cups applesauce
- 3 cups plain flour
- 1 cup nuts (pecans work beautifully, reserve some for decoration)
- 1 teaspoon vanilla extract
How to Make Applesauce Cake
- Preheat your oven to 325°F. Grab your trusty cake pan and give it a generous greasing, followed by a dusting of flour. This ensures no tragic sticking incidents later.
- In a mixing bowl, cream together the butter and both sugars. The mixture should be light and fluffy, almost like a sweet cloud.
- Add in the eggs, one at a time, beating well after each addition. You’re aiming for a smooth, unified batter here.
- Stir in the pure vanilla extract and the applesauce. You’ll notice the batter starts to look luscious and inviting.
- In a separate bowl, whisk together the flour, cinnamon, and baking soda. Carefully fold this dry mixture into the wet ingredients until just combined.
- Gently fold in the raisins, cherries, and nuts. The batter should look speckled with fruity and nutty goodness.
- Pour this aromatic batter into your prepared cake pan. Smooth out the top and sprinkle on those reserved cherries and nuts for a pop of color and texture.
- Bake in the preheated oven for about 1 1/2 hours. The cake is done when it’s golden and a skewer inserted into the center comes out clean.
- Let the cake cool in the pan for a few minutes before transferring it to a wire rack. The wait will be the hardest part!
Cook’s Notes
This cake keeps beautifully, making it an excellent make-ahead option. Just wrap it tightly in plastic wrap and store it in the fridge, where it can last for several days. It actually tastes even better the next day as the flavors meld together. If you find yourself with leftovers (a rarity, let me assure you), they’re perfect with a scoop of vanilla ice cream.
- Don’t skip greasing and flouring the pan; it saves you from the heartbreak of half the cake sticking.
- If your raisins are a bit dry, soak them in hot water for about 10 minutes and then drain them before adding to the batter.
- Feel free to substitute pecans with walnuts if you have those on hand.
Make It Your Own
- If you’re not into pecans, swap them out for walnuts or even hazelnuts for a different nutty note.
- For a boozy twist, soak the raisins in rum before adding them to the batter.
- Replace half the flour with whole wheat flour to add a rustic texture and flavor.
- Try adding a teaspoon of ground ginger or nutmeg for an extra spice kick.
If you try this, I’d love to hear how it turns out—drop a comment or tag me! I’m already excited to see your takes on this cozy classic. Happy baking!
Related update: Applesauce Cake
Related update: Chocolate Chip Peanut Butter Banana Cookies
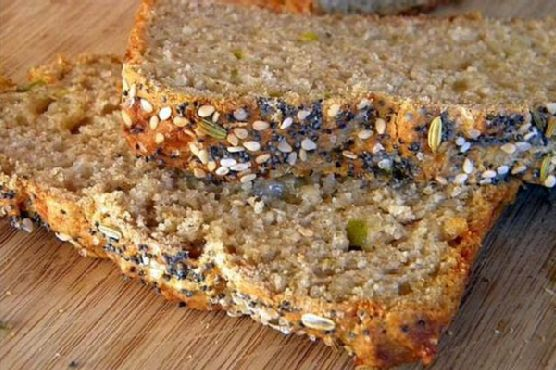
I remember last fall when I was caught in a total downpour on my way back from the farmers’ market. I dashed inside my apartment, dripping and shivering, with a bag full of local cheese and a can of green chiles I had impulsively picked up. My mind immediately went to a warm, comforting loaf of bread, something easy yet satisfying. Enter Cheddar Chile Beer Bread. This recipe is your best friend when you need something hearty but don’t want to fuss with yeast or kneading. It comes together in a flash, and that extra sharp cheddar paired with the zing from the chiles makes it feel special and cozy. Plus, it’s the kind of bread that fills your kitchen with the most *amazing* aroma, making it worth every second of waiting while it bakes.
Jump to Recipe
What You’ll Need
Chances are, most of these ingredients are lurking in your pantry right now, just waiting for their moment to shine. Here’s what you’ll need:
- 1 cup whole wheat flour
- 1 cup all-purpose flour
- 1 tablespoon baking powder
- 1 teaspoon salt
- 1/2 teaspoon dry mustard
- 1 can (12 oz) beer (use what you love to drink!)
- 1 cup white shredded extra sharp cheddar cheese
- 1 can (4 oz) canned green chiles, drained
- 1 tablespoon sesame seeds
- 1 tablespoon poppy seeds
- 1/2 teaspoon caraway seeds
- 1 teaspoon sea salt
How to Make Cheddar Chile Beer Bread
- Preheat your oven to 425 degrees. While it warms up, grease a loaf pan to make sure our bread doesn’t stick.
- In a large mixing bowl, whisk together the whole wheat flour, all-purpose flour, baking powder, salt, and dry mustard. This will be the backbone of your bread.
- Add the green chiles, shredded cheddar, and the beer to the dry mix. Stir until everything comes together. Expect a super thick batter that’s a good arm workout!
- Scrape the thick batter into your prepared loaf pan. Spread it out evenly so it bakes up nice and uniform.
- Now for the fun part: sprinkle the sesame seeds, poppy seeds, and caraway seeds over the top. Finish with a sprinkle of sea salt. Use your fingers to gently press these into the batter so they stick while baking.
- Lower your oven temperature to 400 degrees and pop the loaf in. Bake for 45-50 minutes, and let the aromas take over. It’s done when a toothpick inserted into the center comes out clean.
- Let the bread cool on a wire rack for about 15 minutes, then turn it out of the pan. Try to resist diving in right away, but I give you full permission to sample a slice while it’s still warm!
Cook’s Notes
A few little tips: using a beer you enjoy drinking will really make a difference as it flavors the bread. If the batter feels too thick, that’s totally normal. It might seem like you’ve done something wrong, but trust the process, it will work out. The seeds on top not only add flavor, but also a fun texture contrast to the soft, cheesy bread. This loaf is best the day it’s made, but if you have leftovers, toast them up the next morning with a bit of butter—it’s heavenly!
Make It Your Own
Here are a few ways to switch it up:
- Spicy Kick: Add a chopped jalapeño to the mix for some extra heat.
- Herby Twist: Toss in a tablespoon of dried herbs like rosemary or thyme with the dry ingredients.
- Cheese Swap: Use pepper jack or gouda instead of cheddar for a different cheesy flavor.
- Gluten-Free Version: Substitute the flours with a 1:1 gluten-free blend.
If you try this, I’d love to hear how it turns out—drop a comment or tag me in your photos! Sharing is caring, especially when it’s as delicious as this. Enjoy every bite, friends!
Related update: Cheddar Chile Beer Bread
Related update: Fenugreek Roti
Related update: Savory Cheese Dill Scones
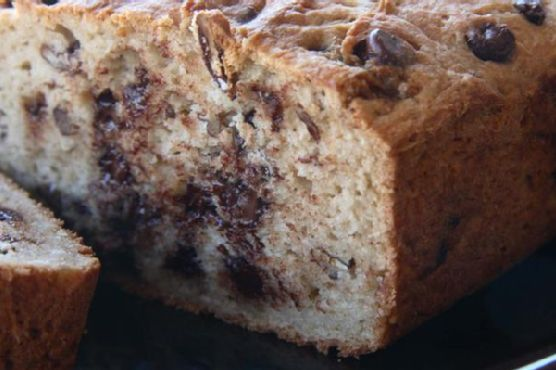
One chilly evening last fall, I found myself in the kitchen, craving something warm and comforting. My cupboard was a bit of a disaster, full of bits and bobs from baking adventures past. A half-used bag of gluten-free flour, some chocolate chips I had been furtively snacking on, and a nearly empty jar of pecans were calling to me. It was definitely a “use what you have” kind of night. As I pulled ingredients together, a gluten-free chocolate-pecan quickbread was born — a delightful mix of melty chocolate and crunchy pecans, wrapped in a tender, slightly sweet loaf. The best part? It made my entire kitchen smell like a cozy bakery on a crisp autumn day. If you’re looking for something that’s both indulgent and easy to whip up, this quickbread might just be your new favorite.
Jump to Recipe
What You’ll Need
The beauty of this quickbread lies in its simplicity. You likely have most of these ingredients on hand:
- Butter, for that irresistible richness
- Gluten-free flour, to keep things friendly for all tummies
- Sugar and brown sugar, for sweetness and a hint of molasses flavor
- Baking soda, to give our loaf a little lift
- Salt, to balance everything out
- Semi-sweet chocolate chips, because chocolate makes everything better
- Pecans, for that nutty crunch
- Eggs, to bind and add moisture
- Unsweetened applesauce, a sneaky moisture-hero
- Vanilla-honey Greek yogurt, for tang and tenderness
- Vanilla extract, because why not double down on vanilla goodness?
How to Make Gluten-Free Chocolate-Pecan Quickbread
- First things first, preheat your oven to 350 degrees Fahrenheit. Butter your trusty 5″x9″ loaf pan and set it aside.
- Gently heat the butter until it’s just melted. Set it aside to cool — you don’t want scrambled eggs in your bread!
- In a large bowl, combine the gluten-free flour, sugar, brown sugar, baking soda, and salt. Give it a good whisk to break up any lumps.
- Stir in the semi-sweet chocolate chips and pecans. This is starting to look delicious already, isn’t it?
- In a separate bowl, whisk together the eggs, applesauce, yogurt, vanilla extract, and the cooled melted butter.
- Pour the wet mixture into the dry ingredients and stir until just combined. Be gentle here; over-mixing is not our friend.
- Pour the batter into the prepared loaf pan, smoothing out the top with a spatula.
- Bake in your preheated oven for about an hour, or until a toothpick inserted into the center comes out clean. The top should be golden and your kitchen will smell heavenly.
- Allow the loaf to cool in the pan for 10 minutes before transferring it to a wire rack to cool completely. Patience, my friend!
Cook’s Notes
Let’s talk about some little tips that make a big difference. First, feel free to use whatever gluten-free flour blend you love; they all work here. Just make sure it has xanthan gum in it, or add a teaspoon if it doesn’t. If your loaf turns out a bit too crumbly, you may have over-mixed, which is easy to do. Treat the batter gently! As for storage, keep your quickbread in an airtight container at room temperature for up to three days. It also freezes beautifully — just slice and wrap individual pieces for easy snacking later.
Make It Your Own
Here’s where you get to play around:
- Swap the pecans for walnuts if you’re feeling nutty.
- Use dark chocolate chips for a more intense chocolate experience.
- Add a teaspoon of cinnamon to the dry mix for a warm, spicy touch.
- Substitute the vanilla-honey Greek yogurt for plain Greek yogurt and an extra teaspoon of honey if that’s what you have on hand.
If you try this, I’d love to hear how it turns out — drop a comment or tag me! Happy baking, and may your kitchen be filled with the sweet aroma of chocolate-pecan goodness.
Related update: Gluten-Free Chocolate-Pecan Quickbread
Related update: Candy Cane Chocolate Marshmallows
Related update: Braised Pork: Filipino Humba
It was one of those weeks where everything seemed a bit too chaotic, and the weather was veering into that crisp, cozy fall vibe that just screams for comfort food. I was rummaging through my pantry, trying to figure out what on earth I could throw together without needing a last-minute grocery run. There it was, a can of chickpeas and some cauliflower that had been patiently waiting for their moment to shine. Enter the Cauliflower Chickpea Stew: a dish that’s hearty, full of flavor, and surprisingly easy to whip up. It’s one of those recipes that feels like a warm hug after a long day, plus it’s packed with spices that make your kitchen smell absolutely divine. Definitely a go-to for those nights when you need something nourishing but not overwhelming to make.
Jump to Recipe
What You’ll Need
I love this recipe because it relies on pantry staples but still feels a bit exotic thanks to the spices. Chances are you already have most of this hanging around your kitchen.
- Olive oil
- Brown rice
- Twice the amount of water to rice
- Garlic cloves
- Turmeric
- Salt & pepper
- Onion
- Canned tomatoes
- Tomato puree
- Fresh cm ginger
- Fresh chili
- Cinnamon
- Garam masala
- Paprika
- Sweet potatoes
- Lemon (juice)
- Additional water
- Cauliflower
- Canned chickpeas
How to Make Cauliflower Chickpea Stew
- Start by heating some olive oil in a large saucepan over high heat. You’ll want it shimmering but not smoking.
- Crush your garlic cloves and toss them in the pan with a generous pinch of turmeric, salt, and pepper. Fry for about a minute until everything is golden and fragrant.
- Add the brown rice, stirring occasionally. Let it fry for 4-5 minutes until the grains become slightly translucent.
- Pour in water (twice the amount of your rice) and bring it to a boil. Once boiling, reduce the heat to low-medium and let it simmer for 30 minutes. The rice should be tender and the water absorbed.
- While the rice does its thing, chop your onion, sweet potatoes, and cauliflower into bite-sized pieces. Grate the ginger and finely slice the chili.
- In another pot, heat more olive oil and sauté the onion until it’s soft and just starting to brown.
- Add the canned tomatoes, tomato puree, grated ginger, chili, cinnamon, garam masala, and paprika. Stir this mix for a couple of minutes until it’s well blended and aromatic.
- Throw in the sweet potatoes and stir them to coat in the sauce. Let them cook for about 5 minutes.
- Add the cauliflower and canned chickpeas, followed by a splash of water to help everything come together. Simmer for about 15 minutes until the veggies are tender but not mushy.
- Squeeze in the juice of a lemon, give it one last stir, and taste to adjust the seasoning as needed.
- Serve the stew over the cooked brown rice, and you’re ready to dig in!
Cook’s Notes
This stew is pretty forgiving, which is what makes it perfect for busy weeknights. A couple of things to keep in mind:
- Be sure not to rush cooking the garlic and spices at the beginning. This step is key for building flavor.
- Leftover stew keeps beautifully in the fridge for up to three days. Just reheat gently on the stove or microwave.
- If you’re prepping ahead, you can chop the veggies and have them ready to go in the fridge—makes the actual cooking a breeze!
- Remember that simmering times can vary depending on the size of your veggie chunks, so keep an eye on them to achieve that perfect tender texture.
Make It Your Own
This stew is a canvas for your creativity. Here are a few ways to switch it up:
- Swap the sweet potatoes for butternut squash if that’s more your style.
- Use coconut milk instead of water for a creamier, richer stew.
- Add spinach or kale at the end for some extra greens.
- Top with a dollop of Greek yogurt for a tangy finish.
If you try this, I’d love to hear how it turns out—drop a comment or tag me! Your feedback makes my day and helps others find their new favorite cozy meal. Happy cooking!
Related update: Cauliflower Chickpea Stew
Related update: Classic Boeuf Bourguignon
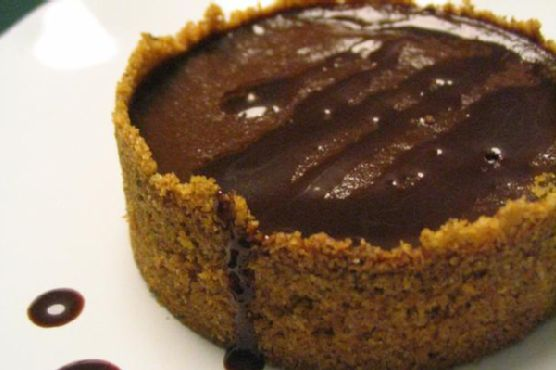
I was standing barefoot in my kitchen, staring down a can of pumpkin puree with the kind of resolve usually reserved for epic culinary battles. It was mid-October, and my house was awash with the smell of burning leaves from the neighborhood bonfires. I craved something cozy yet indulgent, and not just another pumpkin pie — no, this had to be something with a little extra pizzazz. Enter the Triple Chocolate Pumpkin Pie. It’s the perfect treat for when you need to impress without stress. It’s rich, a bit decadent, and just when everyone thinks they’ve guessed the flavor, the trio of chocolates takes them by surprise. Trust me, this isn’t your average pumpkin dessert.
Jump to Recipe
What You’ll Need
I bet you have most of these ingredients lounging in your pantry already. This pie brings together the familiar comforts of fall spices with the irresistible pull of chocolate.
- Ground graham cracker crumbs – the base of our crust
- Unsalted butter
- Granulated sugar
- Light-brown sugar
- Coarse salt
- Ground cinnamon
- Bittersweet chocolate
- Semisweet chocolate
- Canned solid-pack pumpkin
- Canned evaporated milk
- Eggs
- Cornstarch
- Vanilla extract
- Ground ginger
- Ground nutmeg
- Milk chocolate – for that final drizzle
How to Make Triple Chocolate Pumpkin Pie
- Preheat your oven to 350 degrees. In a bowl, mix together the graham cracker crumbs, butter, sugars, salt, and cinnamon until it resembles wet sand.
- Press this crumbly mixture firmly into the bottom and up the sides of a deep, 9 1/2-inch pie dish. It should feel like you’re building a sandy fortress.
- Bake the crust until it’s firm, about 8 to 10 minutes. Once done, take it out and immediately sprinkle the bittersweet chocolate over the bottom. Pop it back in the oven for just a minute more to melt.
- Spread the melted chocolate in a thin layer along the bottom and up the sides. Let this cool on a wire rack while you move on to the filling.
- Reduce the oven temperature to 325 degrees. Set up a double boiler and melt the semisweet chocolate with butter, stirring until smooth and glossy.
- In a separate bowl, mix together the pumpkin, evaporated milk, brown sugar, eggs, cornstarch, vanilla, salt, cinnamon, ginger, and nutmeg. This is your spicy pumpkin concoction.
- Whisk about a third of the pumpkin mix into the melted chocolate. Once smooth, whisk in the remaining pumpkin mixture until fully combined.
- Place your pie dish on a rimmed baking sheet, then pour the pumpkin-chocolate mix into the crust. The anticipation should be building right about now.
- Bake until the center is set but still slightly wobbly, roughly 55 to 60 minutes. Let it cool on a wire rack, then refrigerate for at least 8 hours or overnight for best results.
- Before serving, melt the milk chocolate and drizzle it over the chilled pie, creating tempting ribbons of sweetness. Serve immediately and watch the magic unfold.
Cook’s Notes
This pie is a breeze, but here are a few thoughts to keep in mind. When pressing the crust into the pie dish, make sure you really pack it down to avoid crumbling later. Letting the pie chill overnight isn’t just a suggestion — it’s a non-negotiable. The flavors deepen, and the texture becomes perfectly set. If your pie cracks a little, don’t sweat it. That chocolate drizzle will cover a multitude of sins, plus a little imperfection just adds to the homemade charm.
Make It Your Own
Here are a few twists to make this pie uniquely yours:
- Swap the graham cracker crumbs for gingersnaps to add an extra spicy kick.
- For a nutty twist, add a thin layer of chopped pecans on top of the melted chocolate layer in the crust.
- Replace semisweet chocolate with dark chocolate for a more intense cocoa hit.
- Sprinkle a bit of sea salt over the milk chocolate drizzle for a sweet-salty combo.
If you try this, I’d love to hear how it turns out — drop a comment or tag me! I’m already dreaming about that first bite.
Related update: Triple Chocolate Pumpkin Pie
Related update: Gluten-Free Pressed Lemon Butter Cookies

Last Tuesday, as I stood in my kitchen, surrounded by an unexpected bounty of carrots I’d picked up on a whim, inspiration hit. Why not make a comforting soup that’s both vibrant and subtly spiced? With a hint of coriander and a splash of orange juice, this carrot and coriander soup is not just a feast for the eyes, but also a delightful dance of flavors perfect for a chilly weeknight. It’s impressively easy, too, so it’s a win-win. The kind of recipe that lets you unwind as it simmers, filling your kitchen with warmth and the promise of a cozy meal. Oh, and it’s lightning fast to whip up! Jump to Recipe
What You’ll Need
Chances are you already have most of these ingredients in your pantry. Here’s what you’ll need to bring this dish to life:
- Carrots – peeled and ready to brighten up your evening
- Onion – chopped finely; it’ll lend sweetness as it cooks
- Olive oil – or butter, for that silky start
- Ground coriander – the star of the show with its earthy flavor
- Orange juice – to add a splash of freshness
- Water – enough to let the veggies dance around in the pot
- Salt – to taste, always
- Pepper – for a hint of warmth
- Fresh coriander – for that final, fragrant flourish
How to Make Carrot and Coriander Soup
- In a deep pot, heat the olive oil over medium heat. Toss in the chopped onions, stirring occasionally until they’re soft and translucent, and your kitchen smells like a dream.
- Add the peeled carrots to the pot and sauté them for a few minutes until they start to soften slightly and their sweetness gets a chance to shine.
- Pour in the water, season with salt and pepper, and cover the pot. Let it all simmer until the carrots are tender and flavorful, about 15-20 minutes.
- Stir in the orange juice and ground coriander. Let it cook for an additional 2 minutes, enough for the flavors to mingle and create magic.
- Carefully transfer the mixture to a blender and puree until smooth. You’ll want to do this in batches if your blender is on the smaller side.
- Return the pureed soup to the pot and give it a final taste test, adjusting the seasoning if needed. Serve hot, garnished with fresh coriander for a pop of color and extra zest.
Cook’s Notes
Here’s the stuff you really want to know: You can totally make this soup ahead of time. Just store it in an airtight container in the fridge for up to three days. When you’re ready to serve, simply reheat it on the stove until it’s piping hot. And a little secret — this soup freezes like a champ! Just skip the fresh coriander before freezing and add it only when serving.
Also, make sure your blender can handle hot liquids; you don’t want a carrot explosion! Let the soup cool a bit before blending, and never fill the blender more than halfway. Trust me on this one.
Make It Your Own
- Swap the water for veggie broth to amp up the flavor profile.
- Feeling indulgent? Stir in a splash of cream or coconut milk at the end for a richer texture.
- Boost the spice by adding a pinch of cayenne or smoked paprika.
- For a protein hit, toss in some cooked chickpeas when serving.
If you try this, I’d love to hear how it turns out — drop a comment or tag me! Whether you stick to the classic or put your own twist on it, this soup is sure to warm both your heart and your taste buds.
Related update: Carrot and Coriander Soup
Related update: Corn Avocado Salsa
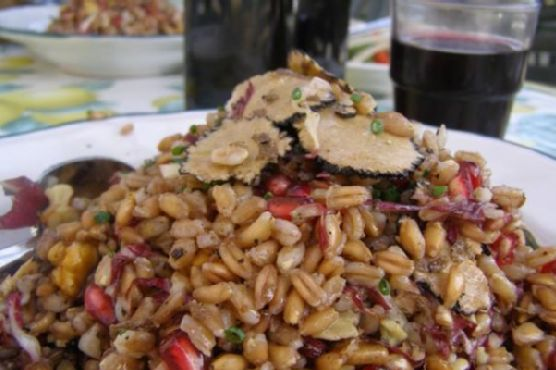
It was one of those evenings when the crisp air makes you crave something grounded yet bright—think cozy sweater vibes but on a plate. I had just returned from the farmers market, pomegranates in hand, and a desire for something different but not overly complicated. That’s how this Fall Farro Salad with Pomegranate, Walnut & Truffles was born. It’s the kind of dish that combines hearty farro with the tangy pop of pomegranate seeds, and the rich aroma of truffles—a little bit of everything deliciously fall. It’s a perfect weeknight meal that’s just as impressive for a weekend get-together, and the best part is how ridiculously easy it is to put together. I mean, we’re talking about strong flavors that do all the heavy lifting for you. Jump to Recipe
What You’ll Need
This salad’s ingredient list is refreshingly straightforward, yet it packs a punch with gourmet vibes. Chances are you already have most of these at home, except maybe the truffle mushroom, but trust me, it’s worth the small trip.
- Extra virgin olive oil
- Farro
- Parmesan (shaved into ribbons)
- Pomegranate (seeds)
- Radicchio (thinly sliced)
- Salt and pepper
- Truffle mushroom
- Vinegar
- Walnuts
How to Make Fall Farro Salad with Pomegranate, Walnut & Truffles
- Begin by rinsing the farro under cold water. In a large pot, bring plenty of cold water to a boil. Add a good pinch of salt along with the farro. If you have any vegetable scraps handy, toss them in for extra flavor. Cook until al dente, about 20-35 minutes. Taste a grain—it should be tender with a slight chew.
- While the farro cooks, prep the other ingredients. Shave the parmesan into delicate ribbons, thinly slice the radicchio, and remove the pomegranate seeds. You know you’re doing it right when your cutting board looks like a painter’s palette.
- In a small skillet, toast the walnuts over medium-low heat until they’re golden and fragrant. Keep an eye on them—they can go from toasty to burnt in a blink.
- Once the farro is ready, drain and let it cool slightly. Toss it into a big bowl with the radicchio, pomegranate seeds, walnuts, and parmesan ribbons.
- Drizzle with extra virgin olive oil, a splash of good vinegar, and season with salt and pepper. Mix gently, ensuring everything is well coated but not bruised.
- Finally, thinly slice the truffle mushroom and gently fold it into the salad. The aroma should start to bloom, lacing through the entire dish.
Cook’s Notes
Farro can be cooked ahead of time, making this salad a great option for meal prep. Just cool it completely before storing it in an airtight container in the fridge. When ready to assemble, allow it to return to room temperature for the best texture.
Watch out for overcooking the farro—it should retain some chewiness to balance the other textures of the salad. And remember, a little truffle goes a long way. You want it to complement, not overpower.
If you have leftovers, store the salad and dressing separately for up to two days to keep everything fresh and crunchy.
Make It Your Own
- Swap the truffle mushroom for a sprinkle of truffle oil if you’re in a pinch—it gives a similar aroma boost.
- Use feta cheese instead of parmesan for a tangier bite.
- Not a fan of radicchio? Substitute with baby kale or arugula.
- For a heartier version, add roasted butternut squash or sweet potato cubes.
If you give this recipe a whirl, I’d love to hear how it turned out—or any fun twists you added! Drop a comment or tag me on your food adventures. Happy cooking!
Related update: Fall Farro Salad with Pomegranate, Walnut & Truffles
Related update: Cauliflower and Broccoli Gratin With Camembert Cheese

So, picture this: It’s a Tuesday evening, and I’m standing in my kitchen feeling utterly uninspired. You know those days when you’ve got a fridge full of nothing and everything? Yeah, that was me. The weather hinted at the first signs of fall, and my lazy bones craved something cozy yet bright—something that would wrap me up like a warm blanket but not put me in a food coma. Enter this Lemon Chickpea & Tomato Stew. It’s the kind of dish that checks all the boxes: fast (you’ll have it on the table in under an hour), flavorful (hello, lemon zest), and so satisfying you’d think it took all day. Trust me, once you make it, your taste buds will thank you, and you might just find a new weeknight staple.
Jump to Recipe
What You’ll Need
This stew is a pantry hero—you probably have most of the ingredients hiding in your kitchen already.
- 2 tablespoons of olive oil
- 1 large shallot, chopped
- 3 garlic cloves, minced
- 2 cans of chickpeas, drained and rinsed
- 1 jalapeno chili, sliced
- 1 teaspoon of dried oregano
- 2 bay leaves, broken
- 1/2 teaspoon of crushed red pepper
- Salt & pepper to taste
- 4 cups of chicken broth
- Zest and juice of 1 fresh lemon
- 1 cup of dried oven tomatoes
- 2 cups of fresh spinach, loosely packed
How to Make Lemon Chickpea & Tomato Stew
- In a large saucepan, heat the olive oil over medium heat. You’ll know it’s ready when the oil starts shimmering like a mirage.
- Add the shallot and garlic, stirring them into the warm oil until they soften and become fragrant, about 5 minutes.
- Toss in the chickpeas, jalapeno, oregano, bay leaves, and crushed red pepper. Season with salt and pepper. Stir frequently, letting those chickpeas get a little crispy and golden, about 5-7 minutes. Keep an eye out—they might try to escape the pan!
- Pour in the chicken broth, lemon zest, and lemon juice. Bring everything to a happy boil, then reduce the heat and let it simmer until the broth is reduced by half, around 20 minutes.
- Stir in the oven-dried tomatoes, garlic, and spinach. Simmer for another 5 minutes, just until the spinach wilts into the stew. Goodbye, bay leaves—you’ve done your job, so remove them.
- Give it one last taste for seasoning, adjust if necessary, and serve hot with warm crusty bread to soak up every last drop.
Cook’s Notes
First things first, don’t rush the browning of your chickpeas. That’s where a lot of the flavor magic happens. If you can, make sure the broth you’re using is low-sodium so you can control the salt levels. This stew is even better the next day, so feel free to make it ahead and store it in the fridge for up to 3 days. Just reheat it gently on the stovetop. If it’s a bit too thick, splash in a little extra broth or water.
Make It Your Own
- Vegetarian version: Swap the chicken broth for vegetable broth, and you’re good to go.
- Spicy kick: Double the jalapeno if you’re feeling bold. You can also add a dash of cayenne.
- Protein boost: Stir in some cooked shredded chicken or crispy tofu just before serving.
- Herbal twist: Add fresh basil or cilantro at the end for an extra layer of flavor.
And there you have it! If you try this, I’d love to hear how it turns out—drop a comment or tag me. Enjoy your cozy bowl of goodness!
Related update: Lemon Chickpea & Tomato Stew
Related update: Enchiladas Verdes (Green Enchiladas)
Related update: Carrot and Coriander Soup
Related update: Cauliflower Chickpea Stew

It was one of those rainy Tuesday afternoons where the chilly wind made its way through every crack in my window, and all I could think about was something warm and cozy to fill my kitchen with delicious smells. I found myself rummaging through my pantry, pulling out half-used bags of dried fruits and a forgotten jar of candied ginger. Instantly, the idea of scones popped into my head—specifically, Dried Fruit and Ginger Scones. This recipe is perfect for those moments when you crave a little treat that’s impressively tasty but doesn’t demand hours in the kitchen. The best part? I promise you, they’re so easy to make, you’ll almost feel like you’re cheating.
Jump to Recipe
What You’ll Need
The ingredient list is delightfully simple. Chances are, you already have most of these items tucked away in your kitchen.
- Flour
- Cake flour
- Baking powder
- Butter
- Heavy cream
- Whole milk
- Salt
- Turbinado sugar
- Dried apples
- Dried cranberries
- Candied ginger
How to Make Dried Fruit and Ginger Scones
- Position a rack in the middle of your oven and preheat to 425°F. If you’re feeling fancy and using a pizza stone, pop it in the oven to preheat too. Otherwise, line a cookie sheet with parchment paper—you’re ready to go.
- In a medium bowl, whisk together the flours, baking powder, 3 tablespoons of the sugar, and salt. It should look like a soft, powdery snow drift.
- Cut in the butter using a pastry blender, two knives, or your fingers, until you have pea-sized butter pieces that make the mixture look a bit like coarse sand with pebbles. Don’t worry if it looks a bit odd; this is what you want!
- Pour in the cream and milk (or go all in with just cream if you’re feeling decadent) and stir with a fork. You’re aiming for a sticky, shaggy dough that’s evenly moist.
- Add in the fruits and ginger. Work the mixture just enough to spread the goodies evenly, breaking up any ginger clumps. Expect your hands to get a little messy.
- Turn the sticky dough onto a floured surface, sprinkling a bit more flour on top. Pat it into a circle about 1-inch thick. Resist the urge to over-flour; we don’t want tough scones.
- Flour a pizza cutter or a sharp knife and slice the dough circle into 8 equal wedges. Flour in between cuts if things get sticky.
- With a bench scraper, spatula, or your brave hands, transfer the scones to your baking vessel. Leave a half-inch space between them so they can sashay their way to deliciousness.
- Sprinkle the tops with the remaining tablespoon of sugar. Bake for 13-15 minutes, until the tops are a lovely light golden and the scones smell irresistible.
- Let them cool on the baking sheet for at least 10 minutes—it’s tempting, but worth the wait. Enjoy them warm or after they’ve cooled. Both ways are pure bliss.
Cook’s Notes
These scones are pretty forgiving. The key is not to overwork the dough, which keeps them tender and fluffy. If you don’t have cake flour, all-purpose flour works too—just be a bit gentler when mixing. They’re best the day they’re made, but you can store them in an airtight container for a day or two. Reheat them in a warm oven if you want to revive that fresh-from-the-oven vibe. If you’re prepping ahead, you can freeze the unbaked scones; just add a couple of extra minutes to the baking time.
Make It Your Own
- Nutty Twist: Swap half of the dried fruits for chopped toasted almonds or walnuts for a crunchy surprise.
- Chocolate Indulgence: Substitute the candied ginger with dark chocolate chips for a sweet, rich variation.
- Zesty Citrus: Add finely grated orange or lemon zest to the dough for a refreshing aromatic lift.
- Herbal Infusion: Replace dried cranberries with dried cherries and throw in a teaspoon of dried rosemary for a sweet-herbaceous combo.
If you try this, I’d love to hear how it turns out—drop a comment or tag me! Your kitchen adventures make this foodie journey so much more fun. Happy baking!
Related update: Dried Fruit and Ginger Scones
Related update: Chouquettes

It was one of those fall evenings where the air turned crisp just a little too early for my liking. I found myself staring at a lonely pair of pears on my countertop, wondering how they’d somehow escaped the lunchbox routine all week. Inspired by the chill, a craving for something both comforting and refreshing struck me. This pear salad with walnuts and blue cheese was the answer — a perfect transitional dish that’s light yet satisfying. It’s what happens when you want to feel like you’re eating something fancy, minus the hassle. It’s filling enough for a lunch, or could be a lovely start to a cozy dinner.
Jump to Recipe
What You’ll Need
This salad is the definition of simple elegance, and chances are you already have most of these ingredients at home.
- Pears – ripe but firm enough to hold their shape
- Mixed salad leaves – I’m partial to using a mix that includes curly endive for that extra crunch
- Walnuts – toasted lightly to bring out their nuttiness
- Blue cheese – creamy and tangy, the star of the show
- Lemon juice – for a zesty dressing that cuts through the richness
- Safflower oil – mild and light, perfect for dressings
- Walnut oil – adds a subtle nutty depth
- Chives – delicate oniony flavor
How to Make Pear Salad With Walnuts and Blue Cheese
- Start by prepping your pears. Trim the base of each pear so they can stand upright like little soldiers on your cutting board. This will make slicing them easier and more stable.
- In individual salad bowls, arrange a generous handful of mixed salad leaves. Place one of your sliced pears on top of the greens in each bowl, making sure to fan them out for a bit of flair.
- Now, sprinkle a small handful of celery pieces into each bowl. The celery adds a delightful crunch and freshness to the salad.
- In a small bowl, combine the safflower oil, walnut oil, lemon juice, and a sprinkle of freshly chopped chives. Whisk together until the dressing is emulsified — you’ll know it’s ready when it’s slightly thick and all combined.
- Drizzle the dressing over each salad evenly. You want just enough to coat everything lightly without drowning it.
- Finish by scattering a healthy amount of crumbled blue cheese and toasted walnuts over each salad. These are your flavor bombs, so be generous!
Cook’s Notes
When it comes to choosing your pears, I recommend a variety like Bosc or Anjou for their firmness and sweetness. If your pears are too ripe, they’ll turn mushy in the salad. As for the blue cheese, any creamy variety works, but I find that a strong Roquefort can elevate the dish beautifully. To toast walnuts, simply spread them on a baking sheet and pop them in a 350°F (175°C) oven for about 5-7 minutes, or until they are golden and fragrant. Watch them closely because they can go from perfectly toasted to burnt in seconds! The salad is best served fresh, but you can store leftovers in an airtight container in the fridge for up to a day — just keep the dressing separate to avoid soggy greens.
Make It Your Own
- Swap out the blue cheese for goat cheese if you’re not a fan of strong flavors. It adds a milder creaminess that is just as delightful.
- Use pecans instead of walnuts for a slightly sweeter nutty touch.
- If you’re looking for a bit more protein, add some grilled chicken or crispy tofu to make it a complete meal.
- Drizzle a little balsamic glaze over the top for an added tangy sweetness that complements the pears beautifully.
If you try this, I’d love to hear how it turns out — drop a comment or tag me on Instagram! Your kitchen adventures make my day. Happy cooking!
Related update: Pear Salad With Walnuts and Blue Cheese
Related update: Fall Farro Salad with Pomegranate, Walnut & Truffles

Last Tuesday, I found myself staring into the fridge, the usual weeknight dilemma playing out: what to make that’s quick, refreshing, yet still feels like a treat? I’d been craving something that had all the comforting notes of fall but was light enough to not weigh me down. Enter the pear salad with walnuts and blue cheese, a concoction that seemed to tick every box. This salad is all about contrasts — the creaminess of the blue cheese against the crisp pears, the bitterness of endive softened by the sweet, nutty warmth of walnuts. It’s a symphony of flavors that feels like indulging without the next-day guilt. Ready to dive in? Trust me, it’s a keeper.
Jump to Recipe
What You’ll Need
This recipe doesn’t require a trip to a gourmet store. Odds are you already have most of these ingredients hanging out in your kitchen.
- Pears – Choose ripe, but firm ones.
- Mixed salad leaves – A blend with some curly endive adds a nice bitter touch.
- Lemon juice – For a bright, tangy kick.
- Blue cheese – Go for your fave, the funkier, the better.
- Chives – Finely chopped for a fresh oniony hint.
- Safflower oil – For a neutral base.
- Walnut oil – Adds a toasty depth.
- Walnuts – Toast these for that extra crunch.
How to Make Pear Salad With Walnuts and Blue Cheese
- Start by prepping the pears. Slice a thin piece off their bases so they can stand upright without toppling over. Trust me, this makes the plating look extra fancy.
- In individual bowls, artistically arrange the pears amidst the mixed salad leaves. Think of this as your blank canvas.
- Sprinkle the chopped chives over the leaves, letting them fall where they may — no need for precision here.
- In a small bowl, whisk together the lemon juice, safflower oil, and walnut oil. Aim for a smooth emulsion that coats the back of a spoon.
- Drizzle this dressing lovingly over your salads. You’ll want a nice, even coverage without drowning the ingredients.
- Finish by scattering a generous handful of blue cheese crumbles and toasted walnuts over each salad, letting them nestle into the greens.
Cook’s Notes
Okay, let’s talk about some things to keep in mind. Firstly, when choosing pears, Bartletts or Anjous are my go-to for their texture and sweet flavor. If they’re too ripe, they might collapse under the pressure of the salad fork, so aim for that sweet spot of just ripe.
Toasting the walnuts is a game-changer. Just a few minutes in a dry skillet until they’re golden and fragrant will make a world of difference. Store any leftovers in a sealed container in the fridge, but honestly, this salad is best enjoyed fresh.
If you’re prepping ahead, keep the dressing separate until you’re ready to serve. This keeps the greens from wilting and maintains that fresh, crisp bite.
Make It Your Own
- Don’t love blue cheese? Swap it out for crumbled feta or goat cheese for a milder taste.
- For a protein boost, add some grilled chicken or crispy tofu on top. It turns this salad into a complete meal.
- Try swapping walnuts with pecans for a sweeter, softer crunch.
- If you can’t find curly endive, arugula offers a peppery alternative that pairs wonderfully with the pears and cheese.
If you try this, I’d love to hear how it turns out — drop a comment or tag me! Whether you stick to the script or put your own twist on it, I hope it becomes a staple in your kitchen like it has in mine. Happy cooking!
Related update: Pear Salad With Walnuts and Blue Cheese
Related update: Pear Salad With Walnuts and Blue Cheese

Picture this: it’s a chilly Tuesday evening, and I’m staring into my fridge, which is looking kind of bare except for a few odds and ends. Ever been there? Yeah, me too. But then, I spot a half-used can of pumpkin puree and some cheese. Suddenly, the idea hits me like a ton of bricks—Pizza Bites with Pumpkin! It’s the ultimate weeknight wonder, combining the cozy vibes of fall with the all-time favorite comfort food: pizza. These little bites are quick, comforting, and yes, they are bound to impress even the pickiest of eaters without much fuss. Plus, they’re made in a muffin tin, which automatically makes them adorable and somehow more delicious. Ready to give it a whirl? Grab your apron!
Jump to Recipe
What You’ll Need
The best part? You probably have most of these in your pantry already.
- 1 cup of pumpkin
- 2 tablespoons of olive oil
- 1/2 cup of feta cheese
- 1/2 cup of mozzarella
- 2 eggs
- 1 teaspoon of dried oregano
- Fresh parsley, chopped, for garnish
- 1 clove of garlic, minced
- Your favorite pizza dough
How to Make Pizza Bites with Pumpkin
- Start by chopping the pumpkin into rice-sized bits using a food processor. This gives you the right texture for the bites.
- Heat up the olive oil in a pan over medium heat. Sauté the pumpkin for about 3 minutes, just until it starts to soften and turns a lovely golden hue. Set it aside to let it cool.
- In a mixing bowl, combine the feta and mozzarella cheeses. Crack in the eggs, one at a time, stirring after each addition until you have a smooth mixture.
- Add the cooled pumpkin and the minced garlic, along with the oregano and parsley. Mix everything until well combined. Your kitchen should start to smell amazing right about now!
- Grease a muffin tin and evenly spoon the mixture into each mold.
- Now, press the pizza dough down evenly and firmly into each mold. This step is crucial to ensure the bites stick together nicely.
- Bake in a preheated oven at 200°C (about 400°F) for 30 minutes, or until the tops are golden brown and the edges are slightly crisp.
- Once done, remove from the oven and let them cool in the pan for 5 to 10 minutes. Trust me, this waiting game is critical so they hold their shape when you take them out.
Cook’s Notes
Okay, let’s talk details. First, make sure to squeeze the pumpkin mixture firmly into the muffin tin. This ensures they hold their cute little bite shape once baked. And seriously, resist the urge to pop them out of the tin too soon. Letting them cool for about 5 to 10 minutes is like letting them gather their strength to hold together.
As for storage, these bites are best enjoyed fresh, but if you have leftovers (unlikely!), pop them in an airtight container in the fridge. Reheat them in the oven to retain that crisp factor.
Make It Your Own
- Swap feta for goat cheese if you’re feeling fancy and want a tangy kick.
- Looking for a veggie boost? Add some finely chopped spinach or kale to the mix.
- For a meatier option, toss in some cooked bacon bits or pepperoni.
- If you’re not a fan of pumpkin, butternut squash is a fantastic alternative.
If you try this, I’d love to hear how it turns out — drop a comment or tag me! Can’t wait to see your pumpkin pizza bite creations. Enjoy every cheesy, pumpkin-y bite!
Related update: Pizza bites with pumpkin
Related update: Bing's Mango Salsa

I was standing in my kitchen one chilly October morning, staring at a basket of apples and pears I’d picked up from the farmer’s market the day before. You know those mornings when the air is crisp, and everything feels just a little bit cozier? That’s when it hit me: a warm, spiced fruit compote that could double as a breakfast topping or a dessert treat was exactly what I needed. This Fall Fruit Compote is the kind of recipe that fills your kitchen with the scent of cinnamon and makes you feel like you’re swaddled in a warm blanket. It’s quick to whip up, requires only a few staple ingredients, and the result is pure comfort.
Jump to Recipe
What You’ll Need
The beauty of this recipe is its simplicity — you probably have most of these items on hand already. Here’s what you’ll need to get that cozy feeling wafting through your kitchen:
- 2 tablespoons butter
- 2 cups diced honeycrisp apples
- 2 cups diced pears
- 1/2 cup dried cherries
- 1/4 cup apple cider vinegar
- 1/2 cup apple juice, plus more as needed
- 1/3 cup brown sugar
- 1 cinnamon stick
How to Make Fall Fruit Compote
- Melt the butter in a medium saucepan over high heat. As it melts, breathe in that nutty aroma — that’s your first sign of deliciousness to come.
- Add the diced honeycrisp apples, diced pears, dried cherries, apple cider vinegar, apple juice, brown sugar, and the cinnamon stick. Your kitchen will start smelling like a fall wonderland. Stir everything well.
- Cook for about 5 minutes, letting the fruit soften slightly and the flavors mingle together. You want the liquid to begin bubbling up around the edges.
- Lower the heat to medium and continue to cook for a few more minutes. Keep stirring occasionally until the fruit is tender and the liquid has mostly evaporated. If it seems like the fruit might stick, add a little more apple juice to keep everything cozy and moist.
Cook’s Notes
Let’s talk about a few things that can make or break your compote. First, the type of apple matters — honeycrisps are perfect here for their sweet-tart flavor and firm texture. If you don’t have dried cherries, dried cranberries can step in as a worthy substitute. Remember, the compote will thicken as it cools, so don’t fret if it seems a bit saucy when you take it off the heat. If you’re planning ahead, you can make this compote up to a week in advance and just store it in an airtight container in the fridge. When you’re ready to serve, a gentle reheat on the stove will do the trick. And hey, it’s not just for potato latkes; try it over pancakes, waffles, or even vanilla ice cream!
Make It Your Own
Here are some fun ways to tweak this compote and make it yours:
- Swap the dried cherries for golden raisins for a different layer of sweetness.
- Substitute the apple cider vinegar with balsamic vinegar for a deeper, richer flavor profile.
- Add a splash of bourbon or rum just before serving for a boozy warmth.
- Throw in a handful of chopped walnuts or pecans for a bit of crunch and nutty warmth.
If you try this, I’d love to hear how it turns out — drop a comment or tag me! Your kitchen is about to smell amazing, and I can’t wait for you to experience it. Enjoy every warm, sweet, and spicy bite!
Related update: Fall Fruit Compote
Related update: Broccoli Oatmeal Breakfast Casserole
Related update: Easy Homemade Apple Fritters
Related update: Béarnaise Sauce

Picture this: It’s a chilly fall evening, and my kitchen still smells like the remnants of the apple pie I baked last weekend. I’m standing in front of the pantry, craving something that’s both cozy and a little unexpected. Ever had those moments where you stare at the ingredients you have and think, “This could either be a disaster or magic”? That was me a few weeks ago, reaching for an acorn squash, some curry powder, and a bottle of maple syrup that I had been saving for pancake Sundays. What came out of that experimental whirlwind was a dish that’s not only delicious but also has become my go-to when I need to impress with minimal effort. It’s sweet, spicy, and roasted to perfection—ideal for spicing up a weeknight or wowing guests without breaking a sweat.
Jump to Recipe
What You’ll Need
This recipe is delightfully simple, and chances are you already have most of these on hand. Here’s what you’ll need:
- Acorn squash – pick one that’s firm and heavy for its size.
- Curry powder – this is where the magic happens, so use your favorite blend.
- Maple syrup – pure, not the pancake kind, for that rich, caramelized finish.
- Olive oil – for that perfect roast.
- Salt – to taste and to enhance all those flavors.
How to Make Maple & Curry Acorn Squash
- Preheat your oven to 400°F (200°C) and line a baking sheet with parchment paper or a silicone mat. This makes cleanup a breeze and prevents any sticky situations.
- Give the acorn squash a good rinse, especially if you plan to eat the skin (which, trust me, you’ll want to after it’s all roasted and crispy).
- Carefully, chop the squash in half and scoop out the seeds. You can use a spoon or an ice cream scoop for this—whichever feels less like wrestling and more like a gentle sweep.
- Slice the squash into one-inch wedges, using the natural grooves as your guide. Not only does this make the pieces look pretty, but it also ensures even cooking.
- In a medium bowl, toss the squash wedges with curry powder, maple syrup, olive oil, and salt. Stir until each piece is glistening with the mixture, and you’re tempted to lick your fingers.
- Arrange the wedges on the prepared baking sheet, cut side down. This helps them get that beautiful golden-brown finish on the edges.
- Bake for 15 minutes, then flip them over with a spatula so both sides get equal love and attention. Bake for another 10 to 15 minutes until they’re tender and can be easily pierced with a fork.
Cook’s Notes
When it comes to choosing the right acorn squash, look for one that feels heavy for its size and has a deep green skin. A few orange patches are okay and can even be a sign of ripeness. If you’re prepping ahead, you can slice the squash a day in advance and keep it in the fridge. Once roasted, these wedges keep well covered in the fridge for up to three days. Just pop them in the oven to reheat and crisp them back up. Be cautious not to over-bake; the squash should be tender but not mushy, and the edges should be caramelized but not burnt.
Make It Your Own
- Switch up the squash: Don’t have acorn squash? Butternut or delicata squash work beautifully too.
- Spice it up: Add a pinch of cayenne pepper to the mix for a spicy kick.
- Play with herbs: Sprinkle some fresh rosemary or thyme over the top before baking for an aromatic twist.
- Sweeten the deal: Drizzle a bit more maple syrup on top right before serving for an extra glossy finish.
If you try this, I’d love to hear how it turns out — drop a comment or tag me! Seriously, nothing makes my day more than seeing someone else enjoy something I whipped up in my kitchen. Happy cooking, and remember, kitchen experiments are just recipes in disguise!
Related update: Maple & Curry Acorn Squash
Related update: Pizza bites with pumpkin

There was this one Thursday evening when I felt the chill in the air turning my fingers just a bit numb, and I craved something that felt like a warm hug. I was rifling through my pantry, hoping to discover a forgotten treasure, when I stumbled upon a jar of sauerkraut and a pack of knockwurst sitting in the fridge. Suddenly, inspiration struck. This dish is the epitome of comfort food — cozy, hearty, and surprisingly easy to throw together with a few pantry staples. The combination of savory knockwurst and tangy sauerkraut, all tied together with a hint of sweetness from molasses and the earthy warmth of spices, truly hits the spot on those brisk evenings when you just need a little extra comfort.
Jump to Recipe
What You’ll Need
This recipe is all about layering flavors with a minimal ingredient list — you’ll likely find many of these in your pantry already!
- 1 tablespoon butter
- 1 medium onion, chopped
- 1 cup beer
- 1 cup water
- 1 tablespoon cornstarch
- 2 tablespoons brown mustard
- 1 tablespoon molasses
- 1 teaspoon caraway seed
- 1/4 teaspoon ground allspice
- 1/4 teaspoon ground black pepper
- 1 medium rutabaga, peeled and chopped
- 1 pound cooked knockwurst
- 2 cooking apples, peeled, cored, and cut into wedges
- 1 can (about 14 ounces) sauerkraut
How to Make Knockwurst with Sauerkraut
- In a medium frying pan, melt the butter over medium heat. Add the knockwurst and cook, turning occasionally, until they’re browned and the edges are just starting to crisp — about 10-12 minutes.
- Meanwhile, drain the sauerkraut in a colander, rinse it under cold water, and let it drain again thoroughly. This step is crucial to avoid an overly sour dish.
- In a large pot, sauté the chopped onion over medium heat until the pieces are tender and translucent, but not browned. You’ll know it’s ready when the kitchen fills with that sweet, savory onion aroma.
- Pour in the beer and let it come to a gentle simmer. Meanwhile, in a separate bowl or measuring cup, mix together the water, cornstarch, brown mustard, molasses, caraway seed, ground allspice, and black pepper until smooth.
- Stir this mixture into the onion and beer in the pot. Cook and stir consistently until the sauce thickens and becomes bubbly. You’ll see it start to coat the back of a spoon — that’s when you know it’s ready for the next step.
- Add the chopped rutabaga to the pot, cover with a lid, and let it simmer for 15 minutes, allowing the rutabaga to become just tender.
- Finally, stir in the browned knockwurst, apple wedges, and sauerkraut. Cover the pot again and let everything simmer together for another 15 to 20 minutes, until the apples have softened and the flavors have melded beautifully.
Cook’s Notes
- When browning the knockwurst, be patient and let them get a nice brown crust. It adds a lovely depth of flavor that you don’t want to miss.
- The molasses adds a touch of sweetness but doesn’t overpower. If you prefer slightly less sweetness, you can reduce the amount to 1 teaspoon.
- This dish can be made ahead and actually tastes better the next day as the flavors have more time to develop. Simply store it in an airtight container in the fridge for up to 3 days. Reheat on the stove over low heat until warmed through.
Make It Your Own
- For a vegetarian twist, swap the knockwurst with crispy tofu cubes. You’ll get that savory satisfaction without the meat.
- Use sweet potatoes in place of rutabaga for a sweeter, more colorful dish.
- Add a handful of chopped kale or spinach at the end for a burst of color and nutrients.
- If you’re a spice lover, a pinch of red pepper flakes will add a nice kick.
If you try this recipe, I’d love to hear how it turns out for you! Drop a comment below or tag me in your culinary adventures. Enjoy every bite of this cozy, delicious meal!
Related update: Knockwurst with sauerkraut
Related update: What to make for dinner tonight?? Bruschetta Style Pork & Pasta
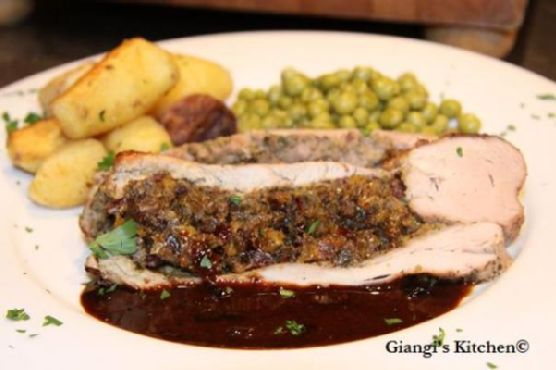
The other night, I found myself aimlessly scrolling through my pantry, wanting something that felt both fancy and comforting. You know those days when takeout just won’t do, but you don’t want to slave away in the kitchen either? Well, that was me. I stumbled on this Stuffed Pork Tenderloin with Marsala-Port Sauce recipe, and let me tell you, it hit every craving. It’s one of those dishes that sounds impressive (trust me, it is), but it’s actually pretty straightforward. Plus, talk about using up those dried fruits that have been lingering in the cupboard! Juicy pork, rich sauce, and a stuffing that makes you feel like you’re indulging at a fancy restaurant—all without breaking a sweat.
Jump to Recipe
What You’ll Need
The magic of this recipe lies in its simplicity—most of these ingredients might already be lounging in your kitchen. It’s all about those pantry staples coming together in the most delightful way. Check it out:
- 1 shallot, finely chopped
- 1 yellow onion, diced
- 1 cup mushrooms, chopped
- 1/4 cup dried apricots
- 1/4 cup raisins
- 1/4 cup dried cranberries
- 1/4 cup flat leaf parsley, chopped
- 2 pounds pork tenderloin
- 1/2 cup Marsala wine
- 1/2 cup Port wine
- 2 tablespoons butter
- 1/4 cup heavy cream
- 2 tablespoons olive oil
- Salt and pepper to taste
How to Make Stuffed Pork Tenderloin with Marsala-Port Sauce
- Preheat your oven to 450°F (230°C). This is crucial to get that perfect sear and juicy interior.
- Warm 1 tablespoon of olive oil in a large skillet over medium heat. Toss in the onions, shallots, and mushrooms. Stir occasionally until the onions are translucent and everything smells mouthwateringly fragrant.
- Remove the skillet from heat. In a small food processor, combine the cooked onion mixture with the dried apricots, raisins, cranberries, and parsley. Pulse just enough to achieve a minced, well-combined filling.
- Cut the pork tenderloin in half crosswise. Butterfly each section, being careful not to cut all the way through the meat. Generously season both sides with salt and pepper.
- Spread the onion-mushroom mixture onto one side of each butterflied section. Place the other half over the mixture, sealing the edges with toothpicks. Give both sides another generous seasoning with salt and pepper.
- In the same skillet, warm another teaspoon of olive oil over medium heat. Carefully sear the pork tenderloin on each side for 3-5 minutes until it’s gorgeously brown.
- Transfer the skillet to your hot oven. Roast for 20-30 minutes, or until the juices run clear. This is your cue that the pork is perfectly cooked.
- Remove from the oven, transferring the pork to a dish. Cover it with foil to let it rest and lock in those juicy flavors.
- Discard any excess fat or stubborn bits in the skillet. Pour in the Marsala and Port wines. Bring to a boil, gently scraping up those flavorful browned bits from the bottom.
- Pour in any juices from the resting pork, reducing the sauce until it measures about 1/2 cup. Remove from heat and swirl in the butter and cream until melted and luxurious.
- Remove the toothpicks from the pork, slice it crosswise, and plate it up. Drizzle that divine sauce over the top or serve it on the side for dipping.
Cook’s Notes
Let’s chat practicalities! This dish is perfect for a special dinner, but it can definitely be prepped ahead. You can assemble the pork with the stuffing a day before—just wrap it up tightly and refrigerate, then bring it to room temperature before cooking. Keep an eye on your sauce; don’t let it reduce too much, or you’ll end up with something more akin to caramel than sauce. Leftovers? They’re even better the next day. Store them in an airtight container in the fridge for up to three days. Reheat gently, so the pork doesn’t dry out.
Make It Your Own
You can totally switch things up depending on what you’ve got lying around or what you’re in the mood for. Here are a few ideas:
- Swap the pork for chicken breast if you’re feeling poultry. Just adjust the cooking time accordingly.
- No Marsala? A dry sherry or even a splash of brandy can stand in beautifully.
- Try adding some crushed walnuts to the stuffing for a crunchy surprise.
- If dried fruit isn’t your thing, substitute with chopped apples for a fresh twist.
If you give this a whirl, let me know how it turns out! Drop a comment or tag me in your culinary creations. I can’t wait to hear what you think. Enjoy every flavorful bite!
Related update: Stuffed Pork Tenderloin with Marsala-Port Sauce
Related update: Cream Cheese Stuffed Chicken Breasts

Picture this: It’s a chilly Tuesday evening, and I’m rummaging through my pantry, mentally mapping out a dinner plan that’s both comforting and a touch fancy. The pumpkins from last weekend’s farmers’ market trip are staring at me, practically begging to be transformed into something indulgent. That’s when it hits me—pumpkin gnocchi. It’s one of those dishes that sounds like it takes hours of meticulous preparation but is surprisingly straightforward. Plus, it’s the perfect blend of fall flavors with the savory twist of basil and Parmesan. This dish is a dinner table showstopper without the stress. Ready to dive in?
Jump to Recipe
What You’ll Need
I love when a recipe feels like solving a cozy puzzle with ingredients you already have hanging out in the kitchen. This one’s full of those pantry-staple vibes with a few key players.
- Pumpkin – the star of the show!
- Whole eggs
- Sea salt
- Pepper
- Fresh basil leaves
- Wheat flour
- Corn flour
- Olive oil
- Grana Padano cheese
How to Make Pumpkin gnocchi with basil and Parmesan
- First, wrestle with that pumpkin like it’s a stubborn jar lid. Separate the flesh and chop it down into a fine puree. Feel free to get your hands a little messy here—it’s part of the fun!
- In a large bowl, combine the pumpkin puree with the eggs. Stir until the mixture looks like a velvety sunset.
- Season the mix with sea salt, a sprinkle of pepper, and a handful of finely chopped fresh basil. The aroma should already start to make you feel warm inside.
- Gradually add the wheat flour, kneading until you get a soft dough. If the dough feels more like sticky tape, throw in some more flour until it’s nice and pliable.
- Divide your dough into equal rolls—aim for about 3 cm thick and around 20 cm long. Then slice these rolls into 2 cm long pillows of joy.
- Bring a large pot of salted water to a rolling boil. Carefully drop the gnocchi in and watch them dance. They’re ready when they bob to the surface, usually within a few minutes.
- Using a slotted spoon, rescue the gnocchi from their hot bath and either drizzle hot olive oil over them or toss them in a skillet with olive oil until they’re lightly golden.
- Serve them up on a platter, showered with Grana Padano and garnished with fresh basil leaves. Stand back and admire your edible masterpiece before digging in.
Cook’s Notes
Making gnocchi can feel like a balancing act between dough that’s too sticky and too dry. Remember, the weather and your pumpkin’s moisture can change the game, so trust your instincts and adjust with flour as needed.
These delicate pillows are best served straight away, but if you must, you can refrigerate them for a day or two. Just reheat gently, perhaps with a little extra olive oil to revive their golden exterior.
Looking to prep in advance? You can shape the gnocchi and freeze them on a tray before transferring them to a bag for storage. Cook them right from frozen, just adding a minute or two to their swim time.
Make It Your Own
- Swap out the pumpkin for butternut squash if you’re feeling adventurous or that’s what’s on hand.
- For a nutty twist, sprinkle toasted pine nuts over the finished dish.
- To add a bit of heat, toss in some red pepper flakes when frying the gnocchi in oil.
- Try a different cheese like Pecorino for a sharper edge.
If you try this out, I’d love to hear how it turns out — drop a comment or tag me! And remember, the best recipes are the ones that come with a story, so let this one create a delicious memory for you. Happy cooking!
Related update: Pumpkin gnocchi with basil and Parmesan
Related update: Broccolini Quinoa Pilaf
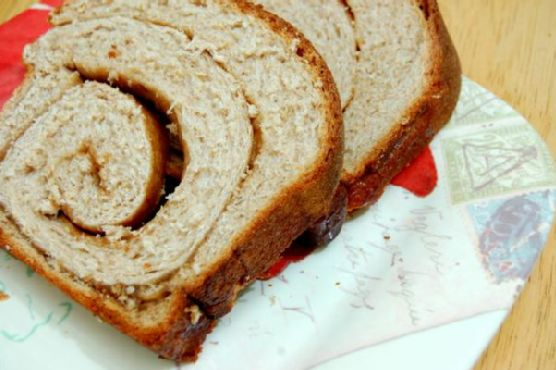
I was standing in my kitchen one chilly autumn evening, flat out of ideas and with only a few pantry staples at my disposal. You know those evenings, right? The ones where you want something homemade and comforting, but also quick enough that you’re not chained to the kitchen all night. That’s when it hit me—why not whip up a loaf of cinnamon swirl bread? This isn’t just any bread, folks; it’s got a heartwarming swirl of cinnamon goodness and a cozy, nutty flavor from whole wheat flour. Perfect for breakfast, dessert, or, let’s be honest, snacking directly from the cooling rack.
Jump to Recipe
What You’ll Need
I bet you already have most of these goodies tucked away in your kitchen. This recipe is all about pantry staples coming together in a magical way.
- 1 large egg
- 1 cup non-fat milk
- 1/4 cup warm water
- 2 tablespoons unsalted butter, softened
- 1/4 cup sugar
- 2 cups all-purpose flour
- 1 cup whole wheat flour
- 1 teaspoon salt
- 1/4 teaspoon nutmeg
- 1 teaspoon ground cinnamon
- 2 1/4 teaspoons dry yeast
- 1/4 cup brown sugar
How to Make Simply Amazing Cinnamon Swirl Wheat Bread
- Place the egg, non-fat milk, and warm water into the bread machine pan. These are your wet ingredients that will bind everything together.
- Add the softened butter, sugar, all-purpose flour, whole wheat flour, salt, nutmeg, cinnamon, and yeast to the pan. Imagine these as your bread’s backbone, each playing its part.
- Set your bread machine to the dough cycle. Let it do its magic while you kick back with your favorite book or start on a Netflix binge.
- When the cycle ends, remove the dough and roll it into a rectangle, about 10×12 inches. You’re going for “slightly wonky” rectangle, not architectural blueprint.
- Spread softened butter all over the surface of the dough, reaching the edges. This is where the decadence starts building.
- Sprinkle the surface with brown sugar and cinnamon, evenly covering the dough. This is your moment to be generous; it’s the heart of your cinnamon swirl.
- Roll the dough tightly, starting with the shorter side. Pinch the ends and fold them down to seal your tasty package.
- Place your dough seam-side down in a bread pan and cover. Let it rise in a warm, cozy spot for about an hour, or until it doubles in size. The dough should look slightly puffed and proud.
- Preheat your oven to 350°F (175°C). The anticipation is building!
- Once your dough has risen, pop the pan into the oven and bake for 35 minutes. The bread will turn a golden brown, filling your kitchen with the aroma of baked heaven.
- Remove from the oven and let it rest in the pan for at least 10 minutes. This is crucial for allowing the swirl to set and for not burning your eager fingers.
Cook’s Notes
One of the greatest joys of this recipe is its forgiving nature. You can store the bread in an airtight container for up to five days, although I suspect it won’t last that long. If you want to get ahead of your bread game, you can prepare the dough the day before. After rolling and placing it in the pan, cover it tightly with plastic wrap and let it hang out in your fridge overnight. Just bring it back to room temperature and allow it to rise before baking.
Make It Your Own
Want to put your own spin on this bread? Here are a few ideas:
- Swap the brown sugar for honey and add a sprinkle of cardamom for a floral twist.
- For a nutty crunch, add a handful of chopped walnuts or pecans to the cinnamon filling.
- Replace the butter with coconut oil for a subtle coconut flavor that pairs beautifully with cinnamon.
- Use a teaspoon of pumpkin spice instead of nutmeg and cinnamon for an autumnal vibe.
If you try this, I’d love to hear how it turns out — drop a comment or tag me! There’s nothing more fun than seeing your delicious creations ripple out into the world. Happy baking!
Related update: Simply Amazing Cinnamon Swirl Wheat Bread
Related update: Chocolate and Szechuan Peppercorn Brownies

The other day, I found myself in one of those classic kitchen dilemmas. It was a chilly autumn afternoon, I was craving something warm and spicy, and I swear, every recipe I came across called for ingredients I didn’t have on hand. Determined not to let my sweet tooth win, I started rummaging through my pantry, and that’s when it hit me: fat-free gingerbread cookies! Yes, you read that right. These cookies are just what you need when you crave that cozy, ginger-spiced goodness but want to keep things light. Trust me, these cookies are packed with bold flavors, and you might already have most of these ingredients at home. Plus, they’re soft, chewy, and perfect for an afternoon treat or a holiday gathering.
Jump to Recipe
What You’ll Need
Okay, so these cookies are awesome because aside from being fat-free, they use simple ingredients that pack a punch. Here’s what you’ll need:
- All-purpose flour
- Whole wheat flour
- Baking soda
- Salt
- Ground ginger
- Cinnamon
- Ground cloves
- Black pepper
- Fresh ground nutmeg
- Ground allspice
- Dark brown sugar
- Blackstrap molasses
- Apple sauce
- Vanilla extract
- Maple extract
- Chai concentrate
- Egg whites
- Candied ginger
- Granulated sugar
- Cinnamon (for rolling)
How to Make Fat Free Gingerbread Cookies
- Start by sifting together the all-purpose flour, whole wheat flour, baking soda, salt, and all your spices. You’ll know it’s ready when the spices smell like a warm hug.
- In a large mixing bowl, combine the dark brown sugar, blackstrap molasses, apple sauce, vanilla extract, maple extract, and chai concentrate. Use an electric mixer and beat it for about four minutes until everything’s smooth and luscious.
- Add the egg whites into your molasses mixture. Beat for another minute until the whites are completely mixed in.
- Slowly incorporate your sifted dry ingredients into the wet mixture. Beat until everything is fully combined, creating a rich, aromatic dough. Stir in the candied ginger bits for that extra zing.
- Cover the dough and let it chill in the fridge for at least an hour. I personally prefer letting it chill overnight for a deeper flavor.
- When you’re ready to bake, preheat your oven to 350°F (175°C). Line a baking sheet with parchment paper or lightly grease it.
- Mix the granulated sugar with a dash of cinnamon in a shallow bowl. Scoop a tablespoon of dough, coat it in the cinnamon sugar, and shape it into a ball.
- Place each dough ball on the prepared baking sheet, leaving about three inches of space between them. They will spread out as they bake.
- Bake the cookies for 10-12 minutes until they’re beautifully puffed and you start to smell that delightful gingerbread aroma.
- Once out of the oven, transfer the cookies to a wire rack to cool. Trust me, waiting for them to cool is the hardest part!
Cook’s Notes
Baking these cookies is pretty straightforward, but here are a few tips to ensure they turn out perfect every time. First, don’t skip the chilling step. It helps the flavors meld together and keeps the dough from spreading too much. If you’re planning ahead, you can make the dough and keep it in the fridge for up to two days. Just remember to let it sit at room temperature for a few minutes if it’s too hard to scoop. For leftovers, these cookies stay fresh for about a week if kept in an airtight container. You can also freeze them for longer storage—just thaw before serving.
Make It Your Own
These cookies are versatile, so feel free to experiment with these ideas:
- Swap the candied ginger for chocolate chips if you’re feeling a chocolate craving coming on.
- Use pumpkin pie spice instead of the individual spices for a quicker spice mix.
- Replace the chai concentrate with a strong brewed tea of your choice for a subtle flavor twist.
- If you want a little crunch, add some finely chopped nuts like pecans or walnuts.
If you try this, I’d love to hear how it turns out—drop a comment or tag me! Baking is all about experimenting and having fun, so don’t be afraid to make these cookies your own. Enjoy every spicy, soft bite!
Related update: Fat Free Gingerbread Cookies
Related update: Triple Citrus Cake