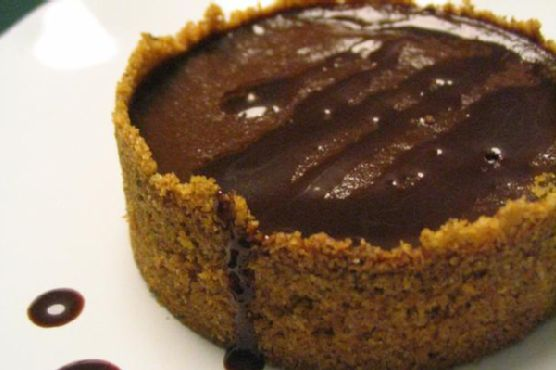
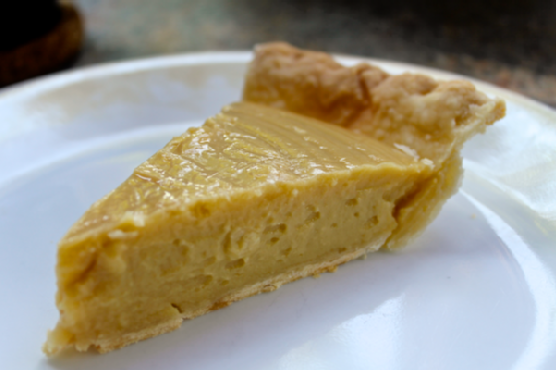
Cherry-Berry Pie With Agave Nectar All-Butter Crust | Made by Meaghan Moineau

It was one of those lazy Sunday afternoons when the world seemed to move a little slower, a gentle breeze fluttering through the open window, the kind that makes you crave something comforting and sweet but not too complicated. My sweet tooth was whispering “pie” in my ear, but I wasn’t up for a full-blown kitchen marathon. Enter my Cherry-Berry Pie with Agave Nectar All-Butter Crust—a delightful, not-too-sweet pie that’s as satisfying to make as it is to eat. It’s my go-to when I need that perfect mix of summery fruitiness and buttery crust without spending all day in the kitchen. Trust me, this pie is a game-changer, and the addition of agave nectar gives it a uniquely mellow sweetness that pairs beautifully with the tart berries. Jump to Recipe

What You’ll Need

The beauty of this pie is its simple ingredient list, many of which you likely have on hand. Plus, the mix of flours and agave nectar gives the crust an irresistible texture and flavor.

  • Agave nectar
  • Sweet agave nectar
  • Almond flour
  • Frozen mixed berries
  • Butter
  • Frozen cherries
  • Coconut flour
  • Flour
  • Lemon juice
  • Orange extract
  • Tapioca flour
  • Whole wheat pastry flour

How to Make Cherry-Berry Pie With Agave Nectar All-Butter Crust

  1. Start by making the crust: In a food processor, pulse the dry ingredients about 5-6 times. This helps them blend evenly.
  2. Add 2 sticks of very cold butter, which you’ve cut into cubes. Pulse until the mixture resembles a very coarse meal, tiny butter bits are a good thing here!
  3. Add the agave nectar and either the fiore di Sicilia flavoring or its substitute, orange extract, one tablespoon at a time. Watch carefully for the dough to just come together.
  4. Divide the dough into two parts, one slightly larger than the other. This larger portion will be your base.
  5. Form each into a flat, round shape, wrap tightly in plastic, and refrigerate for at least 2 hours to let the butter firm up and flavors meld.
  6. While the dough is chilling, whip up the filling. In a large bowl, combine all the filling ingredients thoroughly. It’s going to be quite soupy, so don’t worry!
  7. Once the dough has chilled, let it sit out just long enough to be rollable. Roll out the larger dough disk to fit your pie dish, patching as needed.
  8. Wrap the pie dish with the crust in plastic and chill for another 30 minutes to set.
  9. Pour the berry filling into the chilled crust, then wrap the whole pie in plastic again and pop it back in the fridge.
  10. Roll out the remaining dough disk and use cookie cutters to cut pieces for the top crust. Get creative with shapes!
  11. Remove the pie from the fridge and decorate with your cut-out dough pieces, leaving some gaps for steam to escape.
  12. Cover the edges with foil to prevent over-browning and bake in a preheated 325°F oven for 40 minutes.
  13. Remove the foil and continue baking until the top is golden brown and the filling is bubbling enticingly.
  14. Let the pie cool slightly before slicing in to let the filling set a bit more. Enjoy!

Cook’s Notes

Here’s the scoop: keeping the butter super cold is crucial for that flaky crust we all adore. I like to freeze mine and work quickly to keep it from warming up. If you find the dough a bit too firm after chilling, let it sit out a few minutes until it’s manageable. When it comes to storage, this pie is a champ! Cover it well and it keeps nicely in the fridge for up to 4 days. If you’re making it ahead, bake it a day early; the flavors meld beautifully overnight.

Make It Your Own

Feel free to play around with the recipe a bit to suit your taste or pantry:

  • Swap out the frozen cherries for fresh ones if they’re in season; just pit and halve them.
  • Try maple syrup instead of agave for a more robust sweetness.
  • Use a gluten-free flour blend in place of the wheat and pastry flours for a gluten-free version.
  • Add a teaspoon of cinnamon or nutmeg to the filling for a spiced twist.

I hope you give this pie a whirl and let it bring a bit of sunshine into your kitchen. If you try this recipe, I’d love to hear how it turns out—drop a comment or tag me on social media! Happy baking, friends!

Related update: Cherry-Berry Pie With Agave Nectar All-Butter Crust

S’mores-n-berry Bars for National S’mores Day – August 10 | Made by Meaghan Moineau

Picture this: it’s a Wednesday evening, and I’m knee-deep in that midweek slump, feeling like a bit of a sweet escape. The kind where comfort meets simplicity. I glanced at the calendar and saw it was nearing August 10th—National S’mores Day. Immediately, a light bulb moment struck! Why not combine the nostalgia of campfire s’mores with a fruity twist to lift my spirits? Enter: S’mores-n-berry Bars. They’re as indulgent as they sound, with a crispy graham cracker base, rich brownie layer, and gooey marshmallow topping that’s lightly kissed by the oven’s broiler for that perfect toasted finish. It’s the kind of treat that’s easy to whip up, yet impressive enough to satisfy any sweet tooth. Jump to Recipe

What You’ll Need

You probably have most of these ingredients lounging in your pantry already. Here’s what you’ll need:

  • 1 box of cooked brownie mix
  • 1 egg
  • 1 cup graham cracker crumbs
  • 2 whole graham crackers
  • 1 cup mini marshmallows
  • 1/2 cup fresh dried raspberries
  • 1/4 cup sugar
  • 1/2 cup unsalted butter, melted
  • 1/4 cup vegetable oil
  • 1/4 cup water

How to Make S’mores-n-berry Bars for National S’mores Day – August 10

  1. Preheat your oven to 325°F. Line an 8-inch-square baking pan with foil, making sure the foil hangs over the edges for easy removal later. Give it a spritz of nonstick cooking spray to make doubly sure nothing sticks.
  2. In a medium-sized bowl, combine the melted butter, graham cracker crumbs, and sugar until it resembles wet sand. Press this mixture evenly into the bottom of your prepared pan. Bake for about 20 minutes, or until it looks golden and smells like heaven. Set aside.
  3. Crank up your oven to 350°F. Meanwhile, grab another bowl and mix together the brownie mix, vegetable oil, water, and egg until smooth. Gently fold in the fresh dried raspberries. Pour this luscious batter over the cooled graham cracker crust.
  4. Bake the brownie layer for about 25 minutes, or until a toothpick inserted into the center comes out clean. This is your cue to remove it from the oven.
  5. Break up the two graham crackers into small pieces and scatter them artfully atop the brownie layer.
  6. Scatter the mini marshmallows over the graham crackers. Return the pan to the oven, this time setting it to broil. Watch carefully, as the marshmallows can quickly go from toasty to burnt in a flash! Once they’re golden and bubbly, pull the pan out.
  7. Allow the bars to cool completely in the pan. Lift them out using the overhanging foil and cut into squares. Enjoy the ooey-gooey goodness!

Cook’s Notes

These bars are as versatile as they are delicious. The graham cracker crust adds an incredible texture contrast to the fudgy brownie and gooey marshmallow topping. Here are a few tips to ensure they turn out perfect:

  • If you prefer a denser brownie, add an extra egg to the brownie mixture.
  • Store any leftovers in an airtight container at room temperature for up to 3 days. They’ll stay delicious, though the marshmallows might lose a bit of their chew.
  • To make these ahead, you can prepare the graham cracker crust and brownie layer a day in advance. Add the graham crackers and marshmallows just before serving for the best texture.

Make It Your Own

  • Nutty Twist: Swap out the raspberries for chopped toasted almonds or pecans for a crunchy surprise.
  • Berry Medley: Use a mix of freeze-dried strawberries and blueberries instead of just raspberries for a more fruity experience.
  • Chocolate Lovers: Add chocolate chips to the brownie mix for extra gooeyness. You can never have too much chocolate, right?
  • Salted Caramel: Drizzle caramel sauce over the marshmallows before broiling. A sprinkle of sea salt can elevate these bars to gourmet status.

If you try this, I’d love to hear how it turns out — drop a comment or tag me! S’mores day or not, these bars are a crowd-pleaser every time.

Related update: S’mores-n-berry Bars for National S’mores Day – August 10

Related update: Cherry-Berry Pie With Agave Nectar All-Butter Crust

Baked Alaska | Made by Meaghan Moineau

Picture this: It’s a Friday night, and you’ve had one of those weeks where everything felt like a never-ending to-do list. You’re craving something special, a little dramatic even, to kick off your weekend with flair. That’s when I remembered Baked Alaska. It’s one of those desserts that looks like a total showstopper but is actually super manageable to whip up. I love how it combines the coolness of ice cream, the soft texture of cake, and a toasty meringue that you can’t help but admire. It’s great because you can make it ahead of time, and it doesn’t require any fancy equipment. Seriously, if I can do it, anyone can. You just have to get over the idea that baking something on top of ice cream is somehow impossible — spoiler: it’s not, and it’s ridiculously fun. Jump to Recipe

What You’ll Need

Let’s be real: you’ve probably got most of this stuff on hand already, except maybe the ice cream. But hey, any excuse to grab a pint, right?

  • A round cake (store-bought or homemade, your call!)
  • Ice cream (about 1/2 gallon of your favorite flavor)
  • Egg whites (from about 3 large eggs)
  • Cream of tartar
  • Powdered sugar

How to Make Baked Alaska

  1. Start by greasing a 7-inch bowl with a flavorless oil or unsalted butter. This bowl should be just big enough to snugly hold half a gallon of ice cream, but no wider than your cake round.
  2. Let your ice cream soften a bit so it’s workable. Then pack it tightly into the bowl. Pop it back into the freezer until it hardens — about an hour should do.
  3. For the meringue, beat your egg whites until they are foamy. Add a pinch of cream of tartar and keep whipping until you see stiff peaks. This is when the meringue holds its shape firmly.
  4. Gently fold in the powdered sugar, a bit at a time, to avoid deflating all that nice air you just whipped in.
  5. Once you’re ready to assemble, place your round cake on a plate that’s slightly larger than the cake itself.
  6. To unmold the ice cream, center it over the cake. If it’s being stubborn and won’t release from the bowl, run a bit of warm water over the outside of the bowl for a few seconds.
  7. Time to “frost” it! Cover the cake and ice cream completely with meringue, going wild with a spoon to create peaks and swirls. Don’t be shy — more is more with meringue.
  8. Bake your masterpiece in a preheated oven at 450°F for about 6-7 minutes, until those meringue peaks are beautifully golden brown.
  9. Pop it back in the freezer until you’re ready to serve. It’ll keep just fine for a day or two.

Cook’s Notes

A couple of quick tips to save your sanity: First, make sure your bowl is really cold to help the ice cream set faster. If you’re nervous about the meringue deflating, sift the powdered sugar first; it makes a surprising difference. And for those moments when the ice cream just won’t release, a quick dip in warm water works like magic!

Baked Alaska is a dream to make ahead. You can do all the components a day or two before and just assemble it the day of. Leftovers can be stored in the freezer, but they might lose a bit of their magic.

Make It Your Own

  • Switch out the vanilla ice cream for something more adventurous like coffee or pistachio for a gourmet spin.
  • Use a chocolate or lemon cake base instead of vanilla to complement or contrast your ice cream choice.
  • Add a layer of jam between the cake and ice cream for a fruity surprise that cuts through the richness.
  • Feeling nutty? Toss some toasted almonds or hazelnuts into the meringue for a crunchy texture.

If you try this, I’d love to hear how it turns out — drop a comment or tag me in your photos! Let’s see how your Baked Alaska stacks up. Happy baking, friends!

Related update: Baked Alaska

Related update: Rugelach

Polenta Pie With Italian Toppings | Made by Meaghan Moineau

It was one of those nights when the fridge seemed to mock me with its emptiness, only the defiant glow of the leftover polenta catching my eye. I had no grand plans for dinner, just a craving for something that felt like a hug on a plate without the fuss. Enter Polenta Pie with Italian Toppings — a recipe that marries the comforting, hearty texture of polenta with vibrant, savory toppings. It’s the perfect dish for those evenings when you need a little culinary adventure without a complicated list of steps or ingredients. Plus, it’s a great way to transform humble pantry staples into something that feels a bit fancy.

Jump to Recipe

What You’ll Need

It’s likely that you already have most of these ingredients lingering in your kitchen, making this dish both convenient and delicious. Here’s what you need to gather:

  • Water
  • Milk
  • Olive oil
  • Salt
  • Yellow corn meal
  • Diced pancetta
  • Shallot
  • Garlic
  • Gorgonzola cheese or any blue cheese you love
  • Baby spinach
  • Sweet bright colored bell pepper
  • Pignoli (pine nuts)

How to Make Polenta Pie With Italian Toppings

  1. Start by making the polenta. In a saucepan, bring water, milk, 1/4 cup of olive oil, and a pinch of salt to a boil. Immediately reduce the heat and gradually pour in the cornmeal while stirring to prevent lumps.
  2. Keep simmering the cornmeal, stirring very frequently for about 15 minutes. You’ll know it’s ready when it’s thick and holds its shape.
  3. Line a baking sheet with foil or parchment paper and drizzle it with olive oil. Spread the polenta evenly across the sheet to about 1/2-inch thick, shaping it into a circle like a pizza crust. Let it cool until it’s firm.
  4. Preheat your oven to 425°F. Once the polenta is set, sprinkle it with freshly ground pepper and bake for 30 minutes, until the edges are beautifully browned.
  5. While your crust is baking, prepare the toppings. Heat 1 tablespoon of olive oil in a skillet and sauté the diced pancetta, shallots, and garlic for about 7-8 minutes until they are golden and fragrant. Don’t overdo it — you want them just right, not crunchy.
  6. Remove the pancetta mixture to a bowl. In the same skillet, sauté the baby spinach until it’s wilted and a deep green, about 3 minutes. Remove and set aside.
  7. Add a touch more oil if needed and sauté the bell pepper slices until they’re slightly wilted, about 3-4 minutes.
  8. Now, let’s assemble the pie! Start by spreading the gorgonzola crumbs evenly over the baked polenta crust. Then layer the pancetta mix, followed by the spinach, bell peppers, and finally a sprinkle of pine nuts.
  9. Drizzle a few more drops of olive oil over the top and pop it back in the oven for 4-5 minutes just to warm everything through.
  10. Slice your polenta pie like a pizza or into neat squares. Serve it hot and enjoy the medley of flavors!

Cook’s Notes

This dish is a great candidate for prepping ahead. You can make the polenta crust a day in advance and store it in the fridge, well-wrapped. Just bring it to room temperature before proceeding with the baking step. If you’re lucky enough to have leftovers, they hold well in the fridge for 2-3 days. Simply reheat in the oven to enjoy a second time with a nice crisp. A common pitfall is undercooking the polenta, so keep an eye on that texture — thick but not cement-like is your sweet spot.

Make It Your Own

Here are a few fun twists to try:

  • Swap the pancetta for crispy tofu to make it vegetarian-friendly.
  • Try a mix of mushrooms instead of the bell pepper for an earthy depth.
  • Use feta if you’re not a fan of blue cheese, it brings a nice tang.
  • Replace the pine nuts with toasted almonds for an unexpected crunch.

If you try this Polenta Pie with Italian Toppings, I’d love to hear how it turns out! Drop a comment below or tag me in your creation pics. Let’s share the love for this deliciously comforting dish.

Related update: Polenta Pie With Italian Toppings

Related update: Chicken Porridge

Chocolate and Szechuan Peppercorn Brownies | Made by Meaghan Moineau

It was one of those random Tuesday nights when my sweet tooth orchestrated a full-blown coup d’état. You know the kind—no amount of Netflix snacking could quell the uprising. I needed something decadent, something with a little kick. Enter: Chocolate and Szechuan Peppercorn Brownies. These brownies aren’t just another chocolate fix; they dance on your taste buds with a spicy, aromatic surprise. Imagine the rich, fudgy goodness of classic brownies with a cheeky Szechuan twist. Intrigued? You should be.

Jump to Recipe

What You’ll Need

When I say you probably have most of this already, I mean it. The secret stars here are the **Szechuan peppercorns** and **cinnamon stick**. Trust me; they make all the difference.

  • 1 cup **brown sugar**
  • 1/2 cup **butter**
  • 1 **cinnamon stick**
  • 3 **eggs**
  • 1 tablespoon **espresso** (brewed or powder)
  • 3/4 cup **flour**
  • 1/2 cup granulated sugar
  • 1/2 cup **heavy cream**
  • 1 teaspoon **kosher salt**
  • 1/4 cup milk
  • 1 tablespoon **Szechuan peppercorns**
  • 1 cup semisweet chocolate chips
  • 4 ounces **unsweetened chocolate**
  • 1/4 cup unsweetened cocoa powder
  • 1 teaspoon **vanilla extract**

How to Make Chocolate and Szechuan Peppercorn Brownies

  1. Preheat your oven to 350°F (175°C) and grease an 8×8 baking dish.
  2. In a large sauté pan over medium heat, melt the butter. Add the **Szechuan peppercorns** and **cinnamon stick**. You’ll know it’s ready when the butter stops foaming and you see those lovely browned bits at the bottom—around 5 minutes.
  3. Meanwhile, in a double boiler or microwave, melt the **unsweetened chocolate** and semisweet chocolate together. Stir in the **espresso** for that extra depth.
  4. Remove the peppercorns and cinnamon stick from the butter (straining works wonders). Return the butter to the pan and stir in the sugars, milk, vanilla, and salt. Then mix in the chocolate-espresso concoction along with the cocoa powder.
  5. Beat in the eggs one at a time, ensuring each is well incorporated. Finally, fold in the flour gently until the batter is just mixed.
  6. Pour the batter into your prepared dish and bake for 25-30 minutes. A tester should come out mostly clean—feel free to underbake for extra gooeyness.
  7. Once the brownies are cooled, it’s ganache time! Simmer the heavy cream and peppercorns in a small pot. Strain out the peppercorns and stir in the semisweet chocolate chips until you’ve got a silky ganache. Spread this over the brownies and, for pro-level firmness, refrigerate them until the ganache sets.

Cook’s Notes

These brownies are best enjoyed the day they’re made, but let’s be real—brownies never last long, do they? If they somehow do, keep them in an airtight container in the fridge for up to a week. The ganache will harden a bit, but it just adds to the chewy texture when you bite into them. If you’re a make-ahead kind of person, you can make the brownies a day in advance and ganache them right before serving.

If you find your brownies a bit too spicy or not spicy enough, play around with the amount of Szechuan peppercorns next time. Some like it hot!

Make It Your Own

  • **Nutty Variation**: Swap half the flour for almond meal for a nutty, chewy twist.
  • **Milk Chocolate Fans**: Use milk chocolate chips in the ganache instead of semisweet for a creamier topping.
  • **Coffee Lovers**: Double the espresso for an intensely rich mocha brownie.
  • **Spice It Up**: Toss a pinch of cayenne into the batter for those who crave a more pronounced kick.

If you try this, I’d love to hear how it turns out—drop a comment or tag me! And remember, life is too short to skip dessert. Enjoy every fudgy, peppery bite!

Related update: Chocolate and Szechuan Peppercorn Brownies

Related update: Homemade Banana Bread

Vanilla Cream Cakes, Easy and Fluffy Holiday Cakes | Made by Meaghan Moineau

Picture this: it’s a chilly December evening, and the house smells like winter spices and cozy warmth. My hands were still a bit sticky from wrestling with a stubborn puff pastry earlier that day. I had this sudden craving for something decadent yet comforting, something that would pair perfectly with the hot cocoa I was planning to sip by the fireplace. That’s when these Vanilla Cream Cakes came to life. They’re light, fluffy, and simply divine—a perfect blend of holiday spirit and simple elegance. Not only are they surprisingly easy to whip up, but they also look impressive enough to serve up at any festive gathering or cozy night in.

Jump to Recipe

What You’ll Need

I bet you already have most of these in your pantry. Just a few essentials and a couple of special touches to make these cakes sing.

  • Puff pastry – This is our quick and easy cake base.
  • 6 large eggs
  • 200g sugar – Sweetness is key here.
  • 50g vanilla sugar – It adds a lovely vanilla aroma.
  • 2 tablespoons of rum – For that warm, festive touch.
  • 6 liters of whole milk – It’s a lot, but trust me, it’s worth it.
  • 150g all-purpose flour
  • 200g heavy whipping cream – Fluff it up!
  • Powdered sugar – A dusting of snow on top.

How to Make Vanilla Cream Cakes, Easy and Fluffy Holiday Cakes

  1. Preheat your oven to 200°C (about 390°F). Your kitchen should feel like a warm hug in no time.
  2. Roll out the puff pastry nice and thin, just slightly larger than your baking dish (around 14×10 inches). Split the pastry in two—half for the bottom, half for the top.
  3. Bake the pastry for about 10-15 minutes until it’s gloriously golden brown. Let the top layer cool completely while the bottom one stays snug in the dish.
  4. Separate the egg yolks from the whites, setting the whites aside in a larger bowl.
  5. For the yolk mixture, combine the yolks, sugar, vanilla sugar, and rum in a smaller bowl. Mix until it’s smooth and dreamy.
  6. Add the flour and a quarter of the milk to the yolk mix. Keep mixing until it’s silky smooth.
  7. Whisk the egg whites in the large bowl until they form firm peaks. Add sugar and whisk until the peaks are super firm and glossy.
  8. Meanwhile, bring the remaining milk to a boil in a large pot. Slowly pour the yolk mixture into the boiling milk, whisking continuously. Cook for 5 minutes until it’s thick and gives your arm a workout!
  9. Now for the tricky bit. Pour the boiling yolk mix into the egg whites, starting gradually. Keep whisking until both mixtures are beautifully blended.
  10. Pour this luscious mixture into the baking dish over the bottom pastry. Give the dish a gentle shake to fill every corner. Let it cool overnight in the fridge for best results.
  11. Whip up the heavy cream with some sugar until it’s light and airy. Spread this over the cooled cake mixture.
  12. Cut the cooled top pastry into 15 squares and place them on the whipped cream. Slice the cakes into squares and give them a nice dusting of powdered sugar before serving.

Cook’s Notes

Just a little heads up: when you’re pouring the boiling mixture into the egg whites, it’s helpful to have an extra pair of hands nearby. It’s all about the smooth incorporation to make sure you get that perfect fluffiness. If you’re making these ahead, they store well in the fridge for up to three days—ideal if you want to get a jump on holiday prep! Just keep them covered to maintain their freshness.

Make It Your Own

Here’s how you can play around with these cakes:

  • Swap the rum for your favorite liqueur, like Baileys or Amaretto, for different flavor twists.
  • Add a tablespoon of cocoa powder to the yolk mixture for a chocolatey spin.
  • Switch out vanilla sugar with a teaspoon of almond extract for a nutty aroma.
  • Top with fresh berries before serving for a burst of color and tang.

If you try this, I’d love to hear how it turns out—drop a comment or tag me! And remember, imperfections add character, especially when surrounded by good company. Happy baking!

Related update: Vanilla Cream Cakes, Easy and Fluffy Holiday Cakes

Triple Citrus Cake | Made by Meaghan Moineau

A few weekends ago, I had one of those mornings where you wake up craving something fresh and sunny to get your day going. It was gray and drizzly outside, and I wanted to bring a bit of brightness into the day. As I scanned my pantry, I spotted a forgotten lime yogurt, an orange rolling around with a couple of lemons in the fruit drawer, and a plan began to form. This Triple Citrus Cake is the kind of bake that feels like an instant mood-lifter. It’s got that perfect balance of tangy and sweet, and it’s way simpler than it sounds. Plus, it’s the kind of cake where you might already have most of the ingredients just hanging around. Every bite is like a little burst of sunshine, which sometimes is just what you need.

Jump to Recipe

What You’ll Need

Let me tell you, the best part about this ingredient list is that it’s the kind of thing you probably already have on hand. Here’s what you’ll need to create your own slice of citrusy heaven:

  • 1 1/2 cups flour
  • 2 teaspoons baking powder
  • 1/2 teaspoon salt
  • 3/4 cup lime yogurt
  • 1 cup sugar
  • 3 whole eggs
  • 1 teaspoon vanilla extract
  • 1/2 cup grapeseed oil
  • Zest of 1 lemon
  • 1/4 cup orange juice
  • 1 cup powdered sugar

How to Make Triple Citrus Cake

  1. Preheat your oven to 350 degrees. You want it nice and warm, ready to give your cake a cozy bake.
  2. In a medium bowl, whisk together the flour, baking powder, and salt. This is your dry team; they’ll hang out together until called.
  3. Grab your electric mixer and in a larger bowl, beat together the lime yogurt, eggs, sugar, vanilla, oil, and lemon zest. It’ll look silky smooth and smell divine.
  4. Gently fold the dry ingredients into the wet mixture using a spatula. You’re aiming for a batter that’s just combined; over-mixing is a no-go here.
  5. Coat a 9 x 5 loaf pan with floured baking spray or line with parchment paper and spray. Pour the batter in, smoothing the top so it’s even.
  6. Bake for 40-50 minutes, or until a cake tester comes out clean. The top will be golden brown and your kitchen will smell like citrus heaven.
  7. Let the cake cool in the pan for at least an hour. Patience, my friend. The wait is worth it.
  8. Once cool, transfer to a serving plate. Mix the powdered sugar with orange juice until you have a smooth glaze, then drizzle it over the cake. Watch as it glistens invitingly.

Cook’s Notes

When it comes to baking, patience is key, especially in letting the cake cool before you apply the glaze. Trust me, you don’t want to rush it or you’ll end up with a soggy mess. The cake keeps well for 3-4 days if covered tightly and stored at room temperature, though I doubt it’ll last that long! If you’re planning to make it ahead, bake the cake and store the glaze separately. Glaze just before serving for the best texture.

Make It Your Own

Looking to switch things up? Here are a few ideas:

  • Swap the lime yogurt for Greek yogurt and add a bit more lemon zest for an extra lemony punch.
  • Replace grapeseed oil with melted coconut oil for a subtle coconut twist.
  • Add a handful of poppy seeds to the batter for a delightful texture and a bit of visual flair.
  • Use a mix of blood orange juice for the glaze if you want a richer color and slightly different taste.

If you try this, I’d love to hear how it turns out — drop a comment or tag me in your cake pics! It always makes my day to see your creations. Happy baking! 🍋🍊🍋

Related update: Triple Citrus Cake

Related update: Roasted Strawberry Coconut Milk Ice Cream

Fat Free Gingerbread Cookies | Made by Meaghan Moineau

The other day, I found myself in one of those classic kitchen dilemmas. It was a chilly autumn afternoon, I was craving something warm and spicy, and I swear, every recipe I came across called for ingredients I didn’t have on hand. Determined not to let my sweet tooth win, I started rummaging through my pantry, and that’s when it hit me: fat-free gingerbread cookies! Yes, you read that right. These cookies are just what you need when you crave that cozy, ginger-spiced goodness but want to keep things light. Trust me, these cookies are packed with bold flavors, and you might already have most of these ingredients at home. Plus, they’re soft, chewy, and perfect for an afternoon treat or a holiday gathering.

Jump to Recipe

What You’ll Need

Okay, so these cookies are awesome because aside from being fat-free, they use simple ingredients that pack a punch. Here’s what you’ll need:

  • All-purpose flour
  • Whole wheat flour
  • Baking soda
  • Salt
  • Ground ginger
  • Cinnamon
  • Ground cloves
  • Black pepper
  • Fresh ground nutmeg
  • Ground allspice
  • Dark brown sugar
  • Blackstrap molasses
  • Apple sauce
  • Vanilla extract
  • Maple extract
  • Chai concentrate
  • Egg whites
  • Candied ginger
  • Granulated sugar
  • Cinnamon (for rolling)

How to Make Fat Free Gingerbread Cookies

  1. Start by sifting together the all-purpose flour, whole wheat flour, baking soda, salt, and all your spices. You’ll know it’s ready when the spices smell like a warm hug.
  2. In a large mixing bowl, combine the dark brown sugar, blackstrap molasses, apple sauce, vanilla extract, maple extract, and chai concentrate. Use an electric mixer and beat it for about four minutes until everything’s smooth and luscious.
  3. Add the egg whites into your molasses mixture. Beat for another minute until the whites are completely mixed in.
  4. Slowly incorporate your sifted dry ingredients into the wet mixture. Beat until everything is fully combined, creating a rich, aromatic dough. Stir in the candied ginger bits for that extra zing.
  5. Cover the dough and let it chill in the fridge for at least an hour. I personally prefer letting it chill overnight for a deeper flavor.
  6. When you’re ready to bake, preheat your oven to 350°F (175°C). Line a baking sheet with parchment paper or lightly grease it.
  7. Mix the granulated sugar with a dash of cinnamon in a shallow bowl. Scoop a tablespoon of dough, coat it in the cinnamon sugar, and shape it into a ball.
  8. Place each dough ball on the prepared baking sheet, leaving about three inches of space between them. They will spread out as they bake.
  9. Bake the cookies for 10-12 minutes until they’re beautifully puffed and you start to smell that delightful gingerbread aroma.
  10. Once out of the oven, transfer the cookies to a wire rack to cool. Trust me, waiting for them to cool is the hardest part!

Cook’s Notes

Baking these cookies is pretty straightforward, but here are a few tips to ensure they turn out perfect every time. First, don’t skip the chilling step. It helps the flavors meld together and keeps the dough from spreading too much. If you’re planning ahead, you can make the dough and keep it in the fridge for up to two days. Just remember to let it sit at room temperature for a few minutes if it’s too hard to scoop. For leftovers, these cookies stay fresh for about a week if kept in an airtight container. You can also freeze them for longer storage—just thaw before serving.

Make It Your Own

These cookies are versatile, so feel free to experiment with these ideas:

  • Swap the candied ginger for chocolate chips if you’re feeling a chocolate craving coming on.
  • Use pumpkin pie spice instead of the individual spices for a quicker spice mix.
  • Replace the chai concentrate with a strong brewed tea of your choice for a subtle flavor twist.
  • If you want a little crunch, add some finely chopped nuts like pecans or walnuts.

If you try this, I’d love to hear how it turns out—drop a comment or tag me! Baking is all about experimenting and having fun, so don’t be afraid to make these cookies your own. Enjoy every spicy, soft bite!

Related update: Fat Free Gingerbread Cookies

Related update: Triple Citrus Cake

Blueberry, Chocolate & Cocao Superfood Pancakes – Gluten-Free/Paleo/Vegan | Made by Meaghan Moineau

Last Tuesday morning was one of those days where I just needed a little something extra to kickstart the day. You know the ones — when your brain is stuck somewhere between sleep and waking, your mug of coffee is feeling more like a warm hug than a caffeine fix, and breakfast needs to be something special but not overly demanding. That’s when these Blueberry, Chocolate & Cacao Superfood Pancakes came to the rescue. They’re those perfect pancakes that feel like you’re treating yourself to something really indulgent, yet they’re totally guilt-free. Plus, they’re gluten-free, paleo, and vegan! It’s like a breakfast trifecta. Ready to dive in? Trust me, these are worth the short time it takes to whip them up.

Jump to Recipe

What You’ll Need

Here’s the best part: chances are you already have most of these goodies hanging out in your pantry. No need for a special trip to the store when the craving hits!

  • Almond flour
  • Coconut flour
  • Tapioca or arrowroot flour
  • Nut, hemp, or coconut milk
  • Baking powder
  • Vanilla bean paste or extract
  • Himalayan sea salt
  • Frozen blueberries
  • Cacao nibs
  • Dark chocolate

How to Make Blueberry, Chocolate & Cocao Superfood Pancakes – Gluten-Free/Paleo/Vegan

  1. Grab a mixing bowl and combine the almond flour, coconut flour, and tapioca or arrowroot flour with the baking powder and a pinch of Himalayan sea salt. Give it a good mix until everything is nicely blended.
  2. Pour in the nut, hemp, or coconut milk along with the vanilla bean paste or extract, and whisk it all together until you have a smooth, dreamy batter. Let this beauty sit for 10-15 minutes. It’s like letting the batter take a mini-vacation to thicken up.
  3. Heat a smidge of coconut oil in your favorite skillet over medium heat. Once it’s warm and cozy, pour just enough batter into the center to form a pancake.
  4. Cook until the edges start to brown and you see bubbles gracing the surface. This is your cue to sprinkle a few blueberries on the pancake.
  5. Flip the pancake with confidence, cook for another minute or two, then immediately sprinkle cacao nibs and dark chocolate on the top. Let them melt and meld into pure bliss.
  6. Remove the pancake once fully cooked and repeat with the rest of the batter. Stack them up, drizzle with a little agave if you’re feeling it, and savor the moment!

Cook’s Notes

These pancakes are wonderfully adaptable, so don’t stress if you’re missing an ingredient. You can even mix the dry ingredients the night before to save a few precious minutes in the morning rush. Storing leftovers? Just pop them in an airtight container in the fridge, and they’re good for a couple of days. Reheat in a skillet over low heat or simply enjoy them cold. Making a larger batch and freezing them is also an option; just layer parchment paper between each pancake to keep them from sticking together.

Make It Your Own

  • Swap out the frozen blueberries for fresh raspberries or chopped strawberries for a berry twist.
  • Substitute the cacao nibs with crushed pecans or walnuts for a nutty crunch.
  • If you’re not strictly vegan, a spoonful of Greek yogurt with honey makes an unbeatable topping.
  • For a tropical flair, toss in a handful of shredded coconut before flipping.

If you try this, I’d love to hear how it turns out — drop a comment or tag me! Enjoy every delicious bite of these pancakes, knowing you’re starting the day in the best way possible. 😊

Related update: Blueberry, Chocolate & Cocao Superfood Pancakes – Gluten-Free/Paleo/Vegan

Related update: Breakfast Biscuits and Gravy

Cranberry-Orange Pistachio Chip Cookies | Made by Meaghan Moineau

It was one of those chilly October afternoons where the air feels crisp and the leaves are doing that magical thing they do—turning into a vibrant sea of reds, oranges, and yellows. I was craving something cozy but with a twist, something that fit the season without being a pumpkin-flavored cliché. That’s when the idea for Cranberry-Orange Pistachio Chip Cookies came to me. These cookies are the perfect blend of tart cranberries and zesty orange, with the unexpected crunch of pistachios and creamy white chocolate morsels. They’re a little bit fancy, but still easy enough to whip up on a whim. I promise, once you try them, you’ll want to make them part of your regular cookie rotation.

Jump to Recipe

What You’ll Need

I bet you already have most of these ingredients lounging in your pantry, just waiting to be transformed into something wonderful.

  • 2 1/4 cups all-purpose flour
  • 1 teaspoon baking soda
  • 1/2 teaspoon salt
  • 1 cup (2 sticks) butter, softened
  • 3/4 cup granulated sugar
  • 3/4 cup packed brown sugar
  • 1 teaspoon vanilla extract
  • 2 large eggs
  • 2 cups white nestlé® toll house® premier morsels
  • 1 cup chopped pistachios
  • 1 cup dried craisins
  • 1/2 cup chopped candied orange peel

How to Make Cranberry-Orange Pistachio Chip Cookies

  1. Preheat your oven to 375°F (190°C). The anticipation starts now as the kitchen warms up and gets ready for some cookie magic.
  2. In a small bowl, whisk together the flour, baking soda, and salt. This is your dry mix—it’s the base that holds all the other goodies together.
  3. In a large bowl, beat the butter, granulated sugar, brown sugar, and vanilla extract until creamy. You want it smooth and luscious, like frosting but thicker.
  4. Add the eggs one at a time, beating well after each addition. The batter will start to look pale and fluffy.
  5. Gradually beat in the flour mixture. Go slow here; you don’t want a flour storm in your kitchen.
  6. Fold in those beautiful white morsels, pistachios, dried cranberries, and orange peel. This is where the magic happens—the cookies are getting their personality.
  7. Drop rounded tablespoonfuls of dough onto parchment-lined baking sheets. Space them out, they need room to spread their deliciousness.
  8. Bake for 9 to 11 minutes or until golden brown. You’ll know they’re ready by the dreamy aroma and the slight browning at the edges.
  9. Cool on the baking sheets for a couple of minutes before moving to wire racks. This is the hardest part—waiting for them to cool completely.

Cook’s Notes

These cookies are a bit of a showstopper, but they’re really straightforward. A few tips:

  • Use the freshest pistachios you can find; their flavor really shines here.
  • If you don’t have candied orange peel, you can make your own or use fresh zest in a pinch—just a little extra sugar will balance the tartness.
  • These cookies are perfect for making ahead. You can freeze the dough balls, then bake as needed for a fresh cookie fix.
  • Leftovers will stay delicious in an airtight container for about a week, but honestly, they’ll probably disappear way before then.

Make It Your Own

Want to tweak these cookies to better suit your taste buds or pantry stash? Here are some ideas:

  • Swap the pistachios for almonds or walnuts if you prefer a different nutty note.
  • Try semi-sweet chocolate chips instead of white morsels for a deeper chocolate experience.
  • If dried craisins aren’t your thing, swap them out for dried cherries or even chopped dried apricots.
  • Add a hit of spice with a teaspoon of ground cinnamon or cardamom for a warm, cozy vibe.

If you try this, I’d love to hear how it turns out—drop a comment or tag me! Happy baking, and may your kitchen be filled with the sweet scent of these glorious cookies.

Related update: Cranberry-Orange Pistachio Chip Cookies

Related update: Fat Free Gingerbread Cookies

Pumpkin Pecan Streusel Cake – gluten free, soy free, vegan | Made by Meaghan Moineau

It was one of those dreary, chilly afternoons when all I wanted was to bury myself under a blanket with something sweet and comforting. My pantry was a hodgepodge of half-empty flours, a lonely can of pumpkin puree, and the remnants of a bag of chocolate chips. But somehow, out of that chaos, a masterpiece was born: the Pumpkin Pecan Streusel Cake. It’s like fall in every bite and the best part? You won’t find any gluten, soy, or animal products here. This cake is not only ridiculously delicious but also caters to almost every dietary restriction. And let’s be honest, anything with a streusel that’s crunchy with pecans and a drizzle of chocolate glaze is bound to be a crowd-pleaser.

Jump to Recipe

What You’ll Need

You probably have most of these ingredients lurking around your kitchen already. It’s a collection of pantry staples and a few key items, so grab your measuring spoons and let’s dive in.

  • **Red brown rice flour**
  • **Gluten free oat flour**
  • White rice flour
  • Sorghum flour
  • Tapioca flour
  • Light firmly brown sugar
  • **Roasted pumpkin puree**
  • Coconut yogurt
  • Bananas
  • Earth Balance soy-free spread
  • **Pecans**
  • Enjoy Life brand chocolate chips
  • **Ground ginger**
  • **Ground nutmeg**
  • **Aluminum-free baking soda**
  • **Aluminum-free baking powder**
  • Kosher salt
  • Apple cider vinegar

How to Make Pumpkin Pecan Streusel Cake – gluten free, soy free, vegan

  1. First things first, preheat your oven to 350°F (175°C). Let’s get this cake going!
  2. Mix the flours, brown sugar, cinnamon, and kosher salt in a small bowl. Add the Earth Balance spread and get your hands in there until the mix looks like coarse crumbs. Toss in the pecans and mix. Set aside this delightful streusel topping.
  3. Next up, measure your coconut milk and add the apple cider vinegar. Let it sit and work its magic till it looks all sour-creamy.
  4. In a medium bowl, whisk together the remaining flours, baking powder, baking soda, ground ginger, ground nutmeg, and kosher salt.
  5. In your mixer bowl, beat the Earth Balance and brown sugar together until they’re best friends, fluffy and well-mixed. Add the mashed banana, scraping down the sides of the bowl as needed. Follow with the pumpkin puree and your sour cream-esque coconut milk mixture. Mix on low speed till smooth.
  6. Throw in your flour mixture and stir until combined. The batter’s going to be thick, but that’s what we’re aiming for here.
  7. Spread half of this gloriously thick batter into a prepared cake pan. Sprinkle with half of that irresistible streusel. Layer on the remaining batter and spread it out evenly before topping with the rest of the streusel.
  8. Bake for 55-60 minutes. You’re looking for a clean toothpick when inserted into the center. Cool in the pan on a stovetop for 40 minutes. Patience, my friend.
  9. Once cooled, gently loosen the sides of the cake with a non-scratch knife, lift it out, and let it chill in the fridge for an hour.
  10. Meanwhile, melt the chocolate chips with Earth Balance over simmering water for a glossy glaze. Let it cool for a bit before drizzling over the cake.
  11. Remove the protective parchment paper and voila! You’ve got yourself a cake that’s ready to be devoured. Serve chilled or at room temp — your call!

Cook’s Notes

Now here’s the scoop: this cake loves a good chill in the fridge. It helps the flavors meld and makes slicing a breeze. Got leftovers? Keep them wrapped up in the fridge and they’ll stay fabulous for up to five days. If you prefer to prepare in parts, make the streusel in advance and keep it in the fridge for up to two days. Just don’t try to rush the cooling process. Trust me, it’s worth the wait for that perfect slice.

Make It Your Own

These swaps will keep things interesting, so don’t be shy about experimenting:

  • Swap out the pecans for walnuts if you’re feeling nutty in a different way.
  • Use mashed sweet potatoes instead of pumpkin for a twist on flavor.
  • Try adding a teaspoon of espresso powder to the glaze for a mocha flair.
  • If chocolate chips aren’t your thing, drizzle with a simple sugar glaze instead.

If you try this, I’d love to hear how it turns out — drop a comment or tag me! This cake has become a personal favorite, and I hope it brings as much joy to your table as it does to mine. Happy baking!

Related update: Pumpkin Pecan Streusel Cake – gluten free, soy free, vegan

Related update: Cranberry-Orange Pistachio Chip Cookies

Easter Nest Sweet Cake With Sour Cream-Royal Icing and Pistachios | Made by Meaghan Moineau

It was one of those early spring afternoons when the sun was just starting to peek through the clouds, promising warmer days ahead. I was rifling through my pantry, craving something sweet but not overly indulgent. You know, a little treat to go with my afternoon tea. That’s when I remembered this Easter Nest Sweet Cake recipe. It’s a delightful blend of flavors and textures — a soft cake topped with a tangy sour cream-royal icing and the crunch of pistachios. Perfect for those days when you want something that feels special but comes together without too much fuss. Plus, it makes for a show-stopping centerpiece at any Easter gathering or spring brunch.

Jump to Recipe

What You’ll Need

You might find that most of these ingredients are already in your kitchen, just waiting to be transformed into something magical. Here’s what you’ll want to gather:

  • Unsalted butter – because decadent is the way to go.
  • Brown sugar – for that rich, caramel-like sweetness.
  • Eggs
  • Flour
  • Baking powder
  • Sour cream – adds a moist and tangy kick to the cake.
  • Icing sugar
  • Lemon juice – brings brightness to the icing.
  • Egg white
  • Pistachios, unshelled – for a nutty crunch.
  • Green food coloring – optional, but it gives the icing a festive touch.

How to Make Easter Nest Sweet Cake With Sour Cream-Royal Icing and Pistachios

  1. Preheat your oven to 190°C/375°F. Lightly grease a ring cake pan and set it aside. The anticipation starts here.
  2. In a medium bowl, use an electric mixer to beat the brown sugar, eggs, and unsalted butter until creamy — think smooth and dreamy. The sugar granules should almost disappear.
  3. Add the sour cream and flour to the mixture. Beat for a couple of minutes until everything is well combined. The batter should be thick and luscious.
  4. Pour the batter into your prepared cake pan, smoothing the top with a spatula. Bake for about 20 minutes. The cake should be golden brown and a skewer inserted in the center should come out clean.
  5. Let the cake cool in the pan for a few minutes, then transfer to a wire rack. The aroma is irresistible, but patience will pay off.
  6. For the icing, beat the egg white using a standard mixer until soft peaks form. Add lemon juice, icing sugar, and a drop of green food coloring if you’re feeling festive. Beat for a few more seconds until everything is just combined.
  7. Once the cake is cool, pour the royal icing generously over the top, letting it cascade down the sides. There’s something so satisfying about this step.
  8. Sprinkle with chopped pistachios, and get creative with your decorations. The crunch and subtle saltiness of the pistachios are a game-changer.

Cook’s Notes

Here’s the thing about this cake — it’s quite forgiving. If you find yourself without a ring pan, a regular cake pan or even a loaf pan will do in a pinch. Just keep an eye on the baking time. Store leftovers (if there are any!) in an airtight container at room temperature for up to three days. The icing may lose a little of its shine, but the flavor remains on point. If you’re planning ahead, bake the cake a day before and ice it on the day of serving for maximum freshness.

Make It Your Own

With a few tweaks, you can tailor this cake to suit different tastes or occasions:

  • Swap the pistachios for toasted almonds for a different nutty flavor.
  • If you’re not a fan of sour cream, try using Greek yogurt for a similar tanginess.
  • Feeling adventurous? Add a tablespoon of shredded coconut to the batter for extra texture.
  • For a citrus twist, incorporate the zest of one lemon into the cake batter.

If you try this, I’d love to hear how it turns out — drop a comment or tag me! And if you have any creative twists on this recipe, don’t keep it to yourself; I’m always on the lookout for new ideas. Happy baking!

Related update: Pumpkin Pecan Streusel Cake - gluten free, soy free, vegan

Grandma Inez’s Pineapple Pie | Made by Meaghan Moineau

Picture this: it’s a Tuesday evening, and the only thing standing between me and a total kitchen meltdown is the comforting prospect of pulling together Grandma Inez’s Pineapple Pie. I was staring down a pantry that looked more like a post-tornado disaster zone than the well-stocked haven I imagined. But there it was, hidden among the cans of neglected beans and a jar of something unrecognizable — a lone can of pineapple. That’s when I remembered this pie, a dessert that feels like a tropical vacation and a cozy hug all rolled into one. It’s quick, it’s a little quirky, and it’s a whole lot of delicious. A pie so luscious and breezy, it practically makes the kitchen clean itself. Well, almost.

Jump to Recipe

What You’ll Need

If you’ve got a stocked baking cupboard, you’re probably halfway there. The beauty of this pie is that it doesn’t ask for much — just a bit of finesse and a lot of love.

  • 1 pre-baked pie crust
  • 1 can crushed pineapple (keep the juice!)
  • 1 cup sugar (divided)
  • 1/4 cup butter
  • 3 tablespoons cornstarch
  • 1 teaspoon vanilla
  • 3 egg yolks
  • 3 egg whites
  • 1/4 teaspoon cream of tartar
  • 1/4 teaspoon salt
  • 1/2 cup water

How to Make Grandma Inez’s Pineapple Pie

  1. Start by creaming 3/4 cup of the sugar, butter, and egg yolks in a medium saucepan. Use a hand-held mixer to make it fluffy — a workout for your good arm, just until it’s pale and dreamy.
  2. Blend in the cornstarch and vanilla until smooth. It should look like a creamy potion, sweet and inviting.
  3. Add the water and that whole can of crushed pineapple, juice and all. Mix again, until everything feels like it’s come to a tropical accord.
  4. Transfer your saucepan to the stove and set it over medium heat. Stir constantly — think of it as a zen exercise — until the mix thickens. You’ll know it’s ready when it can coat the back of a spoon.
  5. Pour this luscious filling into your pre-baked pie crust, spreading it out like you’re tucking it into bed.
  6. Now, whip the egg whites until they’re foamy, like the top of a cappuccino. Gradually add the remaining 1/4 cup sugar, cream of tartar, and salt. Keep whipping until soft peaks form and the mixture is glossy like a magazine finish.
  7. Spread the meringue over the cooled pie. Use the back of a spoon to create little peaks, like waves on an ocean.
  8. Bake in a preheated 400°F oven for just a few minutes. Stay close! You want the meringue to be golden, not torched.
  9. Let it cool completely before slicing — if you can wait that long. Store in the fridge and sneak slices whenever you need a pick-me-up.

Cook’s Notes

A few tips to keep this pie from veering off course:

– Make sure your pie crust is completely cool before adding the filling — we want a crispy base, not a soggy one.
– Meringue can be a bit temperamental. Avoid making it on a humid day, or it might weep. No one likes a sad pie.
– The pie is best eaten within a day or two, but trust me, it rarely makes it that long. If you’ve got leftovers, keep them covered in the fridge. The meringue might lose its crispness, but it’ll still taste divine.

Make It Your Own

Here’s where you get to flex your creative muscles:

  • Swap the pineapple for mango or passion fruit for a different tropical twist.
  • Add a hint of ginger or nutmeg to the filling for a warm-spiced version.
  • Use almond extract instead of vanilla for a nutty, nuanced flavor.
  • Try topping with coconut flakes post-bake for an extra layer of texture and flavor.

If you try this, I’d love to hear how it turns out — drop a comment or tag me! Your kitchen is about to smell amazing, and I can’t wait for you to taste this slice of sunshine. Enjoy every bite!

Related update: Grandma Inez’s Pineapple Pie

Related update: How to Make OREO Turkeys for Thanksgiving

Gingerbread | Made by Meaghan Moineau

It was one of those blustery autumn afternoons when the wind just howls around your windows, and all you want is something to make the house smell amazing and your soul feel cozy. I was rummaging through my pantry, craving something spicy and sweet, when I realized I had everything I needed for gingerbread. You know that feeling when you stumble upon a recipe that makes your kitchen feel like a warm hug? This gingerbread is exactly that. It’s quick enough for a weeknight treat but feels special with its aromatic spices and deep molasses goodness. Plus, the glaze? Pure magic. Once you make it, you’ll want to drizzle it over everything.

Jump to Recipe

What You’ll Need

This gingerbread recipe is so forgiving and made with ingredients you probably already have hanging out in your kitchen.

  • Molasses
  • Salt
  • Eggs
  • Salad oil
  • Sugar
  • Soda
  • Water
  • Flour
  • Ginger
  • Cinnamon

How to Make Gingerbread

  1. In a large bowl, mix together the molasses, salad oil, sugar, ginger, cinnamon, and salt until the sugar dissolves and everything smells like holiday cheer.
  2. Add the eggs and beat the mixture until it becomes smooth and glossy.
  3. Dissolve the soda in 1/8 cup of boiling water, then stir it into the molasses mixture. You’ll see the batter start to bubble a little.
  4. Gradually add in the flour, alternating with the remaining water, stirring gently until the batter is smooth. It will be pretty thin, almost like pancake batter, but trust the process!
  5. Pour the batter into a greased 9″x13″ pan and bake at 350 degrees until the top is firm and a toothpick comes out clean. The edges will pull away slightly from the sides of the pan.
  6. While the gingerbread bakes, make the glaze: melt the butter, then stir in the milk and brown sugar. Bring to a boil and let it bubble away for about 4 minutes, stirring occasionally. It’ll thicken a bit as it cools.
  7. Once the gingerbread is done, let it cool slightly before drizzling the glaze over the top. Serve warm or wait until it’s cold—your call!

Cook’s Notes

This gingerbread can be stored covered at room temperature for up to 3 days, though it’s usually gone by day two in my house! If you want to make it ahead, it freezes beautifully. Just wrap it tightly in plastic wrap, and when you’re ready to enjoy, let it thaw at room temperature.

Watch out for overbaking. Because the batter is thin, it might cook faster than you think, especially if your oven runs hot. Check it a bit earlier than you’d expect.

  • For extra flavor depth, consider adding a pinch of nutmeg or cloves along with the ginger and cinnamon.
  • If you want to make the glaze ahead of time, you can reheat it gently before drizzling over the gingerbread.

Make It Your Own

  • Swap the salad oil with melted butter for a richer flavor.
  • Replace half of the flour with whole wheat flour for a heartier texture.
  • Add a handful of chopped walnuts or pecans for a nutty crunch.
  • Add a teaspoon of vanilla extract to the glaze for a hint of vanilla sweetness.

If you try this, I’d love to hear how it turns out—drop a comment or tag me! I promise this gingerbread will make your kitchen feel like the coziest place on earth.

Related update: Gingerbread

Related update: 2 Minute Chocolate Yum

Homemade Apple Almond Granola Bars | Made by Meaghan Moineau

It was one of those late-summer afternoons, the kind where the sun hangs a little lower in the sky and you can just feel fall whispering from around the corner. I found myself digging through the pantry, looking for something to munch on that wouldn’t make me feel guilty later. You know that feeling, right? When you’re just done with salads but not quite ready to dive into pumpkin-everything? That’s when I decided to whip up these Homemade Apple Almond Granola Bars. They’re the perfect transition snack — hearty enough to curb hunger, sweet enough to feel indulgent, but packed with ingredients that say, “Hey, I’m still being healthy!”

Jump to Recipe

What You’ll Need

I love this recipe because you likely already have most of the ingredients lounging in your kitchen. Trust me, it’s all pretty basic, but with a few key players that make these bars special.

  • 2 cups rolled oats
  • 1/4 cup ground flax seed
  • 1/4 cup oat bran
  • 1/4 cup wheat bran
  • 1/2 teaspoon salt
  • 1 teaspoon baking powder
  • 1 teaspoon cinnamon
  • 1/2 cup sugar substitute
  • 1/4 cup unsweetened coconut
  • 1 cup non-fat milk
  • 2 tablespoons sweet honey
  • 1 large egg
  • 1 teaspoon vanilla extract
  • 1 large apple, chopped
  • 1/2 cup sliced almonds

How to Make Homemade Apple Almond Granola Bars

  1. First things first, preheat your oven to 350°F. Grab a 9×13 pan and give it a good spray with non-stick cooking spray. You don’t want any sticking drama later.
  2. In a big mixing bowl, stir together the oats, ground flax seed, oat bran, wheat bran, salt, baking powder, cinnamon, sugar substitute, and coconut. This mixture should look sandy and smell like a cozy cinnamon dream.
  3. Pour in the milk, honey, egg, and vanilla extract. Stir until everything is nice and combined. The mixture will be wet but not soupy.
  4. Fold in the chopped apple and sliced almonds. You want those chunks to be well distributed so every bar gets a piece of the action.
  5. Press the mixture evenly into your prepared pan. Make sure it’s packed tightly, so the bars hold together after baking.
  6. Bake for 15-20 minutes. You’ll know they’re done when the edges are just starting to brown and the kitchen smells like heaven.
  7. Let the bars cool in the pan for about 10 minutes. Then cut them into your desired bar size. Be careful, they’ll still be warm!
  8. Finally, let them cool completely before removing from the pan. This helps them set up nicely.

Cook’s Notes

These granola bars are super forgiving. If your apple is more tart, it pairs beautifully with the sweet honey. The bars are pretty adaptable — you can tweak them based on what you have on hand. Store them in an airtight container, and they’ll stay fresh for about a week, perfect for tucking into lunch boxes or grabbing on your way out the door. If you’re making them ahead, they freeze well too. Just wrap each bar individually and pull one out when you need a quick snack.

Make It Your Own

  • Pumpkin Spice Swap: Trade the cinnamon for an equal amount of pumpkin spice to usher in those autumn vibes.
  • Nutty Buddy: Swap almonds for pecans or walnuts. They add a different crunch and flavor.
  • Chunky Monkey: Throw in some mini chocolate chips or dried banana pieces for a sweeter treat.
  • Berry Burst: Substitute the apple with dried cranberries or raisins for a fruity twist.

If you try this, I’d love to hear how it turns out — drop a comment or tag me! Whether you stick to the script or put your own spin on it, these bars are bound to become a favorite. Happy snacking!

Related update: Homemade Apple Almond Granola Bars

Home made coffee ice cream | Made by Meaghan Moineau

It was one of those afternoons when the sun was too hot, and all I could think of was something cool and creamy to beat the heat. The store-bought ice cream in my freezer just didn’t seem to cut it. I craved something more indulgent—a little scoop of homemade bliss I could savor slowly. That’s when I remembered this magic trick of a recipe for homemade coffee ice cream. It’s the kind of treat that sneaks in the backdoor of your afternoon and turns an ordinary day into something special. All you need is a few pantry staples and a bit of patience. Trust me, this coffee ice cream will make your taste buds dance and your kitchen smell like a cozy coffee shop. It’s the ultimate indulgence, perfect for a quick escape from the everyday grind or for impressing your dinner guests without breaking a sweat.

Jump to Recipe

What You’ll Need

The beauty of this recipe is its simplicity. Chances are, your kitchen already holds most of the magic beans for this spell. Here’s what you’ll need to whip up this silky delight:

  • 2 cups of cream
  • 1 cup of milk
  • 3/4 cup of sugar
  • 1 tablespoon of coffee granules
  • 5 egg yolks
  • 1 teaspoon of vanilla extract

How to Make Homemade Coffee Ice Cream

  1. In a medium, heavy saucepan, combine the cream, milk, sugar, and coffee granules. Heat gently over medium until it just begins to boil, filling your kitchen with a fragrant aroma. Remove from heat and let it sit while you move on to the eggs.
  2. In a medium bowl, beat the egg yolks until they’re smooth like sunshine. Slowly whisk in a cup of your hot coffee cream, taking care not to scramble the eggs.
  3. Add a dash of vanilla extract to this warm blend, because why not add a hint of sweetness to this love affair?
  4. Returning to your saucepan, gradually introduce the egg mixture by pouring it in a steady stream, stirring constantly. Cook over low heat until the mixture coats the back of a spoon, about 4-5 minutes. You’ll know it’s ready when it’s luxuriously thickened.
  5. Remove from heat and pour through a fine mesh strainer into a clean container. This step ensures your ice cream is as smooth as a jazz singer’s voice.
  6. Cover with plastic wrap, pressing it directly onto the surface to prevent a skin from forming. Chill in the fridge for at least 2 hours—perfect time to catch up on your favorite show!
  7. Once chilled, pour the mixture into an ice cream machine and churn according to the manufacturer’s instructions until it reaches a soft serve consistency.
  8. Transfer to a plastic container and freeze for a few hours to firm up. Before serving, let it sit out for 5-10 minutes to soften to the perfect scooping texture.

Cook’s Notes

This recipe is forgiving and rewards patience. Make sure you keep the temperature low when cooking with the egg yolks to avoid unpleasant curdling. Straining the mixture is not optional—it’s essential for that ultra-smooth texture. If you’re making this ahead of time, the mixture can be left to chill overnight in the fridge. Store your ready ice cream in an airtight container to keep it fresh; it should last about a week, but I doubt it will stick around that long!

Make It Your Own

  • Want a more robust coffee flavor? Swap out regular coffee granules for an espresso version.
  • For a luscious mocha twist, add a tablespoon of cocoa powder when combining the cream, milk, sugar, and coffee.
  • Looking to impress with a boozy treat? Fold in a shot of coffee liqueur right before churning.
  • Try using coconut milk instead of cow’s milk for a tropical vibe—it adds an unexpected twist and creaminess.

If you try this, I’d love to hear how it turns out—drop a comment or tag me! Whether you’re savoring this on a quiet afternoon or sharing it with friends, I hope it brings a little extra joy to your day.

Related update: Home made coffee ice cream

Related update: Home made coffee ice cream

Cheesecake with cranberries | Made by Meaghan Moineau

Picture this: It’s a chilly autumn evening, and I’m staring at a bag of cranberries sitting on the counter, just begging to be transformed into something fabulous. The leaves are turning that gorgeous burnt orange, and I’ve got this urge to whip up something that screams cozy. Enter, my Cheesecake with Cranberries. It’s not just any cheesecake; it’s that magical blend of tart cranberries meeting creamy, dreamy cheesecake all bundled up in a hug of buttery, crumbly crust. If you’re in the mood for something that feels like a warm sweater for your taste buds but seems way more impressive than the effort it takes, this is your go-to. And the best part? You might already have most of these ingredients skulking in your pantry. So let’s dive right in.

Jump to Recipe

What You’ll Need

You know those recipes that call for exotic spices and ingredients that you’ll probably only use once? Yeah, this isn’t one of them. Chances are, your cupboards are already harboring most of these goodies.

  • Cranberries – fresh is best, trust me on this one!
  • Water – the unsung hero
  • Allspice – gives it that warm, cozy vibe
  • Cloves – just a pinch for depth
  • Orange extract – for that zingy, citrusy kick
  • Sugar – duh! Sweetness is key
  • McVitie’s wholewheat digestive cookies – the foundation of our crumbly crust
  • Butter – because buttery crust is life
  • Cream cheese – the heart of the cheesecake
  • Sour cream – adds a tangy creaminess
  • Cornstarch – to hold it all together
  • Eggs – the glue that binds

How to Make Cheesecake with Cranberries

  1. First things first, take those cranberries and toss them into a medium saucepan with some water. Bring it to a boil until the skins burst open. It’s like nature’s way of telling you they’re ready—about 5 minutes should do it.
  2. Take the pan off the heat and stir in allspice, cloves, orange extract, and sugar. Mix it all up until it’s just right, then pop it into the fridge to cool. Patience, my friend.
  3. Now, for the crust. Crush those digestive cookies into fine crumbs, mix them with sugar and melted butter, and press the lot into the bottom of a greased 9-inch springform pan. There, the base of our cheesecake empire!
  4. In a mixing bowl, beat the cream cheese and sugar together until they’re smooth like a jazz sax solo. Add the sour cream and cornstarch, beating until well combined.
  5. Gently add the eggs, beating on low speed. This is crucial—overbeating could deflate your cake, and nobody wants that.
  6. Drain the cranberry sauce and reserve those plump cranberry bits. Fold a cup of that sauce into the cheesecake mixture, pour it over your crust, and drizzle with the remaining sauce.
  7. Bake at 160°C for about 30-35 minutes, just until the center is almost set. A little jiggle is fine—it’ll firm up as it cools.
  8. Cool it on a wire rack for about 10 minutes. Run a knife around the edge to loosen it, then let it cool for another hour. Then, into the fridge it goes overnight. Yes, waiting is the hardest part.
  9. When you’re ready to serve, top with those reserved cranberries if you want to get fancy.

Cook’s Notes

Here’s the deal: Cheesecake is one of those things that just gets better with a little time chillin’ in the fridge. If you can, make it the day before. It gives the flavors more time to get together and party. Store leftovers in the fridge, tightly covered, for up to 4 days—if it lasts that long! When making the cranberry sauce, make sure it’s cool before folding it in. Warm sauce can curdle the cream cheese mixture, and we don’t want that drama.

Make It Your Own

Want to put your own spin on this cheesecake wonder? Here are some ideas:

  • Swap the cranberries for raspberries if you’re feeling a different kind of tart.
  • Try ginger snaps instead of digestive cookies for a spicier kick.
  • Feeling nutty? Add a handful of chopped walnuts to the crust mixture for some crunch.
  • For a citrus twist, add a tablespoon of lemon zest to the cream cheese mixture.

If you try this, I’d love to hear how it turns out—drop a comment or tag me in your delicious creations! Your kitchen adventures are what make this all worthwhile. 🍰

Related update: Cheesecake with cranberries

Related update: Home made coffee ice cream

Broccoli and Cheese Phyllo Pie | Made by Meaghan Moineau

Last Tuesday, I found myself staring into the fridge, a little lost and a lot hungry, after a long day of work and an unexpected detour when my grocery bag tore open on the way home. There it was, my knight in shining armor: a half-eaten broccoflower and some leftover bacon from the weekend breakfast. Inspiration struck, and here we are with this Broccoli and Cheese Phyllo Pie. It’s surprisingly easy, deliciously comforting, and had the added bonus of making me feel like a culinary genius without breaking much of a sweat. Plus, who doesn’t love a dish wrapped in layers of flaky, buttery phyllo? Trust me, this is the kind of recipe that saves your night while winning you major points with anyone lucky enough to share it with you. Jump to Recipe

What You’ll Need

This pie is all about using what you likely already have mingling in your pantry and fridge. It’s unpretentious with a twist of sophistication, thanks to that golden, flaky phyllo.

  • 1 broccoflower
  • 5 large eggs
  • 4 slices of cooked bacon, chopped
  • 1 teaspoon salt
  • 2 tablespoons all-purpose flour
  • 1 cup milk
  • 1/2 cup mayonnaise
  • 3 green onions, chopped
  • 1/4 teaspoon cayenne pepper
  • 1/4 teaspoon black pepper
  • 2 cups shredded smoked cheddar cheese
  • 1 package of phyllo dough sheets (about 20 sheets)
  • Butter, melted (for brushing)

How to Make Broccoli and Cheese Phyllo Pie

  1. Begin by preheating your oven to 350°F (175°C). This ensures it’s ready to go once your pie is assembled.
  2. Place your broccoflower in a pot, cover with water, and let it cook for about 5 minutes. Drain it well and set it aside to cool.
  3. In a large bowl, combine your chopped bacon, green onions, and shredded cheese. Give it a good mix so the flavors can start mingling.
  4. In a separate medium bowl, whisk together the eggs, salt, cayenne, black pepper, flour, mayonnaise, and milk. An immersion blender will help achieve a silky smooth texture, especially since mayo can seize up in cold mixtures.
  5. Unroll your phyllo dough and keep it covered with a damp paper towel to prevent it from drying out while you work.
  6. Prep an 8-inch springform pan by greasing it with cooking spray or melted butter, ensuring nothing sticks.
  7. Working quickly, lay two sheets of phyllo in the pan and gently brush with butter. Repeat this process, rotating the pan with each addition, until about 3/4 of your roll is used, creating a thick, pastry ‘nest.’
  8. Now that your broccoflower is cool, roughly chop it and fold it into your bacon mixture. Pour this mixture into your phyllo nest and pat it down gently.
  9. Give your egg mixture a quick remix before pouring it over the broccoli mix. You’ll want to ensure it’s evenly distributed.
  10. Layer the remaining phyllo sheets on top, two at a time, buttering in between. Roll any overhanging edges to create a neat crust. Brush the top with butter for that golden finish.
  11. Bake in the preheated oven for about 1 hour and 15 minutes. Keep an eye on it and cover with foil after an hour if the phyllo browns too quickly.
  12. Once baked, allow the pie to rest for 15 minutes before slicing. This prevents a lava flow of filling escaping. Use a serrated knife to cut through the delicate layers.

Cook’s Notes

Phyllo can be a bit of a diva, so keep it under a damp towel to avoid dryness. The immersion blender trick keeps your mixture velvety and avoids those pesky mayo clumps. If you’re making this ahead of time, the assembled pie can sit in the fridge for a few hours before baking. Leftovers? Store them in the fridge and reheat in the oven to bring back that crispiness.

Make It Your Own

  • Vegetarian Delight: Swap the bacon for sautéed mushrooms or sun-dried tomatoes for a meatless version that’s still packed with umami.
  • Cheese Swaps: If you’re out of smoked cheddar, try using a sharp cheddar or Gruyère for a different but equally mouthwatering experience.
  • Spice It Up: Add a teaspoon of smoked paprika or a pinch of red pepper flakes for a pie with a little extra kick.
  • Mix Up the Greens: No broccoflower? Broccoli, cauliflower, or even a mix of both work just as well, each bringing a unique flavor to the pie.

If you try this, I’d love to hear how it turns out — drop a comment or tag me! Your kitchen victories brighten my day more than you know.

Related update: Broccoli and Cheese Phyllo Pie

Bacon Brownie Cupcakes | Made by Meaghan Moineau

I once found myself in the middle of a weeknight conundrum—my sweet tooth was hollering louder than a toddler missing nap time, and my pantry was looking a little sparse. Cue the genius idea: Bacon Brownie Cupcakes. This is the kind of recipe that was born out of necessity, a craving, and a little slice of bacon heaven left over from breakfast. What’s better than combining the gooey richness of brownies with the savory crunch of bacon? This dish dances the line between dessert and daring, and let me tell you, it’s worth every single bite. Plus, it’s all done using familiar pantry staples, so you’ll feel like a kitchen wizard in no time.

Jump to Recipe

What You’ll Need

When I say this ingredient list will make you feel like you’ve hit the jackpot, I mean it. With just a few special touches, you’ll be whipping up a treat that feels both classic and adventurous.

  • Unsweetened chocolate
  • Sweetened chocolate
  • Butter
  • Sugar
  • Salt
  • Eggs
  • All-purpose flour
  • Cocoa powder
  • Bacon

How to Make Bacon Brownie Cupcakes

  1. Preheat your oven to 350°F, and let’s get that muffin pan greased well. Trust me, you want these to come out looking fab, not stuck like a toddler’s fist in a cookie jar.
  2. Fry up your bacon until it’s crispy perfection, but avoid any charred bits. You want that savory crunch without the burnt taste. Pat it dry and crumble it up, discarding any overly fatty pieces.
  3. In a double boiler, melt the unsweetened chocolate and butter together. Stir occasionally until smooth, then let it cool slightly. This mixture will become the soul of your brownie cupcakes.
  4. Whisk in the sugar and salt into the melted chocolate. Add the eggs one at a time, making sure each is fully incorporated before adding the next. This gives them that fudgy texture we adore.
  5. Sift the flour and cocoa powder together, then gently fold it into the chocolate mixture. This is where the magic happens—don’t rush this step!
  6. Stir in the bacon pieces and sweetened chocolate bits. Pour the batter into your prepared muffin pan, filling each cup about ¾ full.
  7. Bake for around 30 minutes. You’ll know they’re ready when a toothpick inserted in the center comes out with a few moist crumbs. Let them cool before attempting to remove them from the pan.

Cook’s Notes

These little beauties can be stored in an airtight container for up to four days, but let’s be real—they’ll probably vanish much sooner. If you’re making them ahead for a party or just because, you can prepare the batter and refrigerate it for up to 24 hours before baking. Just bring it to room temperature before popping it in the oven. Sometimes the bacon can be a bit tricky; ensure it’s well-drained so you don’t end up with greasy cupcakes. And whatever you do, resist the urge to gobble them up straight from the oven—you’ll want them to firm up a bit first.

Make It Your Own

  • Feeling nutty? Swap out half the bacon for toasted walnuts for a crunchy twist.
  • Prefer a spicy kick? Add a pinch of cayenne pepper to the batter for a surprising heat that pairs beautifully with the chocolate.
  • Not a fan of bacon (gasp!)? Substitute with crispy tofu bits seasoned with smoked paprika for a vegetarian-friendly version.
  • Craving a bit of extra sweetness? Sprinkle some sea salt caramel bits on top before baking for a salty-sweet sensation.

If you try this, I’d love to hear how it turns out—drop a comment or tag me! Whether you stick to the script or put your own twist on it, these Bacon Brownie Cupcakes are bound to be a story in the making. Happy baking!

Related update: Bacon Brownie Cupcakes

Related update: Hard-Boiled Egg Gratin In A Bechamel Sauce

Related update: Cheesecake with cranberries

Blueberry, Chocolate & Cocao Superfood Pancakes – Gluten-Free/Paleo/Vegan | Made by Meaghan Moineau

One rainy Saturday morning, I found myself staring out the window, clutching my mug of coffee and craving something cozy yet indulgent to lift the dreariness. The idea of pancakes popped into my head, but I wanted something a bit more special than the usual stack. That’s when I remembered a little experiment I tried once with superfoods—and hey, if a little cacao nib magic can infuse the morning with some extra joy, I’m all for it. Enter my Blueberry, Chocolate & Cacao Superfood Pancakes. They’re fluffy, packed with antioxidants, and importantly, they’re gluten-free, Paleo, and vegan. Perfect for those of us who like to start the day feeling virtuous yet a tad spoiled.

Jump to Recipe

What You’ll Need

Most of these ingredients are pantry staples if you love dabbling in gluten-free baking like I do. The superstars? A mix of flours and those dreamy add-ins that elevate the pancakes from Saturday to SATUR-YAY.

  • Almond flour
  • Coconut flour
  • Tapioca or arrowroot flour
  • Nut, hemp, or coconut milk
  • Baking powder
  • Vanilla bean paste or extract
  • Himalayan sea salt
  • Frozen blueberries
  • Cacao nibs
  • Dark chocolate

How to Make Blueberry, Chocolate & Cacao Superfood Pancakes – Gluten-Free/Paleo/Vegan

  1. In a large mixing bowl, combine the almond flour, coconut flour, tapioca or arrowroot flour, baking powder, and a pinch of Himalayan sea salt. Stir until everything is well mixed, envisioning the fluffy pancakes you’re about to create.
  2. Pour in your choice of nut, hemp, or coconut milk along with the vanilla bean paste or extract. Whisk everything together until you have a smooth batter that’s reminiscent of a soft morning cloud.
  3. Let the batter sit for 10-15 minutes. This is your moment to sip on some coffee or tea and let the flours absorb all that liquid goodness.
  4. Heat a bit of coconut oil in a frying pan over medium heat. Ladle a small portion of the batter into the center of the pan, forming a circle. Watch as the edges of the pancake begin to brown and bubbles form on the surface.
  5. Gently sprinkle a few blueberries onto the pancake. Flip it over carefully, allowing the other side to cook. The blueberries will burst into juicy pockets of delight.
  6. While the pancake is finishing up, sprinkle some cacao nibs and dark chocolate over the top. Let them melt slightly, mingling with the warm pancake.
  7. Once cooked through, remove the pancake from the pan and keep warm. Repeat with the remaining batter, and try not to nibble them all straight from the pan!

Cook’s Notes

These pancakes are forgiving, so don’t fret if your batter seems a bit thick; just add a splash more milk. If it’s too runny, a touch more almond flour should do the trick. These pancakes store well in the fridge for a couple of days, making them a quick breakfast solution—just pop them in the toaster to reheat. Don’t stack them when storing, though, as the blueberries and chocolate might make them stick together.

Make It Your Own

  • Swap frozen blueberries for fresh raspberries for a tart twist.
  • Try adding a tablespoon of chia seeds to the batter for extra fiber.
  • Use a mix of white and dark chocolate chips if you’re feeling decadent.
  • Top with a dollop of almond butter and a drizzle of maple syrup for an extra treat.

If you try this, I’d love to hear how it turns out—drop a comment or tag me! Whether you’re sharing with friends or keeping them all to yourself (no judgment here), these pancakes are sure to make your morning a little brighter.

Related update: Blueberry, Chocolate & Cocao Superfood Pancakes – Gluten-Free/Paleo/Vegan

Related update: Instant Pot Chicken Tacos

Related update: Peaches And Cream Oatmeal