Picture this: It’s a sweltering summer afternoon, the kind where even the shade feels warm, and all you can think about is finding a way to cool down. I was sprawled out on my couch, contemplating the mysteries of life and my growing need for something refreshing. That’s when the idea hit me — a Green Tea Fruit Medley Smoothie! This drink is the perfect blend of rejuvenating and hydrating, with just enough sweetness from the fruit to make you feel like you’re indulging in a treat. The best part? It’s incredibly easy to whip up, which means more time for lounging and less time in the kitchen.
Jump to Recipe
What You’ll Need
You’re in luck because the ingredient list for this smoothie is delightfully simple. Chances are, you might already have most of these in your kitchen.
- 1 cup of boiling water
- 3 green tea bags
- 1 cup of fresh berries (I love using a mix of blueberries and strawberries!)
- 1/2 cup of pineapple juice
- 1/2 cup of vanilla yogurt
- A handful of ice cubes
How to Make Green Tea Fruit Medley Smoothie
- Start by preparing your tea. Steep the 3 green tea bags in 1 cup of boiling water for about 5 minutes. You’re looking for a nice, rich golden color and that earthy, aromatic green tea scent wafting through your kitchen.
- After the tea has steeped, gently squeeze out the bags to get every last bit of flavor, then discard them.
- In a blender, combine the brewed tea, fresh berries, pineapple juice, vanilla yogurt, and ice cubes. Blend until the mixture is smooth and creamy. You’ll know it’s ready when it has a luscious, thick consistency and a vibrant color.
Cook’s Notes
When it comes to making this smoothie, the key is the balance of flavors. If you find the smoothie too tart, add a bit more vanilla yogurt for sweetness. On the flip side, if it’s too sweet, a splash more of green tea can do wonders. If you’re preparing this ahead of time, store it in the fridge for up to a day, but give it a good shake before drinking as it might separate slightly. And remember, the freshest berries will give you the best flavor, so if you’re using frozen ones, let them thaw a bit first.
Make It Your Own
- Need a protein boost? Swap out the vanilla yogurt for Greek yogurt.
- Looking for a tropical twist? Add a handful of mango chunks instead of or alongside the berries.
- For a dairy-free version, use coconut yogurt — it adds a nice subtle flavor that pairs surprisingly well with the green tea.
- If you’re a mint fan, toss in a few fresh mint leaves for an extra refreshing kick.
If you try this, I’d love to hear how it turns out — drop a comment or tag me! There’s nothing like sharing a refreshing moment with friends, even if it’s virtually. Stay cool, my friends!
Related update: Green Tea Fruit Medley Smoothie

Last Tuesday, my kitchen was a whirlwind of chaos. It was one of those evenings where craving something decadent and a bit out of the ordinary hit like a freight train, and all I had was a pantry challenge waiting to happen. After digging through the freezer, I found a bag of crawfish tails, and suddenly, a memory of summer seafood boils with friends came flooding back. The tantalizing mix of spices and seafood was exactly what I needed, but in a form that was quick and easy without compromising on flavor. Enter: Crawfish Cake Sliders. These little beauties pack a punch, they’re crispy on the outside yet tender inside, and they’re kind of impressive when you serve them up — like a casual, yet gourmet, hand-held delight. Perfect for a weeknight dinner or to wow your friends at a gathering.
Jump to Recipe
What You’ll Need
Let’s be honest, if you love a good seafood dish, you’ve probably got most of this on hand already. Here’s what you’ll need to whip up these sliders:
- 1 teaspoon oil
- 1 cup chopped red onion
- 1 clove garlic, minced
- 1 teaspoon Creole spice (or to taste)
- 1 pound crawfish tails, thawed if frozen
- 1 large egg
- 1/2 cup bread crumbs
- 8 slider buns
- 1/2 cup tartar sauce
How to Make Crawfish Cake Sliders
- Start by heating 1 teaspoon of oil in a sauté pan over medium heat. Toss in the chopped onion and let it sizzle away with a pop of color from some finely chopped red pepper and celery — sauté these until tender, about 2-3 minutes. The kitchen should start smelling like a savory promise.
- Once the veggies are tender, remove the pan from the heat and add the garlic, crawfish meat, and Creole spice. The residual heat will mellow out the garlic and awaken the spices.
- Transfer this aromatic mixture into a mixing bowl and let it cool just enough so that it doesn’t scramble the egg. Speaking from experience here, oops!
- Mix in the egg and just enough bread crumbs for the mixture to bind together — you’re looking for a consistency that holds but isn’t dry. Taste and adjust the seasonings with salt, pepper, and more Creole spice if you’re feeling bold.
- Form the mixture into 8 equal patties and flatten them to about 3/4-inch thick. They should feel sturdy but not densely packed.
- Heat the remaining oil in the same sauté pan over medium heat. Cook the patties on both sides until they’re brown and crispy, about 3-4 minutes per side. This is where the magic happens — the aroma alone is worth it.
- Once cooked, serve each cake nestled in a slider bun with a generous dollop of tartar sauce. It’s the final touch that brings everything together.
Cook’s Notes
As you embark on this culinary adventure, keep a few things in mind: If using frozen crawfish tails, make sure they’re fully thawed and patted dry to prevent soggy cakes. The mixture should be moist but not wet; too much moisture means your patties might fall apart during cooking. If you need to make these ahead, form the patties and store them covered in the fridge for a few hours. Cooked patties can also be reheated in a 350°F oven until warm.
Make It Your Own
Here’s where you can get creative with these sliders:
- Spice Swap: Try using Old Bay or a Cajun spice mix if Creole isn’t your thing.
- Herb Boost: Add chopped fresh parsley or cilantro to the mixture for a fresh twist.
- Different Sauce: Swap out tartar sauce for a spicy remoulade or even a dollop of garlic aioli for a different flavor profile.
- Gluten-Free Option: Use gluten-free bread crumbs and buns to make this dish suitable for your gluten-sensitive friends.
If you try this, I’d love to hear how it turns out — drop a comment or tag me! Your kitchen stories make this cooking journey so much more fun. Happy cooking!
Related update: Crawfish Cake Sliders
Related update: Ditalini with peas

Picture this: It’s the first truly warm day of spring, and I’m staring at my pantry, craving something fresh and zingy. My mind drifts to the mojitos I adore sipping by the pool, and suddenly, I have an idea. Meet my Frozen Mojito Pie, where your favorite cocktail meets a no-bake dessert. It’s the perfect mix of tangy lime and refreshing mint, all wrapped up in a salty-sweet pretzel crust. It’s basically summer on a plate, and trust me, your friends are going to be asking you for the recipe after the first bite. And the best part? It’s deceptively simple to whip up. You don’t even need to turn on the oven! Let’s dive into how you can bring a little sunshine to your table.
Jump to Recipe
What You’ll Need
This recipe is a breeze, and chances are, you’ve got most of it sitting in your kitchen already. Here’s what you’ll need to make this frosty delight:
- 2 cups of **pretzels**, crushed into crumbs
- 1/2 cup of **butter**, melted
- 8 oz of **cream cheese**, softened
- 1/2 cup of sugar
- **Zest from 2 limes**
- **Juice from 2 limes**
- 1/4 cup of fresh mint, chopped
- 8 oz of whipped topping, thawed
How to Make Frozen Mojito Pie
- Start by mixing the pretzel crumbs and melted butter in a medium-sized bowl. You want the mixture to resemble wet sand, which will form our crust. Press this mixture firmly onto the bottom of an 8-inch springform pan or a round pan lined with plastic wrap. Pop it in the freezer for at least an hour to set.
- Now, let’s work on the filling. In your mixer’s bowl, combine the cream cheese, sugar, lime zest, lime juice, and fresh mint. Beat them together until the mixture is smooth and the mint is nicely distributed. It should smell like a mojito at this point!
- Gently fold the whipped topping into the cream cheese mixture. Resist the urge to over-mix; you want it to stay light and fluffy.
- Spoon the filling over the frozen pretzel crust, smoothing the top with a spatula. Cover it and return it to the freezer for at least 6 hours, but overnight is best if you can wait that long.
- When you’re ready to serve, carefully remove the pie from the pan. If you lined it with plastic wrap, it should lift out easily. Garnish with crushed pretzels and thin slices of lime for that extra pizzazz. Keep any leftovers frozen.
Cook’s Notes
Here’s a little secret: the longer you let this pie chill, the more pronounced the flavors become, so patience pays off. If you don’t have a springform pan, lining a regular round pan with plastic wrap works wonders. Just pull up the edges to lift the pie out when it’s time to serve. For leftovers, keep them covered tightly in the freezer to avoid that dreaded freezer burn. And a quick tip: Use a hot knife to slice through the pie cleanly. Just run it under hot water and dry it off before cutting.
Make It Your Own
Here are a few fun ways to jazz up your pie:
- Swap the **pretzels for graham crackers** if you prefer a sweeter crust.
- Add a **splash of rum** to the filling for an adults-only twist.
- Top with **sliced strawberries** or **kiwi** for a fruity touch.
- Mix some **chocolate chips** into the crust for a chocolate-lovers’ version.
If you try this, I’d love to hear how it turns out — drop a comment or tag me! Let’s spread the joy of mojitos in pie form. Happy chilling! 🍋🌿
Related update: Frozen Mojito Pie
Related update: Almond Cookie Bar

It was one of those evenings when nothing seemed to go right. I had just returned from a long day at work, craving something sweet and indulgent. With a sneaky glance at my fruit basket, I realized I had a bunch of slightly overripe bananas begging to be used. That was my eureka moment: Banana in brown sugar ice cream. It’s one of those recipes that sounds super fancy but is actually a delightful twist on your average ice cream. Plus, it’s a fantastic way to transform humble bananas into a rich, creamy treat that’s perfect for any occasion. This recipe strikes the perfect balance between indulgent and comforting, and it’s seriously worth a try.
Jump to Recipe
What You’ll Need
Trust me, you won’t need a shopping cart full of ingredients for this one. Chances are you already have most of these on hand:
- Bananas – The riper, the better!
- Light brown sugar
- Sour full-fat cream or coconut milk for a lighter twist
- Dark rum
- Vanilla extract
- Lemon juice
- A pinch of sea salt
How to Make Banana in brown sugar ice cream
- In a wide skillet or saucepan, heat the light brown sugar with one-quarter of the sour cream. Stir it gently until the mixture becomes smooth and bubbly, filling your kitchen with a caramel-like aroma.
- Add the bananas and a pinch of sea salt. Let them cook for about 5 minutes, stirring occasionally. You’re looking for soft, completely cooked-through bananas with a golden touch.
- Once the bananas are done, remove the skillet from heat and stir in the remaining sour cream, dark rum, and vanilla extract. Give it a taste, and if it’s a tad too sweet, a few drops of lemon juice will brighten it up.
- Pour everything into a blender or food processor, and puree until the mixture is utterly smooth.
- Chill it thoroughly for at least an hour, or if patience is a virtue you possess, let it sit overnight.
- When you’re ready, pour the chilled mixture into your ice cream maker and follow the manufacturer’s instructions. The anticipation is worth it!
- Before serving, let the ice cream sit out for 5-10 minutes, or longer if needed, to reach that perfect scooping consistency.
Cook’s Notes
Making this ice cream is a breeze, but here are a few tips to ensure it turns out perfectly:
- If you choose sour cream, the mixture might curdle a bit while cooking. Don’t panic! It will all smooth out when blended.
- This treat is best served in chilled glass or porcelain bowls to keep it from melting too quickly.
- For effortless scooping, soak your ice cream spoon in boiling water, then dry it before using.
- Store any leftovers (if there are any!) in an airtight container in the freezer. It’ll stay delicious for a week or two, though I doubt it will last that long.
Make It Your Own
Here are a few ideas to tweak this dessert to suit your fancy:
- Swap the dark rum for bourbon for a slightly different boozy kick.
- Add a handful of toasted pecans or walnuts after churning for a nutty crunch.
- For a chocolatey twist, toss in some chocolate chips or a swirl of chocolate syrup during the final mixing.
- Not a fan of bananas? Substitute with ripe peaches or mangoes for a tropical spin.
If you try this, I’d love to hear how it turns out — drop a comment or tag me! Let’s share the ice cream joy because we all need a little sweetness in our lives.
Related update: Banana in brown sugar ice cream
Related update: Traditional Banana Bread
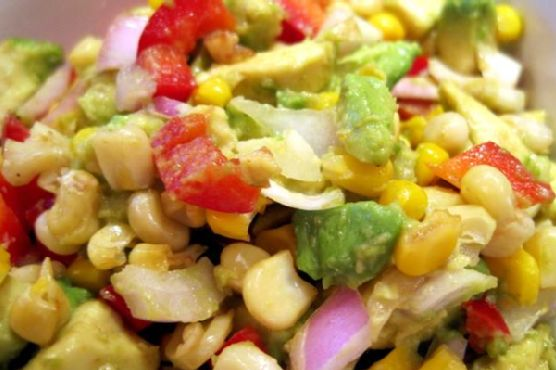
Picture this: It’s a balmy Tuesday evening, and after a long day at work, all you want is something fresh, quick, and a little fun to brighten up your dinner table. You’re standing in the kitchen, barefoot, with the warm breeze tickling your curtains, and that’s when you remember the bag of frozen corn tucked away in the freezer. And oh, the avocado sitting prettily on the counter, just begging to be used! That’s when the idea hits: Corn Avocado Salsa. It’s a dish that’s as vibrant as it is simple, packed with the kind of zesty flavors that say, “Hey, let’s pretend it’s summer all year round.” Plus, it’s the type of recipe that lets you feel like a pro without requiring a culinary degree. Let’s dive in!
Jump to Recipe
What You’ll Need
Here’s the beauty of this dish: It’s made with ingredients you likely already have. It’s about taking the humble and making it shine, and let’s be honest, who doesn’t love a recipe that doesn’t call for a grocery store run?
- Avocado
- Balsamic vinegar
- Cumin
- Canned frozen corn
- Garlic
- Red bell pepper
How to Make Corn Avocado Salsa
- Preheat your oven to 375 degrees. The perfect temperature to get that corn just right—golden and slightly crisp, without venturing into burnt territory.
- Spread the frozen corn flat on a baking sheet. Give it a light spritz of olive oil spray to help it roast up nicely.
- Roast the corn in the oven for about 8-10 minutes. Keep an eye on it; you’re looking for a nice golden hue, not the blackened crunch of forgotten popcorn.
- Once roasted, remove the corn from the heat and let it cool. It’s essential to let the corn relax a bit before mixing, or it’ll cook the avocado, turning your salsa into a mushy mess.
- While the corn is cooling, finely chop the red bell pepper and garlic. Mix these in a bowl, letting their flavors begin their tango.
- Peel and coarsely chop the avocado. Add this beauty to your bowl along with the cooled corn. Try not to mash it; we want chunks, not guac.
- Finally, sprinkle in cumin and drizzle in the balsamic vinegar. Blend well, but gently. You’re aiming for harmony in the bowl, not chaos.
Cook’s Notes
Let’s keep it real: Salsas are wonderfully forgiving, but there are still a few things to keep in mind. First off, make sure to give the corn enough time to cool—otherwise, your avocado may start to look more like a green smoothie. If you want to prep ahead, you can roast the corn and chop the veggies a day in advance. Just keep the avocado out until you’re ready to serve to maintain its gorgeous green color. Leftovers might be rare, but if you do have them, the salsa holds up okay for a day or two in the fridge. Just give it a good stir before serving.
Make It Your Own
Here are a few variations to keep your salsa adventures fresh:
- Swap the red bell pepper for a jalapeño if you like a bit of heat. Just remember to deseed unless you’re feeling particularly daring.
- Try adding some black beans for a heartier version. It makes for a great taco filler.
- Throw in some chopped cilantro for an extra burst of freshness. It’s like a little green party in your mouth.
- If you’re a citrus fan, squeeze in a bit of lime juice for a zesty twist. It pairs beautifully with the avocado.
If you try this, I’d love to hear how it turns out—drop a comment or tag me! Nothing makes my day more than seeing your creations and hearing your thoughts. Happy cooking, friends!
Related update: Corn Avocado Salsa
Related update: Egyptain Cauliflower Side Salad
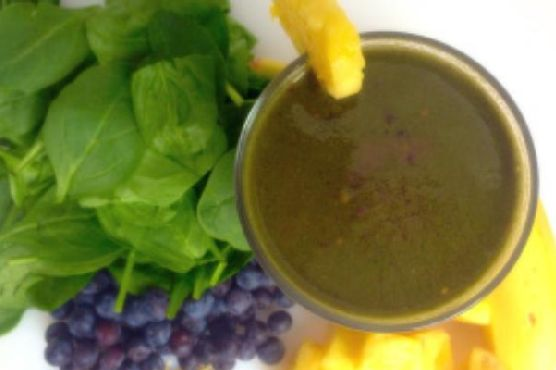
Okay, picture this: It’s a Wednesday morning, you hit snooze one too many times, and now you’re rushing around trying to make it out the door on time. You want something quick, healthy, and delicious to kick-start your day. That’s exactly how I stumbled upon this Tropical Banana Green Smoothie. I was in dire need of something refreshing and energizing, yet easy enough to throw together in less than five minutes. This smoothie checks all those boxes and more. It’s like a mini tropical vacation in a glass, and while it sounds fancy, it’s really just a few simple ingredients blended into creamy perfection. Trust me, one sip of this and you’ll forget all about your hectic morning. Jump to Recipe
What You’ll Need
This smoothie is all about using what you have on hand and embracing the refreshing flavors of the tropics. Chances are you already have most of this in your kitchen.
- 1 ripe banana
- 1 cup pineapple, fresh or frozen
- 1 cup coconut water
- 1/2 cup blueberries, fresh or frozen
- 1 scoop protein powder (vanilla works great!)
- 1 handful mixed spinach
How to Make TROPICAL BANANA GREEN SMOOTHIE
- Peel and slice the banana. If you’re using frozen pineapple, you can skip this step for now. If fresh, chop it into chunks. This will add to the creaminess.
- In a blender, add the banana slices and pineapple chunks. Pour in the coconut water. This will be the base of your smoothie, giving it that tropical flair.
- Throw in the blueberries and the scoop of protein powder. The blueberries add a pop of color and a hint of sweetness that complements the tropical vibes.
- Top it off with a generous handful of mixed spinach. Don’t worry; the taste is so mild, you won’t even notice it’s there (your body will, though!).
- Blend on high until the mixture is smooth and creamy. You’ll know it’s ready when there are no more visible chunks and the blend is a beautiful, vibrant green.
- Pour into your favorite glass, pop in a fun straw, and savor your mini-vacation in a cup.
Cook’s Notes
This smoothie is incredibly forgiving, so feel free to adjust the ingredient quantities to suit your taste. If you prefer a thicker smoothie, use frozen fruit or add a couple of ice cubes before blending. For those with a sweet tooth, a splash of honey or agave nectar can take it to another level.
It’s best enjoyed fresh, but if you’re in a time crunch, you can make it the night before. Just give it a quick stir or shake in the morning. As for leftovers, store in an airtight container in the fridge for up to one day; beyond that, it tends to lose its vibrancy and freshness.
Make It Your Own
- Swap the coconut water with almond milk for a creamier texture and a nutty undertone.
- Add a tablespoon of chia seeds before blending for an extra boost of fiber and omega-3s.
- Replace the spinach with kale for a more robust green flavor.
- For a tropical twist, throw in a few mint leaves during blending.
If you try this, I’d love to hear how it turns out — drop a comment or tag me! Let’s turn those chaotic mornings into something a bit more delightful, one smoothie at a time!
Related update: TROPICAL BANANA GREEN SMOOTHIE
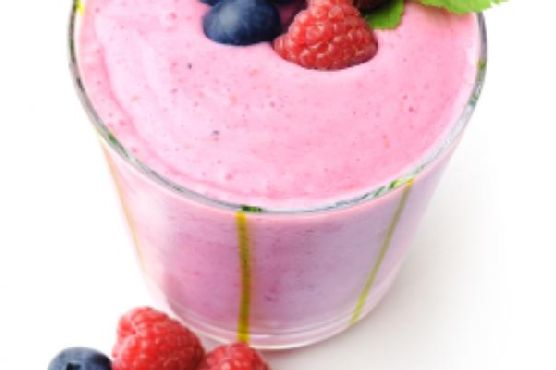
Related update: Protein Strawberry Smoothie

Picture this: It’s a lazy Sunday afternoon, and I’m rummaging through my pantry, longing for something sweet but not overly indulgent. It’s one of those days where you want a little baking therapy but refuse to spend hours in the kitchen. Enter the Apricot Clafouti With Lavender & Pecans. This is the kind of recipe that surprises you with how easy it is, yet it brings such elegance to your table. Imagine delicate apricots mingling with the floral notes of lavender while pecans add that irresistible crunch. It’s like a summer melody in dessert form. Trust me, this is the kind of dish that makes you feel like you’ve been transported to a quaint French cafe.
Jump to Recipe
What You’ll Need
The beauty of this ingredient list is that it’s simple yet feels extravagant, and odds are, you’ve already got most of these on hand.
- All-natural apricot nectar
- Apricot preserves
- Dried California apricots
- Fresh apricots
- Cardamom
- Eggs
- Honey
- Dried culinary lavender buds
- Lemon juice
- Lemon zest
- Low fat sour cream
- Nonfat milk
- Pecans
- Salt
- Unbleached flour
- Vanilla extract
How to Make Apricot Clafouti With Lavender & Pecans
- First thing’s first: preheat your oven to 375°F. We want it nice and hot so that our clafouti bakes to perfection.
- In a large mixing bowl, beat the eggs until they’re frothy. This is your base, so put some love into it.
- Add in the sour cream, milk, apricot nectar, lemon juice, lemon zest, apricot preserves, honey, and vanilla extract. Mix until everything is beautifully combined and smooth.
- Slowly whisk in the flour, a pinch of salt, cardamom, and those aromatic lavender buds. You’ll start to smell the floral notes as you mix—heavenly!
- Fold in the diced, dried apricots and pecans. Make sure they’re evenly distributed; you want each slice to have its share of goodies.
- Pour the mixture into a glass pie plate. Gently press the fresh apricot halves into the mix, forming a decorative pattern on top. This step is where you can get artsy!
- Let it set for 10 minutes. This little rest allows the flavors to mingle and the mixture to thicken slightly.
- Pop it into the oven and let it bake for 30-45 minutes. You’ll know it’s done when the edges are golden and the center is set but slightly wobbly—like a good custard.
Cook’s Notes
Alright, so here’s the deal: the clafouti is best served warm, right out of the oven, with maybe a scoop of vanilla ice cream if you’re feeling decadent. But if you have leftovers, they’re still delightful the next day, cold or gently warmed in the oven. Store any extras in an airtight container in the fridge for up to three days. A little note of caution—don’t overdo the lavender; a little goes a long way, and too much can taste soapy. When folding the nuts and apricots, be gentle to avoid deflating your batter.
Make It Your Own
Here’s where the fun begins—customizing your clafouti to suit your mood or what’s in your pantry.
- Swap the apricots for juicy peaches or nectarines when they’re in season. They work beautifully with lavender as well.
- If pecans aren’t your thing, use almonds or hazelnuts for a different type of crunch.
- Add a handful of fresh raspberries before baking for a tart contrast to the sweet apricots.
- For a more herbal twist, sprinkle in some fresh rosemary to complement the lavender.
If you try this, I’d love to hear how it turns out—drop a comment or tag me! Whether you stick to the script or venture into your own variations, this clafouti is sure to bring a touch of culinary bliss to your table. Bon appétit!
Related update: Apricot Clafouti With Lavender & Pecans
Related update: Banana in brown sugar ice cream

I was standing in my kitchen, staring at an overly ripe banana, when the craving hit me. You know the type: the need for something sweet, quick, and just a little nostalgic. It was one of those almost-summer days that call for a cold treat, but I didn’t want to fuss around with anything too elaborate. Enter the Banana Milo Milkshake — a creamy, chocolatey delight that somehow feels both indulgent and a bit healthy (thanks to that banana). This recipe is a breeze to whip up, and trust me, it’s like sipping on a childhood dream.
Jump to Recipe
What You’ll Need
I bet you have most of this stuff hanging out in your kitchen already. That’s my favorite kind of recipe — no need for a last-minute grocery run.
- Canned almond milk
- Banana – ideally ripe and sweet
- Milo chocolate malt powder – the star of the show
- Vanilla ice-cream – because why not?
- Strawberries – for a pop of color and flavor
- Whipped cream – a fluffy finishing touch
How to Make Banana Milo Milkshake
- In a blender, pour in about a cup of canned almond milk. It’s the creamy base for our shake.
- Add a heaping spoonful of Milo chocolate malt powder. The more, the merrier — but a couple of tablespoons should do the trick.
- Peel your banana and break it into chunks before tossing it into the blender. The riper, the sweeter!
- Scoop in a generous helping of vanilla ice-cream. One or two scoops, depending on how indulgent you’re feeling.
- Blend everything together until it’s smooth and frothy. Listen for that perfect whirring sound and watch as it turns a delightful chocolatey hue.
- Pour the luscious mixture into a tall glass. The anticipation is real!
- Top with a cloud of whipped cream. Don’t be shy; it’s the cherry-on-top moment without the cherry.
- Finally, sprinkle chopped strawberries over the whipped cream. They add a splash of color and a fresh, fruity note.
- Serve immediately, preferably with a straw, and let the cool, creamy goodness wash over you.
Cook’s Notes
If you’re anything like me, you’ll want to make sure your banana is at peak ripeness for the best sweetness. This milkshake is versatile, but using canned almond milk brings a lovely creaminess that other milk might not. You can make the whipped cream yourself or grab some from the store — both work wonders. And if you end up with leftovers (unlikely, but it happens), just cover and pop it in the fridge. Stir it up again before drinking, as it might separate a bit. But honestly, it’s best enjoyed fresh.
Make It Your Own
- For a nutty twist, swap canned almond milk with hazelnut milk.
- Want more chocolate? Add a drizzle of chocolate syrup before blending.
- For a tropical vibe, substitute the strawberries with chopped pineapple.
- Go dairy-free by using coconut milk ice-cream instead of vanilla ice-cream.
If you try this, I’d love to hear how it turns out — drop a comment or tag me! Whether you make it just like this or put your own spin on it, this Banana Milo Milkshake is sure to hit the spot. Stay cool, friends!
Related update: Banana Milo Milkshake
Related update: Protein Strawberry Smoothie

Picture this: it’s a Wednesday evening, and you just got home, eyes baggy from the day, craving something that feels like a mini-vacation but without the suitcase hassle. Enter Crunchy Prawn Skewers With Lemony Avocado Dip. These little beauties are my go-to when I need something fresh, quick, and so delightful it erases the mundane right off your plate. I love that they’re impressive enough to make my husband think I’ve been slaving away when really, it’s just a fun little dish that comes together quicker than you can say “takeout.” Plus, that avocado dip? Oh, it’s the zingy, creamy goodness that dreams are made of.
Jump to Recipe
What You’ll Need
I bet you already have most of these staples hanging around your kitchen. You might just need to grab some prawns on your way home.
- Prawns – The star of the show, fresh or thawed from frozen.
- Flesh of Avocado – Creamy and ripe, please.
- Crème Fraiche – For that lush, smooth texture in the dip.
- Lemon (juice) – Bright, zesty, and necessary.
- Bread crumbs – I like the panko kind for extra crunch.
- Olive oil – Just a splash to coat those prawns.
- Bamboo skewers – Don’t let them set your kitchen on fire.
How to Make Crunchy Prawn Skewers With Lemony Avocado Dip
- Start by making the dip: throw the avocado flesh, crème fraiche, and lemon juice into a food processor. Blend until silky smooth. Taste, season, and set it aside.
- In a separate bowl, mix your breadcrumbs with a touch of lemon zest, and season generously. It should smell like a fresh, zesty day.
- Now, coat your prawns in a little olive oil. Give them a gentle massage, then toss them into the breadcrumb mixture, ensuring they’re well-coated.
- Thread three prawns onto each skewer. Trust me, this is easier than threading a needle.
- Time to grill! Place the skewers on a preheated grill for about 2 minutes on each side, until they’re golden and crisp. The smell should be irresistible by now.
- Serve immediately with that luscious avocado dip and watch them disappear quickly.
Cook’s Notes
I can’t stress enough the importance of soaking those bamboo skewers beforehand. Give them at least an hour in cold water, and you’ll avoid any unwelcome flare-ups. If you’re planning to make this dish ahead, prep the dip and breadcrumb mixture in advance, but hold off on breading the prawns until you’re ready to cook. Leftovers? Pop them in an airtight container in the fridge — the dip stays good for a couple of days, but the prawns are best enjoyed fresh while they’re crispy.
Make It Your Own
- Instead of prawns, try using tofu cubes for a vegetarian twist. Just press them well to remove excess moisture before coating.
- Add a pinch of smoked paprika to the breadcrumb mix for a smoky kick.
- Swap the crème fraiche with Greek yogurt if you prefer a tangier dip.
- For a little heat, toss a few chili flakes into the breadcrumb mixture.
If you try this, I’d love to hear how it turns out — drop a comment or tag me! Enjoy making these skewers and watch them become a weeknight favorite in no time!
Related update: Crunchy Prawn Skewers With Lemony Avocado Dip
Related update: Mini Zucchini Bites (Cuadritos De Calabacin)

Last Wednesday, I found myself staring into the depths of my fridge, contemplating a lonely eggplant and a couple of sad zucchinis. It was one of those evenings when inspiration was as low as my vegetable crisper’s contents. But then, a little spark hit me—why not whip up a colorful and cozy Vegetarian Ratatouille? It’s one of those dishes that feels like a warm hug after a long day. Plus, it’s a melody of summer veggies that’s simple to throw together, making it a perfect midweek hero. Loaded with fresh flavors, it’s hearty without being heavy, and best of all, it can transform fridge odds and ends into something spectacular. So, if you’re ready to turn that produce drawer into a work of art, keep reading. Or, if you’re raring to get started—Jump to Recipe
What You’ll Need
This ingredient list is refreshingly straightforward. Chances are you already have most of these in your kitchen. Here’s what you’ll need for this vibrant veggie medley:
- Eggplant
- Zucchini
- Yellow squash
- Tomato
- Red bell pepper
- Orange bell pepper
- Onion
- Garlic
- Fresh basil
- Thyme
- Dried oregano
- Extra virgin olive oil
- Sea salt
How to Make Vegetarian Ratatouille
- Start by heating a good glug of extra virgin olive oil in a large saucepan over medium-low heat. Toss in the diced onion and minced garlic. Stir them around until the onions are translucent and the whole kitchen smells like a dream.
- Next, add in the chopped tomatoes. Give them a gentle stir and let them mingle with the onions and garlic until the flavors start to blend together.
- Now, it’s time to add the rest of the gang. Introduce the chopped eggplant, zucchini, yellow squash, red and orange bell peppers to the party. Sprinkle in some sea salt, a few sprigs of thyme, and a pinch of dried oregano.
- Lower the heat and let everything simmer gently for about 30 minutes. Stir occasionally, keeping an eye on the eggplant. You’ll know it’s done when it’s tender and the edges of the vegetables are starting to caramelize a bit.
- Before serving, toss in some freshly torn basil leaves for a burst of freshness. Give everything one last stir and get ready to dig in!
Cook’s Notes
Here’s the deal: Ratatouille is incredibly forgiving. If you have extra veggies on hand, like mushrooms or carrots, feel free to toss them in. Just keep an eye on the cooking time; firmer veggies might need a bit more time to tenderize.
- Worried about mushy vegetables? Make sure your heat is low enough to allow them to cook slowly and evenly.
- This dish can easily be made ahead of time. Store it in an airtight container in the fridge for up to three days. The flavors only deepen as it sits, making it an excellent leftover choice.
- If you’re serving this to guests, you can prepare it in advance and simply reheat gently on the stove before serving.
Make It Your Own
- For a protein boost, add in some chickpeas or white beans during the last 10 minutes of cooking.
- Swap the fresh basil for a handful of chopped parsley if that’s what you have on hand.
- Spice things up with a pinch of red pepper flakes for some heat.
- Transform it into a heartier meal by serving it over a bed of fluffy quinoa or couscous.
If you try this, I’d love to hear how it turns out — drop a comment or tag me! Your feedback means the world to me and keeps the inspiration flowing.
Related update: Vegetarian Ratatouille
Related update: Wildwood Ovens Bourbon Apple Glazed Cedar Plank Salmon
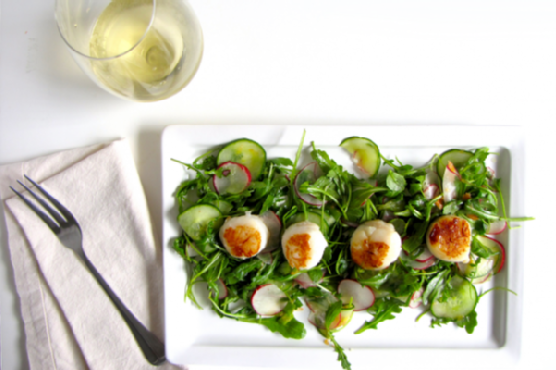
Picture this: It’s a Tuesday evening. You’ve just kicked off your shoes after a whirlwind day, and all you want is something fresh, zesty, and sophisticated on your plate without spending more time in the kitchen than you did in traffic. That’s where my Citrus Arugula Salad with Seared Scallops swoops in to save the day. It’s got that crisp, peppery bite from the arugula that I absolutely crave, the juicy pop of a Cara Cara orange, and the tender, buttery goodness of perfectly seared scallops. It sounds fancy, but trust me, it’s a cinch to throw together—and it’s bound to impress whoever’s lucky enough to join you at the table.
Jump to Recipe
What You’ll Need
Chances are you already have most of this in your kitchen, aside from maybe the scallops. But it’s the simple ingredients that really let those scallops shine.
- Arugula
- Cara Cara orange
- Radish
- English or Persian cucumber
- Green onion
- Salt
- Scallops
How to Make Citrus Arugula Salad with Seared Scallops
- First, thinly slice the radishes and cucumber. You want them delicate enough to complement the scallops, not overshadow them. Dice up the green onion, too.
- In a bowl, squeeze the juice and pulp from half of the Cara Cara orange. Add a pinch of salt and whisk it all together until it’s beautifully blended.
- Add in your radish and cucumber slices, along with a healthy handful of arugula. Toss it all together until every leaf and slice glistens with that citrusy goodness.
- Now, for the scallops: Heat a splash of oil in a pan over high heat. The pan needs to be hot, hot, hot—like sizzling enough that you can almost hear it pleading for the scallops.
- Gently place the scallops flat-side down in the pan. Space is key here, so if you have a lot of scallops, do them in batches. Crowding the pan is the enemy of that golden sear we’re aiming for.
- Let them sear undisturbed. The temptation to peek and prod is real, but resist! After a couple of minutes, check for that caramel-colored crust. Once you see it, flip them over.
- Plate your salad and place about four scallops on top. They should be served immediately to avoid any rubbery disappointments.
Cook’s Notes
Seared scallops are one of those things where less is more. Don’t overdo the seasoning; let their natural sweetness shine. Also, scallops are quick to cook and quick to turn rubbery if left too long. Watch them like a hawk, and you’ll be fine. If you want to make this ahead, prepare the salad components in advance and just sear the scallops right before serving. As for leftovers, the salad keeps well for a day, but the scallops are best enjoyed fresh out of the pan.
Make It Your Own
- Swap the arugula for spinach if you prefer a milder green.
- Replace the Cara Cara orange with blood orange for a deeper color and flavor.
- Try grilling the scallops for a smoky twist.
- For a vegetarian version, swap the scallops for crispy tofu slices.
If you try this, I’d love to hear how it turns out—drop a comment or tag me! Whether it’s a quick weeknight dinner or a date night delight, I hope you find this as much of a joy to make as it is to eat. Enjoy!
Related update: Citrus Arugula Salad with Seared Scallops
Related update: Vegetarian Ratatouille
Related update: Pear Salad With Walnuts and Blue Cheese
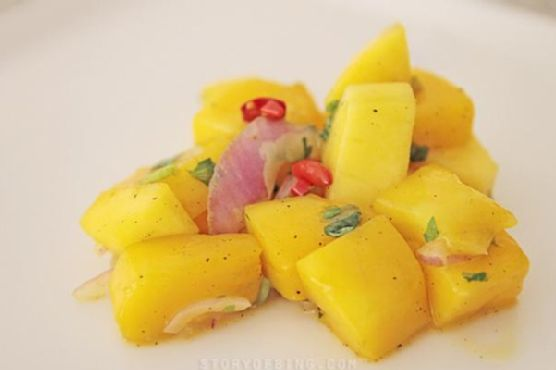
I remember the first time I tried to make Bing’s Mango Salsa. It was one of those sweltering summer days where the air conditioner is doing its best but you’re still considering just living in the fridge. I was craving something refreshing yet spicy to liven up my grilled chicken, and I had a bunch of mangoes sitting on the counter looking a bit too ripe. So, I dove into making this salsa, which turned out to be not only insanely delicious but also incredibly easy to whip up. It’s the kind of recipe you love because it makes you look like a culinary rock star with minimal effort—and it’s perfect for those last-minute BBQ invites. The combination of the sweet mangoes, zesty lime, and spicy chilis is like a little tropical vacation in a bowl. You know you need this in your life.
Jump to Recipe
What You’ll Need
The best part? Chances are you already have most of these ingredients, and they’re all about celebrating fresh, vibrant flavors.
- Sweet mangoes — the star of the show, ripe but not mushy
- Lime zest and juice — for that zesty punch
- A handful of mint leaves — or swap with coriander if you’re feeling rebellious
- 1-2 shallots or a small red onion — sliced paper-thin
- Salt and black pepper — to taste
- A sprinkle of sugar — just a pinch to balance things out
- Fresh chili — dial up the heat as per your taste
How to Make Bing’s Mango Salsa
- Start by dicing the mangoes into small cubes, about 1.5cm each. This size is perfect for ensuring every bite is juicy and flavorful.
- Toss the mango cubes into a large mixing bowl and grate the zest of one lime over them. The fragrance will hit you immediately — heaven!
- Squeeze the juice from half a lime into the bowl. Stir well, and remember, a little more lime juice can be added later if needed.
- Finely chop a bunch of mint leaves (or coriander if you’re in that camp). Add these to the bowl and give it a good mix.
- Slice the shallots or red onion as thin as you can and mix them into the mango concoction. Stir after each addition, trust me, it’s magical.
- Season with 1/2 teaspoon of salt and black pepper. Add 1 teaspoon of sugar, then stir and taste. Adjust these to your liking — it should be a delightful balance of savory, sweet, and tangy.
- Finally, chop the chillis and add them cautiously. Mix well, and taste as you go to achieve your preferred spice level.
- Cover the bowl with cling wrap and let it chill in the fridge for at least 30 minutes. This chilling time lets the flavors meld beautifully.
- Keep it chilled until you’re ready to serve. It’s best enjoyed fresh!
Cook’s Notes
Here’s a few things I’ve learned along the way:
- If you make this ahead of time, give it a good stir before serving as the juices tend to settle at the bottom.
- Leftovers can be stored in the fridge for up to 2 days, but trust me, it rarely lasts that long!
- Be mindful of the type of chili you use. Some can be much spicier than others, so add them slowly until you reach your desired heat level.
- This salsa is versatile. While it’s heavenly with grilled chicken or fish, it also makes a fantastic topping for tacos or a dip with tortilla chips.
Make It Your Own
Want to switch things up? Here are some fun variations:
- Swap the mint leaves with cilantro if you’re a fan of its bold flavor.
- Try adding some diced avocado for an extra creamy texture.
- Use pineapple or peach instead of mango for a different sweet twist.
- If you’re not a fan of heat, replace chilis with bell peppers for a milder version.
If you try this, I’d love to hear how it turns out—drop a comment or tag me! Let’s keep the kitchen adventures going. 🍍🌶️
Related update: Bing's Mango Salsa
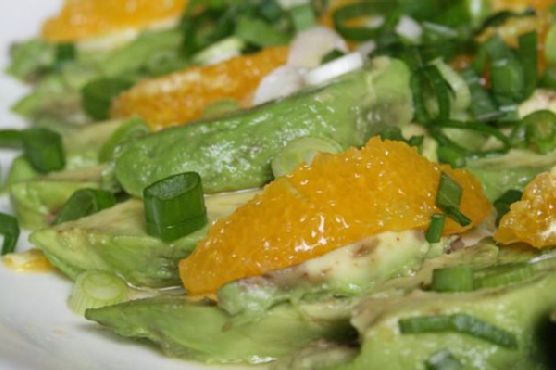
It was one of those days where I stood in front of the open fridge, hoping dinner would magically appear. You know the type, right? The sun had made a surprise appearance after a string of dreary days, and suddenly all I wanted was something fresh, vibrant, and maybe a little unexpected. That’s when the neglected oranges rolled into view, nestled next to a couple of perfectly ripe avocados. Bingo! Avocado and Orange Salad with Orange-Ginger Dressing was on the menu. It’s a salad that feels like sunshine on a plate — quick to prepare, yet impressive enough that you’ll feel like you’ve done something special. It’s got that killer combo of creamy and tangy, with the zing of ginger giving it an extra twist. Seriously, this salad is a game-changer for those nights when you want something different but can’t be bothered with too much fuss.
Jump to Recipe
What You’ll Need
This salad is all about the ingredients speaking for themselves. Chances are you already have most of this hanging around your kitchen.
- Avocados – ripe but still firm
- Oranges – sweet and juicy
- Green onions
- Orange juice – fresh is best
- Lemon juice
- Fresh ginger paste
- Agave syrup
- Olive oil
- Salt and pepper
How to Make Avocado and Orange Salad With Orange-Ginger Dressing
- Start by peeling your oranges. Cut them into segments, saving any extra juice for the dressing. Arrange the orange segments and avocado slices so they’re overlapping slightly on a platter. It should look effortlessly gorgeous.
- Take the leftover orange carcass and give it a good squeeze all over the salad, letting that sweet juice mingle with the creamy avocado. This is what dreams are made of.
- Next, slice up some green onions and sprinkle them over the salad. A pinch of salt here too to bring everything together.
- Cover the platter with cling film and pop it in the fridge. Let it chill out until you’re ready to serve.
- For the dressing, blend together orange juice, lemon juice, fresh ginger paste, agave syrup, and olive oil. Make sure to taste it — you want it balanced, so add salt and pepper as needed.
- Right before serving, pour the dressing generously over the salad. Watch as it glistens and coats everything beautifully, inviting you to dig in.
Cook’s Notes
If you’re prepping this ahead of time, keep the salad and dressing separate until you’re ready to serve. The citrus will keep the avocados from browning, but it’s always best fresh. Leftovers can be stored in the fridge for a day, but the avocados might get a bit soft. I recommend making just enough for the meal to keep everything at its peak. One more tip: make sure the ginger paste is as fresh as possible — it’s key to that lovely zing!
Make It Your Own
- Swap out the green onions for thinly sliced red onions if you prefer a bit more bite and color.
- Add some toasted almonds or walnuts for crunch. They pair beautifully with the creamy avocado.
- If you’re feeling adventurous, try adding thin slices of fennel for a mild anise flavor and an extra bit of crunch.
- For a bit of spice, sprinkle some chili flakes over the salad before drizzling with the dressing.
If you try this, I’d love to hear how it turns out — drop a comment or tag me! There’s something about this salad that just feels like a little bit of sunshine in a bowl, and I hope it brings some brightness to your table too. Enjoy, friends!
Related update: Avocado and Orange Salad With Orange-Ginger Dressing
Related update: Citrus Arugula Salad with Seared Scallops

It was one of those sticky summer afternoons when the air conditioner just couldn’t keep up, and I found myself craving something cool and refreshing. I’d been eyeing the basil plants on my kitchen windowsill, their leaves lush and inviting, and it hit me — basil coconut ice cream. It’s a little unusual, sure, but that’s part of its charm. This recipe is perfect when you’re in the mood for something a bit different yet incredibly easy to whip up. If you’re ready for a creamy, herby delight that tastes like a tropical breeze, you’re in the right place.
Jump to Recipe
What You’ll Need
The best part? You probably already have most of these ingredients in your kitchen. Just a few stars of the show to gather up, and you’re all set for a culinary adventure.
- Fresh basil leaves
- Canned full-fat coconut milk
- Honey
- Half & half
- Salt
How to Make Basil Coconut Ice Cream
- Start by heating the coconut milk and half & half in a saucepan over medium-high heat until it’s hot and just beginning to bubble gently. You’ll want to catch it right before a full boil.
- Add in the honey and a pinch of salt, stirring until they dissolve completely, giving the mixture a lovely sweet-salty balance.
- Drop in the fresh basil leaves and stir them through until they wilt down, infusing the liquid with their aromatic goodness. Remove the saucepan from heat.
- Pour the mixture into a blender, and blend until it’s silky smooth and no chunks of basil remain. If your blender leaves bits, strain the mixture through a fine sieve.
- Let the basil-infused cream cool for about 20 minutes, allowing the flavors to deepen.
- Transfer the mixture to a large container, cover, and chill it in the fridge for a few hours until completely cool.
- If you have an ice cream maker, follow your machine’s instructions to churn the mixture. If not, pour it into a freezer-safe container, and stir it every hour for about 8-10 hours to achieve the best texture possible.
Cook’s Notes
Making ice cream at home is as much about patience as it is about flavor. If you can, use fresh basil for the most vibrant taste. You can make the base a day ahead and chill it overnight, which can deepen the flavors even more. When it comes to leftovers, freeze them in a tightly sealed container. Just remember, the ice cream will harden significantly, so let it sit out for 10 minutes before scooping.
- If you don’t have an ice cream maker, don’t fret! While the texture won’t be as smooth, frequent stirring during the freezing phase will help prevent too many ice crystals from forming.
Make It Your Own
- Swap out the basil for mint leaves if you’re craving a more classic flavor combo.
- For a richer taste, replace half of the half & half with heavy cream.
- Substitute honey with maple syrup for a deeper, earthier sweetness.
- If you’re feeling adventurous, toss in a handful of dark chocolate chips during the churning process for a hint of bitterness against the sweetness.
If you try this, I’d love to hear how it turns out — drop a comment or tag me! Whether you’re enjoying it in the heat of summer or dreaming of warmer days, this basil coconut ice cream is sure to be a hit. Enjoy every refreshing scoop!
Related update: Basil Coconut Ice Cream
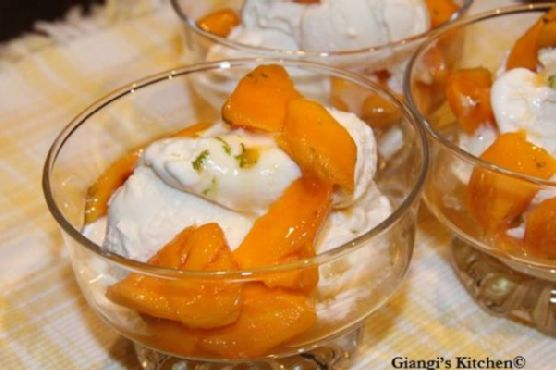
Picture this: It’s a balmy summer evening, and I’m rummaging through my kitchen, desperate for something sweet. There, on the counter, sits a perfectly ripe mango, glistening like it’s daring me to turn it into something spectacular. That’s when it hits me—Mangoes with Rum and Ice Cream. It’s the kind of dessert that feels both indulgent and delightfully easy. The rum-soaked mangoes are a tropical escape with every bite, and the ice cream? Pure creamy bliss. It’s the dessert that says, “I see your heatwave and I raise you a cooling, boozy treat.” Plus, it’s a breeze to whip up, so you can spend less time in the kitchen and more time savoring summer’s finest.
Jump to Recipe
What You’ll Need
If your pantry is anything like mine, you might already have most of what you need. The key is in a few star ingredients that really bring the magic.
- Mangoes – ripe and juicy
- Sugar
- Dark Rum
- Fresh lime juice
- Lime rind
- Vanilla Ice Cream
How to Make Mangoes with Rum and Ice Cream
- Start by peeling your mangoes. Make sure to remove all traces of green-colored flesh; you want the mangoes to be perfectly ripe and sweet.
- Next, slice the mango flesh away from the pit and cut it into pieces about a half-inch thick. Discard the pit and any fibrous bits that might cling to it.
- In a bowl, combine the sugar, dark rum, freshly grated lime rind, and lime juice. Give it a good mix until the sugar starts to dissolve.
- Add the mango slices to the rum mixture. Gently stir so each piece is bathed in that luscious liquid. The aroma will start to swirl around you, making your kitchen smell like a tropical paradise.
- Cover the bowl and let it chill in the fridge for a couple of hours. This wait is key as it allows the flavors to meld beautifully.
- When you’re ready to serve, scoop some vanilla ice cream into chilled glasses. Spoon the rum-soaked mangoes on top, making sure each serving gets a generous amount of the fragrant syrup.
Cook’s Notes
Here’s the thing about this recipe: it’s pretty forgiving. Just make sure your mangoes are ripe; underripe ones can be a bit tart and don’t soak up the rum as well. If you’re in a pinch and can’t find fresh lime, a good quality bottled lime juice will do, but fresh really gives it that zing. For storing leftovers, keep the mango mixture in an airtight container in the fridge, but I doubt there will be any left! The flavors deepen over a day or two, so if you make it ahead, it only gets better. Just store the ice cream separately.
Make It Your Own
- Swap the Rum: If dark rum isn’t your thing, try using coconut rum for a creamy twist.
- Add Some Heat: A pinch of chili flakes can add a surprising kick to the sweet and boozy mixture.
- Try a Sorbet: Replace the vanilla ice cream with a mango or coconut sorbet for a lighter version.
- Go Nutty: Sprinkle some toasted coconut flakes or chopped macadamia nuts over the top for added texture.
If you try this, I’d love to hear how it turns out—drop a comment or tag me! Your feedback and variations are always a treat to read. Enjoy every sweet, boozy bite! 🍨🥭
Related update: Mangoes with Rum and Ice Cream
Related update: Lemonade Bundt Cake
Related update: Eggplant pizzette
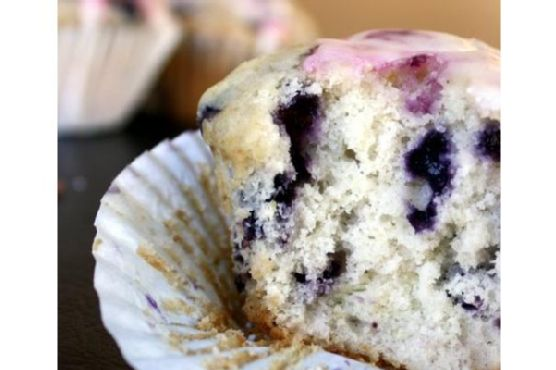
I was having one of those hectic weeks—work deadlines piling up, laundry mountain growing taller by the minute—and all I wanted was a moment of pure joy. Enter my savior: these Wild Blueberry Lemon Muffins. A burst of tart lemon and sweet summer blueberries wrapped up in a soft, buttery muffin. They’re the perfect blend of comforting and feel-good indulgence, but super easy to put together. The best part? They make your kitchen smell like heaven and taste even better! Whether you’re whipping them up for a weekend brunch or a quick weekday treat, these muffins are a little slice of bliss.
Jump to Recipe
What You’ll Need
You’re going to love how most of these ingredients are probably already sitting in your pantry or fridge. Here’s what you need:
- 2 1/2 cups all-purpose flour
- 2 1/2 teaspoons baking powder
- 1/2 teaspoon salt
- 1 cup granulated sugar
- 1/2 cup unsalted butter, softened
- 1 large egg
- 1/2 cup buttermilk
- 1 teaspoon vanilla extract
- 1 tablespoon fresh lemon juice
- 1 tablespoon lemon zest
- 1/8 cup sugar (for mashing with lemon zest)
- 1 can wild blueberries, drained
- 1/2 cup powdered sugar (for glaze)
How to Make Wild Blueberry Lemon Muffins
- Start by preheating your oven to 375°F (190°C). Line 16 muffin cups with paper liners to make cleanup a breeze.
- In a small bowl, mash 1/8 cup sugar with the lemon zest until the sugar is moistened and fragrant. This will amp up the lemony goodness.
- In a medium-sized bowl, whisk together the flour, baking powder, and salt. This dry mix is the backbone of your muffins.
- Using an electric mixer, cream the cup of sugar and butter together until light and fluffy, about 3 minutes. Add the egg, buttermilk, vanilla, and the fragrant lemon sugar, beating each in one at a time.
- Slowly incorporate the flour mixture into the wet ingredients. The batter should be smooth and inviting at this point.
- Gently fold in the wild blueberries with a large spatula. Try not to crush them—you’re aiming for bursts of berry goodness!
- Divide the batter equally into the prepared muffin tins, filling each about 3/4 full. This leaves room for them to rise beautifully.
- Bake in the preheated oven for about 35 minutes, or until a cake tester comes out clean and muffins are golden.
- Let the muffins cool for a few minutes in the pan before transferring them to a wire rack.
- While the muffins cool, whip up your glaze by combining the lemon juice, zest, and powdered sugar. Stir until smooth.
- Spoon about 1 tablespoon of glaze over each muffin, allowing it to drizzle down the sides for that enticing sweet-tangy finish.
Cook’s Notes
If you can, use wild blueberries—they have a more intense flavor and smaller size, making them perfect for muffins. Make sure to drain them well before adding to the batter to keep it from getting too wet. Store your muffins in an airtight container; they stay fresh on the counter for up to three days or can be frozen for up to a month. If you want to prepare ahead, mix the dry ingredients the night before to save time.
Make It Your Own
- Swap canned wild blueberries for fresh ones if they’re in season for a less sugary taste.
- Replace the lemon with orange zest and juice for a citrusy twist.
- Use almond extract instead of vanilla for a nutty undertone.
- Try adding a teaspoon of poppy seeds to the batter for an extra crunch.
If you try this, I’d love to hear how it turns out—drop a comment or tag me on social media! Happy baking, and may your week be as sweet as these muffins.
Related update: Wild Blueberry Lemon Muffins
Related update: Penne Arrabiata
Related update: Fast Tiramisu
Related update: Blueberry Almond Crescent Rolls

It was one of those lazy Sunday afternoons when the world seemed to move a little slower, a gentle breeze fluttering through the open window, the kind that makes you crave something comforting and sweet but not too complicated. My sweet tooth was whispering “pie” in my ear, but I wasn’t up for a full-blown kitchen marathon. Enter my Cherry-Berry Pie with Agave Nectar All-Butter Crust—a delightful, not-too-sweet pie that’s as satisfying to make as it is to eat. It’s my go-to when I need that perfect mix of summery fruitiness and buttery crust without spending all day in the kitchen. Trust me, this pie is a game-changer, and the addition of agave nectar gives it a uniquely mellow sweetness that pairs beautifully with the tart berries. Jump to Recipe
What You’ll Need
The beauty of this pie is its simple ingredient list, many of which you likely have on hand. Plus, the mix of flours and agave nectar gives the crust an irresistible texture and flavor.
- Agave nectar
- Sweet agave nectar
- Almond flour
- Frozen mixed berries
- Butter
- Frozen cherries
- Coconut flour
- Flour
- Lemon juice
- Orange extract
- Tapioca flour
- Whole wheat pastry flour
How to Make Cherry-Berry Pie With Agave Nectar All-Butter Crust
- Start by making the crust: In a food processor, pulse the dry ingredients about 5-6 times. This helps them blend evenly.
- Add 2 sticks of very cold butter, which you’ve cut into cubes. Pulse until the mixture resembles a very coarse meal, tiny butter bits are a good thing here!
- Add the agave nectar and either the fiore di Sicilia flavoring or its substitute, orange extract, one tablespoon at a time. Watch carefully for the dough to just come together.
- Divide the dough into two parts, one slightly larger than the other. This larger portion will be your base.
- Form each into a flat, round shape, wrap tightly in plastic, and refrigerate for at least 2 hours to let the butter firm up and flavors meld.
- While the dough is chilling, whip up the filling. In a large bowl, combine all the filling ingredients thoroughly. It’s going to be quite soupy, so don’t worry!
- Once the dough has chilled, let it sit out just long enough to be rollable. Roll out the larger dough disk to fit your pie dish, patching as needed.
- Wrap the pie dish with the crust in plastic and chill for another 30 minutes to set.
- Pour the berry filling into the chilled crust, then wrap the whole pie in plastic again and pop it back in the fridge.
- Roll out the remaining dough disk and use cookie cutters to cut pieces for the top crust. Get creative with shapes!
- Remove the pie from the fridge and decorate with your cut-out dough pieces, leaving some gaps for steam to escape.
- Cover the edges with foil to prevent over-browning and bake in a preheated 325°F oven for 40 minutes.
- Remove the foil and continue baking until the top is golden brown and the filling is bubbling enticingly.
- Let the pie cool slightly before slicing in to let the filling set a bit more. Enjoy!
Cook’s Notes
Here’s the scoop: keeping the butter super cold is crucial for that flaky crust we all adore. I like to freeze mine and work quickly to keep it from warming up. If you find the dough a bit too firm after chilling, let it sit out a few minutes until it’s manageable. When it comes to storage, this pie is a champ! Cover it well and it keeps nicely in the fridge for up to 4 days. If you’re making it ahead, bake it a day early; the flavors meld beautifully overnight.
Make It Your Own
Feel free to play around with the recipe a bit to suit your taste or pantry:
- Swap out the frozen cherries for fresh ones if they’re in season; just pit and halve them.
- Try maple syrup instead of agave for a more robust sweetness.
- Use a gluten-free flour blend in place of the wheat and pastry flours for a gluten-free version.
- Add a teaspoon of cinnamon or nutmeg to the filling for a spiced twist.
I hope you give this pie a whirl and let it bring a bit of sunshine into your kitchen. If you try this recipe, I’d love to hear how it turns out—drop a comment or tag me on social media! Happy baking, friends!
Related update: Cherry-Berry Pie With Agave Nectar All-Butter Crust

The first time I made this Strawberry-Mango Quinoa Salad, it was one of those chaotic weeknights where I just wanted something fresh and easy. You know the kind—work had run late, the fridge was a bit empty, and the idea of ordering takeout was so tempting. But then I remembered the sweet mangoes I had picked up on a whim, and the lonely strawberries sitting in the fridge. That’s when the idea hit me—what if I threw together a salad that was not only refreshing but also filled with vibrant, zesty flavors? This salad is the kind of dish that makes you feel like you’ve got it all together, even when life is a little messy. Plus, it’s super quick to whip up.
Jump to Recipe
What You’ll Need
This salad’s beauty lies in its simplicity and the burst of flavors from super fresh ingredients. Chances are you already have most of these in your kitchen:
- Quinoa – Nutty and satisfying, the base of our salad.
- Water
- Salt
- Fresh strawberries – Sweet, juicy, and perfect for adding a pop of color.
- Ripe mango – For that tropical twist.
- Cucumber – Crunchy and refreshing.
- Fresh mint – Bright and aromatic.
- Lime juice and zest – To give that zesty zing.
- Honey – For a touch of sweetness.
- Canned sour plain cream – Adds a creamy tang.
- Olive oil – Smooth and rich, tying it all together.
- Bell pepper – For some extra crunch and color.
How to Make Strawberry-Mango Quinoa Salad
- In a medium saucepan, combine the quinoa, water, and a pinch of salt. Bring it to a boil over medium-high heat. Once it starts bubbling, lower the heat and let it simmer. Cover the pan and let it cook for about 15 minutes, until the liquid is just absorbed. You’ll know it’s done when you see those little quinoa tails unfurling.
- Spread the cooked quinoa out on a baking sheet. Let it cool for about 20 minutes. It should be warm to the touch but not steaming hot—perfect for absorbing all the dressing goodness later.
- While the quinoa is cooling, grab a large bowl. Whisk together the lime juice, lime zest, honey, sour cream, and olive oil. The mixture should be smooth and slightly thick, with a lovely citrusy aroma.
- Add the cooled quinoa to the bowl. Then toss in the strawberries, mango, cucumber, and mint. Toss everything well to make sure each bite is balanced.
- Season with a pinch of salt and a grind of pepper to taste. Give it one last gentle toss, and you’re ready to serve immediately.
Cook’s Notes
This salad is as forgiving as they come. If your quinoa isn’t quite cool when you mix it with the dressing, don’t sweat it—just let it sit a little longer before adding the other ingredients. Also, always taste as you go; if your mangoes are particularly sweet, you might want to dial back a bit on the honey. Leftovers can be stored in an airtight container in the fridge for up to two days. But let’s be real, it rarely lasts that long!
Make It Your Own
Here’s where you can get playful with it:
- Swap the mango for juicy pineapple if that’s what’s on hand or in season.
- For a bit of nuttiness, toss in a handful of toasted almonds or cashews.
- Add a spicy kick by mixing in some finely chopped jalapeños or a dash of chili flakes.
- If you’re a cheese lover, crumble some feta or goat cheese on top before serving.
If you try this, I’d love to hear how it turns out—drop a comment or tag me! Whether you stick to the original or put your own twist on it, this salad is sure to bring a bit of sunshine to your table. Enjoy!
Related update: Strawberry-Mango Quinoa Salad
Related update: Carrot and Cabbage Salad With Coriander+cumin Dry Rub
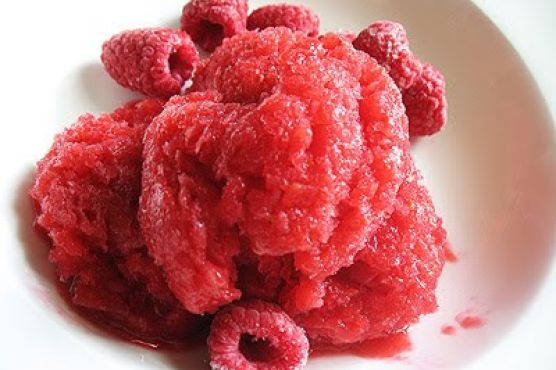
Picture this: it’s a sweltering summer afternoon, and you’re yearning for something refreshing yet a little out of the ordinary. You’ve already got one foot in the kitchen, rifling through the freezer, when you stumble upon a forgotten stash of frozen raspberries. Suddenly, inspiration hits you like a cool breeze. Why not whip up a sorbet that’s as tart as your mood and just a tad mischievous, with a spicy kick to keep things interesting? This Tart Raspberry Sorbet with a Hint of Heat is exactly what you need. It’s the kind of recipe that doesn’t just cool you down but also gives your taste buds a little wake-up call. Plus, it’s ridiculously easy to make—perfect for those moments when you want to impress but can’t be bothered with a culinary masterpiece.
Jump to Recipe
What You’ll Need
You might already have most of these tucked away in your pantry and freezer, which makes this sorbet a breeze to throw together on a whim.
- Frozen raspberries – The star of the show, bringing their tart and vibrant flavor.
- Raspberry jam – For an extra burst of raspberry goodness and a bit of sweetness.
- White grape juice – To lend a subtle sweetness and some liquid gold.
- Cardamom powder – Adds an exotic warmth that pairs beautifully with the raspberries.
- Green chili – Just a little, for that unexpected kick.
- Lime juice – To enhance the tartness and add a citrusy zing.
How to Make Tart Raspberry Sorbet with a Hint of Heat
- In your food processor, combine the frozen raspberries, raspberry jam, and white grape juice. Add a pinch of cardamom powder, a small piece of green chili, and a generous squeeze of lime juice.
- Process the mixture until it’s smooth and vibrant. Listen for the change in sound as the chunks of raspberry become a luscious puree.
- Push the mixture through a fine strainer to remove most of the seeds. This part might seem tedious, but trust me, your teeth will thank you later.
- Transfer the silky mixture to a container, cover, and pop it in the freezer. Every couple of hours, check on it and give it a good stir. This keeps the texture smooth and prevents large ice crystals from forming.
- As the sorbet nears the end of its freezing journey, consider shaping it into enticing balls using an ice cream scoop or a large spoon. It’s not just about looks—it helps the sorbet melt evenly when served.
- Once frozen, let your sorbet thaw for a few minutes before serving. This little pause is crucial, especially if your freezer tends to be overzealous.
Cook’s Notes
Let’s talk about some nuances that can take this sorbet from good to unforgettable. First off, if you’re worried about the heat, start by adding just a sliver of green chili. You can always add more, but you can’t take it out. As for storage, this sorbet keeps well in the freezer for up to two weeks, though it’s best enjoyed within the first few days when the flavors are at their peak.
If you’re planning ahead, make the sorbet the day before you want to serve it. This allows it to firm up perfectly. If you end up with leftovers (unlikely, but it happens), let them soften a bit before diving back in.
Make It Your Own
This sorbet is a canvas for your creativity. Here are a few ideas to make it uniquely yours:
- Swap the raspberries for frozen strawberries for a sweeter, less tart version.
- If you’re a mint fan, add a handful of fresh mint leaves to the food processor for a refreshing twist.
- Looking for an adult-only version? Replace the white grape juice with a splash of Prosecco or a sweet white wine.
- For a nutty contrast, sprinkle a handful of toasted pistachios over your sorbet before serving.
If you try this, I’d love to hear how it turns out—drop a comment or tag me! Your adventures in sorbet-land might just inspire someone else to give it a whirl. Enjoy your chill time!
Related update: Tart Raspberry Sorbet with a Hint of Heat
Related update: S’mores-n-berry Bars for National S’mores Day – August 10
Related update: Pumpkin gnocchi with basil and Parmesan

Picture this: it’s the peak of summer, and I’m standing in my kitchen, trying to figure out a way to cool off and use up the abundance of strawberries I overzealously picked at the farm last weekend. That was the moment when the idea of roasted strawberry coconut milk ice cream popped into my head. This recipe is a savior when the sun is relentless, with its creamy texture and the lush, roasted notes of strawberries and vanilla that take me to a blissful place. Plus, it’s a dairy-free treat that doesn’t skimp on flavor. One bite, and it’s like a mini-vacation!
Jump to Recipe
What You’ll Need
Chances are you already have most of this in your pantry or fridge. We’re keeping it simple, yet the flavors are anything but.
- 1 pound fresh strawberries
- 1/2 cup raw cane sugar, divided
- 1 can full-fat coconut milk
- 1 teaspoon ground cardamom
- 1 vanilla bean
How to Make Roasted Strawberry Coconut Milk Ice Cream
- Preheat your oven to 350°F (175°C). Hull and halve the strawberries, then toss them with 1/4 cup of the raw cane sugar. Spread them out on a baking sheet lined with parchment paper. Roast in the oven for about 25 minutes, until they’re soft, syrupy, and a little caramelized around the edges.
- In a saucepan over medium heat, combine the full can of coconut milk, the remaining 1/4 cup of raw cane sugar, and the cardamom. Using a small knife, split the vanilla bean lengthwise and scrape the seeds into the coconut milk mixture. Toss in the vanilla pod too, because why not? Let it heat gently until it’s steaming and the sugar dissolves completely.
- Remove the saucepan from the heat and let the mixture steep for about 10 minutes, allowing the vanilla to infuse through the coconut milk. Remove the vanilla bean pod after steeping.
- Once the strawberries have cooled slightly, blend them until smooth (a few chunky bits are fine if you like texture). Stir the strawberry puree into the coconut milk mixture, giving it a pretty pink hue.
- Transfer the mixture to a bowl and refrigerate until thoroughly chilled, at least a couple of hours. If you’re impatient like me, you can speed this up by placing the bowl in the freezer and stirring every 15 minutes.
- Pour the chilled mixture into an ice cream maker and churn according to the manufacturer’s instructions until it reaches a soft-serve consistency.
- Transfer to an airtight container and freeze for at least four hours or until firm enough to scoop.
Cook’s Notes
This ice cream is best made a day in advance to allow the flavors to meld and develop. If you find yourself without an ice cream maker, no worries! You can pour the chilled mixture into a loaf pan, freeze it, and stir every 30 minutes for a few hours until it starts to freeze evenly. Just keep in mind that the texture won’t be as creamy as churned. Store leftovers (if there are any!) in the freezer for up to two weeks, but it’s so good, I doubt it’ll last that long.
Make It Your Own
- Swap the strawberries for raspberries or blackberries for a tangy twist.
- Add a tablespoon of balsamic vinegar with the strawberries before roasting for a sophisticated touch.
- Stir in some chopped dark chocolate right before the ice cream sets for a delightful crunch.
- Boost the flavor with a tablespoon of rum or bourbon in the coconut milk mixture before chilling.
If you try this, I’d love to hear how it turns out — drop a comment or tag me! Making this ice cream is like hitting pause on summer’s heat, and I hope it brings you as much joy as it does me. Enjoy! 🍓🌴
Related update: Roasted Strawberry Coconut Milk Ice Cream
Related update: Vanilla Cream Cakes, Easy and Fluffy Holiday Cakes