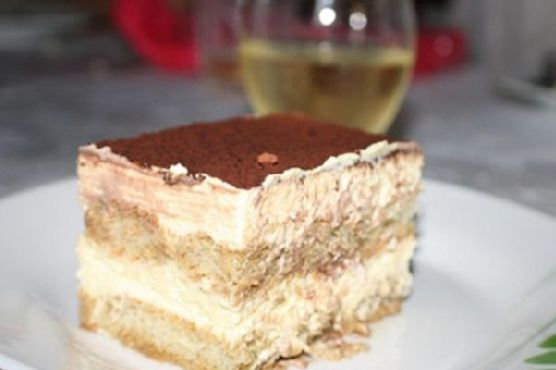
Last Tuesday, in the midst of an unexpected craving for something sweet and slightly elegant, I found myself in a mini kitchen dilemma. I had promised myself a chill evening with something decadent but not labor-intensive. As I rummaged through my pantry, a vision of tiramisu danced through my mind. But not just any tiramisu — a faster, weeknight-friendly version with all the indulgence and none of the fuss. This recipe is my go-to for those dessert emergencies; it’s quick to whip up, doesn’t require baking, and is a surefire way to impress anyone who happens to drop by (or just yourself, let’s be real). It’s creamy, rich, and perfectly layered with just a hint of coffee and liqueur. Trust me, you’ll wonder why you haven’t always made tiramisu this way.
Jump to Recipe
What You’ll Need
If you’re anything like me, you’ll likely find most of these ingredients already nestled in your pantry or fridge. Here’s what you’ll need to create this dreamy dessert:
- Egg yolks – the foundation of our creamy filling.
- Cane sugar – to sweeten things up.
- Mascarpone cheese – the star of the show, lending that iconic tiramisu flavor.
- 35% heavy whipping cream – for that luscious texture.
- Ladyfingers – to soak up all that goodness.
- Rum, brandy, or coffee liqueur – your choice for a boozy touch.
- Coffee – the essential bitter balance.
- Unsweetened cocoa powder – for dusting and drama.
- Vanilla sugar – adds a subtle hint of vanilla without the fuss.
How to Make Fast Tiramisu
- First, brew a fresh cup of coffee and let it cool to room temperature. Once cooled, add a splash of your chosen liqueur for a warm, aromatic twist.
- In a mixing bowl, whip the 35% heavy whipping cream until soft peaks form. If you have vanilla sugar on hand, toss it in for a hint of sweetness. Then, pop it in the fridge to chill.
- In another bowl, beat the egg yolks with 6 tablespoons of cane sugar until the mixture is thick and has taken on a lovely lemon color.
- Fold in the mascarpone cheese into the egg yolk mixture and continue to beat until everything is smooth and well-mixed. Add vanilla sugar if you haven’t already.
- Gently fold in the whipped cream from the fridge, taking care not to deflate the mixture. You want it light and airy.
- Quickly dip each ladyfinger into the cooled coffee mixture, ensuring they’re soaked but not soggy. Arrange them snugly in a 26cm x 40cm pan.
- Spread half of the mascarpone mixture over the ladyfingers, smoothing it out with a spatula.
- Repeat the process with another layer of coffee-soaked ladyfingers, but this time, lay them in the opposite direction.
- Top with the remaining mascarpone mixture, spreading it evenly to cover all the ladyfingers.
- Sprinkle a generous dusting of unsweetened cocoa powder over the top. This not only adds flavor but gives that classic tiramisu look.
- Refrigerate for at least 6 hours to let the flavors meld and the dessert set. Patience is key here!
Cook’s Notes
Chilling is crucial for tiramisu; it allows the flavors to develop and the layers to set, so resist the urge to dive in too early. If you’re in a time crunch, 4 hours will do, but 6 is ideal. This tiramisu keeps well in the fridge for up to 3 days, making it a great make-ahead dessert for gatherings. Just be sure to store it in an airtight container to prevent it from absorbing any fridge odors. When serving, a sharp knife and a clean spatula will ensure neat slices. And while it’s not traditional, a sprinkle of shaved dark chocolate can add a delightful flavor touch.
Make It Your Own
Sometimes, it’s fun to shake things up. Here are a few ideas:
- Swap the coffee for strong chai tea and the liqueur for spiced rum for a chai-inspired twist.
- Use chocolate ladyfingers for an extra hit of cocoa goodness.
- For a non-alcoholic version, substitute the liqueur with vanilla extract for that added depth of flavor.
- Try topping with matcha powder instead of cocoa for a unique, earthy flavor profile.
If you try this, I’d love to hear how it turns out — drop a comment or tag me online! Whether it’s a quiet night in or a dinner party finale, this tiramisu is set to impress. Happy indulging!
Related update: Fast Tiramisu
Related update: Whole Wheat Blueberry Brownies

It was one of those evenings when you open the fridge and just sigh, you know what I mean? It had been a long day, and I wanted something delicious but low-key. There it was, a can of shrimp I had almost forgotten about. That’s when inspiration hit—breaded shrimp with a spicy mayo dip! It’s the kind of dish that feels like a cheat: super quick to make, but everyone will think you’re some kind of kitchen wizard. Perfect for when friends drop by unannounced or when you’re just craving something crispy and spicy. Trust me, this Breaded Shrimp and Spicy Mayo Appetizer is about to become your new go-to.
Jump to Recipe
What You’ll Need
You probably have most of these ingredients hanging out in your pantry already, and if not, they’re easy enough to grab at any grocery store. Here’s what you’ll need:
- All-purpose flour
- Bread crumbs
- Chili powder
- Egg
- Garlic powder
- Mayonnaise
- Onion powder
- Suya pepper
- Salt
- Canned shrimps
- Sriracha sauce
How to Make Breaded Shrimp and Spicy Mayo Appetizer
- Start by peeling and deveining your shrimp. You can leave the tails on for a bit of extra crunch and a nicer presentation if you like.
- Season the shrimp with suya pepper and set them aside to let the flavors sink in.
- Whisk the egg in a small bowl and set it aside as your dipping station.
- In another bowl, combine your all-purpose flour with onion powder, garlic powder, salt, and chili powder.
- Take each seasoned shrimp and dredge it in the seasoned flour, making sure it’s well-coated. The spices should cling to every curve.
- Dunk the floured shrimp into the egg mixture, ensuring they’re nice and gooey.
- Coat them in the bread crumbs; press gently so the crumbs stick fully.
- Heat up a pan with oil for frying until it’s hot but not smoking. Fry the shrimp until golden brown on both sides, about 2-3 minutes per side.
- For the spicy mayo, mix 2 tablespoons of mayonnaise with 1 tablespoon of sriracha sauce until well combined. It should be a lovely salmon pink color.
- Serve your crispy shrimp with the spicy mayo on the side for dipping. Enjoy the crunchy, spicy goodness!
Cook’s Notes
You want to make sure your oil is hot enough before you start frying; otherwise, your shrimp will absorb too much oil and become soggy. If you’re making this for a crowd, you can fry the shrimp earlier and keep them warm in a low oven. Leftovers can be stored in an airtight container in the fridge and reheated in the oven to keep them crispy. I wouldn’t recommend microwaving them—no one likes limp shrimp!
Make It Your Own
- Swap the shrimp for crispy tofu if you’re catering to vegetarians. Just make sure to press the tofu well before seasoning.
- If you love extra heat, add more sriracha or even a dash of hot sauce to the spicy mayo.
- Try using panko instead of regular bread crumbs for an extra-crunchy texture.
- If you’re out of suya pepper, a mix of cayenne and paprika can add that smoky heat.
If you try this, I’d love to hear how it turns out—drop a comment or tag me! I’m always excited to see how you guys make these recipes your own. Happy cooking!
Related update: Breaded Shrimp and Spicy Mayo Appetizer
Related update: Hush Puppies
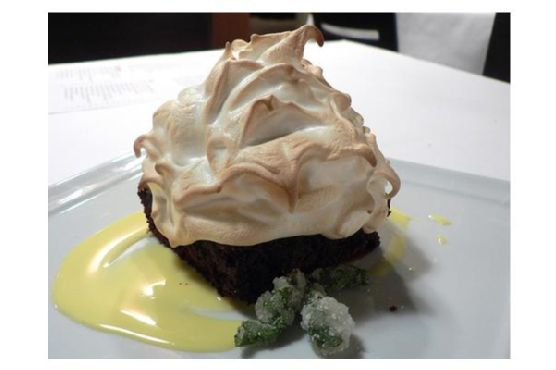
Picture this: It’s a Friday night, and you’ve had one of those weeks where everything felt like a never-ending to-do list. You’re craving something special, a little dramatic even, to kick off your weekend with flair. That’s when I remembered Baked Alaska. It’s one of those desserts that looks like a total showstopper but is actually super manageable to whip up. I love how it combines the coolness of ice cream, the soft texture of cake, and a toasty meringue that you can’t help but admire. It’s great because you can make it ahead of time, and it doesn’t require any fancy equipment. Seriously, if I can do it, anyone can. You just have to get over the idea that baking something on top of ice cream is somehow impossible — spoiler: it’s not, and it’s ridiculously fun. Jump to Recipe
What You’ll Need
Let’s be real: you’ve probably got most of this stuff on hand already, except maybe the ice cream. But hey, any excuse to grab a pint, right?
- A round cake (store-bought or homemade, your call!)
- Ice cream (about 1/2 gallon of your favorite flavor)
- Egg whites (from about 3 large eggs)
- Cream of tartar
- Powdered sugar
How to Make Baked Alaska
- Start by greasing a 7-inch bowl with a flavorless oil or unsalted butter. This bowl should be just big enough to snugly hold half a gallon of ice cream, but no wider than your cake round.
- Let your ice cream soften a bit so it’s workable. Then pack it tightly into the bowl. Pop it back into the freezer until it hardens — about an hour should do.
- For the meringue, beat your egg whites until they are foamy. Add a pinch of cream of tartar and keep whipping until you see stiff peaks. This is when the meringue holds its shape firmly.
- Gently fold in the powdered sugar, a bit at a time, to avoid deflating all that nice air you just whipped in.
- Once you’re ready to assemble, place your round cake on a plate that’s slightly larger than the cake itself.
- To unmold the ice cream, center it over the cake. If it’s being stubborn and won’t release from the bowl, run a bit of warm water over the outside of the bowl for a few seconds.
- Time to “frost” it! Cover the cake and ice cream completely with meringue, going wild with a spoon to create peaks and swirls. Don’t be shy — more is more with meringue.
- Bake your masterpiece in a preheated oven at 450°F for about 6-7 minutes, until those meringue peaks are beautifully golden brown.
- Pop it back in the freezer until you’re ready to serve. It’ll keep just fine for a day or two.
Cook’s Notes
A couple of quick tips to save your sanity: First, make sure your bowl is really cold to help the ice cream set faster. If you’re nervous about the meringue deflating, sift the powdered sugar first; it makes a surprising difference. And for those moments when the ice cream just won’t release, a quick dip in warm water works like magic!
Baked Alaska is a dream to make ahead. You can do all the components a day or two before and just assemble it the day of. Leftovers can be stored in the freezer, but they might lose a bit of their magic.
Make It Your Own
- Switch out the vanilla ice cream for something more adventurous like coffee or pistachio for a gourmet spin.
- Use a chocolate or lemon cake base instead of vanilla to complement or contrast your ice cream choice.
- Add a layer of jam between the cake and ice cream for a fruity surprise that cuts through the richness.
- Feeling nutty? Toss some toasted almonds or hazelnuts into the meringue for a crunchy texture.
If you try this, I’d love to hear how it turns out — drop a comment or tag me in your photos! Let’s see how your Baked Alaska stacks up. Happy baking, friends!
Related update: Baked Alaska
Related update: Rugelach

It was one of those random Tuesday nights when my sweet tooth orchestrated a full-blown coup d’état. You know the kind—no amount of Netflix snacking could quell the uprising. I needed something decadent, something with a little kick. Enter: Chocolate and Szechuan Peppercorn Brownies. These brownies aren’t just another chocolate fix; they dance on your taste buds with a spicy, aromatic surprise. Imagine the rich, fudgy goodness of classic brownies with a cheeky Szechuan twist. Intrigued? You should be.
Jump to Recipe
What You’ll Need
When I say you probably have most of this already, I mean it. The secret stars here are the **Szechuan peppercorns** and **cinnamon stick**. Trust me; they make all the difference.
- 1 cup **brown sugar**
- 1/2 cup **butter**
- 1 **cinnamon stick**
- 3 **eggs**
- 1 tablespoon **espresso** (brewed or powder)
- 3/4 cup **flour**
- 1/2 cup granulated sugar
- 1/2 cup **heavy cream**
- 1 teaspoon **kosher salt**
- 1/4 cup milk
- 1 tablespoon **Szechuan peppercorns**
- 1 cup semisweet chocolate chips
- 4 ounces **unsweetened chocolate**
- 1/4 cup unsweetened cocoa powder
- 1 teaspoon **vanilla extract**
How to Make Chocolate and Szechuan Peppercorn Brownies
- Preheat your oven to 350°F (175°C) and grease an 8×8 baking dish.
- In a large sauté pan over medium heat, melt the butter. Add the **Szechuan peppercorns** and **cinnamon stick**. You’ll know it’s ready when the butter stops foaming and you see those lovely browned bits at the bottom—around 5 minutes.
- Meanwhile, in a double boiler or microwave, melt the **unsweetened chocolate** and semisweet chocolate together. Stir in the **espresso** for that extra depth.
- Remove the peppercorns and cinnamon stick from the butter (straining works wonders). Return the butter to the pan and stir in the sugars, milk, vanilla, and salt. Then mix in the chocolate-espresso concoction along with the cocoa powder.
- Beat in the eggs one at a time, ensuring each is well incorporated. Finally, fold in the flour gently until the batter is just mixed.
- Pour the batter into your prepared dish and bake for 25-30 minutes. A tester should come out mostly clean—feel free to underbake for extra gooeyness.
- Once the brownies are cooled, it’s ganache time! Simmer the heavy cream and peppercorns in a small pot. Strain out the peppercorns and stir in the semisweet chocolate chips until you’ve got a silky ganache. Spread this over the brownies and, for pro-level firmness, refrigerate them until the ganache sets.
Cook’s Notes
These brownies are best enjoyed the day they’re made, but let’s be real—brownies never last long, do they? If they somehow do, keep them in an airtight container in the fridge for up to a week. The ganache will harden a bit, but it just adds to the chewy texture when you bite into them. If you’re a make-ahead kind of person, you can make the brownies a day in advance and ganache them right before serving.
If you find your brownies a bit too spicy or not spicy enough, play around with the amount of Szechuan peppercorns next time. Some like it hot!
Make It Your Own
- **Nutty Variation**: Swap half the flour for almond meal for a nutty, chewy twist.
- **Milk Chocolate Fans**: Use milk chocolate chips in the ganache instead of semisweet for a creamier topping.
- **Coffee Lovers**: Double the espresso for an intensely rich mocha brownie.
- **Spice It Up**: Toss a pinch of cayenne into the batter for those who crave a more pronounced kick.
If you try this, I’d love to hear how it turns out—drop a comment or tag me! And remember, life is too short to skip dessert. Enjoy every fudgy, peppery bite!
Related update: Chocolate and Szechuan Peppercorn Brownies
Related update: Homemade Banana Bread

Picture this: It’s a chilly Wednesday evening, and I’ve got exactly 15 minutes before my friends show up for our weekly Wine & Whine night. The fridge is looking a bit sparse, but I spot some leftover brie from last weekend and a carton of raspberries that are starting to look a tad too ripe. As I rummage through my pantry, I stumble upon a forgotten stash of phyllo shells. A lightbulb moment strikes—why not whip up some White Chocolate Raspberry Brie Cups? They’re quick, ooze class with minimal effort, and the combination of creamy, tangy, and sweet is an absolute game-changer. Trust me, these little bites are what every Wednesday evening dreams of becoming.
Jump to Recipe
What You’ll Need
You might already have most of these on hand, which means fewer trips to the store—score!
- Brie – The creamy heart of our cups.
- Athens phyllo shells – Crunchy, flaky, ready-to-go lifesavers.
- Raspberries – Fresh and slightly tart.
- Raspberry preserves – For that extra berry punch.
- White chocolate – The sweet base to balance it all out.
How to Make White Chocolate Raspberry Brie Cups
- Preheat your oven to 350 degrees. This gives us just enough time to assemble everything.
- Line a baking sheet with parchment paper. This helps prevent any sticky messes and makes cleanup a breeze.
- Place 1 teaspoon of white chocolate in the bottom of each phyllo shell. The chocolate will melt into a sweet, gooey foundation.
- Top with chunks of brie. Go generous here—the brie should be the star of the show.
- Add about 1/2 teaspoon of raspberry preserves on top of the cheese. This layer should start to glisten.
- Bake for 8 minutes, or until the corners of the phyllo shells turn golden and the cheese is bubbling away.
- Carefully remove from the oven and top with a small dollop of extra raspberry jam. Trust me, it’s worth it.
- Place back in the oven for just 1 more minute to let the jam settle.
- Finally, crown each cup with a fresh raspberry. Serve them hot—the contrast of temperatures is divine.
Cook’s Notes
Don’t overstuff the shells; they need some space to breathe and bake properly. If you’re prepping for a party, you can assemble these up to a day in advance. Just cover and refrigerate them, then bake right before serving. These cups are best enjoyed fresh, but if you have leftovers (unlikely!), store them in an airtight container in the fridge. Pop them back in a warm oven for a few minutes to re-crisp.
Make It Your Own
- Swap the brie for camembert if you’re feeling adventurous—another creamy delight.
- Try a darker chocolate for a less sweet, more sophisticated bite.
- Substitute the raspberry preserves with apricot jam for a surprise twist.
- Add a thin slice of prosciutto under the brie for a savory kick.
If you try this, I’d love to hear how it turns out—drop a comment or tag me! Wine & Whine nights are my favorite, and I hope these cups make yours special too.
Related update: White Chocolate Raspberry Brie Cups
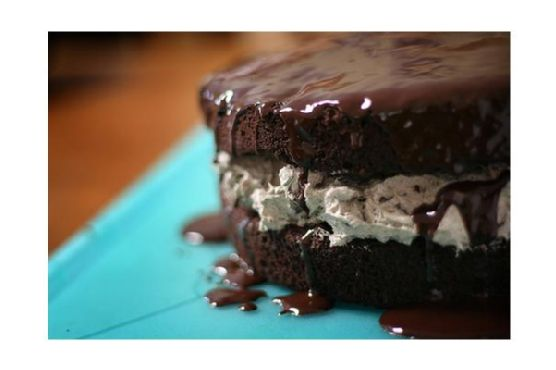
It was one of those weeks where everything felt like a bit too much—work stress, social commitments, and a never-ending to-do list. I wanted to treat myself and my family to something indulgent but didn’t have the energy for an elaborate dessert. That’s when I remembered my Oreo Cake recipe, the ultimate no-bake comfort food that feels like a hug on a plate. It’s like having a sundae in cake form, with layers of creamy vanilla ice cream and that iconic Oreo crunch. Plus, it’s a crowd-pleaser with minimal effort. Win-win, right?
Jump to Recipe
What You’ll Need
This ingredient list is a dream come true for those last-minute dessert cravings. Chances are you already have most of this delightful ensemble in your pantry or freezer.
- 1/2 cup butter
- 1 can chocolate syrup
- 1 container Cool Whip
- 1 package Oreo cookies
- 1 gallon vanilla bean ice cream
How to Make Oreo Cake
- Crumble the entire package of Oreo cookies. Keep about 1/3 of the crumbs aside for the topping.
- In a mixing bowl, combine the melted butter with the remaining 2/3 of the cookie crumbs. Stir until the mixture resembles wet sand.
- Press this buttery Oreo mixture firmly into the bottom of a long cake pan. This will be your deliciously crunchy crust.
- Scoop out half a gallon of vanilla bean ice cream and spread it evenly over the crust. Let it sit for a minute or two to soften a bit if needed.
- Pour half the can of chocolate syrup over the ice cream layer, spreading it gently with the back of a spoon.
- Layer on the Cool Whip, smoothing it out into an even layer that reaches all the corners.
- Sprinkle the reserved Oreo crumbs over the top, followed by a drizzle of the remaining chocolate syrup.
- Cover the cake pan with foil or plastic wrap and freeze it overnight, or for at least 12 hours, to ensure it sets beautifully.
Cook’s Notes
Here’s a little tip: this cake is best served with a bit of time out of the freezer, about 10-15 minutes, so it softens just enough to cut easily. If you’re planning to make this in advance, it can be frozen for up to a week—just make sure it’s well-covered to prevent freezer burn. As for leftovers (if there are any!), they keep nicely in the freezer for about another week.
- Ensure the ice cream is slightly softened before spreading it, or you might end up with an uneven layer.
- If you want stronger chocolate flavor, feel free to add more syrup according to your taste.
Make It Your Own
- Swap the vanilla bean ice cream for chocolate or mint chocolate chip for an interesting twist.
- Use peanut butter sandwich cookies instead of Oreos for a nutty flavor that’s simply irresistible.
- Add a layer of sliced bananas between the ice cream and Cool Whip for a fruity surprise.
- If you’re a coffee lover, drizzle some cooled espresso along with the chocolate syrup for a mocha kick.
If you try this Oreo Cake, I’d love to hear how it turns out! Drop a comment below or tag me in your pictures—sharing your sweet creations makes my day!
Related update: Oreo Cake
Related update: Valentine Hearts
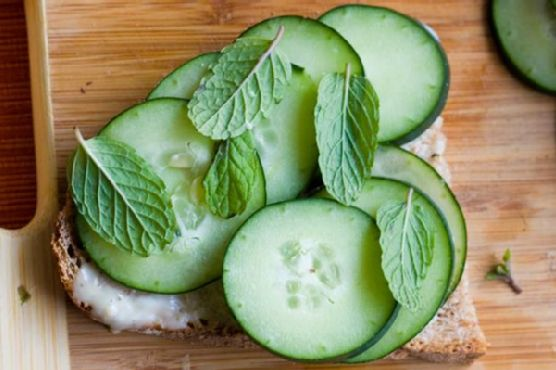
It was one of those gloriously lazy Sunday afternoons when the sun was streaming through the kitchen window, painting everything in a warm, golden hue. I found myself craving something simple yet sophisticated to nibble on while sipping a freshly brewed pot of Earl Grey. That’s when the idea of Cucumber Mint Tea Sandwiches popped into my head. These little bites are like a garden party in your mouth — refreshing, slightly spicy, and with a hint of sweet earthiness. They’re perfect for when you want to impress your friends but also fit perfectly into a no-fuss, no-mess vibe. Trust me, once you try these, they’ll become your go-to for every casual gathering or solo indulgence.
Jump to Recipe
What You’ll Need
Honestly, you probably have most of these ingredients lounging in your pantry or fridge already. And if not, they’re super easy to find on your next grocery run.
- Bread (your choice – think classy yet sturdy)
- Cucumber (cool, crisp, and refreshing)
- Wasabi Maple Spread (the secret zing)
- Black pepper grinder (for that fresh, subtle heat)
- Fresh mint leaves (fragrant and cooling)
- Fresh dill (herbaceous and bright)
- Vegenaise (creamy and delightful)
- Maple syrup (just a touch of sweetness)
- Wasabi powder (for that kick)
How to Make Cucumber Mint Tea Sandwiches
- Start by whipping together the wasabi maple spread. Combine vegenaise, a dash of maple syrup, and a sprinkle of wasabi powder until it’s smooth and slightly spicy.
- Thinly slice the cucumber. You can go for thick, crunchy slices if you’re feeling bold, or thin, silky ones for a more delicate bite. Either way, they should be refreshingly crisp.
- Gather your fresh mint leaves and dill. Rinse them under cold water and pat them dry with a clean kitchen towel. You want them to be fresh and vibrant.
- Spread a very thin layer of your wasabi maple spread on all the inside surfaces of the bread slices. It’s all about that flavor balance, not overpowering.
- Layer your cucumber slices neatly on top of the spread. Feel free to overlap them slightly. It’s like building a little cucumber brick wall.
- Add a layer of mint and dill. You can mix them up in each sandwich or go half mint, half dill if you like to keep your flavors organized.
- Grind some fresh black pepper over the top of the herbs and cucumbers. This will tie all the flavors together beautifully.
- Close each sandwich with another piece of bread and gently press down. Then, slice them into charming quarter cubes or triangles. Presentation is key!
- Plate the sandwiches, and if you’re feeling fancy, sprinkle a few edible flowers around for a pop of color and whimsy.
Cook’s Notes
These sandwiches are meant to be a fresh and light snack, so fresh ingredients are key. Make sure your cucumber is firm and your herbs are not wilting. Want to make them a few hours ahead? No problem! Just cover the platter with a slightly damp paper towel and wrap tightly with plastic wrap to keep everything moist and fresh. Leftovers (if you have any, which I doubt) can be stored in an airtight container in the fridge for up to a day — but they’re best fresh.
Make It Your Own
- Swap out the bread for a whole grain or seed variety for extra texture and flavor.
- Replace the wasabi maple spread with a spicy sun-dried tomato spread for a Mediterranean twist.
- Add a layer of thinly sliced radishes for an extra peppery crunch.
- Sprinkle a dash of red pepper flakes inside for those who love an extra spicy kick.
If you try this, I’d love to hear how it turns out — drop a comment or tag me in your tea-time creations! Happy sandwich making!
Related update: Cucumber Mint Tea Sandwiches
Related update: Vegetarian Spring Rolls With Garlic Lime Sauce

Last Tuesday, I found myself staring into the fridge at 7 PM, wondering what on earth I could whip up for a little evening gathering with friends. You know those days when you just need a recipe that’s not only impressive but also stress-free? That’s when I stumbled upon the forgotten block of *blue cheese* nestled next to a jar of *fig jam*. A brainwave hit me: Blue Cheese Tartlets with Fig Jam and Walnuts! These beauties are the perfect blend of savory and sweet, and trust me, they’re much easier to make than you’d think. Each bite is a little symphony of flavors and textures. Plus, they’re great for making ahead and pop in the oven the moment your guests ring the doorbell.
Jump to Recipe
What You’ll Need
The ingredient list for these tartlets is refreshingly simple. Chances are you already have most of these in your pantry:
- Blue cheese
- Butter
- Flour
- Fig jam
- Walnuts
- Orange zest
- (Optional) Fresh thyme leaves
How to Make Blue Cheese Tartlets With Fig Jam and Walnuts
- Preheat your oven to 350°F (175°C). Lightly grease the cups of your mini muffin pans unless they’re non-stick. No one wants a sticky situation!
- In a medium bowl, cream together the *blue cheese* and *butter*. The mixture should be smooth and creamy, with that unmistakable aroma of rich cheese.
- Add the flour to the bowl and use your hands to bring the dough together. It might take a little coaxing, but be patient — the dough will reward you with a tender crust.
- Divide the dough into 30 pieces and roll them into balls. If you prefer a more delicate shell, go for 36 pieces.
- Using lightly floured fingers, press each dough ball against the sides of the mini tart pan until the dough rises slightly above the rim. This ensures that lovely shell shape.
- Bake the shells for 15 minutes, until they are golden brown and smell like heaven. Let them cool in the pans for about 5 minutes, then transfer to a wire rack to finish cooling completely.
- Once cooled, spoon a dollop of *fig jam* into each tartlet shell. Top with a sprinkle of toasted *walnuts*, a touch of *orange zest*, and a few thyme leaves if you like.
Cook’s Notes
These tartlets are surprisingly versatile. You can prepare the tartlet shells ahead of time and store them in an airtight container. If you’re planning a party, they freeze beautifully — just bake frozen shells for 8 minutes at 325°F before filling them. Pro tip: when pressing the dough into the pan, keep a small bowl of flour nearby to dust your fingers and prevent sticking. And if you’re cooking for a big crowd, consider doubling the recipe because they disappear fast!
Make It Your Own
- Swap the blue cheese for *goat cheese* if you prefer something milder.
- Replace *fig jam* with a spicy *pepper jelly* for a kick.
- Use *pecans* or *hazelnuts* instead of walnuts for a different nutty flavor.
- Add a thin slice of prosciutto to each tartlet for a touch of saltiness.
If you try this, I’d love to hear how it turns out — drop a comment or tag me! These tartlets are really something special and I hope they bring a bit of joy to your kitchen and your taste buds. Enjoy every bite!
Related update: Blue Cheese Tartlets With Fig Jam and Walnuts
Related update: Cucumber Mint Tea Sandwiches
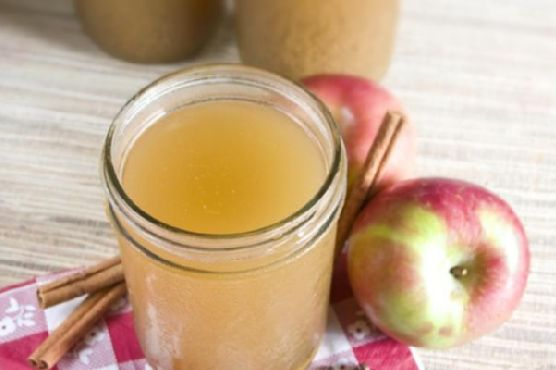
Last Tuesday, as the autumn breeze swept through my kitchen window, I found myself craving something warm and cozy. I had just returned from a brisk walk, the kind that leaves your cheeks rosy and fingers tingling. That’s when the idea of spiced apple cider popped into my head. It’s the perfect drink to transition into the cooler months – comforting, aromatic, and surprisingly easy to whip up. There’s something magical about the way the spices blend with the apple juice, evoking a sense of nostalgia and warmth. Plus, it fills your home with the most inviting aroma. Trust me, this spiced apple cider is exactly what you need on a chilly day, especially if you’re looking for a quick pick-me-up or a delightful way to impress your guests without spending hours in the kitchen.
Jump to Recipe
What You’ll Need
Most of these ingredients are already sitting in your pantry, waiting to be transformed into a cozy beverage.
- Allspice
- Freshly apple juice
- Cinnamon sticks
- Ginger
- Maple syrup
- Nutmeg
- Orange
- Water
How to Make Spiced Apple Cider
- In a large non-reactive pot, combine all the ingredients. Give them a gentle stir to ensure everything is well-mixed.
- Bring the mixture to a boil over medium-high heat. You’ll notice the aroma of spices filling your kitchen — that’s when you know you’re on the right track.
- Let it boil for about 5 minutes, just enough for the flavors to start mingling and becoming friends.
- Cover the pot, reduce the heat, and let it simmer gently for 30-40 minutes. This is when the magic happens, and the flavors deepen into a warm hug in a mug.
- Next, line a colander with cheesecloth and strain the cider. This will give you a smooth, clear drink free of any spice bits.
- Serve it warm in your favorite mug. And if it’s been one of those days, feel free to spike it with a little dark rum for an extra kick.
Cook’s Notes
When making this cider, patience is your best friend. Allowing it to simmer means the spices have the chance to really infuse the apple juice, creating that perfect balance of flavor. If you’re planning ahead, you can make the cider in the morning and reheat it gently before serving. The flavors will actually become more pronounced over time.
- Store any leftovers in the fridge for up to 4 days. Reheat gently on the stove or in the microwave.
- Be cautious when boiling; too high heat can evaporate your cider down more than you’d like.
Make It Your Own
- Swap the maple syrup with honey for a different layer of sweetness.
- Add a splash of lemon juice for a hint of citrusy brightness.
- Replace water with apple brandy for a stronger apple flavor and a boozy twist.
- Introduce star anise for an extra depth of flavor, giving your cider a slightly licorice note.
If you try this, I’d love to hear how it turns out — drop a comment or tag me! Your kitchen adventures are what make sharing these recipes so rewarding.
Related update: Spiced Apple Cider

The craving hit me like a ton of bricks on a random Tuesday night. You know the type — the one where you’re suddenly transported to that cozy pub you used to frequent, with a plate of crispy shrimp and a cold drink in hand. However, instead of heading out, I was determined to recreate that same vibe right in my own kitchen. That’s how this Breaded Shrimp and Spicy Mayo Appetizer came to life. It’s the kind of dish that makes you feel like a rockstar chef without creating a mountain of dirty dishes. Trust me, it’s worth every minute you spend on it, especially when you bite into the perfectly crispy shrimp, complemented by the kick of spicy mayo. Whether you’re hosting a small gathering or just treating yourself, this recipe is a keeper.
Jump to Recipe
What You’ll Need
This recipe is delightfully straightforward, and I’m willing to bet you already have most of the ingredients lounging in your pantry. Here’s what you’ll need:
- All-purpose flour
- Bread crumbs
- Chili powder
- Egg
- Garlic powder
- Mayonnaise
- Onion powder
- Suya pepper (your secret weapon for flavor!)
- Salt
- Canned shrimp
- Sriracha sauce
How to Make Breaded Shrimp and Spicy Mayo Appetizer
- Start by peeling and deveining your shrimp. Leave the tail on if you’re feeling fancy — it makes for a great handle.
- Season the shrimp generously with suya pepper, and let them sit for a bit. The spice will do its magic while you prep the rest.
- In a small bowl, whisk the egg until it’s a smooth, sunny yellow, then set it aside for dunking duty.
- In another bowl, mix the all-purpose flour with onion powder, garlic powder, chili powder, and a pinch of salt. This is your flavor-packed coating.
- Take each shrimp and give it a loving coat in the seasoned flour. Dunk it in the egg mixture, making sure it’s fully covered, and finally, roll it in the breadcrumbs.
- Heat up your oil in a pan over medium heat. Once it’s shimmering, it’s time to fry. Place the shrimp in gently, cooking them until they’re golden brown on both sides, filling your kitchen with a mouth-watering aroma.
- For the spicy mayo, mix two tablespoons of mayonnaise with one tablespoon of sriracha sauce until you have a beautifully smooth and spicy dip.
- Serve your crispy shrimp hot, with a generous dollop of spicy mayo on the side. Enjoy the crunch and kick with every bite!
Cook’s Notes
Here are a few things I’ve learned along the way. First, don’t skimp on the seasoning — the suya pepper really elevates the shrimp. Also, make sure your oil is hot enough before you start frying; otherwise, you’ll end up with greasy shrimp instead of crispy perfection. If you’re making this ahead, fry the shrimp and keep them warm in the oven at a low temperature. They’ll stay crisp without drying out. Leftovers (if there are any!) can be stored in an airtight container in the fridge, but they’re best enjoyed fresh.
Make It Your Own
Here are some fun twists for when you’re feeling adventurous:
- Swap the shrimp for crispy tofu if you’re catering to vegetarian friends. The seasoning works well with tofu too!
- Try adding some lemon zest to the bread crumbs for a citrusy zing that pairs beautifully with the spicy mayo.
- If you love garlic, increase the garlic powder in the flour mix and add a dash of fresh minced garlic to the mayo for a garlic-lover’s dream.
- Add a sprinkle of parmesan cheese to the breadcrumbs for a cheesy twist on the classic breading.
If you try this, I’d love to hear how it turns out — drop a comment or tag me on social media! Whether you stick to the script or put your twist on it, I’m excited to see these shrimp bring joy to your table.
Related update: Breaded Shrimp and Spicy Mayo Appetizer
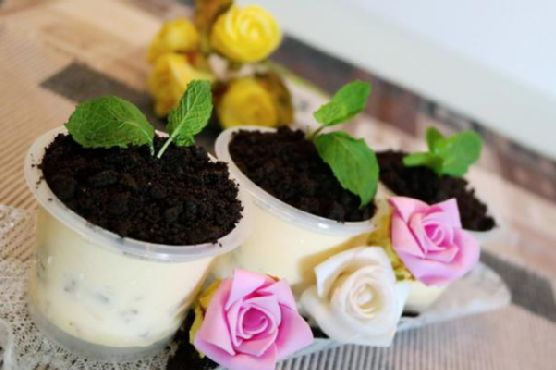
It was a seemingly ordinary Tuesday evening, and I found myself staring at the contents of my freezer, feeling a bit uninspired. A pint of vanilla bean ice cream caught my eye, and suddenly, I was reminded of a cute dessert idea I’d seen earlier — those adorable potted plant ice cream treats. I mean, who wouldn’t want to dig their spoon into what looks like a tiny pot of dirt, only to find a luscious, creamy surprise underneath? Perfect for Valentine’s Day or just because, these desserts are delightfully simple to make and never fail to impress with their whimsical presentation. They come together quickly and are the kind of thing you can whip up on a whim, which, as a busy home cook, is exactly the kind of recipe I adore.
Jump to Recipe
What You’ll Need
Chances are you already have most of this hanging around, but the way these flavors and textures come together is just magical.
- Vanilla bean ice-cream
- Diced palm seeds
- Mixed nuts
- Blueberries
- Oreo cookies
- Parsley
How to Make Valentine’s Day Potted Plant Ice-Cream Desserts
- Start by separating the Oreo cookies; remove the cream filling and set it aside (or snack on it, no judgment here!). Pound the cookies until they transform into fine crumbs that resemble rich, dark soil.
- In a mixing bowl, combine the vanilla bean ice-cream with the diced palm seeds, mixed nuts, and a handful of blueberries. The idea is to get a balanced mix of creaminess, crunch, and bursts of fruity freshness.
- Divide this heavenly mixture into your serving cups. It doesn’t have to be perfect — a little messiness adds to the charm. Place these in the freezer for a good chill.
- Once your ice-cream cups are well-frozen, generously top each one with the Oreo cookie crumbs to create that authentic “soil” look.
- Just before serving, insert a sprig of parsley into each cup. Voilà! You’ve got yourself some delightful potted plant ice-cream desserts that are sure to wow anyone lucky enough to dig in.
Cook’s Notes
Making these desserts is almost as fun as eating them. Remember, the less perfect they look, the better — we’re aiming for a natural, earthy vibe. If you’re prepping ahead, keep the ice-cream mix in the freezer until just before serving, then add the cookie crumbs and parsley. Leftovers (if you have any!) can stay in the freezer for a few days, but be sure to add fresh parsley right before serving again to keep that vibrant green pop.
Make It Your Own
- Swap the vanilla bean ice-cream for chocolate if you want that extra chocolatey punch — it’s a game-changer!
- Try using mint leaves instead of parsley for a refreshing twist and a subtle hint of minty fragrance.
- For a tropical vibe, substitute the blueberries with chunks of pineapple or mango.
- If you’re nuts about nuts, add a sprinkle of crushed pistachios on top of the “soil” for extra crunch and color.
If you try this, I’d love to hear how it turns out — drop a comment or tag me in your potted plant creations! Trust me, these little delightful desserts will grow on you just as they have on me. Happy cooking!
Related update: Valentine’s Day Potted Plant Ice-Cream Desserts
Related update: Banana Pudding Cake

It was one of those chilly fall afternoons when the leaves were swirling outside, and my pantry was looking a bit sparse. I was craving something cozy but hadn’t done a proper grocery run. Luckily, I did have a few seasonal staples on hand, including a couple of butternut squashes that had been staring at me every time I opened the pantry door. A quick rummage through the fridge and spice rack, and voilà! This Roasted Butternut Squash and Sage Dip was born. It’s a creamy, savory dip with just a hint of sweetness from the roasted squash and an earthy touch from the sage. Perfect for those moments when you want to impress without the fuss. Plus, it makes your kitchen smell divine.
Jump to Recipe
What You’ll Need
The beauty of this dip is that it relies on simple, fresh ingredients that you might already have. The key is in the roasting, which brings out all the deep, wonderful flavors.
- Two butternut squash
- Olive oil
- Fresh sage
- Garlic powder
- Fresh ground pepper
- Sea salt
- Onion
- Garlic
- Anchovy (trust me on this one!)
- Goat cheese
How to Make Roasted Butternut Squash and Sage Dip
- Preheat your oven to 350 degrees. This is the perfect time to cozy up and let your kitchen get warm and inviting.
- In a big bowl, mix together some olive oil, fresh sage, a few dashes of salt, pepper, and garlic powder. Toss in the butternut squash cubes, making sure each piece is well-coated with the herby goodness.
- Spread the squash out on a large baking sheet. You want them in a single layer, so they roast up nice and caramelized. Bake for about 30 minutes, or until they are tender and golden at the edges.
- While the squash is doing its thing, sauté chopped onion, anchovy fillets, and garlic in a bit of extra virgin olive oil. Cook them until the onion is soft and the anchovy has melted into the mix. The aroma is heavenly.
- Once the squash is done, let it cool just enough to handle. This way, you’re not nuking your fingers when you move to the next step.
- In a food processor, combine the roasted squash, onion mixture, and about 1/4 cup of crumbled goat cheese. Blend until smooth and creamy. You may need to scrape down the sides a couple of times to get everything evenly mixed.
- Transfer the dip into a pretty bowl because presentation matters! Serve it up with pita wedges, breadsticks, or a colorful array of veggies.
Cook’s Notes
This dip is pretty forgiving and flexible, perfect for those “let’s wing it” cooking sessions. If you’re prepping in advance, you can roast the squash and make the sautéed onion mixture the day before. Just keep them in separate containers in the fridge and blend them up with the cheese when you’re ready to serve. It will keep well in the fridge for about 3 days, though it never lasts that long at my house! If the dip thickens too much after chilling, a splash of olive oil or a bit of warm water stirred in should bring it back to life.
Make It Your Own
This is where the fun begins—don’t be afraid to play around with this recipe!
- Swap the goat cheese for feta if you want a saltier, tangier vibe.
- For a vegan version, skip the anchovy and goat cheese, subbing in roasted red peppers for extra depth.
- Add a pinch of red pepper flakes to the roasting mix for a bit of heat.
- Use sweet potatoes instead of butternut squash for an earthier sweetness.
If you try this, I’d love to hear how it turns out—drop a comment or tag me! Nothing makes me happier than seeing all the delicious ways you bring these recipes to life. Enjoy!
Related update: Roasted Butternut Squash and Sage Dip
Related update: Breaded Shrimp and Spicy Mayo Appetizer
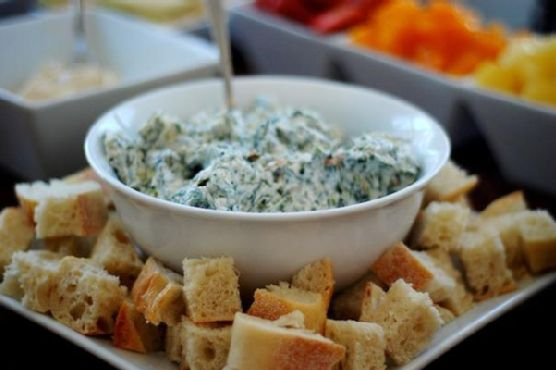
It was one of those evenings when the wind had a bite to it, and all I wanted was something warm and comforting that didn’t require a trip to the store. I peeked into my pantry and there it was — a can of artichoke hearts, a block of cream cheese, and some fresh spinach that had seen better days. It was like they were whispering, “Make something delicious out of us.” And thus, this Warm Spinach Artichoke Dip was born. It’s the kind of dish that’s easy to throw together when you need a little pick-me-up, perfect for snacking or impressing friends without breaking a sweat. The rich, creamy texture and the burst of garlicky goodness is just what you need at the end of a long day.
Jump to Recipe
What You’ll Need
I bet you’ve got most of this stuff in your kitchen already. It’s all about the handful of key players that bring everything together into a cozy, irresistible dip.
- Olive oil
- Artichoke hearts
- Garlic
- Red chili flakes
- Salt
- Baby spinach
- Cream cheese
- Parmesan cheese
- Lemon juice
- Black pepper
How to Make Warm Spinach Artichoke Dip
- Start by placing the olive oil, artichoke hearts, garlic, red chili flakes, and a pinch of salt in a small pot. Cover it up and let it simmer on low heat for an hour. Your kitchen will smell fantastic, a hint that you’re on the right track.
- Once the artichokes are fragrant, add the baby spinach to the pot. Cover it again and steam the leaves for about 2 minutes, just until they wilt and turn a vibrant green.
- Transfer everything from the pot into a food processor. Add the cream cheese, parmesan cheese, and a splash of lemon juice. Pulse until the mixture is chunky but well-combined, a texture that promises every scoop will be packed with flavor.
- Finally, garnish with a sprinkle of black pepper and serve it up with some warm, crusty bread — because trust me, you’ll want something sturdy to scoop up all that goodness.
Cook’s Notes
This dip is pretty forgiving, but here are some tips to keep it extra tasty. Make sure to simmer the artichokes long enough to really let the flavors meld. You can make this dip ahead of time and store it in the fridge for a couple of days. When you’re ready to serve, just reheat gently on the stove. If you find yourself with leftovers (unlikely, but possible), they make a killer sandwich spread or a pasta sauce with a bit of extra cream or milk.
Make It Your Own
- Swap the artichoke hearts for marinated artichokes if you want a little extra zing to your dip.
- Mix in some crispy bacon bits for a smoky touch that complements the creamy base.
- Use feta cheese instead of parmesan for a tangy twist.
- Add a handful of chopped sun-dried tomatoes for a burst of sweetness and color.
If you try this, I’d love to hear how it turns out — drop a comment or tag me! Whether it becomes your go-to for cozy nights in or a star at your next gathering, I hope this dip brings a little warmth and joy to your table.
Related update: Warm Spinach Artichoke Dip
Related update: Roasted Butternut Squash and Sage Dip
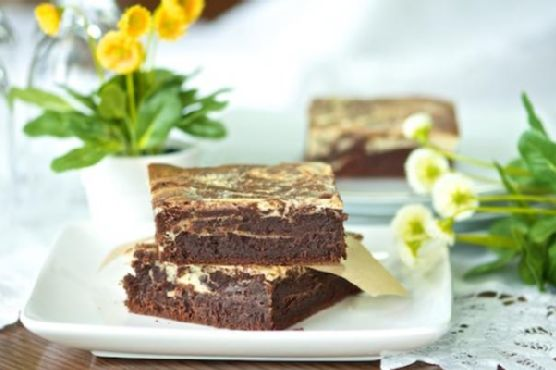
Last Tuesday night, I had one of those cravings that you can’t shake off, no matter how many other snacks you try. You know the kind — rich, chocolaty, and just decadent enough to feel like a little celebration in the middle of your week. I found myself rummaging through the pantry, determined to whip up something that would hit all the right notes. That’s when I landed on these fudgy chocolate cream cheese brownies with a twist of Baileys. These are not your average brownies; they marry the dense, chocolatey goodness we all love with a lush swirl of cream cheese and a hint of Irish cream for a bit of grown-up indulgence. Perfect for a cozy night in or an impressive dessert when you’re hosting friends.
Jump to Recipe
What You’ll Need
It’s likely you already have most of these ingredients lying around, which means you’re just a few steps away from brownie heaven. A few key players make this dish truly special.
- Bittersweet chocolate
- Butter
- Cream cheese
- Eggs
- Flour
- Espresso powder (trust me on this)
- Sugar
- Vanilla extract
- Baileys Irish Cream
How to Make Fudgy Chocolate Cream Cheese Brownies with Baileys
- First, let’s make the chocolate layer. Grab a large glass dish and toss in your bittersweet chocolate and butter. Give it a go in the microwave for about 1.5 minutes. It might still look whole when you take it out, but trust me, it’s ready to be stirred until smooth. If it’s stubborn, zap it for a few more seconds — just don’t overdo it, we don’t want scorched chocolate.
- Once the chocolate is silky, add in the sugar and vanilla. Stir with a whisk until it’s all well blended. Let it cool a little — you don’t want scrambled eggs in your brownies!
- After it’s cooled a bit, whisk in the eggs one by one. Make sure each egg is fully mixed in before adding the next.
- Now, sift the flour over your chocolate concoction, little by little, and fold it in gently. Set this aside; we’ll come back to it soon.
- For the cream cheese layer, grab a bowl and whip your cream cheese with a hand mixer until it’s nice and soft. Mix in the sugar until it’s well combined.
- Next, add the egg and beat until it’s just incorporated, followed by a generous splash of Baileys. Stir it all together until smooth.
- Now, it’s time to assemble! Prepare an 8″ square baking pan by spraying it with non-stick spray or lining it with parchment paper, making sure the paper hangs over the edges for easy lifting later.
- Pour the chocolate layer into your prepared pan and smooth it out. Then, pour the cream cheese mixture over the top. Use a fork to swirl the two layers together, creating pretty marble patterns. Just swirl — don’t mix them entirely!
- Pop it into a preheated oven at 350°F for about 35 minutes. You want a knife to come out clean from the center, but don’t let it overbake. Let it cool completely before slicing into indulgent squares.
Cook’s Notes
Don’t skimp on the chocolate quality — using a good bittersweet chocolate makes a world of difference. And while it might be tempting to skip the espresso powder, it actually enhances the chocolate flavor without making it taste like coffee. These brownies store well in an airtight container at room temperature for up to three days, or wrap them up and freeze for a longer treat stash. If you’re planning ahead, you can make these the day before and let them sit overnight — some say they taste even better the next day as the flavors meld!
Make It Your Own
- Nutty Addition: Add a handful of chopped walnuts or pecans to the chocolate layer for a bit of crunch.
- Spice It Up: Mix in a teaspoon of cinnamon or a pinch of cayenne to the chocolate batter for a warm, spicy kick.
- Minty Fresh: Swap the Baileys for peppermint extract in the cream cheese layer for a refreshing twist.
- Berry Bliss: Add a swirl of raspberry jam on top of the cream cheese for a fruity contrast.
If you give these brownies a whirl, let me know how they turn out! I’d love to hear your thoughts or see your creations — drop a comment or tag me in your posts. Happy baking, friends!
Related update: Fudgy chocolate cream cheese brownies with Baileys
Related update: Fudgy chocolate cream cheese brownies with Baileys
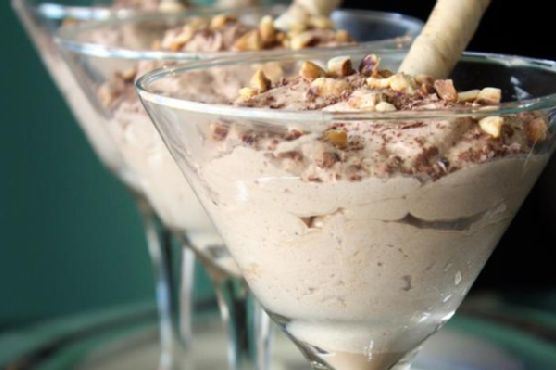
It was one of those Tuesday evenings when I felt like something sweet but didn’t want to spend hours in the kitchen. You know the type—when you’re in your jammies by 6 PM, and the couch is calling your name. I wanted something decadent but easy, a dessert that whispers “treat yourself” without the fuss. That’s when I remembered my go-to: Chocolate Hazelnut Mousse. It’s rich, dreamy, and takes less time than it does to watch an episode of your favorite show. Trust me, this mousse is a game-changer—perfect for impressing guests or just indulging solo.
Jump to Recipe
What You’ll Need
The best part about this recipe? Chances are you already have most of this in your pantry. Here’s what you need to grab:
- 2 tablespoons of instant espresso
- 2 tablespoons of hot water
- 1 cup of Nutella spread
- 2 tablespoons of Kahlua
- 2 cups of chilled whipping cream
- For decoration: toasted hazelnuts, chocolate shavings, and chocolate-hazelnut pirouette cookies
How to Make Chocolate Hazelnut Mousse
- Start by dissolving the instant espresso in hot water in a medium-sized bowl. The aroma will hit you first, filling your kitchen with the scent of a cozy café.
- Add the Nutella and Kahlua to the espresso mixture. Beat until it becomes smooth and glossy; it should pour off the spoon like liquid silk.
- In a stand mixer, whip the chilled whipping cream until it forms stiff peaks. You’re looking for that classic, cloud-like texture that holds its shape.
- Gently fold the Nutella mixture into the whipped cream. Take your time here—you want the color to be uniform but keep that airiness intact.
- Divide the mousse into serving glasses. Martini glasses work wonderfully for that touch of elegance.
- Top with toasted hazelnuts, chocolate shavings, and tuck a pirouette cookie into each glass for that extra flair.
Cook’s Notes
For best results, make sure your whipping cream is well-chilled before you start. It helps the cream whip up nice and fluffy. If you’re planning ahead, this mousse can be made a day in advance—just cover the glasses with plastic wrap and keep them in the fridge. This dessert also holds well for a day or two, so leftovers should never go to waste (if there are any!).
Make It Your Own
- Swap the Kahlua for a splash of vanilla extract if you prefer an alcohol-free version.
- Try using almond butter instead of Nutella for a different nutty twist.
- For a mocha vibe, mix cocoa powder into the espresso before adding to the Nutella.
- Substitute the pirouette cookies with your favorite wafer—any crispy, chocolatey delight will do the trick.
If you try this, I’d love to hear how it turns out—drop a comment or tag me! Happy indulging!
Related update: Chocolate Hazelnut Mousse
Related update: Homemade pineapple ice cream
Related update: Authentic Jamaican Curry Chicken

It was one of those lazy Saturday afternoons, the kind where the sun dips lazily through the blinds, splashing warm streaks of light onto your kitchen floor. The kind where you’re not rushing off anywhere, and all you want is a refreshing drink that feels both like a reward and a moment of pause. This was the day I stumbled into crafting my own Turmeric Ginger Beer, a concoction that is as much about the vibrant color as it is about the zingy, spice-laden flavors. This drink isn’t just a thirst-quencher; it’s an experience. It’s simple to put together and yet tastes like something you’d order on a dreamy vacation.
Jump to Recipe
What You’ll Need
This recipe shines in its simplicity and the likelihood that you already have most of these ingredients tucked away in your pantry. It’s a little spicy, a little sweet, and just perfect.
- 2-3 cardamom pods
- 1 teaspoon coriander seeds
- 2 inches of fresh ginger
- 1/4 cup of turmeric ginger syrup
- Zest of one lemon
- 1 cup of soda water
- 1/4 cup of sugar
- 1 tablespoon of turmeric
- 1 cup of water
How to Make Turmeric Ginger Beer
- Infuse the Syrup: Grate your fresh ginger and turmeric, breathing in that sharp, earthy aroma. It will wake up your senses! Combine them with the sugar, water, cardamom pods, and coriander seeds in a saucepan. Bring everything to a lively boil, then reduce the heat and let it simmer gently for about 10 minutes. You’ll know it’s ready when your kitchen smells like an exotic spice market.
- Let it Rest: Take the saucepan off the heat and let the spices infuse, giving the syrup time to absorb all those intricate flavors as it cools down to room temperature. Patience here pays off!
- Strain the Syrup: For a smooth syrup, strain it twice — first through a regular strainer and then through a fine-mesh tea strainer. This ensures no rogue seeds or ginger bits sneak through. Store this golden liquid in the fridge, where it’ll keep nicely for several weeks, ready to summon at a moment’s notice.
- Mix the Drink: To assemble your drink, measure out 2 tablespoons of the syrup and pour it into an eight-ounce glass. Lightly crush a piece of lemon peel and some mint leaves with the back of a spoon to release their oils and aroma. Squeeze the juice from one quarter of a lemon into the glass, then top with ice and soda water. Stir gently, letting the bubbles work their magic.
Cook’s Notes
Don’t rush the straining process; it’s key for that silky texture. If you’re storing the syrup, make sure it’s in an airtight container to keep the flavors fresh. This syrup is versatile and can even be used in other drinks or desserts. If you’re expecting guests, you can double or triple the syrup recipe — it keeps well, making it a great make-ahead option. Just mix with soda water right before serving for that fizzy freshness.
Make It Your Own
- Spicy Twist: Add a slice of fresh jalapeño to the syrup infusion for a spicier kick.
- Herbal Variation: Swap the mint for basil leaves for a completely different herbal fragrance.
- Citrus Swap: Use lime zest and juice instead of lemon for a tart and tangy tweak.
- Sweeten the Deal: Use honey instead of sugar for a richer, more rounded sweetness.
If you try this, I’d love to hear how it turns out — drop a comment or tag me! Whether you stick to the classic or add your own twist, this Turmeric Ginger Beer is bound to brighten your day. Cheers! 🍻
Related update: Turmeric Ginger Beer
Related update: Turmeric Ginger Beer