
It was a chilly Tuesday evening, and my fridge was looking pretty bare. You know those nights when you just stand there, door open, hoping for inspiration to strike? That was me. But then, hiding behind some leftover lettuce, I found a head of cauliflower and half a leek. It was like a culinary “Aha!” moment. I remembered a soup I improvised once that was so comforting and cheesy, it felt like a warm hug in a bowl. Cauliflower, Leek, and Cheddar Cheese Soup to the rescue! It’s so simple, you might not even need to make a grocery run, and it’s rich and satisfying without being heavy. Plus, it’s a fabulous way to sneak in those veggies.
Jump to Recipe
What You’ll Need
Surprisingly, this soup calls for ingredients you might already have lurking in your kitchen. Simple but mighty, these ingredients come together to make a creamy delight:
- 1 head of trimmed cauliflower
- 1 leek, sliced
- Olive oil
- 1 teaspoon fresh thyme
- 2 cloves garlic, minced
- 1 tablespoon Worcestershire sauce
- 4 cups vegetable broth
- 1 cup fat-free evaporated milk
- 2 cups shredded cheddar cheese
How to Make Cauliflower, Leek and Cheddar Cheese Soup
- Start by heating a splash of olive oil in a large saucepan over medium heat. Toss in the sliced leeks and let them cook for about 5 minutes. You want them softened and a little caramelized, filling your kitchen with that sweet, oniony aroma.
- Next, add the chopped cauliflower, minced garlic, fresh thyme, Worcestershire sauce, and pour in the vegetable broth. Give it a good stir, and bring the soup to a simmer. Let it bubble away gently over medium-low heat for 30 to 40 minutes, until the cauliflower is so tender it practically falls apart.
- Take the pot off the heat. Now for the fun part—puree the soup until it’s silky smooth. You can do this with an immersion blender right in the pot or in batches using a regular blender. Just be careful with hot liquids!
- Once your soup is blended, return it to the saucepan, and stir in the evaporated milk and 2 cups of cheddar cheese. Place it back on medium heat for just 3 to 5 minutes, stirring until the cheese melts into the soup and it’s all dreamy and creamy.
- Pour it into bowls and finish with a sprinkle of cheddar cheese on top for a little extra indulgence. Enjoy your cozy creation!
Cook’s Notes
This soup is super forgiving. If you find it a bit too thick after blending, just add a splash more broth until you reach your desired consistency. It keeps well in the fridge for about 3 days, making it a great make-ahead meal. Reheat gently on the stove to avoid any separation. Freezing isn’t ideal because of the cheese and milk, but it can work in a pinch—just expect a slightly different texture.
Make It Your Own
- Spice it up by adding a pinch of cayenne or smoked paprika for a little heat and depth of flavor.
- If you’re a meat lover, throw in some crispy bacon bits on top just before serving. It adds a delightful crunch!
- For a vegetarian twist, substitute the Worcestershire sauce with soy sauce to keep it plant-friendly.
- Swap the cheddar for a sharp blue cheese if you’re feeling bold and want a tangy kick.
If you try this, I’d love to hear how it turns out—drop a comment or tag me in your cozy creations! Remember, cooking is all about making it suit your taste and enjoying the process. Happy cooking!
Related update: Cauliflower, Leek and Cheddar Cheese Soup

It was one of those chaotic Tuesday nights. You know the ones — the kind where you stare blankly into the fridge, hoping dinner will materialize while the clock ticks ever onward. I was craving something quick and satisfying, with just the right balance of savory and sweet. Enter the Korean Beef Rice Bowl. It’s the kind of recipe that magically turns a handful of ingredients into something that’s not only delicious but feels like a hug in a bowl. Plus, it’s faster than waiting for delivery, and you get all the kitchen glory.
Jump to Recipe
What You’ll Need
You might already have some of these tucked away in your pantry or fridge, just waiting to shine. Here’s the lineup:
- Beef flank steak, fat-trimmed
- Korean marinade
- Green beans
- Carrot
- Rice vinegar
- Asian sesame oil
- Sugar
- Salt
- Salad oil
- Fat-skimmed beef broth
- Cooked rice
- Thinly sliced green onions
- Sesame seeds
How to Make Korean Beef Rice Bowl
- Start by rinsing the beef under cold water, pat it dry, then slice it across the grain into thin, 1/8-inch slices. Aim for pieces that are about 3 inches long. This will help them cook quickly and evenly.
- In a small bowl, combine the sliced beef with 1/4 cup of Korean marinade. Let it sit while you prep the veggies to infuse the meat with flavor.
- Trim the ends and strings from the green beans and cut them diagonally into 3-inch pieces. Slice the carrot into matchstick-size pieces of the same length.
- In a large wok or frying pan over high heat, combine 1/2 cup of water with the green beans and carrot. Cover and stir occasionally, cooking until they’re just tender, about 3 minutes. Drain and promptly immerse them in cold water to stop the cooking. Once cool, drain them again.
- In a bowl, toss the drained veggies with a splash of rice vinegar, a drizzle of sesame oil, and a sprinkle of sugar and salt to taste. Give them a quick toss to coat evenly.
- Wipe out the wok and place it back over high heat, adding a splash of salad oil. Once the oil is hot, add the marinated beef along with any remaining liquid from the bowl. Stir-fry the meat until it’s no longer pink, approximately 2 minutes.
- Pour the remaining marinade and beef broth into the pan with the beef. Stir until the mixture begins to boil, creating a rich and savory sauce.
- To assemble, scoop generous portions of warm cooked rice into bowls. Top with the beef and its sauce, then arrange the marinated vegetables on top. Finish with a sprinkle of green onions and sesame seeds for that final burst of flavor.
Cook’s Notes
Here’s a little advice from my kitchen to yours. When slicing the beef, the thinner, the better — it lets the marinade seep through and cooks in a flash. If you can’t find toasted sesame seeds, no worries. Just toss regular sesame seeds in a pan over low heat for a minute until they’re golden and fragrant. This dish comes together in about 30 minutes, making it perfect for those nights when time is of the essence. Leftovers keep well for a couple of days in the fridge, though the rice might absorb some sauce, so maybe keep extra sauce on the side if you plan on having leftovers.
Make It Your Own
Consider these variations to change things up or cater to your dietary needs:
- Swap out the beef for crispy tofu if you’re going plant-based. Press the tofu to remove excess moisture before marinating.
- Use boneless chicken thighs instead of beef for a different protein option. They stay juicy and cook quickly.
- Substitute broccoli or snap peas for the green beans if that’s what you have on hand or prefer.
- For a spicier kick, add a teaspoon of gochujang (Korean chili paste) to the marinade.
If you try this, I’d love to hear how it turns out — drop a comment or tag me! Remember, your kitchen is your playground, so have fun with it. Happy cooking!
Related update: Korean Beef Rice Bowl
Related update: Thai Savory Brown Fried Rice
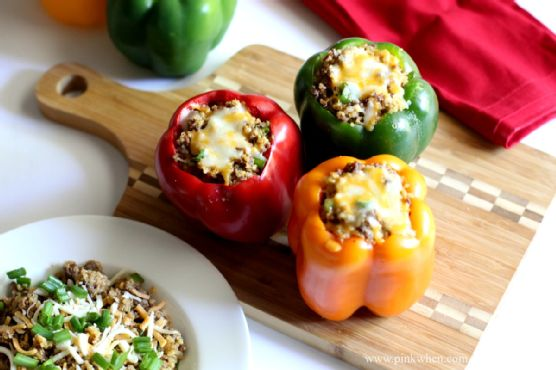
It was one of those weeknights where everything seemed to demand my attention at once. You know the kind, right? The kind where your inbox is overflowing, the laundry pile is ominously high, and all you want to do is eat something comforting that doesn’t involve a microwave pizza. So there I was, staring into my fridge, hoping for inspiration to leap out at me. That’s when I spotted the bell peppers chilling out in the crisper drawer, looking like they needed a purpose. The chorizo and ground beef were sitting in the fridge too, probably whispering that they’d be amazing together. And just like that, dinner was decided. These Chorizo and Beef Quinoa Stuffed Peppers are a satisfying blend of rich, spicy flavors and textures, and they come together quicker than you’d think. Plus, they’re perfect for those nights when you need something a bit more special without all the hassle.
Jump to Recipe
What You’ll Need
If you’re like me, you probably have most of these ingredients already lounging around your pantry and fridge. Here’s what you’ll want to gather:
- Bell peppers (any color you love)
- 1 cup quinoa
- Water (for quinoa)
- Chorizo, 250g
- Lean ground beef, 250g
- Mixed Monterey Jack and Cheddar cheese, 1 cup shredded
- 2 tablespoons green onion tops, chopped
- 1 teaspoon cumin
- 1/2 teaspoon cayenne
- 1 teaspoon chili powder
How to Make Chorizo and Beef Quinoa Stuffed Pepper
- Preheat your oven to 350°F (175°C). While you’re at it, bring a pot of water to boil for the quinoa. The goal is to get these started simultaneously to save time.
- In a skillet over medium heat, brown the chorizo and ground beef together. Stir occasionally until the mixture is golden and fragrant, around 6-8 minutes. Once cooked, drain the excess fat thoroughly and transfer the meat to a medium mixing bowl.
- Once your quinoa is fully cooked and fluffy, add it to the bowl with your meat mixture. This is where it starts to get exciting!
- Add the chopped green onion tops, cumin, cayenne, chili powder, and the shredded Monterey Jack and Cheddar cheese to the bowl. Mix everything well until it’s all happily combined.
- Prepare your bell peppers by cutting off the tops and removing any seeds. You want them to be ready to receive all that deliciousness.
- Stuff each bell pepper generously with your meat and quinoa mixture. Don’t be shy — pack it in there.
- Place your stuffed peppers in a baking dish, sprinkle a little more cheese on top for good measure, and bake in the preheated oven for about 10 minutes. You’ll know they’re done when the peppers have softened slightly and the cheese on top is melty and golden.
- Serve immediately and enjoy the awesome combination of flavors. Trust me, these are worth every bite.
Cook’s Notes
If you’re looking to make these ahead (and who doesn’t love a little meal prep?), you can absolutely prepare the filling in advance. Just store it in an airtight container in the fridge for up to two days. When you’re ready to eat, stuff the peppers and proceed with baking. As for leftovers, they keep well in the fridge for up to three days. Just reheat them gently in the oven or microwave until warmed through. A quick tip: make sure to drain the meat well after browning to avoid a greasy filling. Oh, and don’t skip the step of softening the peppers in the oven; it makes them easier to cut and eat!
Make It Your Own
Feel free to get creative with these stuffed peppers. Here are a few swap ideas to make them suit your taste:
- Swap the quinoa for cooked rice or couscous for a different texture experience.
- If you’re not into beef, try using ground turkey or chicken instead for a lighter option.
- Make it vegetarian by using crumbled tofu or tempeh in place of the meat. Just add a bit more spice to keep the flavor bold.
- Switch up the cheese with crumbled feta or a smoky gouda to add a unique twist.
If you try this, I’d love to hear how it turns out — drop a comment or tag me on your food pics! These stuffed peppers are a personal favorite, and I can’t wait to see your take on them. Happy cooking!
Related update: Chorizo and Beef Quinoa Stuffed Pepper
Related update: Crawfish Cake Sliders

It was one of those evenings when the fridge seemed to have its own agenda. You know, the kind where you open the door, and despite it being packed, you can’t find the makings of a straightforward dinner. I spotted some forlorn leeks and a half-full bottle of porter leftover from the weekend, and inspiration hit me like a bolt of lightning. Enter my Cheese and Leek Strata—a dish that’s an absolute game-changer for those nights when you don’t want to keep oscillating between the fridge and the pantry. This strata is comfort in a casserole, layered with flavors and textures that promise to turn your evening around. It’s like a savory bread pudding, but with a cheesy, leeky twist. Perfect for brunch or a cozy dinner, it’s a make-ahead marvel that gives you more time to curl up on the couch with a good book or Netflix series.
Jump to Recipe
What You’ll Need
With ingredients you likely have lurking around your kitchen, this dish won’t require a mad dash to the grocery store. Here’s the lowdown:
- 6 large eggs
- 2 cups milk
- 1/2 cup porter (or any dark beer)
- 1 garlic clove, minced
- Salt and pepper, to taste
- 1 loaf sourdough bread, cut into cubes
- 1 large leek, thinly sliced
- 1 red bell pepper, diced
- 1 cup shredded cheddar cheese
- 1 cup shredded Swiss cheese
How to Make Cheese and Leek Strata
- Preheat your oven to 350 degrees Fahrenheit. As it warms, the kitchen fills with a cozy promise of what’s to come.
- In a large mixing bowl, combine the eggs, milk, porter, minced garlic, and a generous pinch of salt and pepper. Beat this mixture well until it’s beautifully blended, creamy and slightly frothy.
- Grease a 2.5-quart round baking dish. Place half of the sourdough bread cubes at the bottom, forming the first layer of your strata.
- Sprinkle half of the sliced leeks and diced red bell pepper over the bread layer. The veggies should look like colorful confetti scattered across the bread.
- Top this veggie layer with half of the Swiss and cheddar cheeses, letting it snow over the vibrant layer beneath.
- Repeat the layering process with the remaining ingredients—bread, leeks, bell pepper, and cheeses—ending with a delightful blanket of cheddar cheese on top.
- Pour the egg mixture evenly over the entire dish, ensuring the liquid seeps through to all corners.
- Cover the dish tightly with foil or plastic wrap and weigh it down with a slightly smaller baking dish. This step helps everything meld together beautifully.
- Refrigerate for at least 2 hours or, even better, overnight. This waiting period lets the flavors mingle and intensify.
- When you’re ready to bake, remove the cover and place it in the oven for about 40 minutes. The strata is done when the center is set and the top is golden and enticingly fragrant.
- Serve warm, and let the compliments roll in!
Cook’s Notes
You’ll want to give this strata time in the fridge. Trust me, it makes all the difference in flavor and texture. If you’re strapped for time, a minimum of 2 hours will do, but overnight is optimal. If you have leftovers, they store beautifully in the fridge for up to three days. Just reheat them gently in the oven. Be sure to use a crusty sourdough—it holds up better against the liquid soaking. And if you find the center isn’t setting after 40 minutes, give it another 5-10 minutes until it’s firm.
Make It Your Own
- Swap the cheddar cheese for some sharp Gruyère if you’re feeling fancy.
- Not a fan of leeks? Try using caramelized onions for a sweeter touch.
- Give it a meaty twist by adding cooked bacon or sausage between the layers.
- For a spicy kick, toss in some jalapeños alongside the bell peppers.
If you try this, I’d love to hear how it turns out—drop a comment or tag me! Happy cooking, and may your fridge always surprise you in the best possible way.
Related update: Cheese and Leek Strata
Related update: Chorizo and Beef Quinoa Stuffed Pepper

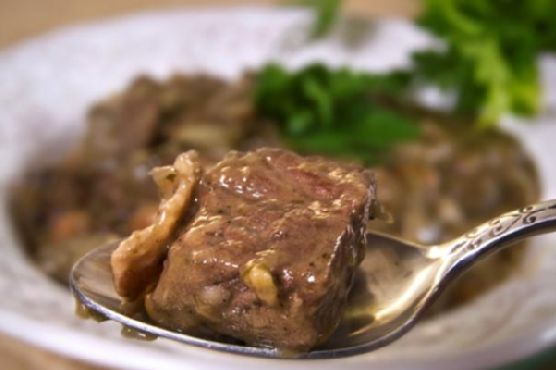
It was a rainy Wednesday evening when my kitchen turned into a culinary battleground. I was battling the clock, the weather, and my own growling stomach. In the chaos, I discovered a family classic that would become my weekday hero: Braised Pork, known in the Philippines as Humba. This dish is like a warm hug — cozy, flavorful, and so much easier than you’d think. The secret? It’s all in the marination and the slow simmering that transforms humble ingredients into something magical. Trust me, this one’s a keeper for when you need something hearty but don’t want to spend all day cooking.
Jump to Recipe
What You’ll Need
You might be surprised to find that the ingredient list reads like a pantry inventory. It’s a delightful mix of familiar staples and a few special twists that make all the difference.
- Pork belly – for that melt-in-your-mouth texture.
- Pork butt shoulder – adds a bit more substance and chew.
- Whole garlic – because vampires aren’t the only ones who appreciate its charm.
- Vinegar – gives the dish its signature tang.
- Brown sugar – balances the tang with a sweetness that caramelizes beautifully.
- Soy sauce – adds umami and color.
- Bay leaf – for a subtle aroma.
- Rice wine – it’s like the secret handshake of Asian cooking.
- Star anise – provides that warm, licorice-like hint.
- Oregano – a little herbal depth.
- Fermented black beans – those little flavor bombs.
- Whole peanuts – adds a nutty crunch.
- Olive oil – gets everything going.
- Paprika – a smoky whisper.
- Water – to help everything meld together.
- Fried bananas – trust me on this one.
How to Make Braised Pork: Filipino Humba
- In a large bowl, toss together the pork belly, pork butt shoulder, garlic, vinegar, brown sugar, soy sauce, and rice wine. Give it a good mix and let it marinate for about 30 minutes in the fridge. This is where the magic starts.
- After marinating, transfer everything from the bowl into a saucepan. Add water, fermented black beans, and peanuts. Cover the pan and bring it to a boil. You’ll start to smell the savory-sweet aroma—it’s heavenly.
- Once it’s boiling, lower the heat to a gentle simmer. Add the bay leaf, star anise, oregano, paprika, and a splash of olive oil. Stir gently, then cover and let it simmer for about an hour or until the sauce is thick and glossy.
- Five minutes before finishing, decide on the bananas. If you’re feeling adventurous, add them in. Otherwise, serve them on the side. They add sweetness and a fun twist.
Cook’s Notes
So, here’s the deal: this dish loves time. The longer it simmers, the more the flavors develop. But don’t overdo it—an hour is usually perfect. If you find the sauce too thick, add a bit of water to loosen it up. Store leftovers in an airtight container and they’ll keep beautifully in the fridge for up to three days. Reheating brings the flavors back to life, just add a splash of water to keep it from drying out.
Make It Your Own
Here are some fun ways to switch things up without losing the essence of the dish:
- Swap the pork for crispy tofu if you’re going for a vegetarian vibe. Just adjust the marinating time a bit shorter.
- Try using coconut vinegar for a milder, slightly tropical twist.
- Add some pineapple chunks during the last ten minutes of simmering for a sweet and tangy flair.
- Replace the peanuts with cashews for an even richer nutty note.
If you try this, I’d love to hear how it turns out — drop a comment or tag me on social media! This dish has become a weeknight favorite in my house, and I hope it does in yours too. Happy cooking!
Related update: Braised Pork: Filipino Humba

It was one of those chilly evenings when nothing but a steaming bowl of comfort would do. My kitchen counter was a mess of ingredients that promised warmth and nostalgia: ramen packets, a handful of mussels I had ambitively picked up at the market, and that last lonely scallion in the crisper. This, I decided, was the night for Neoguri (Spicy Seafood Ramen). Quick enough for a weeknight yet impressive with its depth of flavor, this dish is all about minimal effort with maximum impact. And honestly, who doesn’t love a meal that comes together in under 15 minutes but feels like a hug in a bowl?
Jump to Recipe
What You’ll Need
You probably have most of these already lurking in your kitchen. Just a quick note, make sure to use fresh mussels for the best experience.
- Neoguri ramen (spicy seafood flavor)
- 1 egg
- Mussels (fresh, ideally)
- 1 green scallion
- Seaweed (gim sheets are perfect)
How to Make Neoguri (Spicy Seafood Ramen)
- Start by bringing a pot of water to a rolling boil. This is the moment for a deep breath because things are about to get exciting.
- Add the mussels and the sauce packets from the Neoguri ramen. Let them party in the pot for about 5 minutes. If you’re using fresh mussels, watch them closely: they should open up. Any stubborn, closed mussels deserve to be tossed.
- Time to add the ramen noodles. Give them 2 to 3 minutes to soften and soak up all that spicy goodness.
- For the egg, you have options: beat it and drizzle while swirling the noodles for those lovely egg ribbons or slide it in gently to poach. Both ways are dreamy.
- While everything mingles and cooks, grab your scallion and seaweed. Slice the scallion thinly and tear or cut up your seaweed into munchable pieces.
- Transfer your ramen to a serving bowl, putting the mussels on display like the treasures they are, and sprinkle generously with scallion and seaweed.
Cook’s Notes
The wonderful thing about this ramen is how forgiving it is. If you’re using dried seaweed snacks instead of gim, it works just as well. For those planning ahead, fresh mussels can be stored in the fridge for a day or two if they’re kept cool and moist. Once cooked, the ramen doesn’t fare well as leftovers (it tends to become a soggy sea of sadness), so plan to savor it in one sitting. If you find yourself with extra scallions or seaweed, these make great additions to salads or other soups you’ll whip up during the week.
Make It Your Own
- Swap out the mussels for shrimp or clams if that’s what you have on hand.
- Use crispy tofu instead of mussels for a delightful vegetarian spin that’s still packed with protein.
- If you’re not a fan of spicy, try mixing in a little coconut milk or cream to mellow out the heat.
- Want more greens? Toss in some spinach or bok choy just before the noodles finish cooking for extra nutrients.
If you try this, I’d love to hear how it turns out — drop a comment or tag me on social media! Whether you’re a ramen novice or a seasoned pro, this dish is bound to hit the spot. Enjoy your bowl of cozy goodness!
Related update: Neoguri (Spicy Seafood Ramen)
Related update: Braised Pork: Filipino Humba
Related update: Cauliflower, Leek and Cheddar Cheese Soup

Picture this: It’s a rainy Tuesday evening, I’m rummaging through my pantry, and the undeniable craving for something warm, sweet, and savory strikes. My go-to? Braised Pork: Filipino Humba. There’s something about the combination of tender pork and the rich, slightly sweet sauce that just screams comfort food. You’d think a dish with such bold flavors requires hours, but this gem is surprisingly weeknight-friendly. The magic lies in the balance of flavors, a little patience, and a hint of adventure. So, let’s dive in and make this delightful dish that captures the heart of Filipino cuisine in every bite.
Jump to Recipe
What You’ll Need
This recipe is the definition of pantry-friendly with a sprinkle of exotic intrigue. Chances are you already have most of what you need.
- Pork belly – the king of tender, juicy cuts
- Pork butt shoulder – adds depth with its marbled fat
- Whole garlic – because who doesn’t love garlic?
- Vinegar – for that tangy kick
- Brown sugar – sweetens the pot
- Soy sauce – umami galore!
- Bay leaf – subtle fragrance
- Rice wine – adds complexity
- Star anise – a whisper of licorice
- Oregano – for a hint of earthiness
- Fermented black beans – rich and salty
- Whole peanuts – crunchy texture
- Olive oil – just a splash
- Paprika – a dash for color
- Water – to bring it all together
- Fried bananas – for that tropical twist
How to Make Braised Pork: Filipino Humba
- In a large mixing bowl, combine the diced pork belly and pork butt shoulder with the whole garlic cloves, vinegar, brown sugar, soy sauce, and rice wine. Give it a gentle stir until everything is well-coated. Pop this into the fridge for about 30 minutes to marinate. You’ll want those flavors to mingle and get cozy.
- Once marinated, transfer everything into a heavy-bottomed saucepan. Add water, fermented black beans, and whole peanuts. Bring this beauty to a rolling boil, and then watch as the kitchen fills with an irresistible aroma.
- When it reaches a boil, dial the heat down to a gentle simmer. Stir in the bay leaf, star anise, oregano, paprika, and a drizzle of olive oil. Let it simmer away for about an hour. During this time, the sauce will thicken, and the pork will become melt-in-your-mouth tender.
- Five minutes before you’re ready to serve, decide if you want the fried bananas in the mix or on the side. Either way, they add a delightful sweetness that complements the savory sauce. Taste and adjust seasoning if needed. Then, plate up and dive in!
Cook’s Notes
Don’t rush the marinating process; it’s where the flavor magic truly begins. If you’re short on time, a quick 15-minute marinade can work, but longer is always better. When simmering, keep the lid on to retain moisture, but check occasionally to ensure nothing sticks. Should you find yourself with leftovers (unlikely as that may be!), store them in an airtight container in the fridge. The flavors deepen overnight, making it even better the next day. You can reheat on the stove or microwave, just add a bit of water to loosen the sauce if needed.
Make It Your Own
- Swap the pork for chicken thighs if you’re in the mood for poultry. They’ll soak up the sauce beautifully and cook a bit faster.
- For a vegetarian twist, replace the meat with crispy tofu. Just skip the marinating step and add the tofu in the last 15 minutes of cooking.
- If peanuts aren’t your thing, try adding cashews for a creamier texture.
- Want more heat? Toss in a sliced chili or two with the other spices.
If you try this, I’d love to hear how it turns out — drop a comment or tag me! Cooking is all about sharing the joy, and I’m excited to hear your thoughts and twists on this classic dish. Happy cooking!
Related update: Braised Pork: Filipino Humba
Related update: Zucchini & Basil Frittata
Picture this: It’s a chilly Tuesday evening, and I’ve just managed to duck out of the rain and into my cozy kitchen. My cat, Oliver, is curled up on the windowsill, and the whole place is alive with the soft patter of raindrops. It’s the kind of night that calls for something deeply comforting, something that can fill not just the belly but also the soul. Enter Classic Boeuf Bourguignon — my go-to when I crave something hearty and a tad bit indulgent but without spending hours in the kitchen. Honestly, the magic of this dish lies in its ability to transform simple ingredients into something truly extraordinary. The smell of beef simmering with red wine and herbs is, quite literally, poetry in a pot. Plus, it’s the kind of recipe where you can pop it all into a Dutch oven, let it work its magic, and you’ll still have time to catch up on that new series everyone’s been talking about.
Jump to Recipe
What You’ll Need
Just a heads-up: You might already have most of these tucked away in your pantry, and the rest? Well, they’re worth the trip to the store. Trust me.
- Bacon – Adds a smoky depth to the dish.
- Olive oil
- Beef stew meat – The star of the show.
- Garlic
- Diced onion
- Fresh thyme
- Bay leaves
- Parsley
- Pearl onions
- Button mushrooms
- Carrot
- Red wine – Go for something you’d drink.
- Beef broth
- All-purpose flour
- Salt and pepper
How to Make Classic Boeuf Bourguignon
- Preheat your oven to 400°F (200°C). Get that Dutch oven ready – it’s about to work its magic.
- Heat olive oil over medium heat and toss in the bacon. Let it sizzle for about 2-3 minutes until it’s just perfectly cooked. Transfer the bacon out with a slotted spoon and let it hang out on the side.
- Pat the beef dry with paper towels for a better browning. Crank up the heat to medium-high, throw the beef into the bacon fat, and let it sear for 4-5 minutes until every piece is gloriously browned. Spoon them out and set aside.
- Lower the heat back to medium. Toss in the carrots, garlic, onions, parsley, thyme, and bay leaves. Give them a good stir for about 2-3 minutes. Out they go with the slotted spoon, into a separate dish.
- Add pearl onions and mushrooms to the Dutch oven. Sauté them until the onions start to brown and the mushrooms become tender. Move them to the dish with the bacon.
- Return the beef to the pot and sprinkle one tablespoon of flour over it. Give it a good toss to coat. Season generously with salt and pepper. Pop it in the oven for about 4-5 minutes to develop a gorgeous crust.
- Remove the pot from the oven and set it on the stovetop. Pour in the red wine and deglaze, scraping up all those tasty bits. Add the beef broth, bring it to a gentle simmer.
- Introduce the carrot, onion, and spice mixture back into the pot. Lower the heat, cover, and let it simmer away for an hour, filling your kitchen with the most intoxicating aroma.
- After an hour, add the pearl onions, mushrooms, and bacon. Continue to simmer, allowing the beef to tenderize further, about another 30 minutes.
- Use a slotted spoon to fish out the solids and set them aside. Crank up the heat; let the sauce come to a rapid boil.
- In a small bowl, mix the remaining tablespoon of flour with two tablespoons of sauce. Stir until smooth and lump-free. Add to the pot, stirring constantly until the sauce thickens.
- Remove the bay leaves and thyme sprigs. Discard them. Return the solids to the pot, stirring to coat evenly with the enriched sauce. Serve warm, perhaps over a bed of egg noodles or rice if you’re feeling it.
Cook’s Notes
Let’s talk practicalities. This dish is one of those gems that get even better the next day — so if you can resist not devouring it all, it’s perfect for leftovers. Store it in an airtight container in the fridge, and when you reheat, just do it gently over low heat to keep that beef tender and juicy. If you’re prepping ahead, you can cook everything up to the point just before adding the flour in step 10. Refrigerate and proceed with the sauce thickening when you’re ready to serve. Also, don’t skimp on the wine. A good wine makes all the difference. Taste as you go, and adjust the seasoning if needed.
Make It Your Own
Feel free to get creative and put your own spin on this classic:
- Vegetarian Twist: Swap out the beef for hearty mushrooms like portobello or cremini, and use vegetable broth instead of beef.
- Poultry Option: Switch the beef out for chicken thighs. They’re just as comforting and cook a bit quicker.
- Root Veggie Addition: Try adding some parsnips or turnips along with the carrots for a little extra earthy sweetness.
- Herbaceous Flair: Add rosemary or sage for an aromatic twist that complements the wine beautifully.
If you try this, I’d love to hear how it turns out — drop a comment or tag me! Sharing your kitchen adventures makes my day. Plus, who knows, your twist might just inspire someone else!
Related update: Classic Boeuf Bourguignon

It was one of those evenings where the day seemed to stretch on forever, and all I could think about was something light yet satisfying to cap it off. The sun was setting, casting a warm glow across my kitchen, and I had a sudden craving for something that felt like a mini tropical escape. That’s when the idea of making Grilled Lemongrass Shrimp hit me. It’s the kind of dish that’s deceptively impressive but doesn’t demand hours of your time—perfect for a weeknight treat. The lemongrass adds a citrusy zing, while the chili paste gives it just the right kick. With a short marinating time, it’s as close to instant gratification as you can get with a grill. Plus, there’s something about skewering shrimp that feels like a fun party trick, even if it’s just you and your family.
Jump to Recipe
What You’ll Need
Chances are you already have most of this tucked away in your pantry, aside from maybe the lemongrass. But trust me, it’s worth hunting down for that signature aromatic flavor.
- Bamboo skewers soaked in water
- Lemongrass – the star of the show!
- Garlic
- Soy sauce
- Fish sauce
- Ground chili paste
- Pinch of salt
- Sugar
- Vegetable oil
- Water
- Raw shrimp – peeled and deveined
How to Make Grilled Lemongrass Shrimp
- Gather all your ingredients and a mixing bowl. Combine the chopped lemongrass, minced garlic, soy sauce, fish sauce, chili paste, salt, sugar, and a drizzle of vegetable oil in the bowl. Stir until it all comes together into a fragrant marinade.
- Add the shrimp into the bowl, making sure each one gets coated in the aromatic marinade. Let them marinate for 15 minutes—just enough time to sip on a cool drink and prep your grill.
- Thread the shrimp onto the soaked bamboo skewers. It’s all about that balance, so make sure the shrimp are spaced out evenly.
- Fire up your grill to moderate heat. If you’re using charcoal, wait until the coals are hot but no longer flaming. For a gas grill, a medium setting will do the trick.
- Place the skewers on the grill. The shrimp will cook quickly, so stay close. Turn them after about a minute or so, keeping an eye out for that beautiful pink hue and slightly charred edges. They’re done when they’re opaque and firm, about 2-3 minutes in total.
Cook’s Notes
If you’re like me and tend to get distracted, set a timer for the marinating and grilling time. You don’t want to overdo the shrimp—there’s nothing worse than rubbery seafood. If you don’t have a grill, a griddle pan on the stovetop works surprisingly well. Just make sure it’s hot enough to give you that lovely char. Leftovers, if you have any, are great cold in a salad or tossed into a noodle dish the next day.
Make It Your Own
- Swap the shrimp for chicken or tofu if you’re looking for a different protein. Adjust cooking times accordingly—chicken will take a bit longer.
- For a sweeter twist, add a splash of coconut milk to the marinade. It brings a creamy texture that pairs beautifully with the lemongrass.
- Throw in some chopped cilantro or mint into the marinade for a fresh, herbal kick.
- If you’re feeling brave, up the chili paste for more heat. Just have a cool drink at the ready!
If you try this, I’d love to hear how it turns out—drop a comment or tag me! It’s always fun to see how different kitchens bring their own flair to a dish. Enjoy your little slice of tropical heaven!
Related update: Grilled Lemongrass Shrimp

It was one of those chaotic weeknights when I stumbled back into the kitchen after a long day, only to find a colorful assortment of bell peppers staring back at me from the fridge. They were practically begging to be turned into something delicious. I craved something that was not only quick to whip up but also packed with flavor and just the right amount of comfort. That’s when it hit me – a vibrant, flavor-packed Mexican stuffed bell pepper! These beauties come together effortlessly with a few pantry staples and a rotisserie chicken that I always keep around for emergencies. With a quick trip to the oven, they fill the house with mouthwatering aromas, and in no time, dinner is served. It’s the kind of recipe that feels satisfying and a little bit indulgent, but you know it’s good for you too.
Jump to Recipe
What You’ll Need
Let’s be honest, the best part about this recipe is that you probably have most of these ingredients on hand. Here’s what you’ll need to get started:
- Bell peppers (any color you love)
- Cooked brown rice
- Rotisserie chicken breast, shredded
- Frozen corn kernels
- Roma tomato, diced
- Red diced onion
- Black beans, drained and rinsed
- Fire roasted green diced chile
- Chili seasoning
- Minced garlic
- Low-fat shredded cheddar cheese
- Sour light cream
How to Make Blast Of Color Mexican Stuffed Bell Peppers
- Preheat your oven to 400 degrees. Feel that blast of warmth and imagine the deliciousness to come.
- In a large mixing bowl, toss together the cooked brown rice, shredded chicken, corn, diced tomato, onion, black beans, half a cup of shredded cheddar, garlic, green chile, and chili seasoning. Mix until everything is evenly distributed and it smells like a fiesta.
- Line a baking dish with foil and give it a spritz of cooking spray to prevent sticking.
- Take your bell peppers and cut off the tops, then scoop out the seeds. Stuff them generously with the chicken mixture, pressing it down to fill every nook and cranny, and heap some extra on top for good measure.
- Sprinkle each pepper with a bit more cheddar cheese, because let’s be honest, you can never have too much cheese.
- Bake in the preheated oven for 30 to 40 minutes. When the edges of the peppers start to bubble and the cheese turns golden, you know it’s ready.
- Let them cool just a bit, then top each pepper with a dollop of sour light cream before serving. Dig in and enjoy!
Cook’s Notes
These Mexican Stuffed Bell Peppers are a breeze to make, but here are a few things to keep in mind to ensure they turn out perfectly every time. Make sure your baking dish is large enough to fit all the peppers snugly so they stand upright and cook evenly. If you’re prepping ahead, you can mix the stuffing a day in advance and refrigerate it. Just stuff and bake when you’re ready. Leftovers can be stored in an airtight container in the fridge for up to three days. Just pop them in the microwave for a quick reheat.
Make It Your Own
Personalizing this dish is easy, and here are a few ideas to get you started:
- Swap the chicken for crispy tofu or ground turkey for a different protein option.
- Add a handful of fresh cilantro or parsley to the stuffing mix for a burst of freshness.
- If you like it spicy, throw in some jalapeño slices or a dash of hot sauce.
- Use quinoa instead of brown rice for a protein-packed alternative.
If you try this, I’d love to hear how it turns out — drop a comment or tag me! Cooking is all about experimenting and sharing, and I can’t wait to see your creations. Happy cooking!
Related update: Blast Of Color Mexican Stuffed Bell Peppers
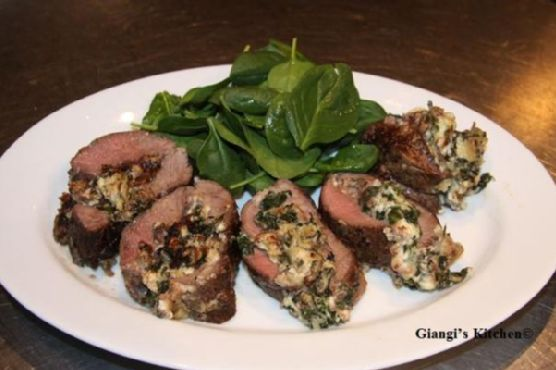
Picture this: It’s a Wednesday night, the middle of a chaos-filled week, and you’re staring into your fridge, half wishing it would magically produce something other than leftovers or eggs. It’s in moments like these that my Spinach and Gorgonzola Stuffed Flank Steak becomes a lifesaver. This dish is what I like to call my “secret weapon” — it sounds like a mouthful, but it’s surprisingly easy to pull together. Plus, it gives off this vibe that you’ve got your life together, even if you’re just trying to make it to the weekend. Think savory, melty gorgonzola mingling with fresh spinach, all hugged by a tender flank steak. Are you drooling yet?
Jump to Recipe
What You’ll Need
This ingredient list is refreshingly short and sweet, which means you can save that grocery store run for another day.
- Lean flank steak – the star of the show
- Olive oil – for a touch of richness
- Shallot – adds a subtle sweetness
- Spinach – fresh and vibrant
- Fresh bread crumbs – gives the stuffing a bit of body
- Blue gorgonzola – the cheesy dream
- Salt and pepper – the essentials
How to Make Spinach and Gorgonzola Stuffed Flank Steak
- Start by preheating your oven to 375°F (190°C). This is your cue to get things rolling.
- Next, butterfly the flank steak. Lay it flat on a cutting board and carefully slice through the long side, stopping just short of cutting it in half. If it’s already thin, just give it a good pounding with a mallet until it’s about 1/2 inch thick. Channel your inner chef!
- In a large skillet over medium heat, add 1 tablespoon of olive oil. Toss in the shallots and sauté until they’re soft and fragrant, about 2 minutes.
- Now, add the spinach. Stir occasionally until it’s just wilted, roughly 2 to 3 minutes. Transfer this mixture to a colander and let it cool. Once you can handle it, squeeze out all the moisture with your hands. Trust me, this step is crucial.
- In a medium bowl, combine the spinach with bread crumbs and gorgonzola. Season generously with salt and pepper, then mix it all up.
- Lay the steak flat on a piece of plastic wrap. Spread the spinach mixture evenly over it, leaving about a 1-inch border along the edges to prevent spillage.
- Using the wrap as an aid, roll the steak up starting from the edge closest to you. Press gently on the filling as you roll to keep it snug. Tie the roll with twine at 2 to 3-inch intervals to hold it all together.
- Season the outside with salt and pepper, then heat the remaining 2 tablespoons of olive oil in a large ovenproof skillet over medium-high heat.
- Sear the rolled steak on all sides until browned, about 2 minutes per side. The aroma will be irresistible at this point!
- Transfer the skillet to your preheated oven and roast for 20 to 25 minutes. When done, the steak should be firm but springy to the touch.
- Remove the steak from the oven, tent it with aluminum foil, and let it rest for 10 minutes. This is the hardest part – the waiting.
- When ready to serve, snip off the twine and slice into 1/2 inch to 1-inch thick slices. Voila! Enjoy your culinary masterpiece.
Cook’s Notes
If you’re looking for a shortcut, ask your butcher to butterfly the steak for you — major time saver. This dish works beautifully for make-ahead dinners. Simply prep it up to the point of searing, then chill in the fridge for a few hours, or even overnight. When you’re ready, just pick up where you left off. Leftovers (if there are any!) will keep well in the fridge for a couple of days and are delightful cold in a sandwich or reheated gently.
Make It Your Own
- Not a fan of gorgonzola? Swap it for creamy goat cheese or a melty Havarti.
- Add a layer of prosciutto before spreading the spinach mixture for an extra savory note.
- Throw in some chopped sun-dried tomatoes or roasted red peppers for a pop of color and flavor.
- For a twist, replace the spinach with arugula or baby kale — it’ll add a peppery kick.
If you try this, I’d love to hear how it turns out — drop a comment or tag me! Cooking should be fun, so let’s keep the conversation going. Happy cooking, friends!
Related update: Spinach and Gorgonzola Stuffed Flank Steak
Related update: Blast Of Color Mexican Stuffed Bell Peppers
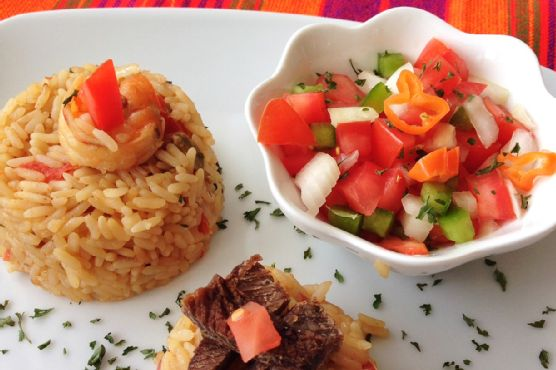
Imagine this: It’s a chilly, rainy Tuesday evening. I find myself staring into the pantry, looking for something that’ll warm me up, body and soul. I have a little bit of goat meat, some shrimp, and the usual pantry spices that seem to multiply on their own. It’s the kind of evening where you crave something comforting yet exotic, and that’s when I remember — Kenyan Pilau. It’s one of those dishes that sounds impressive but is surprisingly easy to whip up. The aroma of spices mingling in the kitchen is enough to make anyone feel like a culinary genius. It’s perfect for those weeknight dinners when you want to travel the world without leaving your kitchen.
Jump to Recipe
What You’ll Need
Trust me, you might already have most of these ingredients lounging around in your kitchen. And the hero of this dish? It’s definitely the spice mix that elevates a simple rice dish into something extraordinary.
- Black whole peppercorns
- Cardamom pods
- Cinnamon sticks
- Cumin seed powder
- Garlic
- Ginger
- Goat meat
- Onion
- Canned rice
- Salt
- Dressed shrimp
- Tomatoes
- Cooking spoon of vegetable oil
How to Make Kenyan Pilau
- First things first, season the goat meat well and set it to boil. You want it tender, like it’s ready to fall apart at a fork’s touch.
- Chop all your lovely spices — the peppercorns, cardamom, and cinnamon — and give them a good crush. This is where the magic begins.
- Heat up a cooking spoon of vegetable oil in a large pot. Once shimmering, add sliced onions and sauté until they’re golden brown, releasing a sweet aroma.
- Add the boiled goat meat to the pot and allow it to brown just a little more. This is where you start to feel like a pro chef.
- Stir in your crushed spices, letting their fragrance envelop the kitchen. Then, add the canned rice and chopped tomatoes, giving it all a good mix.
- Add the dressed shrimp, followed by 2 cups of water. Reduce the heat, cover the pot, and let it steam. Check occasionally to ensure the water is absorbed and the rice is soft.
- Once the rice is perfect, increase the heat briefly and stir to ensure all those fantastic spices soak into every grain. Serve it alongside some Kachumbari or your favorite salad.
Cook’s Notes
A little tip from my kitchen to yours: make sure you don’t rush the browning process for the onions and meat. This step deepens the flavor of the Pilau significantly. Feel free to make this dish ahead of time; it keeps well in the fridge for a couple of days and the flavors only get better. Just reheat gently to avoid drying out the rice. If you find yourself with leftovers, good news — they can be transformed into a delightful next-day lunch. Just add a splash of water before reheating to fluff it up again.
Make It Your Own
This Kenyan Pilau is versatile, and you can easily tweak it to fit your taste or pantry stock. Here are some ideas:
- Swap the goat meat with chicken thighs for a lighter version.
- Substitute the shrimp with crispy tofu for a vegetarian twist.
- Try using basmati rice instead of canned rice for a fragrant touch.
- Add a handful of peas or diced carrots for a pop of color and sweetness.
If you try this, I’d love to hear how it turns out—drop a comment or tag me! Whether you stick to the script or make it your own, this Kenyan Pilau is set to be a crowd-pleaser at your table. Happy cooking!
Related update: Kenyan Pilau

Last Tuesday, I found myself staring into the fridge, bleary-eyed and snacky, with no desire to make a big mess just to satisfy my craving for something warm and flavorful. It had been a long day, and I needed dinner on the table, pronto. Arroz Con Pollo fluttered into my mind like an old friend, promising that elusive blend of comfort and flavor without a crazy ingredient list. This one-pan wonder is my go-to for nights like this—simple enough for a weeknight but lush enough to feel like a treat. The best part? It’s a forgiving recipe that lets you swap in what you’ve got on hand. By the way, if you’re in a rush to get cooking, feel free to skip down to the nitty-gritty details. Jump to Recipe
What You’ll Need
Chances are you already have most of these ingredients chilling in your pantry or fridge. Here’s what you’ll need:
- Butter
- Garlic
- Chicken breasts
- Ground cumin
- Ground coriander
- Ground turmeric
- Onion
- Bell pepper
- Canned diced chiles
- Canned diced tomatoes
- Chicken broth
- Dried rice
- Chili powder
- Salt
- Onion powder
- Shredded cheese
How to Make Arroz Con Pollo
- Start by heating up a large pan over medium heat and melt the butter until it’s sizzling and aromatic.
- Add in the garlic and let it cook for a minute or two until it’s fragrant and just beginning to turn golden.
- Sprinkle your chicken breasts with about 1 teaspoon each of cumin, coriander, and turmeric. Toss them in the pan and cook until they are browned and cooked through.
- Once your chicken is fully cooked, toss in your diced onion and bell pepper. Stir everything together and let it cook for about 3 to 4 minutes, until the veggies start to soften.
- Add the canned diced chiles and tomatoes. Give it all a good swirl to combine.
- Pour in the chicken broth and add your dried rice. Stir gently to make sure everything is mixed well.
- Sprinkle in the remaining teaspoon of chili powder, cumin, and coriander, along with the salt, remaining turmeric, and onion powder.
- Bring the pot to a boil, then reduce the heat to low, cover, and let it simmer for about 20 minutes or until the liquid is absorbed and the rice is cooked through.
- Once the rice is perfectly cooked, grab your shredded cheese and generously spread it across the top of the chicken mixture. Cover the pan for another minute or two until the cheese melts completely into gooey perfection.
Cook’s Notes
This dish is pretty forgiving, but here are a few notes to make sure it’s perfect every time. If you find your pan getting too dry during the simmer, just add a splash more broth or water. Cooking times can vary depending on your stove and pot, so keep an eye on the rice after the 15-minute mark. If you want to prep ahead, you can chop your veggies and measure out spices a day in advance. Leftovers? They make for an awesome lunch the next day. Just store it in an airtight container in the fridge, and it should be good for about 3 days.
Make It Your Own
- Swap the chicken for crispy tofu if you’re leaning towards a plant-based version.
- Add in some frozen peas or corn during the last 5 minutes of cooking for a pop of sweetness and color.
- Use smoked paprika instead of chili powder for a smoky twist.
- Throw in some sliced olives or capers for a briny kick.
If you try this, I’d love to hear how it turns out—drop a comment or tag me! Remember, the best part of cooking is making it your own, so don’t be afraid to tweak it to suit your taste buds.
Related update: Arroz Con Pollo
Related update: Kenyan Pilau

Let’s talk about the time I ambitiously decided to make enchiladas on a Wednesday night after one too many hours of doom-scrolling through Instagram. You know the ones—cheesy, gooey, and utterly comforting. I could already taste the spicy tang of green chilies, imagining it would somehow transform my week. Spoiler: it did. This Enchiladas Verdes recipe is not only a delicious weeknight hero but also a dish that’s forgiving enough for any kitchen mishaps. Didn’t roll the tortillas tight enough? No worries; it’s all going to melt together in a cheesy, saucy hug anyway. And trust me, the result is so satisfying, you’ll forget about that midweek slump. Jump to Recipe
What You’ll Need
What’s fantastic about this dish is you might already have most of the ingredients lounging around in your kitchen. If not, the list is simple and straightforward.
- Skinless boneless chicken breast or a quick swap with a store-bought rotisserie chicken.
- Green Anaheim chili peppers – these are the stars of the show.
- Canola oil
- Flour
- White diced onion
- White corn tortillas
- White shredded cheese
- Queso fresco
- Sour crema
- Salt
- Water
- Suero or buttermilk (canned buttermilk works, too)
How to Make Enchiladas Verdes (Green Enchiladas)
- Preheat your broiler and get those green chili peppers ready for roasting. Choose firm, meaty peppers—no wrinkles, please!
- Rinse the peppers and lay them on a foil-lined cookie sheet. Slide them under the broiler and keep an eye on them. Within minutes, you’ll see the skin begin to blister and turn black.
- Flip the peppers after about 5 minutes to get all sides evenly blistered. Once done, pop them into a plastic bag and cover with a towel, letting them cool. This makes peeling off the blackened skin a breeze.
- For the sauce, blend those roasted peppers, flour, and half of your suero or buttermilk until smooth and creamy. Pour this mixture into a skillet over medium-low heat.
- As it warms, gradually stir in more suero or buttermilk. Season with salt—around 2 teaspoons usually does the trick. If it’s too spicy for your taste, add crema. Too thick? Dribble in some water.
- Now, the chicken. Either boil your chicken breasts in a pot until done or just shred a rotisserie chicken. The choice is yours.
- For stacked style enchiladas, fry your tortillas in hot oil just until they’re soft, then drain. Dip each in the sauce before layering on plates with chicken, cheese, and onion. Go for three layers per serving.
- If you prefer oven-baked, preheat to 350°F. Spread sauce at the bottom of your baking dish, fry and fill the tortillas, then roll them up seam down in the dish.
- Drench with more sauce and sprinkle with crumbled queso fresco. Bake until everything’s gloriously warm, about 15 minutes.
- Serve with a dollop of sour crema and get ready to conquer the rest of your week!
Cook’s Notes
Here are a few tips I’ve picked up along the way:
- These enchiladas are flexible with make-ahead options. Prepare the sauce and chicken in advance, then just assemble when you’re ready.
- Store leftovers in an airtight container in the fridge for up to three days. Reheat in the oven for best results.
- Don’t skip the roasting of peppers, as it’s essential for that smoky flavor. If you find peeling them tricky, let them steam longer in the plastic bag.
Make It Your Own
- For a vegetarian spin, swap out chicken with crispy tofu or sautéed mushrooms.
- Mix in some black beans with the chicken for added texture and protein.
- Try using a mix of different cheeses like mozzarella for an extra gooey factor.
- Add avocado or cilantro as a fresh topping before serving.
If you try this, I’d love to hear how it turns out—drop a comment or tag me on social media! Enjoy your cozy, midweek escape with these Enchiladas Verdes.
Related update: Enchiladas Verdes (Green Enchiladas)
Related update: Baked Sirloin Steak

Last Thursday, I found myself staring into the fridge, hoping for inspiration to strike before my toddler demanded dinner. It was one of those days where you need something kinda fancy to feel like an adult—but it also had to be easy enough to not cause a breakdown. Enter: Wildwood Ovens Bourbon Apple Glazed Cedar Plank Salmon. This dish is the answer to those chaotic moments when you want to impress yourself and anyone lucky enough to be at the table. It’s a little sweet, a little smoky, and totally doable on a weeknight. The cedar plank makes it taste like it came from a restaurant, but really you just soaked a piece of wood and turned on the grill. Magic, right?
Jump to Recipe
What You’ll Need
The beauty here is that the ingredient list is straightforward, and there’s a good chance you’ve got most of this hiding in your pantry. A quick run to the store, and you’ll be ready to rock this impressive dish.
- Apple juice
- Brown sugar
- Cedar plank (make sure it’s food-safe!)
- 3-4 garlic cloves, minced
- 1 tsp kosher salt
- Freshly cracked black pepper
- Salmon filet (about 1.5-2 lbs is perfect)
- Bourbon whiskey
How to Make Wildwood Ovens Bourbon Apple Glazed Cedar Plank Salmon
- Start by soaking your cedar plank in water for at least 2 hours. This step is crucial to prevent any unplanned flare-ups and to infuse that lovely woody flavor into your salmon.
- Rinse the salmon under cold water and gently pat it dry with paper towels. This is essential as it helps the seasoning stick better and gives you a nice crisp finish.
- Grab a medium saucepan and set it over medium-high heat. Carefully pour in the bourbon—remember, no free-pouring from the bottle, unless you enjoy spontaneous kitchen pyrotechnics.
- Once the alcohol is reduced and you’ve got just a little left at the bottom of the pan, add in the apple juice, brown sugar, and minced garlic. Keep it on the heat until it’s reduced to about a third of its original volume. You’re looking for something just thinner than syrup.
- Season the salmon generously with salt and freshly cracked black pepper on both sides. Brush the skin side with a bit of olive oil.
- Place the seasoned salmon, skin side down, on the soaked cedar plank. Then, transfer the plank to a medium-high grill or a wood-fired oven preheated to 500°F, positioning it close to the fire for that authentic flavor.
- Using a probe thermometer, start checking the internal temperature of the salmon after about 10 minutes, and then every 5 minutes thereafter. Once it hits at least 100°F, brush on the apple glaze—every few minutes. This layering helps build up that gorgeous, sticky finish.
- Continue cooking until the salmon reaches your desired doneness; I aim for around 135°F for that perfect, juicy flakiness.
Cook’s Notes
Here are some extra tips for nailing this dish every time:
- Make sure your cedar plank is fully submerged while soaking, maybe putting a can or something on top to keep it under water.
- Don’t skimp on the glaze. The more layers you add, the richer the flavor.
- Leftovers (if you have any) can be kept in an airtight container in the fridge for a couple of days. Flake it over a salad for a quick next-day meal!
Make It Your Own
- Swap the bourbon for brandy if you prefer a slightly sweeter glaze.
- For a spicier kick, add a pinch of chili flakes to the glaze.
- No salmon? Try this glaze on chicken breasts or even tofu—just adjust the cooking time accordingly.
- Top with fresh herbs like dill or parsley for a pop of color and flavor right before serving.
If you try this, I’d love to hear how it turns out—drop a comment or tag me on social media! It’s always a win when we can turn a potential kitchen meltdown into a tasty triumph.
Related update: Wildwood Ovens Bourbon Apple Glazed Cedar Plank Salmon
Related update: Meat rolls with prosciutto and sage

Picture this: it’s a Wednesday evening, and you just got home, eyes baggy from the day, craving something that feels like a mini-vacation but without the suitcase hassle. Enter Crunchy Prawn Skewers With Lemony Avocado Dip. These little beauties are my go-to when I need something fresh, quick, and so delightful it erases the mundane right off your plate. I love that they’re impressive enough to make my husband think I’ve been slaving away when really, it’s just a fun little dish that comes together quicker than you can say “takeout.” Plus, that avocado dip? Oh, it’s the zingy, creamy goodness that dreams are made of.
Jump to Recipe
What You’ll Need
I bet you already have most of these staples hanging around your kitchen. You might just need to grab some prawns on your way home.
- Prawns – The star of the show, fresh or thawed from frozen.
- Flesh of Avocado – Creamy and ripe, please.
- Crème Fraiche – For that lush, smooth texture in the dip.
- Lemon (juice) – Bright, zesty, and necessary.
- Bread crumbs – I like the panko kind for extra crunch.
- Olive oil – Just a splash to coat those prawns.
- Bamboo skewers – Don’t let them set your kitchen on fire.
How to Make Crunchy Prawn Skewers With Lemony Avocado Dip
- Start by making the dip: throw the avocado flesh, crème fraiche, and lemon juice into a food processor. Blend until silky smooth. Taste, season, and set it aside.
- In a separate bowl, mix your breadcrumbs with a touch of lemon zest, and season generously. It should smell like a fresh, zesty day.
- Now, coat your prawns in a little olive oil. Give them a gentle massage, then toss them into the breadcrumb mixture, ensuring they’re well-coated.
- Thread three prawns onto each skewer. Trust me, this is easier than threading a needle.
- Time to grill! Place the skewers on a preheated grill for about 2 minutes on each side, until they’re golden and crisp. The smell should be irresistible by now.
- Serve immediately with that luscious avocado dip and watch them disappear quickly.
Cook’s Notes
I can’t stress enough the importance of soaking those bamboo skewers beforehand. Give them at least an hour in cold water, and you’ll avoid any unwelcome flare-ups. If you’re planning to make this dish ahead, prep the dip and breadcrumb mixture in advance, but hold off on breading the prawns until you’re ready to cook. Leftovers? Pop them in an airtight container in the fridge — the dip stays good for a couple of days, but the prawns are best enjoyed fresh while they’re crispy.
Make It Your Own
- Instead of prawns, try using tofu cubes for a vegetarian twist. Just press them well to remove excess moisture before coating.
- Add a pinch of smoked paprika to the breadcrumb mix for a smoky kick.
- Swap the crème fraiche with Greek yogurt if you prefer a tangier dip.
- For a little heat, toss a few chili flakes into the breadcrumb mixture.
If you try this, I’d love to hear how it turns out — drop a comment or tag me! Enjoy making these skewers and watch them become a weeknight favorite in no time!
Related update: Crunchy Prawn Skewers With Lemony Avocado Dip
Related update: Mini Zucchini Bites (Cuadritos De Calabacin)

Last Tuesday evening, I was standing in my kitchen, staring into the fridge like it was an oracle with all the answers to my dinner dilemmas. It had been a long day, and I needed to whip up something that felt like a reward for surviving it. That’s when I spotted the pack of pork chops tucked away on the bottom shelf, right beside a wedge of Gruyère cheese that had almost been forgotten. The idea of Cheese Pork Chops was born, and let me tell you, this dish is a midweek savior. It’s got that special touch of comfort with gooey cheese and rich mustard cream, yet it’s simple enough to throw together while you’re half-distracted by a podcast or the kids’ homework.
Jump to Recipe
What You’ll Need
This is one of those recipes where you might just have everything you need already. It’s all about bold flavors with just a handful of ingredients.
- 2 tablespoons olive oil
- 2 tablespoons unsalted butter
- 4 pork chops (about 1 inch thick)
- Salt and pepper, to taste
- 1/2 cup heavy cream
- 2 tablespoons dijon mustard
- 1 cup shredded Gruyère cheese
How to Make Cheese Pork Chops
- Heat a heavy-bottom skillet over medium-high heat. Add the olive oil and butter, swirling them together until the butter melts and starts to slightly foam.
- Carefully place the pork chops in the skillet. Sauté for about 3 minutes on each side, letting them develop a lovely golden crust.
- Reduce the heat to medium. Cook the pork chops for an additional 5 to 6 minutes per side, until they’re just cooked through. Sprinkle with salt and pepper to taste. Remember, the juices should run clear when you test them.
- While the chops finish cooking, preheat your broiler. In a small bowl, whisk together the heavy cream, dijon mustard, and shredded Gruyère cheese until well combined.
- Transfer the cooked pork chops to an ovenproof dish. Spread the cheese-cream mixture generously over each chop.
- Place the dish under the preheated broiler for about 5 minutes. Keep a close eye on them—the cheese should be bubbly and slightly browned.
Cook’s Notes
One of the best things about this dish is how forgiving it is. If your chops are a bit thicker or thinner, just adjust cooking time accordingly. You want them juicy, not dry.
If you’re making this ahead of time, you can prepare the cheese mixture in advance and even sear the chops the night before. Just store them separately in the fridge and bring to room temperature before broiling.
Got leftovers? Lucky you! They’re fabulous sliced thin and tossed into a salad, or reheated gently in the microwave for a next-day lunch that will make your coworkers jealous.
Make It Your Own
- Spice it up: Add a teaspoon of chili flakes to the cheese mixture for a spicy kick.
- Herbaceous twist: Mix a tablespoon of chopped fresh herbs like thyme or rosemary into the cheese mixture.
- Cheese swap: Try shredded sharp cheddar or even blue cheese for a different flavor profile.
- Dijon alternative: Experiment with whole grain mustard for a bit more texture and tang.
If you try this, I’d love to hear how it turns out — drop a comment or tag me in your cheesy creations! Happy cooking, friends!
Related update: Cheese Pork Chops

Picture this: It’s a hectic Wednesday evening, and you’ve just walked through the door, shoes off, contemplating what to make for dinner. The fridge hums with half-empty bottles of condiments, and there’s a lone pack of pork chops staring back at you. This is the moment you realize the magic of Bruschetta Style Pork & Pasta. It’s the perfect blend of comforting pasta and savory pork, all wrapped in the tangy-sweet goodness of bruschetta flavors. It’s one of those dishes that feels fancy enough to impress but is wonderfully simple to throw together, ideal for those mid-week dinners when time is not on your side.
Jump to Recipe
What You’ll Need
This recipe is a lifesaver because chances are you already have most of the ingredients hanging around your kitchen. Here’s what you’ll need to whip up this delight:
- One package of bow tie pasta
- Freshly grated parmigiano reggiano
- A jar of Recipe Makers Chicken Bruschetta Pasta sauce
- 4-6 pork chops
How to Make What to make for dinner tonight?? Bruschetta Style Pork & Pasta
- First, give those pork chops a good wash and rinse. Pat them dry, then plop them into your skillet. You’ll want to cut them into bite-sized pieces so they cook quickly and soak up all those delicious flavors.
- Add half of the Basil Garlic simmer sauce from your Bruschetta Pasta kit into the skillet with the pork. You’ll know it’s working its magic when the kitchen starts to fill with a seriously drool-worthy aroma.
- Meanwhile, bring a pot of water to a boil and get your bow tie pasta cooking. Aim for al dente—that perfect balance of tender but still with a bit of bite.
- Once your pasta is done, drained, and ready, toss it into the skillet with the pork. Pour in the rest of the Basil Garlic Simmering Sauce, giving everything a nice mix so the pasta is well-coated.
- Now for the pièce de résistance: top the whole thing with the Chunky Bruschetta Finishing Sauce. Sprinkle generously with Parmesan, then cover the skillet. Let it all cook on low heat for 2 to 3 minutes, just until everything’s heated through and the cheese melts into gooey perfection.
Cook’s Notes
Here’s the deal: when cutting your pork, keep the pieces uniform in size to ensure even cooking. You want them golden but not overcooked. If you’re making this ahead, stop just before adding the Parmesan and Finishing Sauce. Store it in the fridge, and when you’re ready to eat, layer on the sauce and cheese, then heat through. Leftovers? They’re a dream. Just store them in an airtight container, and they’ll be good for up to three days. Reheat gently on the stove or in the microwave with a splash of water to keep everything from drying out.
Make It Your Own
Here are some ways you can switch things up:
- Swap the pork for crispy tofu for a vegetarian twist. Just pan-fry the tofu until golden before adding the sauces.
- Use zoodles or spaghetti squash instead of bow tie pasta for a low-carb version.
- Add a handful of fresh spinach to the skillet before serving for a pop of color and extra nutrients.
- For a spicy kick, toss in some red pepper flakes along with the Parmesan.
If you try this, I’d love to hear how it turns out—drop a comment or tag me! Cooking should be fun, stress-free, and delicious, so let’s make that happen. Happy cooking, friends!
Related update: What to make for dinner tonight?? Bruschetta Style Pork & Pasta

There was this one Thursday evening when I felt the chill in the air turning my fingers just a bit numb, and I craved something that felt like a warm hug. I was rifling through my pantry, hoping to discover a forgotten treasure, when I stumbled upon a jar of sauerkraut and a pack of knockwurst sitting in the fridge. Suddenly, inspiration struck. This dish is the epitome of comfort food — cozy, hearty, and surprisingly easy to throw together with a few pantry staples. The combination of savory knockwurst and tangy sauerkraut, all tied together with a hint of sweetness from molasses and the earthy warmth of spices, truly hits the spot on those brisk evenings when you just need a little extra comfort.
Jump to Recipe
What You’ll Need
This recipe is all about layering flavors with a minimal ingredient list — you’ll likely find many of these in your pantry already!
- 1 tablespoon butter
- 1 medium onion, chopped
- 1 cup beer
- 1 cup water
- 1 tablespoon cornstarch
- 2 tablespoons brown mustard
- 1 tablespoon molasses
- 1 teaspoon caraway seed
- 1/4 teaspoon ground allspice
- 1/4 teaspoon ground black pepper
- 1 medium rutabaga, peeled and chopped
- 1 pound cooked knockwurst
- 2 cooking apples, peeled, cored, and cut into wedges
- 1 can (about 14 ounces) sauerkraut
How to Make Knockwurst with Sauerkraut
- In a medium frying pan, melt the butter over medium heat. Add the knockwurst and cook, turning occasionally, until they’re browned and the edges are just starting to crisp — about 10-12 minutes.
- Meanwhile, drain the sauerkraut in a colander, rinse it under cold water, and let it drain again thoroughly. This step is crucial to avoid an overly sour dish.
- In a large pot, sauté the chopped onion over medium heat until the pieces are tender and translucent, but not browned. You’ll know it’s ready when the kitchen fills with that sweet, savory onion aroma.
- Pour in the beer and let it come to a gentle simmer. Meanwhile, in a separate bowl or measuring cup, mix together the water, cornstarch, brown mustard, molasses, caraway seed, ground allspice, and black pepper until smooth.
- Stir this mixture into the onion and beer in the pot. Cook and stir consistently until the sauce thickens and becomes bubbly. You’ll see it start to coat the back of a spoon — that’s when you know it’s ready for the next step.
- Add the chopped rutabaga to the pot, cover with a lid, and let it simmer for 15 minutes, allowing the rutabaga to become just tender.
- Finally, stir in the browned knockwurst, apple wedges, and sauerkraut. Cover the pot again and let everything simmer together for another 15 to 20 minutes, until the apples have softened and the flavors have melded beautifully.
Cook’s Notes
- When browning the knockwurst, be patient and let them get a nice brown crust. It adds a lovely depth of flavor that you don’t want to miss.
- The molasses adds a touch of sweetness but doesn’t overpower. If you prefer slightly less sweetness, you can reduce the amount to 1 teaspoon.
- This dish can be made ahead and actually tastes better the next day as the flavors have more time to develop. Simply store it in an airtight container in the fridge for up to 3 days. Reheat on the stove over low heat until warmed through.
Make It Your Own
- For a vegetarian twist, swap the knockwurst with crispy tofu cubes. You’ll get that savory satisfaction without the meat.
- Use sweet potatoes in place of rutabaga for a sweeter, more colorful dish.
- Add a handful of chopped kale or spinach at the end for a burst of color and nutrients.
- If you’re a spice lover, a pinch of red pepper flakes will add a nice kick.
If you try this recipe, I’d love to hear how it turns out for you! Drop a comment below or tag me in your culinary adventures. Enjoy every bite of this cozy, delicious meal!
Related update: Knockwurst with sauerkraut
Related update: What to make for dinner tonight?? Bruschetta Style Pork & Pasta

There I was, standing in my tiny kitchen on a Tuesday afternoon, staring at a leg of lamb I’d ambitiously bought during my last grocery run. It was one of those moments where you think, “What have I gotten myself into?” But then inspiration hit me like a delicious lightning bolt: Yogurt Marinated Lamb Skewers. It’s one of those recipes that sounds fancy enough to impress a dinner guest but is secretly simple enough for a weeknight. The magic is all in the marinade, full of spices that soak into the lamb, turning it tender and flavorful. So if you’re looking to impress someone (or just yourself), keep reading.
Jump to Recipe
What You’ll Need
I’m willing to bet you’ve already got most of this stuff hanging out in your pantry. The marinade is what truly makes this dish shine, infusing the lamb with a fragrant mix of spices and creamy yogurt.
- Vegetable oil
- Cumin
- Leg of lamb
- Nutmeg
- Paprika
- Plain yogurt
- Salt
- Turmeric
How to Make Yogurt Marinated Lamb Skewers
- Start by boning the leg of lamb, if it isn’t already done, and cut it into 1-inch cubes. This size is perfect for skewers and ensures even cooking.
- In a large bowl, combine the vegetable oil, cumin, nutmeg, paprika, plain yogurt, salt, and turmeric. Mix until everything is nicely blended and the mixture is aromatic.
- Add the lamb cubes to the marinade. Toss them until they’re well-coated. Cover the bowl and pop it into the refrigerator overnight. This is where the magic happens, as the lamb soaks up all those wonderful flavors.
- The next day, thread the marinated lamb cubes onto skewers. If you’re using wooden skewers, don’t forget to soak them in water for at least 30 minutes to prevent burning.
- Grill the skewers over charcoal, which gives them that beautiful smoky flavor. Cook them for about 7 minutes on each side, until they’re a rich, golden-brown and fragrant.
Cook’s Notes
So, here’s the thing: patience is key! Letting the lamb marinate overnight is what makes it so tender and flavorful. If you’re in a rush, a few hours will do, but try not to skimp on marinating time. As for grilling, charcoal gives the best flavor, but a grill pan on the stovetop works in a pinch. Once cooked, these skewers are best enjoyed fresh, but any leftovers can be stored in an airtight container in the fridge for up to three days. Reheat them gently to avoid drying out the meat.
Make It Your Own
Want to put your own spin on these skewers? Here are some ideas:
- Swap out the lamb for chicken thighs if you’re looking for a more budget-friendly option.
- Add a little lemon juice to the marinade for a citrusy kick that pairs beautifully with the spices.
- Try tossing in some fresh herbs like mint or cilantro at the end for a fresh pop of flavor.
- For a vegetarian twist, use crispy tofu instead of lamb, letting it marinate just as you would the meat.
If you give these Yogurt Marinated Lamb Skewers a go, I’d love to hear how they turned out for you. Drop a comment or tag me on social media. Let’s make deliciousness together!
Related update: Yogurt Marinated Lamb Skewers
Related update: Knockwurst with sauerkraut