
It was a chilly Tuesday evening, and my fridge was looking pretty bare. You know those nights when you just stand there, door open, hoping for inspiration to strike? That was me. But then, hiding behind some leftover lettuce, I found a head of cauliflower and half a leek. It was like a culinary “Aha!” moment. I remembered a soup I improvised once that was so comforting and cheesy, it felt like a warm hug in a bowl. Cauliflower, Leek, and Cheddar Cheese Soup to the rescue! It’s so simple, you might not even need to make a grocery run, and it’s rich and satisfying without being heavy. Plus, it’s a fabulous way to sneak in those veggies.
Jump to Recipe
What You’ll Need
Surprisingly, this soup calls for ingredients you might already have lurking in your kitchen. Simple but mighty, these ingredients come together to make a creamy delight:
- 1 head of trimmed cauliflower
- 1 leek, sliced
- Olive oil
- 1 teaspoon fresh thyme
- 2 cloves garlic, minced
- 1 tablespoon Worcestershire sauce
- 4 cups vegetable broth
- 1 cup fat-free evaporated milk
- 2 cups shredded cheddar cheese
How to Make Cauliflower, Leek and Cheddar Cheese Soup
- Start by heating a splash of olive oil in a large saucepan over medium heat. Toss in the sliced leeks and let them cook for about 5 minutes. You want them softened and a little caramelized, filling your kitchen with that sweet, oniony aroma.
- Next, add the chopped cauliflower, minced garlic, fresh thyme, Worcestershire sauce, and pour in the vegetable broth. Give it a good stir, and bring the soup to a simmer. Let it bubble away gently over medium-low heat for 30 to 40 minutes, until the cauliflower is so tender it practically falls apart.
- Take the pot off the heat. Now for the fun part—puree the soup until it’s silky smooth. You can do this with an immersion blender right in the pot or in batches using a regular blender. Just be careful with hot liquids!
- Once your soup is blended, return it to the saucepan, and stir in the evaporated milk and 2 cups of cheddar cheese. Place it back on medium heat for just 3 to 5 minutes, stirring until the cheese melts into the soup and it’s all dreamy and creamy.
- Pour it into bowls and finish with a sprinkle of cheddar cheese on top for a little extra indulgence. Enjoy your cozy creation!
Cook’s Notes
This soup is super forgiving. If you find it a bit too thick after blending, just add a splash more broth until you reach your desired consistency. It keeps well in the fridge for about 3 days, making it a great make-ahead meal. Reheat gently on the stove to avoid any separation. Freezing isn’t ideal because of the cheese and milk, but it can work in a pinch—just expect a slightly different texture.
Make It Your Own
- Spice it up by adding a pinch of cayenne or smoked paprika for a little heat and depth of flavor.
- If you’re a meat lover, throw in some crispy bacon bits on top just before serving. It adds a delightful crunch!
- For a vegetarian twist, substitute the Worcestershire sauce with soy sauce to keep it plant-friendly.
- Swap the cheddar for a sharp blue cheese if you’re feeling bold and want a tangy kick.
If you try this, I’d love to hear how it turns out—drop a comment or tag me in your cozy creations! Remember, cooking is all about making it suit your taste and enjoying the process. Happy cooking!
Related update: Cauliflower, Leek and Cheddar Cheese Soup
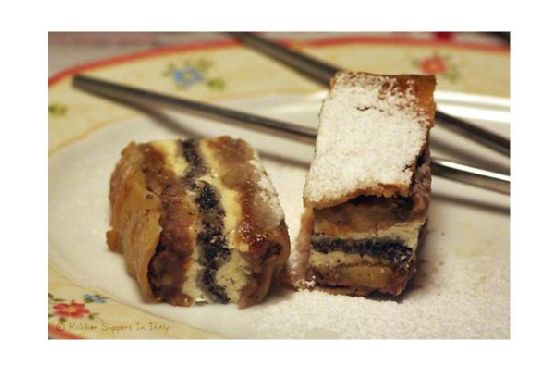
On a particularly rainy Tuesday afternoon, as the water danced against my kitchen window, I found myself craving something both cozy and indulgent. I rummaged through the pantry, hoping for inspiration, and there it was: a can of poppy seed filling. That was all it took to set me on the path toward creating these Layered Poppy Seed Pastries. They’re the perfect blend of buttery layers and rich filling, a treat that feels special but isn’t overly complex to prepare. If you’re like me and love bringing a bit of warmth and comfort on a dreary day, this recipe is a must-try. These pastries are like edible hugs — perfect for impressing friends or just treating yourself.
Jump to Recipe
What You’ll Need
You’d be surprised how many of these ingredients are likely sitting right in your pantry. This recipe doesn’t require anything too exotic, but a few key ingredients really make it shine. Here’s what you’ll need:
- Warm milk – for activating the yeast
- Dry packet yeast – to give our pastries that lovely rise
- Flour – the backbone of our pastry
- Baking powder – adds an extra lift
- Salt and a dash of sugar
- Lemon zest – for a hint of brightness
- Butter – because what’s a pastry without it?
- Whole egg plus an extra yolk for richness
- Vanilla extract – just a splash!
- Canned poppy seed filling – the star of the show
- Ground walnuts – for that nutty crunch
- Water – just a splash to bring it all together
How to Make Layered Poppy Seed Pastries
- Start by mixing the warm milk, dash of sugar, and yeast in a small bowl until the yeast dissolves. Let it sit while you prep the rest.
- In a large mixing bowl, blend the flour, baking powder, salt, and lemon zest. Add the butter and mix until you see a crumbly texture forming.
- In a separate bowl, beat the whole egg and extra yolk with vanilla. Alternate adding this mixture and the yeast mixture to the flour blend, mixing until you have a cohesive dough.
- Transfer your dough to a floured board. Divide it into four parts and knead each into a flat disc. Wrap these in plastic wrap and pop them into the fridge for an hour.
- While the dough chills, spoon your poppy seed filling into a pastry bag. Mix the sugar and ground walnuts in another bowl and set aside.
- Roll each disc into a thin sheet to fit a 13×9-inch baking dish. If you have any trimmings, save them for another pastry adventure.
- Start layering: Place one layer of dough in the baking dish, spread half the poppy seed filling, cover with another dough layer, and sprinkle with the walnut mixture. Repeat once more and top with the final dough layer.
- Let the assembled pastry sit covered with a kitchen towel for 30 minutes, allowing it to rest and rise slightly.
- Brush the top with the egg yolk mixture for a lovely golden finish. Bake at 350°F for around 45 minutes, or until the top is golden brown and the aroma fills your kitchen.
- Once baked, while still hot, cut the pastry into 24 squares. Let them cool in the pan, basking in the glory of your creation.
Cook’s Notes
Always make sure your milk is warm but not hot to the touch, as too much heat can kill the yeast. These pastries freeze beautifully; just wrap them in plastic and then foil, and pop them into a resealable plastic bag. They defrost well and maintain their crispness, tricking everyone into thinking they’re freshly baked. And here’s a tip: when serving, consider making a few extra for your neighbors or friends. Sharing these could easily brighten someone’s day!
Make It Your Own
- Swap out the poppy seed filling with a thick apricot jam for a fruity twist.
- Replace the walnuts with pecans for a sweeter, buttery nut flavor.
- For a citrusy kick, add orange zest instead of lemon zest.
- Want a hint of spice? Add a teaspoon of cinnamon to the walnut mixture.
If you try this, I’d love to hear how it turns out — drop a comment or tag me! These pastries are a rainy day favorite, and I hope they’ll become a part of your kitchen adventures too. Enjoy every flaky, delicious bite!
Related update: Layered Poppy Seed Pastries
Related update: Brandy-Apple Mini Pies With Cornmeal Crust
Picture this: It’s a chilly Tuesday evening, and I’ve just managed to duck out of the rain and into my cozy kitchen. My cat, Oliver, is curled up on the windowsill, and the whole place is alive with the soft patter of raindrops. It’s the kind of night that calls for something deeply comforting, something that can fill not just the belly but also the soul. Enter Classic Boeuf Bourguignon — my go-to when I crave something hearty and a tad bit indulgent but without spending hours in the kitchen. Honestly, the magic of this dish lies in its ability to transform simple ingredients into something truly extraordinary. The smell of beef simmering with red wine and herbs is, quite literally, poetry in a pot. Plus, it’s the kind of recipe where you can pop it all into a Dutch oven, let it work its magic, and you’ll still have time to catch up on that new series everyone’s been talking about.
Jump to Recipe
What You’ll Need
Just a heads-up: You might already have most of these tucked away in your pantry, and the rest? Well, they’re worth the trip to the store. Trust me.
- Bacon – Adds a smoky depth to the dish.
- Olive oil
- Beef stew meat – The star of the show.
- Garlic
- Diced onion
- Fresh thyme
- Bay leaves
- Parsley
- Pearl onions
- Button mushrooms
- Carrot
- Red wine – Go for something you’d drink.
- Beef broth
- All-purpose flour
- Salt and pepper
How to Make Classic Boeuf Bourguignon
- Preheat your oven to 400°F (200°C). Get that Dutch oven ready – it’s about to work its magic.
- Heat olive oil over medium heat and toss in the bacon. Let it sizzle for about 2-3 minutes until it’s just perfectly cooked. Transfer the bacon out with a slotted spoon and let it hang out on the side.
- Pat the beef dry with paper towels for a better browning. Crank up the heat to medium-high, throw the beef into the bacon fat, and let it sear for 4-5 minutes until every piece is gloriously browned. Spoon them out and set aside.
- Lower the heat back to medium. Toss in the carrots, garlic, onions, parsley, thyme, and bay leaves. Give them a good stir for about 2-3 minutes. Out they go with the slotted spoon, into a separate dish.
- Add pearl onions and mushrooms to the Dutch oven. Sauté them until the onions start to brown and the mushrooms become tender. Move them to the dish with the bacon.
- Return the beef to the pot and sprinkle one tablespoon of flour over it. Give it a good toss to coat. Season generously with salt and pepper. Pop it in the oven for about 4-5 minutes to develop a gorgeous crust.
- Remove the pot from the oven and set it on the stovetop. Pour in the red wine and deglaze, scraping up all those tasty bits. Add the beef broth, bring it to a gentle simmer.
- Introduce the carrot, onion, and spice mixture back into the pot. Lower the heat, cover, and let it simmer away for an hour, filling your kitchen with the most intoxicating aroma.
- After an hour, add the pearl onions, mushrooms, and bacon. Continue to simmer, allowing the beef to tenderize further, about another 30 minutes.
- Use a slotted spoon to fish out the solids and set them aside. Crank up the heat; let the sauce come to a rapid boil.
- In a small bowl, mix the remaining tablespoon of flour with two tablespoons of sauce. Stir until smooth and lump-free. Add to the pot, stirring constantly until the sauce thickens.
- Remove the bay leaves and thyme sprigs. Discard them. Return the solids to the pot, stirring to coat evenly with the enriched sauce. Serve warm, perhaps over a bed of egg noodles or rice if you’re feeling it.
Cook’s Notes
Let’s talk practicalities. This dish is one of those gems that get even better the next day — so if you can resist not devouring it all, it’s perfect for leftovers. Store it in an airtight container in the fridge, and when you reheat, just do it gently over low heat to keep that beef tender and juicy. If you’re prepping ahead, you can cook everything up to the point just before adding the flour in step 10. Refrigerate and proceed with the sauce thickening when you’re ready to serve. Also, don’t skimp on the wine. A good wine makes all the difference. Taste as you go, and adjust the seasoning if needed.
Make It Your Own
Feel free to get creative and put your own spin on this classic:
- Vegetarian Twist: Swap out the beef for hearty mushrooms like portobello or cremini, and use vegetable broth instead of beef.
- Poultry Option: Switch the beef out for chicken thighs. They’re just as comforting and cook a bit quicker.
- Root Veggie Addition: Try adding some parsnips or turnips along with the carrots for a little extra earthy sweetness.
- Herbaceous Flair: Add rosemary or sage for an aromatic twist that complements the wine beautifully.
If you try this, I’d love to hear how it turns out — drop a comment or tag me! Sharing your kitchen adventures makes my day. Plus, who knows, your twist might just inspire someone else!
Related update: Classic Boeuf Bourguignon

It was a typical Wednesday evening, and I found myself rummaging through the pantry, desperately seeking something to satisfy my sweet tooth. The weather outside was chilly, the kind of evening that begged for something cozy and chocolatey. In the midst of my search, I stumbled upon a forgotten container of dark cocoa powder wedged between bags of flour and sugar. It was then that the idea struck me — Chocolate Crinkle Cookies. These cookies are like a warm hug: comforting, slightly crunchy on the outside, chewy on the inside, and oh-so-chocolaty. Perfect for a spontaneous midweek baking session, especially when they’re this easy to make. Within an hour, my kitchen was filled with the scent of rich cocoa, and I knew I’d found my new favorite go-to treat for those cold, restless evenings.
Jump to Recipe
What You’ll Need
Imagine the delight of realizing that you already have most of these ingredients lounging in your pantry. Here’s what you need to create these delightful cookies:
- Vegetable oil – keeps the cookies moist
- Sugar – for sweetness and texture
- Vanilla extract – adds a lovely aroma
- Eggs – the glue that binds
- Dark cocoa powder – the heart of the chocolatey goodness
- Flour – the base of any good cookie
- Baking powder – gives those crinkles their puff
- Confectioners’ sugar – for that signature snowy look
How to Make Chocolate Crinkle Cookies
Ready to dive into the wonderful world of crinkly cookies? Here’s the step-by-step:
- Start by mixing the vegetable oil, sugar, and vanilla extract in a mixing bowl. You’ll know it’s right when the mixture looks like wet sand glistening in the sun.
- Add the eggs one at a time, mixing well after each addition until the batter is silky and smooth.
- Incorporate the dark cocoa powder into the mixture, slowly stirring until it turns into a rich, dark chocolate color.
- Combine the flour and baking powder with the wet ingredients. Continue mixing until you have a smooth dough that’s slightly thicker than cake batter.
- Chill the dough in the refrigerator for at least 4 hours. This step isn’t just a suggestion — it’s crucial for achieving perfect crinkles.
- When you’re ready, preheat your oven to 350°F. Line a cookie sheet with greaseproof paper or a nonstick silicone mat.
- Using an ice cream scooper, scoop out the dough and roll each ball generously in confectioners’ sugar. Make sure they’re well-coated for that iconic crinkle effect.
- Place the dough balls on the cookie sheet, leaving about 2 inches of space between each to allow for spreading.
- Bake for 12 minutes. You’ll know they’re done when the edges are firm and the tops have a cracked, powdered sugar crust.
- Let the cookies cool on the sheet initially, then transfer them to a wire rack to finish cooling completely. This helps them firm up nicely.
Cook’s Notes
Let’s chat kitchen wisdom for a second. The dough is sticky, and that’s normal — resist the urge to add more flour! Chilling the dough helps it firm up enough to handle, so don’t skip that step. If you’re in a pinch, you can speed-chill in the freezer for about 30 minutes. These cookies are best enjoyed fresh, but they’ll keep in an airtight container for about a week. To revive day-old cookies, zap them in the microwave for a few seconds — they’ll taste freshly baked!
Make It Your Own
Feeling adventurous? Here are a few ways to tweak these cookies to suit your mood:
- Swap out the dark cocoa powder for regular cocoa powder if you prefer a milder chocolate flavor.
- Add a teaspoon of espresso powder to the dough for a subtle coffee kick that pairs beautifully with the cocoa.
- Fold in some chocolate chips or chunks just before chilling for an extra burst of chocolate in every bite.
- For a festive twist, mix in a teaspoon of peppermint extract or a handful of crushed candy canes.
If you try this, I’d love to hear how it turns out — drop a comment or tag me! Whether you’re indulging alone or sharing with loved ones, these Chocolate Crinkle Cookies are sure to bring a smile. Happy baking!
Related update: Chocolate Crinkle Cookies
Related update: Mangoes with Rum and Ice Cream

It was one of those chilly Tuesday evenings when my fridge looked more like a barren land than a source of inspiration. I had a long day, and there was no way I was going out again. As I rummaged through the scant produce and pantry items, the idea of a comforting pot of soup materialized like magic. That’s when Moosewood Lentil Soup came to the rescue. It’s the kind of recipe where simplicity meets warmth, and it rewards you with a bowl of deliciousness that feels like a hug from the inside. Plus, everything you need is probably already sitting in your kitchen, waiting to transform into something fabulous.
Jump to Recipe
What You’ll Need
The beauty of this recipe is its accessibility. Chances are you already have most of this list on hand, just waiting for their moment in the spotlight. Here’s what you’ll need:
- Lentils
- Water
- Grapeseed oil (or butter, if you’re feeling indulgent)
- Onion
- Celery
- Carrots
- Garlic
- Salt
- Black pepper
- Dried herbs (your choice!)
- Fresh lemon juice
- Brown sugar
- Red wine vinegar
- Tomatoes
How to Make Moosewood Lentil Soup
- Start by placing the lentils and water in a soup pot or Dutch oven. Bring it to a boil, then lower the heat to a simmer. Let the lentils cook until they’re mushy; this should take about 45 minutes. Keep an eye on the pot and add more water as needed until you get your favorite soup consistency.
- While the lentils are doing their thing, heat some oil in a medium-sized skillet. Add in the chopped onion, celery, and carrots. Sauté over medium heat for about 10 minutes; you’ll know it’s ready when the veggies are soft and the kitchen smells heavenly.
- Add the minced garlic, along with some salt, pepper, and any dried herbs you fancy. Keep sautéing for another 5 minutes to let all those flavors meld and get cozy.
- Transfer your aromatic veggie mixture into the pot with the lentils. Stir in the lemon juice and a touch of brown sugar. If you’re in the mood, add a splash of red wine vinegar.
- Taste your creation to adjust the seasonings. Let the soup simmer for at least another 15 minutes. This is where the magic happens as all the flavors marry together beautifully.
- Serve your soup piping hot, with a drizzle of vinegar on each serving and a sprinkle of minced scallions or parsley if you’re feeling fancy.
Cook’s Notes
Here’s the deal: this soup is forgiving. If you find the lentils have soaked up more water than anticipated, just add a bit more to reach the consistency you love. It’s not an exact science. For those who adore a bit of heat, a pinch of red pepper flakes does wonders. The soup keeps well in an airtight container in the fridge for up to 5 days, making it perfect for meal prep. It also freezes beautifully, so don’t hesitate to make a double batch.
Make It Your Own
- Swap the lentils for split peas or even chickpeas for a different texture and flavor.
- Substitute the grapeseed oil with olive oil for a richer taste.
- Add spinach or kale in the last few minutes of cooking for an extra boost of greens.
- Replace the red wine vinegar with apple cider vinegar for a slightly sweeter tang.
If you try this, I’d love to hear how it turns out—drop a comment or tag me! Whether it warms you up on a cold night or becomes your go-to comfort dish, this Moosewood Lentil Soup is sure to find a special place in your recipe repertoire. Happy cooking, friends!
Related update: Moosewood Lentil Soup
Related update: Homemade Broccoli Cheddar Soup

Picture this: it’s a chilly weekday evening, the kind where the wind seems to seep through every layer of clothing, and all I can think about is wrapping my hands around a warm bowl of something comforting. That’s how I found myself in the kitchen, wrestling with the idea of making a classic French Onion Soup. You know, the kind with a deep, rich broth and a cheesy, bubbly top that smells like pure coziness. It’s the perfect dish for those nights when you want to impress yourself with something that feels a bit fancy yet totally do-able. Spoiler alert: this recipe is easier than it seems and totally worth every bit of effort. Oh, and if you’re in a hurry to dive in, I’ve got you covered.
Jump to Recipe
What You’ll Need
Guess what? You might already have most of these ingredients hanging out in your kitchen. This recipe leans on everyday staples with a few stars that bring the magic.
- 2 tablespoons of salted butter
- 4 large yellow onions, sliced thin
- 2 tablespoons of flour
- 1/2 cup of sherry
- 8 cups of beef broth
- 4 sprigs of fresh thyme
- 3 sprigs of fresh parsley
- 1 bay leaf
- Salt and pepper to taste
- 1 French crusty baguette
- 2 cups of shredded gruyere cheese
How to Make Classic French Onion Soup
- Preheat your oven to 400°F (200°C). This is crucial for that cheesy top finish.
- In a large Dutch oven, melt the butter over medium heat. Let it sizzle and foam—it’s the signal that your onions are ready to join the party.
- Add the sliced onions to the pot and sprinkle them with flour. Stir occasionally, adjusting the heat between medium and low. You’ll want to do this for about 45 minutes until they turn a tender, golden brown. If they start to brown too quickly, don’t hesitate to lower the heat.
- It’s de-glazing time! Pour in the sherry and scrape up those flavorful bits stuck to the bottom of the pot—aroma heaven.
- Add the beef broth and bring everything to a rolling boil. The anticipation builds!
- Toss in the fresh thyme, parsley, bay leaf, and season with salt and pepper. Simmer gently for 15 minutes, letting the flavors mingle and deepen.
- Meanwhile, slice the baguette and butter each piece. Arrange them on a cookie sheet and bake for 5-10 minutes until they’re dry and ready to soak up all that brothy goodness. Set aside to cool just a bit.
- Remove the herb sprigs and bay leaf from the soup. Ladle the soup into four oven-safe ramekins. Now, the fun part: top each with a slice of crusty bread and a generous sprinkle of gruyere cheese.
- Place your ramekins on a cookie sheet (for easy handling) and bake uncovered at 400°F for another 5-10 minutes until the cheese is bubbling. For an extra golden top, switch to broil for one more minute.
- Finally, serve warm and watch the smiles unfold around the table.
Cook’s Notes
Okay, here are a few nuggets of wisdom to ensure your soup is spot-on. First, let’s talk onions. Low and slow is key for that melt-in-your-mouth caramelization, so patience is your best friend here. And always taste your broth before seasoning—sometimes beef broth can be saltier than expected.
If you’re making it ahead, the soup base can be stored in the fridge for up to 3 days. Just reheat gently and add the bread and cheese topping before serving. Leftovers? They reheat beautifully in the oven; just keep the bread and cheese separate until you’re ready to enjoy round two.
Make It Your Own
Want to put a personal spin on this classic? Here are some tasty variations:
- For a vegetarian version, swap the beef broth with a robust veggie broth and add a splash of soy sauce for depth.
- If sherry isn’t your thing, try a dry white wine or even a splash of brandy for a different kind of warmth.
- Love a bit of heat? Add a pinch of red pepper flakes to the onion mix for a subtle kick.
- Switch up the cheese! Try a combo of gruyere and sharp cheddar for a more pronounced flavor.
If you give this recipe a try, I’d love to hear how it turns out—drop a comment or tag me in your delicious creations. Happy cooking, and may your kitchen be filled with warmth and joy!
Related update: Classic French Onion Soup
Related update: One Soup, Two Ways: Chunky Vegetables and Cream Of Vegetables

Picture this: it’s a chilly December evening, and the house smells like winter spices and cozy warmth. My hands were still a bit sticky from wrestling with a stubborn puff pastry earlier that day. I had this sudden craving for something decadent yet comforting, something that would pair perfectly with the hot cocoa I was planning to sip by the fireplace. That’s when these Vanilla Cream Cakes came to life. They’re light, fluffy, and simply divine—a perfect blend of holiday spirit and simple elegance. Not only are they surprisingly easy to whip up, but they also look impressive enough to serve up at any festive gathering or cozy night in.
Jump to Recipe
What You’ll Need
I bet you already have most of these in your pantry. Just a few essentials and a couple of special touches to make these cakes sing.
- Puff pastry – This is our quick and easy cake base.
- 6 large eggs
- 200g sugar – Sweetness is key here.
- 50g vanilla sugar – It adds a lovely vanilla aroma.
- 2 tablespoons of rum – For that warm, festive touch.
- 6 liters of whole milk – It’s a lot, but trust me, it’s worth it.
- 150g all-purpose flour
- 200g heavy whipping cream – Fluff it up!
- Powdered sugar – A dusting of snow on top.
How to Make Vanilla Cream Cakes, Easy and Fluffy Holiday Cakes
- Preheat your oven to 200°C (about 390°F). Your kitchen should feel like a warm hug in no time.
- Roll out the puff pastry nice and thin, just slightly larger than your baking dish (around 14×10 inches). Split the pastry in two—half for the bottom, half for the top.
- Bake the pastry for about 10-15 minutes until it’s gloriously golden brown. Let the top layer cool completely while the bottom one stays snug in the dish.
- Separate the egg yolks from the whites, setting the whites aside in a larger bowl.
- For the yolk mixture, combine the yolks, sugar, vanilla sugar, and rum in a smaller bowl. Mix until it’s smooth and dreamy.
- Add the flour and a quarter of the milk to the yolk mix. Keep mixing until it’s silky smooth.
- Whisk the egg whites in the large bowl until they form firm peaks. Add sugar and whisk until the peaks are super firm and glossy.
- Meanwhile, bring the remaining milk to a boil in a large pot. Slowly pour the yolk mixture into the boiling milk, whisking continuously. Cook for 5 minutes until it’s thick and gives your arm a workout!
- Now for the tricky bit. Pour the boiling yolk mix into the egg whites, starting gradually. Keep whisking until both mixtures are beautifully blended.
- Pour this luscious mixture into the baking dish over the bottom pastry. Give the dish a gentle shake to fill every corner. Let it cool overnight in the fridge for best results.
- Whip up the heavy cream with some sugar until it’s light and airy. Spread this over the cooled cake mixture.
- Cut the cooled top pastry into 15 squares and place them on the whipped cream. Slice the cakes into squares and give them a nice dusting of powdered sugar before serving.
Cook’s Notes
Just a little heads up: when you’re pouring the boiling mixture into the egg whites, it’s helpful to have an extra pair of hands nearby. It’s all about the smooth incorporation to make sure you get that perfect fluffiness. If you’re making these ahead, they store well in the fridge for up to three days—ideal if you want to get a jump on holiday prep! Just keep them covered to maintain their freshness.
Make It Your Own
Here’s how you can play around with these cakes:
- Swap the rum for your favorite liqueur, like Baileys or Amaretto, for different flavor twists.
- Add a tablespoon of cocoa powder to the yolk mixture for a chocolatey spin.
- Switch out vanilla sugar with a teaspoon of almond extract for a nutty aroma.
- Top with fresh berries before serving for a burst of color and tang.
If you try this, I’d love to hear how it turns out—drop a comment or tag me! And remember, imperfections add character, especially when surrounded by good company. Happy baking!
Related update: Vanilla Cream Cakes, Easy and Fluffy Holiday Cakes

Last winter, I found myself staring down a half-eaten box of candy canes—a festive gift from my overly enthusiastic neighbor. I adore peppermint, but there’s only so much peppermint tea one can drink! Desperate to create something my friends and family would devour, it hit me: those candy canes needed a sweet partner. Enter my Candy Cane Chocolate Marshmallows. Perfect for a cozy evening in your favorite fuzzy socks, these treats are surprisingly easy to make and look infinitely more impressive than the effort they require. They’re the kind of thing you whip up to wow guests during holiday gatherings or to simply satisfy that post-dinner sweet tooth while binge-watching your favorite show. Trust me, they’re a hit! Jump to Recipe
What You’ll Need
This recipe is like a scavenger hunt in your pantry; chances are you already have most of the goodies tucked away. Here’s what you’ll need:
- Candy canes – the stars of the show!
- Dark chocolate – for that rich, bittersweet contrast.
- Marshmallows – go for the big, fluffy kind.
- Milk chocolate – adds a creamy sweetness to balance the dark chocolate.
How to Make Candy Cane Chocolate Marshmallows
- First, let’s get those candy canes ready. Grab a few and crush them using the bottom of a sturdy glass or a mallet. You want pieces small enough to stick but not so tiny that they turn to dust. Set them aside.
- Set up a double boiler by placing a heat-safe bowl over a pot of simmering water. Make sure the bottom of the bowl doesn’t touch the water. Add the dark and milk chocolate to the bowl, stirring occasionally until the mixture is smooth and glossy.
- Now for the fun part—dip each marshmallow into the melted chocolate, ensuring it’s nicely coated but not drowning. Let the excess drip off back into the bowl.
- Immediately roll the chocolate-dipped marshmallow into the crushed candy canes. The pieces should stick to the chocolate, creating a delightful crunchy coating.
- Place each finished marshmallow on a sheet of wax paper. They’ll need to chill in the fridge for at least an hour, or until the chocolate has fully hardened.
Cook’s Notes
These little delights are pretty forgiving, so don’t stress if things get a bit messy. Here are a few pointers to keep you on track:
- If you don’t have a double boiler, don’t sweat it. Use a microwave in short bursts to melt the chocolate, stirring in between.
- Store your marshmallows in an airtight container in a cool, dry place. They should last up to a week, but honestly, they’ll probably disappear much sooner!
- To make ahead, prepare them up to two days in advance. They’re the perfect treat to have waiting for last-minute guests or unexpected sweet cravings.
Make It Your Own
- Try using white chocolate for a sweeter, milder twist. It pairs beautifully with peppermint!
- For a nutty crunch, roll the chocolate-coated marshmallows in finely chopped hazelnuts instead of candy canes.
- If you’re feeling adventurous, add a pinch of cayenne pepper to the melted chocolate for a spicy kick.
- Not a fan of peppermint? Substitute with crushed graham crackers and sprinkle with a touch of cinnamon for a s’mores vibe.
If you try this, I’d love to hear how it turns out—drop a comment or tag me in your marshmallow masterpiece! Happy indulging, and may your winter be as sweet as these treats!
Related update: Candy Cane Chocolate Marshmallows
Related update: Grandma Inez’s Pineapple Pie
Related update: Tuna and Tofu Cold Dish

It was one of those unexpectedly chilly evenings when I found myself craving warmth, not just from the heater but from something I could savor. The kind of evening where you want to wrap yourself in a cozy sweater and let your kitchen fill with the scent of baking spices. That’s when gingerbread came to mind — the kind that’s rich with molasses and spices, yet so simple to whip up that you almost wonder if you missed a step. This recipe is one of those gems; it’s quick but doesn’t skimp on flavor, comforting with just the right amount of sweetness, and impressive enough if you decide last-minute to invite a friend over for tea. Trust me, you won’t regret letting this gingerbread become part of your chilly evening rituals.
Jump to Recipe
What You’ll Need
Gingerbread is all about those warm, inviting flavors that make your house smell like a dream. Chances are, you’ll already have most of these ingredients tucked away in your pantry:
- Molasses
- Salt
- Eggs
- Salad oil (use what you have — canola or vegetable oil works great)
- Sugar
- Baking soda
- Boiling water
- Flour
- Ground ginger
- Cinnamon
How to Make Gingerbread
- Start by mixing the molasses, salad oil, sugar, ground ginger, cinnamon, and a pinch of salt in a large bowl. Stir them together until the mixture looks smooth and the spices are beautifully fragrant.
- Add the eggs into the mix and beat them well. You want the batter to be uniform and glossy.
- Dissolve the baking soda in 1/8 cup of boiling water. This step is crucial as it activates the soda, giving your gingerbread the rise it needs. Stir this into your batter.
- Gradually add the flour and the rest of the water into the mixture. The batter will be thin, but that’s exactly what you’re aiming for.
- Pour the batter into a 9″x13″ pan, spreading it evenly. Bake in a preheated oven at 350°F until the top is done and lightly springy to the touch — your kitchen will smell divine!
- If you’re feeling extra indulgent, make the glaze: combine a stick of butter, 1/4 cup milk, and 1 cup brown sugar in a saucepan. Bring the mixture to a boil and let it bubble away for about 4 minutes. Drizzle this heavenly glaze over your gingerbread once it’s out of the oven.
Cook’s Notes
Here’s the thing about gingerbread: it’s forgiving. If you find yourself without ground ginger, a bit of allspice or nutmeg can pinch-hit in a hurry. Store any leftovers tightly wrapped in foil, and they’ll keep well at room temperature for a few days — if they last that long. To really appreciate its flavor, serve it either hot or cold; each temperature brings out different notes in the spices and molasses.
If you’re planning ahead, the gingerbread can be made a day in advance. Just keep it covered and apply the glaze right before serving to maintain that perfect texture.
Make It Your Own
- Switch up the spices: Add a bit of ground cloves or nutmeg for an extra spice twist.
- Nutty addition: Stir in a handful of chopped walnuts or pecans for some delightful crunch.
- Fruity flair: Toss in a handful of raisins or chopped dried apricot before baking for a fruity surprise.
- Lemon zest: For a citrusy zing, add the zest of a lemon to the batter before baking.
If you try this gingerbread, I’d truly love to know how it turns out — drop a comment or tag me in a post! Your kitchen will thank you for the delightful aroma, and your taste buds will be doing a happy dance. Happy baking!
Related update: Gingerbread
Related update: Gingerbread

It was one of those days when the weather couldn’t make up its mind – gloomy clouds threatening rain one moment, only to break into streams of sunlight the next. I found myself aimlessly wandering the aisles of my favorite local grocer, craving something rich and warming. Lamb in Red Mole Sauce – that’s the dish that came to mind. It’s the kind of meal that feels like a cozy blanket after a long day but also carries a bit of flair, like you’ve spent hours crafting something special just for you (even if, honestly, the oven does most of the work). When you take that first bite and the tender lamb mingles with the smoky, spicy mole, it’s pure magic. Trust me, you’ll want to give this recipe a go, especially when you need a little pick-me-up that feels just a tad indulgent.
Jump to Recipe
What You’ll Need
This ingredient list is a little trip to flavor town with a Mexican twist. The beauty? You might already have most of these in your pantry, and the rest are definitely worth the hunt.
- Dried chipotle peppers
- Pasilla peppers
- Plum tomatoes
- Garlic
- Oregano
- Cinnamon
- Sesame seeds
- Pepper
- Canola oil
- Mexican chocolate
- Salt
- Tomato sauce
- Lamb shoulder
- Salt and pepper for seasoning
How to Make Lamb In Red Mole Sauce
- Begin by soaking the dried chipotle peppers in hot water until they soften up. Once soft, remove the seeds and stem. This is where the magic begins.
- In a blender, puree the softened chipotles, roasted pasilla peppers, plum tomatoes, and garlic until smooth. Set this flavor bomb aside for later.
- Grab a small skillet and toast the oregano, cinnamon, sesame seeds, and pepper until your kitchen smells like a spice market in Mexico – fragrant and irresistible.
- In a saucepan, heat some canola oil. Add the pureed vegetable mix, the freshly toasted spices, chocolate, salt, and tomato sauce. Stir everything together and let it simmer gently until the chocolate melts and the sauce is well blended. If it looks like it’s getting too thick, a splash of water will do the trick.
- Meanwhile, in a large skillet, heat more oil. Season the lamb shoulder liberally with salt and pepper. Sear it on all sides until a glorious brown crust forms. This step is where flavor meets texture.
- Place the browned lamb on a piece of heavy-duty aluminum foil. Pour the mole sauce over the top, making sure it’s nicely coated. Seal the foil tightly – doubling up is a smart move to keep all those juices in.
- Bake in the oven at 325°F for 3-4 hours. When you open that foil, the lamb should be so tender it practically falls off the bone. Succulent perfection.
Cook’s Notes
Cooking this dish is like an art, where patience is rewarded with flavors that are deep and layered. The sauce should be thick but pourable; add water if it gets too sturdy. If you’re making this ahead, you can prepare the mole sauce a day in advance and just warm it up when needed. As for leftovers, they keep well in the fridge for up to three days and taste even better the next day as the flavors meld. Just ensure you reheat gently to prevent the lamb from drying out.
Make It Your Own
While I adore the traditional flavors in this dish, there’s always room for a little personalization:
- Swap the lamb for pork shoulder if that’s more your style, but keep the cooking time the same to ensure tenderness.
- For a vegetarian twist, use large portobello mushrooms in place of lamb, adjusting the cooking time to just an hour.
- If spicy isn’t your thing, sub the chipotle peppers with guajillo peppers for a milder kick.
- Want to add a bit more crunch? Garnish with toasted pumpkin seeds and fresh cilantro before serving.
If you try this, I’d love to hear how it turns out—drop a comment or tag me! Whether you’re savoring it solo or sharing with friends, I hope this dish brings you as much joy as it’s brought me. Happy cooking!
Related update: Lamb In Red Mole Sauce
Related update: Broccoli and Cheese Phyllo Pie
Related update: Chimichurri

It was one of those dreary Tuesday evenings, the kind where the wind howls just a little too enthusiastically and the rain taps against the window like it’s trying to join the conversation. I found myself in need of something cozy, something that would wrap me up like a warm blanket with each and every spoonful. Enter my kitchen experiment turned favorite: French Onion Marsala Soup. This dish has the timeless charm of French onion soup, but with a cheeky twist thanks to the marsala wine. It’s the kind of soup that feels indulgent but is actually surprisingly simple to whip up. Perfect for those nights when you’re craving restaurant-quality comfort without leaving the house.
Jump to Recipe
What You’ll Need
Trust me, the ingredient list is straightforward, and you probably have most of these tucked away in your pantry or fridge already. Here’s what you’ll need to make this comforting bowl of goodness:
- Butter
- Olive oil
- Onions — lots of them!
- Canned beef broth
- Marsala wine — this is the twist that makes it special
- Dried thyme
- Salt and pepper
- Sugar
- Texas toast croutons
- Provolone cheese
- Diced Swiss cheese
- Parmesan cheese
How to Make French Onion Marsala Soup
- Melt the butter with the olive oil in a large pot over medium heat. You’ll want to use a pot that’s big enough to handle all those onions without a fuss.
- Add the onions and stir them gently and continually until they’re translucent. Give them the time they need to soften and release their sweet fragrance.
- Pour in the beef broth, marsala wine, and a sprinkle of dried thyme. Bring it to a simmer, letting the flavors meld together for about 30 minutes.
- Add a dash of sugar and season with salt and pepper to taste. Be careful with the salt — it’s easy to go overboard when the broth’s already savory.
- Ladle the soup into oven-safe bowls. Add a generous handful of croutons to each bowl — they’re the crunchy surprise waiting at the bottom.
- Top with a sprinkle of Swiss cheese and Parmesan. Finish with two slices of provolone, which will melt into a gooey, golden layer.
- Place the bowls on a cookie sheet and broil them in a preheated oven until the cheese is bubbly and beautifully browned. Keep an eye on them — no one likes burnt cheese!
Cook’s Notes
This soup is all about the onions and cheese, so don’t rush the onion cooking phase. Slow and steady wins the race here. If you’re planning to make it ahead, you can stop right before broiling and refrigerate. Just reheat and broil when you’re ready to serve. Leftovers can be stored in the fridge for up to three days. They reheat beautifully, though you might want to add fresh croutons and cheese before broiling again to keep that satisfying texture balance.
Make It Your Own
Feel free to play around with this soup! Here are some ideas to make it your own:
- For a vegetarian version, swap the beef broth for a rich vegetable stock.
- Try using Gruyère cheese instead of Swiss for a nuttier flavor.
- Use homemade croutons if you have stale bread lying around — just toss them in some olive oil and bake until crispy.
- Want a bit of heat? Add a pinch of red pepper flakes during the simmering step.
If you try this, I’d love to hear how it turns out — drop a comment or tag me! Your kitchen adventures make my day, and who knows? You might just come up with a new twist on this classic for me to try next time. Happy cooking!
Related update: French Onion Marsala Soup
Related update: Ham and Red Bean Soup

It was one of those weeks where I was juggling a dozen things—work deadlines, a last-minute school project, and the usual life chaos. That’s when I stumbled upon the idea of making soup, a comforting pause in a hectic day. But I wanted something versatile enough to please everyone’s different tastes at home. Enter: One Soup, Two Ways. This recipe is like a choose-your-own-adventure book from my childhood, letting you decide between a comforting chunky vegetable soup or a smooth, creamy version. Perfect for when you want a warm hug in a bowl or to impress your family and friends without breaking a sweat. Plus, it’s one of those recipes where I bet you already have most of the ingredients lying around, so no emergency grocery runs are needed.
Jump to Recipe
What You’ll Need
You might be amazed at how these pantry staples transform into something delicious and heartwarming!
- Olive oil
- Garlic (because everything good starts with garlic, right?)
- Onion
- Carrots
- Celery
- Salt
- Canned tomato puree
- Canned corn
- Chicken broth
- Canned beans
- Dried herbs like thyme
- Whole cooking cream (for the creamy version)
- Turmeric
How to Make One Soup, Two Ways: Chunky Vegetables and Cream Of Vegetables
- Heat a drizzle of olive oil over medium-low heat in a soup pot that’s big enough to hold all the goodness you’re about to create.
- Sauté the garlic, onions, carrots, and celery in the pot. You want that garlic to get fragrant and the onions to turn translucent while the carrots and celery soften up, about 10 minutes.
- Sprinkle in the salt, give it a good stir, and cover the pot to let those veggies sweat it out.
- Pour in the tomato puree and canned corn, stirring them in well. Let that mixture cook for a few minutes until the tomato puree deepens in color.
- Add the chicken broth and turn the heat to high. Bring it all to a rolling boil, which infuses the flavors beautifully.
- Stir in the canned beans and dried herbs, feeling free to add a pinch more if you’re feeling adventurous. Let it simmer for a few more minutes.
- Here’s where you choose your path: For chunky soup, simply ladle it into bowls. For the creamy version, remove the pot from heat, stir in the whole cooking cream, and use an immersion blender to blend until smooth and velvety.
- Sprinkle turmeric over both versions for a pop of color and a hint of earthiness. It’s like the finishing touch that makes everything special.
Cook’s Notes
- This soup is a great “clean out the fridge” meal. Toss in any leftover veggies you’ve got on hand.
- Store leftovers in the fridge, in an airtight container, for up to 3 days. Reheat on the stove over low heat until warmed through.
- If you want to make it ahead, just stop before adding the cream and blend. The chunky version freezes like a charm!
Make It Your Own
- Swap out the chicken broth for vegetable broth to keep it vegetarian-friendly.
- Use crispy tofu instead of beans for a plant-based protein option.
- Add a dash of hot sauce or chili flakes for a spicy kick.
- Incorporate some cooked pasta or rice for a heartier meal.
If you try this, I’d love to hear how it turns out—drop a comment or tag me! Whether you’re slurping the chunky version or savoring the creaminess, enjoy every spoonful. Happy cooking!
Related update: One Soup, Two Ways: Chunky Vegetables and Cream Of Vegetables
Related update: Instant Pot Chicken Thighs
Related update: French Onion Marsala Soup

So it was one of those Thursday afternoons. You know the kind — when the clock seems to tick extraordinarily slowly, and the chilly breeze outside just makes you crave something deeply satisfying. I found myself staring at a pack of beef short ribs in the fridge, remembering a long-ago failed attempt at a backyard barbecue. But this day was different. I had a plan that didn’t involve open flames but rather the comforting embrace of a dutch oven. These Amazing Braised Beef Short Ribs are perfect for when you want to impress without the stress. They practically cook themselves once they’re in the oven, and trust me, the aroma will fill your home with anticipation.
Jump to Recipe
What You’ll Need
You might already have most of these tucked in your pantry, but a quick trip to grab a few fresh items will make this dish sing.
- 4 strips of bacon
- 3 tablespoons olive oil
- 2 pounds of beef short ribs
- sea salt and fresh ground pepper
- 8 ounces of white button mushrooms, sliced
- 1 cup of yellow diced onions
- 1 cup of diced carrot
- 3 cloves of garlic, minced
- 2 cups of Cabernet Sauvignon wine
- 2 cups of beef stock
- 2 tablespoons of tomato paste
- 1 tablespoon of beef base
- 2 teaspoons of fresh dried thyme
- 2 bay leaves
How to Make Amazing Braised Beef Short Ribs
- Preheat your oven to 300°F. Grab your largest heavy-bottomed pot—I swear by my trusty Le Creuset for this.
- Over medium heat, cook the bacon until crisp, then let it drain on paper towels. You’re gonna crumble this into the sauce later, but for now, keep the bacon fat in the pot.
- Pat the short ribs dry with paper towels. This is crucial for that perfect caramelization. Trim a bit of the excess fat, but don’t go overboard—flavor, remember?
- Season the short ribs liberally with sea salt and fresh ground pepper. Brown them in the pot over medium-high heat in olive oil and bacon fat, making sure to give them space. You might need to do this in batches.
- Once browned, remove the ribs and set them aside in a large bowl. Pour out the used fat, keeping those flavorful bits stuck to the bottom intact.
- Lower the heat to medium, add fresh olive oil, and sauté the mushrooms until crisp and golden, about 7-10 minutes.
- Throw in the onions and carrots, cooking until soft, about 5-7 minutes. Add the garlic and cook for just a minute more.
- Crank up the heat to high and deglaze the pot with the Cabernet Sauvignon. Stir vigorously, scraping up the browned bits. Bring to a boil.
- Add beef stock, tomato paste, beef base, thyme, bay leaves, sea salt, and pepper. Let it boil while stirring for about 3 minutes.
- Snuggle the browned short ribs back into the pot, ensure they’re covered in liquid, and bring it back to a boil for 2 more minutes.
- Put the lid on the pot and transfer it to the oven. Let it cook undisturbed for 3 hours—don’t peek!
- When time’s up, carefully remove the pot from the oven and brace yourself for a steam facial as you take the lid off.
- Gently move the short ribs to a bowl—they’ll be meltingly tender. Skim the fat off the sauce that’s gathered at the top.
- Remove the bay leaves and thyme stems. Bring the pot back to medium-high heat and reduce the sauce by a third, concentrating the flavors.
- Crumble the bacon into the sauce, stirring well. Return the short ribs to the pot, ensuring they’re well-coated in the sauce. Serve immediately over mashed potatoes or polenta. Absolute heaven!
Cook’s Notes
– Bacon lovers, rejoice! The bacon fat really amps up the richness, but if you’re looking for a lighter version, you can skim more of it off before deglazing.
– This dish is even better the next day, so consider making it ahead and letting the flavors meld overnight in the fridge. Just reheat gently on the stovetop.
– If your sauce turns out too salty, don’t worry—add a touch more beef stock or water during the reduction phase to balance it out.
– Leftovers can be stored in an airtight container in the fridge for up to three days. They’re pretty dreamy in a sandwich or tossed with pasta!
Make It Your Own
- Substitute the short ribs with boneless chicken thighs. They’ll cook faster—about 1.5 to 2 hours should do it.
- Swap the carrots for parsnips or sweet potatoes for a different kind of sweetness.
- Use a different red wine like Merlot if Cabernet isn’t your jam.
- Add a handful of chopped fresh herbs like parsley or basil at the end for a fresh, bright twist.
If you try this, I’d love to hear how it turns out—drop a comment or tag me! There’s something so fulfilling about sharing good food, and I hope this becomes one of your go-to comfort dishes. Enjoy every delicious bite!
Related update: Amazing Braised Beef Short Ribs
Related update: Steak with lemon and capers

I remember the evening perfectly. It was one of those chilly Tuesday nights when you feel like you’ve barely survived the day and the only thing that could possibly make it better is a big bowl of something soul-warming. I opened my fridge and, like a miracle, the ingredients for this Kale and Chickpea Soup with Lemon seemed to jump out at me. The magic of this soup is in its simplicity. It’s the kind of dish that feels like a hug in a bowl, yet it’s deceptively easy to throw together. A few fresh ingredients, a touch of blending, and you’ve got yourself a soup that’s both nourishing and comforting. Plus, it’s the perfect excuse to use that crusty bread you’ve been meaning to finish.
Jump to Recipe
What You’ll Need
I bet you’ve got most of these lying around already. This list is all about those everyday heroes that transform humble into heartwarming.
- 2 banana shallots
- 1 bay leaf
- 2 cans chickpeas, drained and rinsed
- 2 stalks of celery
- 1/2 teaspoon of chilli flakes
- 1 loaf of crusty bread
- 1 garlic clove
- Lemon (juice of half, plus slices for garnish)
- 1 bunch of kale, stems removed, roughly chopped
- 2 tablespoons of olive oil
- Parmesan cheese, for topping
- 1 sprig of rosemary
- Salt, to taste
- 1.5 liters of stock (vegetable or chicken)
How to Make Kale and Chickpea Soup with Lemon
- Set a Dutch oven or large saucepan over medium heat and pour in the olive oil. Let it warm slightly until it shimmers.
- Finely dice the banana shallots and toss them in, stirring to coat them in the oil. Let them sizzle and become translucent.
- Slice the celery stalks horizontally into long strips, then chop them into small pieces. Add these to the shallots, stirring occasionally.
- Finely chop the rosemary leaves and add them to the pan, along with the bay leaf and chilli flakes. Wait for the fragrance to hit you – it’s a good sign.
- Smash the garlic clove using the flat of your knife and your palm, then toss it in whole. No need to fuss over chopping here.
- Rinse and drain the chickpeas and add them to the pan along with the kale. Stir everything together until it’s all coated nicely.
- Pour in the hot stock and bring it all to a gentle boil, then reduce the heat and let it simmer for about 20 minutes, until the kale is beautifully tender.
- Squeeze in the juice of half a lemon, stirring to blend. Taste and adjust the seasoning with more lemon or salt, depending on your stock.
- Using either a stick blender in the pan or in batches in a regular blender, blitz the soup to your desired texture. I like to set aside a ladleful or two before blending so there are still some chickpeas and kale for texture.
- Serve hot, with a couple of lemon slices floating on top of each bowl, and pass around the parmesan cheese for everyone to sprinkle to their heart’s content. Pair with toasted crusty bread for dipping.
Cook’s Notes
Okay, here’s the lowdown. If you’re planning ahead, this soup is a fantastic make-ahead option. It actually tastes even better the next day once the flavors have had time to marry. Just store it in an airtight container in the fridge for up to three days. Reheat gently on the stove, adding a splash of water if it’s thickened up too much. You can also freeze this soup for up to three months, though I’d recommend freezing before adding the lemon juice to prevent bitterness. Defrost it overnight in the fridge and add the lemon after reheating.
Watch your salt! If your stock is already salted, you might want to wait until the end of cooking to adjust the seasoning. It’s always easier to add than to take away.
Make It Your Own
The beauty of this soup is its flexibility. Here are a few of my favorite variations:
- Swap the chickpeas for white beans: Cannellini or Great Northern beans work beautifully here, offering a creamier texture.
- Add protein with chicken: Shredded rotisserie chicken stirred in at the end makes this a heartier meal.
- Spice it up with chorizo: Cook some diced chorizo in the pan before the shallots and let the spicy oil enrich the soup.
- Go green with spinach or Swiss chard: If kale isn’t your thing, these leafy greens make a great substitute.
If you try this, I’d love to hear how it turns out — drop a comment or tag me! Your feedback is the best part of sharing recipes. Happy cooking!
Related update: Kale and Chickpea Soup with Lemon
Related update: One Soup, Two Ways: Chunky Vegetables and Cream Of Vegetables

It was one of those classic winter weekends when all you want to do is nestle under a blanket with something hearty and warm. The kind where the wind whistles outside like it’s in on some secret joke. I was in the kitchen, rifling through the pantry, and there it was: a can of black beans. That was the spark for my Superbowl Chili, a dish that’s not just for the big game but perfect for any occasion when you need a comforting, one-pot wonder. It’s rich, robust, and oh-so-satisfying, with a kick that warms you from the inside out. The best part? You probably have most of the ingredients already sitting in your kitchen waiting for their moment to shine.
Jump to Recipe
What You’ll Need
Most of these ingredients are pantry staples, so you might not even need a grocery run. And honestly, any recipe that saves me a trip to the store is already a win in my book.
- Lean ground beef – This is our hearty base.
- Sirloin steak – Adds a nice textural contrast.
- Olive oil
- Yellow onions
- Carrots
- Garlic
- Canned black beans
- Diced canned tomatoes
- Chili powder
- Cumin
- Dried oregano
- Chipotle chile pepper in adobo sauce
- Kosher salt
- Low sodium chicken stock
- Fresh cilantro
- Green onions
- Lime
- Monterey jack cheese
- Sour cream
How to Make Superbowl Chili
- In a large heavy pot set over high heat, add the ground beef and steak chunks. Stir frequently until the meat is browned. This should take about 8 minutes. The kitchen will start to fill with those irresistible, savory aromas.
- Using a slotted spoon, remove the beef to a plate. Pour off the excess liquid from the pot. I like to use a strainer over a bowl to make sure I catch all the leftover juices, leaving the meat nicely drained.
- In the same pot, add a splash of olive oil and set over medium heat. Once it’s shimmering, toss in the carrots, onions, and garlic. Stir these until they’re softened, about 5 minutes, and enjoy how they turn golden and fragrant.
- Return the beef to the pot and sprinkle in the chili powder, cumin, oregano, salt, and chopped chipotle chile. Stir and let these cook for just a minute to unlock all those bold, mouth-watering flavors.
- Add in your diced tomatoes and chicken stock. Bring everything to a simmer, then reduce the heat to keep it at a gentle simmer for 30 minutes. Stir occasionally and watch as the liquid gradually reduces, intensifying the flavors.
- Stir in all but 1/3 cup of the black beans and cook for another 5 minutes. Mash the reserved beans with a fork and mix them into the chili for extra body and thickness.
- If you find the chili too thick, don’t fret. You can stir in up to an additional cup of chicken stock to get your preferred consistency. Let it warm for a few minutes, and you’re ready to serve.
- Ladle the chili into bowls and garnish with your favorite toppings like fresh cilantro, green onions, a squeeze of lime, a sprinkle of Monterey jack cheese, and a dollop of sour cream. Enjoy!
Cook’s Notes
This chili is perfect for making ahead. You can prepare it up to two days before you plan to serve it. Just cool, cover, and refrigerate. When you’re ready to eat, reheat it over medium heat, stirring often to make sure it warms evenly.
Here’s a tip: if you’re making this for a crowd, keep the garnishes in separate bowls so everyone can customize their bowl just the way they like it. Don’t rush the simmering step. It’s crucial for developing that deep, rich flavor that makes this chili so special.
Make It Your Own
This chili is a canvas waiting for your personal touches. Here are a few ideas:
- Swap the beef for crispy tofu to make it vegetarian. Just cube and brown the tofu before adding to the pot.
- Use smoked paprika instead of regular chili powder for a smoky twist.
- Add some bell peppers with the onions and carrots for an extra layer of sweetness.
- For a spicier kick, add an extra chipotle pepper or a teaspoon of cayenne pepper.
If you try this, I’d love to hear how it turns out — drop a comment or tag me! Whether you’re watching the game or just enjoying a cozy night in, I hope this chili warms your heart and home. Enjoy every spoonful!
Related update: Superbowl Chili
Related update: Healthy Orange Chicken

It was one of those biting-cold Wisconsin evenings when the wind cut through my coat like a knife, and all my fingers could think about was curling around something warm. I stumbled into the kitchen, cheeks pink from the chill, and had that lightbulb moment: Wisconsin Beer Cheese Soup. It’s one of those recipes that feels like a cozy flannel blanket – indulgent, comforting, and just what you need when the weather’s not cooperating. It’s like a big, cheesy hug in a bowl, and the best part is that it comes together quickly with ingredients you probably already have lurking in your pantry or fridge. Plus, melting cheese into anything just seems to magically fix a bad day, don’t you think?
Jump to Recipe
What You’ll Need
Just a heads-up, this isn’t one of those shopping list monsters. You might already have a lot of these basics on hand, except for maybe the hero of the dish: a good Wisconsin beer.
- 2 tablespoons butter
- 1 medium onion, diced
- 2 carrots, peeled and diced
- 2 celery sticks, chopped
- 2 cloves garlic, minced
- 1/4 cup flour
- 1 cup Wisconsin beer
- 2 cups broth (chicken or vegetable)
- 1 cup half & half
- 2 cups shredded Wisconsin cheddar
- 1 tablespoon mustard
- 1 teaspoon worcestershire sauce
- 1/2 teaspoon black pepper
- 1/4 teaspoon red pepper flakes
- Salt to taste
How to Make Wisconsin Beer Cheese Soup
- Start by melting the butter over medium heat. Once it’s all sizzly and lovely, toss in the onion, carrots, celery, and garlic. Cook everything for about 3-4 minutes until the veggies are soft and the kitchen smells like you’re winning at dinner.
- Sprinkle the flour over your veggie mix and stir until it disappears into the buttery goodness, absorbing all those delicious flavors.
- Pour in the beer and broth, scrapping up any bits sticking to the bottom of the pot, and bring it to a gentle boil. You’ll see some bubbles start to form at the edges – that’s your cue!
- Lower the heat to a simmer and stir in the half & half and the shredded cheddar. Let the cheese melt completely, stirring occasionally. This is where the magic happens, so don’t rush it.
- Add in the mustard, worcestershire sauce, black pepper, and red pepper flakes. Give it a good stir.
- Time to grab your immersion blender and blend the soup until it’s smooth and creamy. No immersion blender? No worries! Carefully blend in batches using a regular blender, but only fill it a third full each time to prevent a hot liquid disaster.
- Taste and add salt as needed. Pour yourself a big bowl, sit back, and enjoy the creamy, cheesy glory.
Cook’s Notes
When it comes to soup, patience is key. Letting the cheese melt slowly into the broth ensures a velvety texture. If you rush this part, you might end up with a grainy soup, and nobody wants that. As for storage, this soup keeps well in the fridge for about 3 days. Just give it a good stir when you reheat it since the cheese and liquid might separate a bit. Unfortunately, this one’s not a great candidate for freezing; the texture changes too much after thawing. If you’re planning ahead, you can chop the veggies a day early and store them in the fridge to make your cooking super speedy.
Make It Your Own
- Swap the beer: If you’re not a beer person, a hard cider can add an interesting twist with a sweet undertone.
- Make it meatier: Stir in some cooked, crumbled bacon for added smokiness and texture.
- Vegetarian version: Use vegetable broth instead of chicken broth and skip the worcestershire sauce or use a veggie-friendly alternative.
- Spice it up: Add a finely chopped jalapeño with the veggies for an extra kick.
If you try this, I’d love to hear how it turns out — drop a comment or tag me! Cooking is all about sharing, after all. Can’t wait to see your delicious creations!
Related update: Wisconsin Beer Cheese Soup
Related update: Tomato and lentil soup

Picture this: It’s a chilly Wednesday evening, and I’ve had one of those days where I needed something more than just food—I needed comfort on a plate. In moments like these, I often find myself reaching for my trusty Dutch oven and a bottle of red wine to whip up my favorite Beef Braised In Red Wine. This dish is my go-to because it hits all the right notes: it’s rich, savory, and cozy, but doesn’t require babysitting on the stove. Plus, it fills the house with the kind of aroma that makes you feel wrapped in a warm hug. Trust me, this is the kind of dish that can turn any mundane weeknight into something special.
Jump to Recipe
What You’ll Need
What I love about this recipe is how unfussy it is. Chances are you already have most of these ingredients lounging in your pantry or fridge. Let’s gather up all the deliciousness:
- Olive oil
- Bacon, chopped
- Boneless beef chuck roast
- Salt
- Pepper
- 1 large onion, chopped
- 2 carrots, peeled and chopped
- 2 celery stalks, chopped
- 4 garlic cloves, minced
- 1 tablespoon tomato paste
- 2 cups dry red full-bodied wine
- 2 cups water
- 1 teaspoon fresh thyme leaves
- 1 teaspoon fresh rosemary, chopped
How to Make Beef Braised In Red Wine
- Place the oven rack in the middle position and preheat your oven to 325°F. This will give us that perfect low and slow heat we need for tender meat.
- In a large Dutch oven, heat a splash of olive oil until it’s shimmering but not smoking. This is where the magic begins!
- While the oil heats, pat your beef chuck roast dry with a paper towel, then season generously with salt and pepper. You want a nice crust when you sear it.
- Brown the beef on both sides for about 10 minutes total. Get it nice and golden—this is where flavor builds. If the pan gets too hot and things start to scorch, turn down the heat a bit.
- Remove the beef and let it rest on a plate, letting all those yummy juices hang out. We’ll need them later.
- In the same pot, toss in the bacon. Sauté until it’s browned and crisp. The smell will make you want to dive right in, but hold tight!
- Add the onion, carrots, and celery to the bacon and cook until they’re softened and golden brown. Think of this as the cozy base of your dish.
- Stir in the garlic, thyme, and rosemary, sautéing for just a minute until fragrant. Then add the tomato paste, cooking for another minute to caramelize those flavors.
- Pour in the wine and bring it to a boil. Let it bubble away until reduced by half, concentrating all that deliciousness.
- Add the water and bring everything to a simmer. This is the luxurious bath your beef will cook in.
- Return the beef and any accumulated juices to the pot, nestling it in with all the flavors. Cover with a lid and transfer to the oven.
- Let it cook in the oven for 2 1/2 to 3 hours, or until the meat is fall-apart tender. Your patience will be rewarded!
- Once done, remove the beef and slice it across the grain. Serve it atop fluffy mashed potatoes or creamy grits, spooning that gorgeous sauce over the top.
Cook’s Notes
Here’s the thing: you don’t have to be a culinary master to nail this dish. The key is in the low and slow cooking. If you rush it, the meat might not be as tender, so patience is your friend here. Also, feel free to experiment with the type of wine you use, but stick to something you enjoy drinking for the best results.
- Leftovers will keep beautifully in the fridge for up to 3 days. Just warm them gently on the stove or in the microwave.
- This is a great make-ahead dish. The flavors only get better after a day or two in the fridge.
Make It Your Own
- Go Mediterranean by swapping out the rosemary and thyme for oregano and adding a handful of olives when you add the wine.
- For a mushroom lover’s twist, add a cup of sliced mushrooms along with the veggies.
- Substitute the beef with lamb for a different depth of flavor—just as delicious and maybe even more luxurious!
- Skip the bacon for a leaner version and use a tablespoon of butter with the olive oil for browning.
If you try this, I’d love to hear how it turns out—drop a comment or tag me! It’s always a joy to see your creations and hear about any delicious twists you might have added. Happy cooking, friends!
Related update: Beef Braised In Red Wine
Related update: Guinness and Brats
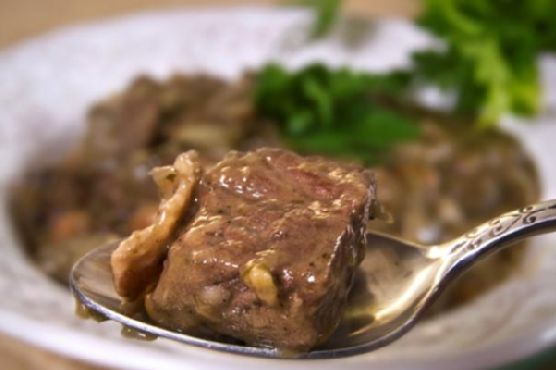
I’ve got to tell you about this time when I found myself staring into the abyss of my pantry, a little uninspired and a lot hungry. It was one of those dreary afternoons where the rain just wouldn’t let up, and all I craved was something rich and comforting to fill the house with warmth — and let’s be honest, something that would have me coming back for seconds. That’s when I remembered the oxtails tucked away in the freezer, just waiting for their moment. A few hours later, my kitchen was filled with the deep, savory aroma of Oxtail Ragout simmering away, and let me tell you, it was glorious. This recipe is the kind of comfort food that hugs you from the inside out, and while it might sound fancy, it’s pretty straightforward and oh-so-worth it.
Jump to Recipe
What You’ll Need
This ingredient list is a pantry’s best friend. You’re likely to have most of this stuff already, and the flavors all come together to create something magical.
- Oxtails
- Flour
- Salt
- Pepper
- Paprika
- Hot fat (like vegetable oil or lard)
- Onion, chopped
- Garlic, minced
- Bell pepper, diced
- Whole allspice
- Whole bay leaf
- Tomato juice
- Water
- Lemon juice
How to Make Oxtail Ragout
- In a small bowl, mix together 1 teaspoon of salt, some freshly cracked pepper, paprika, and enough flour to lightly coat the oxtails. Roll the oxtails in this seasoned flour mixture until they are fully covered.
- Heat some hot fat in a heavy-bottomed pot over medium-high heat. Add the floured oxtails and brown them thoroughly on all sides. You’re looking for a deep, golden crust that’s almost irresistible.
- Once browned, toss in the chopped onion, minced garlic, and diced bell pepper. Stir everything around until the onions are translucent and the garlic is fragrant but not burned.
- Add in the whole allspice and bay leaf, followed by the tomato juice and enough water to cover the oxtails. Give everything a good stir to combine.
- Bring the pot to a gentle simmer, then cover it up and let it do its thing for about 3 hours. You’re aiming for the kind of tenderness where the meat practically falls off the bone.
- Once the oxtails are melt-in-your-mouth tender, fish out the allspice and bay leaf. Stir in a splash of lemon juice to brighten the flavors, and you’re done!
Cook’s Notes
I’ve learned a few things the hard way, so here are some tips to keep in mind. Be patient with the browning process; it’s where a lot of the flavor develops. Don’t rush it! If you want to make this ahead, the ragout tastes even better the next day once the flavors have had a chance to deepen. Just store it in the fridge and reheat gently. Leftovers can be kept in an airtight container for up to 3 days, or frozen if you want to hoard this goodness for a rainy day.
Make It Your Own
Here are a few variations to keep things interesting or to cater to different tastes:
- Swap the tomato juice for red wine if you’re looking for a richer, more robust flavor.
- Add diced carrots and celery for a bit more veggie goodness and texture.
- Try using smoked paprika for a deeper, smokier flavor profile.
- If you’re feeling adventurous, throw in a dash of hot sauce for a little heat.
If you try this, I’d love to hear how it turns out — drop a comment or tag me on social media. Your kitchen adventures are half the fun for me!
Related update: Oxtail Ragout

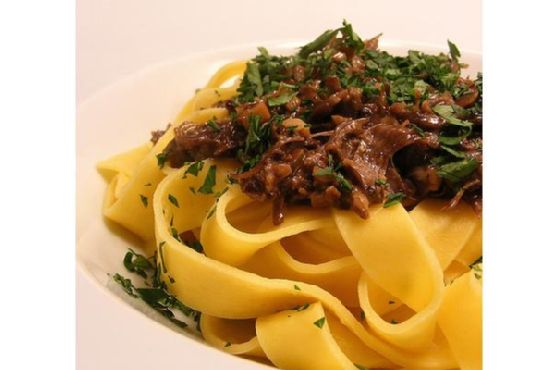
It was one of those chilly, rainy afternoons when the sky couldn’t quite decide if it wanted to drizzle or pour, and I found myself leaning into the kind of comfort cooking that warms you from the inside out. I’d been craving something rich and flavorful, the kind of dish that makes your whole home smell like a cozy hug. Enter: Oxtail Ragout. Trust me, this recipe is a keeper. It’s the kind of meal that feels like a culinary project, but it’s actually more about letting the ingredients do their thing while you kick back. You get meltingly tender meat and a sauce that’s so good you’ll want to sop it up with a hunk of crusty bread. Plus, the prep is minimal, so it’s perfect for those days when you want something special without spending the whole day in the kitchen.
Jump to Recipe
What You’ll Need
One of the best parts? You might already have most of these goodies hanging out in your pantry or fridge. Here’s what you’ll need to gather:
- Oxtails
- Flour
- 1 teaspoon of salt
- Pepper
- Paprika
- Hot fat (like vegetable oil or lard)
- 1 large onion, chopped
- 2 cloves of garlic, minced
- 1 bell pepper, chopped
- Tomato juice
- 1 whole bay leaf
- 1 whole allspice berry
- Water
- Lemon juice
How to Make Oxtail Ragout
- In a shallow dish, combine 1 teaspoon of salt, a few grinds of pepper, paprika, and some flour. This seasoned flour is where the magic starts, giving the oxtails a flavorful crust.
- Roll the oxtails in the seasoned flour until they’re well coated. Shake off any excess so you get a nice, even crust.
- Heat some hot fat in a large pot over medium-high heat. Brown the oxtails thoroughly on all sides. You want them deeply caramelized — think golden and fragrant.
- Once browned, add the chopped onion, minced garlic, and bell pepper to the pot. Stir them around, scraping up any delicious bits stuck to the bottom, until they start to soften and smell amazing.
- Pour in enough tomato juice to cover the oxtails, then add the whole bay leaf and allspice. Top it off with a splash of water to ensure everything is nicely submerged.
- Bring the mixture to a gentle simmer, then cover the pot. Let it do its thing for about 3 hours, checking occasionally to ensure it stays at a low simmer.
- When the meat is fall-off-the-bone tender, remove the bay leaf and allspice berry. Stir in a splash of lemon juice to brighten the flavors, adjusting seasoning to taste.
Cook’s Notes
This dish is pretty forgiving, but here are a few tips to make things even smoother:
- Don’t rush the browning process. It’s where a lot of the flavor comes from, so take your time.
- If you don’t have tomato juice, you can use crushed tomatoes or even a bit of tomato paste mixed with water.
- This ragout tastes even better the next day, so feel free to make it ahead. It stores well in the fridge for up to 3 days.
- If you’re wondering about leftovers, they freeze beautifully for up to 3 months. Just reheat gently on the stove.
Make It Your Own
- Swap the oxtails for short ribs if you’re in the mood for something different but equally delicious.
- Add a handful of chopped carrots or celery for extra veg power and a bit of sweetness.
- If you like a bit of heat, throw in a pinch of red pepper flakes with the garlic and onions.
- For a smoky twist, use smoked paprika instead of regular paprika.
If you try this, I’d love to hear how it turns out — drop a comment or tag me! Nothing makes my day like seeing your creations. Enjoy every rich, saucy bite!
Related update: Oxtail Ragout
Related update: Green Beans with Pearl Onions and Salmon

It was one of those foggy evenings in San Francisco where the mist hangs thick like a cozy, damp blanket. I was craving something that would bring all the warmth of the ocean into my little kitchen, something that felt like a tight hug for the soul. Enter: San Francisco Cioppino. This dish is not just a seafood stew; it’s a symphony of fresh catches and bold flavors that feel both hearty and impressively easy. You’ll find this cioppino is perfect for those nights you want to channel your inner fisherwoman without having to dive into the deep blue yourself. Trust me, it’s worth every delicious drop.
Jump to Recipe
What You’ll Need
You may be surprised to learn that despite sounding fancy, this ingredient list is mostly straightforward and filled with things you might already have. The key is in the freshness — it makes all the difference.
- Fresh canned tomatoes
- Clams
- Dry white wine
- Cooked freshly Dungeness crabs
- White fresh fish
- Fresh basil
- Fresh parsley
- Garlic
- Black fresh ground pepper
- Olive oil
- Fresh oregano
- Raw shrimp
- Scallops
- Tomato paste
- Yellow onion
How to Make San Francisco Cioppino
- Start by prepping the star of the show: the crabs. Gently remove the legs and claws, then break the body in half, making sure to keep as much of the “crab butter” (the delightful yellow center) as you can. Set the crab pieces aside and press the crab butter through a sieve into a small bowl. Set aside.
- For the clams, place them in a pan and add 1 cup of dry white wine. Cover and steam over medium heat for about 5 minutes, until their shells open wide like they’re waving hello. Discard any clams that refuse to open, then strain the stock through a cheesecloth and keep the liquid gold that’s left.
- Now, in your trusty 8-quart saucepan, heat up some olive oil. Toss in the onions and garlic, letting them dance over medium heat until they’re soft but not brown — think of it as just waking them up.
- Stir in the fresh canned tomatoes, tomato paste, the rest of your wine, pepper, herbs, and that flavorful clam stock you reserved. Partially cover the pot and let it simmer for a solid 20 minutes, letting those flavors mingle and get cozy.
- Add in your seafood: the fish, scallops, shrimp, crab, and the sacred crab butter. Simmer for about 5 minutes, but resist the urge to stir, as you want the fish to stay whole and proud. Then, add the clams and heat for another scant minute.
- Top with fresh parsley and serve immediately from the pot while everything is still joyously warm and inviting.
Cook’s Notes
Here’s the deal: freshness is key with cioppino, especially with the seafood. If you can get it from the market the day of, do it. As for the wine, choose a decent dry white that you’d actually enjoy sipping — it makes a big difference. And remember, don’t stir the stew after adding the fish. You want those chunks intact for a beautiful presentation. Leftovers can be stored in the fridge for up to two days and gently reheated over low heat. If you’re making it ahead of time, keep the seafood separate until you’re ready to serve, and add it in the last 5-6 minutes of reheating.
Make It Your Own
Here’s where you can play around with this seaside classic:
- Swap the white fish with salmon for a richer flavor.
- Trade the scallops for mussels if you fancy a different texture.
- Add a pinch of red pepper flakes for a bit of a kick.
- Use a splash of Pernod instead of wine for a slight anise twist that pairs beautifully with seafood.
If you try this, I’d love to hear how it turns out — drop a comment or tag me! Let’s keep sharing those warm, delicious moments. 🌊🍅🍲
Related update: San Francisco Cioppino
Related update: Curry-Braised Chicken