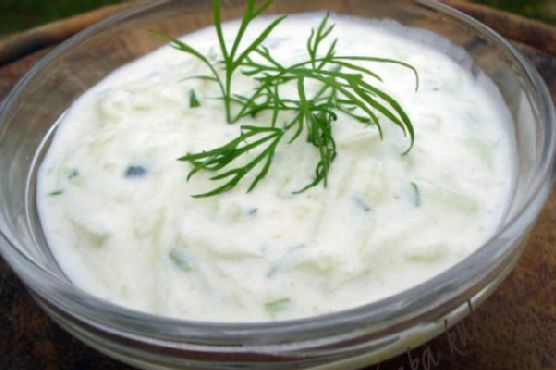
Oh, the joys of summer! Last week, I found myself standing in the kitchen, windows wide open, a warm breeze sneaking in with the scent of freshly cut grass. It was the kind of day that begged for something cool, creamy, and refreshing. That’s when it hit me—I needed tzadziki in my life, like, immediately. This is the kind of dish that doesn’t just fill your belly; it feels like a mini-vacation to the Mediterranean. It’s quick and straightforward but has that “made from scratch” vibe that’ll make you feel like a kitchen wizard. Seriously, if you’re looking for something to dollop on just about anything, tzadziki is your go-to. Jump to Recipe
What You’ll Need
You might already have most of these on hand, especially if you’re a fan of Greek cooking. Here’s what you’ll need:
- Cucumbers – The crunchy base of our dip.
- Sea salt – To draw out that extra moisture from the cuke.
- Yogurt – The creamy heart of the tzadziki.
- Sour cream – Adds a little tang and extra creaminess.
- Olive oil – Just a drizzle for richness.
- Vinegar – A splash to brighten up the flavors.
- Garlic – Because what’s tzadziki without garlic?
- White pepper – For a subtle heat that doesn’t overpower.
- Fresh dried dill – The herb that ties it all together.
How to Make Tzadziki
- Start by lightly salting the cucumbers. This isn’t just seasoning; it’ll help draw out the water. Let them sit for about 5 minutes.
- Once they’ve had a good cry, take small handfuls of the cucumbers and squeeze out as much water as you can. You’ll be surprised how much comes out!
- In a bowl, mix the yogurt, sour cream, olive oil, vinegar, garlic, and white pepper. You’re looking for a smooth, creamy blend here.
- Add the drained cucumbers and dill to your creamy mixture. Give it a good stir until everything’s well combined.
- Taste and adjust the seasoning. It might need a pinch more salt or a dash of vinegar to suit your taste.
- Chill the tzadziki in the fridge for at least two hours. This is where the magic happens as the flavors meld together.
Cook’s Notes
Ah, the art of tzadziki making! It’s all about getting those cucumbers nice and dry, so don’t skimp on the squeezing. Trust me, the less water, the creamier your dip. And while you’re at it, make sure you let it chill long enough. The flavors need time to develop, and patience is key here. Planning ahead? Make it the day before your gathering, and it’ll be even better! Store any leftovers in an airtight container in the fridge, and they’ll last a good three days. Just give it a stir before serving because the water might separate a bit.
Make It Your Own
- Spicy Kick – Add a pinch of cayenne pepper for a hint of heat.
- Herb Swaps – Try mint or parsley instead of dill for a different herbal note.
- Extra Creamy – Use full-fat Greek yogurt for an even richer texture.
- Vegan Twist – Swap the yogurt and sour cream for coconut yogurt to make it vegan-friendly.
If you give this a whirl, I’d absolutely love to hear how it turns out for you. Drop a comment or tag me in your creations. Happy dipping!
Related update: Tzadziki
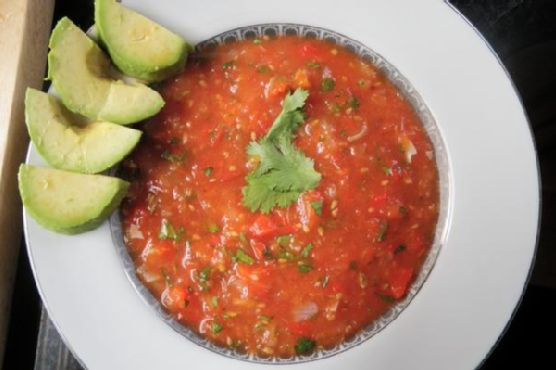
It was one of those lazy Sunday afternoons when the weather couldn’t decide if it wanted to be sunny or stormy. I found myself staring at an overabundance of tomatoes and peppers on my counter, all begging for attention before they started their slow decline. You know, that guilt-inducing moment when your produce is almost too ripe, taunting you with its fleeting freshness? That’s when I decided it was a perfect day to whip up a batch of my favorite Roasted Red Pepper & Tomato Salsa. It’s one of those recipes that rewards you with intense, smoky flavors and a satisfying texture—all with minimal effort. Plus, with the broiler doing most of the work, you’ll spend less time in the kitchen and more time curled up with a good book or catching the latest episode of your favorite show.
Jump to Recipe
What You’ll Need
This recipe is delightfully simple, and chances are you already have most of these ingredients hanging out in your kitchen, just waiting to be transformed into something magical.
- Tomatoes, ripe and juicy
- Red bell pepper, for that sweet, smoky touch
- Onion, because every good salsa needs a little bite
- Whole garlic cloves, roasted to mellow perfection
- Jalapeno pepper, for those who like a kick
- Olive oil, just a drizzle to bring it all together
- Smoked salt or sea salt, whatever you have on hand
- Fresh cilantro, for that bright, herby finish
- Lime juice, to add the perfect zing
- Cumin, a dash for warmth and depth
How to Make Roasted Red Pepper & Tomato Salsa
- Preheat your oven to broil. This step is where all the magic begins—the high heat will give your veggies that perfect char.
- Cut the tomatoes in half and the onions into quarters, then arrange them on a tin-foil lined baking sheet. Trust me, the foil makes clean-up a breeze.
- Add the red bell pepper, whole garlic cloves (leave the skins on for now), and the jalapeno pepper to the sheet. The hot pepper is where we bring the heat, so adjust to your liking.
- Drizzle everything with a bit of olive oil and a sprinkle of salt. This is where the flavor party starts.
- Pop the sheet under the broiler for about 10 minutes. You’re looking for those beautiful char marks—until the skins start to blacken and bubble.
- Remove from the oven and let your veggies cool for about 5 minutes. This gives you just enough time to pour yourself a refreshing drink.
- Once cooled, peel the skins from the tomatoes, pepper, and garlic. It’s a bit messy, but oh-so-worth it.
- Toss all the roasted goodness into a food processor, except for the cilantro and lime juice. Pulse 2-4 times. You’re going for a chunky texture, not smooth.
- Transfer to a bowl and mix in the fresh cilantro and lime juice. This is the part where your salsa gets its vibrant color and zing.
- Season with cumin and add salt to taste. Give it a quick stir, and you’re done! Serve it up with corn chips or toasted pita chips and dig in.
Cook’s Notes
Remember, the key to this salsa is the broil—don’t skip it! It gives the dish that lovely depth of flavor that you simply can’t achieve with raw veggies. If you’re making it ahead, you can store it in the fridge for up to three days in a sealed container. The flavors actually meld together even more beautifully as it sits. Just give it a good stir before serving. If you find your leftovers a bit too thick, a splash of lime juice or even a bit of water can help loosen things up nicely.
Make It Your Own
Here’s where you can let your creativity run wild with some easy variations:
- Swap the red bell pepper for a couple of yellow or orange peppers for a sweeter, milder salsa.
- If you’re not a fan of spice, leave out the jalapeno or replace it with a sweet pepper variety.
- For a smoky twist, replace the cumin with a teaspoon of smoked paprika.
- Want a fruitier version? Add in some mango chunks before serving for a sweet and spicy delight.
If you try this, I’d love to hear how it turns out—drop a comment or tag me! Your feedback and creativity make this journey even more fun. Happy cooking!
Related update: Roasted Red Pepper & Tomato Salsa
Related update: Tzadziki

It was one of those chilly fall afternoons when the leaves were swirling outside, and my pantry was looking a bit sparse. I was craving something cozy but hadn’t done a proper grocery run. Luckily, I did have a few seasonal staples on hand, including a couple of butternut squashes that had been staring at me every time I opened the pantry door. A quick rummage through the fridge and spice rack, and voilà! This Roasted Butternut Squash and Sage Dip was born. It’s a creamy, savory dip with just a hint of sweetness from the roasted squash and an earthy touch from the sage. Perfect for those moments when you want to impress without the fuss. Plus, it makes your kitchen smell divine.
Jump to Recipe
What You’ll Need
The beauty of this dip is that it relies on simple, fresh ingredients that you might already have. The key is in the roasting, which brings out all the deep, wonderful flavors.
- Two butternut squash
- Olive oil
- Fresh sage
- Garlic powder
- Fresh ground pepper
- Sea salt
- Onion
- Garlic
- Anchovy (trust me on this one!)
- Goat cheese
How to Make Roasted Butternut Squash and Sage Dip
- Preheat your oven to 350 degrees. This is the perfect time to cozy up and let your kitchen get warm and inviting.
- In a big bowl, mix together some olive oil, fresh sage, a few dashes of salt, pepper, and garlic powder. Toss in the butternut squash cubes, making sure each piece is well-coated with the herby goodness.
- Spread the squash out on a large baking sheet. You want them in a single layer, so they roast up nice and caramelized. Bake for about 30 minutes, or until they are tender and golden at the edges.
- While the squash is doing its thing, sauté chopped onion, anchovy fillets, and garlic in a bit of extra virgin olive oil. Cook them until the onion is soft and the anchovy has melted into the mix. The aroma is heavenly.
- Once the squash is done, let it cool just enough to handle. This way, you’re not nuking your fingers when you move to the next step.
- In a food processor, combine the roasted squash, onion mixture, and about 1/4 cup of crumbled goat cheese. Blend until smooth and creamy. You may need to scrape down the sides a couple of times to get everything evenly mixed.
- Transfer the dip into a pretty bowl because presentation matters! Serve it up with pita wedges, breadsticks, or a colorful array of veggies.
Cook’s Notes
This dip is pretty forgiving and flexible, perfect for those “let’s wing it” cooking sessions. If you’re prepping in advance, you can roast the squash and make the sautéed onion mixture the day before. Just keep them in separate containers in the fridge and blend them up with the cheese when you’re ready to serve. It will keep well in the fridge for about 3 days, though it never lasts that long at my house! If the dip thickens too much after chilling, a splash of olive oil or a bit of warm water stirred in should bring it back to life.
Make It Your Own
This is where the fun begins—don’t be afraid to play around with this recipe!
- Swap the goat cheese for feta if you want a saltier, tangier vibe.
- For a vegan version, skip the anchovy and goat cheese, subbing in roasted red peppers for extra depth.
- Add a pinch of red pepper flakes to the roasting mix for a bit of heat.
- Use sweet potatoes instead of butternut squash for an earthier sweetness.
If you try this, I’d love to hear how it turns out—drop a comment or tag me! Nothing makes me happier than seeing all the delicious ways you bring these recipes to life. Enjoy!
Related update: Roasted Butternut Squash and Sage Dip
Related update: Breaded Shrimp and Spicy Mayo Appetizer

It was one of those evenings when the wind had a bite to it, and all I wanted was something warm and comforting that didn’t require a trip to the store. I peeked into my pantry and there it was — a can of artichoke hearts, a block of cream cheese, and some fresh spinach that had seen better days. It was like they were whispering, “Make something delicious out of us.” And thus, this Warm Spinach Artichoke Dip was born. It’s the kind of dish that’s easy to throw together when you need a little pick-me-up, perfect for snacking or impressing friends without breaking a sweat. The rich, creamy texture and the burst of garlicky goodness is just what you need at the end of a long day.
Jump to Recipe
What You’ll Need
I bet you’ve got most of this stuff in your kitchen already. It’s all about the handful of key players that bring everything together into a cozy, irresistible dip.
- Olive oil
- Artichoke hearts
- Garlic
- Red chili flakes
- Salt
- Baby spinach
- Cream cheese
- Parmesan cheese
- Lemon juice
- Black pepper
How to Make Warm Spinach Artichoke Dip
- Start by placing the olive oil, artichoke hearts, garlic, red chili flakes, and a pinch of salt in a small pot. Cover it up and let it simmer on low heat for an hour. Your kitchen will smell fantastic, a hint that you’re on the right track.
- Once the artichokes are fragrant, add the baby spinach to the pot. Cover it again and steam the leaves for about 2 minutes, just until they wilt and turn a vibrant green.
- Transfer everything from the pot into a food processor. Add the cream cheese, parmesan cheese, and a splash of lemon juice. Pulse until the mixture is chunky but well-combined, a texture that promises every scoop will be packed with flavor.
- Finally, garnish with a sprinkle of black pepper and serve it up with some warm, crusty bread — because trust me, you’ll want something sturdy to scoop up all that goodness.
Cook’s Notes
This dip is pretty forgiving, but here are some tips to keep it extra tasty. Make sure to simmer the artichokes long enough to really let the flavors meld. You can make this dip ahead of time and store it in the fridge for a couple of days. When you’re ready to serve, just reheat gently on the stove. If you find yourself with leftovers (unlikely, but possible), they make a killer sandwich spread or a pasta sauce with a bit of extra cream or milk.
Make It Your Own
- Swap the artichoke hearts for marinated artichokes if you want a little extra zing to your dip.
- Mix in some crispy bacon bits for a smoky touch that complements the creamy base.
- Use feta cheese instead of parmesan for a tangy twist.
- Add a handful of chopped sun-dried tomatoes for a burst of sweetness and color.
If you try this, I’d love to hear how it turns out — drop a comment or tag me! Whether it becomes your go-to for cozy nights in or a star at your next gathering, I hope this dip brings a little warmth and joy to your table.
Related update: Warm Spinach Artichoke Dip
Related update: Roasted Butternut Squash and Sage Dip