
I was standing in my kitchen one Sunday afternoon, staring at the latest cookbook I’d impulsively bought. You know the feeling — you’ve got that itch to bake something, but the ingredients list reads like a novel. So there I was, craving something sweet, but not ready for a grocery run. A little lightbulb moment hit me when I remembered these Mexican Wedding Cookies — they’re a breeze to make and taste like pure joy wrapped in sugar. The kind of recipe that makes you feel accomplished without breaking a sweat. They’re like a warm hug, perfect for when you need a bit of comfort. Now, imagine sinking your teeth into a buttery, nutty cookie, with a snowy coating of sugar. You’re welcome.
Jump to Recipe
What You’ll Need
Honestly, you probably have most of these right in your kitchen. These cookies are all about keeping it simple yet delicious. Here’s what you need:
- Butter – The star of the show for that rich flavor.
- Powdered sugar – Twice; once for the dough, once for rolling.
- Vanilla extract – Just a splash for depth.
- All-purpose flour – The backbone of any good cookie.
- Pecans – Coarsely chopped for that lovely crunch.
- Ground cinnamon – For a little warmth in the sugar coating.
How to Make Authentic Mexican Wedding Cookies
- Start by beating the butter in a large bowl using an electric mixer. You want it to be light and fluffy, like clouds on a summer day.
- Add 1/2 cup of powdered sugar and a splash of vanilla. Keep beating until everything is well blended and smells heavenly.
- Mix in the flour bit by bit, then fold in the pecans. The dough should come together nicely — feel free to steal a taste test!
- Divide the dough in half and roll each into a ball. Wrap them in plastic and let them chill in the fridge for about 30 minutes.
- Preheat your oven to 350°F (or 180°C if you’re in my neck of the woods).
- While waiting, whisk the remaining 1 1/2 cups of powdered sugar with the cinnamon in a pie dish. This will be your magical coating.
- Take half of the chilled dough and roll it into small balls, about 2 teaspoons each. Line them up on a baking sheet, giving them a little room to breathe.
- Bake for about 18 minutes. You’re looking for golden brown bottoms and just a hint of gold on top.
- Let them cool on the sheet for 5 minutes, then gently toss in the cinnamon sugar while still warm. It’s like a sugar spa treatment.
- Transfer to a rack to cool completely, then repeat with the other half of the dough. Dust any leftover cinnamon sugar over the cookies before serving.
Cook’s Notes
Grab a good-quality vanilla extract, it makes a difference. Pecans can be swapped out for walnuts if you’re in a pinch, but pecans do have that melt-in-your-mouth quality that’s hard to beat. To store, keep them in an airtight container — if they last that long! They freeze well too, just defrost at room temperature. If you’re making ahead, you can chill the dough overnight. But be warned, you might start sneaking little bites from the fridge.
Make It Your Own
- Almond Lovers: Swap pecans for almonds, and maybe add a dash of almond extract for a nutty twist.
- Chocolate Dream: Add mini chocolate chips to the dough for a sweet surprise in every bite.
- Orange Zest: Add a teaspoon of orange zest to the dough for a citrusy zing.
- Gluten-Free: Use a cup-for-cup gluten-free flour blend — easy peasy!
If you try these, I’d love to hear how they turn out for you — drop a comment or tag me! There’s something magical about sharing a recipe and seeing it come to life in other kitchens. Enjoy, lovely bakers!
Related update: Authentic Mexican Wedding Cookies
Related update: Layered Poppy Seed Pastries
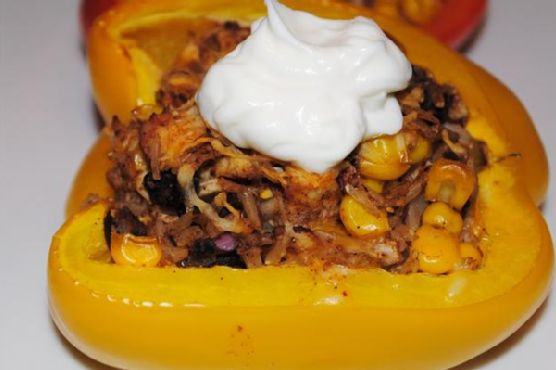
It was one of those chaotic weeknights when I stumbled back into the kitchen after a long day, only to find a colorful assortment of bell peppers staring back at me from the fridge. They were practically begging to be turned into something delicious. I craved something that was not only quick to whip up but also packed with flavor and just the right amount of comfort. That’s when it hit me – a vibrant, flavor-packed Mexican stuffed bell pepper! These beauties come together effortlessly with a few pantry staples and a rotisserie chicken that I always keep around for emergencies. With a quick trip to the oven, they fill the house with mouthwatering aromas, and in no time, dinner is served. It’s the kind of recipe that feels satisfying and a little bit indulgent, but you know it’s good for you too.
Jump to Recipe
What You’ll Need
Let’s be honest, the best part about this recipe is that you probably have most of these ingredients on hand. Here’s what you’ll need to get started:
- Bell peppers (any color you love)
- Cooked brown rice
- Rotisserie chicken breast, shredded
- Frozen corn kernels
- Roma tomato, diced
- Red diced onion
- Black beans, drained and rinsed
- Fire roasted green diced chile
- Chili seasoning
- Minced garlic
- Low-fat shredded cheddar cheese
- Sour light cream
How to Make Blast Of Color Mexican Stuffed Bell Peppers
- Preheat your oven to 400 degrees. Feel that blast of warmth and imagine the deliciousness to come.
- In a large mixing bowl, toss together the cooked brown rice, shredded chicken, corn, diced tomato, onion, black beans, half a cup of shredded cheddar, garlic, green chile, and chili seasoning. Mix until everything is evenly distributed and it smells like a fiesta.
- Line a baking dish with foil and give it a spritz of cooking spray to prevent sticking.
- Take your bell peppers and cut off the tops, then scoop out the seeds. Stuff them generously with the chicken mixture, pressing it down to fill every nook and cranny, and heap some extra on top for good measure.
- Sprinkle each pepper with a bit more cheddar cheese, because let’s be honest, you can never have too much cheese.
- Bake in the preheated oven for 30 to 40 minutes. When the edges of the peppers start to bubble and the cheese turns golden, you know it’s ready.
- Let them cool just a bit, then top each pepper with a dollop of sour light cream before serving. Dig in and enjoy!
Cook’s Notes
These Mexican Stuffed Bell Peppers are a breeze to make, but here are a few things to keep in mind to ensure they turn out perfectly every time. Make sure your baking dish is large enough to fit all the peppers snugly so they stand upright and cook evenly. If you’re prepping ahead, you can mix the stuffing a day in advance and refrigerate it. Just stuff and bake when you’re ready. Leftovers can be stored in an airtight container in the fridge for up to three days. Just pop them in the microwave for a quick reheat.
Make It Your Own
Personalizing this dish is easy, and here are a few ideas to get you started:
- Swap the chicken for crispy tofu or ground turkey for a different protein option.
- Add a handful of fresh cilantro or parsley to the stuffing mix for a burst of freshness.
- If you like it spicy, throw in some jalapeño slices or a dash of hot sauce.
- Use quinoa instead of brown rice for a protein-packed alternative.
If you try this, I’d love to hear how it turns out — drop a comment or tag me! Cooking is all about experimenting and sharing, and I can’t wait to see your creations. Happy cooking!
Related update: Blast Of Color Mexican Stuffed Bell Peppers

Let’s talk about the time I ambitiously decided to make enchiladas on a Wednesday night after one too many hours of doom-scrolling through Instagram. You know the ones—cheesy, gooey, and utterly comforting. I could already taste the spicy tang of green chilies, imagining it would somehow transform my week. Spoiler: it did. This Enchiladas Verdes recipe is not only a delicious weeknight hero but also a dish that’s forgiving enough for any kitchen mishaps. Didn’t roll the tortillas tight enough? No worries; it’s all going to melt together in a cheesy, saucy hug anyway. And trust me, the result is so satisfying, you’ll forget about that midweek slump. Jump to Recipe
What You’ll Need
What’s fantastic about this dish is you might already have most of the ingredients lounging around in your kitchen. If not, the list is simple and straightforward.
- Skinless boneless chicken breast or a quick swap with a store-bought rotisserie chicken.
- Green Anaheim chili peppers – these are the stars of the show.
- Canola oil
- Flour
- White diced onion
- White corn tortillas
- White shredded cheese
- Queso fresco
- Sour crema
- Salt
- Water
- Suero or buttermilk (canned buttermilk works, too)
How to Make Enchiladas Verdes (Green Enchiladas)
- Preheat your broiler and get those green chili peppers ready for roasting. Choose firm, meaty peppers—no wrinkles, please!
- Rinse the peppers and lay them on a foil-lined cookie sheet. Slide them under the broiler and keep an eye on them. Within minutes, you’ll see the skin begin to blister and turn black.
- Flip the peppers after about 5 minutes to get all sides evenly blistered. Once done, pop them into a plastic bag and cover with a towel, letting them cool. This makes peeling off the blackened skin a breeze.
- For the sauce, blend those roasted peppers, flour, and half of your suero or buttermilk until smooth and creamy. Pour this mixture into a skillet over medium-low heat.
- As it warms, gradually stir in more suero or buttermilk. Season with salt—around 2 teaspoons usually does the trick. If it’s too spicy for your taste, add crema. Too thick? Dribble in some water.
- Now, the chicken. Either boil your chicken breasts in a pot until done or just shred a rotisserie chicken. The choice is yours.
- For stacked style enchiladas, fry your tortillas in hot oil just until they’re soft, then drain. Dip each in the sauce before layering on plates with chicken, cheese, and onion. Go for three layers per serving.
- If you prefer oven-baked, preheat to 350°F. Spread sauce at the bottom of your baking dish, fry and fill the tortillas, then roll them up seam down in the dish.
- Drench with more sauce and sprinkle with crumbled queso fresco. Bake until everything’s gloriously warm, about 15 minutes.
- Serve with a dollop of sour crema and get ready to conquer the rest of your week!
Cook’s Notes
Here are a few tips I’ve picked up along the way:
- These enchiladas are flexible with make-ahead options. Prepare the sauce and chicken in advance, then just assemble when you’re ready.
- Store leftovers in an airtight container in the fridge for up to three days. Reheat in the oven for best results.
- Don’t skip the roasting of peppers, as it’s essential for that smoky flavor. If you find peeling them tricky, let them steam longer in the plastic bag.
Make It Your Own
- For a vegetarian spin, swap out chicken with crispy tofu or sautéed mushrooms.
- Mix in some black beans with the chicken for added texture and protein.
- Try using a mix of different cheeses like mozzarella for an extra gooey factor.
- Add avocado or cilantro as a fresh topping before serving.
If you try this, I’d love to hear how it turns out—drop a comment or tag me on social media! Enjoy your cozy, midweek escape with these Enchiladas Verdes.
Related update: Enchiladas Verdes (Green Enchiladas)
Related update: Baked Sirloin Steak
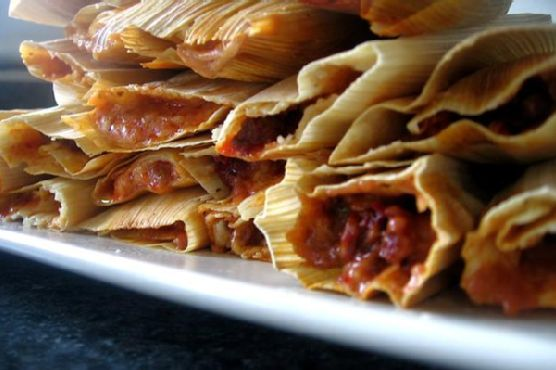
The first time I attempted to make tamales, it was a classic case of my eyes being bigger than my expertise. I had this craving for something hearty yet comforting, and tamales seemed like the perfect challenge. Spoiler alert: the kitchen looked like a masa massacre by the end of it. But with a little patience and practice, these Beef, Poblano & Cheese Tamales have become my go-to for impressing friends without losing my mind in the process. They’re just the right mix of savory and spicy, with a cheesy twist that keeps you coming back for more. Plus, the aroma that fills your kitchen is like a warm hug from a friend you haven’t seen in ages.
Jump to Recipe
What You’ll Need
You might already have most of these staples in your pantry. And if you don’t, trust me, it’ll be worth the grocery run.
- Dried corn husks
- Dried California chili pods
- Ground beef
- Shredded mozzarella cheese
- Diced poblano pepper
- Garlic, minced
- Olive oil
- Goya seasoning
- Salt
- Chili powder
How to Make Beef, Poblano & Cheese Tamales
- Start by soaking the corn husks in hot water in a large bowl. They need to be pliable, so give them at least 20 minutes.
- In a large saucepan, bring 4 cups of water to a boil. Remove any string-like bits from the chili pods and throw them into the boiling water with half a packet of Goya seasoning. Cover it up and let it all simmer for about 20 minutes.
- Once the chili pods have softened, blend them with 2 cups of the chili stock until you get a smooth sauce. Drain the rest of the stock from the saucepan, but keep it handy.
- Put the saucepan back on medium heat. When any leftover stock evaporates, add a splash of olive oil, then toss in the onion and beef. Break apart the beef as it cooks.
- Season the beef with a packet of Goya seasoning and chili powder, then let it cook for about 5 minutes until it gets a bit brown.
- Pour in the chili sauce, followed by the garlic and about 2 teaspoons of salt. Add the diced poblano pepper now for the best flavor. Turn the heat down to medium-low, partially cover the pan, and let it simmer for an hour. The sauce should thicken nicely.
- While the beef is simmering, make the corn masa mix. In a large bowl, combine the instant corn masa mix, water, baking powder, salt, and olive oil. Mix until it’s spongy.
- Now for assembly: spread the masa mix thinly on the right side of a corn husk, leaving about 2 inches at the left edge clear. Spoon about 2 tablespoons of the meat mixture and a sprinkle of cheese onto the masa. Roll it up starting with the right-hand side, and fold the left flap over.
- If you’ve got a double boiler, great! If not, a metal colander in a large pot will do. Arrange the tamales so they’re snug but not squashed.
- Boil 2 cups of water in the pot (or about 1 inch high), then reduce the heat and add the tamales. Place a towel between the colander and lid to keep the steam in. Let them steam for 30 minutes.
Cook’s Notes
Soaking the corn husks longer is better than less, so patience pays off here. When blending the chili pods, you might have to stop and scrape the sides of the blender to get a smooth sauce. And hey, don’t stress if your masa isn’t perfectly even when you spread it — it’s homemade charm we’re going for, not factory precision.
Leftovers? Store them in an airtight container in the fridge; they’ll last up to a week. Reheat them by steaming again or even in the microwave wrapped in a damp paper towel to keep them from drying out. You can also freeze them for up to three months, just make sure they’re cool before you pack them up.
Make It Your Own
- Swap the ground beef for shredded chicken or even pulled pork for a different protein punch.
- Try smoked gouda or Monterey Jack instead of mozzarella for a unique cheesy twist.
- If you’re a veggie lover, add in some sautéed mushrooms or zucchini with the poblano for extra texture.
- For a spicy kick, mix in some diced jalapeños or serrano peppers when you add the poblano.
And there you have it! If you try this, I’d love to hear how it turns out — drop a comment or tag me! These tamales are a labor of love, but trust me, they are totally worth it. Enjoy every bite!
Related update: Beef, Poblano & Cheese Tamales
Related update: Chimichurri Skirt Steak with Grilled Asparagus

I was having one of those days where everything was just a bit off. You know, the kind where you realize the night before that you’ll have zero time to cook because every second is spoken for? Yep, that was me. Between juggling work and the kids’ activities, I needed something simple yet satisfying. Enter: Crockpot “Refried” Beans. It’s the perfect blend of effort-saving and comfort-inducing — a culinary hug when you need it most. Plus, it’s a lifesaver for those impulsive taco nights or unexpected guests. There’s something magical about the way this dish makes the whole house smell like you’ve been cooking for hours, even when you haven’t. Cozy, rich, and oh-so-easy.
Jump to Recipe
What You’ll Need
Trust me, you might already have most of these goodies chilling in your pantry. And if not, they’re probably on your next grocery list.
- Pinto beans – the star of this show, bringing that creamy, earthy flavor we crave
- Water – keeps things from drying out
- Canned garlic – because chopping garlic on a busy day? No, thanks
- Onion – for that sweet, savory backdrop
- Cumin – a must-have for that warm, smoky depth
- Black pepper – a touch of heat
- Salt – brings everything together
How to Make Crockpot “Refried” Beans
- Start by rinsing the pinto beans in a colander. Feel each bean quickly as you do this, and pick out any that feel off or look suspiciously shriveled.
- Combine the beans, water, canned garlic, onion, cumin, black pepper, and salt in your trusty crockpot. Give it all a gentle stir to mingle those flavors.
- Watch for any beans that float to the top — these are the slackers, and we don’t need them here. Skim them off and toss ’em.
- Cover the crockpot and let it do its magic on HIGH for 4 hours. Switch to LOW for 2 more hours. Your kitchen will smell amazing by now — the kind of aroma that makes you want to curl up with a good book.
- Once the time is up, uncover and assess the liquid situation. Remove any excess, leaving just enough to mash into your perfect consistency. Aim for somewhere between soupy and stiff.
- Grab a potato masher and mash away! The beans should be buttery soft and mash to your desired texture without much effort.
- Serve them warm, maybe with a sprinkle of cheese or a dollop of sour cream if you’re feeling extra.
Cook’s Notes
Let’s chat practicalities. First, make sure to store these in air-tight containers, where they’ll keep in the fridge for up to 2 weeks. Or, portion them into ziplock bags, squeeze out the air, and pop them in the freezer for those nights you just can’t. Defrost in the fridge or microwave, and they’ll taste like you just made them.
Avoid adding acidic ingredients like tomatoes or lime juice before the beans are fully cooked, or they might stay a little too firm. And one more thing — taste as you go! The right amount of salt can vary depending on your beans and personal taste.
Make It Your Own
Here are a few ideas to switch things up and keep those taste buds entertained:
- Swap the pinto beans for black beans for a darker, richer version.
- Add a can of diced green chilies for a hint of heat and tang.
- Stir in some cooked crumbled bacon for a smoky, meaty twist.
- Top with cotija cheese and fresh cilantro to make it restaurant-fancy.
If you try this, I’d love to hear how it turns out — drop a comment or tag me! There’s nothing better than seeing your delicious creations. Enjoy those cozy vibes, my friend. 🌮❤️
Related update: Crockpot “Refried” Beans
Related update: Eggplant Fries with Tzatziki Sauce

It was one of those freakishly warm spring afternoons when I first craved something light but satisfying. You know, when the sun teases you into thinking it’s okay to pack away your sweaters, only for the evening chill to remind you it’s not quite summer yet. I was rummaging through my fridge, hoping for inspiration, when I stumbled upon some swai fillets tucked behind the carton of eggs. Cue lightbulb moment: ceviche. Fresh, tangy, and with a bit of a kick, this swai ceviche is the kind of dish that feels fancy but comes together with minimal effort. Perfect for those nights when you want to impress without breaking a sweat. Jump to Recipe
What You’ll Need
Most of these ingredients are things you might already have lounging around in your kitchen. The magic is in the freshness and the little kick of spice.
- 1 pound of diced swai fillets
- Lime juice from about 4-5 limes
- 1 red diced shallot
- 1 cup of diced avocado
- 1 tomato, diced
- 1 tablespoon of chile-garlic paste
- 2 tablespoons of olive oil
- 1/4 cup of cilantro, chopped
- Salt and pepper to taste
How to Make Fresh and Simple Swai Ceviche
- Place the diced swai fillets in a bowl and cover them with half of the lime juice. Make sure each piece is submerged, then cover and pop it in the fridge for at least 3 hours. This allows the fish to “cook” in the acidity of the lime juice. You’re looking for it to turn opaque and tender.
- Once the fish is ready, strain it to remove excess lime juice. Don’t rush this step; too much moisture will make the ceviche soupy.
- In another bowl, combine the diced tomato, red shallot, and avocado with the remaining lime juice. Toss gently, so the avocado stays in lovely chunks.
- Stir in the swai and chopped cilantro. Give it all a good, gentle mix.
- Drizzle with olive oil and add the chile-garlic paste. The sauce gives it that spicy, garlicky punch that makes you go back for more.
- Season with salt and pepper to taste. Remember, a little goes a long way, so keep tasting as you go.
- Serve immediately with tortilla chips or over a fresh salad. Enjoy the vibrant flavors in every bite!
Cook’s Notes
Don’t skimp on the lime juice – it’s both the cooking agent and flavor base. If you’re not a fan of too much heat, start with half the amount of chile-garlic paste and adjust. This ceviche is best enjoyed fresh, but if you have leftovers, store them in an airtight container for up to a day. The avocado might brown slightly, but the taste will still be lovely.
Make It Your Own
- Swap the swai for shrimp or scallops if you’re feeling fancy.
- Add some diced cucumber for extra crunch and freshness.
- If cilantro isn’t your thing, try using fresh mint or basil for a different herbal note.
- For a sweeter twist, toss in some diced mango or pineapple.
If you try this, I’d love to hear how it turns out — drop a comment or tag me in your creations! Happy ceviche making!
Related update: Fresh and Simple Swai Ceviche
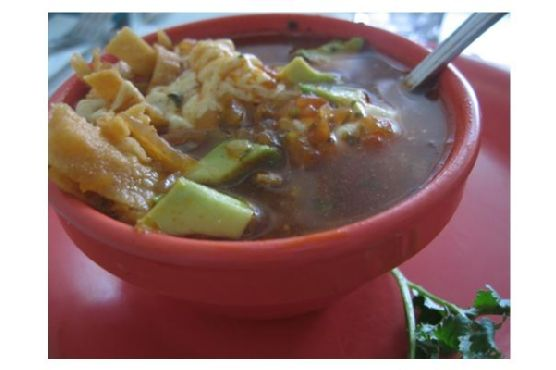
The other day, I found myself staring aimlessly into my pantry, contemplating the eternal question: "What's for dinner?" It was one of those never-ending Tuesdays, and I needed a dinner that was like a warm hug — something quick, cozy, and just a bit zesty to shake off the day's blues. That's when Azteca Soup became my savior. With a refrigerator already stocked with fresh vegetables and a trusty can of tomatoes, it felt like the universe was nudging me toward this comforting bowl of delight. This soup is like a fiesta in a bowl; it’s rich, tangy, and just spicy enough to dance on your taste buds without setting off fire alarms. It’s easy enough to whip up on a weeknight, but impressive enough to make you feel like a kitchen goddess (or god, no discrimination here).
Jump to Recipe
What You'll Need
You might be surprised at how many of these ingredients are already in your kitchen. This list is all about bold flavors and easy pantry staples.
- Olive oil – for that luscious sauté start.
- 2 cloves garlic, minced
- 1 onion, chopped
- 1 jalapeno pepper, seeded and diced
- 2 celery stalks, chopped
- 1 can tomatoes, with juice reserved
- 1 teaspoon chili powder
- 1 teaspoon cumin
- 1 cup fresh corn kernels
- 2 tablespoons basil in ribbons
- 3 cups vegetable stock
- 2 tablespoons lime juice
- 1 avocado, diced
- Nacho chips
- Sour cream, for serving
- Basil shreds, for garnish
How to Make Azteca Soup
- In a medium saucepan, heat a splash of olive oil over medium heat. Toss in the garlic, onions, jalapeno pepper, and celery. Sauté until everything softens and becomes fragrant, about 5 minutes.
- Add the canned tomatoes, including the reserved juice, along with the chili powder and cumin. Cook this mixture down for about 10 minutes, stirring often. You'll know it's right when the tomatoes start breaking down, and the kitchen smells irresistible.
- Stir in the fresh corn and basil ribbons, followed by the vegetable stock. Bring it all to a gentle boil, then reduce the heat to a simmer. Let it bubble away for 15 minutes, letting all those flavors meld.
- Once done, remove the soup from heat. Stir in the fresh lime juice and diced avocado. The lime adds a bright kick, while the avocado brings a creamy contrast.
- Break a handful of nacho chips into each serving bowl. Ladle the hot soup on top, then add a generous dollop of sour cream. Scatter a few basil shreds and perch a nacho chip on top for good measure.
- Serve immediately to enjoy the full spectrum of flavors and textures. This makes enough for six people, whether it’s for a full lunch or a hearty starter.
Cook's Notes
Let's talk about a couple of things to keep in mind. First, sautéing your veggies just right is key — don't rush this step; it builds the flavor base. If you're making this ahead, the soup itself stores well in the fridge for a couple of days; just hold off on adding the avocado and chips until you're ready to serve. The avocado tends to go brown, and nobody wants soggy chips. Reheat gently, and add the fresh ingredients and garnishes once it's hot and ready to serve.
Make It Your Own
Here are some fun ways to tweak this soup to match your mood or pantry:
- Swap the chicken for crispy tofu: If you're in the mood for some protein, toss in some tofu cubes, pan-fried to crisp perfection.
- Heat lovers' edition: Throw in an extra jalapeno or a dash of hot sauce for an extra spicy kick.
- Cheese, please: Mix in a handful of shredded cheddar or jack cheese right before serving for a gooey, melty twist.
- Herbal touch: Substitute the basil with cilantro for a different but equally vibrant herbal note.
If you try this, I'd love to hear how it turns out — drop a comment or tag me! Sharing your kitchen adventures makes my day. I hope this Azteca Soup brings as much joy to your table as it does to mine. Happy cooking!
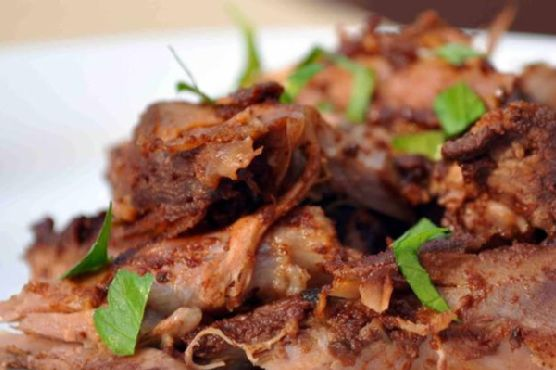
It was one of those days when the weather couldn’t make up its mind – gloomy clouds threatening rain one moment, only to break into streams of sunlight the next. I found myself aimlessly wandering the aisles of my favorite local grocer, craving something rich and warming. Lamb in Red Mole Sauce – that’s the dish that came to mind. It’s the kind of meal that feels like a cozy blanket after a long day but also carries a bit of flair, like you’ve spent hours crafting something special just for you (even if, honestly, the oven does most of the work). When you take that first bite and the tender lamb mingles with the smoky, spicy mole, it’s pure magic. Trust me, you’ll want to give this recipe a go, especially when you need a little pick-me-up that feels just a tad indulgent.
Jump to Recipe
What You’ll Need
This ingredient list is a little trip to flavor town with a Mexican twist. The beauty? You might already have most of these in your pantry, and the rest are definitely worth the hunt.
- Dried chipotle peppers
- Pasilla peppers
- Plum tomatoes
- Garlic
- Oregano
- Cinnamon
- Sesame seeds
- Pepper
- Canola oil
- Mexican chocolate
- Salt
- Tomato sauce
- Lamb shoulder
- Salt and pepper for seasoning
How to Make Lamb In Red Mole Sauce
- Begin by soaking the dried chipotle peppers in hot water until they soften up. Once soft, remove the seeds and stem. This is where the magic begins.
- In a blender, puree the softened chipotles, roasted pasilla peppers, plum tomatoes, and garlic until smooth. Set this flavor bomb aside for later.
- Grab a small skillet and toast the oregano, cinnamon, sesame seeds, and pepper until your kitchen smells like a spice market in Mexico – fragrant and irresistible.
- In a saucepan, heat some canola oil. Add the pureed vegetable mix, the freshly toasted spices, chocolate, salt, and tomato sauce. Stir everything together and let it simmer gently until the chocolate melts and the sauce is well blended. If it looks like it’s getting too thick, a splash of water will do the trick.
- Meanwhile, in a large skillet, heat more oil. Season the lamb shoulder liberally with salt and pepper. Sear it on all sides until a glorious brown crust forms. This step is where flavor meets texture.
- Place the browned lamb on a piece of heavy-duty aluminum foil. Pour the mole sauce over the top, making sure it’s nicely coated. Seal the foil tightly – doubling up is a smart move to keep all those juices in.
- Bake in the oven at 325°F for 3-4 hours. When you open that foil, the lamb should be so tender it practically falls off the bone. Succulent perfection.
Cook’s Notes
Cooking this dish is like an art, where patience is rewarded with flavors that are deep and layered. The sauce should be thick but pourable; add water if it gets too sturdy. If you’re making this ahead, you can prepare the mole sauce a day in advance and just warm it up when needed. As for leftovers, they keep well in the fridge for up to three days and taste even better the next day as the flavors meld. Just ensure you reheat gently to prevent the lamb from drying out.
Make It Your Own
While I adore the traditional flavors in this dish, there’s always room for a little personalization:
- Swap the lamb for pork shoulder if that’s more your style, but keep the cooking time the same to ensure tenderness.
- For a vegetarian twist, use large portobello mushrooms in place of lamb, adjusting the cooking time to just an hour.
- If spicy isn’t your thing, sub the chipotle peppers with guajillo peppers for a milder kick.
- Want to add a bit more crunch? Garnish with toasted pumpkin seeds and fresh cilantro before serving.
If you try this, I’d love to hear how it turns out—drop a comment or tag me! Whether you’re savoring it solo or sharing with friends, I hope this dish brings you as much joy as it’s brought me. Happy cooking!
Related update: Lamb In Red Mole Sauce
Related update: Broccoli and Cheese Phyllo Pie
Related update: Chimichurri

So there I was, staring at a pantry full of canned goods and feeling absolutely uninspired. You know those moments, right? When dinner needs to magically appear, but the motivation to whip up something grand is nowhere to be found? That’s when my trusty crockpot became my salvation, and this Crockpot “Refried” Beans recipe was born. Packed with hearty pinto beans and a kiss of cumin, it’s the kind of dish that mellows me out on a hectic Tuesday evening. Not to mention, it’s an absolute breeze to prepare. Whether you’re looking for a simple side or a filling for your tacos, this dish has you covered.
Jump to Recipe
What You’ll Need
Picture this: a short list of ingredients, most of which are probably lurking in your pantry right now. We’re talking about pantry staples here, folks, nothing too fancy.
- Pinto beans – the star of our show, dried and ready for action
- Water – simple enough
- Canned garlic – because chopping fresh is overrated (or maybe just too much effort today)
- Onion – for that subtle depth of flavor
- Cumin – gives that warm, earthy vibe to our beans
- Black pepper – just enough to make things interesting
- Salt – essential seasoning, obviously
How to Make Crockpot “Refried” Beans
- Rinse those pinto beans in a colander. Seriously, give them a good rinse until the water runs clear, and make sure to pick out any bad beans that are looking questionable.
- Combine all of the ingredients into your trusty crockpot. Toss the rinsed beans in, add the water, canned garlic, onion, cumin, black pepper, and salt. Give it a little stir to distribute the flavors.
- Notice any beans floating to the top? Go ahead and remove those. Floating beans often mean they’re not quite right, and we’re all about quality here.
- Cover the crockpot, set it on HIGH, and let it work its magic for 4 hours. The kitchen will start to smell warm and inviting — almost like a hug.
- After the 4 hours are up, switch the setting to LOW and let it continue to cook for another 2 hours. Patience, my friend, is key.
- Once cooked, uncover the crockpot and assess the liquid situation. Remove any excess liquid, but leave enough to reach your desired consistency when mashed. Remember, we’re aiming for somewhere between very liquidy, restaurant-style beans and the thicker, canned kind.
- Mash the beans using a potato masher. Go as smooth or chunky as you like — it’s your masterpiece.
- Serve them warm, and soak in the satisfaction of a meal well-crafted with minimal effort.
Cook’s Notes
So, a few things to keep in mind: using dried beans means you get to control the texture and sodium levels, which is a total win-win. As for storage, pop any leftovers into air-tight containers and they’ll chill in the fridge for up to 2 weeks. If you’re more of a plan-ahead person, freeze the beans in ziplock bags to enjoy at a later date. Just remember to thaw them in the fridge overnight before reheating.
Make It Your Own
Experimenting is half the fun, right? Here are a few ways to switch things up:
- Swap the pinto beans for black beans for a subtly different flavor profile.
- Feeling adventurous? Add a diced jalapeño to the crockpot for a spicy kick.
- Toss in a handful of chopped cilantro after mashing for a fresh, herbaceous finish.
- For a smoky twist, stir in a teaspoon of smoked paprika with the other spices.
If you try this recipe, I’d love to hear how it turned out! Drop a comment or tag me in your kitchen adventures. Happy cooking!
Related update: Crockpot "Refried" Beans
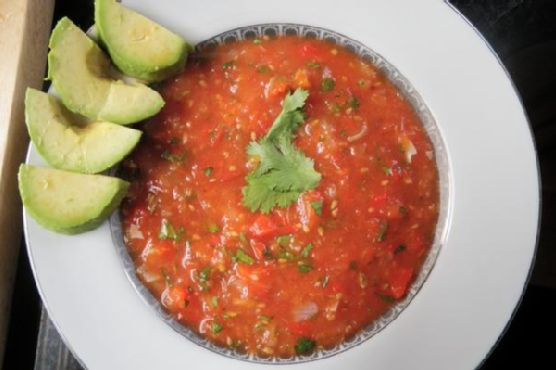
It was one of those lazy Sunday afternoons when the weather couldn’t decide if it wanted to be sunny or stormy. I found myself staring at an overabundance of tomatoes and peppers on my counter, all begging for attention before they started their slow decline. You know, that guilt-inducing moment when your produce is almost too ripe, taunting you with its fleeting freshness? That’s when I decided it was a perfect day to whip up a batch of my favorite Roasted Red Pepper & Tomato Salsa. It’s one of those recipes that rewards you with intense, smoky flavors and a satisfying texture—all with minimal effort. Plus, with the broiler doing most of the work, you’ll spend less time in the kitchen and more time curled up with a good book or catching the latest episode of your favorite show.
Jump to Recipe
What You’ll Need
This recipe is delightfully simple, and chances are you already have most of these ingredients hanging out in your kitchen, just waiting to be transformed into something magical.
- Tomatoes, ripe and juicy
- Red bell pepper, for that sweet, smoky touch
- Onion, because every good salsa needs a little bite
- Whole garlic cloves, roasted to mellow perfection
- Jalapeno pepper, for those who like a kick
- Olive oil, just a drizzle to bring it all together
- Smoked salt or sea salt, whatever you have on hand
- Fresh cilantro, for that bright, herby finish
- Lime juice, to add the perfect zing
- Cumin, a dash for warmth and depth
How to Make Roasted Red Pepper & Tomato Salsa
- Preheat your oven to broil. This step is where all the magic begins—the high heat will give your veggies that perfect char.
- Cut the tomatoes in half and the onions into quarters, then arrange them on a tin-foil lined baking sheet. Trust me, the foil makes clean-up a breeze.
- Add the red bell pepper, whole garlic cloves (leave the skins on for now), and the jalapeno pepper to the sheet. The hot pepper is where we bring the heat, so adjust to your liking.
- Drizzle everything with a bit of olive oil and a sprinkle of salt. This is where the flavor party starts.
- Pop the sheet under the broiler for about 10 minutes. You’re looking for those beautiful char marks—until the skins start to blacken and bubble.
- Remove from the oven and let your veggies cool for about 5 minutes. This gives you just enough time to pour yourself a refreshing drink.
- Once cooled, peel the skins from the tomatoes, pepper, and garlic. It’s a bit messy, but oh-so-worth it.
- Toss all the roasted goodness into a food processor, except for the cilantro and lime juice. Pulse 2-4 times. You’re going for a chunky texture, not smooth.
- Transfer to a bowl and mix in the fresh cilantro and lime juice. This is the part where your salsa gets its vibrant color and zing.
- Season with cumin and add salt to taste. Give it a quick stir, and you’re done! Serve it up with corn chips or toasted pita chips and dig in.
Cook’s Notes
Remember, the key to this salsa is the broil—don’t skip it! It gives the dish that lovely depth of flavor that you simply can’t achieve with raw veggies. If you’re making it ahead, you can store it in the fridge for up to three days in a sealed container. The flavors actually meld together even more beautifully as it sits. Just give it a good stir before serving. If you find your leftovers a bit too thick, a splash of lime juice or even a bit of water can help loosen things up nicely.
Make It Your Own
Here’s where you can let your creativity run wild with some easy variations:
- Swap the red bell pepper for a couple of yellow or orange peppers for a sweeter, milder salsa.
- If you’re not a fan of spice, leave out the jalapeno or replace it with a sweet pepper variety.
- For a smoky twist, replace the cumin with a teaspoon of smoked paprika.
- Want a fruitier version? Add in some mango chunks before serving for a sweet and spicy delight.
If you try this, I’d love to hear how it turns out—drop a comment or tag me! Your feedback and creativity make this journey even more fun. Happy cooking!
Related update: Roasted Red Pepper & Tomato Salsa
Related update: Tzadziki
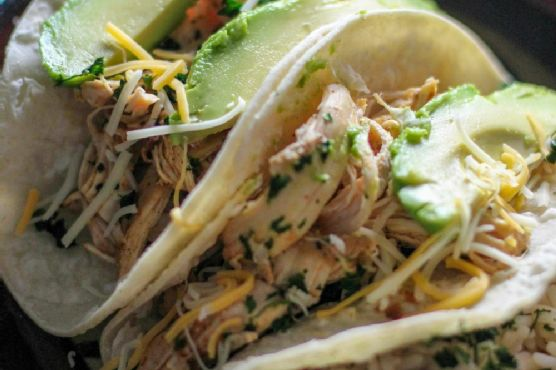
One rainy Tuesday evening, I found myself staring at a lonely lime on the counter, wondering how I could whip up something that felt fresh and exciting despite the weather gloom. My Instant Pot was calling, and I imagined the sizzle of tacos — not just any tacos, but ones that are easy enough for a weeknight yet flavorful enough to make you feel like a dinner hero. That’s how these Instant Pot Chicken Tacos came to life. They’re a symphony of flavors, with just the right tang from lime and a kick from taco seasoning, and the best part? They’re a breeze to make, even if you’re juggling a million things. Trust me, you’re going to want to bookmark this one for every taco Tuesday (or any day, really) when life gets a little hectic.
Jump to Recipe
What You’ll Need
The beauty of this recipe is its simplicity. Chances are, you already have most of these waiting in your pantry or fridge. Here’s what you’ll need to create this taco magic:
- Chicken breasts — the star of the show, tender and juicy.
- Black pepper
- Taco seasoning — brings the fiesta to your taste buds.
- Purple onion — for a subtle sharpness and a pop of color.
- Canned salsa — your secret shortcut to layered flavor.
- Lime juice — for that fresh zing at the end.
How to Make Instant Pot Chicken Tacos
With just a few steps, you’ll have these delightful tacos ready in no time:
- First, generously season both sides of the chicken breasts with black pepper and taco seasoning. Make sure they’re well-covered for maximum flavor.
- Place the seasoned chicken into the bottom of your Instant Pot. Let the anticipation build as you layer the flavors.
- Next, top the chicken with a handful of diced purple onion and a generous pour of canned salsa. It should look like a fiesta in a pot!
- Secure the Instant Pot lid into the lock position. Set it to the Poultry setting for 12 minutes. During this time, you can almost hear the flavors mingling and dancing inside.
- Once the timer beeps, don’t rush things. Allow the Instant Pot to naturally release pressure for 20 minutes. This is where the magic happens.
- Carefully remove the chicken from the pot and shred it with two forks. You’ll notice how effortlessly it falls apart.
- Sprinkle the shredded chicken with fresh lime juice. The tangy aroma will hit you, and you’ll know it’s taco time.
- Serve the chicken over a bed of rice or wrap it snugly in tortillas. Either way, you’re in for a treat!
Cook’s Notes
Here’s a little insider scoop to make the most out of this recipe:
– If you’re in a hurry, you can quick-release the pressure after cooking, but I find the patience pays off in flavor.
– Store any leftovers in an airtight container in the fridge for up to 3 days. They make for some mean taco bowls or quesadillas the next day.
– Shredding gets messy, but it’s worth it! Just make sure your forks are sturdy enough for the job.
– If you like your tacos with a bit of heat, feel free to throw in a pinch of cayenne with the taco seasoning.
Make It Your Own
Here are a few ideas to put your personal spin on these tacos:
- Swap the chicken for crispy tofu for a vegetarian delight that’s just as satisfying.
- Use a smoky chipotle salsa instead of regular salsa for an extra layer of depth.
- Top with crumbled queso fresco or a dollop of sour cream for added creaminess.
- Stir in some fresh corn kernels or sliced bell peppers before cooking for extra crunch and color.
If you try this, I’d love to hear how it turns out — drop a comment or tag me! Your kitchen adventures make my day. Enjoy those tacos, and remember, the best meals are the ones shared with laughter and a little bit of lime. 🌮
Related update: Instant Pot Chicken Tacos
Related update: Herb chicken with sweet potato mash and sautéed broccoli

Picture this: it’s one of those hectic Tuesday nights where you’ve got about 45 minutes to get something on the table before the whole evening devolves into chaos. The fridge is looking sparse, but you’ve got a pack of chorizo, some eggs, and a block of cheddar that’s been patiently waiting for its moment in the spotlight. That’s when this Chorizo and Egg Bake comes to the rescue. It’s one of those dishes that’s deceptively simple but packs a punch of flavor that’s sure to convince everyone you planned it all along. Plus, it’s all about that melty cheese and spicy kick that makes life feel just a bit more exciting.
Jump to Recipe
What You’ll Need
The beauty of this recipe is its simplicity—you’re likely to have almost everything you need ready to go!
- 4 large eggs
- 1 cup grated cheddar cheese
- 200g smoked chorizo sausage, diced
- 1 medium onion, finely chopped
- 2 cloves garlic, minced
- 1 can red and green chillies, drained
- Salt and pepper to taste
How to Make Chorizo and Egg Bake
- Preheat your oven to 170°C. You’ll want it nice and warm to get that cheese melted just right.
- In a mixing bowl, crack the eggs and whisk them until the yolks and whites are fully combined. This is going to ensure a fluffy texture.
- Add the grated cheddar cheese, chopped onion, diced chorizo, minced garlic, and chopped chillies to the bowl. Give it all a good stir until everything’s evenly mixed. The aroma should already be enticing!
- Season generously with salt and pepper. Remember, the chorizo will add a bit of saltiness, so don’t go too wild.
- Lightly grease a baking dish to prevent sticking. Pour your eggy mixture into the dish, spreading it out evenly.
- Pop it into the oven and bake for about 20 minutes. You’ll know it’s ready when the edges start to bubble and turn a light golden brown.
Cook’s Notes
This dish is wonderfully forgiving, so feel free to tweak the ingredient amounts based on what you have. If you’re preparing it in advance, you can whisk together all the ingredients the night before and store them in the fridge. Just pour it into the baking dish and bake when you’re ready. Leftovers can be stored in an airtight container in the fridge for up to three days and are just as delicious when reheated—perfect for a quick lunch or a lazy breakfast.
Make It Your Own
- Vegetarian Twist: Swap the chorizo for your favorite meat-free sausage or sautéed mushrooms.
- Extra Veggies: Throw in some bell peppers or spinach for added color and nutrients.
- Spicy Kick: Add a pinch of cayenne pepper or a few dashes of hot sauce to the egg mixture.
- Different Cheese: Try swapping the cheddar with Monterey Jack or pepper jack for a different flavor profile.
If you give this recipe a whirl, I’d love to hear how it turns out for you! Drop a comment below or tag me on social media to share your delicious creations. Happy cooking!
Related update: Chorizo and egg bake
Related update: Broccoli Rabe with Tomatoes, Anchovies & Spaghetti
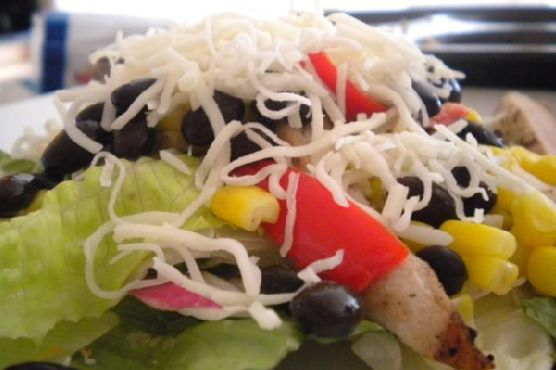
Picture this: It’s midweek, and you’re staring into the abyss of your fridge, seeking inspiration for dinner. We’ve all been there, and that’s precisely how this Garlic Lime Grilled Chicken Salad came to life in my kitchen. It’s that perfect holistic mix of tangy, zesty, and fresh that turns a mundane weeknight into a mini feast. The best part? It’s simple yet impressive enough to make you feel like a culinary genius without breaking a sweat. It’s brightened by the citrusy marinade and packed with vibrant, savory flavors that are sure to elevate your salad game. Plus, it’s a great excuse to fire up the grill! So, if you’re looking for a vibrant, flavor-packed dinner that’s also healthy, this one’s for you. Jump to Recipe
What You’ll Need
Chances are you already have most of these in your pantry or fridge, making this dish delightfully low-fuss. Here’s the lineup:
- Chicken breast
- Limes
- Garlic
- Olive oil
- Cooked refrigerated black beans
- Black pepper
- Cilantro
- Cumin
- Frozen corn
- Kosher salt
- Shredded Mexican cheese
- Onions
- Orange
- Oregano
- Red peppers
- Romaine lettuce
- Vinegar
How to Make Garlic Lime Grilled Chicken Salad
- In a small bowl, mix 1/4 cup of fresh orange juice and 1/4 cup of fresh lime juice with olive oil, a sprinkle of cumin, a dash of oregano, a generous pinch of kosher salt, and minced garlic. Trust me, the aroma is divine!
- Pour half of this citrusy concoction over the chicken breasts, ensuring they get a good soak. Save the rest of the marinade for later. Let those flavors mingle for at least an hour—two if you have the time.
- Prepare your grill and heat it up to a sizzling 425°F. Once hot, sear the marinated chicken on both sides, about 12 minutes, or until you see those lovely grill marks.
- Lower the heat to 350°F and let the chicken cook through for another 7-10 minutes. You’re aiming for juicy, not dry!
- Slice up the red peppers into thin strips and give them a quick grill for about 2-3 minutes, so they’re tender but still have a bit of crunch.
- Warm up the frozen corn—nothing fancy here, just make sure it’s warm to the touch.
- Transform the leftover marinade into a vinaigrette by whisking in 1-2 tablespoons of vinegar. This will be your salad’s secret weapon.
- Start your salad assembly: Start with a bed of fresh romaine lettuce, layer on the grilled chicken, sprinkle with black beans, grilled red peppers, cheese, and a drizzle of your vinaigrette. Voilà!
Cook’s Notes
Here’s the scoop: Marinating is key. The longer you let the chicken hang out in that zingy bath, the better. If you’re in a hurry, even 30 minutes can work. Don’t rush the grill time; those grill marks are where the magic happens, giving that smoky, irresistible taste.
Store any extras in separate containers, if possible, to avoid soggy lettuce—nobody likes a wilted salad! This dish holds up beautifully in the fridge for up to three days, so it’s perfect for meal prep, too.
Make It Your Own
- Swap the chicken for crispy tofu to make it vegetarian-friendly. Just press and marinate the tofu the same way you would the chicken.
- Add some diced avocado for creamy goodness that pairs perfectly with the citrusy zing.
- Not a fan of romaine? Spinach or arugula would be fantastic substitutes, bringing their unique flavors to the table.
- Craving extra crunch? Toss in a handful of tortilla strips or crushed tortilla chips right before serving.
If you try this, I’d love to hear how it turns out—drop a comment or tag me! Whether it’s a weeknight or a weekend grill-out, this salad is a surefire way to brighten up your dinner table. Enjoy!
Related update: Garlic Lime Grilled Chicken Salad
Related update: Swiss Chard Wraps
Related update: Traditional Panzanella
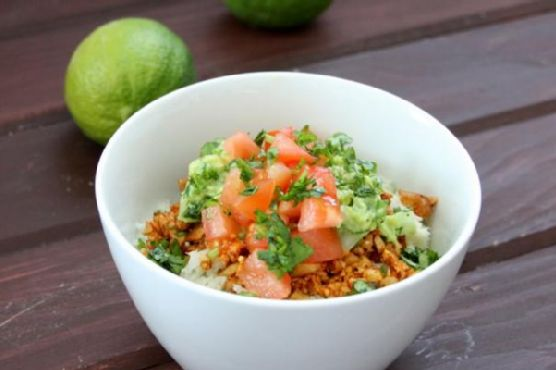
On a particularly hectic Tuesday evening, not too long ago, I found myself staring into the abyss of my pantry, wondering what on earth I could whip up for dinner. After a long day, the thought of a quick yet satisfying meal was all I needed to keep my spirits up. It was then that my eyes fell on a bag of walnuts tucked away in the corner, and inspiration struck. Enter: Vegan Taco Bowls with Cilantro Lime Cauliflower Rice. A burst of fresh flavors, a medley of textures, and the best part? It’s as comforting as it is healthy. This dish has become my go-to when I crave something hearty yet light, and the simplicity of it is just the cherry on top.
Jump to Recipe
What You’ll Need
What makes this dish a gem is that it’s likely you already have most of these ingredients at home. It’s about combining fresh goodness with a pinch of creativity.
- Avocado oil
- Cauliflower
- Red New Mexico chili powder
- Fresh cilantro
- Garlic powder
- Hass avocado
- Fresh jalapeño
- Fresh lime juice
- Onion
- Salt
- Tomato
- Walnuts
How to Make Vegan Taco Bowls with Cilantro Lime Cauliflower Rice
- Set the walnuts to soak in a bowl of water for 2-8 hours before you plan to prepare the taco meat. This will soften them up nicely for processing.
- Preheat your oven to 375°F and line a baking sheet with aluminum foil. This step will ensure easy clean-up later.
- Finely chop the cauliflower into rice-sized pieces, or give it a quick whirl in a food processor until you achieve the desired consistency. Toss with avocado oil and spread onto the baking sheet in an even layer.
- Bake the cauliflower for 18 minutes, giving it a stir halfway through to ensure it cooks evenly. You’ll know it’s done when it turns a lovely golden brown and smells slightly nutty.
- While the cauliflower rice is cooking, turn your attention to the guacamole and taco meat. Cut the avocado into large chunks and place them into a small bowl. Add the lime juice and mash until you reach a chunky puree or your preferred consistency.
- Stir in finely chopped cilantro, diced jalapeño, onion, and a pinch of garlic powder into the avocado mix. Set your guacamole aside — if you can resist a taste test, that is.
- Drain the soaked walnuts and place them into a small food processor. Pulse until they’ve reached a ground meat consistency; about 5-7 pulses should do the trick.
- Transfer the walnut mixture to a bowl and stir in the salt, cumin, garlic powder, and red chili powder. Set aside.
- Once the cauliflower is done, transfer it to a mixing bowl while still warm and toss with lime juice, cilantro, and a sprinkle of salt to taste.
- To assemble, layer 1 cup of your fragrant cauliflower rice into a bowl, add a hearty portion of taco nut meat, a generous dollop of guacamole, fresh tomatoes, and a sprinkling of fresh cilantro.
- Serve immediately with an additional slice of lime if desired. Enjoy the fresh, vibrant flavors dancing in your mouth!
Cook’s Notes
Here’s the deal: soaking the walnuts ahead of time is crucial for getting that perfect meaty texture. So, if you’re planning on making this, set a reminder or put a sticky note on your fridge. This dish is fabulous fresh, but it also makes for great leftovers. Store the components separately in airtight containers in the fridge — they’ll keep well for up to three days. Simply reassemble and enjoy when you’re ready for round two!
Make It Your Own
- Swap the walnuts with pecans for a sweeter, nuttier taco meat.
- Spice things up by adding a pinch of smoked paprika to the walnut mix for a deeper flavor.
- Make it extra creamy by adding a dollop of coconut yogurt on top of your assembled bowl.
- Include black beans for an extra protein punch and a heartier meal.
If you try this, I’d love to hear how it turns out — drop a comment or tag me on social media! Your kitchen adventures make this cooking journey all the more rewarding. Enjoy every delicious bite!
Related update: Vegan Taco bowls with Cilantro Lime Cauliflower Rice
Related update: Moroccan Chicken Tagine

Okay, imagine this: It’s a Wednesday night, and I’m standing in my kitchen, staring at a bunch of bell peppers I bought on impulse. You know the feeling, right? That moment of “What am I even going to do with these?” My brain whispers, “Stuff them!” But not just any stuffing — let’s infuse them with a fiesta of flavors. Enter these Mini Stuffed Mexican Bell Peppers. They’re a little spicy, a little tangy, and oh-so-satisfying. Perfect for those nights when you want something quick but super flavorful. Trust me, after you try this, you’ll wonder why you don’t have canned bell peppers permanently on your shopping list.
Jump to Recipe
What You’ll Need
Honestly, you’ve probably got most of this lounging around in your pantry. Here’s what you’ll need to create some magic:
- Canned bell peppers
- Lean ground turkey
- Canned black beans
- Chili powder
- Chipotles in adobo
- Fire roasted canned tomatoes
- Garlic
- Canned green chilies
- Tsp ground coriander
- Ground cumin
- Paprika
- Tomatillos
- Yellow onion
How to Make Mini Stuffed Mexican Bell Peppers
- Preheat your oven to 400°F (200°C). Let’s get those veggies nice and roasted.
- Slice the tomatillos in half and the onion into 1/2-inch slices. Peel the garlic cloves.
- Spread the tomatillos, onions, and garlic on a baking sheet. Roast them in the oven until the tomatillos are tender and start to brown, about 20 minutes.
- While the veggies roast, get a large skillet and start cooking the ground turkey over medium heat. Break it up with a spatula until it’s no longer pink and just beginning to brown.
- Add the chili powder, ground coriander, ground cumin, and paprika to the turkey. Stir until everything is coated with those warm spices.
- Stir in the fire roasted tomatoes, black beans, chipotles in adobo, and green chilies. Let it simmer until the mixture thickens, about 5-7 minutes.
- By now, your kitchen should smell amazing. Once the veggies are done roasting, chop them up and mix them into the turkey concoction.
- Drain the canned bell peppers and arrange them on a baking tray, cut side up.
- Spoon the turkey and veggie mixture into each bell pepper evenly. Don’t be shy — pack them full!
- Pop the stuffed peppers into the oven for about 10 minutes. You’ll know they’re ready when the tops start to look a bit crispy.
- Let them cool slightly before digging in, but the anticipation is half the fun!
Cook’s Notes
Here’s a heads-up: Avoid overfilling the peppers, or they might collapse — they’re mini, after all! If you’re making this ahead, store the filling separately and stuff the peppers just before baking. Leftovers? Toss them in an airtight container; they’ll be good for about 3 days in the fridge. Reheat them gently, so you don’t lose any of that lovely texture.
Make It Your Own
- Vegetarian Twist: Swap the turkey for crumbled firm tofu. Just make sure to press it well to get that nice crumbly texture.
- Cheesy Version: Stir in some shredded Monterey Jack or sprinkle it on top before the final bake for a melty finish.
- Spice It Up: Add some diced jalapeños or a dash of cayenne pepper if you’re craving extra heat.
- Fresh Hit: Top with chopped cilantro or a squeeze of fresh lime juice right before serving for a zesty lift.
If you try this, I’d love to hear how it turns out — drop a comment or tag me! Cooking is all about sharing, and I can’t wait to see your takes on this spicy little number. Enjoy, my pepper-loving friends!
Related update: Mini Stuffed Mexican Bell Peppers
Related update: Bigoli with smoked salmon
Related update: How to make the World’s Greatest Lasagna Roll Ups
Related update: Cheesy Cauliflower