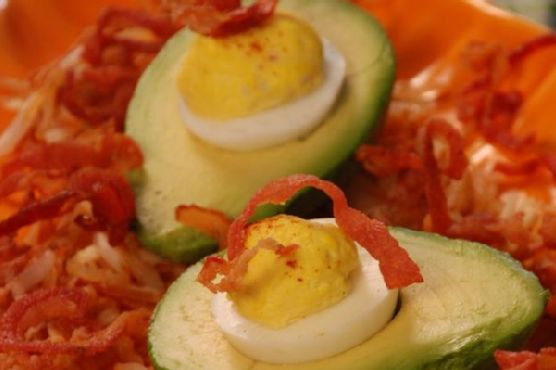
Loaded Veggie Omelet | Made by Meaghan Moineau

I was deep in the throes of a Tuesday night quandary—hungry but not wanting to commit to a full-on kitchen escapade. You know those nights, right? The ones where takeout seems like the easy choice, but your inner voice whispers (or maybe shouts), “Use the groceries you bought!” It was on one such evening that I whipped up this Loaded Veggie Omelet. It’s the kind of recipe that feels like a mini victory; quick to make yet hearty enough to satisfy. Perfect for when you want something impressive without the fuss. Plus, who wants a mountain of dishes? Not me.

Jump to Recipe

What You’ll Need

This isn’t one of those recipes where you’ll be chasing obscure ingredients. Chances are you already have most of this:

  • Shallot
  • Garlic
  • Mushrooms
  • Cherry tomatoes
  • Fresh basil
  • Fresh spinach
  • Eggs whisked
  • White cheese
  • Drizzle of olive oil

How to Make Loaded Veggie Omelet

  1. Start by preheating your oven to warm or 170 degrees. This will keep your first omelet cozy while you prepare the second one. Trust me, it’s worth it.
  2. Heat a small sauté pan over medium. Drizzle it with just enough olive oil to give your veggies a glistening hug.
  3. Add the shallot and garlic first. Sauté them until they’re golden and fragrant—your kitchen should smell amazing by now.
  4. Toss in the mushrooms and let them soften. They’ll release their juices, which is exactly what we want.
  5. Now, add the cherry tomatoes and fresh spinach. Give everything a good stir and then remove the pan from the heat. The spinach should just start to wilt.
  6. In a small omelet or sauté pan, pour in a layer of your whisked eggs. As the egg begins to set, gently run a spatula around the edges. This keeps it from sticking and makes folding easier.
  7. When the egg is almost fully cooked—think slightly runny on top—layer half of the basil, cheese, and your sautéed veggie mix onto one side of the egg.
  8. Gently fold the other side of the egg over the filling. Use your spatula to help if needed. Slide the omelet onto a small oven-safe plate and keep it warm in the oven.
  9. Repeat the process for the second omelet, then serve both while they’re still warm.

Cook’s Notes

Cooking omelets is more of an art than a science, and a few tips can make all the difference.

  • If you’re not a fan of runny eggs, let them cook a bit longer before adding the filling. The key is to keep it soft enough to fold.
  • Store leftovers in an airtight container in the fridge. They make a delightful breakfast next day, just reheat in a pan to revive some freshness.
  • Use a non-stick pan to make your life easier, especially if you’re new to making omelets. It’s all about the slide!
  • If you want to make these ahead, prepare the veggie mix and store it separately. When you’re ready to eat, whip up those eggs and you’re set.

Make It Your Own

Here’s where you get to play chef. These variations keep things exciting:

  • Swap the mushrooms for crispy tofu for an extra protein punch.
  • If you’re a cheese enthusiast, try using feta instead of white cheese for a tangy twist.
  • Give it a spicy kick by adding a dash of red pepper flakes or a few jalapeño slices.
  • Not a fan of spinach? Substitute with arugula for a peppery note.

I hope this Loaded Veggie Omelet becomes your go-to for those nights when you need a quick, satisfying meal. If you try this, I’d love to hear how it turns out — drop a comment or tag me! Here’s to cozy, tasty evenings in.

Related update: Loaded Veggie Omelet

Related update: Jumbo Blueberry Muffins

Hard-Boiled Egg Gratin In A Bechamel Sauce | Made by Meaghan Moineau

It was one of those gloomy Tuesday evenings when the thought of another sad salad was just too much to bear. I glanced at the dozen eggs I had forgotten in my fridge and thought, “We can do better than this, guys!” Thus, the Hard-Boiled Egg Gratin In A Béchamel Sauce was born. This dish is the perfect marriage of creamy comfort and accessible elegance. It’s like giving your humble eggs a posh makeover, and believe me, it’s way easier than you’d think. Plus, it’s the kind of dish that makes you feel like you can handle anything the week throws at you.

Jump to Recipe

What You’ll Need

You might already have most of this in your kitchen, just waiting to become something delightfully decadent. Here’s what you’ll gather:

  • 6 large eggs
  • 4 tablespoons butter, divided
  • 1 small onion, finely chopped
  • 3 tablespoons flour
  • 2 cups milk
  • Nutmeg, a pinch
  • Salt and white pepper to taste
  • 1 cup grated gruyère cheese

How to Make Hard-Boiled Egg Gratin In A Béchamel Sauce

  1. Start with hard-boiling your eggs. Bring a saucepan of salted water to a boil, add the eggs gently, then reduce the heat and let them simmer for 10 minutes. Once done, transfer the eggs to a bowl of cold water to cool slightly, then peel them. Trust me, rolling them gently with your palm on a hard surface makes peeling a breeze.
  2. In a small frying pan, melt 2 tablespoons of the butter over low heat and add the chopped onion. Cook, stirring frequently, until the onion is tender but not colored — you want that sweet onion aroma wafting through your kitchen.
  3. Now for the béchamel sauce: In a medium saucepan, melt the remaining 2 tablespoons of butter over low heat. Add the flour and whisk it for about 2 minutes. Keep an eye on it; you want a smooth blend without any color change.
  4. Slowly whisk in the milk and bring the mixture to a boil. Keep whisking to avoid lumps. Season the sauce with nutmeg, salt, and white pepper to your liking. Lower the heat and let it simmer for 10 minutes, continuing to whisk and scrape the sides for a silky finish.
  5. Stir in the cooked onions and let it all meld together for another 5 minutes, stirring occasionally.
  6. Preheat your grill. While it heats, slice the eggs about 1 cm thick. Spread a thin layer of béchamel sauce on the bottom of a gratin dish, then layer in the sliced eggs. Coat the slices generously with the remaining sauce.
  7. Top it all off with a generous sprinkle of grated gruyère cheese. Pop it under the grill and watch closely — turn the dish if needed to ensure an even, golden-brown crust. Serve immediately and bask in the glory of your culinary creation.

Cook’s Notes

A few things to keep in mind: The béchamel can be made ahead and stored in the fridge for up to two days. Just reheat gently before assembling the gratin. If you find your sauce is too thick after reheating, add a splash of milk to loosen it up. Leftovers (if you have any!) can be kept in the fridge and reheated in the oven at a low temperature. Just be mindful that the eggs can toughen slightly as they are reheated.

Make It Your Own

The joy of this dish is in its flexibility. Here are some fun variations:

  • For a smoky twist, swap the gruyère for smoked gouda.
  • If you’re feeling fancy, add a layer of sautéed mushrooms between the eggs and the sauce.
  • For a fresh hit, sprinkle chopped chives or parsley over the top before serving.
  • Try adding a thin layer of spinach under the eggs for a pop of color and nutrition.

If you try this, I’d love to hear how it turns out — drop a comment or tag me! Whip it up, make it your own, and most importantly, enjoy every creamy forkful. Happy cooking, friends!

Related update: Hard-Boiled Egg Gratin In A Bechamel Sauce

Mediterranean eggplants | Made by Meaghan Moineau

Picture this: It’s a Wednesday evening, and I’m staring at a couple of eggplants sitting forlornly in my fridge. They’re giving me that “use us before we wilt away” look. I had originally bought them with grand plans of making something elaborate, but let’s be real, life happened, and here we are. So, in the spirit of keeping things simple yet utterly delicious, I decided to whip up my go-to Mediterranean eggplants. This dish is like a warm hug—comforting yet bright, with the kind of flavors that make you feel like you’ve just dined at a cozy little seaside café. Plus, it’s a one-pan wonder that’ll save you from a pile of dish-nightmares.

Jump to Recipe

What You’ll Need

Chances are you already have most of this lying around, which is perfect because who wants to make a grocery run for a weeknight meal?

  • Eggplants – the stars of the show, make sure they’re fresh and firm.
  • Fresh sausage without the casing – it adds savoriness and richness.
  • Almonds – for that unexpected crunch.
  • Egg – to bring everything together.
  • Feta cheese – for that tangy creaminess we all love.
  • Mozzarella cheese – because melted cheese is life.
  • Pepper – freshly ground, of course.
  • Bread crumbs – gets all crispy and delightful on top.
  • Olive oil – don’t skimp on this, it’s the liquid gold that makes everything better.
  • Fresh dill – for a pop of freshness to finish.

How to Make Mediterranean Eggplants

  1. Start by washing the eggplants thoroughly. Cut off the stems and slice them in half lengthwise. You’ll want to scoop out the middle, leaving about a half-inch shell. It’s like carving a little canoe for all the tasty fillings.
  2. In a mixing bowl, combine the sausage meat, egg, feta cheese, mozzarella, almonds, and a few cracks of pepper. Use your hands to mix it all up until everything is just combined. It should smell irresistible already.
  3. With a spoon, generously stuff this mixture into your eggplant halves. Don’t worry about being too precise; rustic is charming, right?
  4. Sprinkle each stuffed eggplant with breadcrumbs, about a tablespoon each, then drizzle with olive oil. This will give your eggplants a delectable golden crust.
  5. Place them all on a baking sheet lined with parchment paper. Bake in a preheated oven at 230°C (that’s about 450°F) for 25 minutes. You’re looking for bubbling cheese, golden tops, and the edges of the eggplant to be slightly charred.
  6. Serve hot, sprinkled with fresh, chopped dill, or if you’ve got some chives or basil hanging out, they’ll work beautifully too.

Cook’s Notes

A couple of things to keep in mind: When scooping out the eggplant, don’t take too much flesh out, or else you’ll end up with a floppy mess. If you scoop out a bit of extra flesh, you can mix it into the sausage filling for zero waste. These eggplants are best eaten fresh out of the oven, but if you’ve got leftovers, store them in an airtight container in the fridge. They’ll keep for about 2-3 days, and you can reheat them in the oven or a skillet to keep that delightful crispiness intact.

Make It Your Own

  • Swap the sausage for crispy tofu if you’re going the vegetarian route. Just crumble and sauté it with some smoked paprika for extra flavor.
  • Switch out the almonds for walnuts if that’s what you have on hand. They add a lovely depth of flavor.
  • If you’re out of feta, try using goat cheese for a similarly tangy kick.
  • No dill? No worries! Parsley or cilantro can step in as a fresh finisher.

If you try this, I’d love to hear how it turns out — drop a comment or tag me! Happy cooking, and may your eggplants never languish in the fridge again. 🌿

Related update: Mediterranean eggplants

Related update: How Sweet It Is Sweet Potato Lasagne

Chorizo and egg bake | Made by Meaghan Moineau

Picture this: it’s one of those hectic Tuesday nights where you’ve got about 45 minutes to get something on the table before the whole evening devolves into chaos. The fridge is looking sparse, but you’ve got a pack of chorizo, some eggs, and a block of cheddar that’s been patiently waiting for its moment in the spotlight. That’s when this Chorizo and Egg Bake comes to the rescue. It’s one of those dishes that’s deceptively simple but packs a punch of flavor that’s sure to convince everyone you planned it all along. Plus, it’s all about that melty cheese and spicy kick that makes life feel just a bit more exciting.

Jump to Recipe

What You’ll Need

The beauty of this recipe is its simplicity—you’re likely to have almost everything you need ready to go!

  • 4 large eggs
  • 1 cup grated cheddar cheese
  • 200g smoked chorizo sausage, diced
  • 1 medium onion, finely chopped
  • 2 cloves garlic, minced
  • 1 can red and green chillies, drained
  • Salt and pepper to taste

How to Make Chorizo and Egg Bake

  1. Preheat your oven to 170°C. You’ll want it nice and warm to get that cheese melted just right.
  2. In a mixing bowl, crack the eggs and whisk them until the yolks and whites are fully combined. This is going to ensure a fluffy texture.
  3. Add the grated cheddar cheese, chopped onion, diced chorizo, minced garlic, and chopped chillies to the bowl. Give it all a good stir until everything’s evenly mixed. The aroma should already be enticing!
  4. Season generously with salt and pepper. Remember, the chorizo will add a bit of saltiness, so don’t go too wild.
  5. Lightly grease a baking dish to prevent sticking. Pour your eggy mixture into the dish, spreading it out evenly.
  6. Pop it into the oven and bake for about 20 minutes. You’ll know it’s ready when the edges start to bubble and turn a light golden brown.

Cook’s Notes

This dish is wonderfully forgiving, so feel free to tweak the ingredient amounts based on what you have. If you’re preparing it in advance, you can whisk together all the ingredients the night before and store them in the fridge. Just pour it into the baking dish and bake when you’re ready. Leftovers can be stored in an airtight container in the fridge for up to three days and are just as delicious when reheated—perfect for a quick lunch or a lazy breakfast.

Make It Your Own

  • Vegetarian Twist: Swap the chorizo for your favorite meat-free sausage or sautéed mushrooms.
  • Extra Veggies: Throw in some bell peppers or spinach for added color and nutrients.
  • Spicy Kick: Add a pinch of cayenne pepper or a few dashes of hot sauce to the egg mixture.
  • Different Cheese: Try swapping the cheddar with Monterey Jack or pepper jack for a different flavor profile.

If you give this recipe a whirl, I’d love to hear how it turns out for you! Drop a comment below or tag me on social media to share your delicious creations. Happy cooking!

Related update: Chorizo and egg bake

Related update: Broccoli Rabe with Tomatoes, Anchovies & Spaghetti

Beet Greens and Poached Eggs | Made by Meaghan Moineau

Picture this: it’s a lazy Sunday morning, and the sun’s rays are just starting to peek through your kitchen window. You’re in the mood for something special, something that feels like a treat but won’t have you slaving away in the kitchen. Enter my Beet Greens and Poached Eggs recipe. It’s one of those dishes that looks impressive but is surprisingly easy to whip up. The combination of fresh, vibrant beet greens and perfectly poached eggs is both comforting and elegant — a win-win! Plus, it’s a great way to use up those pesky beet greens that always seem to end up forgotten in the fridge. Whether you’re treating yourself or impressing a loved one, this dish will hit the spot.

Jump to Recipe

What You’ll Need

We’re keeping this simple and fresh. Chances are, you already have most of these on hand, and if not, they’re worth the grocery run.

  • Eggs – go for the freshest ones you can find.
  • Vinegar – just a splash for the poaching water.
  • Water – enough to fill a skillet for poaching.
  • Coconut oil – gives the greens a lovely depth.
  • Leek – thinly sliced for a subtle oniony flavor.
  • Baby beet greens – the star of the show, chopped.
  • Garlic – minced for that irresistible aroma.
  • Lemon (juice) – for a bright hit of acidity.
  • Shredded Parmesan cheese – because cheese makes everything better.

How to Make Beet Greens and Poached Eggs

  1. Heat a small skillet over medium-low heat and add about 2 inches of water. Wait until tiny bubbles start to gently rise to the surface. This is your cue to add a pinch of salt and a splash of vinegar.
  2. Carefully crack the eggs into the water, one at a time, slowly sliding each into its own corner of the pan. Cover the skillet and allow to simmer gently for 8 to 10 minutes. You’re aiming for whites that are set with yolks still runny — that’s the magic moment.
  3. While the eggs are poaching, heat a large nonstick skillet over medium heat and add the coconut oil. Once the oil has melted and filled the kitchen with its nutty aroma, toss in the sliced leeks and beets.
  4. Cook the leeks and beets for about 5 to 8 minutes, stirring occasionally, until they’re tender and their natural sweetness is coaxed out.
  5. Add the minced garlic, letting it do its aromatic dance for about a minute before introducing the chopped baby beet greens. Stir everything together for another two minutes, then remove from heat. Toss in a splash of lemon juice and keep stirring gently until the greens are just wilted.
  6. Divide the greens mixture between two plates. When the eggs are ready, carefully lift them out with a slotted spoon, letting the excess water drain away, and place one egg on each pile of greens.
  7. Finish each plate with a tablespoon of shredded Parmesan cheese, letting it melt slightly from the heat of the eggs. Serve immediately and enjoy the glorious marriage of flavors and textures.

Cook’s Notes

A few quick tips to make your cooking experience smoother than a perfectly poached egg. When poaching, don’t rush the process. Patience is key, and those few extra minutes will make all the difference. If your skillet lid doesn’t fit perfectly, that’s okay — just do your best to cover the pan. As for leftovers, good luck having any! But if you do, store the greens and eggs separately in the fridge and reheat gently. The greens are quite forgiving, but reheating poached eggs is a delicate dance — a quick dip in hot water can do the trick if needed.

Make It Your Own

This dish is a canvas ripe for personalization. Here are some variations to get you started:

  • Switch up the greens: Try swapping beet greens for Swiss chard or spinach for a slightly different flavor profile.
  • Add some heat: Sprinkle a pinch of red pepper flakes over the greens for a little kick.
  • Mix up the cheese: Replace Parmesan with crumbled feta for a tangy twist.
  • Protein boost: Top with crispy bacon bits or slices of smoked salmon for added texture and flavor.

If you give this recipe a try, I’d love to hear how it turns out for you! Drop a comment below or tag me in your kitchen adventures. Happy cooking, friends!

Related update: Beet Greens and Poached Eggs

Related update: Strawberry Shortcake Pancakes

Hard-Boiled Egg Gratin In A Bechamel Sauce | Made by Meaghan Moineau

It was one of those rainy Tuesday evenings when the thought of another takeout meal just didn’t appeal. You know those nights, right? When you crave something warm and comforting that feels like a hug on a plate? That’s when this Hard-Boiled Egg Gratin in a Béchamel Sauce came to life in my kitchen. It’s the kind of dish that’s deceptively simple yet incredibly satisfying, with a creamy sauce and a crispy, cheesy top. It’s perfect for when you want something a bit special but don’t want to spend hours in the kitchen. Plus, chances are, you already have most of the ingredients lurking in your pantry or fridge.

Jump to Recipe

What You’ll Need

Imagine pulling together a dish without a last-minute grocery run. That’s the beauty of this recipe. Here’s what you’ll need:

  • Eggs – the stars of the show, of course!
  • Butter – for that rich, comforting flavor.
  • Flour – to thicken up our luscious sauce.
  • Gruyère cheese – because what’s a gratin without a cheesy top?
  • Milk – to create the creamy béchamel.
  • Nutmeg – just a dash for warmth.
  • Onion – adds a subtle sweetness.
  • White salt and pepper – to season everything just right.

How to Make Hard-Boiled Egg Gratin In A Bechamel Sauce

Ready to dive in? Here’s how to bring this cozy dish to life:

  1. Start by hard-boiling the eggs. Bring a saucepan of salted water to a rolling boil, then gently add the eggs. Lower the heat and let them simmer for 10 minutes.
  2. Once the eggs are done, place them into cold water until they’re just cool enough to handle. Here’s a little trick: roll them with your palm on a hard surface to crack the shell, then peel under a slow stream of running water. It works like a charm!
  3. In a small frying pan, melt some butter over low heat. Add the onion and cook, stirring frequently, until they’re tender but not browned. Set aside.
  4. Next, let’s make the béchamel sauce. In a medium heavy-bottomed saucepan, melt more butter over low heat. Stir in the flour and whisk for around 2 minutes without letting it color.
  5. Whisk in the milk, bringing it to a boil while whisking constantly to avoid lumps. Season with nutmeg, salt, and pepper, then reduce the heat and let it simmer for 10 minutes. Keep whisking and scraping the pan to ensure nothing sticks.
  6. Stir the cooked onions into the béchamel and let it all cook together for an additional 5 minutes.
  7. Preheat your grill. Slice the eggs into 1 cm (0.4 inch) slices and start assembling. Spread a thin layer of the béchamel sauce at the bottom of your gratin dish.
  8. Layer the egg slices over this sauce, covering them with the remaining béchamel. Sprinkle generously with grated Gruyère cheese.
  9. Place the dish under the grill. Keep an eye on it and turn the dish if necessary to ensure an evenly golden, bubbly top. Serve immediately and enjoy the deliciousness!

Cook’s Notes

Let’s talk practical tips. First, don’t rush the béchamel sauce; whisk it patiently to avoid lumps. If you find the bechamel is too thick, a splash more milk can help loosen it up. This dish is best served right away when the cheese is melty and gooey, but if you do have leftovers, they can be stored in an airtight container in the fridge for up to two days. Reheat gently in the oven or microwave until warmed through.

Make It Your Own

This recipe is delicious as is, but here are a few ways to make it your own:

  • Swap the Gruyère cheese for sharp cheddar for a more pronounced flavor.
  • Add a layer of sautéed spinach between the eggs and the sauce for some greens.
  • Substitute half of the milk with cream for an even richer béchamel.
  • Sprinkle some crispy bacon bits on top before grilling for a smoky kick.

If you try this, I’d love to hear how it turns out — drop a comment or tag me! Whether it’s your first time making a gratin or you’re an old pro, I hope this becomes a comforting staple in your kitchen. Happy cooking!

Related update: Hard-Boiled Egg Gratin In A Bechamel Sauce

Related update: Caramelised Onion and Mushroom Quiche

Tuna Stuffed Hard-Boiled Eggs | Made by Meaghan Moineau

Last Tuesday, I found myself staring into the fridge at 6 p.m. with a growling stomach and no dinner plans. You know the feeling, right? That weeknight scramble where you’re just trying to conjure up something quick yet satisfying. Lucky for me, an almost forgotten can of tuna and some leftover boiled eggs saved the day. Enter these deliciously simple Tuna Stuffed Hard-Boiled Eggs—a perfect blend of creamy and tangy, ready in a flash and impressive enough that you might actually look forward to making them again. Whether you’re crafting a light lunch or a snack for a spontaneous get-together, these little bites are exactly what you need.

Jump to Recipe

What You’ll Need

The beauty here is that you probably have all these ingredients lounging in your kitchen. It’s a simple yet delightful list that packs a punch.

  • 6 hard-boiled eggs
  • 1 can of tuna, drained
  • 1/4 cup finely chopped onion
  • 1/4 cup grated carrot
  • 2 tablespoons chopped parsley
  • 1 tablespoon fresh lemon juice
  • 1/4 cup corn kernels for garnish

How to Make Tuna Stuffed Hard-Boiled Eggs

  1. Start by peeling those perfectly boiled eggs and slicing them in half lengthwise. Scoop the yolks into a bowl and place the whites on a plate.
  2. In the bowl with the yolks, add the drained tuna, chopped onion, grated carrot, parsley, and a squeeze of fresh lemon juice. Mash everything together with a fork until it’s well combined and creamy.
  3. Spoon or pipe the tuna mixture back into the egg whites, filling each hollow generously. You’ll want the filling to have a slightly mounded look.
  4. To finish, sprinkle the tops with corn kernels. They add a sweet pop and a dash of color—plus, who doesn’t love a little crunch?

Cook’s Notes

If you’re boiling the eggs specifically for this recipe, a 9-minute boil should give you that perfect firm yolk. To prevent overcooking them (nobody likes a green-tinged yolk!), immediately plunge them into an ice bath after boiling.

  • For a smoother filling, try blending the mixture in a food processor. It’s not necessary, but it adds a touch of elegance.
  • You can make the filling a day ahead—just store it in an airtight container in the fridge. Stuff the eggs just before serving for the freshest result.
  • Leftovers can be stored in the fridge for up to 2 days, but honestly, they’re so good, you probably won’t have any!

Make It Your Own

  • Swap the tuna for canned salmon or even shredded chicken for a different flavor profile.
  • Love a bit of heat? Add a spoonful of sriracha or a pinch of cayenne pepper to the tuna mixture for a spicy kick.
  • If you’re a fan of herbs, try swapping parsley for dill or basil for a fresh twist.
  • For added creaminess, mix in a tablespoon of mayo or Greek yogurt with the tuna filling.

If you try this, I’d love to hear how it turns out—drop a comment or tag me! These eggs might just become your new go-to when you’re in a pinch. Happy cooking!

Related update: Tuna Stuffed Hard-Boiled Eggs

Related update: Warm Spinach Artichoke Dip

Baked Eggs and Bacon Cream In Spinach Fettuccine Nests | Made by Meaghan Moineau

Baked Eggs and Bacon Cream In Spinach Fettuccine Nests

Intro

There’s something incredibly comforting about a dish that combines the richness of cream, the salty crispiness of bacon, and the smooth, silky texture of perfectly cooked pasta. This recipe for Baked Eggs and Bacon Cream in Spinach Fettuccine Nests is one that I hold dear to my heart. It reminds me of lazy Sunday mornings in my grandmother’s kitchen, where the aroma of sizzling bacon and freshly baked bread filled the air. My grandmother, with her gentle hands and warm smile, would let me help with the pasta, showing me how to shape the nests just right. It’s a memory I cherish, and every time I make this dish, I feel like I’m back in her cozy kitchen, enveloped in her love.

Why You’ll Love It

This dish is a celebration of flavors and textures. The creamy sauce, enriched with Parmigiano-Reggiano, wraps around the spinach fettuccine like a warm hug, while the crisp bacon adds a delightful crunch. The pièce de résistance is the whole egg nestled in the center, its yolk just waiting to be broken and mixed into the pasta. It’s elegant enough for a dinner party yet comforting enough for a quiet night in. Plus, it’s a one-dish wonder that’s easy to prepare and sure to impress!

Ingredients

  • Bacon
  • Butter
  • Parmigiano-Reggiano
  • Heavy cream
  • Fresh eggs
  • Nests of spinach fettuccine
  • Salt and pepper
  • Scallions

Instructions

  1. Chop the bacon into small cubes and fry until crispy. Set aside 3/4 of the bacon for the sauce, reserving a few pieces for garnish.
  2. Boil the spinach fettuccine nests in salted water for 10 minutes until slightly undercooked. Reserve a tablespoon of pasta water.
  3. Melt butter in a wok over high heat. Add the heavy cream and bring to a simmer.
  4. Stir in 3/4 of the shredded Parmigiano-Reggiano, salt, and pepper. Simmer until the sauce thickens and is smooth.
  5. Add 3/4 of the cooked bacon to the sauce and blend well.
  6. Transfer the pasta to the sauce using tongs and a meshed spoon. Toss well, adding a bit of reserved pasta water to keep the sauce wet.
  7. Divide the pasta and sauce evenly into two buttered ceramic ramekins.
  8. Sprinkle the remaining bacon over the pasta and nestle a whole egg in the center of each dish.
  9. Bake in a preheated oven at 350°F for 15 minutes, until the egg whites are set but the yolks remain runny.
  10. Garnish with the reserved bacon and shaved Parmigiano-Reggiano before serving.

Tips

For the best results, use fresh eggs and high-quality bacon. If you prefer a spicier kick, add a pinch of red pepper flakes to the sauce. Also, make sure to keep an eye on the eggs while baking to achieve the perfect runny yolk.

Variations & Substitutions

If you’re looking for a lighter version, you can substitute half-and-half for the heavy cream. For a vegetarian option, replace the bacon with sautéed mushrooms or sun-dried tomatoes. You could also use whole wheat fettuccine instead of spinach for a different flavor profile.

Storage

While this dish is best enjoyed fresh, you can store leftovers in an airtight container in the fridge for up to two days. To reheat, place the nests in a preheated oven at 350°F until warmed through.

FAQ

Can I make this dish ahead of time?

Yes, you can prepare the pasta and sauce ahead of time and assemble the nests just before baking. Keep the components separate in the fridge and bring them to room temperature before assembling and baking.

What can I serve with this dish?

A simple green salad with a light vinaigrette complements the rich flavors of the pasta nests beautifully. Additionally, you can serve some crusty bread on the side to soak up the delicious sauce.

Conclusion

Baked Eggs and Bacon Cream in Spinach Fettuccine Nests is more than just a meal; it’s an experience. It combines the best of comfort food with an elegant presentation, making it perfect for both casual and special occasions. With each bite, you’re transported to a place of warmth and satisfaction, much like the cherished memories of my grandmother’s kitchen. I hope this recipe brings the same joy to your home as it does to mine, and that it becomes a favorite in your culinary repertoire. Enjoy!

Related update: Baked Eggs and Bacon Cream In Spinach Fettuccine Nests

Related update: Cajun Seafood and Andouille Sausage Gumbo

Pittata – Pizza Frittata | Made by Meaghan Moineau

Pittata – Pizza Frittata: A Delicious Twist on Classic Breakfast

Intro

Growing up, Sunday mornings were a sacred time in our household. The aroma of freshly brewed coffee mingled with the sounds of sizzling bacon, creating a comforting symphony that signaled the start of a leisurely day. My mother, with her extraordinary culinary skills, would whisk together the most delightful dishes, but there was one that always stood out – the pittata. A clever blend of pizza and frittata, this dish was the embodiment of indulgence and creativity. Today, I’m thrilled to share this cherished recipe with you, bringing a piece of my family tradition to your kitchen.

Why You’ll Love It

The pittata is a versatile dish that combines the best of two worlds: the savory satisfaction of pizza and the fluffy, protein-packed delight of a frittata. It’s perfect for breakfast, brunch, or even a light dinner, offering a filling meal that’s both quick to prepare and utterly delicious. Whether you’re hosting a gathering or simply looking to treat yourself, this dish is sure to impress with its simple ingredients and depth of flavor.

Ingredients

  • 6 large eggs
  • 1/4 cup fresh basil, chopped
  • 1/4 cup milk (optional)
  • 1/2 cup grated parmesan cheese
  • 1/4 cup sliced pepperoni
  • 1/2 cup shredded mozzarella cheese
  • Salt and pepper to taste
  • Cooking fat (e.g., olive oil, butter)

Instructions

  1. Preheat your oven to ~450°F (230°C), using the top heat setting only.
  2. On the stove, heat your choice of cooking fat in a large oven-safe skillet over medium heat.
  3. In a bowl, beat the eggs with milk, salt, pepper, and any herbs or spices you desire.
  4. Add any additional ingredients (except cheese) to the skillet. For this recipe, we keep it simple, but feel free to include cooked or quick-cooking vegetables like bell peppers.
  5. Pour the egg mixture into the skillet, tilting it to evenly distribute around any add-ins.
  6. Distribute the shredded mozzarella cheese and pepperoni slices over the egg mixture.
  7. Allow the eggs to cook on the stove until the edges are set, leaving the center slightly jiggly.
  8. Generously top with parmesan cheese.
  9. Transfer the skillet to the preheated oven and bake until the eggs are puffed, browned, and the center is firm.
  10. Remove from the oven and let the pittata cool for a couple of minutes before slicing into wedges.

Tips

For the best results, ensure that your skillet is well-greased to prevent sticking. Keep an eye on the pittata as it bakes; it can go from perfectly puffed to overcooked quickly. Use a toothpick to check that the center is set if you’re unsure. Lastly, let it rest slightly before serving; this makes cutting it into neat wedges much easier.

Variations & Substitutions

One of the joys of a pittata is its adaptability. Feel free to experiment with different herbs, spices, or cheeses. Swap pepperoni for sausage, or go vegetarian with mushrooms and spinach. For a dairy-free option, skip the milk and use a plant-based cheese alternative. The possibilities are endless, ensuring every pittata is a unique creation.

Storage

Store any leftover pittata in an airtight container in the refrigerator for up to three days. To reheat, warm it in the oven or a skillet over low heat until heated through, or microwave individual slices for about 30 seconds. For longer storage, freeze individual portions and reheat directly from frozen for a quick and easy meal.

FAQ

Can I make the pittata ahead of time?

Yes, you can prepare the pittata a day in advance. Simply follow the instructions until baking, then cover and refrigerate the skillet. When ready to bake, allow it to come to room temperature before placing it in the oven.

What can I serve with pittata?

Pittata pairs beautifully with a simple green salad, fresh fruit, or crusty bread. For a heartier meal, consider serving it with roasted potatoes or a side of bacon or sausage.

Is there a way to make it spicier?

For a spicier kick, add crushed red pepper flakes, diced jalapeños, or a splash of your favorite hot sauce to the egg mixture before cooking.

Nutrition

While the exact nutritional content will vary with portion sizes and specific ingredients used, a typical slice of pittata (1/6 of the whole) provides approximately 200 calories, 15g of protein, and 15g of fat, making it a hearty, satisfying dish that’s also relatively low in carbohydrates.

Conclusion

The pittata is more than just a meal; it’s a nod to creativity and the joy of cooking. Whether you’re reliving cherished memories or creating new ones, this dish is sure to become a staple in your recipe repertoire. I hope you find as much comfort and joy in making and sharing this dish as I have over the years. Bon appétit!

Related update: Pittata – Pizza Frittata

Related update: Mixed Berry Yogurt with Almonds

Hard-Boiled Egg Gratin In A Bechamel Sauce | Made by Meaghan Moineau

Hard-Boiled Egg Gratin In A Bechamel Sauce | Made by Meaghan Moineau

A Nostalgic Twist on Comfort Food: Hard-Boiled Egg Gratin in a Bechamel Sauce


Discover the Heartwarming Delight of a Family Favorite


In the world of culinary delights, few dishes evoke a sense of nostalgia quite like a good old-fashioned gratin. Today, we're diving into a recipe that has stood the test of time in my family: Hard-Boiled Egg Gratin in a Bechamel Sauce. This comforting, flavorful dish is not only a feast for the taste buds but also a journey down memory lane. With its creamy bechamel sauce, rich gruyère cheese, and perfectly hard-boiled eggs, this recipe is sure to become a staple in your home as it is in mine.


Ingredients


- Butter


- Eggs


- Flour


- Gruyère cheese


- Milk


- Nutmeg


- Onion


- White salt and pepper


Instructions


1. Hard-Boil the Eggs: Start by bringing a saucepan of salted water to a boil. Gently add the eggs, reduce the heat, and let them simmer for 10 minutes. Once done, transfer the eggs to cold water until they are just cool enough to handle. This makes peeling them a breeze. A little trick I learned from my grandmother: roll the eggs with the palm of your hand on a hard surface to crack the shell, then peel them under a slow stream of running water. Reserve the eggs in a bowl of warm water.
2. Cook the Onion: Melt some butter in a saucepan or small frying pan over low heat. Add the onion and cook, stirring frequently, until it's tender but not colored.
3. Prepare the Bechamel Sauce: In a medium heavy-bottomed saucepan, melt the butter over low heat. Add the flour and whisk for about 2 minutes, being careful not to let it color. Gradually whisk in the milk and bring to a boil, whisking constantly to prevent lumps. Season with nutmeg, salt, and pepper to taste. Reduce the heat and simmer for 10 minutes, whisking constantly and scraping the bottom and sides of the pan to keep the sauce smooth. Stir in the cooked onions and let it cook for an additional 5 minutes.
4. Assemble the Gratin: Preheat your grill. Slice the eggs into 1 cm (0.4 inch) thick slices. Spread a thin layer of the bechamel sauce over the bottom of your gratin dish. Layer the egg slices over the sauce and coat them with the remaining sauce. Sprinkle with grated gruyère cheese, then grill, turning the dish if necessary to ensure an evenly golden-brown top. Serve immediately.

A Family Memory


This dish always takes me back to Sunday afternoons at my grandmother's house. She would prepare her kitchen with the aroma of melted butter and onions, a scent that still makes me feel at home. My siblings and I would gather around, watching her every move, eager to learn the secrets of her cooking. The moment she pulled the gratin from the oven, with its golden-brown crust and bubbling cheese, we knew we were in for a treat. Sharing this meal brought us closer, and each bite was a reminder of the warmth of family and tradition.


Difficulty: 6/10


Classification: Main Dish


Hard-Boiled Egg Gratin in a Bechamel Sauce is more than just a meal—it's a journey back to simpler times, a celebration of comfort and family. Whether you're looking for a hearty main dish or a nostalgic culinary adventure, this recipe is sure to delight both the palate and the heart. So, gather your loved ones, roll up your sleeves, and create your own cherished memories with this timeless classic.

Read more about Appetizers

Read more about Main Dishes

Read more about Desserts