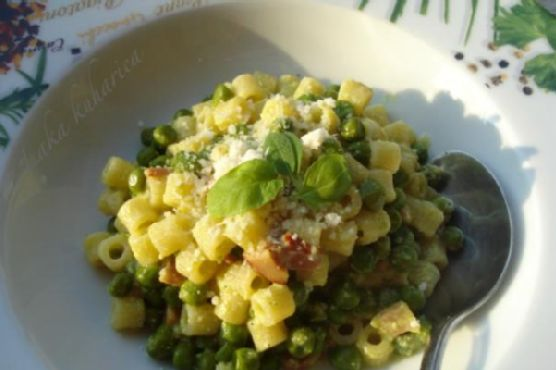
Picture this: It’s Wednesday evening, and you’re staring into the abyss of your fridge, wondering how you’ll whip up something delicious without diving into another takeout night. We’ve all been there, right? This moment is precisely when Ditalini with Peas swoops in like a culinary superhero. It’s got the comfort factor of pasta, a delightful pop of sweetness from peas, and the creamy, golden goodness of ricotta and turmeric. Plus, it’s one of those meals where you can almost hear your inner voice singing “I can’t believe it’s not takeout!” as you serve it up. If that sounds good to you, you’re in for a treat.
Jump to Recipe
What You’ll Need
This ingredient list is refreshingly simple, and I’m willing to bet you already have most of these in your pantry or fridge. It’s all about combining these humble ingredients into something greater than the sum of its parts.
- Coarse sea salt
- Ditalini pasta
- Freshly ground black pepper
- Ham, diced
- Olive oil
- Onion, finely chopped
- Pancetta, diced
- Parmesan or Grana Padano cheese, grated
- Ricotta cheese
- Turmeric, dissolved in 2 ladles of water
How to Make Ditalini with Peas
- Start by placing your onion in the olive oil, which is still cold. Cook it gently, adding a teaspoon of water now and then to prevent browning. You’re aiming for it to become soft and translucent, about 10 minutes.
- Once the onion is ready, introduce the peas to the party. Add just enough water to cover them, then season with salt and pepper. Cook until the peas are tender. Fresh peas might take anywhere from 5 to 15 minutes, depending on their size and freshness, while frozen peas will need about 10 minutes.
- As the peas reach their peak of tenderness, toss in the diced pancetta and ham. Give everything a good stir, then turn off the heat. This is where the magic begins.
- Pour in the turmeric-infused water and add the ricotta, sieving it through a colander. Stir until the ricotta melts into the liquid, creating a luscious golden sauce. Keep this mixture warm while you cook the pasta.
- Cook the ditalini according to the package instructions. Reserve some of the pasta water before you drain it, just in case you need to loosen the sauce later.
- With the pasta drained, immediately toss it into the saucepan with your glorious sauce. Stir until every little piece of ditalini is coated, then serve hot with a generous sprinkle of grated Parmesan or Grana Padano.
Cook’s Notes
Let’s chat about the little things that make a big difference. First, be gentle with the onion and remember that patience is key; you want them soft and flavorful, not browned. When it comes to water, trust your instincts—add as needed to keep things from sticking but not so much that you drown the flavor. If your final dish feels a bit dry, that reserved pasta water you saved is a lifesaver for loosening things up. Leftovers? They’re a joy to have and reheat beautifully with a splash of water or olive oil.
Make It Your Own
This recipe is as versatile as your imagination. Here are some ideas to switch things up:
- Swap the ham and pancetta for crispy tofu to keep it vegetarian while maintaining that satisfying protein punch.
- Add a kick of heat with a sprinkle of red pepper flakes during the onion sauté for those who love a bit of spice.
- Replace the peas with asparagus or broccoli for a different green vibe — just cut them small so they cook in about the same time.
- Use smoked paprika instead of turmeric for a smokier, earthier flavor profile.
If you try this, I’d love to hear how it turns out—drop a comment or tag me! Cooking is all about sharing the love, and I can’t wait to see how you make this dish your own. Happy cooking, friends!
Related update: Ditalini with peas
Related update: Korean Beef Rice Bowl
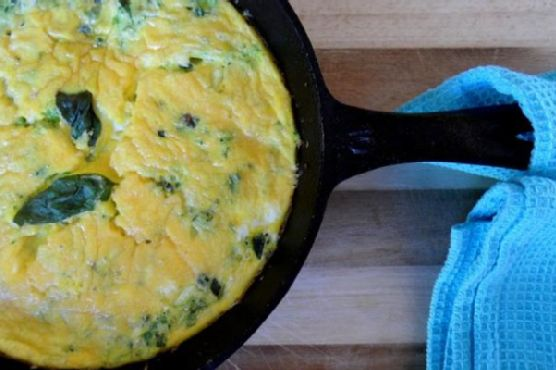
It was one of those Tuesday nights when the fridge was looking scarily empty, and yet, the thought of braving the grocery store felt like too much. That’s when I spotted the lone zucchini in the crisper drawer, looking like it might be the hero of dinner. With some eggs, a handful of basil, and a bit of cheese, this Zucchini & Basil Frittata came to life. It’s like an Italian hug in a skillet, perfect for a weeknight when you need something cozy but also have about 20 minutes of energy left in you. The beauty of this frittata is how it transforms humble ingredients into something that feels a bit more special.
Jump to Recipe
What You’ll Need
You probably have most of these on hand, which makes this recipe a lifesaver when you need a quick meal. Here’s what you’ll gather:
- Zucchini
- Salt
- Green onions
- Basil
- Cheddar cheese
- Eggs
- Grapeseed oil (or olive oil)
How to Make Zucchini & Basil Frittata
- First, shred your zucchini using a box grater or food processor. Place the shredded zucchini into a colander set over a bowl. Sprinkle with a little salt and let it sit for about 20 minutes to draw out the water. If you’re short on time, give it a squeeze with your hands to speed up the process.
- In a large mixing bowl, combine the shredded zucchini, chopped green onions, fresh basil, and grated cheddar cheese. Season with a bit more salt and stir everything until it’s well mixed.
- Crack the eggs into a separate bowl and beat them until smooth. Pour the beaten eggs into the vegetable mixture and stir until everything is happily combined.
- Preheat your oven to 350°F (175°C). While it’s warming up, heat 1 to 2 tablespoons of grapeseed oil in a 10-inch cast iron skillet over medium heat, ensuring the bottom and sides are well-coated.
- Pour the egg and veggie mixture into the skillet, spreading it out evenly. Let it cook for about 3 to 5 minutes, until the edges start to set and cook.
- Carefully transfer the skillet to the preheated oven. Bake for 12 to 15 minutes, or until the center is set and a toothpick comes out clean.
Cook’s Notes
Let’s talk about getting the most out of your frittata. It’s crucial to get rid of excess water from the zucchini; otherwise, the frittata might end up watery. If you’re planning ahead, you can shred the zucchini the night before, which makes assembling the dish a breeze the next day. Leftovers can be stored in an airtight container in the fridge for up to three days. Reheat gently in a skillet or microwave when ready to enjoy again.
Make It Your Own
Feel free to get creative with this recipe! Here are some swap ideas:
- Switch out the cheddar cheese for feta for a tangy twist.
- Substitute basil with fresh dill or parsley for a different herbal note.
- Add sliced cherry tomatoes for a burst of color and sweetness.
- Replace the zucchini with shredded carrots or thinly sliced bell peppers if you’re out of zucchini.
If you try this, I’d love to hear how it turns out — drop a comment or tag me! Can’t wait to see your delicious frittatas!
Related update: Zucchini & Basil Frittata

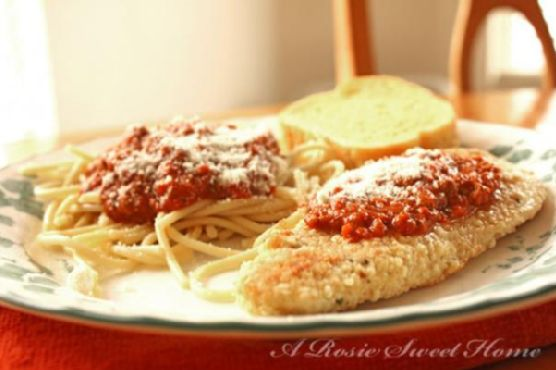
It was one of those chaotic Tuesday nights, you know the kind — the kind where you’re juggling an imaginary circus of tasks, and the last thing you want is to spend hours cooking. As I stood in front of my fridge, eyeing the contents like a puzzle to solve, I remembered a dish that never fails to impress with minimal effort: Broccoli Rabe and Breaded Veal Scallopini. This dish is a lifesaver when you want something that tastes gourmet but doesn’t require a culinary degree to execute. It’s elegant enough for company but simple enough for a weeknight. Plus, there’s the unbeatable combination of crispy breaded veal and the slightly bitter yet vibrant broccoli rabe. Trust me, it’s a winner.
Jump to Recipe
What You’ll Need
I promise, this recipe won’t send you on a scavenger hunt through specialty stores. Chances are you already have most of the ingredients hanging out in your pantry or fridge. Here’s what you’ll need:
- Broccoli rabe
- Veal scallopini
- Butter
- Egg
- Olive oil
- Salt and pepper
- Yellow onion
- Garlic clove
- Tomatoes
- Bread crumbs
How to Make Broccoli Rabe and Breaded Veal Scallopini
- Start by giving the broccoli rabe a good wash. Steam it for about three minutes until it’s a vibrant green but still slightly crisp. If you have a pressure cooker, even better — it’ll be done in no time.
- While your broccoli rabe is steaming away, thinly slice the yellow onion and peel a clove of garlic. Cut the garlic in half and remove the stem to mellow out the flavor a bit.
- In a deep pan, heat up a tablespoon or two of olive oil over medium heat. Toss in the sliced onion and garlic. Sauté until the onions are translucent and the garlic is fragrant — about three minutes.
- Add the steamed broccoli rabe to the pan, cover with a lid, and let it cook for another few minutes. You want it tender but not mushy.
- Chop your tomatoes into wedges — four or eight, depending on their size. Add them to the pan and let everything mingle together for a few more minutes. Season with salt and pepper to taste.
- Now for the veal: Season each piece of veal scallopini with salt and pepper. Dip them first in a beaten egg, and then in bread crumbs, ensuring an even coat.
- In another pan, melt a generous amount of butter over high heat. Pan-fry the veal for 1-2 minutes on each side until they’re golden brown and crispy. Remember, these cook fast, so keep an eye on them!
- Serve the veal alongside the broccoli rabe and tomato medley, and enjoy the delicious symphony of flavors.
Cook’s Notes
Okay, let’s chat about some practical stuff. First, make sure your veal is patted dry before you start breading. It helps the crumbs stick better. If you’re making this ahead of time, prepare the broccoli rabe and tomatoes and store them in the fridge. You can bread the veal in advance, but I recommend frying it right before serving for the best crunch. Leftovers? Store them in an airtight container and gently reheat them in a pan — the microwave will make the breading soggy, and nobody wants that.
Make It Your Own
Here are a few fun ways to switch things up!
- Swap the veal for chicken breast if that’s what you have on hand, or if you prefer chicken. It works just as well!
- Want a vegetarian version? Use crispy tofu as your protein. Just press it well before breading and frying.
- Add a sprinkle of grated Parmesan cheese to the bread crumbs for an extra layer of flavor.
- If you’re not a fan of broccoli rabe, broccolini or kale are great substitutes.
If you try this, I’d love to hear how it turns out — drop a comment or tag me! Cooking is all about experimenting and making it your own, so don’t hold back. Happy cooking!
Related update: Broccoli Rabe and Breaded Veal Scallopini
Related update: Spinach and Gorgonzola Stuffed Flank Steak

It was one of those busy Thursdays, teetering on the edge of the weekend, where my to-do list was as long as my arm, but I still had friends coming over to my place. I needed something quick, something that could impress without stress, and that’s when I remembered my go-to Party Sausage Bites With Pine Nuts. This little number is a gem; it’s like magic with how it comes together with little effort, yet packs a punch in flavor and charm. Perfect for those days when you need to juggle a hundred things but still want to treat your crew right. Plus, who doesn’t love a flaky, buttery bite filled with savory sausage goodness?
Jump to Recipe
What You’ll Need
If your pantry is anything like mine, you’re probably already stocked with most of these ingredients. Here’s what you’ll need:
- 2 tablespoons butter
- 1 medium onion, finely chopped
- 3 garlic cloves, minced
- 1 pound Italian mild sausage, casings removed
- 1 teaspoon dry thyme
- 1 teaspoon dry basil
- 2 tablespoons fresh dill, chopped
- 1/4 cup pine nuts
- Salt, to taste
- 2 sheets of frozen puff pastry, thawed
- 1/4 cup parmesan, grated
- 1 egg, beaten
- Splash of water
- 1 tablespoon sesame seeds
How to Make Party Sausage Bites With Pine Nuts
- In a skillet, melt the butter over medium heat. Add the chopped onion and minced garlic, and sauté for 5-6 minutes until everything smells heavenly and the onions look translucent.
- Take the skillet off the heat and let that mixture cool just enough so you can handle it without screaming.
- In a mixing bowl, combine the Italian sausage, cooled onion-garlic mix, thyme, basil, fresh dill, salt, and those lovely pine nuts. Mix until everything’s cozy and smooth.
- Lightly flour your kitchen counter and roll out the puff pastry into four strips, each about 3 inches wide and 12 inches long.
- Channel your inner artist and place the sausage mix along the center of each pastry strip, shaping it into a neat 1-inch roll. Go edge to edge with that sausage goodness!
- Sprinkle a little parmesan love on top of the sausage.
- Beat the egg with a splash of water to make an egg wash. Brush it along one long edge of the pastry. Fold the pastry over the filling and press to seal. Roll the whole thing gently to ensure it’s snug and happy.
- Do the same with the rest of the pastry and sausage mixture.
- Once all your rolls are ready, brush the egg wash generously over them and sprinkle sesame seeds as if it’s confetti at a party.
- Preheat your oven to 425°F (220°C). While it warms, cut each pastry roll into 12 cute little bites.
- Place the bites on a baking sheet, leaving a little room between each so they don’t fight for space while baking.
- Bake for about 20 minutes, or until they’re golden and crisp and your kitchen smells like an Italian bistro.
- Let them cool for a minute or two on the sheet before serving them warm to your guests—if they can resist snatching them immediately!
Cook’s Notes
Okay, let’s chat about the nitty-gritty. These bites can be prepped ahead of time. Just assemble them up to the cutting stage, cover them, and store them in the fridge until you’re ready to bake. If you have leftovers (not likely), store them in an airtight container in the fridge. They can be reheated in the oven to bring back some crunch. Watch out for overcooking the sausage filling; it can dry out if you’re not careful. And make sure your puff pastry stays cold until you need it—it’s a flaky game-changer.
Make It Your Own
Feeling creative? Here are some fun twists:
- Swap the Italian sausage for spicy chorizo for a hit of heat.
- Use feta instead of parmesan for a tangy kick.
- Switch out the pine nuts for chopped pistachios if you’re feeling fancy.
- Top with black sesame seeds instead of regular for a striking look.
If you try this, I’d love to hear how it turns out — drop a comment or snap a pic and tag me on social media. Let’s make our kitchens the happiest place to be!
Related update: Party Sausage Bites With Pine Nuts
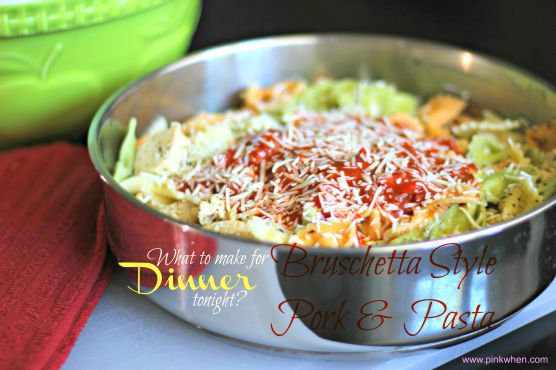
Picture this: It’s a hectic Wednesday evening, and you’ve just walked through the door, shoes off, contemplating what to make for dinner. The fridge hums with half-empty bottles of condiments, and there’s a lone pack of pork chops staring back at you. This is the moment you realize the magic of Bruschetta Style Pork & Pasta. It’s the perfect blend of comforting pasta and savory pork, all wrapped in the tangy-sweet goodness of bruschetta flavors. It’s one of those dishes that feels fancy enough to impress but is wonderfully simple to throw together, ideal for those mid-week dinners when time is not on your side.
Jump to Recipe
What You’ll Need
This recipe is a lifesaver because chances are you already have most of the ingredients hanging around your kitchen. Here’s what you’ll need to whip up this delight:
- One package of bow tie pasta
- Freshly grated parmigiano reggiano
- A jar of Recipe Makers Chicken Bruschetta Pasta sauce
- 4-6 pork chops
How to Make What to make for dinner tonight?? Bruschetta Style Pork & Pasta
- First, give those pork chops a good wash and rinse. Pat them dry, then plop them into your skillet. You’ll want to cut them into bite-sized pieces so they cook quickly and soak up all those delicious flavors.
- Add half of the Basil Garlic simmer sauce from your Bruschetta Pasta kit into the skillet with the pork. You’ll know it’s working its magic when the kitchen starts to fill with a seriously drool-worthy aroma.
- Meanwhile, bring a pot of water to a boil and get your bow tie pasta cooking. Aim for al dente—that perfect balance of tender but still with a bit of bite.
- Once your pasta is done, drained, and ready, toss it into the skillet with the pork. Pour in the rest of the Basil Garlic Simmering Sauce, giving everything a nice mix so the pasta is well-coated.
- Now for the pièce de résistance: top the whole thing with the Chunky Bruschetta Finishing Sauce. Sprinkle generously with Parmesan, then cover the skillet. Let it all cook on low heat for 2 to 3 minutes, just until everything’s heated through and the cheese melts into gooey perfection.
Cook’s Notes
Here’s the deal: when cutting your pork, keep the pieces uniform in size to ensure even cooking. You want them golden but not overcooked. If you’re making this ahead, stop just before adding the Parmesan and Finishing Sauce. Store it in the fridge, and when you’re ready to eat, layer on the sauce and cheese, then heat through. Leftovers? They’re a dream. Just store them in an airtight container, and they’ll be good for up to three days. Reheat gently on the stove or in the microwave with a splash of water to keep everything from drying out.
Make It Your Own
Here are some ways you can switch things up:
- Swap the pork for crispy tofu for a vegetarian twist. Just pan-fry the tofu until golden before adding the sauces.
- Use zoodles or spaghetti squash instead of bow tie pasta for a low-carb version.
- Add a handful of fresh spinach to the skillet before serving for a pop of color and extra nutrients.
- For a spicy kick, toss in some red pepper flakes along with the Parmesan.
If you try this, I’d love to hear how it turns out—drop a comment or tag me! Cooking should be fun, stress-free, and delicious, so let’s make that happen. Happy cooking, friends!
Related update: What to make for dinner tonight?? Bruschetta Style Pork & Pasta
So, there I was last Tuesday, staring into the fridge, wondering what to make for dinner that wouldn’t take an eternity. You know those days when all you want is something delicious but quick enough that you won’t be stuck in the kitchen all night? Enter: Eggplant pizzette. It’s that magical intersection of pizza cravings and veggie goodness. Plus, it’s one of those recipes that looks fancy enough to impress but is secretly super simple to throw together. Trust me, once you smell that cheese bubbling away, you’re going to thank yourself for making these little guys.
Jump to Recipe
What You’ll Need
Let’s talk about the ingredient list — it’s mercifully short and sweet. Chances are, you already have most of this at home, especially if you’re a basil hoarder like me.
- Round eggplant – the base for our pizzette
- Tomatoes – fresh or canned, your choice!
- Swiss cheese – for that perfect melty goodness
- Fresh basil leaves
- Oregano leaves
- Olive oil
How to Make Eggplant pizzette
- Preheat your oven to 230°C. Trust me, getting this right from the start saves you from impatiently watching the oven later.
- Grab your round eggplant and slice it into rounds, about half an inch thick. You want them thin enough to cook quickly but thick enough to hold all that topping.
- Place the eggplant rounds on a non-stick pan greased with olive oil. A light coating will do; no one wants oily pizzette.
- Bake the eggplant in the oven for about 10 minutes. You’ll know it’s ready for the next step when the edges start looking golden and slightly crispy.
- Carefully remove the pan from the oven — the eggplant stays, so it keeps warm and toasty.
- Spoon a generous amount of chopped tomatoes onto each eggplant round. If you’re using canned, make sure they’re well-drained to avoid sogginess.
- Sprinkle fresh basil and oregano leaves over the tomatoes. The aroma will start to hit you about now, and it’s divine.
- Top everything with grated Swiss cheese. Go ahead and be generous here; a good layer ensures that melty, bubbly finish.
- Pop the pan back in the oven for another 5 minutes. Keep an eye out — you want that cheese to turn a lovely golden brown.
- Remove from the oven and let them cool for a minute or two. These are fab served warm or even cooled down a bit as a snack.
Cook’s Notes
Alright, a few things to keep in mind. First, if you slice the eggplant too thin, it might turn into a mushy mess, so aim for that half-inch thickness. If you’re worried about bitterness, sprinkle a bit of salt on the eggplant slices and let them sit for 10 minutes before rinsing and patting dry. Also, feel free to adjust the herbs based on what you have—dried oregano works if fresh isn’t available. These pizzette can be stored in the fridge for up to two days, though they’re best enjoyed fresh.
Make It Your Own
Want to switch things up? Here are some ideas:
- Swap the Swiss cheese for mozzarella for a more classic pizza flavor.
- Add a layer of pesto under the tomatoes for an herbaceous kick.
- Use zucchini slices instead of eggplant if you prefer a different base.
- Try adding thin slices of pepperoni or mushrooms for extra toppings.
If you try this, I’d love to hear how it turns out — drop a comment or tag me! Happy cooking, and may your kitchen adventures be as tasty as they are fun!
Related update: Eggplant pizzette
Related update: Maple & Curry Acorn Squash

Last Tuesday, in the midst of an unexpected craving for something sweet and slightly elegant, I found myself in a mini kitchen dilemma. I had promised myself a chill evening with something decadent but not labor-intensive. As I rummaged through my pantry, a vision of tiramisu danced through my mind. But not just any tiramisu — a faster, weeknight-friendly version with all the indulgence and none of the fuss. This recipe is my go-to for those dessert emergencies; it’s quick to whip up, doesn’t require baking, and is a surefire way to impress anyone who happens to drop by (or just yourself, let’s be real). It’s creamy, rich, and perfectly layered with just a hint of coffee and liqueur. Trust me, you’ll wonder why you haven’t always made tiramisu this way.
Jump to Recipe
What You’ll Need
If you’re anything like me, you’ll likely find most of these ingredients already nestled in your pantry or fridge. Here’s what you’ll need to create this dreamy dessert:
- Egg yolks – the foundation of our creamy filling.
- Cane sugar – to sweeten things up.
- Mascarpone cheese – the star of the show, lending that iconic tiramisu flavor.
- 35% heavy whipping cream – for that luscious texture.
- Ladyfingers – to soak up all that goodness.
- Rum, brandy, or coffee liqueur – your choice for a boozy touch.
- Coffee – the essential bitter balance.
- Unsweetened cocoa powder – for dusting and drama.
- Vanilla sugar – adds a subtle hint of vanilla without the fuss.
How to Make Fast Tiramisu
- First, brew a fresh cup of coffee and let it cool to room temperature. Once cooled, add a splash of your chosen liqueur for a warm, aromatic twist.
- In a mixing bowl, whip the 35% heavy whipping cream until soft peaks form. If you have vanilla sugar on hand, toss it in for a hint of sweetness. Then, pop it in the fridge to chill.
- In another bowl, beat the egg yolks with 6 tablespoons of cane sugar until the mixture is thick and has taken on a lovely lemon color.
- Fold in the mascarpone cheese into the egg yolk mixture and continue to beat until everything is smooth and well-mixed. Add vanilla sugar if you haven’t already.
- Gently fold in the whipped cream from the fridge, taking care not to deflate the mixture. You want it light and airy.
- Quickly dip each ladyfinger into the cooled coffee mixture, ensuring they’re soaked but not soggy. Arrange them snugly in a 26cm x 40cm pan.
- Spread half of the mascarpone mixture over the ladyfingers, smoothing it out with a spatula.
- Repeat the process with another layer of coffee-soaked ladyfingers, but this time, lay them in the opposite direction.
- Top with the remaining mascarpone mixture, spreading it evenly to cover all the ladyfingers.
- Sprinkle a generous dusting of unsweetened cocoa powder over the top. This not only adds flavor but gives that classic tiramisu look.
- Refrigerate for at least 6 hours to let the flavors meld and the dessert set. Patience is key here!
Cook’s Notes
Chilling is crucial for tiramisu; it allows the flavors to develop and the layers to set, so resist the urge to dive in too early. If you’re in a time crunch, 4 hours will do, but 6 is ideal. This tiramisu keeps well in the fridge for up to 3 days, making it a great make-ahead dessert for gatherings. Just be sure to store it in an airtight container to prevent it from absorbing any fridge odors. When serving, a sharp knife and a clean spatula will ensure neat slices. And while it’s not traditional, a sprinkle of shaved dark chocolate can add a delightful flavor touch.
Make It Your Own
Sometimes, it’s fun to shake things up. Here are a few ideas:
- Swap the coffee for strong chai tea and the liqueur for spiced rum for a chai-inspired twist.
- Use chocolate ladyfingers for an extra hit of cocoa goodness.
- For a non-alcoholic version, substitute the liqueur with vanilla extract for that added depth of flavor.
- Try topping with matcha powder instead of cocoa for a unique, earthy flavor profile.
If you try this, I’d love to hear how it turns out — drop a comment or tag me online! Whether it’s a quiet night in or a dinner party finale, this tiramisu is set to impress. Happy indulging!
Related update: Fast Tiramisu
Related update: Whole Wheat Blueberry Brownies
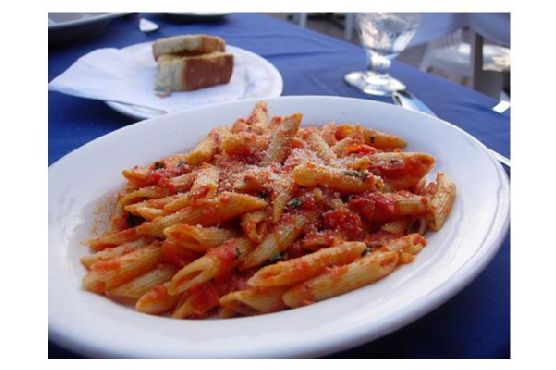
So there I was, standing in my kitchen on a chilly Tuesday evening, feeling like a culinary daredevil — or maybe just a hungry one. My pantry was looking a bit sparse, but fate (or my recent grocery run) had left me with the essentials for one of my all-time favorite dishes: Penne Arrabiata. This spicy, comforting pasta is like a warm hug with a side of sass. It’s perfect for those nights when you need something quick but full of flavor, and it definitely delivers. I promise, even if your spice tolerance is on the lower side, this dish has a way of pulling you in. Grab your apron, and let’s dive in!
Jump to Recipe
What You’ll Need
The beauty of Penne Arrabiata is in its simplicity. Chances are, you already have most of the ingredients, but it’s the combination that makes the magic happen.
- 1 packet of penne pasta
- 1 can of whole tomatoes (Pomi boxed tomatoes work well too)
- 5 cloves of fresh garlic, minced
- 3 tablespoons of olive oil
- 1 teaspoon of red dried peppers
- 2 tablespoons of fresh Italian parsley, minced
- Coarsely chopped fresh basil (optional, but highly recommended)
- Salt, to taste
How to Make Penne Arrabiata
- First, get a large pot of water on the stove and bring it to a boil. Add a generous pinch of salt. This is your pasta’s time to shine.
- In a skillet, heat 3 tablespoons of olive oil over medium heat. Toss in about a teaspoon of dried red pepper. Let it sizzle gently, releasing its spicy aroma, but keep it from burning.
- Add the minced garlic and 2 tablespoons of parsley to the oil. Stir it around until the garlic is golden and fragrant, filling your kitchen with the most tantalizing, spicy scent.
- Now, it’s time for the star of the show: add the can of chopped tomatoes to the skillet. Stir everything together, cover, and let it cook until the sauce is heated through. The edges will start to bubble, and that’s your cue!
- Meanwhile, the pasta water should be boiling. Add the penne and cook until it’s al dente — tender but with a firm bite.
- Drain the pasta and add it straight into the sauce. The penne will soak up all that spicy, garlicky goodness as you mix it thoroughly.
- Just before serving, sprinkle some coarsely chopped fresh basil and a bit more parsley on top. Serve immediately and enjoy the aroma of fresh herbs mingling with the rich, spicy sauce.
Cook’s Notes
Ah, the joys and perils of making Penne Arrabiata! A couple of things to keep in mind: don’t go overboard with the dried red pepper unless you’re ready for a fiery experience. Also, be patient with your garlic; you want it golden, not brown. If your sauce seems too thick, a splash of the pasta cooking water can help thin it out without losing flavor.
Got leftovers? Lucky you! This dish reheats beautifully, just make sure to add a splash of water before microwaving to keep it from drying out. You could even make the sauce ahead of time and store it in the fridge for up to three days. When you’re ready, just cook the pasta and combine — dinner done in a snap.
Make It Your Own
Here are a few ways to switch things up if you’re feeling adventurous:
- For a protein boost, swap the penne for a whole-grain version. The nutty flavor pairs wonderfully with the spicy sauce.
- Make it vegan by adding sautéed mushrooms instead of cheese for an umami hit.
- Swap the penne for zucchini noodles if you’re in the mood for something lighter and low-carb.
- For a heartier dish, add cooked and crumbled Italian sausage just before serving.
If you try this, I’d love to hear how it turns out! Drop a comment or tag me in your culinary creations. Happy cooking, and may your pasta always be perfectly saucy!
Related update: Penne Arrabiata

So there I was, staring at the butternut squash I’d ambitiously bought a week ago, thinking I’d make soup but never did. It was one of those drizzly evenings when the couch was calling louder than the kitchen, but the idea of a warm, creamy pasta dish was too tempting to ignore. Pasta with Butternut Parmesan Sauce was a perfect solution. This dish is a cozy, comforting hug in a bowl, and it’s deceptively simple to make. It’s the kind of recipe that feels special enough for a dinner party, but easy enough for a Tuesday night when you’re just trying to feed yourself without ordering takeout again. Plus, who doesn’t love a recipe that transforms a stubborn squash into a silky sauce?
Jump to Recipe
What You’ll Need
Chances are, you already have most of what you need in your kitchen. The magic comes from a few key ingredients that turn a humble vegetable into something seriously crave-worthy.
- Butternut squash (about 2 pounds, give or take)
- Bow-tie pasta (or your favorite shape)
- Olive oil
- Shallots
- Parmesan cheese, freshly grated if possible
- Heavy cream
- Nutmeg
- Fresh parsley
- Lemon juice
- Salt and pepper
- Water (or chicken stock) to thin the sauce
How to Make Pasta With Butternut Parmesan Sauce @ Dw Magazine.Com
- Start by preheating your oven to 350°F. Trust me, this is the hardest part—waiting for it to heat up!
- Carefully slice the butternut squash in half lengthwise. To keep things safe, cut a bit off both ends first so it stands upright without wobbling. Scoop out the seeds and guts and toss them.
- Place the squash halves cut side down in a baking dish with about 1/4 cup of water. Roast them for about 40 minutes, or until a fork slides easily through the flesh. Let cool for about 10 minutes.
- Once cooled, scoop the squash flesh into a blender or bowl if you’re using an immersion blender. Puree until smooth and set aside. This is where the magic starts to happen!
- Meanwhile, bring a large pot of salted water to a rolling boil. Add your pasta and cook until just al dente. Drain and set aside.
- While the pasta is cooking, heat olive oil in a large skillet over medium heat. Add the shallots and sauté until they become soft and translucent, about 5 minutes, wafting that lovely aroma.
- Add the butternut squash puree to the shallots, stirring until it’s all mixed together. Cook for about a minute.
- Stir in the heavy cream a tablespoon at a time, watching as it transforms the puree into a luscious sauce. Add the Parmesan and stir until it melts into the mix.
- Season the sauce with nutmeg, salt, and pepper. Add water or stock to thin it to your desired consistency—think silky, not soupy.
- Remove from heat and stir in fresh parsley and a splash of lemon juice for brightness. This is the moment it all comes together!
- Plate your pasta, ladle the sauce generously over it, and garnish with extra parsley and Parmesan. Serve immediately, because who can wait at this point?
Cook’s Notes
A few tips to keep your pasta game strong: First, make sure to season your pasta water well. It’s your first chance to flavor the pasta itself. When thinning the sauce, go slow—it’s easier to add more liquid than to take it away. If you’re planning ahead, the sauce can be made a day in advance and kept in the fridge. Just reheat it gently on the stove, adding a splash of water or stock if it’s too thick. Leftovers? Store them in an airtight container in the fridge for up to 3 days. To reheat, warm gently on the stove, adding a bit of water to loosen the sauce if needed.
Make It Your Own
- Swap bow-tie pasta for whole wheat spaghetti for a nuttier flavor and a little extra fiber.
- For a protein boost, toss in some cooked chicken or crispy tofu before serving.
- Want to sneak in more veggies? Add some sautéed spinach or kale to the sauce just before serving.
- Feeling fancy? Drizzle a little truffle oil over the top before serving for an indulgent touch.
If you try this, I’d love to hear how it turns out—drop a comment or tag me on social media! Your version might just become my new favorite. Enjoy every creamy, dreamy bite!
Related update: Pasta With Butternut Parmesan Sauce @ Dw Magazine.Com

Picture this: It’s a chilly Tuesday evening, and I’m rummaging through my pantry, mentally mapping out a dinner plan that’s both comforting and a touch fancy. The pumpkins from last weekend’s farmers’ market trip are staring at me, practically begging to be transformed into something indulgent. That’s when it hits me—pumpkin gnocchi. It’s one of those dishes that sounds like it takes hours of meticulous preparation but is surprisingly straightforward. Plus, it’s the perfect blend of fall flavors with the savory twist of basil and Parmesan. This dish is a dinner table showstopper without the stress. Ready to dive in?
Jump to Recipe
What You’ll Need
I love when a recipe feels like solving a cozy puzzle with ingredients you already have hanging out in the kitchen. This one’s full of those pantry-staple vibes with a few key players.
- Pumpkin – the star of the show!
- Whole eggs
- Sea salt
- Pepper
- Fresh basil leaves
- Wheat flour
- Corn flour
- Olive oil
- Grana Padano cheese
How to Make Pumpkin gnocchi with basil and Parmesan
- First, wrestle with that pumpkin like it’s a stubborn jar lid. Separate the flesh and chop it down into a fine puree. Feel free to get your hands a little messy here—it’s part of the fun!
- In a large bowl, combine the pumpkin puree with the eggs. Stir until the mixture looks like a velvety sunset.
- Season the mix with sea salt, a sprinkle of pepper, and a handful of finely chopped fresh basil. The aroma should already start to make you feel warm inside.
- Gradually add the wheat flour, kneading until you get a soft dough. If the dough feels more like sticky tape, throw in some more flour until it’s nice and pliable.
- Divide your dough into equal rolls—aim for about 3 cm thick and around 20 cm long. Then slice these rolls into 2 cm long pillows of joy.
- Bring a large pot of salted water to a rolling boil. Carefully drop the gnocchi in and watch them dance. They’re ready when they bob to the surface, usually within a few minutes.
- Using a slotted spoon, rescue the gnocchi from their hot bath and either drizzle hot olive oil over them or toss them in a skillet with olive oil until they’re lightly golden.
- Serve them up on a platter, showered with Grana Padano and garnished with fresh basil leaves. Stand back and admire your edible masterpiece before digging in.
Cook’s Notes
Making gnocchi can feel like a balancing act between dough that’s too sticky and too dry. Remember, the weather and your pumpkin’s moisture can change the game, so trust your instincts and adjust with flour as needed.
These delicate pillows are best served straight away, but if you must, you can refrigerate them for a day or two. Just reheat gently, perhaps with a little extra olive oil to revive their golden exterior.
Looking to prep in advance? You can shape the gnocchi and freeze them on a tray before transferring them to a bag for storage. Cook them right from frozen, just adding a minute or two to their swim time.
Make It Your Own
- Swap out the pumpkin for butternut squash if you’re feeling adventurous or that’s what’s on hand.
- For a nutty twist, sprinkle toasted pine nuts over the finished dish.
- To add a bit of heat, toss in some red pepper flakes when frying the gnocchi in oil.
- Try a different cheese like Pecorino for a sharper edge.
If you try this out, I’d love to hear how it turns out — drop a comment or tag me! And remember, the best recipes are the ones that come with a story, so let this one create a delicious memory for you. Happy cooking!
Related update: Pumpkin gnocchi with basil and Parmesan
Related update: Broccolini Quinoa Pilaf
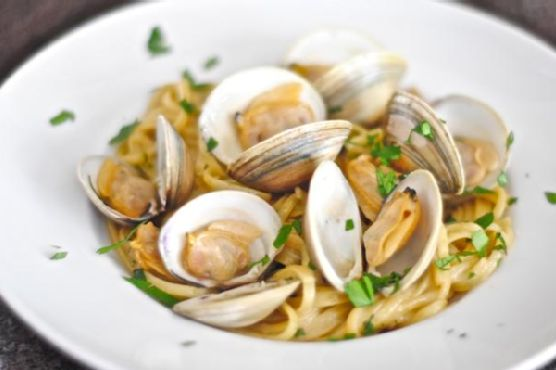
It was one of those weeknights when I opened the fridge and stared blankly, hoping dinner would magically appear. With only a few clams left from last weekend and some trusty linguine, I decided it was time to whip up my favorite Linguine with Clams in Garlic White Wine Sauce. It’s one of those dishes that sounds fancy—and tastes even fancier—but it’s surprisingly forgiving and quick to prepare, perfect for a midweek pick-me-up. By the time the pasta was perfectly al dente, my kitchen smelled like a cozy little Italian trattoria. My secret weapon? Loads of garlic and a splash of wine that turns simple ingredients into something special.
Jump to Recipe
What You’ll Need
I bet you have most of these ingredients hanging around already, and if not, they’re worth stocking up on for moments like this.
- 5 cloves of garlic
- 3 1/2 dozen little neck clams
- 1 cup dry white wine
- Pinch of red pepper flakes
- 1 pound linguine
- 4 tablespoons unsalted butter
- 1/4 cup fresh Italian parsley
- 1/4 cup fresh oregano leaves
- Parmigiano-Reggiano (optional)
- Kosher salt
How to Make Linguine and Clams In Garlic White Wine Sauce
- Coat a large sauté pan with olive oil and toss in 5 garlic cloves with a pinch of red pepper flakes. Crank the heat to medium-high until the garlic is golden brown and fragrant; this is when your kitchen begins to smell divine. If you’re like me and adore garlic, flip the cloves for extra flavor. Once golden, remove and discard them.
- Add the clams to the pan, pour in the white wine, and cover. Allow it to come to a boil over medium heat. Let it simmer until the clams open up, around 10 minutes. Use a slotted spoon to fish out the clams, reserving the cooking liquid.
- Boil a large pot of water for your linguine. Normally, I’d salt the water generously, but this time I skipped it because the clam juice added enough salty goodness.
- Mince the remaining garlic cloves. In the same sauté pan, drizzle more olive oil, add the minced garlic and another pinch of red pepper flakes. Cook until the garlic is just releasing its aroma, careful not to brown it.
- Add the raw clams and reserved clam juice back to the pan, checking the liquid for any sand or grit. A paper towel-lined sieve could help here to avoid any unwanted crunchiness in your dish.
- Cover and let the clams cook while you drop your linguine into the boiling water, aiming for very al dente—about a minute less than the box suggests.
- Once the clams have opened, set aside those in their shells to keep warm. Add butter and the clams removed from their shells back to the pan. Bring the liquid to a boil, then toss in the cooked pasta and fresh herbs.
- Cook everything together until the sauce coats the linguine. Kill the heat, then stir in grated Parmigiano-Reggiano if you’re using. Serve up the pasta, topping each dish with the clams in their shells and a sprinkle of fresh herbs.
Cook’s Notes
A few pearls of wisdom from my kitchen to yours: make sure to buy shellfish sold in mesh bags to avoid dead shellfish—plastic suffocates them. If you’re planning in advance, all the components can be prepped a few hours ahead, but cook them right before serving for optimal freshness. Leftovers, if you have any, can be refrigerated for up to two days. Just know that reheating clams can make them chewy, so enjoy it fresh if possible.
Make It Your Own
Switch it up with a few fun variations:
- Substitute the clams for crispy tofu for a plant-based twist.
- Use whole wheat or gluten-free pasta to suit dietary needs.
- Swap the white wine for vegetable broth if you’re steering clear of alcohol.
- Add a handful of cherry tomatoes for a pop of color and sweetness.
If you try this, I’d love to hear how it turns out—drop a comment or tag me! Cooking is all about sharing, so let’s keep this delicious conversation going.
Related update: Beans With Smoked Pork Hock
Related update: Greek Yogurt Chicken Salad

It was one of those nights when the fridge seemed to mock me with its emptiness, only the defiant glow of the leftover polenta catching my eye. I had no grand plans for dinner, just a craving for something that felt like a hug on a plate without the fuss. Enter Polenta Pie with Italian Toppings — a recipe that marries the comforting, hearty texture of polenta with vibrant, savory toppings. It’s the perfect dish for those evenings when you need a little culinary adventure without a complicated list of steps or ingredients. Plus, it’s a great way to transform humble pantry staples into something that feels a bit fancy.
Jump to Recipe
What You’ll Need
It’s likely that you already have most of these ingredients lingering in your kitchen, making this dish both convenient and delicious. Here’s what you need to gather:
- Water
- Milk
- Olive oil
- Salt
- Yellow corn meal
- Diced pancetta
- Shallot
- Garlic
- Gorgonzola cheese or any blue cheese you love
- Baby spinach
- Sweet bright colored bell pepper
- Pignoli (pine nuts)
How to Make Polenta Pie With Italian Toppings
- Start by making the polenta. In a saucepan, bring water, milk, 1/4 cup of olive oil, and a pinch of salt to a boil. Immediately reduce the heat and gradually pour in the cornmeal while stirring to prevent lumps.
- Keep simmering the cornmeal, stirring very frequently for about 15 minutes. You’ll know it’s ready when it’s thick and holds its shape.
- Line a baking sheet with foil or parchment paper and drizzle it with olive oil. Spread the polenta evenly across the sheet to about 1/2-inch thick, shaping it into a circle like a pizza crust. Let it cool until it’s firm.
- Preheat your oven to 425°F. Once the polenta is set, sprinkle it with freshly ground pepper and bake for 30 minutes, until the edges are beautifully browned.
- While your crust is baking, prepare the toppings. Heat 1 tablespoon of olive oil in a skillet and sauté the diced pancetta, shallots, and garlic for about 7-8 minutes until they are golden and fragrant. Don’t overdo it — you want them just right, not crunchy.
- Remove the pancetta mixture to a bowl. In the same skillet, sauté the baby spinach until it’s wilted and a deep green, about 3 minutes. Remove and set aside.
- Add a touch more oil if needed and sauté the bell pepper slices until they’re slightly wilted, about 3-4 minutes.
- Now, let’s assemble the pie! Start by spreading the gorgonzola crumbs evenly over the baked polenta crust. Then layer the pancetta mix, followed by the spinach, bell peppers, and finally a sprinkle of pine nuts.
- Drizzle a few more drops of olive oil over the top and pop it back in the oven for 4-5 minutes just to warm everything through.
- Slice your polenta pie like a pizza or into neat squares. Serve it hot and enjoy the medley of flavors!
Cook’s Notes
This dish is a great candidate for prepping ahead. You can make the polenta crust a day in advance and store it in the fridge, well-wrapped. Just bring it to room temperature before proceeding with the baking step. If you’re lucky enough to have leftovers, they hold well in the fridge for 2-3 days. Simply reheat in the oven to enjoy a second time with a nice crisp. A common pitfall is undercooking the polenta, so keep an eye on that texture — thick but not cement-like is your sweet spot.
Make It Your Own
Here are a few fun twists to try:
- Swap the pancetta for crispy tofu to make it vegetarian-friendly.
- Try a mix of mushrooms instead of the bell pepper for an earthy depth.
- Use feta if you’re not a fan of blue cheese, it brings a nice tang.
- Replace the pine nuts with toasted almonds for an unexpected crunch.
If you try this Polenta Pie with Italian Toppings, I’d love to hear how it turns out! Drop a comment below or tag me in your creation pics. Let’s share the love for this deliciously comforting dish.
Related update: Polenta Pie With Italian Toppings
Related update: Chicken Porridge
I was standing in my kitchen one Tuesday night, craving something hearty yet low-key — you know, that sweet spot between weeknight ease and weekend indulgence. I scoured my pantry for inspiration and stumbled upon a can of tuna. That’s when it hit me: Pasta With Tuna. This dish is like a warm hug on a plate, combining the creamy comfort of a sauce with the lightness of seafood. It’s quick, it’s satisfying, and yes, it’s got a little kick, thanks to that dash of hot pepper sauce. Perfect when you need to whip up something scrumptious without a ton of fuss.
Jump to Recipe
What You’ll Need
The beauty of this dish is in its simplicity. Chances are you already have most of these lying around in your kitchen:
- Olive oil
- 1 onion, chopped
- Flour
- Non-fat milk
- 1 can water-packed tuna, drained and shredded into chunks
- 1 cup frozen peas
- A bunch of fresh parsley, chopped
- 2-3 green onions, sliced
- 1 cup parmesan cheese, grated
- A dash of pepper sauce
- 1 pound of tubular pasta of your choice
How to Make Pasta With Tuna
- Start by cooking your pasta in a large pot of boiling water until it’s perfectly al dente. You want it to have a nice bite — not too soft.
- Once done, drain the pasta and return it to the warm pot. This keeps it cozy while you work on the sauce.
- Grab a saucepan and heat up a drizzle of olive oil over medium heat. Toss in the chopped onion and sauté until it’s transparent, releasing its sweet aroma.
- Sprinkle in the flour and give it a good stir. Cook for just a few seconds to take off that raw edge.
- Whisk in the non-fat milk, stirring constantly. You’ll see it start to thicken into a creamy base — that’s the magic happening!
- Add in the frozen peas, and let them mingle with the sauce for a couple of minutes until they’re vibrant and heated through.
- Introduce the tuna, breaking it into chunks as you go, followed by the parsley, green onions, and a generous amount of parmesan. Don’t forget that dash of pepper sauce for some zing!
- Pour this delightful sauce over the pasta and stir gently to mix everything together. You want each piece of pasta to be lovingly coated.
- Serve it up immediately, preferably with extra parmesan on top — because why not?
Cook’s Notes
Let’s get real — this dish is pretty forgiving. Don’t sweat the small stuff. If your onions are more golden than transparent, it’s all good. The key is stirring the sauce constantly; it keeps it smooth and prevents lumps. Make it ahead by prepping the sauce and storing it separately from the pasta. When you’re ready to eat, simply reheat them together on the stove. Leftovers? They keep well for up to two days in the fridge. Just note that the pasta will continue to absorb the sauce, so it may be less saucy but still deliciously flavorful.
Make It Your Own
Feeling adventurous? Here are some fab twists to try:
- Swap the tuna for crispy tofu chunks for a vegetarian spin.
- Add a squeeze of lemon juice for a citrusy pop that brightens the flavor.
- Replace the parmesan with feta cheese for a tangy twist.
- Throw in a handful of cherry tomatoes for a burst of sweetness and color.
If you give this pasta dish a try, I’d love to know how it turns out for you! Drop a comment below or tag me on social media with your culinary creations. Bon appétit!
Related update: Pasta With Tuna
Related update: Creamy Mushrooms Over Soba Noodles (Vegan)
It was one of those nights where the fridge was whispering, “Hey, you forgot to grocery shop this week.” You know the ones? I had a craving for something cozy but didn’t want to spend hours in the kitchen. Enter: the World’s Greatest Lasagna Roll Ups. These babies are not only a twist on the classic lasagna but also perfect for when you want to impress without the stress. They’re a bit like lasagna’s cool, quirky cousin – all the comfort, but with a fun twist. Plus, they make the whole place smell like a tiny Italian bistro. Who can say no to that? Grab your apron, and let’s do this!
Jump to Recipe
What You’ll Need
This is one of those glorious recipes where you probably already have most of the stuff sitting in your pantry. A few fresh ingredients and some pantry heroes, and you’re ready to roll.
- Lean ground beef you like
- Italian sausage
- Extra virgin olive oil
- Onion
- Garlic
- Italian seasoning
- Dried basil
- Fire roasted diced canned tomatoes
- Canned tomato sauce
- Canned tomato paste
- Water
- Black ground pepper
- Lasagna noodles
- Ricotta cheese
- Fresh parsley
- Egg
- Salt
- Parmesan Reggiano
- Mozzarella cheese
How to Make the World’s Greatest Lasagna Roll Ups
- In a large saucepan over medium heat, start browning the ground beef and Italian sausage. This is where the comforting aroma begins!
- In a separate pan, heat a tablespoon of extra virgin olive oil over medium heat. Cook the onion, garlic, Italian seasoning, and dried basil for about 6-8 minutes, or until the onion is translucent and everything smells heavenly.
- Add the cooked onion and garlic mixture to the meat. Stir in the diced canned tomatoes, tomato sauce, tomato paste, water, black pepper, and 2 tablespoons of the fresh parsley. Let it simmer uncovered for an hour, filling your home with the scent of Italian goodness.
- Meanwhile, bring a large pot of water to a boil. Cook the lasagna noodles for 8-10 minutes, then drain and rinse with cold water. Set them aside.
- In a small mixing bowl, combine the remaining parsley, ricotta cheese, egg, and 1/2 teaspoon salt. Mix well until it’s creamy and spreadable.
- Preheat your oven to 375°F. Pour a bit of the meat sauce into the bottom of a 9 x 13 glass baking dish to set the stage for our roll ups.
- To assemble, lay a lasagna noodle on a flat surface. Spread a generous amount of the cheese mixture over it, sprinkle with a little Parmesan Reggiano, and roll it up snugly. Place it seam side down in the baking dish. Repeat with the remaining noodles.
- Cover each roll up with a spoonful of the meat sauce. Top with slices of mozzarella cheese for that melty goodness we all adore.
- Cover the dish with foil and bake in the oven for 20 minutes. Then, remove the foil and bake for an additional 10 minutes uncovered. This is when the cheese gets all bubbly and golden!
- Let them cool for about 10 minutes before serving. Trust me, they’re worth the wait!
Cook’s Notes
- This dish is forgiving. If you need to make it ahead, just assemble the roll ups in the baking dish, cover, and refrigerate until you’re ready to bake. Just add a few minutes to the baking time if you’re cooking them from cold.
- Leftovers? Absolutely. They reheat beautifully in the microwave or oven. If you want to freeze them, do so before baking.
- Don’t overstuff the noodles. It’s tempting, but a little restraint keeps them from bursting and ensures they stay tidy and perfect.
Make It Your Own
- Swap the ground beef for ground turkey or chicken if that’s what you have or prefer.
- For a veggie twist, replace the meat with mushrooms and zucchini, just cook them down until tender.
- If you’re feeling spicy, add some crushed red pepper flakes to the meat sauce for an extra kick.
- Use fresh spinach in the cheese mixture for a pop of color and nutrition. Just make sure to sauté it first to remove excess moisture.
If you try this, I’d love to hear how it turns out—drop a comment or tag me! Your kitchen adventures make my day. Happy rolling!
Related update: How to make the World’s Greatest Lasagna Roll Ups
Last Tuesday, I found myself staring into the fridge, contemplating my dinner choices. It was one of those days when the work seemed endless, and my energy level was as flat as a pancake. You know what I mean, right? When the day is long, but your patience is short? In times like these, I crave something that’s both comforting and ridiculously easy to make. Enter: Easy Baked Parmesan Chicken. The result? A dish that’s cozy enough for a solo dinner yet impressive enough for unexpected guests. Plus, the oven does most of the heavy lifting while you unwind with a glass of wine. Let’s dive in!
Jump to Recipe
What You’ll Need
This recipe is all about simplicity, and chances are you already have most of the ingredients chillin’ in your pantry or fridge.
- 4 skinless, boneless chicken breast halves
- 1 egg
- 1 cup Italian bread crumbs
- 2 cups pasta sauce (your favorite brand or homemade!)
- 1 cup shredded mozzarella cheese
- 1/2 cup grated parmesan cheese
How to Make Easy Baked Parmesan Chicken
- Preheat your oven to 400°F (200°C). The warm-up is key for that golden finish.
- Crack the egg into a shallow bowl and whisk it up like you’re making a mini omelet.
- Coat each chicken breast in the egg, letting the excess drip off, then roll it in breadcrumbs until it’s snugly coated.
- In a 13×9-inch baking dish, arrange the chicken breasts in a single layer. Make sure they’re not too cozy — social distancing for the chicken is important for even cooking!
- Bake the chicken uncovered for 20 minutes. The edges will start to brown and the kitchen will smell divine.
- Pour the pasta sauce over the chicken, covering each piece generously. Think of it as giving the chicken a warm tomato blanket.
- Sprinkle the mozzarella and parmesan cheese over the top. This is where the magic happens — golden, bubbly goodness incoming.
- Return the dish to the oven and bake for an additional 10 minutes. The cheese should be melted, bubbly, and just beginning to brown. Check that the chicken reaches 170°F and is no longer pink inside.
- Serve immediately, either on its own or over your favorite pasta. Enjoy the cheesy, saucy goodness!
Cook’s Notes
If you’re planning ahead or happen to have leftovers (lucky you!), this dish stores well in an airtight container in the fridge for up to three days. For reheating, skip the microwave unless you like rubbery chicken — instead, pop it back in the oven until warmed through.
A common pitfall is not letting the excess egg drip off the chicken before coating with breadcrumbs. Trust me, a thin coat is all you need for that perfect crisp. Another tip? Let the chicken rest a minute before serving — just enough time to pour yourself another glass of wine.
Make It Your Own
- Swap the chicken for crispy tofu slices if you’re feeling a vegetarian vibe. Just press the tofu well to get rid of excess moisture.
- Use panko breadcrumbs instead of Italian for an extra crunch factor.
- Going gluten-free? Opt for gluten-free breadcrumbs and gluten-free pasta sauce.
- Add sliced fresh basil or a sprinkle of red pepper flakes just before serving for an aromatic kick.
If you try this, I’d love to hear how it turns out — drop a comment or tag me! Let’s keep the deliciousness going. 🍽️
Related update: Easy Baked Parmesan Chicken
Related update: Alouette Chicken Paprika
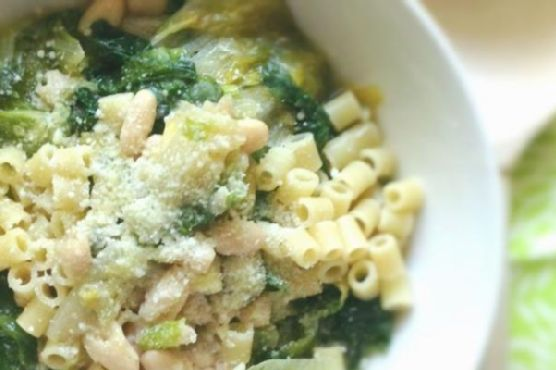
Picture this: it’s a dreary Tuesday evening, and the rain won’t let up. You’re standing in the kitchen, craving something warm and comforting but also something that won’t require an entire evening of chopping, stirring, and watching the pot. That’s when this Escarole & Beans recipe becomes your best friend. This dish is like a cozy blanket in a bowl—hearty, savory, and surprisingly simple to whip up. A few pantry staples, a quick simmer, and voila: you’re transported to a place where the rain feels less dreary and dinner feels a little more special. And trust me, the addition of escarole gives it just the right touch of freshness and bite.
Jump to Recipe
What You’ll Need
This dish thrives on simplicity, using ingredients you probably already have, with a couple of stars that elevate it from your typical pantry meal.
- 8 oz of ditilini pasta
- 3 diced garlic cloves
- 3 tablespoons of olive oil
- 1 can of cannellini beans, with its juice
- 1 cup of vegetable broth
- Salt & pepper to taste
- 1 head of escarole, washed and chopped
- 1 teaspoon of crushed red pepper flakes
- Freshly grated parmesan cheese for garnish
How to Make Escarole & Beans
- Start by cooking the ditilini pasta according to the package directions. You want it al dente, so it holds up in the broth later.
- In a large pot, heat the olive oil over medium heat. Add the diced garlic and sauté just until it starts to turn golden and fragrant—don’t let it burn!
- Pour in the cannellini beans, juice and all. Add a sprinkle of salt, a crack of black pepper, and the crushed red pepper flakes. Stir it all together and let it heat through for a few minutes.
- Stir in the vegetable broth. Let the mixture simmer gently for about 10 minutes. You’ll notice the edges start to bubble, and it smells heavenly.
- Toss in the chopped escarole and cover the pot with a lid. You’re aiming to wilt the escarole, not stew it, so check every couple of minutes and give it a stir until it’s just wilted.
- Once the escarole is tender but still vibrant, turn off the heat. Taste and adjust the seasoning if needed—sometimes it just needs that little extra pinch of salt.
- To serve, spoon some pasta into each bowl and ladle the escarole and bean mixture over top. Don’t skimp on the broth—it’s the best part! Finish with a generous sprinkle of parmesan cheese.
Cook’s Notes
This dish is all about balance. The escarole should be wilted but not mushy, and the pasta al dente. If you’re making it ahead, you might want to store the pasta and the bean mixture separately, so the pasta doesn’t soak up all the broth and get soggy. Just combine them when you’re ready to eat.
- If you’re not a fan of spicy, you can reduce or even omit the crushed red pepper flakes. It’s still delicious without the heat!
- Leftovers can be stored in an airtight container in the fridge for up to three days. Reheat gently on the stove, adding a splash of water or broth if it’s too thick.
Make It Your Own
- Swap out the escarole for kale or spinach if that’s what you have on hand or prefer. Both hold up beautifully in the broth.
- If you’re looking for a heartier meal, add some Italian sausage to the pot when you sauté the garlic. Cook it through before proceeding with the recipe.
- For a vegetarian twist with a protein kick, throw in some crispy tofu cubes just before serving.
- Fancy a change from pasta? Try serving the beans and escarole over a slice of crusty, toasted sourdough bread for a rustic feel.
If you try this, I’d love to hear how it turns out—drop a comment or tag me! Cooking is all about sharing the love, after all. Bon appétit!
Related update: Escarole & Beans
Related update: Philly Cheesesteak Grilled Wraps

It was one of those rainy Wednesday nights when the craving hit hard. You know the type — the kind where you just need something indulgent to take the edge off the mid-week blues. My mind immediately went to tiramisu, but not just any tiramisu. I wanted something with a little extra kick, a little something-something to make it feel like more than just a dessert. Enter Kahlua Tiramisu. This dish is luxurious yet surprisingly easy, a balance of creamy mascarpone and velvety espresso with a splash of Kahlua for that extra oomph. The best part? You don’t need to be a pastry chef to whip this up. It’s perfect for those nights when you want to impress with minimal effort.
Jump to Recipe
What You’ll Need
Before diving in, take a peek at the ingredient list. Chances are you already have most of this sitting around, just waiting to transform into dessert magic.
- Mascarpone cheese
- Vanilla extract
- Kahlua
- Espresso
- Whipping cream
- Icing sugar
- Ladyfingers (pick a pack that will fit snugly in an 11×7 dish)
- Cocoa powder
How to Make Kahlua Tiramisu
- In a medium mixing bowl, combine the mascarpone cheese with vanilla extract, Kahlua, and just under half of your freshly brewed espresso. Blend it well until you achieve a smooth, lush mixture.
- In another medium bowl, whip the cream with the icing sugar until it holds soft peaks. You want it smooth, like a cloud. Gently fold in the mascarpone mixture until it’s fully incorporated.
- Pour the remaining espresso into a wide, shallow dish, ready to soak those ladyfingers. Quickly dip each ladyfinger in, flipping it to coat both sides. Don’t let them soak too long — you want them soft but not mushy.
- Arrange the soaked ladyfingers to form a single layer at the bottom of an 11×7 casserole dish. Spread half of your mascarpone mixture over the ladyfingers, covering them evenly.
- Repeat the dipping and layering process with the rest of the ladyfingers and mascarpone mixture.
- Refrigerate for at least 4 hours, preferably overnight, to let the flavors meld. Just before you’re ready to serve, dust a generous layer of cocoa powder over the top using a fine sieve. For an extra treat, scatter some grated bittersweet chocolate or chocolate curls over the top.
Cook’s Notes
This dessert is a dream for planners. You can make it a day ahead, and it actually tastes better the next day as the flavors have time to develop and deepen. Store leftovers in the fridge, tightly covered, for up to three days. Avoid freezing; it messes with the creamy texture that makes tiramisu so delightful. When dipping ladyfingers, keep it quick! A mere second or so in the espresso will keep them from getting too soggy and disintegrating.
Make It Your Own
- For a boozier version, swap some of the espresso for extra Kahlua. Your call!
- Not a fan of Kahlua? Try using a hazelnut liqueur or even a shot of Baileys for a different flavor profile.
- For a nutty twist, add a layer of crushed toasted almonds in between the mascarpone layers. It adds a lovely crunch.
- If you’re watching sugar intake, reduce the amount of icing sugar in the whipped cream, or use a sugar substitute that blends well.
If you try this, I’d love to hear how it turns out — drop a comment or tag me! There’s nothing quite like sharing a sweet success. Enjoy your little slice of indulgence!
Related update: Kahlua Tiramisu
Related update: Gingerbread
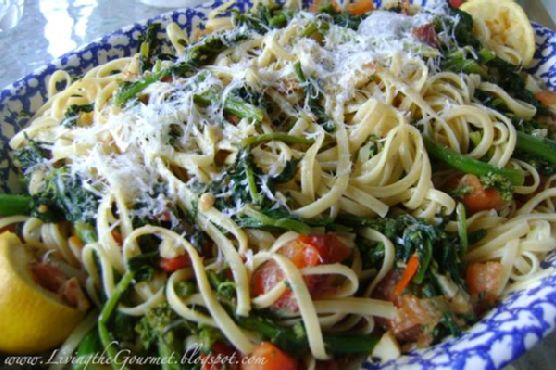
It was one of those whirlwind Tuesdays, you know, the kind where you look up and suddenly it’s 7 PM and you’re staring at your fridge like it’s a magic portal to dinner. The last thing I wanted was a complicated meal, but I was craving something a little more special than the usual weeknight pasta. That’s when I remembered this Broccoli Rabe with Tomatoes, Anchovies & Spaghetti recipe. It’s the perfect combination of quick, comforting, and just a touch fancy — like your favorite pair of jeans that still manage to make you feel dressed up. The best part? It comes together in no time, leaving you with a warm, savory bowl of goodness that feels like a little triumph over the chaos of the day.
Jump to Recipe
What You’ll Need
Before you make a mad dash to the grocery store, take a peek into your pantry. Chances are, you already have most of what you need. Here’s the simple lineup:
- 1 bunch of broccoli rabe
- 1 can of anchovies
- 3 cloves of garlic
- Juice of 1 lemon
- 1/2 teaspoon red pepper flakes
- 1/2 cup grated Romano cheese
- 12 ounces of spaghetti
- 1 cup cherry or grape tomatoes
- Olive oil
How to Make Broccoli Rabe with Tomatoes, Anchovies & Spaghetti
Ready to transform these humble ingredients into something spectacular? Here’s how:
- Start by prepping the broccoli rabe. Trim about 1 inch off the stems and then give them a quick blanch in boiling water for 3-4 minutes. This will take out the bitterness and keep that lovely green color. Drain and set aside.
- In a large frying pan, heat a couple of drizzles of olive oil over medium heat. Toss in the garlic, red pepper flakes, and tomatoes. Sauté until the tomatoes are soft and the garlic is fragrant — think of it as the kitchen’s way of saying “hello, deliciousness!”
- Add the blanched broccoli rabe to the pan and continue to sauté for a few more minutes. This step gets all those flavors mingling.
- Now, for the umami punch: add the anchovies to the pan. They’ll melt into the dish, leaving behind a savory depth that’s pure magic.
- Meanwhile, cook your spaghetti in a large pot of salted boiling water. Before draining, scoop out about 1/2 cup of the pasta water and add it to the broccoli rabe mixture. This starchy water helps create a luscious sauce.
- Drain the spaghetti and get ready to plate. On a serving platter, drizzle a bit of olive oil and sprinkle some grated Romano cheese. Add the spaghetti, top with the broccoli rabe mix, then give it a final drizzle of olive oil, a squeeze of lemon juice, and a generous dusting of Romano cheese.
Cook’s Notes
A couple of things to keep in mind: If you’re new to cooking with anchovies, don’t be scared! They dissolve beautifully and add a savory backbone without a fishy taste. Make sure not to overcook the broccoli rabe initially; you want it vibrant, not mushy.
Got leftovers? Store them in an airtight container and they’ll keep well in the fridge for a couple of days. If you plan to make this ahead, keep the lemon juice out until serving to keep everything fresh and bright.
Make It Your Own
Feel free to play around with this recipe. Here are some ideas to get you started:
- Swap the anchovies for crispy tofu to make it vegetarian-friendly.
- Add a handful of toasted pine nuts for a bit of crunch and nuttiness.
- Switch out the Romano cheese for Parmesan if that’s what you have on hand.
- Try using kale instead of broccoli rabe for a slightly milder, less bitter green.
If you try this, I’d love to hear how it turns out — drop a comment or tag me! Cooking is all about making it work for you and having a little fun along the way. Enjoy your dinner, friend!
Related update: Broccoli Rabe with Tomatoes, Anchovies & Spaghetti
Related update: Bibimbab (Korean Rice w Vegetables & Beef)
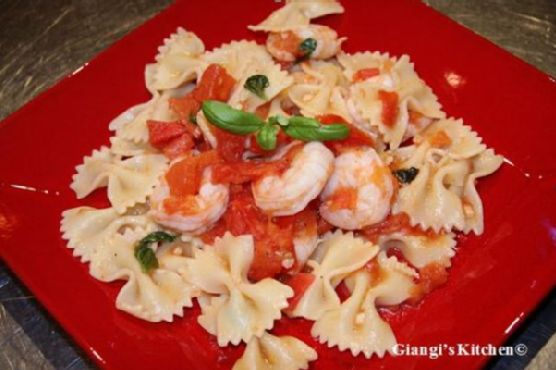
It was a Wednesday evening, and I’d just returned home after a long day that seemed to have no end in sight. You know the one — where you’re too exhausted to even scroll through your takeout apps. I peered into the fridge, hoping for a miracle, and voilà, the ingredients for Farfalle with Shrimps, Tomatoes Basil Sauce all but jumped out at me. It was like they were whispering, “We got you.” There’s something magical about pulling together a meal that feels indulgent and comforting but comes together in the blink of an eye. This dish is that kind of magic. Perfect for those nights when you want something special without the hassle.
Jump to Recipe
What You’ll Need
You might already have most of these ingredients lounging in your pantry or fridge, just waiting to become something delicious. Farfalle pasta is the star of the show, and everything else is there to make it shine even brighter.
- 1 tablespoon of butter
- 8 ounces of farfalle pasta
- 1 cup of fresh tomatoes, chopped
- 1/2 pound of fresh shrimp, peeled and deveined
- 1/2 cup of fresh basil leaves
- Salt and freshly ground black pepper, to taste
How to Make Farfalle with Shrimps, Tomatoes Basil Sauce
- Bring a large pot of salted water to a boil. Add the farfalle and cook until al dente, which should take about 10-12 minutes. You’ll know it’s ready when it’s firm to the bite yet tender.
- While the pasta cooks, melt the butter in a large frying pan over medium-high heat. Once the butter starts to bubble and gives off a nutty aroma, toss in the tomatoes.
- Sauté the tomatoes for about a minute, just until they start to soften and their juices mingle with the butter, creating a simple, vibrant sauce.
- Add the shrimp to the pan. Cook them until they turn a beautiful light pink and are cooked through, about 3-4 minutes. Sprinkle with salt and freshly ground black pepper to taste.
- Toss in the fresh basil leaves and give everything a gentle stir, letting the basil release its fragrant oils.
- Once your pasta is perfectly cooked, drain it and add it directly to the skillet with the shrimp and tomatoes. Toss everything together so the pasta is well-coated in the buttery tomato sauce.
- Serve immediately while it’s still hot, and watch as the room fills with the comforting aroma of basil and buttery goodness.
Cook’s Notes
This dish is forgiving, which is a blessing if you’re prone to distractions like I am. Keep an eye on the shrimp; they cook fast and go from perfect to rubbery in a blink. If you find your sauce getting too thick, a splash of the pasta cooking water will loosen it right up.
Leftovers can be stored in an airtight container in the refrigerator for up to two days. Reheat gently in a skillet over low heat, adding a little water to bring back the sauce’s creaminess.
Make It Your Own
- Swap out the shrimp for crispy tofu if you’re in the mood for a vegetarian twist.
- Add a handful of baby spinach along with the basil for a boost of greens.
- If you love a bit of heat, a pinch of red pepper flakes will do wonders.
- For a citrusy finish, add a squeeze of lemon juice just before serving.
If you try this, I’d love to hear how it turns out — drop a comment or tag me! Cooking is such a shared joy, and I can’t wait to hear your tales from the kitchen.
Related update: Farfalle with Shrimps, Tomatoes Basil Sauce
Related update: Cannellini Bean Side Dish With Fennel, Red Onion, and Saffron
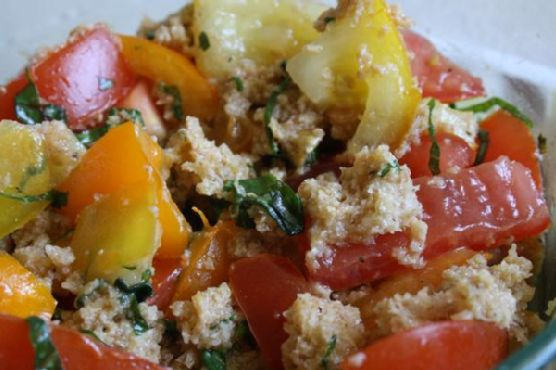
Picture this: It’s the kind of sweltering summer day where the thought of turning on the oven makes you break into a sweat. My garden was overgrown with tomatoes begging to be picked, and the loaf of Tuscan bread on the counter was a day away from becoming an even more petrified artifact of the kitchen. That’s when I remembered the glory of Panzanella. This Tuscan bread salad is not only a perfect way to beat the heat, but it’s also a deliciously resourceful way to use up what you might already have at home. The magic of it lies in its simplicity: juicy tomatoes, aromatic basil, and chewy-crunchy bread brought to life with a glug of olive oil and a tangy splash of vinegar. It’s a dish that’s as comforting as it is impressive, and trust me, the flavors are anything but humble.
Jump to Recipe
What You’ll Need
The beauty of Panzanella is its simplicity. Chances are you already have most of these ingredients cozying up in your kitchen:
- Six slices of day-old Tuscan bread
- Extra virgin olive oil
- Fresh basil leaves
- Red onion
- Red wine vinegar
- Salt and pepper
- Tomatoes (as ripe as you can find, trust me!)
How to Make Traditional Panzanella
- First up, grab a large bowl and submerge your day-old bread in water. Let it lounge in its little pool for about 20 minutes. You’re aiming for soft, but not soggy.
- Once soaked, drain the bread and give it a good squeeze to get rid of all that water. Crumble the bread into a serving bowl; think large, rustic chunks rather than breadcrumbs.
- Now, scatter your chopped tomatoes, thinly sliced red onion, and fragrant basil leaves over the bread. The colors should already be making you smile.
- Dress the salad with a generous drizzle of extra virgin olive oil and a splash of red wine vinegar. Salt and pepper to taste, then toss everything together like you’re giving it a gentle hug.
- Give it a taste and adjust with more oil, salt, or vinegar as your taste buds demand. Let the Panzanella sit for 15 minutes to let the flavors mingle and serve it up at room temperature.
Cook’s Notes
So here’s the deal: Panzanella is all about that bread absorbing the tomato juices and dressing. Use the sturdiest day-old bread you can find for the best texture—soggy bread is a no-go. If you can, make this a bit ahead of time; the flavors only get better as they sit together. Store any leftovers in the fridge, but honestly, Panzanella is best on the day it’s made. If you need to refresh it the next day, add a bit more olive oil and vinegar to bring it back to life.
Make It Your Own
Here are a few ideas to switch things up while still keeping that classic Panzanella vibe:
- Swap the red onion for thinly sliced shallots for a milder flavor.
- Add cucumbers for extra crunch and freshness.
- Throw in some capers for a briny kick that plays nicely with the tomatoes.
- For a bit of protein, toss in some creamy mozzarella balls or crispy tofu.
If you try this, I’d love to hear how it turns out — drop a comment or tag me! Your kitchen stories make my day. Here’s to celebrating simple ingredients and the joy of letting them shine.
Related update: Traditional Panzanella
Related update: Radish and Watercress Salad