
It was one of those chaotic weeknights when I stumbled back into the kitchen after a long day, only to find a colorful assortment of bell peppers staring back at me from the fridge. They were practically begging to be turned into something delicious. I craved something that was not only quick to whip up but also packed with flavor and just the right amount of comfort. That’s when it hit me – a vibrant, flavor-packed Mexican stuffed bell pepper! These beauties come together effortlessly with a few pantry staples and a rotisserie chicken that I always keep around for emergencies. With a quick trip to the oven, they fill the house with mouthwatering aromas, and in no time, dinner is served. It’s the kind of recipe that feels satisfying and a little bit indulgent, but you know it’s good for you too.
Jump to Recipe
What You’ll Need
Let’s be honest, the best part about this recipe is that you probably have most of these ingredients on hand. Here’s what you’ll need to get started:
- Bell peppers (any color you love)
- Cooked brown rice
- Rotisserie chicken breast, shredded
- Frozen corn kernels
- Roma tomato, diced
- Red diced onion
- Black beans, drained and rinsed
- Fire roasted green diced chile
- Chili seasoning
- Minced garlic
- Low-fat shredded cheddar cheese
- Sour light cream
How to Make Blast Of Color Mexican Stuffed Bell Peppers
- Preheat your oven to 400 degrees. Feel that blast of warmth and imagine the deliciousness to come.
- In a large mixing bowl, toss together the cooked brown rice, shredded chicken, corn, diced tomato, onion, black beans, half a cup of shredded cheddar, garlic, green chile, and chili seasoning. Mix until everything is evenly distributed and it smells like a fiesta.
- Line a baking dish with foil and give it a spritz of cooking spray to prevent sticking.
- Take your bell peppers and cut off the tops, then scoop out the seeds. Stuff them generously with the chicken mixture, pressing it down to fill every nook and cranny, and heap some extra on top for good measure.
- Sprinkle each pepper with a bit more cheddar cheese, because let’s be honest, you can never have too much cheese.
- Bake in the preheated oven for 30 to 40 minutes. When the edges of the peppers start to bubble and the cheese turns golden, you know it’s ready.
- Let them cool just a bit, then top each pepper with a dollop of sour light cream before serving. Dig in and enjoy!
Cook’s Notes
These Mexican Stuffed Bell Peppers are a breeze to make, but here are a few things to keep in mind to ensure they turn out perfectly every time. Make sure your baking dish is large enough to fit all the peppers snugly so they stand upright and cook evenly. If you’re prepping ahead, you can mix the stuffing a day in advance and refrigerate it. Just stuff and bake when you’re ready. Leftovers can be stored in an airtight container in the fridge for up to three days. Just pop them in the microwave for a quick reheat.
Make It Your Own
Personalizing this dish is easy, and here are a few ideas to get you started:
- Swap the chicken for crispy tofu or ground turkey for a different protein option.
- Add a handful of fresh cilantro or parsley to the stuffing mix for a burst of freshness.
- If you like it spicy, throw in some jalapeño slices or a dash of hot sauce.
- Use quinoa instead of brown rice for a protein-packed alternative.
If you try this, I’d love to hear how it turns out — drop a comment or tag me! Cooking is all about experimenting and sharing, and I can’t wait to see your creations. Happy cooking!
Related update: Blast Of Color Mexican Stuffed Bell Peppers

Last Tuesday, I found myself staring into the fridge, bleary-eyed and snacky, with no desire to make a big mess just to satisfy my craving for something warm and flavorful. It had been a long day, and I needed dinner on the table, pronto. Arroz Con Pollo fluttered into my mind like an old friend, promising that elusive blend of comfort and flavor without a crazy ingredient list. This one-pan wonder is my go-to for nights like this—simple enough for a weeknight but lush enough to feel like a treat. The best part? It’s a forgiving recipe that lets you swap in what you’ve got on hand. By the way, if you’re in a rush to get cooking, feel free to skip down to the nitty-gritty details. Jump to Recipe
What You’ll Need
Chances are you already have most of these ingredients chilling in your pantry or fridge. Here’s what you’ll need:
- Butter
- Garlic
- Chicken breasts
- Ground cumin
- Ground coriander
- Ground turmeric
- Onion
- Bell pepper
- Canned diced chiles
- Canned diced tomatoes
- Chicken broth
- Dried rice
- Chili powder
- Salt
- Onion powder
- Shredded cheese
How to Make Arroz Con Pollo
- Start by heating up a large pan over medium heat and melt the butter until it’s sizzling and aromatic.
- Add in the garlic and let it cook for a minute or two until it’s fragrant and just beginning to turn golden.
- Sprinkle your chicken breasts with about 1 teaspoon each of cumin, coriander, and turmeric. Toss them in the pan and cook until they are browned and cooked through.
- Once your chicken is fully cooked, toss in your diced onion and bell pepper. Stir everything together and let it cook for about 3 to 4 minutes, until the veggies start to soften.
- Add the canned diced chiles and tomatoes. Give it all a good swirl to combine.
- Pour in the chicken broth and add your dried rice. Stir gently to make sure everything is mixed well.
- Sprinkle in the remaining teaspoon of chili powder, cumin, and coriander, along with the salt, remaining turmeric, and onion powder.
- Bring the pot to a boil, then reduce the heat to low, cover, and let it simmer for about 20 minutes or until the liquid is absorbed and the rice is cooked through.
- Once the rice is perfectly cooked, grab your shredded cheese and generously spread it across the top of the chicken mixture. Cover the pan for another minute or two until the cheese melts completely into gooey perfection.
Cook’s Notes
This dish is pretty forgiving, but here are a few notes to make sure it’s perfect every time. If you find your pan getting too dry during the simmer, just add a splash more broth or water. Cooking times can vary depending on your stove and pot, so keep an eye on the rice after the 15-minute mark. If you want to prep ahead, you can chop your veggies and measure out spices a day in advance. Leftovers? They make for an awesome lunch the next day. Just store it in an airtight container in the fridge, and it should be good for about 3 days.
Make It Your Own
- Swap the chicken for crispy tofu if you’re leaning towards a plant-based version.
- Add in some frozen peas or corn during the last 5 minutes of cooking for a pop of sweetness and color.
- Use smoked paprika instead of chili powder for a smoky twist.
- Throw in some sliced olives or capers for a briny kick.
If you try this, I’d love to hear how it turns out—drop a comment or tag me! Remember, the best part of cooking is making it your own, so don’t be afraid to tweak it to suit your taste buds.
Related update: Arroz Con Pollo
Related update: Kenyan Pilau

Let’s talk about the time I ambitiously decided to make enchiladas on a Wednesday night after one too many hours of doom-scrolling through Instagram. You know the ones—cheesy, gooey, and utterly comforting. I could already taste the spicy tang of green chilies, imagining it would somehow transform my week. Spoiler: it did. This Enchiladas Verdes recipe is not only a delicious weeknight hero but also a dish that’s forgiving enough for any kitchen mishaps. Didn’t roll the tortillas tight enough? No worries; it’s all going to melt together in a cheesy, saucy hug anyway. And trust me, the result is so satisfying, you’ll forget about that midweek slump. Jump to Recipe
What You’ll Need
What’s fantastic about this dish is you might already have most of the ingredients lounging around in your kitchen. If not, the list is simple and straightforward.
- Skinless boneless chicken breast or a quick swap with a store-bought rotisserie chicken.
- Green Anaheim chili peppers – these are the stars of the show.
- Canola oil
- Flour
- White diced onion
- White corn tortillas
- White shredded cheese
- Queso fresco
- Sour crema
- Salt
- Water
- Suero or buttermilk (canned buttermilk works, too)
How to Make Enchiladas Verdes (Green Enchiladas)
- Preheat your broiler and get those green chili peppers ready for roasting. Choose firm, meaty peppers—no wrinkles, please!
- Rinse the peppers and lay them on a foil-lined cookie sheet. Slide them under the broiler and keep an eye on them. Within minutes, you’ll see the skin begin to blister and turn black.
- Flip the peppers after about 5 minutes to get all sides evenly blistered. Once done, pop them into a plastic bag and cover with a towel, letting them cool. This makes peeling off the blackened skin a breeze.
- For the sauce, blend those roasted peppers, flour, and half of your suero or buttermilk until smooth and creamy. Pour this mixture into a skillet over medium-low heat.
- As it warms, gradually stir in more suero or buttermilk. Season with salt—around 2 teaspoons usually does the trick. If it’s too spicy for your taste, add crema. Too thick? Dribble in some water.
- Now, the chicken. Either boil your chicken breasts in a pot until done or just shred a rotisserie chicken. The choice is yours.
- For stacked style enchiladas, fry your tortillas in hot oil just until they’re soft, then drain. Dip each in the sauce before layering on plates with chicken, cheese, and onion. Go for three layers per serving.
- If you prefer oven-baked, preheat to 350°F. Spread sauce at the bottom of your baking dish, fry and fill the tortillas, then roll them up seam down in the dish.
- Drench with more sauce and sprinkle with crumbled queso fresco. Bake until everything’s gloriously warm, about 15 minutes.
- Serve with a dollop of sour crema and get ready to conquer the rest of your week!
Cook’s Notes
Here are a few tips I’ve picked up along the way:
- These enchiladas are flexible with make-ahead options. Prepare the sauce and chicken in advance, then just assemble when you’re ready.
- Store leftovers in an airtight container in the fridge for up to three days. Reheat in the oven for best results.
- Don’t skip the roasting of peppers, as it’s essential for that smoky flavor. If you find peeling them tricky, let them steam longer in the plastic bag.
Make It Your Own
- For a vegetarian spin, swap out chicken with crispy tofu or sautéed mushrooms.
- Mix in some black beans with the chicken for added texture and protein.
- Try using a mix of different cheeses like mozzarella for an extra gooey factor.
- Add avocado or cilantro as a fresh topping before serving.
If you try this, I’d love to hear how it turns out—drop a comment or tag me on social media! Enjoy your cozy, midweek escape with these Enchiladas Verdes.
Related update: Enchiladas Verdes (Green Enchiladas)
Related update: Baked Sirloin Steak
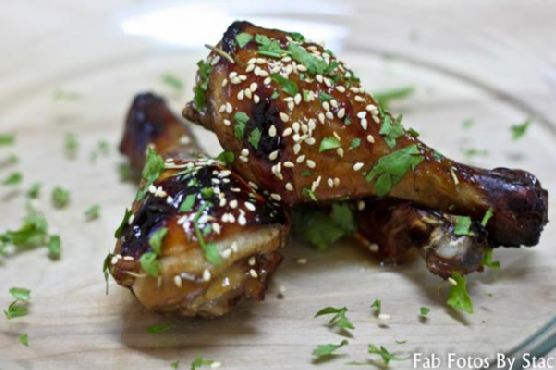
Last Tuesday night, I found myself elbow-deep in a fridge raid, eyeing a pack of chicken drumsticks that had been giving me the side-eye all week. It was one of those evenings where time was not on my side. I needed something quick, but I also craved something that felt a little special. That zingy, sweet, and sticky combination of balsamic vinegar and honey popped into my mind like a lightbulb moment, and let me tell you, it did not disappoint. These Balsamic-Honey Chicken Drumsticks are not only ridiculously easy to throw together but they make your kitchen smell like you’ve been cooking for hours. You know that feeling when a dish makes you look like a kitchen wizard with minimal effort? Yeah, this is one of those recipes. Bonus: The leftovers are a gift that keeps on giving.
Jump to Recipe
What You’ll Need
Let’s be real, the magic here lies in a few pantry staples that you probably already have lurking in your cupboards. Here’s your shopping list:
- Chicken drumsticks
- Balsamic vinegar
- Honey
- Brown sugar
- Soy sauce
- Rosemary sprigs
- Garlic cloves
- Sesame seeds
- Fresh flat-leaf parsley
How to Make Balsamic-Honey Chicken Drumsticks
- Grab a large, resealable plastic bag and toss in the balsamic vinegar, honey, brown sugar, soy sauce, rosemary, and garlic cloves. Now, shake it like a Polaroid picture until the honey and sugar dissolve. You’ll know it’s ready when it’s all shiny and smooth.
- Add the chicken drumsticks to the bag. Try to squeeze out as much air as you can before sealing it up. Give the drumsticks a little massage to make sure they’re all cozy in the marinade. Let them chill in the fridge for about two hours. Trust me, the wait is worth it.
- Preheat your oven to a toasty 450°F. Line a baking sheet with foil — it makes clean-up a breeze later. Lay out the marinated drumsticks, making sure they have some space to breathe.
- Bake the drumsticks for 30 to 35 minutes. You’re looking for that gorgeous caramelized skin, dark in spots, with the smell wafting through your home.
- While the drumsticks are in the oven, pour the leftover marinade into a small saucepan. Bring it to a bubbly boil, then simmer on low until it thickens up, about 15 minutes. This is your golden glaze.
- Once the drumsticks are out of the oven, brush them with the boiled marinade. It’s like giving them a glossy topcoat. Arrange them on a serving platter and sprinkle with sesame seeds and parsley. Voilà!
Cook’s Notes
A few words of wisdom from my kitchen to yours: If you accidentally leave the drumsticks to marinate a bit longer than two hours, it’s no biggie. It’s all about that flavor infusion. Just don’t go beyond 24 hours. This dish is perfect for making ahead; just stop before baking and keep the marinated chicken in the fridge until you’re ready to cook. Leftovers can be stored in an airtight container in the fridge for up to three days. Reheat them in the oven to keep that skin crispy.
Make It Your Own
- Swap the drumsticks for chicken thighs or wings — adjust cooking time accordingly.
- If you’re avoiding soy, coconut aminos make a great substitute.
- Not a fan of rosemary? Try thyme or oregano for a different aromatic twist.
- For a vegetarian option, replace the chicken with crispy tofu squares.
If you try this, I’d love to hear how it turns out — drop a comment or tag me! Whether it’s a weeknight dinner or an impromptu gathering, I promise these drumsticks will steal the show. Happy cooking!
Related update: Balsamic-Honey Chicken Drumsticks
Related update: Balsamic & Honey Glazed Salmon with Lemony Asparagus

Picture this: It’s a Wednesday night, and I have exactly 45 minutes to whip up something that feels a little fancy but won’t leave me with a mountain of dishes. That’s when I remember my trusty cream cheese stuffed chicken breasts. It’s the kind of meal that sounds like it took hours, but really, it’s a bit of kitchen magic that you can pull together with everyday ingredients. And let’s be honest, who doesn’t love a good creamy-cheesy-bacon combo? The first time I made it, I almost skipped the tarragon — but trust me, it’s the game-changer that makes this dish sing.
Jump to Recipe
What You’ll Need
This list is pretty much pantry-basics-plus-bacon. You might even have everything you need already, minus a quick trip to the fridge:
- Skinless boneless chicken breasts
- Cream cheese
- Bacon
- Olive oil or unsalted butter
- Diced onion
- Garlic
- Salt
- Black pepper
- Fresh tarragon
How to Make Cream Cheese Stuffed Chicken Breasts
- Preheat your oven to 350°F. This is your moment to take a deep breath and envision the golden deliciousness to come.
- In a small skillet, warm the butter or olive oil over medium-low heat. Add the diced onions and let them sweat it out until they’re soft and translucent, about 5 minutes. Toss in the garlic and stir for another minute until it’s fragrant enough to make you weak in the knees.
- While that cools, grab another skillet and give the bacon a gentle sauté over low heat. You want it soft and a little bit rendered, not crispy. Paper towel it up and let it chill.
- Place the chicken breasts between two sheets of waxed paper, and give them a good, even pounding to about 1/4-inch thickness. Channel your inner zen and season them with salt and pepper.
- Combine the cooled onion-garlic mix with the cream cheese. Spread a generous dollop of this goodness in the center of each chicken breast.
- Roll or fold the chicken around the cream cheese mixture. Tuck the ends under and secure these delightful little packages with toothpicks. Don’t worry if they look a bit rustic, that’s part of the charm.
- Sprinkle fresh tarragon over the rolled chicken. Wrap each piece with bacon, giving them a cozy little blanket.
- Place your chicken rolls in an 8×11 baking dish and drizzle with melted butter. Pop them in the oven for 25 to 30 minutes. They’re done when the chicken is cooked through, the bacon is browned, and the cream cheese is irresistibly melty.
- Serve immediately and watch them disappear. Seriously, they’re magic.
Cook’s Notes
A few things to keep in mind while you’re chef-ing it up:
– Make sure the onions and garlic are cool before mixing them with the cream cheese. Otherwise, things might get a bit too melty too soon.
– If you’re making this ahead, you can assemble the chicken rolls and keep them in the fridge for a few hours. Just bake them right before you’re ready to eat.
– Leftovers? Store them in an airtight container in the fridge for up to two days. Reheat gently in the oven to keep that bacon crisp.
Make It Your Own
Here’s where you can get a little playful:
- Swap the chicken for crispy tofu for a vegetarian twist that still brings all the creamy-bacon vibes (yep, vegetarian bacon exists!).
- Add some chopped spinach to the cream cheese mixture for a pop of color and a little extra nutrition.
- Try prosciutto instead of bacon for a slightly saltier, more gourmet flavor.
- Experiment with herbs — basil or rosemary could take this dish in a deliciously different direction.
If you try this, I’d love to hear how it turns out — drop a comment or tag me! Your kitchen adventures are what make this all so fun. Happy cooking!
Related update: Cream Cheese Stuffed Chicken Breasts
Related update: Crock-Pot: Asian-Style Country Ribs with Black Bean Garlic Sauce
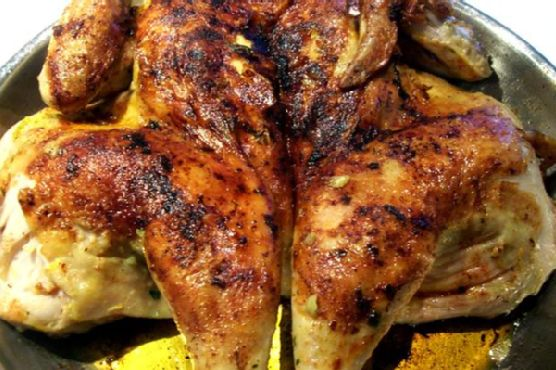
It was one of those weeks where everything felt like a mad dash. The kind where your to-do list is longer than your patience, and the only thing you’re craving is something that feels like a warm hug on a plate. Enter: Moroccan Spiced Chicken Under A Brick. It sounds fancy, right? But trust me, it’s deceptively simple and perfect for when you want to impress without the stress. Plus, there’s something deeply satisfying about the way the flavors meld together, transporting you somewhere far more exotic than your messy kitchen. This dish is all about that crispy skin and bold, aromatic spices. You’ll see why it’s become a favorite weeknight escape for me.
Jump to Recipe
What You’ll Need
Let’s talk about the ingredient list. It’s one of those recipes where you’re likely to have most items already. And the ones you don’t? Well, they’re worth the trip to the store because they pack a punch.
- Whole chicken
- 3-4 garlic cloves
- Fresh cilantro leaves
- Sea salt
- Lemon zest
- Saffron threads
- Olive oil
- Paprika
- Ground cumin
- Black pepper
- Cayenne (if you like a little heat)
How to Make Moroccan Spiced Chicken Under A Brick
- First, grab your mortar and pestle. Combine the garlic, a handful of cilantro leaves, one teaspoon of salt, lemon zest, and a pinch of saffron. Smash it all into a fragrant paste. It should smell like a garden in full bloom.
- Stir in about 3 tablespoons of olive oil until everything is beautifully combined. This is your flavor-packed paste of dreams.
- Take your chicken and rub it all over with the paste. Don’t be shy — get it everywhere, even between the skin and breast meat. This is where the magic happens.
- Place the chicken on a tray or platter, skin side up, and cover it loosely with plastic wrap. Refrigerate for at least 2 hours. If you’ve got the time, let it go up to 6 hours. This step lets the flavors really sink in.
- About 30 minutes before you’re ready to roast, take the chicken out of the fridge. Let it come to room temperature; this helps it cook evenly.
- Preheat your oven to 450°F (230°C). While it heats, place a heavy pan (like cast iron) on top of the chicken to press it down. This is the “brick” part — it ensures that golden crispy skin you’re after.
- Roast the chicken for about 35-45 minutes. You’ll know it’s done when the skin is a deep, enticing golden brown, and the kitchen smells like you’ve been transported to the heart of a Moroccan spice market.
Cook’s Notes
Let’s keep it real: the saffron might be a splurge, but it’s worth it for that unique, earthy aroma. If you don’t have a mortar and pestle, a small food processor will do in a pinch. Just don’t overblend — we want a paste, not a smoothie! Store any leftovers in an airtight container in the fridge for up to 3 days. Reheat gently in the oven to keep that skin crisp. Pro tip: You can make the paste the day before, which is a real time-saver on a busy day.
Make It Your Own
- Swap the chicken for crispy tofu for a vegetarian take. Just press the tofu to remove excess water before marinating.
- Out of cilantro? Try parsley or even mint for a different herbaceous twist.
- If saffron’s not your thing, a pinch of turmeric will give you that lovely color and an earthy flavor.
- Want more heat? Double up on the cayenne or add a bit of smoked paprika for a smoky kick.
If you try this, I’d love to hear how it turns out — drop a comment or tag me! Cooking is all about sharing and experimenting, so let me know how you make this dish your own. Enjoy every bite!
Related update: Moroccan Spiced Chicken Under A Brick
Related update: Beef, Poblano & Cheese Tamales
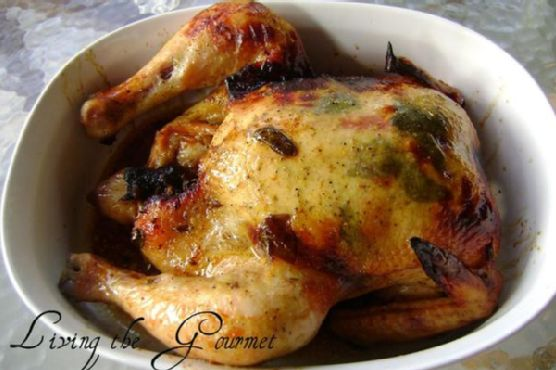
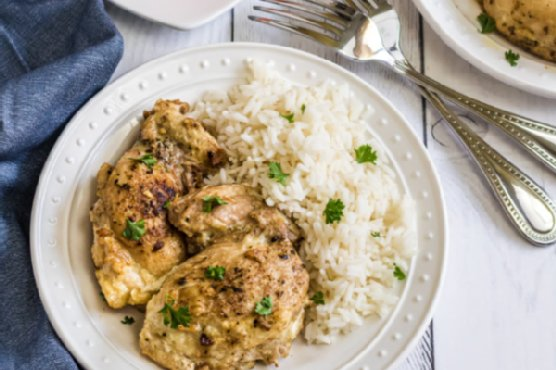
It was one of those frantic weeknights when I stared into my fridge, hoping for a dinner miracle. You know those nights, right? When you need something comforting and full of flavor but don’t have the energy to tackle a complex recipe? That’s when I stumbled upon the delightful harmony of curry and sage roast chicken. This dish is the perfect blend of aromatic spices and fresh herbs, with a hint of sweetness from honey and citrusy brightness from lemon and orange. It’s one of those recipes that sounds fancy but is so straightforward you’ll be able to pull it off without breaking a sweat. Plus, your kitchen will smell amazing.
Jump to Recipe
What You’ll Need
Do you ever have those happy moments when you realize you actually have most of the ingredients you need? That’s this recipe for you. It’s likely most of these are already sitting in your pantry or fridge.
- Whole chicken
- Curry powder
- Fresh sage
- Garlic
- Honey
- Lemon juice
- Orange juice
- Olive oil
- Black pepper
- Turmeric
How to Make Curry and Sage Roast Chicken
- Preheat your oven to 350°F. Take a moment to breathe in that pre-cooking calm.
- Clean the chicken inside and out, patting it dry with paper towels. Think of it as giving the chicken a mini spa day.
- In a small bowl, mix olive oil, lemon juice, orange juice, crushed garlic, honey, curry powder, black pepper, and turmeric. The mixture should smell like a small slice of heaven.
- Rub the chicken thoroughly with this vibrant mixture. Don’t be shy—get in there and make sure every nook and cranny is covered.
- Gently lift the skin and stuff some garlic and sage underneath. This is like a hidden treasure of flavor that will infuse the meat.
- Place the chicken in a baking pan, breast side up. Pop it into the oven and let it bake. The skin will become golden and fragrant, a sure sign it’s nearly time to eat.
Cook’s Notes
Keep an eye on your chicken as it roasts; baking time can vary depending on size. A good rule of thumb is about 20 minutes per pound, but make sure the internal temp hits at least 165°F. If the skin starts to get too dark before the meat is cooked through, tent some foil over the top. Leftovers will keep well in the fridge for a few days, and trust me, they’re perfect for a quick lunch salad or sandwich. You can also mix the rub and prep the chicken a day ahead, leaving it to marinate in the fridge for even more flavor.
Make It Your Own
- Swap the chicken for crispy tofu by marinating tofu slices in the same spice mixture and baking until golden.
- Try adding a sprinkle of cumin for a deeper, earthier vibe if that’s your thing.
- If you’re not a fan of sage, rosemary could be a delightful substitute.
- For a spicier kick, toss in some crushed red pepper flakes to the marinade.
If you try this, I’d love to hear how it turns out—drop a comment or tag me! Your kitchen is about to be filled with aromatic joy, and I’m excited for you to experience it. Happy cooking!
Related update: Curry and Sage Roast Chicken
Related update: Pasta With Butternut Parmesan Sauce @ Dw Magazine.Com
Related update: Potatoes Smothered with Egg Sauce (Cariucho)
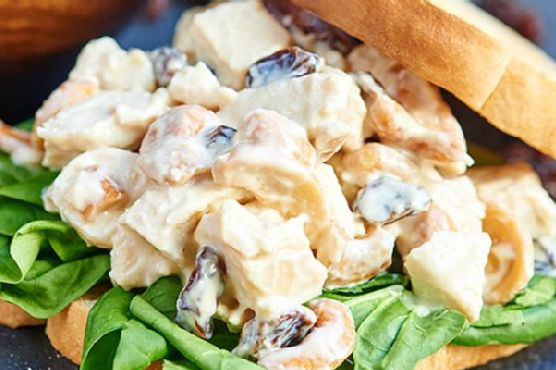
It was one of those whirlwind Wednesday evenings where everything seemed to be happening at once. My kitchen was a mess of grocery bags, half-empty coffee cups, and a laptop precariously perched on the edge of the counter streaming my latest binge-worthy show. Between juggling work calls and taming the chaos that had taken over my living space, I needed dinner to be quick, satisfying, and ideally nutritious enough to make me feel like I was winning at adulthood. Enter the Greek Yogurt Chicken Salad. It’s a reliable hero for those nights when you need something comforting yet refreshing, and it doesn’t hurt that the cleanup is a breeze! The creamy, tangy dressing paired with the tender chicken and the occasional sweet zing from the craisins is just what you need to hit reset.
Jump to Recipe
What You’ll Need
Just a heads up, this is the kind of recipe where you might already have most of the ingredients lounging around in your kitchen. It’s simple yet flavorful.
- 2-3 whole chicken breasts
- 4 cups chicken broth or water
- 1 cup plain Greek yogurt
- 1 tablespoon Dijon mustard
- 1 teaspoon garlic powder
- 1/2 cup craisins (or raisins)
- 1/2 cup roasted cashews
- Salt, to taste
- Pepper, to taste
How to Make Greek Yogurt Chicken Salad
- Start by bringing your chicken broth or water to a boil in a medium pot. Once it’s bubbling, add in your whole chicken breasts. Let them cook until there’s no pink left in the middle; this usually takes about 15-20 minutes depending on their size.
- While your chicken is having its spa treatment, whisk together the Greek yogurt, Dijon mustard, and garlic powder in a bowl. You’re aiming for a smooth, well-mixed sauce here. Add a dash of salt and pepper, adjusting to your taste.
- Stir in the craisins and cashews. If you love a bit more crunch, hold off on the cashews until just before serving. This way, they maintain their delightful crunch!
- Once the chicken is done, let it rest for about 5 minutes. Trust me, this little pause keeps all those flavorful juices locked in.
- Dice the chicken into bite-sized chunks and toss it into your prepared sauce. Give everything a good mix so each piece of chicken is generously coated.
- Serve your chicken salad chilled or at room temperature. It’s perfect in a sandwich, on a bed of greens, or just straight from the bowl.
Cook’s Notes
– Boiling the chicken in broth instead of water really takes the flavor up a notch, but if you’re in a pinch, water works just fine.
– This chicken salad keeps well in the fridge for about 3 days, making it a great make-ahead lunch option. Just store it in an airtight container to keep it fresh.
– If you’re planning to eat it over a few days, consider adding the cashews just before serving each time to maintain that satisfying crunch.
– Be mindful not to overcook the chicken, as it can become a bit rubbery. You want it tender and juicy!
Make It Your Own
- Swap the chicken for crispy tofu if you’re going for a vegetarian vibe. Just cube it and toss it in!
- Love a bit of heat? Add a pinch of cayenne pepper or some chopped jalapeños to the sauce.
- For an extra tangy twist, try tossing in some diced green apples. They add a delightful crunch and zing.
- Switch the craisins for chopped dried apricots for a different kind of sweetness if you’re feeling adventurous.
If you give this Greek Yogurt Chicken Salad a whirl, I’d love to hear how it turns out for you! Drop a comment below or tag me in your kitchen creations. Let’s keep those weeknight dinners delicious and stress-free!
Related update: Greek Yogurt Chicken Salad
Related update: Strawberry-Mango Quinoa Salad

It was one of those rainy Tuesday evenings where all you want is something warm and nourishing that hugs you from the inside out. I was staring into my pantry, contemplating the array of tins and boxes, when I stumbled upon a forgotten bag of rice. That was the moment Chicken Porridge became my saving grace. It’s a dish that’s comforting, easy to put together, and just sophisticated enough to impress with its humble roots. You’ll love how straightforward this recipe is, and honestly, it uses things you probably already have lying around – except maybe the fresh ginger, but trust me, it’s worth a trip to the store.
Jump to Recipe
What You’ll Need
You’re going to love how this one simple dish can use up the odds and ends in your kitchen. Let’s raid the pantry and the fridge:
- 1 cup of rice (any kind you have will do, but jasmine is my favorite)
- 2 cups of chicken stock (homemade if you have it; the boxed kind works too!)
- 1 large chicken breast
- 1 medium carrot, diced
- 1 tablespoon of julienne young ginger
- 1 teaspoon of white ground pepper
- 2 tablespoons of chopped parsley
- 2 shallots, thinly sliced
- 1 spring onion, diced
- 2 tablespoons of vegetable oil
- Salt to taste
How to Make Chicken Porridge
- Start by deep-frying the sliced shallots in the vegetable oil until they turn a gorgeous golden brown. The aroma will be irresistible! Drain them on a paper towel and set them aside. Save that shallot-infused oil; it’s liquid gold.
- Wash the rice under cold water until the water runs clear. This helps keep the porridge from becoming too sticky.
- Mix the washed rice with a tablespoon or two of the reserved shallot oil. This gives it an extra layer of flavor that is just divine.
- In a large pot, combine the rice, chicken stock, chicken breast, and diced carrots. Bring everything to a gentle boil over medium heat.
- Once boiling, reduce the heat to low. Let it simmer for around an hour, stirring occasionally. You’ll know it’s ready when the rice breaks down and the porridge thickens to a silky consistency.
- Remove the chicken breast, shred it using two forks, and return the shredded meat to the pot. This ensures every bite has a bit of chicken goodness.
- Warm everything through, then season with salt and white ground pepper. Taste as you go; you might prefer it a bit pepperier.
- Serve the porridge hot, garnished with diced spring onion, chopped parsley, julienne young ginger, and the crispy fried shallots. A few drops of that shallot oil on top, and you have a bowl of bliss.
Cook’s Notes
Don’t rush the simmering process; the longer it simmers, the creamier it gets. If you find your porridge too thick, just stir in a bit more chicken stock or water. This porridge keeps well in the fridge for a couple of days. When reheating, add a splash of water to bring it back to life. The crispy shallots are best fresh, but if you need to, you can store them in an airtight container for a day or two; they may just lose a bit of their crunch.
Make It Your Own
- Swap the chicken for crispy tofu, and you’ve got a vegetarian version that’s just as comforting.
- Use beef stock and thinly sliced beef for a heartier alternative.
- Add a dash of soy sauce or fish sauce for an umami boost.
- Throw in a handful of spinach or kale right before serving for some extra greens.
If you try this, I’d love to hear how it turns out — drop a comment or tag me! Eating your way through a rainy day has never been more delightful. Enjoy every spoonful!
Related update: Chicken Porridge
Related update: Classic French Onion Soup
So there I was, standing in my kitchen, staring down a package of chicken breasts and wondering how on earth I was going to make an exciting dinner out of them—again. It was one of those evenings where you just want something easy yet indulgent, and frankly, I felt like a culinary magician without a wand. That’s when it hit me: Alouette Chicken Paprika. This dish has saved my weeknight dinners countless times, thanks to its creamy, savory sauce and that lovely paprika kick. It feels fancy enough to impress anyone you might have over but is straightforward enough to whip up after a long day. Trust me, once you try it, you’ll be hooked.
Jump to Recipe
What You’ll Need
The beauty of this recipe is that you probably already have most of these gems in your kitchen. It’s a pantry hero, with a few special players like Alouette Garlic & Herbs Spreadable Cheese that make it sing.
- 2 tablespoons butter
- 4 boneless chicken breast halves
- 1 teaspoon garlic powder
- 1 container Alouette Garlic & Herbs Spreadable Cheese
- 1/2 cup milk
- 6 teaspoons paprika
How to Make Alouette Chicken Paprika
- In a small bowl, blend the garlic powder with 6 teaspoons of paprika until well combined. Coat each chicken breast generously with this mixture, making sure they’re evenly covered.
- Melt the butter in a skillet over medium heat. Add the chicken and sauté for about 5 minutes on each side. You’ll know it’s ready to move on when the chicken is golden and slightly crisp at the edges.
- Cover the skillet, reduce the heat to low, and let the chicken simmer for 15 minutes. This is your chance to let the flavors mingle and intensify.
- Once done, remove the chicken from the skillet but keep that liquid gold in there—you’re going to need it!
- In another bowl, combine the milk, Alouette Garlic & Herbs Spreadable Cheese, and any remaining paprika. Mix until smooth and dreamy.
- Pour this cheese mixture into the skillet, stirring well with the reserved liquid. Let it simmer for a couple of minutes until the sauce is smooth and slightly thickened.
- To serve, generously pour this creamy, aromatic sauce over the chicken. If you’re feeling extra indulgent, use any remaining sauce over a bed of rice, pasta, or potatoes.
Cook’s Notes
When cooking the chicken, make sure not to rush the sautéing step. That golden color adds layers of flavor that are worth the wait. If the sauce seems too thick, a splash more milk can save the day. For leftovers, store the chicken and sauce separately in airtight containers in the fridge for up to 3 days. The sauce will thicken as it chills, so warming it gently on the stovetop with a bit of extra milk will bring it back to life.
Make It Your Own
- Swap the chicken for crispy tofu for a vegetarian twist—just coat and cook the same way.
- Love smoky flavors? Use smoked paprika instead of regular for an extra punch.
- Add a handful of sautéed mushrooms to the sauce for more earthiness and texture.
- Try coconut milk in place of regular milk for a dairy-free and slightly exotic option.
If you try this, I’d love to hear how it turns out—drop a comment or tag me! Your feedback is like the perfect spice blend for my recipe collection!
Related update: Alouette Chicken Paprika
Related update: Cauliflower, Brown Rice, and Vegetable Fried Rice
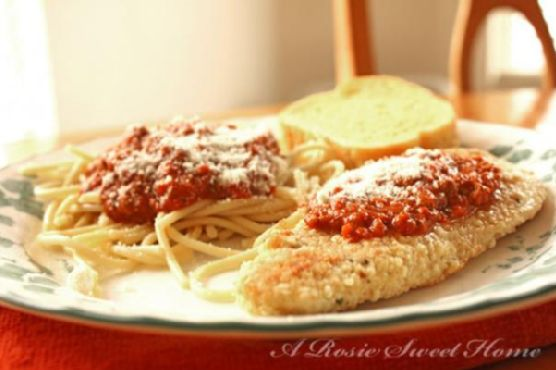
Last Tuesday, I found myself staring into the fridge, contemplating my dinner choices. It was one of those days when the work seemed endless, and my energy level was as flat as a pancake. You know what I mean, right? When the day is long, but your patience is short? In times like these, I crave something that’s both comforting and ridiculously easy to make. Enter: Easy Baked Parmesan Chicken. The result? A dish that’s cozy enough for a solo dinner yet impressive enough for unexpected guests. Plus, the oven does most of the heavy lifting while you unwind with a glass of wine. Let’s dive in!
Jump to Recipe
What You’ll Need
This recipe is all about simplicity, and chances are you already have most of the ingredients chillin’ in your pantry or fridge.
- 4 skinless, boneless chicken breast halves
- 1 egg
- 1 cup Italian bread crumbs
- 2 cups pasta sauce (your favorite brand or homemade!)
- 1 cup shredded mozzarella cheese
- 1/2 cup grated parmesan cheese
How to Make Easy Baked Parmesan Chicken
- Preheat your oven to 400°F (200°C). The warm-up is key for that golden finish.
- Crack the egg into a shallow bowl and whisk it up like you’re making a mini omelet.
- Coat each chicken breast in the egg, letting the excess drip off, then roll it in breadcrumbs until it’s snugly coated.
- In a 13×9-inch baking dish, arrange the chicken breasts in a single layer. Make sure they’re not too cozy — social distancing for the chicken is important for even cooking!
- Bake the chicken uncovered for 20 minutes. The edges will start to brown and the kitchen will smell divine.
- Pour the pasta sauce over the chicken, covering each piece generously. Think of it as giving the chicken a warm tomato blanket.
- Sprinkle the mozzarella and parmesan cheese over the top. This is where the magic happens — golden, bubbly goodness incoming.
- Return the dish to the oven and bake for an additional 10 minutes. The cheese should be melted, bubbly, and just beginning to brown. Check that the chicken reaches 170°F and is no longer pink inside.
- Serve immediately, either on its own or over your favorite pasta. Enjoy the cheesy, saucy goodness!
Cook’s Notes
If you’re planning ahead or happen to have leftovers (lucky you!), this dish stores well in an airtight container in the fridge for up to three days. For reheating, skip the microwave unless you like rubbery chicken — instead, pop it back in the oven until warmed through.
A common pitfall is not letting the excess egg drip off the chicken before coating with breadcrumbs. Trust me, a thin coat is all you need for that perfect crisp. Another tip? Let the chicken rest a minute before serving — just enough time to pour yourself another glass of wine.
Make It Your Own
- Swap the chicken for crispy tofu slices if you’re feeling a vegetarian vibe. Just press the tofu well to get rid of excess moisture.
- Use panko breadcrumbs instead of Italian for an extra crunch factor.
- Going gluten-free? Opt for gluten-free breadcrumbs and gluten-free pasta sauce.
- Add sliced fresh basil or a sprinkle of red pepper flakes just before serving for an aromatic kick.
If you try this, I’d love to hear how it turns out — drop a comment or tag me! Let’s keep the deliciousness going. 🍽️
Related update: Easy Baked Parmesan Chicken
Related update: Alouette Chicken Paprika
It was one of those nights where dinner plans were nonexistent and I was staring at the contents of my fridge, hoping for inspiration to strike. You know the kind of night where the thought of cooking something complicated is just… ugh. Enter the hero of this tale: Curried Chicken Roll-Ups. They’re quick, they’re easy, and they have just the right amount of zing to make you feel like you’ve put in way more effort than you actually have. These roll-ups are like a little flavor vacation on a weeknight—tangy, crunchy, and creamy all in one bite. Plus, they’re perfect for using up random bits of veggies you’ve got lounging about.
Jump to Recipe
What You’ll Need
Surprisingly, you probably have most of these ingredients chilling in your fridge or pantry right now, just waiting to be turned into something fabulous.
- 1 can of chicken breast
- 1/2 cup diced cucumber
- 1/2 cup diced red bell pepper
- 1/2 cup diced celery stalk
- 2 tablespoons chopped green onion
- 1/4 cup light mayonnaise
- 1 tablespoon lime juice
- 1 tablespoon red curry paste
- 1/2 teaspoon garlic powder
- 1/4 teaspoon paprika
- 1/4 teaspoon chili powder
- Salt and pepper to taste
- 4 whole grain tortillas
- 1 cup shredded lettuce
How to Make Curried Chicken Roll-Ups
- In a large bowl, place all the ingredients except for the tortillas and lettuce. Stir everything until it’s nicely mixed, and any large pieces of chicken have broken down into shreds.
- Heat a skillet over medium and lightly toast or warm your tortillas. You’re looking for them to be pliable and just a tad crispy, which makes rolling them up so much easier.
- Scoop out a quarter of your chicken salad mixture and spread it evenly over the top of one tortilla. It should cover the tortilla pretty much edge to edge.
- Sprinkle a quarter of your lettuce on top of the chicken salad. It’ll add that fresh crunch we’re all about.
- Gently, and I mean gently, roll up your tortilla as tightly as you can without tearing it. Think burrito, but more delicate.
- Take a serrated knife and carefully slice the roll into 4 or 6 pieces, depending on your desired serving size. Serve immediately or stash them in the fridge for later munching.
Cook’s Notes
These roll-ups are great for a make-ahead lunch because they hold up well without getting soggy. Just keep them wrapped in plastic wrap or a sealed container in the fridge, and they’ll be good for up to 3 days. If you’re a prep-ahead wizard, you can mix the chicken salad the night before, and it’ll be even tastier as the flavors meld overnight. One thing to watch out for: Make sure your tortillas are fresh and not too dry, or they’ll crack when you roll them. If you’re feeling fancy, you can even warm them with a dab of butter!
Make It Your Own
- Swap the chicken for crispy tofu for a vegetarian twist. Just give it a quick sauté to ensure it’s nice and golden before adding it to your mix.
- Add sliced avocado right on top of the lettuce for extra creaminess and a touch of luxury.
- Use a spicy mayo instead of plain light mayo if you’re into a bit more heat and tang.
- Try spinach leaves instead of lettuce for a bit more nutritional punch without sacrificing crunch.
If you try this, I’d love to hear how it turns out—drop a comment or tag me in your roll-up adventures! Happy rolling, friends!
Related update: Curried Chicken Roll-Ups
Related update: Fresh and Simple Swai Ceviche
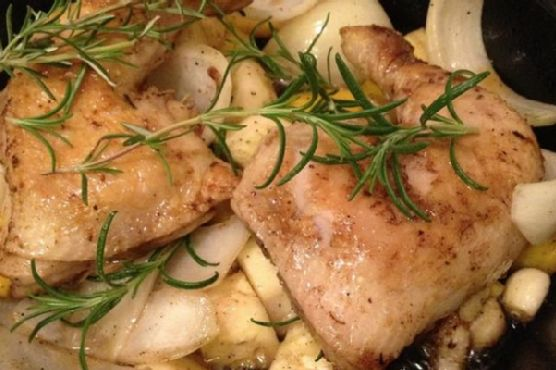
It was one of those fall evenings when the air felt crisp enough to warrant something warm and homely. I was rummaging through my pantry, looking for inspiration, when I spotted a basket of apples I’d forgotten about. That’s when it hit me: roast chicken with apples and rosemary. It’s a dish that sounds grand but is deceptively simple. Perfect for those days when you want the aroma of something wonderful wafting through your home, without spending hours in the kitchen. Trust me, the combination of sweet apples, aromatic rosemary, and the tangy kick from lemon balsamic vinegar makes this a dish you’ll want to repeat. It’s like autumn on a plate.
Jump to Recipe
What You’ll Need
I adore this recipe because you likely have most of these ingredients lounging in your kitchen already. Here’s what you’ll need to gather:
- Fresh apples
- Onions
- Garlic
- Fresh rosemary
- Lemons
- Raimondo Sicilian lemon balsamic vinegar
- Seasoning for a rub (salt, pepper, maybe your secret mix?)
- Roasting chickens
- Canned stock
How to Make Roast Chicken with Apples and Rosemary
- Preheat your oven to 400°F. Set a rack in the lower third of the oven to allow for even heat distribution.
- Rinse the chicken under cold water, then pat it completely dry with paper towels. This step is crucial for crispy skin.
- In a shallow roasting pan, arrange the apples, rosemary, three lemons (halved), onions, and garlic in a single layer. Season generously with salt and pepper. Toss everything together, then drizzle with the lemon balsamic vinegar.
- Rub the chicken with your seasoning mix until well coated. Place it breast-side-up on top of the apple and rosemary mixture. For added flavor, stuff some of the apple and onion mix inside the chicken cavity.
- Roast the chicken for about 30 minutes until the breast feels firm and starts to brown slightly. The aroma will start making its way into every nook of your home.
- Using tongs, flip the chicken over, breast-side-down, and let it roast for another 20 minutes. This helps the chicken cook evenly and the skin to attain a beautiful golden color.
- The chicken is done when a thermometer inserted into the thickest part reads 175°F. Tilt the chicken to let the cavity juices drain into the pan, then transfer it to a cutting board to rest.
- Spoon off any fat from the roasting pan, then place it over high heat. Add the canned stock, scraping up all those tasty browned bits. Squeeze in the juice of the last lemon to brighten up the sauce.
- Carve the chicken and serve it with the apples and onions, passing the chunky jus at the table. Enjoy the applause from your dinner guests!
Cook’s Notes
Let’s chat about making this dish your best friend in the kitchen. First off, drying the chicken well is key; moisture on the skin is the enemy of crispiness. When flipping the chicken, be gentle to keep the skin intact. If you’re in a hurry, you can prepare the apple and rosemary mix ahead of time and store it in the fridge until you’re ready to roast. Leftovers make fantastic sandwiches or can be tossed with some greens for a vibrant salad. Store any extras in an airtight container in the fridge for up to three days. Reheat gently to avoid drying out the meat.
Make It Your Own
Here are a few ideas to tweak this dish to your liking:
- Swap in pears instead of apples for a slightly different fruity twist.
- Use thyme or sage in place of rosemary if that’s what you’ve got on hand.
- Try a white wine vinegar instead of lemon balsamic for a milder acidity.
- For a vegetarian version, use crispy tofu in place of chicken and adjust cooking time accordingly.
If you give this roast chicken a whirl, I’d love to see your masterpiece! Drop a comment below or tag me on social media. Cooking is always more fun when shared, don’t you think? Happy roasting!
Related update: Roast Chicken with Apples and Rosemary
Related update: Curried Chicken Roll-Ups
It was one of those chaotic weekday evenings where all I could think about was getting dinner on the table in less time than it would take for me to order takeout. I stood in my kitchen, slightly overwhelmed by the day’s hustle, when I felt that familiar craving for something warm and homey — something that felt like a hug on a plate. The answer? My trusty Instant Pot Chicken Thighs. This dish is perfect when you want something flavorful but don’t want to spend hours in the kitchen. With a few pantry staples and the magic of the Instant Pot, dinner would be ready in a flash. It’s the kind of meal that makes you feel accomplished and cozy all at once.
Jump to Recipe
What You’ll Need
This recipe is great because you probably have most of these ingredients already lounging in your pantry, like they’re waiting for their time to shine. Here’s what you’ll need:
- Skinless boneless chicken thighs
- Dried oregano
- Dried thyme
- Pepper
- Garlic powder
- Onion powder
- White pepper
- Olive oil
How to Make Instant Pot Chicken Thighs
- In a small bowl, mix together dried oregano, dried thyme, pepper, garlic powder, onion powder, and white pepper. This will be your flavor magic dust.
- Rub the chicken thighs generously with the seasoning mix. Imagine you’re giving them a spa treatment — they deserve it.
- Set your Instant Pot to Saute mode and let it get nice and warm for about a minute. When it’s ready, add the olive oil. The oil should shimmer — that’s your cue.
- Place the seasoned chicken thighs in the pot and cook them for 3-4 minutes on each side until they’re lightly browned. You want them to have that golden look, and your kitchen will start smelling heavenly.
- Transfer the chicken thighs to a plate. Now, turn off the Instant Pot and pour in 1 cup of water. Use a scraper to gently nudge all those tasty brown bits off the bottom of the pot — these are flavor bombs!
- Place the metal trivet into the pot, and then nestle the chicken thighs on top of it.
- Secure the lid on the Instant Pot, making sure the vent is closed. Set it to Manual Pressure on high for 8 minutes. This is where the Instant Pot works its magic.
- Once the timer is up, let the pressure release naturally for 10 minutes. Then, carefully release any remaining pressure. When the pin drops, it’s safe to open the lid and reveal your perfectly cooked chicken.
- Serve these juicy chicken thighs with your favorite sides, and enjoy the deliciousness!
Cook’s Notes
Here’s the scoop: don’t skip the browning step. It adds a depth of flavor that makes people wonder if you’ve been cooking all day. If you’re making this ahead of time, these chicken thighs reheat beautifully. Just pop them in the microwave or a warm oven for a few minutes. Store leftovers in an airtight container in the fridge for up to three days. If you happen to forget to release the pressure naturally, don’t worry too much; the chicken should still be juicy, but try to remember next time for the best texture.
Make It Your Own
There’s a world of possibilities to tweak this recipe to your liking:
- Swap the chicken thighs for crispy tofu if you’re going for a vegetarian vibe. Just be mindful of cooking times.
- Add a squeeze of lemon juice and zest to the seasoning mix for a bright, zesty kick.
- Craving spice? Toss in some cayenne pepper with the seasoning for a fiery twist.
- Throw in some baby potatoes or carrots on the trivet with the chicken for a complete one-pot meal.
If you try this, I’d love to hear how it turns out — drop a comment or tag me! This dish has saved my sanity more times than I can count, and I hope it becomes a staple in your kitchen too. Enjoy every bite!
Related update: Instant Pot Chicken Thighs
Related update: Tuna Noodle Casserole: Mommie Cooks
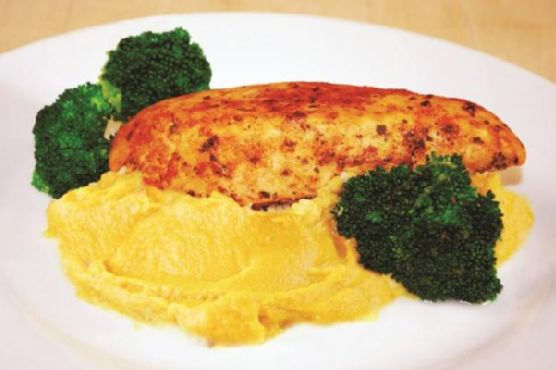
Last Tuesday, I found myself frantically rummaging through my pantry, desperately trying to pull a quick dinner together while my kids were on the brink of a full-blown meltdown. You know, one of those evenings when time feels like it’s slipping through your fingers, and everyone is hangry? That’s when I stumbled upon my trusty mixed herb pack and had a lightbulb moment: Herb chicken with sweet potato mash and sautéed broccoli. This dish turned out to be a lifesaver — it’s comforting enough to soothe any midweek chaos but feels just fancy enough to make you proud of your culinary skills. Plus, it’s a breeze to make, with most of the ingredients likely lounging around in your kitchen already.
Jump to Recipe
What You’ll Need
This ingredient list is refreshingly simple, and chances are you already have most of this on hand. Here’s what you’ll need to whip up this delicious meal:
- Broccoli
- Mixed pack of Maggi So Herbs
- Olive oil
- Diced russet potato
- Black pepper and salt
- Skinless boneless chicken breasts
- Diced sweet potatoes
- Unsalted butter
How to Make Herb Chicken with Sweet Potato Mash and Sautéed Broccoli
- Preheat your oven to 350°F (180°C) or 320°F (160°C) if you’re using a convection oven. Cook the chicken following the instructions on the herb pack — it’s as simple as it sounds, and your kitchen will soon smell divine.
- About 15 minutes before the chicken is done, bring a pot of water to a boil. Toss in the diced russet potatoes and let them cook for 5 minutes. Then add the sweet potatoes and continue boiling until both types of potatoes are tender.
- Drain the potatoes and roughly mash them. Add a generous dollop of butter, a pinch of salt, and a sprinkle of black pepper. Mash until everything is smooth and creamy — taste and adjust seasoning if needed.
- While the potatoes are doing their thing, heat a splash of olive oil in a pan over medium heat. Add the broccoli and sauté it quickly until it’s tender and vibrant green. Cover to keep it warm and steamy.
- Once the chicken is done, take it out of the oven and let it rest for a minute. Carefully cut open the cooking bag and gently tip the contents into a serving dish.
- Slice the chicken breasts into chunky pieces, doing your best to keep their original shape. This’ll make for a pretty presentation when served on top of the mash.
- To serve, generously pile the mash onto a plate, top it with sliced chicken and any delicious juices from the cooking bag, and add a side of that bright sautéed broccoli. Enjoy!
Cook’s Notes
Here’s the lowdown on making this dish smoothly. First off, when you’re mashing the potatoes, don’t be shy with the butter — it’s what makes the mash indulgently creamy. If you want to make this meal ahead, you can prep the mash and broccoli earlier in the day and just reheat them when you’re ready to serve. The chicken is best cooked fresh, but if you have leftovers, store them in an airtight container in the fridge for up to two days. Just note that reheated chicken can dry out, so add a splash of water or broth when warming it up.
Make It Your Own
This dish is versatile, so don’t hesitate to put your own spin on it! Here are a few ideas:
- Swap the chicken for crispy tofu to make it vegetarian. Just coat the tofu in herbs before baking.
- Add a handful of grated cheese to the mashed potatoes for an extra creamy, cheesy flavor.
- Throw some sliced almonds or pine nuts into the broccoli for a bit of crunch and nuttiness.
- Use a mix of sweet and smoked paprika in the potatoes for a smoky kick.
If you try this, I’d love to hear how it turns out — drop a comment or tag me on social media. Happy cooking, and may this recipe save your midweek dinner scramble just like it did mine!
Related update: Herb chicken with sweet potato mash and sautéed broccoli
Related update: Mediterranean eggplants

One rainy Tuesday evening, I found myself staring at a lonely lime on the counter, wondering how I could whip up something that felt fresh and exciting despite the weather gloom. My Instant Pot was calling, and I imagined the sizzle of tacos — not just any tacos, but ones that are easy enough for a weeknight yet flavorful enough to make you feel like a dinner hero. That’s how these Instant Pot Chicken Tacos came to life. They’re a symphony of flavors, with just the right tang from lime and a kick from taco seasoning, and the best part? They’re a breeze to make, even if you’re juggling a million things. Trust me, you’re going to want to bookmark this one for every taco Tuesday (or any day, really) when life gets a little hectic.
Jump to Recipe
What You’ll Need
The beauty of this recipe is its simplicity. Chances are, you already have most of these waiting in your pantry or fridge. Here’s what you’ll need to create this taco magic:
- Chicken breasts — the star of the show, tender and juicy.
- Black pepper
- Taco seasoning — brings the fiesta to your taste buds.
- Purple onion — for a subtle sharpness and a pop of color.
- Canned salsa — your secret shortcut to layered flavor.
- Lime juice — for that fresh zing at the end.
How to Make Instant Pot Chicken Tacos
With just a few steps, you’ll have these delightful tacos ready in no time:
- First, generously season both sides of the chicken breasts with black pepper and taco seasoning. Make sure they’re well-covered for maximum flavor.
- Place the seasoned chicken into the bottom of your Instant Pot. Let the anticipation build as you layer the flavors.
- Next, top the chicken with a handful of diced purple onion and a generous pour of canned salsa. It should look like a fiesta in a pot!
- Secure the Instant Pot lid into the lock position. Set it to the Poultry setting for 12 minutes. During this time, you can almost hear the flavors mingling and dancing inside.
- Once the timer beeps, don’t rush things. Allow the Instant Pot to naturally release pressure for 20 minutes. This is where the magic happens.
- Carefully remove the chicken from the pot and shred it with two forks. You’ll notice how effortlessly it falls apart.
- Sprinkle the shredded chicken with fresh lime juice. The tangy aroma will hit you, and you’ll know it’s taco time.
- Serve the chicken over a bed of rice or wrap it snugly in tortillas. Either way, you’re in for a treat!
Cook’s Notes
Here’s a little insider scoop to make the most out of this recipe:
– If you’re in a hurry, you can quick-release the pressure after cooking, but I find the patience pays off in flavor.
– Store any leftovers in an airtight container in the fridge for up to 3 days. They make for some mean taco bowls or quesadillas the next day.
– Shredding gets messy, but it’s worth it! Just make sure your forks are sturdy enough for the job.
– If you like your tacos with a bit of heat, feel free to throw in a pinch of cayenne with the taco seasoning.
Make It Your Own
Here are a few ideas to put your personal spin on these tacos:
- Swap the chicken for crispy tofu for a vegetarian delight that’s just as satisfying.
- Use a smoky chipotle salsa instead of regular salsa for an extra layer of depth.
- Top with crumbled queso fresco or a dollop of sour cream for added creaminess.
- Stir in some fresh corn kernels or sliced bell peppers before cooking for extra crunch and color.
If you try this, I’d love to hear how it turns out — drop a comment or tag me! Your kitchen adventures make my day. Enjoy those tacos, and remember, the best meals are the ones shared with laughter and a little bit of lime. 🌮
Related update: Instant Pot Chicken Tacos
Related update: Herb chicken with sweet potato mash and sautéed broccoli
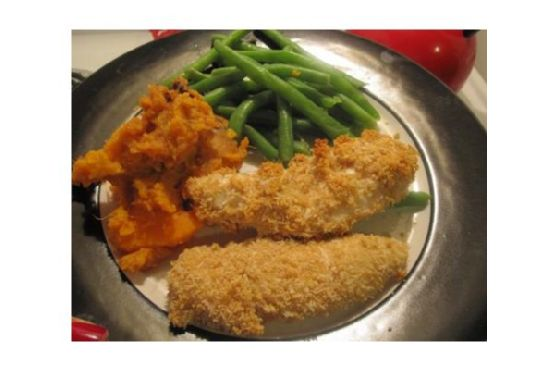
Last Tuesday, I found myself staring into my pantry, half-hungry and half-hoping for inspiration to strike. The kids were asking for chicken nuggets, and I was craving something a little more grown-up but still easy to whip up on a weeknight. That’s when I remembered these Coconut and Whole Wheat Chicken Tenders. They’re like a tropical vacation for your taste buds and so much better than any fast-food version. Crispy on the outside, juicy on the inside, and with a hint of coconut that makes you feel like you’re doing something special. Plus, they’re baked, not fried, so you can feel a bit virtuous while indulging. Seriously, these are a must-try for anyone looking to jazz up their dinner routine without spending hours in the kitchen. Jump to Recipe
What You’ll Need
The beauty of this recipe is that it’s simple yet flavorful, and chances are you already have most of these ingredients at home.
- Chicken tenders – the star of the show
- Egg whites – to give that perfect coating
- Unsweetened coconut – for that tropical flair
- Whole wheat bread crumbs – for a hearty crunch
How to Make Coconut and Whole Wheat Chicken Tenders
- Preheat your oven to 350 degrees Fahrenheit. There’s nothing like a warm oven ready to welcome a new creation!
- Dip each chicken tender into a bowl filled with egg whites, ensuring it’s fully coated. The egg whites are the glue that will hold the crunchy magic together.
- In another bowl, mix the whole wheat bread crumbs with the unsweetened coconut until they’re evenly distributed. This is where the magic happens, friends!
- Roll the egg-coated chicken tenders in the breadcrumb-coconut mixture, pressing gently so it sticks. You’ll know it’s right when they’re wearing their new coat proudly.
- Place the tenders on a cookie sheet, making sure they’re not touching. Bake them for 20 minutes, or until the crust is golden and fragrant. Your kitchen will smell amazing!
Cook’s Notes
These chicken tenders are the perfect blend of easy and impressive. Here are a few tips to make sure they turn out perfect every time:
- If you find yourself without whole wheat bread crumbs, regular breadcrumbs will do, though you’ll miss a bit of that nutty flavor.
- Make sure your coconut is unsweetened, or you’ll end up with a surprisingly sweet dish that’s not quite what we’re going for here.
- These tenders are best eaten fresh out of the oven, but you can reheat leftovers in a 350-degree oven for about 10 minutes.
- Store leftovers in an airtight container in the fridge for up to 3 days. They’re great for a quick lunch the next day!
Make It Your Own
- Swap the chicken for crispy tofu if you’re looking for a vegetarian option. The texture is amazing and soaks up the flavors beautifully.
- Try adding a teaspoon of curry powder to the breadcrumb mixture for a spicy twist.
- Use panko breadcrumbs instead of whole wheat for an extra crispy texture that crunches with every bite.
- If you’re a garlic lover, add a teaspoon of garlic powder to the bread crumb mix for an additional layer of flavor.
If you try this, I’d love to hear how it turns out — drop a comment or tag me! Cooking is all about sharing the joy, after all. Enjoy your tropical escape from the comfort of your kitchen!
Related update: Coconut and Whole Wheat Chicken Tenders
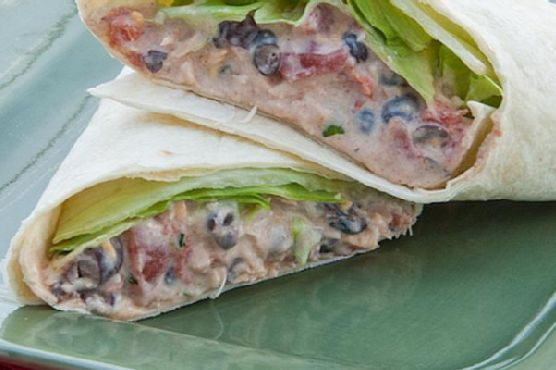
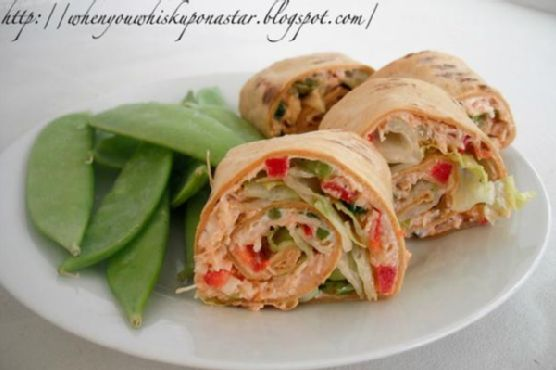
Picture this: It’s a Tuesday night, and you’re dead set on making dinner happen without a trip to the store. As I rummaged through my pantry, I found a can of Swanson Premium Chicken and thought, “Well, this could be interesting!” That’s how these Chicken Enchilada Salad Wraps came to life. They’re the kind of dish that feels like you’ve put way more effort into dinner than you really have. Perfect for when you want something comforting yet fresh and vibrant. These wraps are my go-to when I need a quick meal that doesn’t skimp on flavor. Trust me, they’re a keeper! Jump to Recipe
What You’ll Need
There’s a good chance you already have most of these ingredients hiding in your kitchen. It’s all about those pantry staples coming together to make magic.
- Light cream cheese
- Sour light cream
- Chili powder
- Cumin
- Garlic
- Canned Swanson Premium Chicken
- Shredded cheddar cheese
- Diced canned tomatoes
- Diced green onions
- Fresh cilantro
- Lettuce
- Burrito-sized tortillas
How to Make Chicken Enchilada Salad Wraps
- In a medium-sized bowl, blend together the light cream cheese, sour cream, chili powder, cumin, and garlic until smooth. You’ll want the mixture to be creamy with a little bit of a kick – smell those spices bloom!
- Gently fold in the shredded cheddar cheese, Swanson Premium Chicken, diced tomatoes, green onions, and fresh cilantro. Make sure everything is evenly mixed so you get a bit of everything in each bite.
- Divide the mixture evenly between the tortillas, making sure to spread it to the edges for maximum flavor coverage.
- Top each tortilla with a handful of lettuce. This adds a nice crunch and keeps things fresh and light.
- Roll up each tortilla burrito-style, tucking in the edges as you go to keep all the goodness inside.
- Slice in half if you’re feeling fancy and serve immediately. Enjoy the meld of textures and flavors, from cool and creamy to warm and savory.
Cook’s Notes
These wraps are pretty forgiving, so feel free to adjust the spices to your liking. If you’re a spice lover, a dash of cayenne wouldn’t hurt. They’re best enjoyed fresh but will keep in the fridge for a day or so. Just wrap them tightly in foil or plastic wrap to keep them from drying out.
- If you’re making them ahead for a lunchbox, keep the lettuce separate until you’re ready to eat to avoid it getting soggy.
- Got leftovers? They make a surprisingly good quesadilla filling. Just heat a pan and crisp them up until golden!
Make It Your Own
- Swap the chicken for crispy tofu for a vegetarian twist that still packs in the protein.
- Use spinach instead of lettuce for a slight nutritional boost and a different kind of crunch.
- If you’re out of tortillas, this mix works wonderfully as a dip with some crispy tortilla chips.
- Add some sliced avocado for an extra creamy dimension and a touch of healthy fat.
If you try this, I’d love to hear how it turns out — drop a comment or tag me! Your kitchen adventures always make my day.
Related update: Chicken Enchilada Salad Wraps
Related update: Hyderabadi baghara Baingan
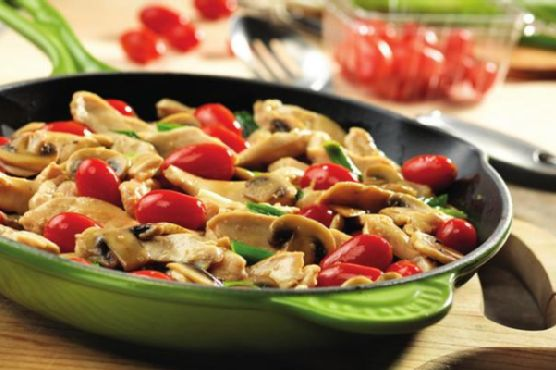
It was one of those evenings where the fridge seemed determined to sabotage my dinner plans. A random mix of odds and ends stared back at me — a handful of grape tomatoes about to bid farewell, a shy pack of mushrooms, and the ever-reliable chicken breast. I was craving something that felt like comfort but didn’t require a culinary degree. And just like that, this Chicken with Grape Tomatoes and Mushrooms came to life. It’s simple, a bit rustic, and oh, the flavors! You can whip it up in about 30 minutes, and it’s perfect for those nights when you want something special but don’t want to break a sweat.
Jump to Recipe
What You’ll Need
This dish is all about fresh simplicity. You might already have most of these beauties in your kitchen:
- 2 tablespoons olive oil
- 4 skinless boneless chicken breast halves
- 2 cups fresh mushrooms, sliced
- 2 cloves garlic, minced
- 1 cup grape tomatoes, halved
- 2 green onions, sliced
- 1 packet flavor concentrated chicken broth
- 1/4 cup water
How to Make Chicken with Grape Tomatoes and Mushrooms
- Start by heating 1 tablespoon of the olive oil in a 12-inch skillet over medium-high heat. Once the oil shimmers, add the chicken and let it sizzle until well browned, turning occasionally to get an even golden crust. This should take about 5-7 minutes. Remove the chicken and set it aside.
- In the same skillet, pour in the remaining tablespoon of oil. Toss in the mushrooms and let them cook, stirring occasionally, until they’re tender and releasing their juices, about 5 minutes.
- Reduce the heat to medium and add the garlic, grape tomatoes, and green onions to the skillet. Stir everything together for about a minute until the garlic is fragrant and the tomatoes start to soften slightly.
- Nestle the browned chicken back into the skillet. Pour in the flavor boost and water, stirring gently to combine all the flavors. Let everything simmer together for another 5-7 minutes, or until the chicken is cooked through and no longer pink in the middle.
Cook’s Notes
When cooking chicken, keep an eye on the heat. If it’s too high, the chicken can dry out and the vegetables might scorch. If you’re not a fan of mushrooms, swap them out for zucchini or bell peppers. This dish can be made ahead of time and stored in the fridge for up to 3 days in a sealed container. To reheat, simply warm it in a skillet over low heat until heated through. Avoid using the microwave if you can — it tends to make the chicken rubbery.
Make It Your Own
- Swap the chicken for crispy tofu for a vegetarian version. Just be sure to press the tofu to remove excess moisture.
- Add a splash of white wine when you add the garlic for a richer flavor profile. Let it cook off slightly before proceeding to the next step.
- If you love a bit of heat, throw in a pinch of red pepper flakes along with the garlic and tomatoes.
- For a creamier sauce, stir in a tablespoon of heavy cream right at the end.
If you try this, I’d love to hear how it turns out — drop a comment or tag me! I’m always curious to see how you make it your own. Happy cooking!
Related update: Chicken with Grape Tomatoes and Mushrooms
Related update: Farfalle with Shrimps, Tomatoes Basil Sauce
Related update: Chicken Enchilada Salad Wraps
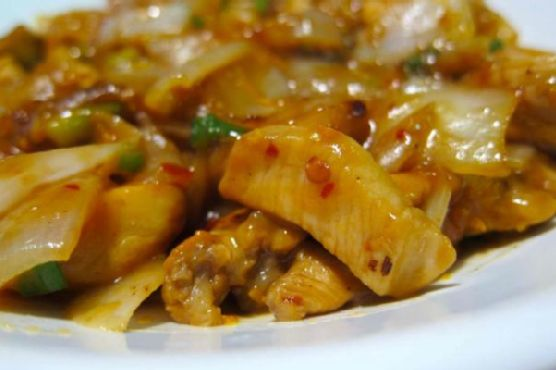
It was one of those evenings where the craving for takeout hits hard, but the thought of delivery fees makes you cringe. I remember standing in my kitchen, staring at a lonely chicken breast and a couple of oranges, thinking, “Could I… maybe… make orange chicken from scratch?” Spoiler: I did, and it was magic. It turns out, whipping up a healthier version of this takeout classic is not only doable but downright satisfying. The best part? It’s a whirlwind of citrusy freshness, subtle heat, and a sweet tangy glaze that hugs every bite of tender chicken.
Jump to Recipe
What You’ll Need
So, what’s the secret sauce (pun intended) to this homemade wonder? A lot of it is probably already chillin’ in your pantry or fridge. Here’s what you’ll need:
- Chicken breast – the star; make sure it’s fresh and juicy.
- Vegetable oil
- Orange juice – squeezed or store-bought, but fresh is fab.
- Rice vinegar
- Rice wine
- Soy sauce – it’s gotta be the good stuff.
- Chili sauce
- Garlic – because what is even life without garlic?
- Brown sugar
- Orange zest – that’s where the zing comes from!
- Green onions
- Water
- Corn starch
- Salt and pepper
- White rice – fluffy and perfect for soaking up all that goodness.
How to Make Healthy Orange Chicken
- First, cut the chicken breast into bite-sized cubes. This is where the magic begins.
- In a mixing bowl, combine the chicken with orange juice, rice vinegar, rice wine, chili sauce, brown sugar, and minced garlic. Mix it up and let those flavors marinate.
- Cover the bowl with plastic wrap, pressing it down so the marinade really gets to know the chicken. Pop it in the fridge for about an hour.
- While the chicken is getting cozy in the marinade, chop up your veggies. Cut the onion into square pieces and separate the white and green parts of the green onions. Don’t forget to zest that orange!
- Heat vegetable oil in a sauté pan over high heat. Toss in the marinated chicken and sauté for about a minute. Toss it around and give it another minute until it’s golden and caramelized.
- Transfer the chicken to a dish and, in the same sizzling pan, add the chopped onion. Sauté until they’re soft and aromatic.
- Add the chicken back into the pan along with the white parts of the green onion and your glorious orange zest. Let them mingle for about 30 seconds.
- Pour in the marinade liquid and let it simmer. This is where things get saucy!
- Add the remaining green onion and let the sauce thicken to your liking. A little patience here goes a long way.
- Once the sauce has reached your preferred consistency, season with salt and pepper. Serve it over a bed of fluffy white rice, and voilà, your orange chicken masterpiece is ready!
Cook’s Notes
– Make sure not to skip the marinating process. It’s what gives the chicken all that flavor you love.
– If you’re short on time, you can marinate for less, but an hour is ideal.
– Store leftovers in an airtight container. They’ll keep in the fridge for up to three days, and honestly, the flavors get even better!
– To reheat, just pop it in a pan over medium heat. Add a splash of water if the sauce gets too thick.
Make It Your Own
- Swap the chicken for crispy tofu to keep it vegetarian. Just prep the tofu the same way!
- Add some bell pepper slices or broccoli florets for extra crunch and color.
- Switch up the sauce with a few dashes of sesame oil for a nutty twist.
- Fancy a bit more heat? A sprinkle of crushed red pepper or a drizzle of sriracha should do the trick!
If you try this, I’d love to hear how it turns out — drop a comment or tag me! And remember, cooking is all about experimenting, so don’t be afraid to put your own spin on it. Happy cooking! 🍊🍗
Related update: Healthy Orange Chicken
Related update: Cheddar Polenta With Bacon Wrapped Asparagus