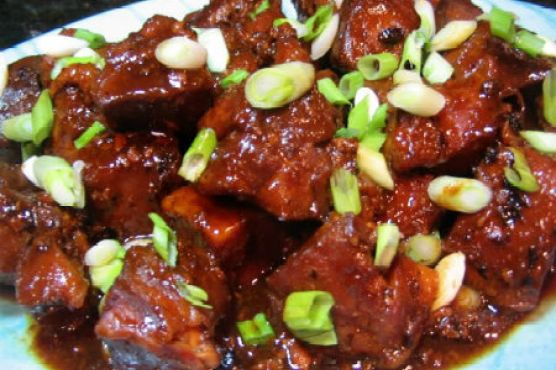
On one of those bustling weekday evenings when time seems to slip away faster than you can say “dinner,” I found myself staring into the fridge, hoping for a miracle. What I really wanted was something fresh and light but also satisfying. That’s when I remembered these Easy To Make Spring Rolls. They’re perfect for those nights when you want something delicious and impressive-looking without the fuss. Plus, they have this uncanny ability to make you feel like you’ve got your life together. Not bad for a dish that’s ready in under 30 minutes!
Jump to Recipe
What You’ll Need
This recipe is the epitome of a grab-and-go grocery list. Most of these ingredients are probably already lounging in your kitchen. Here’s what you’ll need to whip up these fresh bites of joy:
- Rice paper wrappers
- Cooked shrimp, halved
- Boston lettuce leaves
- Fresh basil, mint, and coriander leaves
- Red bell pepper, sliced into thin strips
- Chili pepper, thinly sliced (optional for a kick)
- Garlic, minced
- Fresh lime juice
- Nuoc cham for dipping
- Fish sauce
- Rice vinegar
- Sugar
- Water
How to Make Easy To Make Spring Rolls
- First, get all your ingredients prepped and within arm’s reach. Trust me, this will save you a lot of scrambling later.
- Fill a large bowl with warm water. Dip a rice paper wrapper in the water just until it softens—this means a couple of swishes should do it. It might feel slightly stiff as you take it out, but don’t worry.
- Lay the softened wrapper flat on a clean surface. In the center, line up two shrimp halves. It’s like creating a little shrimp runway!
- Top the shrimp with a few leaves of basil, mint, and cilantro. Add a layer of Boston lettuce, and maybe some red bell pepper strips and a slice of chili if you’re feeling spicy.
- Fold the sides of the wrapper inward over the filling. Start rolling from the end with the lettuce, tucking in the filling as you go for a snug little spring roll.
- Repeat with the remaining wrappers and ingredients. Once you’ve got your little spring roll soldiers lined up, cut them in half for easy handling.
- Serve them at room temperature with some nuoc cham for dipping. Don’t skip the dipping sauce—it’s the secret weapon!
Cook’s Notes
Dealing with rice paper wrappers can be a bit like handling a delicate flower. Too much time in the water and they’ll become a soggy mess. Not enough and they’ll tear when you try to roll. My trick? A quick dip and a confident hand. They’ll soften up perfectly by the time you start rolling. These rolls are best enjoyed fresh, but you can prepare all the components ahead of time and roll them just before serving. If you have leftovers, wrap them tightly in plastic wrap to keep them from drying out.
Make It Your Own
Feel free to get creative with these spring rolls. Here are some variations to consider:
- Swap the shrimp for crispy tofu to make it vegetarian-friendly.
- Add in slivers of cooked pork or chicken for a meatier bite.
- Include julienned carrots for an extra crunch and pop of color.
- Spice things up by adding a dash of Sriracha to the dipping sauce.
If you try this, I’d love to hear how it turns out—drop a comment or tag me on social media! Whether you’re a spring roll pro or a first-timer, I hope these become a fun and tasty part of your meal rotation. Enjoy every bite!
Related update: Easy To Make Spring Rolls
It was one of those frantic weeknights when the thought of cooking anything complicated felt like a Herculean task. The kids were hungry, my partner was stuck in traffic, and the fridge looked like it had been raided by a group of snack-hungry gremlins. That’s when I spotted the package of rice paper hiding behind the milk. In a flash, I knew what to do. These Vegetarian Spring Rolls with Garlic Lime Sauce were going to be our savior. They’re colorful, crunchy, and somehow manage to make you look like a culinary genius with minimal effort. Perfect for a quick dinner fix or when you want to impress without breaking a sweat.
Jump to Recipe
What You’ll Need
The beauty of this recipe is its simplicity — chances are, you already have most of these ingredients lurking around.
- Rice paper
- Butter leaf lettuce
- Carrots
- Jicama
- Red bell pepper
- Yellow bell pepper
- Thai basil
- Ginger
- Garlic
- Lime
- Hoisin sauce
- Sriracha
How to Make Vegetarian Spring Rolls With Garlic Lime Sauce
- First, julienne the red and yellow bell peppers, carrots, jicama, and Thai basil. Aim for strips about 1/8 inch thick and 2 inches long, like colorful little matchsticks.
- Fill a round pie pan or shallow plate with warm water. Delicately dip one piece of rice paper in the water, ensuring both sides are soaked — but no need to drown them!
- Carefully lay the rice paper on a flat, flour towel cloth. Wait about ten seconds for it to soften — it should feel silky and pliable.
- Gently peel the rice paper off the cloth and place half a butter leaf lettuce on top. Discard the ribbing to keep things smooth and easy to roll.
- Add a delicate layer of each vegetable on top of the lettuce, finishing with a sprinkle of Thai Basil. It’s like art — have fun with it!
- To roll: start at one end, fold the edge toward the middle, and repeat with the parallel side. Give it a little 90-degree turn and roll it snugly, like wrapping up a little gift.
- Cut each roll diagonally and arrange them on a serving platter, so they look all fancy and inviting.
- For the Garlic Lime Hoisin Sauce, use a mortar and pestle to crush the garlic and ginger together until fragrant. The aroma should make you smile.
- Whisk in fresh lime juice and a modest splash of Sriracha for that zingy, spicy kick. Finally, add the hoisin sauce and whisk until combined. Taste and adjust as needed.
Cook’s Notes
Rolling these can be a bit of a learning curve, but once you get the hang of it, you’re golden. Rice paper can be temperamental, so if it tears, just keep going — a little imperfection never hurt anyone. If you want to prep these in advance, keep the veggies prepped in the fridge and roll them just before serving to keep everything fresh. Leftover rolls can be stored in an airtight container in the fridge for a day, but the rice paper will lose some of its magic over time. The sauce, however, can be made days ahead and will only get better as the flavors mingle.
Make It Your Own
- Swap the jicama for cucumber for a refreshing twist.
- Replace Thai basil with cilantro if that’s more your vibe.
- For a protein boost, add slices of crispy tofu or tempeh.
- Feeling nutty? Toss in some crushed peanuts for extra crunch.
If you try this, I’d love to hear how it turns out — drop a comment or tag me! Whether it’s a weeknight fix or a dinner party appetizer, these spring rolls are sure to brighten your table and your tastebuds. Enjoy!
Related update: Vegetarian Spring Rolls With Garlic Lime Sauce
Related update: Easy To Make Spring Rolls
It was one of those evenings where the craving for takeout hits hard, but the thought of delivery fees makes you cringe. I remember standing in my kitchen, staring at a lonely chicken breast and a couple of oranges, thinking, “Could I… maybe… make orange chicken from scratch?” Spoiler: I did, and it was magic. It turns out, whipping up a healthier version of this takeout classic is not only doable but downright satisfying. The best part? It’s a whirlwind of citrusy freshness, subtle heat, and a sweet tangy glaze that hugs every bite of tender chicken.
Jump to Recipe
What You’ll Need
So, what’s the secret sauce (pun intended) to this homemade wonder? A lot of it is probably already chillin’ in your pantry or fridge. Here’s what you’ll need:
- Chicken breast – the star; make sure it’s fresh and juicy.
- Vegetable oil
- Orange juice – squeezed or store-bought, but fresh is fab.
- Rice vinegar
- Rice wine
- Soy sauce – it’s gotta be the good stuff.
- Chili sauce
- Garlic – because what is even life without garlic?
- Brown sugar
- Orange zest – that’s where the zing comes from!
- Green onions
- Water
- Corn starch
- Salt and pepper
- White rice – fluffy and perfect for soaking up all that goodness.
How to Make Healthy Orange Chicken
- First, cut the chicken breast into bite-sized cubes. This is where the magic begins.
- In a mixing bowl, combine the chicken with orange juice, rice vinegar, rice wine, chili sauce, brown sugar, and minced garlic. Mix it up and let those flavors marinate.
- Cover the bowl with plastic wrap, pressing it down so the marinade really gets to know the chicken. Pop it in the fridge for about an hour.
- While the chicken is getting cozy in the marinade, chop up your veggies. Cut the onion into square pieces and separate the white and green parts of the green onions. Don’t forget to zest that orange!
- Heat vegetable oil in a sauté pan over high heat. Toss in the marinated chicken and sauté for about a minute. Toss it around and give it another minute until it’s golden and caramelized.
- Transfer the chicken to a dish and, in the same sizzling pan, add the chopped onion. Sauté until they’re soft and aromatic.
- Add the chicken back into the pan along with the white parts of the green onion and your glorious orange zest. Let them mingle for about 30 seconds.
- Pour in the marinade liquid and let it simmer. This is where things get saucy!
- Add the remaining green onion and let the sauce thicken to your liking. A little patience here goes a long way.
- Once the sauce has reached your preferred consistency, season with salt and pepper. Serve it over a bed of fluffy white rice, and voilà, your orange chicken masterpiece is ready!
Cook’s Notes
– Make sure not to skip the marinating process. It’s what gives the chicken all that flavor you love.
– If you’re short on time, you can marinate for less, but an hour is ideal.
– Store leftovers in an airtight container. They’ll keep in the fridge for up to three days, and honestly, the flavors get even better!
– To reheat, just pop it in a pan over medium heat. Add a splash of water if the sauce gets too thick.
Make It Your Own
- Swap the chicken for crispy tofu to keep it vegetarian. Just prep the tofu the same way!
- Add some bell pepper slices or broccoli florets for extra crunch and color.
- Switch up the sauce with a few dashes of sesame oil for a nutty twist.
- Fancy a bit more heat? A sprinkle of crushed red pepper or a drizzle of sriracha should do the trick!
If you try this, I’d love to hear how it turns out — drop a comment or tag me! And remember, cooking is all about experimenting, so don’t be afraid to put your own spin on it. Happy cooking! 🍊🍗
Related update: Healthy Orange Chicken
Related update: Cheddar Polenta With Bacon Wrapped Asparagus
Last Tuesday, I found myself staring at a lonely cabbage and some tomatoes in my fridge, wondering how I was going to transform these humble ingredients into something more exciting than their usual salad gig. I was craving something warm, comforting, and surprisingly quick because, you know, not all weeknight dinners should feel like a marathon. That’s when I remembered my fail-safe stir fry trick. This Stir Fried Cabbage and Tomatoes dish is like a warm hug on a chilly day — it’s savory, a touch sweet, and comes together faster than you can decide what to watch on Netflix. Trust me, this is the kind of dish that makes you look like you’ve got your life together, even if it’s just dinner.
Jump to Recipe
What You’ll Need
Gathering ingredients for this recipe is almost as easy as making it. Most of them are probably sitting quietly in your kitchen, waiting for their moment to shine.
- Beijing cabbage – coarsely shredded
- Diced tomatoes – as fresh as you can get
- Gloves garlic – because garlic is life
- Salt
- Sugar
- Ketchup – yes, the condiment extraordinaire
- Water
How to Make Stir Fried Cabbage and Tomatoes
- Start by giving your cabbage a good rinse and then coarsely shred it. You want the pieces to be bite-sized but not too tiny, allowing them to retain a slight crunch.
- Dice your tomatoes. The juicier, the better, as they’ll add a wonderful freshness to the dish.
- Heat a wok over medium-high heat, adding a splash of oil. When the oil shimmers, toss in the garlic. Sauté until golden and fragrant, about 30 seconds. Your kitchen should smell amazing already!
- Throw in the shredded cabbage. Stir-fry until it begins to soften. If it looks a bit dry, don’t hesitate to add a tablespoon or two of water to help it along.
- Now, add your diced tomatoes along with a pinch of salt, a dash of sugar, and a nice squirt of ketchup for that umami-rich depth. Pour in 2-3 tablespoons of water to create a light sauce.
- Stir everything together until well combined. The mixture should be juicy but not soupy. Cook until the tomatoes have broken down slightly and everything is melded together. This is when you taste and adjust seasoning if needed.
- Serve immediately. Your stir fry should be vibrant and steaming hot.
Cook’s Notes
This dish is all about balance. The sugar helps offset the acidity of the tomatoes and ketchup, so don’t skip it. If your cabbage feels too crunchy, just add a touch more water and give it a few more minutes — patience is key.
- This stir fry doesn’t hold up beautifully as leftovers, so try to enjoy it fresh. But if you do have some left, store it in an airtight container in the fridge and reheat gently.
- If you’re planning a dinner party, you can prep the cabbage and tomatoes ahead of time. Just keep them in separate containers in the fridge until you’re ready to cook.
Make It Your Own
- Add protein: Toss in some sliced chicken or crispy tofu for a heartier version.
- Switch up the veggies: Bell peppers or shredded carrots would be a lovely addition for some color and sweetness.
- Spice it up: Introduce a bit of heat with a sliced chili or a dash of hot sauce if you like things spicy.
- Herb it up: Finish with fresh cilantro or basil for an aromatic lift.
If you try this, I’d love to hear how it turns out — drop a comment or tag me! Cooking is all about experimenting and having fun, so make this stir fry your own and enjoy every bite.
Related update: Stir Fried Cabbage and Tomatoes
Related update: Tomato Cutlets
I had one of those days where the sun just wouldn’t quit, blazing through my kitchen window, taunting me while I was craving something light but satisfying. The usual suspects in my pantry were looking tired, and I wanted something that just screamed “refreshing.” Enter Mango Fried Rice, my answer to a summer evening where you want a meal that’s as breezy and colorful as you’d imagine a tropical getaway to be. This dish is one of those delightful concoctions that’s both a little fancy and incredibly simple to pull off. The sweetness of the mango mixed with the savory notes of the fried rice is the comfort you didn’t know you needed. Trust me, it’ll impress your taste buds—and maybe anyone else lucky enough to share it with you.
Jump to Recipe
What You’ll Need
I love this ingredient list because it feels like a scavenger hunt in your own kitchen. Chances are you’re already halfway there.
- 1 cup rice
- 1 1/2 cups chicken stock
- 1 large mango, cubed
- Mixed vegetables (like carrots, peas, and bell peppers)
- 1 scotch bonnet pepper, chopped
- 1-2 seasoning cubes
How to Make Mango Fried Rice
- First, wash your rice thoroughly. You want those grains shining like little pearls.
- Bring it to a gentle boil on medium heat with just a splash of water. No need to drown it; we’re going minimalist here since the chicken stock’s coming in hot later.
- As soon as the rice turns slightly soft and absorbs that initial water, it’s time to reduce the heat. Pour in the chicken stock and let it work its magic. Cook until all that flavorful stock is absorbed and the rice is dry.
- Now, crank up the heat a bit and stir in the chopped vegetables and that fiery scotch bonnet pepper. It’s like a spa day for your rice, soaking up all those vibrant colors and flavors.
- Crumble in your seasoning cube. Oh, the savory goodness! Give it a gentle toss so it’s evenly distributed.
- Finally, gently fold in your cubed mango. You’re aiming for a harmonious blend of sweet and savory. Serve it warm with any protein you fancy. Chicken is my go-to, but hey, follow your heart!
Cook’s Notes
Let’s chat about how to keep this masterpiece at its peak. First off, if your chicken stock is homemade and has a bit of oil, you’re golden—no need for additional oil. Store leftovers in the fridge for up to three days, but good luck having any left over! If you’re meal prepping, cook everything except the mango and add it fresh when you’re ready to eat. Nobody wants mushy mango, trust me. Common misstep: rushing the rice. Give it the time it needs to soak up those flavors!
Make It Your Own
Feeling adventurous? Here are some ideas to switch things up:
- Go vegetarian by swapping the chicken stock for vegetable broth and adding some crispy tofu.
- Kick up the heat with an extra scotch bonnet. Fire lovers, this one’s for you!
- Try pineapple instead of mango for a tangier twist.
- Add a handful of roasted cashews for some crunch and extra protein.
If you give this Mango Fried Rice a whirl, I’d love to hear how it turns out—drop a comment or tag me in your culinary adventures! Enjoy the sweet and savory carnival in your mouth! 🌟
Related update: Mango Fried Rice
Related update: The Blarney Burger
The other night, I found myself staring into my pantry, that familiar feeling of “what on earth can I make for dinner?” creeping in. It was one of those long days where you’re just too exhausted to whip up anything too complicated. That’s when I remembered Turbo Chicken. It’s the perfect mix of comforting and impressive, with just the right amount of effort to make you feel like a kitchen hero without breaking a sweat. The best part? The crispy skin and juicy meat are practically a hug on a plate. So, let’s dive in together!
Jump to Recipe
What You’ll Need
The beauty of this dish lies in its simplicity. Chances are you already have most of these on hand, so no need for a last-minute grocery run. Here’s what you’ll gather:
- Whole chicken
- Soy sauce
- Salt
- Calamansi (or lemon/lime if you can’t find it)
- Baking flour dissolved in water
- Gravy from the turbo broiler drippings
- Bell pepper
How to Make Turbo Chicken
- Start by giving that chicken a loving rubdown with soy sauce, salt, and calamansi. Don’t be shy—massage it inside and out as if you’re making it the most relaxed chicken ever.
- Let the chicken marinate for about 10-20 minutes on each side. This is the perfect time to set up your turbo broiler and perhaps sip on a glass of something refreshing.
- Place a small baking pan at the bottom of the turbo broiler to catch all those wonderful drippings. Trust me, you’ll want this later for the gravy magic.
- Set the chicken in the turbo broiler, crank up the heat to 250 degrees, and let it work its magic for 30 minutes.
- After 30 minutes, turn the chicken over. Give it another 10 minutes to achieve the crispiest golden brown skin you’ve ever seen.
- While the chicken finishes up, grab those drippings and pour them into a small pan over low heat. Stir in the flour dissolved in water until silky smooth, then add salt, pepper, and a splash of calamansi to taste.
- Once your chicken is done and rested, carve it up and drizzle it with that beautiful gravy. Voilà! Dinner is served.
Cook’s Notes
Let me just say, the turbo broiler can be your best friend in the kitchen if you let it. It cooks everything evenly and gives you that crispy skin we all crave. Just be sure to watch your chicken closely after flipping it—those last 10 minutes can make all the difference between perfect and a tad too crispy.
Got leftovers? Lucky you! Store them in an airtight container in the fridge, and they’ll keep beautifully for up to three days. Reheat gently to keep all those juices locked in.
Make It Your Own
Feel like getting creative? Here are a few fun twists:
- Swap the chicken for some crispy tofu for a vegetarian-friendly version. Just adjust the cooking time accordingly.
- Add a hint of heat by including some chili flakes in your marinade.
- Throw in some garlic cloves inside the chicken cavity for an aromatic twist.
- Mix in a tablespoon of honey with your soy sauce marinade for a sweet and savory combo.
If you try this, I’d love to hear how it turns out — drop a comment or tag me! Can’t wait to see how you make Turbo Chicken your own. Happy cooking, friends! 🐔
Related update: Turbo Chicken
Related update: Tasty Easy Meatloaf
It was one of those evenings where the day just didn’t stop. You know the kind—I spent too long in traffic, the grocery store was packed, and let’s not even talk about the email avalanche. As I finally stepped into the kitchen, I was craving something that’s both comforting and invigorating. I remembered a recipe tucked away for a rainy day, one that combines creamy coconut with warming spices and fresh fish—Linefish Simmered In A Spiced Coconut Gravy. It’s the kind of dish that feels like a warm hug but also has a playful kick to it. The real beauty? Once you’ve got everything prepped, it practically cooks on its own, allowing you to sip a glass of your favorite white wine as the magic happens.
Jump to Recipe
What You’ll Need
I promise, most of these ingredients are pantry staples, lurking in the back of your cupboard just waiting for their time to shine. And those that aren’t, well, they’re totally worth the trip.
- Garlic
- Fresh thumb-sized piece of ginger
- Red chilli powder
- Turmeric
- Salt
- Tamarind pulp
- Vegetable oil
- Brown mustard seeds
- Fenugreek seeds
- Whole cloves
- White whole cardamom pods
- Thumb-length quill of cinnamon
- Onions
- Coconut milk
- Powdered cumin
- Black freshly milled pepper
- Fresh cilantro
- White fresh firm-fleshed fish fillets
- White fresh kilograms (assuming this means the right quantity for your crowd!)
How to Make Linefish Simmered In A Spiced Coconut Gravy
- Start by cutting the fish into large, hearty chunks. Toss them into a bowl, sneaking in half of that aromatic garlic and ginger while you’re at it. Sprinkle generously with chilli powder, turmeric, and a bit of salt. Give it all a good mix and let it chill in the fridge for a cool 30 minutes.
- While your fish is taking a breather, soften that tamarind pulp in a cup of warm water. It’s like giving it a little spa treatment for 20 minutes.
- Heat the vegetable oil in a large saucepan over a high flame. As soon as it’s shimmering, in go the mustard seeds, fenugreek, cloves, cardamom, and cinnamon. Let them sizzle and pop — this is when your kitchen starts to smell divine.
- Add the onions along with the reserved ginger and garlic to the party. Fry them briskly for about 10 minutes until they’re golden brown and fragrant.
- Mash the softened tamarind pulp into its soaking water with your fingers. Strain this tangy liquid over the onions and discard the leftover pulp.
- Pour in the creamy coconut milk and sprinkle the cumin powder. Give it a good stir and let it simmer for about 15 minutes, letting the flavors meld into a fragrant gravy.
- Gently tip the marinated fish cubes into the sauce. Stir them in with care and let them simmer until just cooked, about 7 minutes. You’re aiming for tender, not tough!
- Finish with a flourish of fresh cilantro sprinkled on top. Serve your creation hot with a side of Basmati rice, and enjoy the bliss that follows.
Cook’s Notes
Here’s the deal: fresh ingredients are non-negotiable here. They make all the difference. Also, when cooking the spices, keep an ear out for the mustard seeds popping. It’s their way of telling you they’re ready. This dish is best enjoyed fresh, but if you need to make it ahead, do the prep steps and store the marinated fish and sauce separately in the fridge. Just combine and simmer when you’re ready to serve. Leftovers? They’re even better the next day, as the flavors deepen. Just keep them in an airtight container in the fridge for up to two days.
Make It Your Own
- Not a fan of fish? Swap it out for crispy tofu chunks for a vegetarian twist. Just adjust the marinating time to let those flavors soak in.
- If you’re feeling adventurous, substitute the white fish with shrimp. Just be mindful; shrimp cooks a lot faster, so adjust the simmering time accordingly.
- Add a handful of baby spinach at the end for a pop of color and nutrients. It wilts beautifully into the sauce.
- For a richer texture, throw in a handful of cashew nuts while simmering the sauce. They’ll soften up and add a lovely creaminess.
If you try this, I’d love to hear how it turns out—drop a comment or tag me! Whether it’s your first taste or a comforting regular, this dish is a keeper. Enjoy every spoonful!
Related update: Linefish Simmered In A Spiced Coconut Gravy
Related update: Turbo Chicken
One Thursday evening, I found myself staring at my pantry, hoping for culinary inspiration to jump out at me. You know how it goes — those nights when you’re craving something more exciting than a sandwich but don’t want to spend hours in the kitchen. That’s when my memory flashed back to a street food adventure in Vietnam. I remembered devouring these crispy, savory pancakes called Bánh Xèo, filled with fresh veggies and a fragrant dipping sauce that tingled the senses. It was the perfect balance of crispy, soft, and tangy. So, I decided to recreate that magic. This recipe is both comforting and impressive without demanding too much of your time. Perfect for when you want to feel like you’ve traveled the world from your kitchen!
Jump to Recipe
What You’ll Need
Ever had one of those moments when you think you have nothing to cook, but then realize you actually have the makings of a feast? This is one of those recipes. Chances are you already have most of this in your kitchen, and the rest are worth adding to your pantry!
- Brown rice flour – the backbone for a gluten-free batter.
- Coconut milk – for that creamy texture and subtle sweetness.
- Tamari sauce – adds depth to the dipping sauce.
- Egg – helps bind the batter.
- Sea salt
- Turmeric – for color and a hint of earthiness.
- Cayenne – just a pinch for a touch of heat.
- Green fresh chili – adds freshness and zing.
- Carrot, daikon radish, and snow peas – for the filling, adding crunch and nutrition.
- Mung bean sprouts – because they make everything better.
- Fresh basil, mint, and parsley leaves – an aromatic, herbal trio.
- Trimmed enoki mushrooms – delicate and perfect for texture.
- Garlic and fresh ginger – because no good dish is complete without them.
- Red fresh chilies – for a spicy kick in the sauce.
- Lime juice – lifts everything with its citrusy zest.
- Rice vinegar – for a tang in the sauce.
- Sesame oil – for richness in the sauce.
How to Make Vietnamese Pancakes with Vegetables, Herbs and a Fragrant Dipping Sauce (Bánh Xèo)
- Start by making the pancake batter: In a mixing bowl, whisk together the rice flour, egg, sea salt, turmeric, cayenne, and green chili. Gradually add the coconut milk, whisking as you go. Aim for a smooth, pourable consistency. If it’s too thick, a splash of water does wonders. Cover the bowl and set it aside to rest.
- Now, onto the sauce: Combine the tamari sauce, lime juice, rice vinegar, minced garlic, grated ginger, chopped red chilies, and a drizzle of sesame oil. Whisk until all the flavors meld together and set aside. This fragrant sauce will take your pancakes to another level.
- For the filling, mix the julienned carrot, daikon radish, thinly sliced green onions, chopped green chilies, and sliced snow peas in a bowl. In another bowl, gather the chopped fresh herbs and have the mung bean sprouts and enoki mushrooms ready to go.
- Time to cook the pancakes! Heat a teaspoon of sesame oil in a non-stick skillet over medium heat. Once hot, pour in about 1/2 cup of batter. Use the bottom of the ladle to spread it into a 6 to 8-inch circle. Cook for 6 to 8 minutes, waiting for small bubbles to pop and the edges to turn crispy and golden brown. Flip and cook the other side for another couple of minutes. Repeat with the remaining batter, keeping the cooked pancakes warm in a 150°F oven.
- To serve, layer a portion of the vegetable mixture and herbs on one half of the pancake. Drizzle with some sauce, fold the pancake over, and give it another light drizzle of sauce. Voilà, your culinary journey to Vietnam is served!
Cook’s Notes
Don’t rush the pancake batter; a little rest allows the flour to hydrate fully, giving you that perfect texture. When cooking the pancakes, medium heat is your best friend. Too high, and you’ll burn them before they’re cooked through. If making ahead, the batter can rest in the fridge for a few hours, just give it a gentle stir before using. Leftover pancakes are a treat; reheat them in a hot pan to regain the crispiness. The sauce and filling can be prepped in advance, making your cooking process even smoother.
Make It Your Own
- Swap the enoki mushrooms for shiitake if you like a meatier texture.
- Use crispy tofu instead of, or alongside, the veggies for a protein-packed version.
- For a spicier kick, add an extra green chili or some Sriracha to the batter.
- Play with the herbs: cilantro lovers, feel free to add it into the mix!
If you try this, I’d love to hear how it turns out — drop a comment or tag me! Making Bánh Xèo is like taking a mini vacation right from your kitchen. Enjoy every crispy, savory bite.
Related update: Vietnamese Pancakes with Vegetables, Herbs and a Fragrant Dipping Sauce (Bánh Xèo)
Related update: Grilled Chicken Hunter Style
Picture this: it’s a Wednesday evening, my fridge looks like a ghost town except for a couple of halibut fillets staring back at me, and I’m craving something a bit more exciting than the usual mid-week fare. I’m also avoiding another last-minute dash to the store because, you know, life. So, I decided to bring some brightness and zing to the table with a Soy Ginger Glazed Halibut, topped with a Ginger Peach Relish that’s basically summer in a spoon. This recipe is the answer to impressing your taste buds without needing a culinary degree—or a packed pantry. Easy yet striking, this dish is the perfect combo of sweet, spicy, and savory. Trust me, you’ll want to keep this one in your recipe stash.
Jump to Recipe
What You’ll Need
Chances are, you already have most of what you need for this dish in your kitchen, especially if you’re a fan of Asian-inspired flavors. Here’s what to gather:
- Halibut fillets – the star of the show, make sure they’re nice and fresh
- Fresh ginger – adds that spicy zing we all love
- Soy sauce – for that umami depth
- White wine – adds a touch of elegance and acidity
- Olive oil – a smooth base for our marinade
- Peach – sweet and juicy, perfect for the relish
- Red onion – brings in a sharp, savory note
- Jalapeno – for a kick of heat
- Apple cider vinegar – a tangy counterbalance
- Lime – freshens everything up
How to Make Soy Ginger Glazed Halibut with Ginger Peach Relish
- Peel and roughly chop a piece of fresh ginger. You’re looking for that sharp, spicy aroma to fill your kitchen. Place all marinade ingredients—soy sauce, white wine, olive oil, and 1 tablespoon of chopped ginger—in a blender and blend until smooth. This ensures the ginger infuses its flavor beautifully.
- In a zip-lock bag or bowl with a secure cover, add the halibut fillets and pour in the marinade. Massage the bag gently to ensure the fillets are fully coated. Let them soak up all that goodness for at least 20 minutes, though a few hours would make them sing.
- Preheat your oven to broil. Once heated, place the fish in a casserole dish along with all the marinade. Set the dish on one of the top racks and bake for about 10-12 minutes. You’re aiming for a nice brown glaze on top and perfectly cooked-through fish.
- For the relish, chop up the peach, red onion, and jalapeno. Combine them in a bowl with apple cider vinegar, the juice of half a lime, and 1 tablespoon of ginger. Stir and refrigerate. The longer it sits, the more the flavors meld into a vibrant accompaniment.
Cook’s Notes
Let’s get practical for a second. First off, if you forget to marinate the fish ahead of time, don’t panic—it’ll still be delicious after just 20 minutes. However, if you can plan ahead, the flavors really deepen with a longer soak. When broiling, keep an eye on the fish to avoid burning, especially if your oven runs hot. As for the relish, it’s a make-ahead’s best friend. If you want, prepare it in the morning or even the night before. The flavors only get better with time, and it keeps beautifully in the fridge for a couple of days.
Make It Your Own
Feeling adventurous? Here are a few swaps that keep the spirit of the dish alive but shake things up a bit:
- Swap the halibut for salmon if you’re feeling more like a buttery fish vibe.
- If peaches are out of season, try using mango for the relish—a tropical twist that pairs beautifully with the heat of the jalapeno.
- Not a fan of heat? Leave out the jalapeno or swap it for a milder pepper like a poblano.
- For a gluten-free version, use tamari in place of soy sauce.
If you try this, I’d love to hear how it turns out—drop a comment or tag me! Seeing your creations is the best part of sharing these recipes. Bon appétit!
Related update: Soy Ginger Glazed Halibut with Ginger Peach Relish
Related update: Stir Fried Quinoa, Brown Rice and Chicken Breast
Last Tuesday, I found myself staring at an array of mismatched jars and half-opened cans in my pantry, curiously wondering, “What can I whip up for dinner that’s both comforting and easy?” The answer came in the form of this delightful Curry-Braised Chicken. It’s one of those glorious dishes where the simplicity of ingredients belies its depth of flavor. I’m all about recipes that make you look like a kitchen wizard without breaking a sweat, and this one’s a total weeknight win. The chicken turns out tender and juicy, and the creamy coconut curry sauce is pure magic over a bed of fluffy basmati rice. It’s the kind of dinner that makes you want to sit down, take a deep breath, and savor every bite. Plus, your home will smell incredible.
Jump to Recipe
What You’ll Need
This recipe is a pleasant surprise because chances are you already have most of these ingredients chilling in your kitchen.
- Skinless boneless chicken breasts – these soak up the curry flavors like a dream.
- Vegetable oil – just enough to get the party started in your Dutch oven.
- Salt – essential for seasoning the chicken.
- Yellow, red, or green curry paste – your choice here will define the dish’s character.
- Canned unsweetened coconut milk – the creamy backbone of our sauce.
- Fish sauce – brings a subtle umami depth.
- Brown sugar – a pinch of sweetness to balance the spice.
- Fresh lime juice – adds freshness and zing at the end.
- Basmati rice – perfect to soak up all that curry goodness.
- Bell pepper – optional, but adds a pop of color and texture.
How to Make Curry-Braised Chicken
- Preheat your oven to 325 degrees Fahrenheit. This ensures the magic happens slowly, making everything tender.
- Cut your chicken breasts in half. Season them with salt and a dash of pepper, massaging it in like you’re giving the chicken a spa day.
- Heat some vegetable oil over medium-high heat in a trusty Dutch oven. You want it hot enough that the chicken sizzles on contact.
- Brown the chicken on both sides for 1-2 minutes per side. You’re not cooking it through here; just giving it a lovely golden crust. Work in batches if needed.
- Remove the chicken and add your chosen curry paste to the same pot. Use a wooden spoon to break it up, getting the paste to meld beautifully with the leftover oil.
- Once the curry paste is fragrant and slightly darker, pour in the coconut milk. Stir with your spoon to scrape up any golden bits stuck to the bottom of the pot.
- Add the fish sauce and brown sugar, stirring until everything’s a harmonious blend.
- Return the chicken to the pot, snuggling it into the sauce. Cover with a lid and place the Dutch oven in the preheated oven.
- Bake for 45-55 minutes or until the chicken is cooked through and no longer pink. The sauce should be bubbling enticingly around the edges.
- Right before serving, stir in the fresh lime juice. Trust me, this is the zingy magic touch.
- Serve the curry-braised chicken over steaming basmati rice and, if using, sprinkle with sliced bell peppers for a crisp contrast.
Cook’s Notes
A few things I’ve learned along the way: don’t rush the browning step. That lovely golden crust adds layers of flavor. If you plan on making this ahead, you can pop it into the fridge after step 8 and finish baking when you’re ready to eat. Leftovers taste even better the next day, as the flavors have more time to mingle. Reheat gently on the stove, and add a splash of water if the sauce has thickened too much.
Make It Your Own
Looking to switch things up? Here are a few ideas:
- Swap the chicken for crispy tofu for a vegetarian version. Just brown the tofu pieces before adding them to the curry.
- Use shrimp instead of chicken. Adjust the cooking time – shrimp cooks much faster!
- Throw in some diced sweet potatoes along with the chicken. They’ll soak up the curry flavor wonderfully.
- Add a handful of spinach or kale at the end for a dose of greens.
If you try this, I’d love to hear how it turns out — drop a comment or tag me! Cooking is all about sharing, so let’s swap stories and tips. Happy cooking, friends!
Related update: Curry-Braised Chicken
Related update: Soy Ginger Glazed Halibut with Ginger Peach Relish
It was a chilly Tuesday, and I found myself rummaging through my pantry, yearning for something warm and satisfying. As I sifted through the usual suspects, my eyes caught a glimpse of a pack of Neoguri ramen — my secret weapon for those mid-week cravings. The spicy seafood aroma from this dish has always been my go-to comfort, especially when I’m in the mood for something quick yet soul-satisfying. The best part? It’s like taking a mini-trip to a seaside ramen bar without leaving my kitchen. Trust me, you don’t need much time or experience to whip this up, but the flavor will have you thinking you’re some kind of ramen master.
Jump to Recipe
What You’ll Need
You know what’s great about this recipe? You probably have most of these ingredients lounging in your pantry or fridge. No wild goose chase required!
- 1 pack of Neoguri ramen (spicy seafood flavor)
- Mussels (fresh or pre-cooked, your choice)
- 1 egg
- 1 green scallion
- 1 sheet of gim (seaweed)
How to Make Neoguri (Spicy Seafood Ramen)
- First, get a pot of water boiling. Toss in the mussels and the sauce packets from the Neoguri ramen. Let it roll on medium heat for about 5 minutes. The broth should smell like spicy seafood heaven.
- If you’re using fresh mussels, keep an eye on them. Once they open, they’re ready. Any stubborn closed ones? Toss them out — they’re not invited to this party.
- Now, add the ramen noodles. Let them mingle with the broth for 2 to 3 minutes. You’ll know it’s time when they’re perfectly tender.
- Time for the egg! Beat it lightly and pour it in while stirring the noodles in a circular motion. This creates that lovely, flaky egg drop texture. If you’re more of a poached egg fan, gently slip the egg off to the side of the pot instead.
- While the pot is doing its thing, slice your scallion into thin pieces and tear up the gim (seaweed). Prep done!
- Scoop everything into a serving bowl. Sprinkle with the scallions and gim, and get ready to dive in.
Cook’s Notes
Let me share a few nuggets of wisdom to make your ramen experience even better. If you’re prepping this ahead, keep the broth and noodles separate until you’re ready to eat — nobody likes mushy noodles. For leftovers (if there are any), store the broth and noodles individually. They’ll keep in the fridge for a day or two. Reheat gently on the stove for best results. Watch your mussels — overcooked ones turn rubbery, which is less than ideal.
Make It Your Own
Want to put a personal spin on this ramen? Here are some ideas:
- Swap the mussels for crispy tofu for a vegetarian twist. Just pan-fry the tofu until golden and add it when your noodles are done.
- Spice it up a notch by adding a spoonful of your favorite chili paste or sriracha to the broth.
- For a heartier meal, toss in some cooked shrimp or sliced fish cake along with the mussels.
- Throw in a handful of baby spinach or bok choy for a dose of greens. They’ll wilt beautifully in the hot broth.
If you try this, I’d love to hear how it turns out — drop a comment or tag me! Once your friends get a taste, they’ll be begging you for the recipe, and you can be all smug and mysterious about your ramen secrets.
Related update: Neoguri (Spicy Seafood Ramen)
Related update: Broccoli Rabe and Breaded Veal Scallopini
Related update: Roasted Garlic & Butternut Parmesan Soup
So there I was, standing in the kitchen on a Tuesday night, staring at my pantry like it was a black hole of culinary despair. You know those nights when you crave something satisfying but don’t want to spend an eternity making it? Enter this Cauliflower, Brown Rice, and Vegetable Fried Rice. It’s my go-to when I’m in the mood for something cozy yet packed with veggies. I promise, even if you’re a notorious takeout lover, you’ll want to make this at home. It’s got that perfect balance of taste and texture, and let’s be real, sneaking cauliflower into anything is a win in my book. Plus, it’s a great way to use up leftover rice and that stubborn head of cauliflower that’s been giving you the side-eye from the fridge. Jump to Recipe
What You’ll Need
This ingredient list is your best friend on a busy night. Chances are you already have most of this hanging out in your kitchen.
- 1 tablespoon grapeseed oil
- 1 tablespoon coconut oil
- 4 green dark scallions, sliced (white and green parts separated)
- 3 cloves garlic, minced
- 1 medium head of raw cauliflower, cut into florets
- 2 cups cooked brown rice
- 1 cup cooked broccoli
- 1 cup frozen peas
- 2 tablespoons low sodium soy sauce
- 1 teaspoon sesame oil
- 1 tablespoon sesame seeds
- Additional scallion tops for garnish
- Salt, to taste
How to Make Cauliflower, Brown Rice, and Vegetable Fried Rice
- Start by removing the cauliflower’s tough stem and save it for another day (hello, veggie broth!). Pulse the florets in a food processor until they look like rice or couscous. You’ll end up with about four cups of this magic “cauliflower rice.”
- Heat 1 tablespoon of butter and 1 tablespoon of grapeseed oil in a large skillet over medium heat. Add the garlic and the white and light green parts of the scallions. Sauté until they start smelling amazing, about a minute.
- Toss the cauliflower rice into the pan. Stir it to coat with oil, then spread it out in the pan. Let it sit so it can caramelize a bit—this is where the sweetness comes out. After a couple of minutes, give it a stir and spread it out again.
- Add the cold brown rice to the skillet along with the remaining grapeseed and coconut oil. Crank up the heat to medium-high. Mix everything together and spread it out over the whole pan, pressing it down slightly. This helps it toast up and get a little crispy, which is what we’re going for.
- Next, add the peas and broccoli. Mix them in with the rice. Drizzle the soy sauce and sesame oil on top and give it all a good stir. Cook for another minute or so, then turn off the heat.
- Top everything with the chopped scallion tops. Toast some sesame seeds in a dry pan until they’re golden, then sprinkle them along with some raw, chopped scallion over the rice. Give it a taste and season with salt if needed. If you’re pairing this with something salty, like teriyaki chicken, keep the salt in check.
Cook’s Notes
For the best results, use day-old rice. Freshly cooked rice tends to be too moist and can turn your dish into a mushy mess. If you make rice specifically for this, spread it out on a baking sheet and pop it in the fridge for an hour to dry it out a bit. You can store leftovers in an airtight container in the fridge for up to 3 days. Just reheat in a pan over medium heat — adding a splash of water helps bring it back to life.
If you’re a meal prepper (is that even a word?), this dish is your friend. The cauliflower ‘rice’ can be made ahead and stored in the fridge for a couple of days. Just keep it in an airtight container, and you’re good to go.
Make It Your Own
- Swap the broccoli for any other veggie you love — bell peppers and snap peas are excellent choices.
- If you’re in the mood for protein, add some crispy tofu or a scrambled egg for extra goodies.
- For a spicy kick, throw in a pinch of red pepper flakes or a drizzle of sriracha.
- Make it nutty by tossing in a handful of cashews or almonds before serving.
If you try this, I’d love to hear how it turns out — drop a comment or tag me! I’m always here for your kitchen adventures. Happy cooking!
Related update: Cauliflower, Brown Rice, and Vegetable Fried Rice