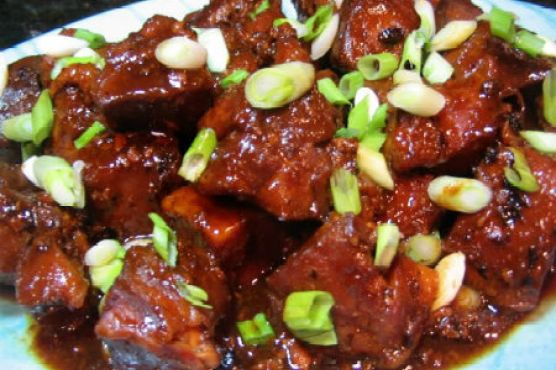
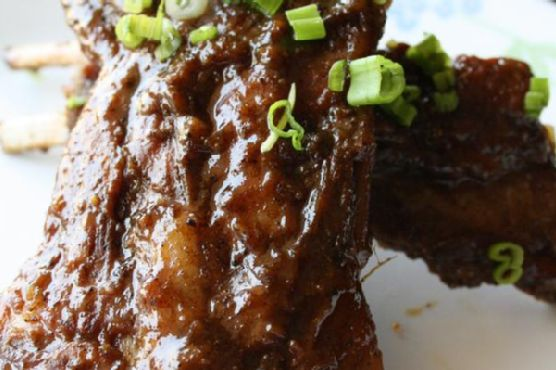
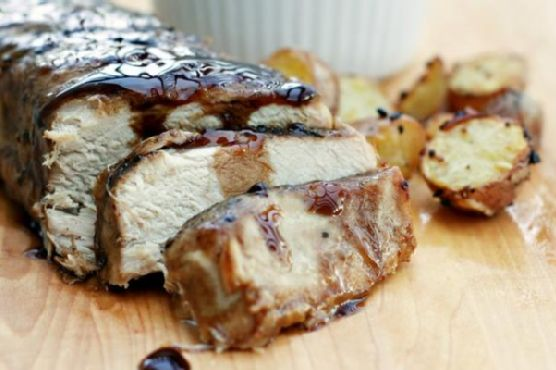
Stuffed Pork Tenderloin with Marsala-Port Sauce | Made by Meaghan Moineau

Picture this: It’s a chilly Tuesday evening, and I’m staring at the contents of my fridge, wondering what in the world to make for dinner. My eyes land on a pork tenderloin, and I remember that bottle of Marsala that’s been collecting dust on the shelf. Suddenly, the idea of a Stuffed Pork Tenderloin with Marsala-Port Sauce sounds like the perfect blend of comforting yet impressive. It’s the kind of dish that feels a bit fancy but is deceptively easy to whip up. As the aroma of Marsala and sautéed onions fills the kitchen, I can’t help but feel a little proud of the culinary magic happening right at my stove.

Jump to Recipe

What You’ll Need

The beauty of this dish is in its simplicity and the likelihood that you already have most of these ingredients tucked away in your pantry or fridge. We’re talking about a few surprises that elevate the dish, like dried fruits and Marsala wine.

  • 1 pork tenderloin
  • 1 shallot, finely diced
  • 1 small yellow onion, diced
  • 8 oz mushrooms, chopped
  • 1/4 cup dried apricots
  • 1/4 cup raisins
  • 1/4 cup dried cranberries
  • 1/4 cup flat-leaf parsley, chopped
  • 1/2 cup Marsala wine
  • 1/2 cup Port wine
  • 2 tablespoons butter
  • 1/4 cup heavy cream
  • 2 tablespoons olive oil
  • Salt and pepper to taste

How to Make Stuffed Pork Tenderloin with Marsala-Port Sauce

  1. Preheat your oven to 450°F (230°C). The key to a crispy outside and juicy inside is starting with a hot oven.
  2. In a large skillet over medium heat, warm up 1 tablespoon of olive oil. Toss in the diced onions, shallots, and mushrooms. Cook these until the onions turn translucent, and your kitchen smells like heaven.
  3. Remove the skillet from heat. In a small food processor, combine the cooked onion mixture, dried apricots, raisins, cranberries, and parsley. Pulse until everything is minced and well combined. This mixture will be your delectable stuffing.
  4. Take the pork tenderloin and cut it in half crosswise. Butterfly each section carefully, ensuring not to cut all the way through. Season both sides generously with salt and pepper.
  5. Spread the stuffing over one side of each butterflied pork piece. Lay the other half of the meat on top and secure the edges with toothpicks. Don’t be shy with the salt and pepper here — it’s the secret to bringing out all those flavors.
  6. In the same skillet you used earlier, heat another teaspoon of olive oil. Sear the pork tenderloin on each side for about 3-5 minutes. You’re looking for a lovely golden crust.
  7. Transfer the pork to the oven and let it roast for 20 to 30 minutes, until there’s no pink and the juices run clear. Internal temperature should hit 145°F (63°C).
  8. Once done, remove the pork from the oven, place it on a dish, and tent it with aluminum foil to rest while you make the sauce.
  9. Pour off any fat from the skillet. Add the Marsala and Port wines, scraping up any browned bits with a spatula as you bring it to a boil. Let this bubble away until reduced to about 1/2 cup.
  10. Remove from heat and swirl in the butter and cream. You’ll know it’s perfect when the butter is completely melted and the sauce is just thick enough to coat the back of a spoon.
  11. Remove the toothpicks, slice the pork tenderloin into rounds, and drizzle with that luscious sauce. Serve immediately and prepare to wow your taste buds.

Cook’s Notes

When stuffing the tenderloin, ensure the filling is well minced so it stays snugly inside as it cooks. If you don’t have a small food processor, chopping everything by hand works too — just takes a little more elbow grease. I recommend letting the meat rest for at least 5 minutes before slicing; this keeps it juicy. In terms of leftovers, this dish keeps well in the fridge for up to 3 days. Reheat gently with a splash of water or stock to keep it moist.

Make It Your Own

  • Try swapping the pork for a boneless chicken breast. Just pound it to an even thickness and proceed with stuffing and cooking as directed.
  • For a vegetarian twist, replace the pork with large portobello mushrooms. Use the same stuffing and bake them until tender, about 15 minutes.
  • Substitute the Marsala for sherry or white wine if you prefer a different flavor profile.
  • Add a sprinkle of crushed pistachios or walnuts to the stuffing for a delightful crunch.

If you try this, I’d love to hear how it turns out — drop a comment or tag me on social media! Your kitchen adventures make my day. Happy cooking!

Related update: Stuffed Pork Tenderloin with Marsala-Port Sauce

Related update: Vegan Taco bowls with Cilantro Lime Cauliflower Rice

Sweet Mustard BBQ Pork Chops | Made by Meaghan Moineau

Picture this: it’s a busy Tuesday evening, and I’m racing against the clock to get dinner ready before my favorite show starts. My fridge is a chaotic jigsaw puzzle of assorted jars and half-emptied condiments. I’m craving something hearty but not the usual weekday fare that I’ve cycled through a million times. Enter the Sweet Mustard BBQ Pork Chops. They’re my go-to when I want something that feels special without the fuss of a complicated recipe. These pork chops are a harmony of sweet, tangy, and savory flavors that dance on your taste buds, all thanks to a marinade that takes about five minutes to throw together. Trust me, you’ll want these on your dinner rotation.

Jump to Recipe

What You’ll Need

If you’re like me, you might already have most of these ingredients hanging out in your pantry and fridge—the kind of staples that are real lifesavers.

  • 4 bone-in pork chops
  • Dijon mustard
  • 3 cloves of garlic, minced
  • Coarsely ground black pepper
  • Honey
  • Juice of one lemon
  • Soy sauce

How to Make Sweet Mustard BBQ Pork Chops

  1. In a medium-sized bowl, whisk together the honey, Dijon mustard, lemon juice, soy sauce, and minced garlic until smooth. You want the honey to meld into the mix without a trace—it might take a minute or two.
  2. Place your pork chops in a large resealable plastic container or a trusty zip-top bag. Pour the marinade over them, making sure every inch of those chops gets some love.
  3. Seal the container or bag and pop it into the fridge. Let those flavors get cozy for at least 4 hours, but if you can swing it, overnight is where the magic happens. Give the container a shake or the bag a turn every now and then.
  4. When you’re ready to cook, fire up your grill to medium-high heat. Take the pork chops out of the fridge and let them come to room temp while you prep the grill.
  5. Sprinkle freshly cracked black pepper on both sides of the chops. The pepper adds a nice bit of heat to balance the sweetness.
  6. Grill the pork chops for about 5-7 minutes per side. You’re looking for a beautiful char and an internal temp of 145°F to 150°F. Feel free to brush on some leftover marinade as they cook, but if they start to burn, move them to a cooler spot on the grill.
  7. Once done, transfer the chops to a platter, cover them with foil, and let them rest for 5 minutes. This step is key—juices will redistribute, making every bite moist and tender.
  8. Serve these beauties with your favorite sides and watch them disappear.

Cook’s Notes

A couple of things I’ve picked up along the way: First, make sure to use bone-in pork chops. They’re less likely to dry out on the grill, and the bone adds some lovely flavor. Also, when you’re grilling, keep a little extra marinade handy for basting, but do it sparingly towards the end to avoid burning. If you’re new to grilling, a meat thermometer is your best friend—it takes the guesswork out of knowing when the meat is done.

For leftovers (if there are any!), store them in an airtight container in the fridge for up to three days. They’re fantastic cold in a salad or warmed up for a quick lunch.

Make It Your Own

I get it—sometimes you want to throw in a twist. Here are a few ideas to switch things up:

  • Swap the pork for crispy tofu. Just press and cube the tofu, and marinate it the same way. Grill until it’s golden and crisp.
  • Try adding a tablespoon of sriracha to the marinade for a sweet and spicy kick.
  • If you’re out of lemon, lime juice works beautifully for a slightly different tang.
  • Throw in some fresh rosemary or thyme into the marinade for an herbal note that complements the sweetness.

If you try this, I’d love to hear how it turns out—drop a comment or tag me! Whether you stick to the script or put your own spin on it, these pork chops are a winner. Enjoy the flavors and the simplicity, and happy cooking!

Related update: Sweet Mustard BBQ Pork Chops

Related update: Mini Stuffed Mexican Bell Peppers

Guinness and Brats | Made by Meaghan Moineau

It was one of those weeks where everything seemed to be going at double speed. You know the kind? Work was hectic, my inbox was overflowing, and the kids had back-to-back soccer practices. By Friday, I was craving something bold, comforting, and just a little indulgent. Enter: Guinness and Brats. This dish is the kind of recipe that makes you feel like a weekend warrior even on a Tuesday night. It’s smoky, savory, and hearty enough to make you forget the chaos of the week. Plus, there’s something incredibly satisfying about cooking with beer, especially when it’s a robust Guinness Stout. So, let’s dive into this dish that turns a few humble ingredients into a weeknight hero.

Jump to Recipe

What You’ll Need

It’s a short and sweet list of ingredients, with a touch of the unexpected. Chances are you already have most of this, or at least something close enough to swap in:

  • Bratwurst – the star of the show, so choose your favorite kind!
  • Guinness Stout – the magic ingredient that marries everything together.
  • Onions – go for sweet or yellow, quartered for those lovely caramelized edges.
  • Hotdog buns – soft or crusty, whatever you prefer for wrapping up all that goodness.

How to Make Guinness and Brats

  1. Preheat your grill to about 400°F. You want it nice and hot to do justice to these brats.
  2. In a large cast iron skillet, nestle your bratwurst links and scatter the quartered onions around them. Pour an entire bottle of Guinness Stout over the top. The aroma as it sizzles is just divine.
  3. Place the skillet directly on the grill and close the lid. Let the magic happen as the Guinness starts to bubble and the flavors meld together.
  4. Every 5-10 minutes, open the lid and give everything a good toss. The onions should be getting golden, and the brats will be plumping up beautifully.
  5. After about 45 minutes to an hour, everything should be perfectly cooked. The brats should be juicy and the onions caramelized in that lovely stout reduction.
  6. Take a brat and some of those luscious onions, and tuck them into a hotdog bun. Serve immediately, and enjoy the praises you’ll undoubtedly receive.

Cook’s Notes

Cooking on the grill adds a wonderful smoky depth you just can’t fake, but if the weather is uncooperative, you can make this on the stovetop or in the oven. Just keep in mind that stovetop cooking may require more frequent stirring to prevent sticking. Leftovers (if there are any!) can be stored in an airtight container in the fridge for up to 3 days. They reheat beautifully, and you can even slice the brats and onions to toss with pasta for a quick lunch.

Make It Your Own

  • Swap the bratwurst for spicy Italian sausage if you crave a kick.
  • Use a different stout or dark beer if you’re not a fan of Guinness — just make sure it’s something full-bodied.
  • Try adding bell peppers to the mix for a bit of sweetness and color.
  • For a lighter option, serve the brats and onions over a bed of greens instead of in a bun.

If you try this, I’d love to hear how it turns out — drop a comment or tag me! There’s something so rewarding about sharing a meal that feels like a mini celebration. Enjoy!

Related update: Guinness and Brats

Related update: Pan Fried Potato Wedges

Related update: Sweet Mustard BBQ Pork Chops

Siew Mai | Made by Meaghan Moineau

Siew Mai Recipe: A Delightful Dim Sum Treat

Intro

Growing up, weekends meant one thing: dim sum with the family. We would gather around a bustling table, eagerly awaiting the arrival of steaming baskets of our favorite dumplings. Among them, Siew Mai was always a standout. These flavorful pork dumplings, adorned with vibrant toppings, were a family favorite. Now, I’m excited to share this treasured recipe with you, bringing the joy of dim sum into your home.

Why You’ll Love It

Siew Mai, also known as Shumai, offers a delightful combination of flavors and textures that will captivate your taste buds. The juicy pork filling, coupled with the subtle crunch of water chestnuts and a burst of umami from mushrooms, creates a harmonious blend. Whether you’re a dim sum aficionado or a first-timer, these dumplings are sure to become a beloved addition to your culinary repertoire.

Ingredients

  • Wonton wrappers
  • 700g fatty pork
  • 2 tablespoons corn starch
  • 1 teaspoon salt
  • 1 teaspoon white ground pepper
  • 1/2 teaspoon sugar
  • 1 teaspoon Worcestershire sauce or Maggie Seasoning Sauce
  • 2 tablespoons Shaoxing Huatiao wine
  • 2 tablespoons sesame oil
  • 80g canned water chestnuts
  • 4 large Chinese mushrooms
  • 1 small carrot
  • Cooked whole shrimp
  • Raw glutinous rice
  • Shallots
  • Ginger
  • Cooking oil
  • Dried shrimps
  • Cooked dried scallops
  • Light soy sauce
  • Oyster sauce
  • 2 lap cheongs (Chinese sausages)
  • Water

Instructions

  1. To prepare the pork filling, mince 700g of pork and place it in a large mixing bowl. Add 2 tablespoons of corn starch, 1 teaspoon of salt, 1 teaspoon of white ground pepper, 1/2 teaspoon of sugar, 1 teaspoon of Worcestershire sauce, 2 tablespoons of Shaoxing Huatiao wine, and 2 tablespoons of sesame oil.
  2. Roughly chop 80g of water chestnuts and 4 large Chinese mushrooms into fine pieces. Add them to the pork mixture and mix well to combine.
  3. Finely dice a small carrot. Set aside the pork mixture and diced carrots for garnishing.
  4. For the glutinous rice filling, soak 2 lap cheongs in boiling water until the skin separates. Remove the skin and dice the meat.
  5. In a large saucepan, pan-fry the diced lap cheong until golden red. Follow instructions to prepare the glutinous rice as per Glutinous Rice in Lotus Leaf. Add fried lap cheong pieces and set aside to cool.
  6. To wrap the dumplings, place a wonton wrapper on a flat surface. Add a teaspoon of filling in the center, wet the edges with water, and fold the wrapper around the filling tightly.
  7. Top each pork Siew Mai with a shrimp and diced carrot. Add more lap cheong pieces to the glutinous rice Siew Mai if desired.
  8. Place dumplings in a steamer lined with baking paper. Steam over boiling water for 14-15 minutes or until cooked. Serve hot.

Tips

For the best texture, ensure that the pork is fatty, as this keeps the dumplings juicy. When wrapping, make sure the dumplings are tightly sealed to prevent them from falling apart during steaming.

Variations & Substitutions

If you prefer a different protein, ground chicken or turkey can be used instead of pork. For a vegetarian option, substitute the meat filling with a mixture of finely chopped vegetables like cabbage, mushrooms, and tofu. Feel free to experiment with different toppings, such as salmon roe or salted egg yolk, to enhance the visual appeal and taste.

Storage

Uncooked Siew Mai can be frozen for up to three months. To prevent them from sticking, dust a container with flour before placing the dumplings inside. When ready to serve, steam directly from the freezer for an additional 2-3 minutes.

FAQ

Can I make Siew Mai ahead of time?

Yes, you can prepare the fillings a day in advance and store them in the refrigerator. Assemble the dumplings just before steaming for the freshest taste.

What can I serve with Siew Mai?

Siew Mai pairs beautifully with a variety of dipping sauces, such as soy sauce, chili oil, or a simple vinegar and ginger dip. Serve them alongside other dim sum favorites for a complete meal.

Is there a gluten-free option?

To make this recipe gluten-free, use gluten-free wonton wrappers and replace soy sauce with a gluten-free alternative. Ensure all other ingredients are verified gluten-free.

Nutrition

While exact nutrition will vary based on specific ingredients and quantities used, Siew Mai is generally a good source of protein and provides essential vitamins and minerals from the vegetables and shrimp. For a healthier option, use lean pork or substitute with chicken.

Conclusion

Siew Mai is more than just a dumpling; it’s a celebration of flavors and a connection to cherished memories of family gatherings. Whether you’re reminiscing about past dim sum experiences or creating new ones, this recipe is sure to bring warmth and joy to your table. Happy cooking!

Related update: Siew Mai

Related update: Baked Rigatoni

Butchers Reinvent Menus as Beef Costs Soar | Analysis by Brian Moineau

When the Price of a Ribeye Rises, Small Butchers Reinvent the Counter

It used to be that a stroll into the neighborhood butcher meant two things: a chat with someone who knew the cut by name, and the smell of fresh meat ready for the weekend grill. Lately, that stroll comes with sticker shock. As beef prices climb to multi‑decade highs, small butcher shops are quietly reshaping how they sell, what they recommend, and how they keep customers coming back.

Why this matters now

  • Ground beef and steak prices climbed to record levels in 2025, driven by shrinking U.S. cattle herds, drought, higher feed and production costs, and other supply‑chain strains. (cbsnews.com)
  • Unlike large grocery chains with buying power and vertical integration, independent butchers rely on local supply and customer trust — two things that feel fragile when the cost of a pound of meat jumps dramatically. (cbsnews.com)

If you buy meat regularly — or run a small meat business — this is more than an economic headline. It changes weekly shopping lists, family dinners, and the way small food retailers position themselves in a competitive market.

How small butcher shops are adapting

Butchers are leaning into the advantages they have: craft, relationship, knowledge. The ways they’re responding fall into a few practical, customer‑facing moves:

  • Recommend cheaper cuts and show how to cook them

    • Educating customers about braises, slow roasts, and mince versus steak helps shoppers stretch a dollar without sacrificing flavor. (cbsnews.com)
  • Offer more value through portioning and combo packs

    • Smaller, recipe‑focused packs or mixed‑protein bundles let households get a taste of beef without buying an expensive whole cut.
  • Promote alternative proteins and mixed dishes

    • Increased suggestion of pork, chicken, plant‑based options, and blends (e.g., beef‑pork blends for meatloaf) helps retain customers who want familiar flavors at lower cost. (cbsnews.com)
  • Lean on relationships and local sourcing narratives

    • Customers are willing to pay a premium for traceability and trust; butchers emphasize provenance, seasonal availability, and chef‑style guidance.
  • Adjust pricing strategies and special offers

    • Time‑limited sales, loyalty deals, and highlighting lower‑cost cuts for weeknight meals help balance margins and foot traffic.

The supply picture behind the counter

To make sense of a butcher’s new pitch, you need the behind‑the‑scenes context:

  • Herds are smaller. The U.S. cattle inventory fell to its lowest levels in decades after years of drought and higher costs, shrinking the supply pipeline from ranch to retail. (axios.com)

  • It takes time to rebuild herds. Biological realities and feeding cycles mean relief won’t be immediate; even when ranchers expand, it can be years before more beef reaches grocery aisles. (farmprogress.com)

  • Policy, trade, and extreme weather add volatility. Tariffs, import/export shifts, and persistent climate stressors have amplified price swings for both cattle and feed. (cbsnews.com)

That combo explains why prices remain elevated even when ranchers or processors tweak production: the whole chain is interdependent and slow to rebalance.

For shoppers: smart moves at the meat counter

If you’re feeling the pinch, small changes at the store (or in your kitchen) can reduce cost without losing satisfaction:

  • Ask your butcher for weeknight‑friendly cuts (chuck, brisket, round) and simple recipes for braising or slow cooking.
  • Buy larger, less‑processed cuts and portion at home — it’s often cheaper per pound and gives leftovers for sandwiches or tacos.
  • Mix proteins in recipes (half beef, half turkey or pork) for flavor and savings.
  • Consider frozen or vacuum‑sealed bargains for longer shelf life and bulk savings.
  • Build rapport with a local butcher: they’ll tip you off on sales, day‑of‑cut discounts, or creative substitutions.

For butchers: business lessons from a beef squeeze

Independent meat sellers can survive and even strengthen their position by leaning into differentiation:

  • Become an educator: host demos, share recipes, and show cooking techniques to make lower‑cost cuts desirable.
  • Diversify inventory: sell more pork, poultry, value‑added items, and prepared foods to smooth revenue.
  • Strengthen supply relationships: local sourcing and cooperative purchasing can reduce exposure to volatile national markets.
  • Use storytelling: provenance and trust are powerful — customers pay for connection and honesty.
  • Innovate pricing and packaging: meal‑kits, subscription boxes, and mixed‑protein bundles increase convenience and perceived value.

What this trend might mean longer term

  • Beef may remain relatively expensive for months or years as herd recovery and supply‑chain fixes take hold. (farmprogress.com)
  • Consumer habits can shift permanently: when families learn new ways to cook cheaper cuts or embrace other proteins, demand patterns change.
  • Smaller shops that pivot effectively could win loyal customers who value expertise and personalized service — but those who cling to old assortments may lose traffic.

What to remember

  • Beef prices rose due to tight supply, drought impacts, and production costs; relief will be gradual. (axios.com)
  • Small butchers are responding by educating customers, promoting alternatives, and rethinking packaging and pricing. (cbsnews.com)
  • Practical consumer choices (different cuts, mixing proteins, buying larger portions) can blunt the sting of higher prices.

Final thoughts

Higher beef prices are reshaping more than grocery bills — they’re nudging everyday cooking toward resourcefulness and creativity. That’s a win for home cooks who learn to coax flavor from unexpected cuts, and for independent butchers who double down on craft and customer relationships. In a world where supply shocks and climate stressors are increasingly common, the butcher’s counter is quietly becoming a classroom in resilience.

Sources

Siew Mai | Made by Meaghan Moineau

Siew Mai: A Delightful Dim Sum Classic

Intro

Growing up, dim sum Sundays were a cherished tradition in my family. We would gather around a bustling table, eagerly anticipating the arrival of steaming bamboo baskets filled with an assortment of dumplings. Among my favorites was siew mai, a delectable pork and shrimp dumpling that quickly won my heart with its savory filling and delightful textures. Today, I’m excited to share my family’s recipe for siew mai, a dish that brings back fond memories and continues to be a beloved part of our dining experience.

Why You’ll Love It

Siew mai is a timeless dish that has captivated taste buds for generations. Here’s why you’ll love making and eating these delicious dumplings:

  • Flavorful Filling: The combination of pork, shrimp, and Chinese sausages creates a savory and satisfying flavor profile.
  • Texture Delight: The tender pork is complemented by the crunch of water chestnuts and the chewy texture of glutinous rice.
  • Customizable: Easily adapt the recipe to suit your taste preferences with variations and substitutions.
  • Perfect for Sharing: These bite-sized delights are perfect for gatherings and will surely impress your guests.

Ingredients

  • Wonton wrappers
  • 700g fatty pork
  • 2 tablespoons corn starch
  • 1 teaspoon salt
  • 1 teaspoon white ground pepper
  • 1/2 teaspoon sugar
  • 1 teaspoon Worcestershire sauce or Maggie Seasoning Sauce
  • 2 tablespoons Shaoxing Huatiao wine
  • 2 tablespoons sesame oil
  • 80g canned water chestnuts
  • 4 large Chinese mushrooms
  • Cooked whole shrimp
  • Carrot
  • 2 lap cheongs (Chinese sausages)
  • Raw glutinous rice
  • Shallots
  • Ginger
  • Cooking oil
  • Dried shrimps
  • Cooked dried scallops
  • Light soy sauce
  • Oyster sauce

Instructions

  1. To prepare the pork filling, mince 700g of pork and place it in a large mixing bowl.
  2. Add 2 tablespoons of corn starch, 1 teaspoon of salt, 1 teaspoon of ground white pepper, 1/2 teaspoon of sugar, 1 teaspoon of Worcestershire sauce, 2 tablespoons of Shaoxing Huatiao wine, and 2 tablespoons of sesame oil. Mix well.
  3. Roughly chop 80g of canned water chestnuts and 4 large Chinese mushrooms into fine pieces. Add to the pork mixture and combine thoroughly.
  4. Finely dice a small carrot to garnish the siew mai later. Set aside.
  5. For the glutinous rice filling, soak 2 lap cheongs in boiling water until the skin separates. Remove the skin and dice the sausages.
  6. In a large saucepan over medium-high heat, pan fry the diced lap cheong until they are golden. Follow the instructions for glutinous rice preparation and stir-fry until fragrant. Add the fried lap cheong pieces and set aside to cool.
  7. Prepare the wonton wrappers by placing a sheet on a flat surface. Place a teaspoon of filling in the center of each wrapper.
  8. Dampen your finger with water and wet the edges of the wonton wrapper. Gather the wrapper around the filling and squeeze gently to seal.
  9. Top each pork siew mai with a shrimp and garnish with chopped carrot.
  10. Place the dumplings in a steamer lined with perforated baking paper. Steam over boiling water for 14-15 minutes or until cooked through.
  11. Serve hot, or freeze uncooked dumplings for later use.

Tips

To ensure the best results when making siew mai, keep these tips in mind:

  • Keep it Tight: Make sure the dumplings are tightly wrapped to prevent them from falling apart while steaming.
  • Use Fresh Ingredients: Fresh shrimp and quality pork make a significant difference in taste.
  • Steam Properly: Ensure steam can circulate by cutting holes in the baking paper lining the steamer.

Variations & Substitutions

Feel free to experiment with these variations to suit your preferences:

  • Vegetarian Siew Mai: Replace meat with chopped vegetables such as mushrooms, carrots, and bamboo shoots.
  • Spicy Twist: Add a dash of chili oil or finely chopped fresh chili for a spicy kick.
  • Flavor Enhancers: Add a touch of grated ginger or garlic for additional depth of flavor.

Storage

Siew mai is best enjoyed fresh, but if you have leftovers, store them in an airtight container in the refrigerator for up to 2 days. To freeze uncooked siew mai, place them on a baking sheet lined with parchment paper, freeze until solid, and then transfer to a freezer-safe container. They can be steamed directly from frozen.

FAQ

Can I make siew mai without shrimp?

Yes, you can omit the shrimp if desired. The pork filling is flavorful enough on its own, or you could increase the amount of pork or add other ingredients like mushrooms for added texture and taste.

What can I use instead of wonton wrappers?

If you don’t have wonton wrappers, you can use dumpling wrappers or even make your own from scratch using flour and water. The texture may vary slightly, but they’ll still be delicious.

Nutrition

While exact nutritional values can vary, siew mai is a protein-rich dish thanks to the pork and shrimp. The inclusion of vegetables like mushrooms and water chestnuts adds fiber and vitamins. Opt for leaner pork cuts to reduce fat content if desired.

Conclusion

Siew mai is more than just a dish; it’s a culinary tradition that brings people together. Whether you’re enjoying it as part of a dim sum spread or making it the star of your meal, siew mai is sure to delight with its savory flavors and satisfying textures. I hope this recipe brings joy to your kitchen and adds a touch of nostalgia to your dining table. Happy cooking!

Related update: Siew Mai

Related update: Red, White, and Blue Fruit Salsa

Related update: Lamb Tagine Stew

Pork with Blueberry Sauce | Made by Meaghan Moineau

Pork with Blueberry Sauce

Intro

There’s something uniquely satisfying about combining savory flavors with a touch of sweetness. It reminds me of summer evenings spent at my grandmother’s house, where she would always surprise us with her inventive dishes. One of my fondest memories is of her tangy pork chops served with a delightful fruit sauce that seemed to encapsulate the essence of the season. Inspired by those cherished moments, I’ve crafted this recipe for Pork with Blueberry Sauce. It’s a dish that promises to bring a burst of flavor to your dinner table, and I’m excited to share it with you.

Why You’ll Love It

This Pork with Blueberry Sauce is a symphony of flavors. The juicy pork chops are perfectly seasoned and seared to golden perfection, while the blueberry sauce provides a sweet and tangy counterpoint. The balsamic vinegar adds depth, and the lime zest gives it a zesty punch. Whether you’re hosting a dinner party or enjoying a quiet meal at home, this dish is sure to impress. Plus, it’s easy to make and requires just a few simple ingredients!

Ingredients

  • Pork chops
  • Salt and pepper
  • Canola oil
  • Fresh pint blueberries
  • Brown sugar
  • Balsamic vinegar
  • Red diced onion
  • Lime zest
  • Parsley, for garnish

Instructions

  1. Preheat the oven to 400 degrees Fahrenheit.
  2. In a nonreactive bowl, mash the blueberries with the brown sugar to your desired consistency and set aside.
  3. Heat a sauté pan over medium heat. Season the pork chops with salt and pepper on both sides.
  4. Add canola oil to the sauté pan. Brown the pork chops on both sides until golden and crispy, about 2-3 minutes on each side. Remove from the pan and place on a baking dish to finish cooking in the oven, if necessary. If the pork is thin, keep it warm aside until the sauce is ready.
  5. In the same pan, add the chopped red onion and sauté until translucent.
  6. Add the mashed blueberry-sugar mixture and balsamic vinegar. Cook until the sauce thickens, about 2-3 minutes.
  7. Add the lime zest and juice to the sauce, seasoning with salt and pepper to taste.
  8. If you placed the pork in the oven, remove it and place on serving plates. Serve the sauce on top and garnish with parsley or cilantro. Enjoy!

Tips

To get the perfect sear on your pork chops, make sure your pan is hot before adding the meat. This will help achieve a crispy exterior while keeping the inside juicy. Additionally, letting the pork rest after cooking allows the juices to redistribute, resulting in tender and flavorful meat.

Variations & Substitutions

If you’re looking to switch things up, you can substitute pork chops with chicken breasts or turkey cutlets. For a vegetarian version, consider using seared tofu or tempeh. You can also experiment with different fruits like raspberries or blackberries for the sauce, adjusting the sugar to taste.

Storage

Leftover pork with blueberry sauce can be stored in an airtight container in the refrigerator for up to 3 days. To reheat, gently warm it in a pan over medium-low heat, adding a splash of water if the sauce has thickened too much during storage.

FAQ

Can I use frozen blueberries for this recipe?

Yes, you can use frozen blueberries if fresh ones are not available. Just make sure to thaw them and drain any excess liquid before mashing them with the sugar.

What can I serve with Pork with Blueberry Sauce?

This dish pairs beautifully with a variety of sides. Consider serving it with creamy mashed potatoes, roasted vegetables, or a simple green salad to complement the flavors.

Nutrition

While the exact nutritional content can vary based on the specific ingredients and portion sizes used, this dish is a good source of protein from the pork and antioxidants from the blueberries. It’s a balanced meal that offers both nutrients and flavor.

Conclusion

This Pork with Blueberry Sauce is more than just a meal; it’s an experience that brings together the best of sweet and savory. Whether you’re cooking for your family or hosting guests, this dish is sure to delight everyone at the table. I hope it becomes a favorite in your home, just as it has in mine. Enjoy the journey of flavors and happy cooking!

Related update: Pork with Blueberry Sauce

Related update: Smoked Salmon and Mascarpone Calzone

Chinese Potstickers | Made by Meaghan Moineau

Chinese Potstickers | Made by Meaghan Moineau

Title: Unveiling the Art of Chinese Potstickers: A Delicious Journey from My Family's Kitchen
Description: Dive into the captivating world of Chinese Potstickers with our authentic recipe, bursting with flavors of lean ground pork, water chestnuts, and aromatic spices. This dish is a culinary bridge between past and present, enriched with a nostalgic family tale that warms the heart. Perfect as an appetizer, this recipe is rated 6/10 in difficulty, making it an exciting kitchen adventure for culinary enthusiasts.

---


A Culinary Bridge to My Heritage: Chinese Potstickers


Chinese Potstickers are more than just a delightful treat; they are a culinary emblem that brings my family together, echoing stories of laughter and tradition that span generations. This dish, known for its crisp, golden exterior and juicy, flavorful interior, embodies the essence of Chinese cuisine in every bite.


Ingredients


- 200g lean ground pork (or substitute with ground chicken)


- 1 teaspoon sea salt


- 1 teaspoon fine sugar


- 1/2 teaspoon ground black pepper


- 2 teaspoons light soy sauce


- 2 teaspoons sesame oil


- 1 tablespoon Shaoxing Huatiao wine


- 100g canned water chestnuts (or substitute with spinach or cabbage)


- 2-3 tablespoons finely chopped scallions


- Dumpling wrappers


- Plain flour (for dusting)


- 2-3 tablespoons vegetable oil


- 1/3 cup water


Instructions


1. Prepare the Filling: In a large mixing bowl, combine 200g of lean ground pork with sea salt, sugar, black pepper, light soy sauce, sesame oil, and Shaoxing Huatiao wine. Chop the water chestnuts into small pieces and add them to the mixture along with finely chopped scallions. Mix thoroughly.
2. Prepare the Wrappers: Thaw dumpling wrappers if frozen. Dust a dish and your working surface with flour. Carefully separate the dumpling wrappers and lay them out.
3. Assemble the Potstickers: Place 1.5 teaspoons of filling in the center of each wrapper. Lightly wet the rims with water, fold, and pleat as instructed, ensuring a tight seal. Arrange the prepared dumplings on a floured dish.
4. Cook the Potstickers: Heat vegetable oil in a frying pan. Place the potstickers flat-side down and fry until golden brown. Add water, cover the pan, and steam for 4-5 minutes. Remove the lid to let the base crisp up again.
5. Serve: Transfer to a plate and serve immediately with a vinegar dip made of balsamic or black Chinese vinegar and thinly sliced ginger. Enhance with soy sauce, chili oil, or sesame oil as desired.

A Family's Culinary Tale


As I prepare these delicious potstickers, I am transported back to my grandmother's kitchen—a warm haven filled with the intoxicating aroma of sizzling dumplings and her gentle laughter. Each pleat I form echoes the patient hands of my grandmother teaching me the art of dumpling-making, an experience woven with stories of her childhood in China. The kitchen was our storytelling stage, where tales of resilience and joy unfolded with every fold of dough.


These potstickers were the highlight of our family gatherings, a dish that symbolized unity and love. The crispy potstickers served with a tangy vinegar dip were not just an appetizer; they were a ceremonial opening to an evening filled with laughter and cherished memories.


Difficulty and Classification


Difficulty: 6/10
Classification: Appetizer

Whether you're a seasoned cook or a culinary novice, this recipe offers a delightful challenge that promises rewarding results. Share this dish with loved ones and create your own stories, adding to the rich tapestry of traditions that Chinese Potstickers bring to the table.

Read more about Appetizers

Read more about Main Dishes

Read more about Desserts

Siew Mai | Made by Meaghan Moineau

Siew Mai | Made by Meaghan Moineau

Title: "Savor the Tradition: Crafting Authentic Siew Mai at Home"
Description:

Journey into the heart of Asian cuisine with our detailed guide to making authentic Siew Mai. Discover the blend of succulent pork, fragrant glutinous rice, and traditional Chinese flavors that make this dish a cherished family favorite. Infused with a personal story and rated for difficulty, this recipe will guide you in creating an appetizer that’s sure to impress.


---


Savor the Tradition: Crafting Authentic Siew Mai at Home

In the world of dim sum, Siew Mai holds a special place. These delicate dumplings, with their tender pork filling and aromatic glutinous rice, are a staple in Cantonese cuisine and beloved by many. Today, I invite you to dive into the art of making Siew Mai from scratch — a journey filled with rich flavors and nostalgic family memories.


Ingredients:

*For the Pork Filling:*


- Wonton wrappers


- 700g minced fatty pork


- 2 tablespoons corn starch


- 1 teaspoon salt


- 1 teaspoon white ground pepper


- 1/2 teaspoon sugar


- 1 teaspoon Worcestershire sauce or Maggie Seasoning Sauce


- 2 tablespoons Shaoxing Huatiao wine


- 2 tablespoons sesame oil


- 80g canned water chestnuts, finely chopped


- 4 large Chinese mushrooms, finely chopped


- Carrot, finely diced for garnish


- Cooked whole shrimp


*For the Glutinous Rice Filling:*


- Raw glutinous rice, prepared as per instructions (see link to Glutinous Rice in Lotus Leaf)


- 2 lap cheongs (Chinese sausages)


- Shallots


- Ginger


- Cooking oil


- Dried shrimps


- Cooked dried scallops


- Mushrooms


- Water


- Light soy sauce


- Oyster sauce


- White ground pepper


Instructions:
1. Preparing the Pork Filling:

Start by mincing 700g of fatty pork and place it in a large mixing bowl. Add corn starch, salt, white ground pepper, sugar, Worcestershire sauce, Shaoxing Huatiao wine, and sesame oil.


Next, roughly chop the water chestnuts and Chinese mushrooms before adding them to the pork mixture. Mix all ingredients well to combine. Set aside the mixture along with the finely diced carrot for garnish.


2. Preparing the Glutinous Rice Filling:

Soak the lap cheongs in boiling water until the skin separates. Remove the skin, dice the sausages, and pan fry until golden. Prepare the glutinous rice as per the instructions detailed in the Glutinous Rice in Lotus Leaf recipe. Once ready, combine with the fried lap cheong pieces and set aside to cool.


3. Assembling the Dumplings:

Lay a wonton wrapper flat and place a teaspoon of the pork or glutinous rice filling in the center. Wet the edges of the wrapper and gather it around the filling, squeezing gently to form a tight dumpling. Top each pork Siew Mai with a whole shrimp and some carrot for a pop of color. For the glutinous rice Siew Mai, add extra lap cheong pieces on top if desired.


Arrange the dumplings in a steamer lined with baking paper, ensuring steam can circulate through small holes. Steam over boiling water for 14-15 minutes until cooked through.


4. Serving and Storage:

Serve the dumplings hot. Uncooked dumplings can be frozen for future enjoyment. Simply dust them with flour to prevent sticking before storage.


A Family Memory:

Every Sunday morning, my family would gather at my grandmother’s house, the air filled with the aroma of steaming Siew Mai. My grandmother, with her deft hands, would teach us the art of folding dumplings, her stories interwoven with each precise fold. It was more than just cooking; it was a lesson in tradition and love. These moments, rich with laughter and shared stories, are forever etched in my mind, making Siew Mai more than a dish, but a cherished family tradition.


Difficulty Level: 7/10
Classification: Appetizer

Creating Siew Mai is a rewarding endeavor that brings both flavor and tradition to your table. Whether you're a novice or a seasoned cook, this dish will challenge your culinary skills while offering a taste of cherished Asian heritage. Enjoy crafting these delicious dumplings and creating memories of your own.

Read more about Appetizers

Read more about Main Dishes

Read more about Desserts

Pork Carnitas Tacos | Made by Meaghan Moineau

Pork Carnitas Tacos | Made by Meaghan Moineau

Unforgettable Pork Carnitas Tacos: A Taste of Tradition and Togetherness


A Culinary Journey Down Memory Lane


There's something truly magical about the way food can evoke cherished memories and transport us back to special moments spent with loved ones. In our family, Pork Carnitas Tacos have always held a special place in our hearts. Not only is this dish a tantalizing blend of flavors and textures, but it also serves as a delicious reminder of countless family gatherings, where the kitchen buzzed with laughter and the air was filled with the irresistible aroma of simmering pork and fresh cilantro.


The Recipe: Pork Carnitas Tacos


Difficulty: 6/10
Category: Main Dish

Ingredients:

- 2 cups water

- 3 lbs lean pork butt


- 4 cloves garlic, minced


- Sea salt and ground pepper to taste


- 2 tablespoons olive oil


- 1 cup orange juice


- 1 cup milk


- Corn tortillas


- Salsa fresca


- 2 ripe avocados, sliced


- Fresh cilantro, chopped


- 1 onion, finely chopped


- 2 limes, sliced into wedges


Instructions:

1. Prepare the Pork:

In a large Dutch oven, combine the pork, garlic, sea salt, ground pepper, and water. Bring the mixture to a boil, then reduce the heat, cover, and let it simmer over medium-low heat for 45 minutes to one hour. This slow cooking process ensures the meat becomes tender and infused with the aromatic flavors of garlic and spices.


2. Shred and Brown the Pork:

Once cooked, drain the pork well. Allow it to cool until it's manageable, then shred the meat by hand or with the tines of a fork, discarding any remaining fat. Return the shredded pork to the Dutch oven, heating the olive oil over medium heat. Add the orange juice and milk, cooking until the liquid evaporates and the pork is beautifully browned. Season with additional salt and pepper to taste.


3. Prepare the Toppings:

Chop the onion and cilantro, and slice the avocado and limes. Place each in small individual bowls for an inviting serving presentation.


4. Assemble the Tacos:

Heat the corn tortillas in a dry frying pan to keep them warm and pliable. For each taco, stack two tortillas and layer them with warm carnitas. Top with chopped cilantro, onion, avocado slices, and a squeeze of fresh lime juice for that perfect burst of citrusy brightness.


A Nostalgic Family Memory


Growing up, weekends at Grandma's house were synonymous with the sizzle of carnitas on the stove. I remember sitting on a stool by the kitchen counter, watching in awe as she effortlessly transformed simple ingredients into a feast that brought us all together. The highlight of those afternoons was gathering around the table, each of us eagerly assembling our tacos, swapping stories, and savoring the rich, savory flavors that felt like a warm embrace.


Even as I recreate this dish today, I can almost hear the echoes of playful banter and feel the familial warmth that made those gatherings so special. Pork Carnitas Tacos are more than just a meal; they are a bridge to the past, a reminder of the joy that comes from shared moments and the love that binds us together.


Conclusion


Pork Carnitas Tacos are a delightful main dish that combines the heartiness of seasoned pork with the freshness of vibrant toppings. With a difficulty rating of 6/10, it's a recipe that balances simplicity with a touch of culinary finesse. Whether you're creating new memories or reliving cherished ones, these tacos promise to bring a touch of tradition and a whole lot of flavor to your table. So gather your loved ones, roll up your sleeves, and let the delicious journey begin!

Read more about Appetizers

Read more about Main Dishes

Read more about Desserts

Chinese Potstickers | Made by Meaghan Moineau

Chinese Potstickers | Made by Meaghan Moineau

Deliciously Nostalgic: Crafting Perfect Chinese Potstickers at Home


Description

Dive into the rich flavors and textures of Chinese potstickers, a delightful culinary journey wrapped in a delicate dumpling. This detailed guide not only provides a step-by-step recipe but also shares a heartwarming family story that will inspire you to bring a taste of tradition to your kitchen. Perfect as an appetizer or a savory snack, these potstickers will soon become a family favorite.

---


A Taste of Tradition: Chinese Potstickers


The sizzling sound of dumplings hitting the hot pan, the aroma of sesame oil wafting through the kitchen, and the anticipation of that first bite—making Chinese potstickers is more than just preparing a meal; it's about creating memories. For me, these potstickers are a culinary heirloom passed down through generations, each fold and pleat crafted with love.


Ingredients


- 200g lean ground pork (or substitute with ground chicken)


- 100g canned water chestnuts, chopped (or substitute with spinach or cabbage)


- 1 teaspoon sea salt


- 1 teaspoon fine sugar


- 1/2 teaspoon black ground pepper


- 2 teaspoons light soy sauce


- 2 teaspoons sesame oil


- 1 tablespoon Shaoxing Huatiao wine


- 2-3 tablespoons finely chopped scallions


- Dumpling wrappers (thawed if frozen)


- Plain flour for dusting


- 2-3 tablespoons vegetable oil


- 1/3 cup water


Instructions


1. Prepare the Filling:

- In a large mixing bowl, combine the ground pork with sea salt, sugar, ground pepper, soy sauce, sesame oil, and Shaoxing Huatiao wine.


- Add the chopped water chestnuts to the mixture. For a twist, you can use spinach or cabbage instead.


- Stir in the finely chopped scallions and mix all ingredients well.


2. Assemble the Dumplings:

- Dust your working surface with flour. Carefully separate the dumpling wrappers and lay them out.


- Place about 1.5 teaspoons of the pork filling in the center of each wrapper.


- Lightly wet the edges of the wrapper with water. Bring the edges together and pinch at the center.


- Create pleats on one side of the dumpling, folding towards the center and pinching to seal. Repeat on the other side, ensuring three pleats per side.


3. Cooking the Potstickers:

- Heat vegetable oil in a frying pan over high heat.


- Place the dumplings flat-side down in the pan and fry until the bottoms are golden brown.


- Add water, cover the pan, and steam for 4-5 minutes. Remove the cover and let them crisp up for another minute.


4. Serving Suggestion:

- Serve the potstickers with a vinegar dip made of balsamic or black Chinese vinegar and thinly sliced ginger. Enhance the dip with soy sauce, chili oil, or sesame oil for extra flavor.


A Family Memory


Growing up, Sunday afternoons were reserved for dumpling-making in my grandmother's kitchen. Her nimble fingers would work magic, transforming simple ingredients into delectable bites. As children, my siblings and I would gather around the table, our hands dusted with flour, trying to mimic her expert pleats. Laughter and stories filled the room, each dumpling a testament to our shared love and heritage. These potstickers are more than a dish; they're a connection to those cherished days, a reminder that food has the power to bring families together.


Difficulty: 6/10

Classification: Appetizer


Creating Chinese potstickers is a rewarding experience that combines the art of cooking with the joy of tradition. Whether you're new to dumpling-making or a seasoned pro, this recipe promises delicious results that will delight your senses and bring a touch of nostalgia to your dining table. Enjoy!

Read more about Appetizers

Read more about Main Dishes

Read more about Desserts

Vietnamese Banh Mi | Made by Meaghan Moineau

Vietnamese Banh Mi | Made by Meaghan Moineau

Title: "Savory Memories: Crafting the Perfect Vietnamese Banh Mi"
Description: Dive into the delightful world of Vietnamese cuisine with our authentic Banh Mi recipe. Learn how to combine flavorful ingredients and create a sandwich that’s not just a meal, but a nostalgic journey. Perfectly balanced with tender pork, fresh herbs, and tangy pickles, this Banh Mi is rated 5/10 in difficulty and is a fulfilling main dish.

---


A Taste of Home: The Vietnamese Banh Mi


In the realm of Vietnamese cuisine, Banh Mi stands out as a testament to the country's rich culinary tapestry. This delightful sandwich, with its perfect balance of flavors and textures, has not only become a street food favorite but also a cherished dish in our family. Today, I’m excited to share both a beloved recipe and a heartwarming story that brings this dish to life.


Ingredients


- Rolls


- Pork loin, thinly sliced


- 2 cloves garlic, minced


- 3 tablespoons fish sauce


- 1 tablespoon sugar


- Freshly ground black pepper


- 1 small onion, sliced


- 2 tablespoons vegetable oil


- 1 teaspoon sesame seed oil


- Mayonnaise


- Fresh cilantro sprigs


- Pickled carrot and daikon


- Pâté


- Cucumber, sliced


- Jalapeño, sliced


Instructions


1. Marinate the Pork: In a large plastic bag, combine garlic, fish sauce, sugar, black pepper, onion, vegetable oil, and sesame seed oil. Mix well until the sugar dissolves completely. Add the thinly sliced pork loin to the marinade, ensuring each piece is well-coated. Seal the bag and let it marinate in the refrigerator for at least 1 hour to absorb all the flavors.
2. Cook the Pork: Heat a pan over medium heat. Remove the pork from the marinade and cook the slices in a single layer. Once one side is cooked, flip each piece to ensure even cooking on both sides. Once done, let the pork rest for 10 minutes before slicing into strips.
3. Assemble the Banh Mi: Slice the rolls in half and spread a generous layer of mayonnaise on one side. Add a layer of pâté on the other side. Carefully layer the pork strips, pickled carrot and daikon, cucumber slices, jalapeño, and cilantro sprigs inside the roll. Close the sandwich and serve immediately.

A Nostalgic Journey


Growing up, Banh Mi was more than just a meal; it was a symbol of home and togetherness. I vividly remember Sunday mornings bustling with activity in our kitchen. My grandmother, with her gentle hands and wise smile, would carefully prepare the marinade, a secret recipe she brought with her from Vietnam. As the pork sizzled on the pan, the aroma would fill our home, drawing everyone to the kitchen.


We would gather around the table, eagerly waiting to assemble our sandwiches. Each ingredient was a story, from the tart pickled vegetables representing the vibrant markets of Saigon, to the fresh cilantro, reminiscent of the herbs in our garden. The Banh Mi was not just a sandwich; it was a bridge to our heritage and a delicious reminder of the love that bound our family together.


Recipe Difficulty and Classification


This Vietnamese Banh Mi recipe is rated 5/10 in difficulty, making it accessible for home cooks while still providing a satisfying culinary challenge. Classified as a main dish, it offers a complete meal experience that is both filling and flavorful.


Whether you’re a seasoned chef or a home cook exploring new cuisines, this Banh Mi recipe invites you to savor not just a meal, but a memory. As you take your first bite, may it transport you to a place of warmth, nostalgia, and culinary delight. Enjoy!

Read more about Appetizers

Read more about Main Dishes

Read more about Desserts