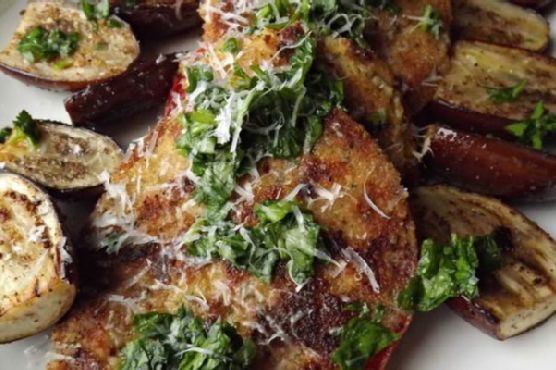
Pittata – Pizza Frittata | Made by Meaghan Moineau

Pittata – Pizza Frittata: A Delicious Twist on Classic Breakfast

Intro

Growing up, Sunday mornings were a sacred time in our household. The aroma of freshly brewed coffee mingled with the sounds of sizzling bacon, creating a comforting symphony that signaled the start of a leisurely day. My mother, with her extraordinary culinary skills, would whisk together the most delightful dishes, but there was one that always stood out – the pittata. A clever blend of pizza and frittata, this dish was the embodiment of indulgence and creativity. Today, I’m thrilled to share this cherished recipe with you, bringing a piece of my family tradition to your kitchen.

Why You’ll Love It

The pittata is a versatile dish that combines the best of two worlds: the savory satisfaction of pizza and the fluffy, protein-packed delight of a frittata. It’s perfect for breakfast, brunch, or even a light dinner, offering a filling meal that’s both quick to prepare and utterly delicious. Whether you’re hosting a gathering or simply looking to treat yourself, this dish is sure to impress with its simple ingredients and depth of flavor.

Ingredients

  • 6 large eggs
  • 1/4 cup fresh basil, chopped
  • 1/4 cup milk (optional)
  • 1/2 cup grated parmesan cheese
  • 1/4 cup sliced pepperoni
  • 1/2 cup shredded mozzarella cheese
  • Salt and pepper to taste
  • Cooking fat (e.g., olive oil, butter)

Instructions

  1. Preheat your oven to ~450°F (230°C), using the top heat setting only.
  2. On the stove, heat your choice of cooking fat in a large oven-safe skillet over medium heat.
  3. In a bowl, beat the eggs with milk, salt, pepper, and any herbs or spices you desire.
  4. Add any additional ingredients (except cheese) to the skillet. For this recipe, we keep it simple, but feel free to include cooked or quick-cooking vegetables like bell peppers.
  5. Pour the egg mixture into the skillet, tilting it to evenly distribute around any add-ins.
  6. Distribute the shredded mozzarella cheese and pepperoni slices over the egg mixture.
  7. Allow the eggs to cook on the stove until the edges are set, leaving the center slightly jiggly.
  8. Generously top with parmesan cheese.
  9. Transfer the skillet to the preheated oven and bake until the eggs are puffed, browned, and the center is firm.
  10. Remove from the oven and let the pittata cool for a couple of minutes before slicing into wedges.

Tips

For the best results, ensure that your skillet is well-greased to prevent sticking. Keep an eye on the pittata as it bakes; it can go from perfectly puffed to overcooked quickly. Use a toothpick to check that the center is set if you’re unsure. Lastly, let it rest slightly before serving; this makes cutting it into neat wedges much easier.

Variations & Substitutions

One of the joys of a pittata is its adaptability. Feel free to experiment with different herbs, spices, or cheeses. Swap pepperoni for sausage, or go vegetarian with mushrooms and spinach. For a dairy-free option, skip the milk and use a plant-based cheese alternative. The possibilities are endless, ensuring every pittata is a unique creation.

Storage

Store any leftover pittata in an airtight container in the refrigerator for up to three days. To reheat, warm it in the oven or a skillet over low heat until heated through, or microwave individual slices for about 30 seconds. For longer storage, freeze individual portions and reheat directly from frozen for a quick and easy meal.

FAQ

Can I make the pittata ahead of time?

Yes, you can prepare the pittata a day in advance. Simply follow the instructions until baking, then cover and refrigerate the skillet. When ready to bake, allow it to come to room temperature before placing it in the oven.

What can I serve with pittata?

Pittata pairs beautifully with a simple green salad, fresh fruit, or crusty bread. For a heartier meal, consider serving it with roasted potatoes or a side of bacon or sausage.

Is there a way to make it spicier?

For a spicier kick, add crushed red pepper flakes, diced jalapeños, or a splash of your favorite hot sauce to the egg mixture before cooking.

Nutrition

While the exact nutritional content will vary with portion sizes and specific ingredients used, a typical slice of pittata (1/6 of the whole) provides approximately 200 calories, 15g of protein, and 15g of fat, making it a hearty, satisfying dish that’s also relatively low in carbohydrates.

Conclusion

The pittata is more than just a meal; it’s a nod to creativity and the joy of cooking. Whether you’re reliving cherished memories or creating new ones, this dish is sure to become a staple in your recipe repertoire. I hope you find as much comfort and joy in making and sharing this dish as I have over the years. Bon appétit!

Related update: Pittata – Pizza Frittata

Related update: Mixed Berry Yogurt with Almonds

Baked Tortellini In Red Sauce | Made by Meaghan Moineau

Baked Tortellini In Red Sauce

Intro

Growing up, Sunday family dinners were a beloved ritual in our home. The tantalizing aroma of tomatoes and garlic simmering on the stove would draw everyone into the kitchen, setting the stage for an evening of laughter, stories, and delicious food. One of my all-time favorite dishes from those cherished meals was my grandmother’s Baked Tortellini in Red Sauce. With its warm, comforting flavors and perfectly baked, cheesy top, it’s a dish that brings back fond memories each time I make it. Today, I’m thrilled to share this beloved recipe with you, hoping it becomes a staple in your home too.

Why You’ll Love It

This Baked Tortellini in Red Sauce is the epitome of comfort food, combining the richness of a homemade tomato sauce with the creamy, satisfying texture of cheese-filled tortellini. It’s a dish that feels both indulgent and heartwarming, perfect for a cozy family dinner or a special gathering with friends. The ingredients are simple, yet they come together to create a symphony of flavors with every bite. Plus, it’s easy to prepare, making it perfect for those busy weeknights when you crave something homemade without the fuss.

Ingredients

  • 2 cloves garlic, minced
  • 1/2 cup grated Grana Padano cheese
  • 1 cup coarsely grated mozzarella
  • 2 tablespoons olive oil
  • 1 medium onion, chopped
  • 1 teaspoon dried oregano
  • Salt and pepper to taste
  • 1 teaspoon sugar
  • 2 cans (14 ounces each) chopped tomatoes with juice
  • 1 pound fresh tortellini

Instructions

  1. Preheat your oven to 240°C (464°F) and lightly oil a baking dish.
  2. In a large pan, heat the olive oil over medium heat. Add the chopped onion and minced garlic, sautéing for about 5 minutes until the onion is translucent.
  3. Season the onion and garlic with salt, pepper, and dried oregano.
  4. Add the chopped tomatoes and their juice to the pan. Stir to combine and season again with salt, pepper, and oregano.
  5. Bring the mixture to a boil, then sprinkle in the sugar and reduce the heat. Let it simmer on low heat for 20 minutes, allowing the flavors to meld. Adjust seasoning to taste.
  6. While the sauce is simmering, bring a pot of salted water to a boil. Plunge the fresh tortellini into the boiling water and cook just until they float to the surface. Drain and return them to the pot.
  7. Toss the cooked tortellini with the tomato sauce, ensuring each piece is well coated.
  8. Transfer the tortellini and sauce mixture to the prepared baking dish. Sprinkle evenly with the grated Grana Padano and mozzarella cheese.
  9. Bake in the preheated oven for 20-25 minutes, until the cheese is golden and bubbly and the surface is well baked.
  10. Remove from the oven and let the dish stand for 5 minutes before serving. Enjoy with a fresh green salad for a complete meal.

Tips

For an even richer flavor, consider adding a splash of red wine to the tomato sauce as it simmers. If you prefer a spicier kick, a pinch of red pepper flakes can elevate the dish nicely. Remember to taste and adjust the seasoning of the sauce before combining it with the pasta.

Variations & Substitutions

Feel free to customize this recipe to suit your taste or dietary needs. Substitute the Grana Padano cheese with Parmesan for a slightly different flavor. For a vegetarian version, ensure your tortellini is filled with cheese or vegetables. You can also add sautéed mushrooms or spinach for an extra layer of flavor and nutrition.

Storage

Leftovers can be stored in an airtight container in the refrigerator for up to 3 days. To reheat, simply place the tortellini in a preheated oven at 180°C (356°F) until warmed through, or microwave individual portions until hot.

FAQ

Can I use frozen tortellini instead of fresh?

Yes, you can use frozen tortellini. Simply follow the package instructions for cooking time, and proceed with the recipe as directed.

Is it possible to make this dish ahead of time?

Absolutely! You can prepare the tomato sauce and cook the tortellini ahead of time. Combine them in the baking dish, cover and refrigerate for up to a day. When ready to serve, sprinkle with cheese and bake as directed, adding a few extra minutes to the baking time if needed.

Nutrition

While the exact nutritional information will vary based on the brands and specific ingredients used, a generous serving of this baked tortellini dish is a good source of protein and calcium, thanks to the cheese and pasta. For those watching their sodium intake, consider using low-sodium canned tomatoes and adjusting the amount of salt added throughout the recipe.

Conclusion

There’s something truly special about a dish that can transport you back in time, evoking memories of family gatherings and cherished moments. This Baked Tortellini in Red Sauce is not only a simple, satisfying meal but also a culinary hug that brings warmth and comfort to the table. Whether you’re making it for your family or sharing it with friends, it’s sure to become a favorite in your home, just as it has in mine. Enjoy every bite and the memories it creates!

Related update: Baked Tortellini In Red Sauce

Related update: Liz's Lomo Saltado

Osso Buco | Made by Meaghan Moineau

Osso Buco: A Timeless Italian Classic

Intro

There’s something magical about the aroma of a slowly simmering pot of osso buco. It takes me back to my grandmother’s kitchen, where the warmth and comfort of her delicious meals enveloped us like a loving embrace. She would often prepare osso buco on special Sundays, filling the house with the tantalizing scent of veal shanks melding with fresh herbs and zesty lemon. Those cherished family gatherings, filled with laughter and stories, remain etched in my heart. Today, I’m excited to share this classic Italian recipe with you, hoping it becomes a beloved favorite in your home just as it is in mine.

Why You’ll Love It

Osso buco is not just a dish; it’s an experience. This traditional Italian stew is a beautiful blend of flavors and textures that will transport you to the heart of Italy. The slow-cooked veal shanks become incredibly tender, with the marrow adding a rich depth to the sauce. The citrusy hint of lemon rind and the fresh burst of parsley elevate the dish, making it a perfect balance of hearty and fresh. Whether you’re hosting a dinner party or enjoying a cozy night in, this dish is sure to impress and satisfy.

Ingredients

  • 4 veal shanks
  • 1/4 cup fresh parsley, chopped
  • Rind of 1 lemon, grated
  • 1/2 cup flour, for dredging
  • 1 bell pepper, chopped
  • 2 tablespoons olive oil
  • 2 cloves garlic, minced
  • 1 onion, finely chopped
  • 2 cups chicken stock
  • 1 cup dry white wine
  • 1 cup tomato sauce

Instructions

  1. Dredge the veal shanks in seasoned flour, shaking off any excess.
  2. Heat the olive oil in a large, deep pan over medium heat. Add the veal shanks and sauté until they are lightly browned on all sides. Remove and set aside.
  3. In the same pan, add the garlic and onion. Sauté until the onion is translucent, about 5 minutes.
  4. Return the veal shanks to the pan. Pour the boiling chicken stock, white wine, and tomato sauce over the meat.
  5. Cover the pan and let it simmer on low heat for about 1 1/2 hours, or until the meat is tender and falling off the bone.
  6. Just before serving, stir in the chopped parsley and grated lemon rind.
  7. Serve the osso buco over a bed of saffron rice, allowing the sauce to soak into the grains.

Tips

For the best results, use high-quality veal shanks with a good amount of marrow. This will enhance the flavor of the dish. Be patient while simmering the osso buco; the longer it cooks, the more tender the meat will become. Make sure to taste the sauce and adjust the seasoning as needed, adding salt and pepper to your preference.

Variations & Substitutions

If veal isn’t to your taste or is unavailable, you can substitute with beef shanks. They offer a similar texture and richness. For a different flavor profile, consider adding a splash of balsamic vinegar or a teaspoon of rosemary. If you prefer a thicker sauce, mix a tablespoon of cornstarch with cold water and stir it into the sauce towards the end of cooking.

Storage

Osso buco keeps well and can be refrigerated in an airtight container for up to three days. To reheat, gently warm it on the stovetop over low heat or in the microwave. This dish also freezes beautifully. Simply allow it to cool completely before transferring to a freezer-safe container. It will keep in the freezer for up to three months. Thaw overnight in the refrigerator before reheating.

FAQ

Can I prepare osso buco in advance?

Absolutely! In fact, osso buco often tastes even better the next day as the flavors have more time to meld together. You can prepare it a day ahead and store it in the refrigerator. Simply reheat before serving.

What should I serve with osso buco?

Osso buco is traditionally served with risotto alla Milanese, a saffron-infused risotto. However, you can also pair it with creamy mashed potatoes, polenta, or a simple crusty bread to soak up the delicious sauce.

Nutrition

This dish is rich in protein and provides a good amount of iron and zinc, thanks to the veal. While it is a hearty dish with some fat content, you can balance it with a side of vegetables or a fresh salad. The use of fresh herbs and lemon also adds vitamin C and antioxidants, contributing to a well-rounded meal.

Conclusion

Osso buco is a dish that brings people together, fostering a sense of warmth and community. With its rich flavors and comforting presence, it’s a meal that turns ordinary occasions into special ones. Whether it’s a Sunday family dinner or a festive gathering, this Italian classic is sure to leave a lasting impression. I hope this recipe becomes as cherished in your culinary repertoire as it is in mine. Enjoy the journey of creating and savoring this timeless dish, and may it fill your home with love and delicious memories.

Related update: Osso Buco

Related update: Slow Cooker Kahlua Pork with Sweet Chili Pineapple Sauce

Risotto With Fresh Peas | Made by Meaghan Moineau

Risotto With Fresh Peas: A Creamy, Comforting Delight

Intro

There’s something undeniably comforting about a warm bowl of risotto, especially when it’s made with fresh, vibrant peas. I vividly recall spending weekends in my grandmother’s kitchen, where the scent of simmering onions and garlic would fill the air as she prepared her signature risotto. It was a dish that brought our family together, and every bite seemed to tell a story of love and tradition. Today, I’m excited to share this beloved recipe with you, hoping it brings as much joy to your table as it has to mine.

Why You’ll Love It

This risotto with fresh peas is more than just a meal; it’s an experience. The creamy texture of the arborio rice, the subtle sweetness of the peas, and the richness of Parmesan cheese create a symphony of flavors that are both luxurious and comforting. Whether you’re making it for a special occasion or a simple weeknight dinner, this dish is sure to impress. Plus, it’s a fantastic way to incorporate more vegetables into your diet while indulging in a bit of decadence.

Ingredients

  • Chicken stock
  • Butter
  • Extra virgin olive oil
  • Onions
  • Garlic cloves
  • Arborio rice
  • Dry white wine
  • Peas
  • Parmesan cheese
  • Bay leaf
  • Salt and pepper

Instructions

  1. Melt butter in a heavy large saucepan over medium heat, then add extra virgin olive oil, bay leaf, and onions. Season with salt and pepper.
  2. Cook until onions are translucent, then add minced garlic. Sauté until tender, roughly 8 minutes.
  3. Stir in the arborio rice and toast it for a few minutes, ensuring each grain is coated.
  4. Add the dry white wine and cook until the liquid is absorbed, stirring often, about 2 minutes.
  5. Add 1 cup of hot chicken broth at a time, allowing the liquid to be absorbed before adding more. Stir often. This should be done over medium-low heat and will take about 28 minutes.
  6. Continue adding 1 cup of chicken broth roughly every 3 minutes, cooking the rice until it’s tender and the mixture is creamy.
  7. Stir in the fresh peas, Parmesan cheese, and additional salt and pepper to taste. Cook until the mixture has absorbed all the liquid and doubled in size.
  8. Let cool slightly before serving. Be warned: it might not last long, as it’s irresistibly delicious!

Tips

For the best results, use high-quality ingredients. Fresh peas will give a burst of flavor and color, while freshly grated Parmesan will melt beautifully into the risotto. Make sure to keep stirring; this is key to achieving that creamy texture. If you find your risotto is drying out, a splash of broth or water will help bring it back to life.

Variations & Substitutions

If you’re looking to switch things up, consider these variations. For a vegetarian version, substitute vegetable stock for chicken stock. Add a handful of sautéed mushrooms for an earthy depth, or stir in some cooked shrimp for a seafood twist. If you’re a fan of herbs, a sprinkle of fresh thyme or basil can add a delightful aromatic note.

Storage

Store any leftover risotto in an airtight container in the refrigerator for up to 3 days. To reheat, add a splash of chicken stock or water to loosen the texture and warm gently over the stove or in the microwave. While risotto is best enjoyed fresh, these storage tips will help maintain its wonderful flavor and texture.

FAQ

Can I use frozen peas instead of fresh peas?

Absolutely! If fresh peas are not available, frozen peas are a perfect substitute. Just be sure to thaw them before adding to the risotto to ensure even cooking.

What can I use instead of arborio rice?

For the classic creamy texture, arborio rice is ideal due to its high starch content. However, you can also use other short-grain rice varieties like carnaroli or vialone nano, which will yield similar results.

Is it necessary to use wine in the recipe?

While wine adds a lovely depth of flavor, you can skip it if preferred or replace it with additional broth. The dish will still be delicious!

Nutrition

While exact nutritional values can vary based on ingredients and portion sizes, this risotto is a well-balanced dish. It offers carbohydrates from the rice, protein from the cheese and stock, and vitamins from the peas. Using olive oil and moderate amounts of cheese keeps it relatively heart-healthy.

Conclusion

This risotto with fresh peas is a dish that embodies comfort and sophistication in every bite. Whether you’re crafting it for a family dinner or a special gathering, it’s sure to become a favorite. It’s a reminder of the joy and warmth that comes from sharing a homemade meal with loved ones. I hope this recipe finds a cherished place in your culinary repertoire, just as it has in mine.

Related update: Risotto With Fresh Peas

Related update: Barbecued Baby Back Pork Ribs and Bush's Grillin' Beans

Zabaglione with Roasted Plums | Made by Meaghan Moineau

Zabaglione with Roasted Plums

Intro

There’s something incredibly comforting about the gentle sizzle of plums roasting in the oven, their sweet fragrance perfuming the entire kitchen. Zabaglione with Roasted Plums is a dessert that transports me back to my childhood, where Sunday afternoons were spent in my grandmother’s cozy kitchen. She would prepare this delightful treat as the sun dipped below the horizon, its warmth mirrored by the glow of her smile. This dessert is not just a dish; it is a cherished memory passed down through generations, capturing the essence of Italian comfort food.

Why You’ll Love It

This Zabaglione with Roasted Plums is a dessert that will captivate your senses with its delightful blend of flavors and textures. The creamy, frothy zabaglione pairs perfectly with the juicy, caramelized plums, creating a harmonious balance of sweetness and tartness. It’s an elegant yet simple dessert that is sure to impress your guests, yet easy enough to make for a special family dinner. The aromatic brandy adds a sophisticated touch, while the hint of salt enhances the natural sweetness of the plums. This dish is a testament to the beauty of Italian culinary tradition, bringing warmth and joy to any occasion.

Ingredients

  • Italian plums
  • Sugar
  • Egg yolks
  • Mixed plum brandy
  • Kosher salt

Instructions

  1. Preheat your oven to 400°F (200°C).
  2. Place the plums on a rimmed cookie sheet lined with parchment paper for easier cleanup.
  3. Sprinkle the plums with 2 tablespoons of sugar.
  4. Roast the plums in the oven until they are browning and tender but not falling apart, about 15 minutes.
  5. Meanwhile, bring about 2 inches of water to a bare simmer in a saucepan over medium-high heat. Reduce the heat to maintain a bare simmer.
  6. In a round-bottomed metal mixing bowl, combine the egg yolks, remaining 4 tablespoons of sugar, mixed plum brandy, and a pinch of kosher salt. Whisk thoroughly.
  7. Set the bowl over the simmering water, ensuring the base of the bowl does not touch the water, and whisk continuously.
  8. The egg yolks will begin to froth, lighten, and grow greatly in volume. If you sense that the yolks are at risk of scrambling, quickly remove the bowl from the heat and whisk to cool slightly, then continue.
  9. When soft peaks form, after 5 to 10 minutes, the zabaglione is done.
  10. Transfer the zabaglione to a clean bowl, cover, and refrigerate.
  11. To serve, place 6 plum halves in the bottom of each of 4 glasses. Give the zabaglione a quick whisk and spoon it on top of the plums.
  12. Serve immediately and enjoy!

Tips

For the perfect zabaglione, it’s crucial to maintain a gentle heat under the bowl to prevent the eggs from scrambling. If you don’t have a round-bottomed mixing bowl, a regular metal bowl can work, but be extra cautious with the heat. Whisking continuously is key to achieving that light, airy texture. Additionally, using a good quality plum brandy will enhance the flavor profile, creating a more refined dessert experience.

Variations & Substitutions

If Italian plums are not in season, you can substitute them with other stone fruits such as peaches or nectarines. For a non-alcoholic version, replace the plum brandy with a splash of vanilla extract and a little extra sugar for sweetness. You can also experiment with different types of sugar, like brown sugar or honey, to add a different depth of flavor to the dessert.

Storage

This dessert is best enjoyed fresh, but if you have leftovers, store the zabaglione and roasted plums separately in airtight containers in the refrigerator. They will keep for up to two days. Before serving, give the zabaglione a gentle whisk to restore its creamy consistency. Avoid freezing the zabaglione, as it can affect the texture.

FAQ

Can I make zabaglione without alcohol?

Yes, you can make a non-alcoholic version of zabaglione by substituting the plum brandy with a splash of vanilla extract and a little extra sugar to maintain the sweetness. This will still give you a deliciously creamy dessert without the alcohol.

What can I serve with zabaglione and roasted plums?

Zabaglione with roasted plums pairs beautifully with a crisp biscotti or a light almond cookie for added texture. You could also serve it alongside a scoop of vanilla ice cream or a dollop of whipped cream for an extra indulgent treat.

Nutrition

This dessert provides a delightful balance of flavors with a moderate calorie count, making it a perfect treat for special occasions. The plums offer a good source of vitamins and antioxidants, while the eggs provide protein. However, due to the sugar and brandy, it’s best enjoyed in moderation.

Conclusion

Zabaglione with Roasted Plums is more than just a dessert; it’s a celebration of flavors and a testament to the joy of cooking with love. Whether you’re rekindling cherished memories or creating new ones, this dish is sure to become a beloved part of your culinary repertoire. With its delicate sweetness and rich flavors, it’s a perfect way to end any meal. Enjoy this little taste of Italy and share it with those you love.

Related update: Zabaglione with Roasted Plums

Related update: Home made coffee ice cream

Chicken Parmesan Patty- Eat As A Burger OR On Pasta | Made by Meaghan Moineau

Chicken Parmesan Patty – Eat As A Burger OR On Pasta

Intro

There’s something about the aroma of Italian seasonings and the rich, comforting taste of a classic Chicken Parmesan that brings back fond memories of family gatherings in my grandmother’s cozy kitchen. I remember the sound of laughter echoing through the house and the sight of her expertly preparing meals that would warm our hearts and fill our bellies. This Chicken Parmesan Patty recipe is a tribute to those cherished moments, offering the same delightful flavors in a versatile form. You can enjoy it nestled in a soft burger bun or served atop a bed of pasta for a delicious meal that is as comforting as it is satisfying.

Why You’ll Love It

This Chicken Parmesan Patty is perfect for those busy weeknights when you crave something delicious yet easy to prepare. The patties are packed with flavor, thanks to a mix of Italian seasoning, garlic, and onion, and they are wonderfully juicy thanks to the addition of ground chicken and egg. Plus, whether you decide to savor them as burgers or paired with pasta, these patties are sure to be a hit with the whole family. Their versatility means you can switch up your meal presentation without compromising on taste.

Ingredients

  • 1 cup whole wheat bread crumbs, divided
  • 1 egg
  • 1/2 cup fresh mozzarella, sliced
  • 2 cloves garlic, minced
  • 1 lb ground chicken
  • 2 tablespoons olive oil
  • 1 small onion, chopped and divided
  • 1/2 teaspoon pepper
  • 1 teaspoon sea salt
  • 1 teaspoon Italian seasoning blend

Instructions

  1. Preheat your oven to 400°F (200°C).
  2. In a large mixing bowl, combine the ground chicken, egg, 1/2 cup of the bread crumbs, half of the chopped onion, minced garlic, Italian seasoning, salt, and pepper.
  3. Mix the ingredients thoroughly until well combined.
  4. Shape the mixture into 6-8 patties, depending on your preferred size.
  5. Place the remaining bread crumbs on a plate and coat each patty evenly.
  6. Arrange the breaded patties on a sheet pan and drizzle them with olive oil.
  7. Bake in the preheated oven for about 20 minutes or until cooked through and golden brown.
  8. Top each patty with a slice of fresh mozzarella cheese and return to the oven for an additional 5 minutes, until the cheese is melted and bubbly.

Tips

For the best results, ensure that your patties are of even thickness so they cook uniformly. If you have time, let the patties rest in the refrigerator for about 30 minutes before cooking to help them hold their shape better. When drizzling olive oil, try to distribute it evenly to achieve a nice crispy texture on the outside.

Variations & Substitutions

If you prefer a spicier kick, add a pinch of red pepper flakes to the chicken mixture. To make a gluten-free version, substitute the whole wheat bread crumbs with gluten-free breadcrumbs. You could also experiment by adding some freshly chopped basil or parsley for an aromatic touch. For a creamier texture, mix a tablespoon of ricotta cheese into the chicken mixture before shaping the patties.

Storage

Store any leftover patties in an airtight container in the refrigerator for up to 3 days. To reheat, place them in a preheated oven at 350°F (175°C) for about 10 minutes, or until they are heated through. You can also freeze the patties for up to 2 months; just make sure to wrap them tightly in plastic wrap or aluminum foil before placing them in a freezer-safe bag.

FAQ

Can I use ground turkey instead of ground chicken?

Yes, ground turkey can be a great substitute for ground chicken in this recipe. It will yield a similar texture and flavor, and it’s just as nutritious.

How can I serve these patties as a burger?

To serve these patties as a burger, simply place them in a toasted burger bun. Top with your favorite condiments such as marinara sauce, fresh basil, or sliced tomatoes, and enjoy with a side of your choice.

What type of pasta pairs well with these patties?

These Chicken Parmesan Patties pair beautifully with a variety of pasta types. Consider serving them over spaghetti, penne, or fettuccine, topped with marinara sauce and a sprinkle of Parmesan cheese for a complete meal.

Nutrition

These patties are not only delicious but also packed with protein. Each serving contains approximately 220 calories, 15g of protein, 10g of fat, and 15g of carbohydrates. They’re a nutritious choice that fits well into a balanced diet.

Conclusion

This Chicken Parmesan Patty recipe is a delightful fusion of classic Italian flavors with modern culinary convenience. Whether you’re enjoying them as a hearty burger or a comforting pasta dish, these patties are sure to become a staple in your meal rotation. They bring the warmth and nostalgia of a cherished family recipe straight to your table, offering not just sustenance, but a taste of home. Bon appétit!

Related update: Chicken Parmesan Patty- Eat As A Burger OR On Pasta

Related update: Broccolini Quinoa Pilaf

Pasta with Peas and Italian Sausage | Made by Meaghan Moineau

Pasta with Peas and Italian Sausage

Intro

There’s something incredibly comforting about a hearty pasta dish, especially one that brings back memories of family gatherings around a bustling kitchen. For me, Pasta with Peas and Italian Sausage is not just a recipe; it’s a treasured memory of Sunday dinners at my grandmother’s house, where the aroma of sizzling sausages and simmering tomatoes would fill the air, coaxing everyone to the table. This simple yet flavorful dish has always been a favorite, and I’m thrilled to share it with you. Whether you’re cooking for a large family dinner or a cozy night in, this pasta dish is sure to bring warmth and joy to your table.

Why You’ll Love It

This Pasta with Peas and Italian Sausage recipe is more than just a meal—it’s a celebration of flavors and textures. You’ll love how the sweetness of the peas perfectly complements the savory Italian sausage, while the farfalle pasta catches every bit of the rich tomato sauce. It’s a dish that comes together effortlessly, making it perfect for busy weeknights or leisurely weekends. With its vibrant colors and mouth-watering aroma, this pasta is sure to become a staple in your home.

Ingredients

  • 1 tablespoon olive oil
  • 4 Italian sweet sausages, casings removed
  • 1 cup frozen peas
  • 1 can (14 oz) canned tomatoes, chopped
  • 1/2 cup Pomi strained tomato sauce
  • 12 oz farfalle pasta
  • 2 tablespoons butter
  • Salt and pepper to taste

Instructions

  1. Begin by cooking the farfalle pasta according to the package directions until al dente. Drain and set aside.
  2. In a very large skillet, heat the olive oil over medium heat. Add the sausage meat and sauté until it is slightly browned all over.
  3. Add the frozen peas, canned tomatoes, and Pomi strained tomato sauce to the skillet. Stir well to combine.
  4. Season the mixture with salt and pepper to taste. Lower the heat to medium and let it cook for another 10 to 15 minutes, allowing the flavors to meld together.
  5. Once the sauce is ready, add the cooked pasta to the skillet along with the butter. Toss everything together until the pasta is well coated in the sauce.
  6. Serve hot, garnished with freshly grated parmesan cheese if desired.

Tips

For the best results, use high-quality Italian sausages, as they bring a rich flavor to the dish. If you prefer a spicier kick, you can use hot Italian sausages instead of sweet ones. Also, don’t be afraid to adjust the amount of peas to suit your taste; their sweetness balances the savory elements beautifully. Lastly, remember to reserve a bit of pasta water before draining, just in case you need to loosen the sauce a little when tossing it with the pasta.

Variations & Substitutions

This recipe is quite versatile, allowing for plenty of creative variations. If you’re looking for a vegetarian option, simply omit the sausage and add more peas or other vegetables like bell peppers or zucchini. You can also substitute the farfalle pasta with any other pasta shape you have on hand, such as penne or rigatoni. For a creamier sauce, consider adding a splash of heavy cream or a dollop of ricotta cheese just before serving.

Storage

Leftovers can be stored in an airtight container in the refrigerator for up to 3 days. To reheat, simply warm the pasta in a skillet over medium heat, adding a splash of water or broth to loosen the sauce if needed. This dish is also freezer-friendly; just be sure to let it cool completely before transferring it to a freezer-safe container. It can be frozen for up to 2 months. Thaw overnight in the refrigerator before reheating.

FAQ

Can I use fresh peas instead of frozen?

Absolutely! Fresh peas can be a delightful addition. Simply blanch them in boiling water for a few minutes before adding them to the sauce. This will ensure they remain tender and vibrant.

What can I use instead of Pomi strained tomato sauce?

If you don’t have Pomi strained tomato sauce, you can use any high-quality tomato puree or passata. The key is to ensure it’s a smooth, rich tomato sauce to complement the chunky canned tomatoes.

Is this dish spicy?

This recipe is not inherently spicy, as it uses sweet Italian sausage. However, you can adjust the spice level by using hot Italian sausage or adding a pinch of red pepper flakes to the sauce for an extra kick.

Nutrition

This hearty pasta dish is packed with protein from the sausages and peas, providing a satisfying and balanced meal. The tomatoes add a dose of vitamin C, while the pasta offers plenty of energy-boosting carbohydrates. As always, moderation is key, especially if you’re watching your calorie intake.

Conclusion

Pasta with Peas and Italian Sausage is a dish that embodies comfort and nostalgia, bringing together simple ingredients to create something truly special. Whether you’re reconnecting with family traditions or starting new ones, this recipe is sure to become a beloved favorite. I hope it brings as much joy and warmth to your home as it has to mine. Happy cooking!

Related update: Pasta with Peas and Italian Sausage

Ditalini with peas | Made by Meaghan Moineau

Ditalini with Peas: A Cozy Italian Classic

Intro

Growing up, Sundays at my grandmother’s house were a time of laughter, family, and, most importantly, the comforting aroma of her hearty Italian cooking. Among the delightful array of dishes she would prepare, Ditalini with Peas was my absolute favorite. This simple yet flavorful pasta dish, dotted with sweet peas and enriched with creamy ricotta, brings back fond memories of sitting at her rustic kitchen table, eagerly awaiting my bowl of goodness. Today, I am thrilled to share this cherished recipe with you, hoping it brings warmth and joy to your family meals just as it has to mine.

Why You’ll Love It

This Ditalini with Peas recipe is a beautiful blend of flavors and textures that makes it irresistible. You’ll love it because:

  • Simple Ingredients: You don’t need a long list of fancy ingredients to create something delicious.
  • Quick and Easy: Perfect for a weeknight dinner, this dish comes together in under 30 minutes.
  • Family-Friendly: Its mild flavors and creamy texture make it a hit with both kids and adults.
  • Customizable: Easily adaptable to suit dietary preferences or ingredient availability.

Ingredients

  • Coarse sea salt
  • Ditalini pasta
  • Freshly ground black pepper
  • Ham, diced
  • 2 tablespoons olive oil
  • 1 medium onion, finely chopped
  • Pancetta, diced
  • Parmesan or Grana Padano cheese, grated
  • Ricotta cheese
  • 1 teaspoon turmeric in 2 ladles of water
  • 1 cup peas (fresh or frozen)

Instructions

  1. In a large sauté pan, place the chopped onion in cold olive oil. Soften the onion without letting it color by adding a teaspoon of water occasionally. Cook until the onion becomes wilted and opaque, about 10 minutes.
  2. Add the peas to the pan and pour in enough water to just cover them. Season with coarse sea salt and freshly ground black pepper. Cook until the peas are tender, approximately 5 to 15 minutes for fresh peas, depending on their freshness and size, or 10 minutes for frozen peas.
  3. Just before the peas are fully cooked, add the diced pancetta and ham. Stir everything together and then turn off the heat.
  4. Stir in the turmeric water and incorporate the ricotta cheese by sieving it through a colander. Allow the ricotta to melt into the cooking liquids, creating a golden sauce. Keep the mixture warm until the pasta is ready.
  5. Meanwhile, cook the ditalini pasta according to the manufacturer’s instructions. Drain the pasta, reserving some of the cooking water.
  6. Immediately toss the cooked pasta in the sauté pan, ensuring it is thoroughly coated with the sauce. If the sauce seems dry, add a bit of the reserved pasta cooking water to loosen it.
  7. Serve immediately, topped with grated Parmesan or Grana Padano cheese.

Tips

  • Use fresh peas: If possible, try to use fresh peas for the best texture and flavor. However, frozen peas work well too.
  • Adjust seasoning: Taste the sauce before serving and adjust the salt and pepper to your preference.
  • Don’t overcook the pasta: Ditalini should be cooked al dente to avoid a mushy texture when mixed with the sauce.

Variations & Substitutions

This Ditalini with Peas recipe is versatile! Here are some variations and substitutions you might enjoy:

  • Vegetarian Option: Omit the pancetta and ham for a meat-free version. Add sliced mushrooms or sun-dried tomatoes for extra flavor.
  • Spicy Twist: Add a pinch of red pepper flakes or a dash of hot sauce for a subtle kick.
  • Cheese Lovers: For an extra cheesy version, mix in some mozzarella or fontina cheese before serving.
  • Gluten-Free: Use your favorite gluten-free pasta instead of traditional ditalini.

Storage

Leftover Ditalini with Peas can be stored in an airtight container in the refrigerator for up to three days. To reheat, add a splash of water or broth to loosen the sauce before microwaving or warming on the stove. For best results, avoid freezing as the texture of the pasta and peas may change.

FAQ

Can I make this dish in advance?

Yes, you can prepare the sauce in advance and store it in the refrigerator for up to two days. When ready to serve, cook the pasta and toss it with the reheated sauce.

What can I use instead of ditalini pasta?

Any small pasta shape, such as macaroni or orzo, can be used as a substitute for ditalini in this recipe. Choose a pasta type that will hold the sauce well.

How can I make this dish more flavorful?

For added depth of flavor, try using chicken or vegetable broth instead of water when cooking the peas. You can also add a splash of white wine to the onion and olive oil mixture for a more robust taste.

Nutrition

This dish is a comforting blend of carbohydrates, protein, and fats. With its moderate portion of cheese and meats, it’s a satisfying meal that can be part of a balanced diet. To lighten it up, consider using low-fat ricotta and reducing the amount of cheese.

Conclusion

Ditalini with Peas is a heartwarming dish that brings people together around the table, much like it did in my grandmother’s kitchen. Its simplicity and rich flavors make it a timeless classic perfect for any occasion. I hope you enjoy making and sharing this recipe with your loved ones, creating your own cherished memories along the way. Buon appetito!

Related update: Ditalini with peas

Related update: Neoguri (Spicy Seafood Ramen)

Related update: Colcannon

Authentic Bolognese Sauce | Made by Meaghan Moineau

Authentic Bolognese Sauce

Intro

There’s something deeply comforting about a simmering pot of Bolognese sauce on the stove, its rich aromas filling the kitchen and evoking memories of family dinners. Growing up, weekends were synonymous with my grandmother’s Bolognese—an authentic recipe passed down through generations. I fondly recall sitting at the kitchen table, my eyes barely peeking over the edge, watching her expertly chop vegetables and stir the sauce with love and dedication. Today, I’m thrilled to share this cherished recipe with you, hoping it brings warmth to your table and creates new memories with your loved ones.

Why You’ll Love It

This Authentic Bolognese Sauce is a labor of love, but it’s worth every minute of simmering. Here’s why you’ll adore making and eating this classic Italian sauce:

  • Rich Flavor: The combination of pancetta, beef, and aromatic vegetables creates a depth of flavor that is both hearty and inviting.
  • Versatile: While traditionally served with tagliatelle, this sauce pairs beautifully with any pasta, lasagna, or even as a topping for polenta.
  • Family Tradition: It’s a recipe that invites you to slow down, enjoy the cooking process, and share a meal steeped in cultural heritage.

Ingredients

  • 1 carrot, diced
  • 1 celery stalk, diced
  • 1/2 cup dry white wine
  • 2 garlic cloves, minced
  • 1 pound regular ground beef
  • 2 tablespoons olive oil
  • 1 diced onion
  • 4 ounces pancetta, diced
  • 1/2 teaspoon pepper
  • 1 teaspoon salt
  • 2 tablespoons tomato paste
  • 1 cup whole milk

Instructions

  1. In a large skillet, heat the olive oil over medium heat.
  2. Add the pancetta, onion, carrot, celery, and garlic. Cook until the vegetables are soft, about 10-15 minutes, stirring occasionally.
  3. Add the ground beef to the skillet. Cook until it is no longer pink, breaking it up with a wooden spoon as it cooks.
  4. Stir in the dry white wine, allowing it to simmer for about 2 minutes.
  5. Add the whole milk and tomato paste, stirring well to combine.
  6. Season with salt and pepper to taste.
  7. Reduce the heat to low and let the sauce simmer uncovered for 1 hour, or until most of the liquid has been absorbed, stirring occasionally.
  8. Once the sauce has thickened, taste and adjust seasoning if necessary before serving.

Tips

  • Take your time: This sauce benefits from a slow simmer, allowing the flavors to meld beautifully. Resist the urge to rush.
  • Quality ingredients: Use the best quality ingredients you can find, especially when it comes to the wine and beef.
  • Stir occasionally: Make sure to stir the sauce every now and then to prevent it from sticking to the bottom of the skillet.

Variations & Substitutions

While this recipe strives to stay true to its authentic roots, there are always ways to make it your own:

  • Vegetarian Bolognese: Substitute the beef and pancetta with lentils and mushrooms for a hearty vegetarian version.
  • Different Meats: Feel free to use a mix of ground pork and beef for a slightly different flavor profile.
  • Herbs and Spices: Add a bay leaf or a pinch of nutmeg for additional depth.

Storage

Allow the Bolognese sauce to cool completely before storing. Transfer it to an airtight container and refrigerate for up to 3 days. For longer storage, freeze the sauce in airtight containers or freezer bags for up to 3 months. Thaw in the refrigerator overnight before reheating.

FAQ

Can I make this sauce ahead of time?

Absolutely! In fact, Bolognese sauce often tastes even better the next day as the flavors have time to develop further. Simply reheat gently on the stove before serving.

What type of pasta pairs best with Bolognese sauce?

Traditionally, Bolognese sauce is served with tagliatelle, a wide, flat pasta that holds the sauce beautifully. However, it also pairs well with pappardelle, fettuccine, or any pasta you have on hand.

Can I use red wine instead of white?

While white wine is traditional in Bolognese, red wine can be used for a slightly different, richer flavor. Just ensure it’s a dry variety to maintain the sauce’s balance.

Nutrition

This recipe serves approximately 6 people. Each serving contains:

  • Calories: 320
  • Protein: 20g
  • Carbohydrates: 12g
  • Fat: 22g
  • Fiber: 2g

Conclusion

Authentic Bolognese Sauce is more than just a meal—it’s a celebration of tradition, flavor, and the joy of cooking. Whether you’re recreating cherished family memories or crafting new ones, this dish brings warmth and togetherness to any table. I hope this recipe becomes a beloved staple in your home, infusing your kitchen with the same love and care my grandmother infused into hers. Buon appetito!

Related update: Authentic Bolognese Sauce

Related update: Chimichurri Skirt Steak with Grilled Asparagus

Related update: Walnut Pesto

Penne Arrabiata | Made by Meaghan Moineau

Penne Arrabiata | Made by Meaghan Moineau

Title: A Taste of Home: The Timeless Comfort of Penne Arrabiata
Description: Dive into the rich flavors and heartwarming memories of Penne Arrabiata. This classic Italian dish, infused with the vibrant notes of garlic, olive oil, and red peppers, not only satisfies the palate but also brings back cherished family memories. Discover the recipe that's a perfect main dish for any occasion and simple enough for a cozy night in.

---


When the aroma of garlic sizzling in olive oil wafts through the kitchen, I am instantly transported back to my grandmother's bustling kitchen. There, amidst laughter and the clinking of pots, Penne Arrabiata was more than just a meal; it was a cherished tradition. This fiery dish, with its perfect balance of spicy, tangy, and savory notes, encapsulates both the simplicity and depth of Italian cuisine.


Ingredients:

- 1 can whole tomatoes (preferably Pomi, which comes in a box)


- 5 cloves fresh minced garlic


- 3 tablespoons olive oil


- 1 teaspoon dried red peppers


- 2 tablespoons fresh Italian parsley, minced


- Packet of penne pasta


- Fresh basil, coarsely chopped


- A pinch of salt


Instructions:
1. Boil the Pasta: Start by bringing a large pot of salted water to a boil. Add the penne and cook until al dente, which should take about 8-10 minutes. Drain and set aside.
2. Prepare the Sauce: In a large skillet, heat 3 tablespoons of olive oil over medium heat. Add 1 teaspoon of dried red peppers and sauté for about a minute until they release their heat into the oil. Be cautious not to let them burn.
3. Flavor Infusion: Incorporate the minced garlic and 2 tablespoons of fresh parsley into the skillet. Stir continuously until the garlic is fragrant but not browned.
4. Tomato Magic: Add the chopped canned tomatoes to the mixture. Stir well, cover, and let the sauce simmer until it is heated through and slightly thickened.
5. Combine: Once the sauce is ready, add the cooked and drained penne to the skillet. Mix thoroughly to ensure each piece of pasta is coated in the spicy tomato sauce.
6. Finishing Touches: Just before serving, add a generous handful of coarsely chopped fresh basil and a little more parsley for an added burst of flavor and color.
7. Serve Immediately: This dish is best enjoyed hot, straight from the stove to the table.
A Nostalgic Memory:

Every Sunday, our family would gather at my grandmother's house, where Penne Arrabiata was always the centerpiece. Grandma would regale us with tales of her childhood in Italy, where this dish was a staple during festive gatherings. As children, we eagerly watched her expertly toss the pasta in the spicy sauce, waiting for the moment we could dive into our bowls. The lively conversations and shared laughter over this simple yet delectable meal are memories that have stayed with me, encapsulating the warmth and togetherness of family.


Difficulty Rating: 4/10
Classification: Main Dish

Penne Arrabiata is a dish that embodies the heart of Italian cooking—simple ingredients with bold flavors. It's perfect for those seeking comfort in tradition and flavor, offering a taste of Italy with every bite. Whether you're cooking for family or indulging in a solo culinary adventure, this dish promises satisfaction and a touch of nostalgia.

Read more about Appetizers

Read more about Main Dishes

Read more about Desserts

Prosciutto and Mushroom Ravioli With Basil Browned Butter Sauce | Made by Meaghan Moineau

Prosciutto and Mushroom Ravioli With Basil Browned Butter Sauce | Made by Meaghan Moineau

Title: A Taste of Italy: Crafting Prosciutto and Mushroom Ravioli with Basil Browned Butter Sauce
Description: Dive into the heart of Italian cuisine with our Prosciutto and Mushroom Ravioli, bathed in a luscious Basil Browned Butter Sauce. This main dish marries the rich flavors of savory prosciutto, earthy mushrooms, and fresh basil, creating a symphony of tastes that will transport you to a cozy trattoria in Italy. Learn how to master this dish, perfect for special occasions or a delightful family dinner, and discover a cherished family memory that makes this recipe truly special.

---


A Culinary Journey: Prosciutto and Mushroom Ravioli with Basil Browned Butter Sauce


There's something inherently magical about making pasta from scratch. As you knead the dough, feeling its texture change beneath your hands, you're not just creating food; you're crafting an experience. This is especially true with our Prosciutto and Mushroom Ravioli, a dish that encapsulates the warmth and love of home-cooked Italian meals.


Ingredients:


- All-purpose flour


- Butter (for both the filling and sauce)


- Eggs


- Fresh basil


- Garlic


- Diced mushrooms


- Diced onion


- Oregano


- Prosciutto


- Salt


- Fresh spinach


Instructions:


We'll start by creating the foundation of our dish—the ravioli dough. In a food processor, combine all the ravioli ingredients. If the dough resembles pebbles, it needs a bit more moisture; add 1/2-1 tsp of water and mix until it forms a smooth ball. Knead the dough outside the processor for a few minutes, wrap it in plastic, and let it rest for 20 minutes.


While the dough rests, it's time to prepare the flavorful filling. Heat butter in a skillet over medium heat, then add garlic, prosciutto, onions, and mushrooms. Cook until fragrant, seasoning with salt and oregano. Add spinach and allow it to wilt completely before removing from heat.


Once your dough is ready, roll it out to your desired thinness. Cut out your ravioli shapes and fill each with a teaspoon of the prosciutto mixture. Use an egg wash to seal them with another piece of pasta.


Boil water in a pot and cook the ravioli until they float. Meanwhile, prepare the basil browned butter sauce. Melt butter in a pan until golden brown and nutty, then lower the heat and add garlic and basil. Swirl to combine.


Finally, toss the cooked ravioli in the sauce, ensuring they're well-coated. Serve with grated Parmesan or Romano cheese for a touch of indulgence.


A Nostalgic Family Memory


Growing up in a big Italian family, Sunday afternoons were reserved for making pasta. I remember standing on a stool beside Nonna, my tiny hands barely able to grasp the rolling pin. She would tell stories of her own childhood in Italy, where her mother taught her the same recipes. As we filled the ravioli, we'd talk about everything from school to dreams of traveling to Italy. Those afternoons were filled with laughter, flour-dusted clothes, and the promise of a delicious meal shared with loved ones. This dish isn't just about the taste; it's a tribute to those cherished memories and the joy of family.


Difficulty: 7/10


Classification: Main Dish


---


Creating this dish is not just about following a recipe; it's about embracing the tradition and love that comes with it. Whether you're an experienced chef or a beginner, the Prosciutto and Mushroom Ravioli with Basil Browned Butter Sauce is a delightful challenge that promises a rewarding experience with every bite. Enjoy the process, savor the flavors, and most importantly, share it with those you love.

Read more about Appetizers

Read more about Main Dishes

Read more about Desserts

Easy Baked Parmesan Chicken | Made by Meaghan Moineau

Easy Baked Parmesan Chicken | Made by Meaghan Moineau

Title: A Taste of Home: Easy Baked Parmesan Chicken
Description: Discover the comforting flavors of Easy Baked Parmesan Chicken, a dish that brings warmth to your dining table and heart. With its simple preparation and rich taste, this main dish is perfect for busy weeknights or a cozy family dinner. Let the aroma of Italian spices and melted cheese fill your home as you create a meal that's sure to become a family favorite.

---


When it comes to creating meals that evoke warm memories and bring families together, few dishes do it as beautifully as the Easy Baked Parmesan Chicken. This dish is a savory symphony of flavors, combining tender chicken, crispy bread crumbs, and a rich medley of cheeses, all embraced by a hearty pasta sauce. Not only is it a delight to the palate, but it also holds a special place in my heart, reminding me of cherished family gatherings from my childhood.


Ingredients:

- 4 skinless, boneless chicken breast halves


- 1 egg, beaten


- 1 cup Italian bread crumbs


- 1 jar pasta sauce


- 1 cup shredded mozzarella cheese


- 1/2 cup grated Parmesan cheese


Instructions:

1. Preheat your oven to 400 degrees Fahrenheit.


2. Dip each chicken breast half into the beaten egg, ensuring it's fully coated.


3. Dredge the egg-coated chicken in the Italian bread crumbs, pressing gently to adhere.


4. Arrange the breaded chicken breasts in a 13 x 9-inch baking dish.


5. Bake uncovered in the preheated oven for 20 minutes.


6. Remove the dish from the oven and pour the pasta sauce over the chicken.


7. Sprinkle the mozzarella and Parmesan cheeses generously over the sauce-covered chicken.


8. Return the dish to the oven and bake for an additional 10 minutes, or until the chicken reaches an internal temperature of 170 degrees and is no longer pink.


9. Serve immediately, either on its own or over a bed of pasta for a complete meal.


Difficulty: 3/10
Classification: Main Dish
A Nostalgic Family Memory:

As I prepare this dish, I am transported back to my grandmother's cozy kitchen, where the aroma of her famous Baked Parmesan Chicken filled the air. Every Sunday, our family gathered around her large, wooden dining table, eagerly awaiting the meal that was always the highlight of the week. I remember watching in awe as she deftly coated each piece of chicken, her hands moving rhythmically as she hummed a familiar tune.


This dish was more than just a meal; it was a tradition. Each bite was a reminder of the laughter and love that filled the room, the stories shared, and the bonds strengthened. Even now, as an adult, I find myself recreating this recipe for my own family, hoping to pass down not just the taste, but the sentiment of those cherished Sunday afternoons.


Cooking the Easy Baked Parmesan Chicken is more than just about following a recipe; it's about reliving those memories and creating new ones. Whether you're serving it to friends or family, this dish is sure to warm their hearts and become a beloved tradition in your own home.

Read more about Appetizers

Read more about Main Dishes

Read more about Desserts

Farfalle with Shrimps, Tomatoes Basil Sauce | Made by Meaghan Moineau

Farfalle with Shrimps, Tomatoes Basil Sauce | Made by Meaghan Moineau

Title: Farfalle with Shrimps and Tomato Basil Sauce: A Taste of Summer Evenings
Description: Dive into the vibrant flavors of a quintessential Italian dish, Farfalle with Shrimps and Tomato Basil Sauce. This delightful recipe combines the tenderness of fresh shrimps with the aromatic charm of basil and tomatoes, creating a symphony of flavors that whisk you away to warm, sunlit family gatherings. Simple yet sophisticated, this main dish is a culinary ode to cherished memories and is perfect for bringing a touch of nostalgia to your dinner table.

---


Farfalle with Shrimps and Tomato Basil Sauce: A Culinary Journey Back in Time

There’s something truly magical about a dish that can transport you back to a cherished moment in time. For me, Farfalle with Shrimps and Tomato Basil Sauce is not just a meal—it’s a portal to warm summer evenings spent in my grandmother’s cozy kitchen, where the aroma of fresh basil and sizzling butter filled the air.


Ingredients:

- 2 tablespoons of butter


- 400g Farfalle pasta by Barilla


- A handful of fresh basil leaves, roughly torn


- Freshly ground black pepper and salt to taste


- 500g fresh shrimps, cleaned and deveined


- 4 ripe tomatoes, diced


Instructions:

1. Bring a large pot of salted water to a boil and cook the Farfalle pasta according to the package instructions, ensuring it is al dente.


2. While the pasta is cooking, melt the butter in a large frying pan over medium-high heat. Add the diced tomatoes and sauté for about 1 minute, allowing them to release their juices and meld with the butter.


3. Add the cleaned shrimps to the pan and cook until they turn a light pink, which should take about 3-4 minutes. Sprinkle with freshly ground black pepper and salt to taste.


4. Gently stir in the fresh basil leaves, allowing their fragrant oils to infuse the sauce.


5. Once the pasta is ready, drain it and add it directly to the skillet with the shrimps and tomato mixture. Add an extra pat of butter for richness and toss everything together until well combined.


6. Serve immediately while hot, and enjoy a dish that is as comforting as it is delicious.


A Nostalgic Tale:

Growing up, every Sunday was a celebration of family, food, and laughter. My grandmother, a woman whose heart was as vast as her culinary skills, had a way of turning simple ingredients into masterpieces. Her Farfalle with Shrimps and Tomato Basil Sauce was a staple at our gatherings, a dish that brought everyone to the table with eager anticipation.


I remember sitting by the kitchen counter, watching her nimble fingers deftly chop tomatoes and basil picked fresh from her garden. The air would be filled with stories of her own childhood, tales that danced through the kitchen as we waited for the water to boil and the butter to melt.


Each bite of this dish was like a hug from her—a reminder of the love and care she poured into everything she did. Even now, as I recreate this recipe in my own kitchen, I can almost hear her laughter and feel the warmth of those summer evenings. It’s a dish that not only satisfies the palate but also nourishes the soul, reminding me that food is one of the greatest ties that bind us to our past.


Difficulty: 4/10
Classification: Main Dish

Whether you're an experienced chef or a novice in the kitchen, this Farfalle with Shrimps and Tomato Basil Sauce is a delightful journey into the heart of Italian cuisine, rich with flavor and steeped in tradition. It's a meal that invites you to create your own memories, to share stories, and to savor the simple joys of life. Enjoy!

Read more about Appetizers

Read more about Main Dishes

Read more about Desserts

Easy Eggplant Parmesan | Made by Meaghan Moineau

Easy Eggplant Parmesan | Made by Meaghan Moineau

Savoring Simplicity: Easy Eggplant Parmesan for Cozy Family Dinners


Description

Delve into the flavors of Italy with our Easy Eggplant Parmesan recipe—a heartwarming dish that brings the taste of tradition to your table without the fuss. Discover how this delightful main dish, with a difficulty rating of just 4 out of 10, can transform any evening into a memorable culinary experience. Perfect for family gatherings or a comforting solo meal, this recipe is a nod to cherished family memories and the joy of home-cooked meals.

---


A Nostalgic Whiff of Eggplant Parmesan


There's something magical about the aroma of eggplant, cheese, and basil mingling in the oven. It takes me back to Sundays spent in my grandmother's rustic kitchen. As a child, I would eagerly await the moment when the rich scent of eggplant parmesan would signal that dinner was near. My grandmother, with her apron dusted in flour and a perpetual smile, would tell stories of her own childhood in Italy, where eggplants grew abundantly in her family's garden.


Her version of eggplant parmesan was always a labor of love, involving hours of preparation and an unspoken rule that every slice of eggplant be cooked to perfection. My siblings and I would gather around the kitchen table, helping with what little tasks we could manage, like tearing fresh basil leaves or grating cheese. It wasn't just about the food; it was about the laughter, the stories, and the warmth of being together.


This Easy Eggplant Parmesan recipe captures those cherished memories, delivering the same soulful flavors with a fraction of the effort. Whether you’re a seasoned chef or a kitchen novice, its simplicity ensures you can enjoy a taste of Italy right at home.


---


Ingredients


- Olive oil


- 1 onion, finely chopped


- 1 garlic clove, minced


- 2 cups pasta sauce


- 2 medium eggplants, sliced


- 2 cups Italian style cheese, shredded


- Fresh basil leaves, for garnish


---


Instructions


1. Prepare the Eggplant: Preheat your broiler and arrange the eggplant slices on a baking sheet. Brush each slice generously with olive oil. Place under the broiler until the eggplants become soft and tender. Once done, remove them from the oven and allow them to cool slightly.
2. Make the Sauce: In a small saucepan, gently heat the pasta sauce. Meanwhile, heat additional olive oil in a skillet over medium heat. Add the chopped onion and cook for about 5 minutes until translucent. Stir in the minced garlic and sauté for an additional minute. Combine the sautéed onion and garlic with the warm pasta sauce.
3. Assemble the Dish: In an 8 x 6 baking dish, create a layer of eggplant slices. Sprinkle a generous amount of Italian style cheese over the eggplant. Repeat these layers until all the eggplant is used, finishing with a final coating of sauce, fresh basil leaves, and the remaining cheese.
4. Bake: Preheat your oven to 375°F (190°C). Bake the assembled dish for approximately 40 minutes, until the cheese is golden and bubbly.
5. Optional Method: For a richer flavor, you can fry the eggplant slices in olive oil instead of broiling them. If you choose this method, be sure to let them drain on a paper towel to remove excess oil.

---


Enjoy this Easy Eggplant Parmesan as a main dish, either on its own or alongside a fresh salad or crusty bread. With its comforting flavors and simple preparation, it’s a dish that's sure to become a staple in your home, just as it has in ours.

Read more about Appetizers

Read more about Main Dishes

Read more about Desserts

Heirloom Tomato Basil and Olive Oil Wine Sauce over Pasta | Made by Meaghan Moineau

Heirloom Tomato Basil and Olive Oil Wine Sauce over Pasta | Made by Meaghan Moineau

Title: A Taste of Tradition: Heirloom Tomato Basil and Olive Oil Wine Sauce over Pasta
Description: Dive into the heart of Italian cuisine with our Heirloom Tomato Basil and Olive Oil Wine Sauce over Pasta. This dish combines the rich, vibrant flavors of heirloom tomatoes, fresh basil, and extra virgin olive oil with a touch of dry white wine. Perfect as a main dish, this recipe is not only a feast for the senses but also a nostalgic journey back to family gatherings and the comforting warmth of homemade meals. Rated 5/10 for difficulty, it's accessible for home cooks seeking to create a memorable dining experience.

---


A Taste of Tradition: Heirloom Tomato Basil and Olive Oil Wine Sauce over Pasta

In the world of culinary delights, few dishes evoke the warmth and comfort of family gatherings like a lovingly prepared pasta. One such dish that holds a special place in my heart is the Heirloom Tomato Basil and Olive Oil Wine Sauce over Pasta. Each bite is a harmonious blend of rich flavors and cherished memories.


Growing up, Sundays were always reserved for family. The kitchen would buzz with activity, filled with laughter and the tantalizing aromas of fresh ingredients. My grandmother, the heart of our family, would preside over the stove, her hands deftly transforming simple ingredients into a feast. This recipe, passed down through generations, was always the highlight of our Sunday dinners.


Ingredients:

- 400g of your favorite pasta


- 5 heirloom tomatoes


- A generous bunch of fresh basil


- 4 cloves of garlic


- 1/2 cup of extra virgin olive oil


- 1/2 cup of dry white wine


- Sea salt, to taste


Instructions:

1. Begin by grating two heirloom tomatoes using a cheese grater, capturing all the juice and pulp. Dice the remaining three tomatoes and set them aside.


2. Chop a generous handful of basil and set it aside for later.


3. Mince the garlic cloves and sauté them in a tablespoon of olive oil over medium heat until they turn a light golden color, stirring often to prevent burning.


4. Add the dry white wine to the garlic and allow it to reduce until it reaches a syrupy consistency. This step imparts a rich depth of flavor to the sauce.


5. While the wine is reducing, bring a pot of salted water to a boil. Add a splash of olive oil to prevent the pasta from sticking, then cook the pasta according to the package directions.


6. Incorporate the grated and diced tomatoes into the reduced wine, adding a pinch of sea salt to enhance the flavors. Pour in half a cup of extra virgin olive oil and reduce the heat to medium-low.


7. Gradually stir in the chopped basil, allowing the flavors to meld together. Cook until the tomatoes are hot and soft, creating a thick, luscious sauce.


8. Once the pasta is al dente, drain it and combine it with the sauce, ensuring every strand is coated in the vibrant mixture.


This dish, with its rating of 5/10 in difficulty, is a perfect main dish for those seeking to create a heartfelt meal. The simplicity of the ingredients belies the complexity of flavors, making it a testament to the beauty of traditional cooking.


Every time I prepare this pasta, I'm transported back to those cherished Sundays, surrounded by family and the warmth of shared meals. It's more than just a recipe; it's a piece of my heritage, a reminder of the love and togetherness that food can bring. So gather your loved ones, and savor the taste of tradition with every delightful bite.

Read more about Appetizers

Read more about Main Dishes

Read more about Desserts

Minestrone | Made by Meaghan Moineau

Minestrone | Made by Meaghan Moineau

A Hearty Bowl of Memories: Classic Minestrone Soup Recipe


Description

Dive into the heartwarming world of classic Italian cuisine with our Minestrone Soup recipe. Perfect for a chilly evening, this nutrient-packed dish is brimming with vibrant vegetables and robust flavors. Whether you're a seasoned cook or a kitchen novice, this recipe is sure to bring comfort to your table and warmth to your soul.

A Nostalgic Tale

Growing up, Saturday afternoons were always a time of togetherness in our household. The comforting aroma of simmering soup would fill every corner of our home, drawing us all to the kitchen. My grandmother, with her gentle hands and warm smile, would orchestrate these culinary symphonies, turning ordinary ingredients into extraordinary meals.

Minestrone was her masterpiece—a dish that transcended mere sustenance and ventured into the realm of family tradition. As she sautéed the carrots, celery, onions, and cabbage, she would share stories of her childhood in a small Italian village. Her tales of sun-drenched fields and bustling local markets were as rich and vibrant as the soup itself.


Each ingredient she added seemed to carry a piece of her past. The Worcestershire sauce, a nod to her adventurous spirit, the Italian mixed seasoning, a tribute to her roots. The pot would bubble gently on the stove, much like the laughter and chatter that filled the room. It was more than just a meal; it was a legacy of love and warmth passed down through generations.


Recipe Details


Ingredients

- 2 tablespoons butter

- 2 cups carrots, diced


- 2 cups celery, diced


- 2 cups onions, chopped


- 4 cloves garlic, minced


- 2 cups cabbage, shredded


- 1 can (28 ounces) tomatoes, diced


- 6 cups water


- 1/2 cup brown rice


- 2 teaspoons salt


- 1 tablespoon Worcestershire sauce


- 1 tablespoon Italian mixed seasoning


- 1/2 teaspoon pepper


- 2 cups potatoes, peeled and diced


- 3 beef bouillon cubes


- 1 zucchini, sliced


- 1 can (15 ounces) kidney beans, drained and rinsed


- 1 cup frozen spinach


- Parmesan cheese, for garnish


Instructions

1. In a large soup kettle, melt the butter over medium heat. Add the carrots, celery, onions, garlic, and cabbage. Sauté for about 20 minutes, stirring often, until the vegetables are tender.

2. Stir in the canned tomatoes, water, brown rice, salt, Worcestershire sauce, Italian seasoning, pepper, potatoes, bouillon cubes, and zucchini.


3. Bring the mixture to a boil, then reduce the heat. Cover and simmer for at least 30 minutes.


4. Add the kidney beans and frozen spinach. Return to a boil and cook over medium heat until the spinach is cooked through, adding more water if necessary.


5. Garnish with Parmesan cheese before serving.


Difficulty: 4/10
Classification: Main Dish

Conclusion

This Minestrone Soup is not just a recipe; it's an invitation to create your own memories, to gather loved ones around the table, and to share stories and laughter. As you savor each spoonful, may you feel the comforting embrace of family, tradition, and the enduring warmth of home.

Read more about Appetizers

Read more about Main Dishes

Read more about Desserts

Farfalle with Peas, Ham and Cream | Made by Meaghan Moineau

Farfalle with Peas, Ham and Cream | Made by Meaghan Moineau

Title: "A Taste of Nostalgia: Farfalle with Peas, Ham, and Cream"
Description: Discover the comfort and joy of a classic Italian-inspired dish, Farfalle with Peas, Ham, and Cream. Perfectly blending simple ingredients with cherished memories, this easy-to-make main dish is sure to become a family favorite.

---


There's something enchantingly comforting about dishes that transport us back to cherished family gatherings. Farfalle with Peas, Ham, and Cream is one such recipe that not only delights the palate but also warms the soul. This dish, rich in both flavor and nostalgia, has been a staple at our family dinners, where laughter and love were always the main ingredients.


A Stroll Down Memory Lane

Growing up, Sunday dinners at my grandmother's house were a sacred ritual. The aroma of hearty dishes would greet us at the door, promising an afternoon of indulgence and togetherness. Among the myriad of recipes she crafted with love, Farfalle with Peas, Ham, and Cream stood out not just for its taste, but for the warmth it brought to our hearts.


I vividly recall the sight of my grandmother bustling around her cozy kitchen, her apron dusted with flour and her face glowing with the joy of cooking for her family. As the farfalle pasta danced in the boiling pot, she would hum a tune that was as comforting as the meal itself. The sizzle of butter in the skillet, the vibrant green of the peas, and the savory aroma of ham melded together to create a symphony of flavors that was simply irresistible.


After a day filled with conversation and laughter, we would gather around the dining table. Bowls of Farfalle with Peas, Ham, and Cream were passed around, each serving a testament to the love that went into its making. The creaminess of the sauce, the saltiness of the ham, and the subtle sweetness of the peas perfectly complemented the al dente farfalle, making every bite a delight.


The Recipe
This dish, with its Italian roots and heartwarming simplicity, is a breeze to prepare. Here's how you can recreate this beloved family treasure:
Ingredients:

- 2 tablespoons butter


- 1 cup diced ham


- 12 ounces farfalle pasta


- 1 cup canned heavy cream


- 1 cup parmesan cheese, grated


- 1 cup frozen peas


- Salt and pepper to taste


Instructions:

1. Cook the farfalle pasta according to the package directions until al dente. Drain and set aside.


2. In a skillet over medium heat, melt the butter. Add the diced ham and frozen peas, sautéing them together for about 5 minutes.


3. Pour in the heavy cream, season with salt and pepper, and let the mixture cook for 5 to 10 minutes, or until the cream begins to thicken slightly.


4. Remove the skillet from heat. Add the cooked pasta to the pan and gently stir to coat the farfalle with the creamy sauce.


5. Sprinkle the grated parmesan cheese over the pasta, stirring until the cheese melts and blends into the sauce.


6. Serve immediately, ensuring each plate is filled with love, warmth, and a sprinkle of nostalgia.


Difficulty Rating: 3/10
Classification: Main Dish

This recipe's simplicity is not just in its preparation but also in its ability to bring people together. It serves as a gentle reminder that the most cherished moments are often found in the simplest of meals, shared with those we love. So, gather your family and create new memories with this timeless dish that has been a cherished part of ours for generations. Enjoy!

Read more about Appetizers

Read more about Main Dishes

Read more about Desserts

Vanilla Panna Cotta with Chocolate Ganache | Made by Meaghan Moineau

Vanilla Panna Cotta with Chocolate Ganache | Made by Meaghan Moineau

Title: A Sweet Symphony: Vanilla Panna Cotta with Chocolate Ganache
Description: Experience the perfect balance of creamy vanilla panna cotta and rich chocolate ganache with this elegant dessert recipe. A touch of nostalgia, a dash of sophistication, and a whole lot of flavor await you in this culinary journey.

---


When it comes to creating a dessert that is both elegant and comforting, few dishes can match the allure of Vanilla Panna Cotta with Chocolate Ganache. This classic Italian dessert, with its silky texture and harmonious flavors, is the perfect way to end a meal on a high note. In this blog post, I'll walk you through the process of making this delightful treat, while sharing a personal family memory that makes this dish even more special.


Ingredients:

- Gelatin

- Milk


- Vanilla bean


- Cream


- Sugar


- Chocolate bar


Instructions:


1. Prepare the Gelatin: Begin by filling a bowl with water and adding the gelatin. Let it soak until it becomes soft and pliable.
2. Heat the Milk: Pour the milk into a pan and bring it to just below simmering. It's crucial not to let it boil, as boiling can ruin the delicate texture of your panna cotta. Once the milk is heated, remove the pan from the heat.
3. Incorporate the Gelatin: Drain and squeeze out the gelatin, then add it to the warm milk, stirring until completely dissolved.
4. Flavor with Vanilla: In another pan, pour the cream and add sugar along with a split vanilla bean. Bring this mixture to a gentle boil over low heat, stirring constantly to infuse the cream with the vanilla's sweet aroma. Once it begins to boil, remove from heat and discard the vanilla bean.
5. Combine and Chill: Stir the milk mixture into the cream. Rinse your chosen ramekins or molds in ice-cold water, shaking out any excess, and fill them with the panna cotta mixture. Chill in the refrigerator for at least 3-4 hours, or until set.
6. Prepare the Chocolate Ganache: Using a double boiler, melt a chocolate bar until completely smooth. Gradually whisk in cream until you reach the desired consistency for your ganache.
7. Serve with Elegance: Once the panna cotta is set, gently turn it out onto a serving dish. Drizzle the luxurious chocolate ganache over the top just before serving.

A Slice of Nostalgia:


Every time I make this Vanilla Panna Cotta with Chocolate Ganache, I'm transported back to my grandmother's cozy kitchen. I recall a chilly winter evening when the family gathered around her rustic dining table, eagerly anticipating the dessert she'd promised. She was a maestro in the kitchen, turning simple ingredients into spectacular creations. That night, the panna cotta she served was a revelation—its creamy richness perfectly complemented by the decadent chocolate ganache. As we savored each bite, the room was filled with stories, laughter, and the warmth of family. It was one of those evenings that felt like a scene from a movie, and it's a memory I cherish every time I recreate this dish.


Difficulty Rating: 5/10


Classification: Dessert


This Vanilla Panna Cotta with Chocolate Ganache is a dessert that combines simplicity with sophistication. Whether you're hosting a dinner party or simply treating yourself, this recipe is sure to impress. So, gather your ingredients, embrace the nostalgia, and enjoy the sweet symphony of flavors in every bite.

Read more about Appetizers

Read more about Main Dishes

Read more about Desserts

Lasagne Roll Ups | Made by Meaghan Moineau

Lasagne Roll Ups | Made by Meaghan Moineau

Title: Rolling with Tradition: Delightful Lasagne Roll Ups for Family Gatherings
Description: Discover a heartwarming twist on a classic Italian favorite with our Lasagne Roll Ups. Packed with vibrant flavors and a touch of nostalgia, this dish is perfect for bringing families together. Dive into this main dish recipe that’s rich in taste and memories, rated 6/10 on the difficulty scale.

---


Ah, lasagne! A dish that has graced many tables, bringing warmth and comfort to countless gatherings. But have you ever tried Lasagne Roll Ups? This delightful variation not only elevates the classic flavors but also adds a touch of elegance to your dining experience.


Ingredients:

- Fresh finely-chopped basil leaves


- Red thinly-sliced bell peppers


- Black pepper


- Chicken broth


- Dried thyme


- 2 garlic cloves, minced


- Fresh lemon juice


- A pinch of nutmeg


- Olive oil


- 1 finely-chopped onion


- Parmesan cheese


- Dry lasagne pasta sheets


- Red dried pepper flakes


- Ricotta cheese


- Salt


- Shredded mozzarella cheese


- 1 packet frozen spinach, thawed and drained


- Unsalted butter


Instructions:
1. Prepare the Sauce: In a skillet, heat olive oil over moderately-low heat. Add garlic, onion, red pepper flakes, thyme, and salt and pepper to taste. Stir until the onion softens. Reserve 3 tablespoons of this mixture in a bowl.
2. Cook the Peppers: Add bell peppers and chicken broth to the skillet. Cover and simmer for about 10 minutes until the peppers are very soft. Puree the mixture in a blender until smooth, then return it to the skillet. Swirl in unsalted butter and stir in basil and lemon juice.
3. Cook the Noodles: Cook the lasagne noodles according to package directions. Rinse with cold water and drain.
4. Preheat the Oven: Set your oven to 375°F (190°C).
5. Make the Filling: In a bowl, combine the reserved onion mixture, 1/4 cup Parmesan cheese, mozzarella, ricotta, nutmeg, spinach, and salt and pepper. Mix well.
6. Assemble the Roll Ups: Spread 1 cup of sauce in a 9x9x2-inch baking pan. Spread 3 tablespoons of filling on each noodle, roll up like a jelly roll, and place seam-side down in the pan. Repeat with remaining noodles.
7. Bake: Top with remaining sauce, cover with foil, and bake for 25 minutes. Uncover, sprinkle with remaining Parmesan cheese, and bake uncovered until golden, about 5 more minutes.

This recipe yields 6 servings of pure joy.


Nostalgic Story:

Growing up, Sunday family dinners were a sacred tradition in our household. Grandma would always whip up her legendary lasagne, the recipe passed down from her mother, who brought it over from the old country. But it wasn't until one chilly autumn afternoon that she decided to give the classic a twist.


I remember the warmth of the kitchen, the aroma of garlic and basil wafting through the air, blending with the laughter of my cousins and the gentle hum of the radio. Grandma, with her ever-present apron, decided to surprise us with Lasagne Roll Ups. It was her way of honoring tradition while embracing creativity.


As I helped her spread the filling and roll the noodles, she shared stories of her childhood, the challenges and joys of adapting to a new world while preserving her heritage. Those roll ups were more than just a meal; they were a testament to resilience and love. Every bite was a journey back to simpler times, a reminder of the strength found in family bonds.


To this day, whenever I prepare Lasagne Roll Ups, I am transported back to that cozy kitchen, surrounded by love and laughter, reminded of the power of food to connect us across generations.


Difficulty: 6/10
Classification: Main Dish

Whether you’re creating new memories or honoring old traditions, Lasagne Roll Ups are a delightful way to bring everyone together. Enjoy!

Read more about Appetizers

Read more about Main Dishes

Read more about Desserts

Authentic Bolognese Sauce | Made by Meaghan Moineau

Authentic Bolognese Sauce | Made by Meaghan Moineau

Title: Unveiling Tradition: Crafting Authentic Bolognese Sauce
Description: Dive into the heart of Italian culinary tradition with our Authentic Bolognese Sauce recipe. This rich, savory delight brings together a symphony of flavors that will transport you straight to the sun-drenched hills of Bologna. Perfect for a comforting main dish, this recipe is steeped in family memories and culinary heritage. Discover the secret to creating a sauce that captures the essence of Italy in every bite.

---


A Taste of Italy: Crafting the Perfect Bolognese Sauce


When it comes to Italian cuisine, few dishes evoke the warmth and comfort of home quite like a traditional Bolognese sauce. This beloved staple has been a cherished part of my family’s culinary repertoire for generations, with each spoonful bringing back fond memories of bustling kitchens and lively family gatherings.


Ingredients:


- 1 carrot, finely chopped


- 1 celery stalk, finely chopped


- 1 cup dry white wine


- 2 garlic cloves, minced


- 1 pound regular ground beef


- 2 tablespoons olive oil


- 1 diced onion


- 3 ounces pancetta, diced


- Salt and pepper to taste


- 2 tablespoons tomato paste


- 1 cup whole milk


Instructions:


1. Prepare the Base: In a large skillet, heat the olive oil over medium heat. Add the diced pancetta, onion, carrot, celery, and minced garlic. Cook until the vegetables are soft and aromatic, about 10-15 minutes.
2. Cook the Meat: Increase the heat slightly and add the ground beef to the skillet. Cook until the beef is browned and no longer pink, breaking it apart with a wooden spoon.
3. Combine Flavors: Stir in the dry white wine, allowing it to simmer until mostly evaporated. Follow with the whole milk and tomato paste, stirring well to combine.
4. Season and Simmer: Season the sauce with salt and pepper to taste. Reduce the heat to low and let the sauce simmer uncovered for about 1 hour, or until most of the liquid is absorbed and the flavors have melded together beautifully.
5. Serve: Pair this luscious Bolognese sauce with your favorite pasta, and garnish with freshly grated Parmesan cheese for an authentic Italian experience.

A Nostalgic Journey:


Every time I prepare this Bolognese sauce, I am transported back to my grandmother's cozy kitchen. The scent of onions and garlic sizzling in olive oil always takes me to those Sunday afternoons, where the entire family would gather around the table, eagerly anticipating the meal to come. My grandmother, with her flour-dusted apron and warm smile, would share stories of her childhood in Italy as she stirred the sauce, infusing it with love and tradition.


These moments were more than just meals—they were a celebration of our heritage, a connection to our roots. Today, as I pass this recipe down to my own children, I hope they too will carry forward the sense of belonging and joy that comes with every delicious bite.


---


Difficulty: 5/10
Classification: Main Dish

This Authentic Bolognese Sauce is not just a meal; it's an experience—a journey through time and taste that brings family and friends together. Whether you’re an experienced cook or a culinary newcomer, this recipe promises to delight and inspire, creating memories as rich and flavorful as the sauce itself. Buon Appetito!

Read more about Appetizers

Read more about Main Dishes

Read more about Desserts