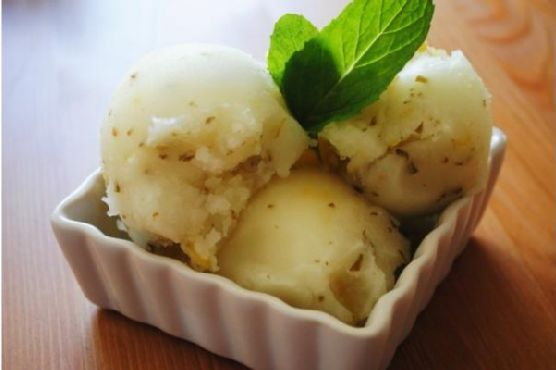
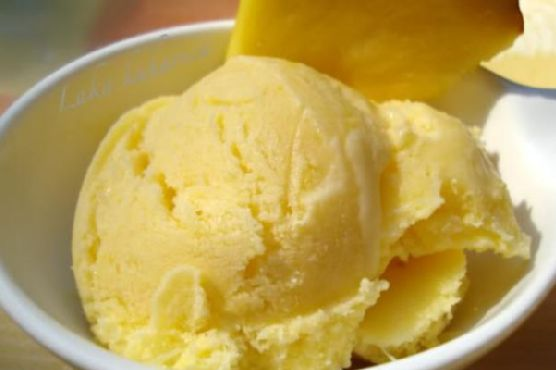
Fresh Peach Margarita With Lime Sugar | Made by Meaghan Moineau

Fresh Peach Margarita With Lime Sugar

Intro

There’s something incredibly nostalgic about sipping on a refreshing cocktail that takes you back to warm summer evenings and gatherings with loved ones. The Fresh Peach Margarita with Lime Sugar does just that. It reminds me of the time I spent at my grandmother’s house in the heart of peach country, where the air always smelled of fresh fruit. We would sit on her porch and watch the sunset, savoring the sweetness of ripe peaches. This margarita is a delightful blend of those cherished memories and the vibrant flavors of peach and lime, offering a unique twist on the classic margarita.

Why You’ll Love It

This Fresh Peach Margarita is not just another cocktail; it’s an experience. The combination of juicy peaches and tangy lime sugar creates a harmony of flavors that’s both refreshing and invigorating. You’ll love the way the lime sugar adds a zesty kick to the sweet peach and smooth tequila, making each sip feel like a mini-vacation. Whether you’re hosting a summer party or simply enjoying a quiet evening at home, this margarita is sure to delight your taste buds and transport you to sunnier days.

Ingredients

  • Ice
  • 1 lime (juice)
  • Lime sugar (1/2 teaspoon of finely minced lime zest and 1/4 cup granulated sugar)
  • 1 ounce orange liquor
  • 1 ripe peach, peeled and sliced
  • 1 ounce peach schnapps
  • 1 tablespoon sugar
  • 2 ounces silver tequila

Instructions

  1. Add 1/2 teaspoon of finely minced lime zest to 1/4 cup granulated sugar and set aside for about 30 minutes, stirring occasionally.
  2. For a pretty presentation, coat the rims of the glasses you are using with lime sugar. Do this by rubbing the rim with a lime wedge and then placing the rim into a plate that has the sugar in it until the rim is coated.
  3. Place all ingredients into the blender and puree until smooth.
  4. If the mixture is too thick, add a little cold water to achieve the desired consistency.
  5. Either chill all ingredients before making or add some ice cubes after you have made the margarita and stir it until it is as cold as you like.
  6. Strain it into your glasses or serve on the rocks, as per your preference.

Tips

For the best flavor, use ripe peaches that are in season. They will be sweeter and more flavorful. If peaches aren’t available, frozen peaches can be used as a substitute. To enhance the lime flavor, consider adding a splash of lime juice directly into the margarita mixture. If you’re a fan of spicy drinks, try adding a dash of chili powder to the rim of your glass along with the lime sugar for an extra kick.

Variations & Substitutions

If you want to mix things up, consider using different fruits. Mango or pineapple can be excellent substitutes for peach, offering a tropical twist. You can also experiment with flavored tequilas or use a splash of coconut rum for a different flavor profile. For a non-alcoholic version, simply omit the tequila and schnapps and replace them with peach juice or nectar.

Storage

If you have any leftover margarita mix, store it in an airtight container in the refrigerator for up to two days. Before serving, give it a good stir or shake, as the ingredients may settle. It’s best enjoyed fresh, so try to consume it as soon as possible for the best taste.

FAQ

Can I make this margarita ahead of time?

Yes, you can prepare the lime sugar and slice the peaches ahead of time. However, for the freshest taste, it’s best to blend the margarita just before serving. If you must make it in advance, store it in the refrigerator and give it a good stir before serving.

What can I use if I don’t have a blender?

If a blender isn’t available, you can use a cocktail shaker. Muddle the peach slices in the shaker to release their juice, then add the rest of the ingredients with ice and shake well. Strain into your glass and enjoy.

Nutrition

While this cocktail is a treat, it’s worth noting that it contains sugar and alcohol, so enjoy it in moderation. The inclusion of fresh fruit does provide some nutritional benefits, such as vitamins and antioxidants from the peaches.

Conclusion

The Fresh Peach Margarita with Lime Sugar is a delightful way to celebrate the flavors of summer. Its vibrant taste and beautiful presentation make it the perfect addition to any gathering or a relaxing evening at home. I hope this recipe brings you as much joy as it has brought me, conjuring memories of sun-drenched days and cherished moments with loved ones. Cheers to creating new memories with every sip!

Related update: Fresh Peach Margarita With Lime Sugar

Related update: Spiced Apple Cider

Strawberry Basil Italian Ice | Made by Meaghan Moineau

Strawberry Basil Italian Ice

Intro

There’s something magical about the first taste of summer. For me, that taste has always been a mouthful of frosty, refreshing Italian ice. Growing up, my family would often visit a quaint little stand at the end of our street where the owner, an Italian immigrant named Giuseppe, crafted the most delightful ices in a rainbow of flavors. My favorite was always the strawberry basil—a combination so unexpected yet wonderfully refreshing. Today, I’m thrilled to share my own take on this classic summer treat, blending the sweetness of ripe strawberries with the aromatic hint of basil. It’s a nostalgic nod to those sun-drenched afternoons of my childhood.

Why You’ll Love It

This Strawberry Basil Italian Ice is not just a treat for your taste buds, but a delightful experience for all your senses. Here’s why you’ll fall in love with this recipe:

  • Refreshing and Light: Perfect for hot summer days when you crave something cool and invigorating.
  • Simple Ingredients: You’ll only need four basic ingredients, making it as easy as it is delicious.
  • Natural and Homemade: Free from artificial flavors and colors, this recipe is all about pure, fresh flavors.
  • Versatile: Can be served as a palate cleanser or a sweet treat at the end of a meal.

Ingredients

  • 1 cup fresh basil leaves
  • Juice of 1 lemon
  • 1 cup simple syrup (recipe below)
  • 2 cups fresh strawberries, hulled and halved

Instructions

  1. To make the simple syrup, combine one cup of water and one cup of sugar in a small saucepan or microwave-safe bowl. Heat until the sugar has completely dissolved. Allow it to cool slightly before using.
  2. Place the basil leaves, lemon juice, simple syrup, and strawberries in a blender.
  3. Puree the mixture until smooth and fully combined.
  4. Pour the mixture into 1 large container, or divide it evenly among 6 small dishes.
  5. Freeze for several hours or until fully set.
  6. When ready to serve, remove the container from the freezer and let it sit for about 10 minutes.
  7. Use a spoon to shave away the ice, creating a fluffy, snow-like texture. Enjoy!

Tips

  • For Best Flavor: Use ripe, in-season strawberries for the sweetest, most flavorful ice.
  • Blending: If your blender struggles with the mixture, add a splash of water to help it along.
  • Serving: Use chilled bowls or cups to keep your Italian ice frozen longer while serving.

Variations & Substitutions

Feel free to get creative with this recipe:

  • Different Herbs: Swap basil with mint for a more classic combination, or try adding a hint of rosemary for an earthy flavor.
  • Fruity Twists: Add a handful of raspberries or blueberries for an extra layer of flavor.
  • Sugar Alternatives: Use honey or agave syrup in place of the simple syrup for a different sweetness profile.

Storage

Store any leftover Italian ice in the freezer for up to one week. Be sure to cover it tightly with plastic wrap or a lid to prevent ice crystals from forming. When ready to enjoy again, let it thaw for a few minutes and then shave it with a spoon as before.

FAQ

Can I use frozen strawberries instead of fresh?

Yes, you can use frozen strawberries if fresh ones are not available. Just allow them to thaw slightly before blending to make it easier on your blender.

What if I don’t have a blender?

If you don’t have a blender, you can use a food processor instead. The key is to ensure the mixture is smooth and well blended to achieve the perfect texture.

Nutrition

Each serving of Strawberry Basil Italian Ice is approximately 100 calories, with most of the energy coming from the natural sugars in the strawberries and the simple syrup. It is a fat-free and gluten-free treat, perfect for those looking for a light and refreshing dessert.

Conclusion

This Strawberry Basil Italian Ice is a beautifully simple yet sophisticated treat that captures the essence of summer. Whether you’re reminiscing about childhood adventures or creating new memories, this recipe is sure to bring a smile to your face. Gather your ingredients, fire up that blender, and let this delightful dessert transport you to a sunlit afternoon, no matter where you are. Enjoy every refreshing spoonful!

Related update: Strawberry Basil Italian Ice

Traditional Panzanella | Made by Meaghan Moineau

Traditional Panzanella: A Taste of Tuscany

Intro

When I think of summers in Tuscany, the vibrant colors and rich flavors of Panzanella instantly transport me back to my grandmother’s kitchen. I remember watching her skillful hands as she lovingly prepared this traditional bread salad. The aroma of fresh basil mingling with ripe tomatoes filled the air, promising a meal that was not only delicious but also a celebration of simple, honest ingredients. This recipe is a cherished heirloom, a taste of home, and a perfect dish to share with loved ones.

Why You’ll Love It

Panzanella is more than just a salad; it’s a delightful blend of textures and flavors that captures the essence of summer. You’ll love it for its simplicity, its ability to bring stale bread to life, and its fresh, vibrant taste. The combination of juicy tomatoes, fragrant basil, and tangy dressing makes every bite a refreshing experience. Plus, it’s a dish that’s as beautiful as it is delicious, perfect for impressing guests or enjoying a quiet meal at home.

Ingredients

  • Six slices of day-old Tuscan bread
  • Extra virgin olive oil
  • Fresh basil leaves
  • Red onion
  • Red wine vinegar
  • Salt and pepper
  • Tomatoes

Instructions

  1. In a bowl, combine the bread with water and let it stand for at least 20 minutes or until it’s soft.
  2. Drain the bread and squeeze out as much water as you can.
  3. Crumble the bread and place it in a serving bowl.
  4. Scatter the tomatoes, onions, and chopped basil over the top.
  5. Dress the Panzanella with extra-virgin olive oil and vinegar. Season with salt and pepper and toss well.
  6. Taste and adjust the seasoning with more oil, salt, and vinegar.
  7. Leave the Panzanella to stand for 15 minutes and serve at room temperature.

Tips

For the best flavor, use the ripest tomatoes you can find. If your bread isn’t stale, you can dry it out in the oven for a few minutes. Be generous with the basil, as it adds a wonderful fragrance and taste to the dish.

Variations & Substitutions

Feel free to customize your Panzanella with additional ingredients like cucumbers, capers, or olives. If you don’t have red wine vinegar, balsamic vinegar can be a great substitute. For a gluten-free option, use your favorite gluten-free bread.

Storage

Panzanella is best enjoyed fresh, but you can store leftovers in an airtight container in the refrigerator for up to 2 days. The flavors will continue to meld, making it even more delicious the next day.

FAQ

Can I make Panzanella ahead of time?

Yes, Panzanella can be made a few hours in advance. In fact, letting it sit for a while allows the flavors to meld beautifully. However, it’s best to add the basil just before serving to keep it fresh.

What type of bread is best for Panzanella?

Traditionally, Panzanella is made with Tuscan bread, but any rustic, crusty bread will work. The key is to use day-old bread that can absorb the dressing without becoming too mushy.

Can I add protein to Panzanella?

Absolutely! Grilled chicken, tuna, or mozzarella are great additions if you want to make the salad more filling.

Nutrition

This classic Panzanella is not only delicious but also a nutritious option. It’s rich in healthy fats from the olive oil, packed with vitamins from the vegetables, and provides a good source of carbohydrates from the bread. Enjoy it as a wholesome meal or a side dish to complement any main course.

Conclusion

Traditional Panzanella is a testament to the beauty of simple ingredients coming together to create something magical. Whether you’re reliving cherished memories or creating new ones, this dish is sure to become a favorite in your kitchen. I hope you enjoy making and sharing this taste of Tuscany as much as I do. Buon Appetito!

Related update: Traditional Panzanella

Related update: Tempered Spicy Potatoes

Related update: Guacamole

Related update: Lebanese Tabouleh

Tex-Mex Burger | Made by Meaghan Moineau

Tex-Mex Burger

Intro

There’s something truly magical about a sizzling burger hot off the grill, bringing back memories of summer nights spent laughing and sharing stories with family and friends. Growing up, my family had a weekly tradition of gathering around the backyard grill, where my father would prepare his famous Tex-Mex burgers. The aroma of spices mingling with beef was irresistible, and the first bite was always a heavenly blend of flavors that danced on the palate. Now, I’m excited to share this beloved recipe with you, so you can create new memories with your loved ones, just as I have.

Why You’ll Love It

This Tex-Mex Burger is a flavor-packed twist on the classic American burger. It’s perfect for anyone who loves a bit of spice and a lot of flavor. The combination of cumin, chili powder, and paprika gives the beef a smoky, spicy depth, while the creamy avocado and pepper jack cheese add richness and a hint of heat. Topped with fresh cilantro and red onion, each bite is a delightful balance of textures and tastes. Whether you’re hosting a backyard barbecue or looking to switch up your weeknight dinner routine, this burger is sure to become a favorite!

Ingredients

  • 1 pound ground beef
  • 1/4 cup salsa
  • 1 teaspoon chili powder
  • 1 teaspoon cumin
  • 1/2 teaspoon paprika
  • 1/2 teaspoon salt
  • 1/4 teaspoon pepper
  • 4 slices pepper jack cheese
  • 1 avocado, sliced
  • 1/2 small red onion, thinly sliced
  • 1/4 cup fresh cilantro, chopped
  • 4 hamburger buns

Instructions

  1. Preheat your broiler to high. This will ensure your buns are perfectly toasted and ready to hold all the delicious fillings.
  2. In a large frying pan, heat to medium-high heat. This is where the magic happens, as the patties get their perfect sear.
  3. Make the patties: In a large bowl, combine ground beef, salsa, chili powder, cumin, paprika, salt, and pepper. Mix until the ingredients are evenly distributed. Be careful not to overwork the meat to maintain tenderness.
  4. Form the mixture into four equal-sized patties, making a slight indentation in the center of each to ensure even cooking.
  5. Place the patties in the heated frying pan. Cook for about 4-5 minutes on each side, or until they reach your desired level of doneness.
  6. During the last minute of cooking, place a slice of pepper jack cheese on each patty. Cover the pan briefly to allow the cheese to melt.
  7. While the patties are cooking, place the hamburger buns under the broiler for about 1 minute, or until they are lightly toasted.
  8. Assemble the burgers: Place each patty on the bottom half of a toasted bun. Top with avocado slices, red onion, and fresh cilantro. Finish with the top half of the bun.
  9. Serve immediately and enjoy the explosion of Tex-Mex flavors!

Tips

For the juiciest burgers, use ground beef with a higher fat content, like 80/20. If your patties shrink during cooking, it means they’re too compact; gently form them to avoid this. Toasting the buns adds a pleasant crunch and prevents them from getting soggy with the juicy toppings.

Variations & Substitutions

If you’re looking to customize your Tex-Mex Burger, consider these variations:

  • Protein Swap: Substitute the ground beef with ground turkey or chicken for a lighter version. Vegetarians can use black bean patties.
  • Cheese Options: Swap pepper jack for cheddar or Monterey Jack for a different cheesy experience.
  • Spice Level: Add a pinch of cayenne pepper for extra heat, or omit the chili powder for a milder taste.
  • Bun Alternatives: Use whole wheat buns or lettuce wraps for a low-carb option.

Storage

If you have leftovers, let the cooked patties cool to room temperature before storing them in an airtight container in the refrigerator for up to three days. To reheat, warm them in a skillet over medium heat or in the microwave, ensuring they’re thoroughly heated. Unfortunately, these burgers are best enjoyed fresh, so try to make just enough for your meal.

FAQ

Can I make the burger patties ahead of time?

Absolutely! You can prepare the patties and store them in the refrigerator for up to 24 hours before cooking. This can help save time during meal prep and allow the flavors to meld together even more.

What can I serve with Tex-Mex Burgers?

These burgers pair well with a variety of sides, such as crispy sweet potato fries, a fresh green salad, or classic coleslaw. For a true Tex-Mex experience, consider serving with a side of Mexican street corn or spicy black bean salad.

Nutrition

While exact nutritional values will vary based on portion sizes and specific ingredients used, each Tex-Mex Burger (including toppings and bun) is approximately 550 calories. This includes 35g of protein, 30g of fat, and 40g of carbohydrates. For a lighter version, consider using leaner meats and reducing the cheese and avocado portions.

Conclusion

There you have it — a delightful Tex-Mex Burger recipe that brings a touch of southwestern flair to your table. Whether you’re reliving cherished memories or creating new ones, this burger is sure to impress with its bold flavors and satisfying textures. I hope this recipe becomes a staple in your home, just as it has in mine. Enjoy the culinary journey, and happy cooking!

Related update: Tex-Mex Burger

Related update: Pan Seared Lamb Loin With Chimichurri & Roasted Trio Squash Salad With Goat Cheese and Pinenuts

Caramel Almond Berry Trifle | Made by Meaghan Moineau

Caramel Almond Berry Trifle

Intro

There’s something truly special about desserts that combine layers of flavor and texture, and the Caramel Almond Berry Trifle is a perfect example of this magic. This dessert takes me back to warm summer afternoons at my grandmother’s house, where the aroma of fresh berries and sweet caramel wafted through the air. The kitchen was always bustling with activity, and the centerpiece was always a beautiful trifle that brought smiles to everyone’s faces. Today, I’m sharing this cherished recipe with you, hoping it brings as much joy to your table as it did to ours.

Why You’ll Love It

This Caramel Almond Berry Trifle is a showstopper for several reasons. First, it combines the richness of butterscotch caramel with the freshness of berries, creating a balance that will delight your taste buds. The almond extract adds a subtle but distinct flavor that elevates the entire dessert. It’s a perfect treat for gatherings, as it’s easy to make and assemble, yet impressive enough to wow your guests. Whether you’re hosting a summer party or just want to indulge in a sweet treat, this trifle is bound to become a favorite.

Ingredients

  • 1 large box of vanilla pudding mix
  • Milk (as directed on pudding package)
  • 1 cap full of almond extract
  • Fresh berries (such as strawberries, blueberries, and raspberries)
  • Mrs. Richardson’s Butterscotch Caramel Sauce
  • 1 container of Cool Whip
  • Pound cake, cut into cubes

Instructions

  1. Prepare the vanilla pudding by mixing the pudding mix with milk according to the package instructions.
  2. Add one cap full of almond extract to the pudding and mix well. Allow the pudding to set by chilling it in the refrigerator.
  3. Once the pudding has set, begin layering the trifle. Start with a thick layer of pudding at the bottom of your trifle dish.
  4. Add a layer of pound cake cubes over the pudding.
  5. Spread a layer of fresh berries over the pound cake.
  6. Drizzle a generous amount of butterscotch caramel sauce over the berries.
  7. Add a layer of Cool Whip on top of the caramel sauce.
  8. Repeat the layers until you reach the top of your dish, ending with Cool Whip.
  9. Top with additional fresh berries and a final drizzle of caramel sauce for a beautiful finish.

Tips

For the best results, make sure your pudding is fully set before beginning the layering process. This will help each layer maintain its shape. You can also slightly toast the pound cake cubes for added texture and flavor. Ensure your berries are fresh and washed thoroughly, and consider using a mix of different berries for a more vibrant presentation.

Variations & Substitutions

If you want to switch things up, consider using different flavors of pudding, such as chocolate or butterscotch, instead of vanilla. You can also swap the pound cake for angel food cake or even brownies for a richer dessert. For a nut-free version, simply omit the almond extract. If fresh berries are not available, frozen berries can be used, but make sure to thaw and drain them properly to avoid excess moisture in your trifle.

Storage

The Caramel Almond Berry Trifle is best enjoyed fresh, but it can be stored in the refrigerator for up to two days. Cover the dish with plastic wrap to keep the layers intact and prevent the dessert from absorbing any fridge odors. Note that the longer it sits, the more the layers will blend together, which may affect the texture.

FAQ

Can I make this trifle ahead of time?

Yes, you can prepare the individual components of the trifle, such as the pudding and cake, a day in advance. Assemble the trifle on the day you plan to serve it to ensure the freshest layers and presentation.

What can I do if I don’t have a trifle dish?

If you don’t have a trifle dish, any large, clear bowl will work. You can also create individual servings using smaller glasses or jars, which makes for a beautiful presentation at parties.

Nutrition

While this trifle is a treat best enjoyed in moderation, it’s good to be aware of its nutritional content. Each serving provides a delightful combination of carbohydrates, fats, and sugars. For a lighter option, consider using sugar-free pudding mix, low-fat Cool Whip, and a reduced-sugar caramel sauce.

Conclusion

The Caramel Almond Berry Trifle is not just a feast for the taste buds but also a feast for the eyes. It combines the best of flavors and textures into a dessert that’s perfect for any occasion. Whether you’re reminiscing about family gatherings or creating new memories, this trifle is sure to become a beloved part of your dessert repertoire. Give it a try, and watch as it becomes a staple at your family gatherings, just as it has in mine.

Related update: Caramel Almond Berry Trifle

Related update: Yoghurt Honey Madeleines

Three Ingredient Frozen Pina Colada | Made by Meaghan Moineau

Three Ingredient Frozen Pina Colada

Intro

There’s something magical about sipping a perfectly chilled Pina Colada on a warm sunny day. It transports me back to my childhood, when my family would go on summer vacations to the beach. My parents would enjoy their tropical drinks while my siblings and I played in the sand, and I’d always beg for a taste of their creamy, coconut-scented cocktails. Fast forward to today, and I’ve crafted an easy version that anyone can make at home with just three ingredients. Whether you’re lounging by the pool or hosting a summer party, this Three Ingredient Frozen Pina Colada will instantly bring the tropics to you. Let’s dive into what makes this drink the ultimate summer refresher!

Why You’ll Love It

This simple yet delightful version of the classic Pina Colada is perfect for those who crave that tropical flavor without the fuss. Here are a few reasons why you’ll fall in love with this recipe:

  • Simplicity: With only three main ingredients, it’s incredibly easy to whip up.
  • Refreshing: The combination of pineapple and coconut is the quintessential tropical duo that cools you down on hot days.
  • Customizable: You can easily adjust the sweetness and texture to your liking.
  • Perfect for Entertaining: It’s a crowd-pleaser that adds a touch of elegance to any gathering.

Ingredients

  • 2 cups ice
  • 1 cup pineapple juice
  • 1/2 cup coconut milk
  • 1/2 cup coconut rum (optional, adjust to taste)
  • Fresh pineapple wedges, for garnish
  • Maraschino cherries, for garnish

Instructions

  1. Add the ice, pineapple juice, coconut milk, and coconut rum to a blender.
  2. Blend on high until the mixture is smooth and creamy.
  3. Pour the Pina Colada into glasses.
  4. Garnish with fresh pineapple wedges and maraschino cherries before serving.

Tips

Creating the perfect Pina Colada can be an art. Here are some tips to ensure your drink is the best it can be:

  • Blending Time: Blend until completely smooth to avoid ice chunks.
  • Chill Your Glass: For an extra frosty experience, chill your glasses before serving.
  • Adjust Sweetness: If you prefer a sweeter drink, add a teaspoon of sugar or a splash of sweetened coconut milk.

Variations & Substitutions

The beauty of this recipe is its flexibility. Here are some variations and substitutions to try:

  • Non-Alcoholic Version: Skip the rum for a family-friendly mocktail.
  • Frozen Pineapple: Use frozen pineapple chunks instead of ice for a thicker texture.
  • Extra Coconut: Add a tablespoon of coconut cream for a richer coconut flavor.
  • Alternative Milks: Substitute coconut milk with almond or oat milk for a different twist.

Storage

While this Pina Colada is best enjoyed fresh, you can store any leftovers in the freezer. Pour the mixture into an airtight container and freeze for up to a month. When ready to serve, allow it to thaw slightly and blend again until smooth. Note that the texture might change slightly after freezing.

FAQ

Can I make this Pina Colada without a blender?

While a blender is ideal for achieving a smooth consistency, you can use a food processor if that’s what you have on hand. Alternatively, mix the ingredients well in a shaker with crushed ice for a less blended version.

What if I don’t have coconut rum?

No worries! You can use regular white rum and add a few drops of coconut extract to mimic the flavor. Adjust to taste for a delicious result.

Can I prepare this drink in advance?

Yes, you can make the mixture ahead of time and store it in the refrigerator for up to 24 hours. Give it a good stir or re-blend before serving to refresh its texture.

Nutrition

While indulging in this tropical delight, it’s good to know what’s in your drink. Each serving contains approximately:

  • Calories: 180
  • Fat: 6g
  • Carbohydrates: 20g
  • Protein: 1g
  • Sugar: 18g

Nutrition values may vary based on specific ingredients and quantities used.

Conclusion

The Three Ingredient Frozen Pina Colada is a testament to the fact that you don’t need a lengthy list of ingredients to create something truly special. Whether you’re reminiscing about sun-soaked vacations or simply seeking a moment of tropical bliss at home, this drink is your ticket to paradise. I hope this recipe brings a little sunshine into your day and perhaps even inspires you to create new memories with loved ones over a delicious glass of Pina Colada. Cheers to simple pleasures and the joy of sharing them!

Related update: Three Ingredient Frozen Pina Colada

Watermelon Popsicles with Mint, Basil & Lime | Made by Meaghan Moineau

Watermelon Popsicles with Mint, Basil & Lime

Intro

The sweet, refreshing taste of watermelon always brings me back to the long, sun-drenched days of my childhood. I fondly remember those lazy summer afternoons spent in my grandmother’s backyard. There, under the shade of her old oak tree, we’d enjoy slices of watermelon, the juice dripping down our chins as we laughed and played. It was during one of those sunlit afternoons that my grandmother first introduced me to the magic of pairing watermelon with fresh herbs and a squeeze of lime. These Watermelon Popsicles with Mint, Basil & Lime are my modern twist on her timeless refreshment, perfect for savoring those sunlit memories and creating new ones.

Why You’ll Love It

This recipe is the epitome of summer in a bite. The watermelon provides a natural sweetness and hydrating base, while the basil and mint add a fragrant complexity that elevates the flavor profile. The lime juice introduces a tangy contrast, making each bite a refreshing explosion of taste. These popsicles are not only delicious but also incredibly easy to make. With just five simple ingredients and a blender, you can create a treat that will delight both kids and adults alike. Whether you’re lounging by the pool or hosting a summer barbecue, these popsicles are sure to be a crowd-pleaser.

Ingredients

  • 1/4 cup fresh basil leaves
  • Juice of 1 lime
  • 1/4 cup fresh mint leaves
  • Pinch of salt
  • 4 cups cubed watermelon flesh

Instructions

  1. In a blender, combine the basil leaves, lime juice, mint leaves, and a pinch of salt.
  2. Add the cubed watermelon flesh to the blender.
  3. Blend at the highest speed until the mixture is completely liquefied.
  4. Carefully pour the liquid into popsicle molds or an ice cube tray, leaving a little space at the top for expansion.
  5. Freeze for a minimum of 4 hours or until fully frozen.
  6. To serve, remove the popsicles from the molds and enjoy immediately.

Tips

For the best results, choose a ripe and juicy watermelon—one that feels heavy for its size and has a deep, uniform color. If you find the mixture is too sweet for your liking, you can add a bit more lime juice or a dash of apple cider vinegar to balance the flavors. To make unmolding easier, run the popsicle molds under warm water for a few seconds before releasing the treats.

Variations & Substitutions

Feel free to experiment with this recipe to suit your taste preferences. If you’re not a fan of basil, you can substitute it with additional mint for a more pronounced minty flavor. For a spicier kick, consider adding a thin slice of jalapeño to the blender. If you’re looking for a touch of sweetness, you can add a tablespoon of honey or agave syrup. For a tropical twist, try adding a cup of fresh pineapple chunks to the mix.

Storage

Store any leftover popsicles in the freezer for up to one month. To prevent ice crystals from forming, wrap each popsicle in parchment paper or store them in an airtight container. If using an ice cube tray, transfer the cubes to a zip-top bag once frozen, and remove as much air as possible before sealing.

FAQ

Can I use dried herbs instead of fresh?

While fresh herbs provide the best flavor, you can use dried herbs in a pinch. Use one-third of the amount specified for fresh herbs, as dried herbs are more concentrated in flavor. However, the texture and aroma may differ slightly.

Is it possible to make this recipe without a blender?

Yes, you can make this recipe without a blender by using a food processor or an immersion blender. If neither is available, finely chop the herbs and mash the watermelon with a fork or potato masher, then mix everything thoroughly. The texture will be less smooth but still delicious.

Nutrition

This recipe yields about 8 popsicles, depending on the size of your molds. Each popsicle is low in calories and provides a good source of hydration, thanks to the watermelon. The fresh herbs are packed with vitamins and antioxidants, while the lime juice offers a boost of vitamin C. It’s a guilt-free treat that you can enjoy any time!

Conclusion

Incorporating the fresh, vibrant flavors of summer, these Watermelon Popsicles with Mint, Basil & Lime are a simple yet exquisite treat for any occasion. Whether you’re reminiscing about the good old days or creating new memories, these popsicles are sure to bring a smile to your face and delight your taste buds. I hope this recipe becomes a cherished part of your summer traditions just as it has in mine. Enjoy the taste of summer, one delicious bite at a time!

Related update: Watermelon Popsicles with Mint, Basil & Lime

Related update: Lavender Tea With Lemon French Macarons

Zucchini Ribbon Caper Salad | Made by Meaghan Moineau

Zucchini Ribbon Caper Salad

Intro

There’s something inherently magical about the simplicity of summer salads. Growing up, my grandmother’s garden was a vibrant tapestry of colors and textures, where we spent countless summer afternoons. Among her many garden treasures, zucchini was always in abundance, and she had a knack for turning it into the most delightful dishes. This Zucchini Ribbon Caper Salad is a tribute to those cherished moments—filled with fresh, crisp flavors reminiscent of sunny days spent in her backyard.

Why You’ll Love It

This Zucchini Ribbon Caper Salad is a symphony of flavors and textures that will captivate your taste buds. The crispness of the zucchini ribbons, the savory burst from the capers, and the aromatic dance of garlic and lemon zest create a dish that is both refreshing and satisfying. It’s an elegant addition to any meal, and its simplicity is matched only by its deliciousness. Perfect as a light appetizer or a side dish, this salad will become a staple in your culinary repertoire.

Ingredients

  • 2 medium zucchinis, thinly sliced into ribbons
  • 2 tablespoons capers
  • 1 clove garlic, minced
  • Zest of 1 lemon
  • 2 tablespoons olive oil
  • Salt and pepper to taste
  • 1 medium tomato, julienned
  • Dried parsley, for garnish

Instructions

  1. In a large bowl, toss the zucchini strips with the olive oil, lemon zest, lemon juice, garlic, salt, and pepper.
  2. Set aside and allow the mixture to marinate for 30 minutes. This step allows the flavors to meld beautifully and the zucchini to soften slightly.
  3. Divide the marinated zucchini between 2-3 plates.
  4. Top each serving with capers and julienned tomato.
  5. Drizzle any extra dressing over the salad, if desired.
  6. To garnish, sprinkle a pinch of dried parsley over each plate before serving.

Tips

For the best results, use fresh, firm zucchinis and a high-quality olive oil to enhance the flavor. A vegetable peeler or mandoline slicer works wonders for creating perfect zucchini ribbons. Remember to taste the salad before serving to ensure the seasoning is just right—sometimes a little extra lemon juice or a pinch of salt can make all the difference.

Variations & Substitutions

This salad is incredibly versatile, and you can easily adapt it to suit your tastes or what you have on hand:

  • Herbs: Fresh basil or mint can add a delightful twist to this salad. Simply chop and sprinkle over before serving.
  • Cheese: Add a sprinkle of feta or goat cheese for a creamy contrast to the crisp zucchini.
  • Olives: Substitute capers with chopped olives for a different kind of briny bite.

Storage

While this salad is best enjoyed fresh, you can store leftovers in an airtight container in the refrigerator for up to 2 days. Note that the zucchini may become more tender as it sits, but the flavors will continue to develop, making it even more delicious.

FAQ

Can I make this salad ahead of time?

Yes, you can prepare the salad up to a day in advance. Just keep the zucchini marinating in the refrigerator and add the capers and tomato just before serving to maintain their fresh texture.

What can I serve with this salad?

This salad pairs beautifully with grilled chicken, fish, or even a simple pasta dish. It’s also a lovely addition to a summer picnic or barbecue spread.

Is this salad vegan?

Yes, this Zucchini Ribbon Caper Salad is naturally vegan, making it a great choice for those following a plant-based diet.

Nutrition

This salad is not only delicious but also packed with nutrients. Zucchini is a low-calorie vegetable high in antioxidants, vitamin A, and fiber. The olive oil provides healthy fats, while the lemon and garlic contribute additional vitamins and immune-boosting properties.

Conclusion

Our Zucchini Ribbon Caper Salad is more than just a dish—it’s a celebration of fresh, vibrant flavors that bring a touch of brightness to any meal. Whether you’re looking to reminisce about summer days gone by or simply want to enjoy a nutritious, delightful salad, this recipe is sure to please. Gather your ingredients, embrace the simplicity, and savor the taste of summer with every bite. Enjoy!

Related update: Zucchini Ribbon Caper Salad

Related update: Mashed Potatoes with Garlic, Sage & Goat Cheese

Related update: Pizza bites with pumpkin

Related update: Traditional Panzanella

Traditional Panzanella | Made by Meaghan Moineau

Traditional Panzanella Recipe: A Taste of Italian Summer

Introduction

There’s something truly magical about the simplicity of Italian cuisine, and nothing epitomizes this more than the traditional Panzanella. I remember the first time I tasted this delightful Tuscan bread salad; it was a warm summer afternoon in Florence, sitting in a quaint trattoria with my grandmother. The vibrant colors of the fresh tomatoes, the aroma of basil, and the satisfying crunch of day-old bread soaked in olive oil and vinegar created an unforgettable symphony of flavors. This dish not only filled our bellies but also our hearts with cherished memories. I hope this recipe brings a little piece of Italy to your table and becomes a staple in your home, just as it has in mine.

Why You’ll Love It

Traditional Panzanella is a celebration of the freshest ingredients and the beauty of rustic cooking. Here’s why it’s sure to become a favorite:

  • Simple Ingredients: Made with just a handful of pantry staples and fresh produce, this recipe is all about quality ingredients shining through.
  • Quick and Easy: With minimal preparation and no cooking required, this dish is perfect for those hot summer days when you want something light yet satisfying.
  • Versatile and Adaptable: Easily customizable to suit your taste preferences, Panzanella is a great way to use up any leftover bread or vegetables you have on hand.
  • Healthy and Delicious: Packed with fresh vegetables and healthy fats from olive oil, it’s a nutritious option for any meal.

Ingredients

  • Six slices of day-old Tuscan bread
  • Extra virgin olive oil
  • Fresh basil leaves
  • One red onion
  • Red wine vinegar
  • Salt and pepper, to taste
  • Four ripe tomatoes

Instructions

  1. In a bowl, combine the bread with water and let it stand for at least 20 minutes or until it’s soft.
  2. Drain the bread and squeeze out as much water as you can. Crumble the bread and place it in a serving bowl.
  3. Scatter the tomatoes, onions, and chopped basil over the top of the bread.
  4. Dress the Panzanella with extra-virgin olive oil and vinegar. Season with salt and pepper and toss well.
  5. Taste and adjust the seasoning with more oil, salt, and vinegar according to your preference.
  6. Leave the Panzanella to stand for 15 minutes to allow the flavors to meld together. Serve at room temperature.

Tips

  • Choose the right bread: A rustic, crusty bread like Tuscan or sourdough works best. It should be slightly stale for the perfect texture.
  • Use the best tomatoes: Opt for ripe, juicy tomatoes for the best flavor. Heirloom varieties can add beautiful color and taste.
  • Let it rest: Allow the salad to sit for at least 15 minutes before serving to let the flavors meld.

Variations & Substitutions

Panzanella is incredibly adaptable, so feel free to make it your own:

  • Add protein: Include grilled chicken or tuna for a more substantial meal.
  • Incorporate more veggies: Cucumbers, bell peppers, or even olives can add extra flavor and texture.
  • Herb it up: Try adding parsley, oregano, or mint for a different aromatic profile.

Storage

Panzanella is best enjoyed fresh, but if you have leftovers, store them in an airtight container in the refrigerator for up to 2 days. Note that the bread will continue to absorb the dressing and may become softer. If you plan on making it ahead, keep the bread separate and combine just before serving.

FAQ

Can I use fresh bread instead of day-old bread?

While day-old bread is traditional and helps to achieve the right texture, you can use fresh bread in a pinch. Simply toast it lightly to dry it out before soaking.

Is there a gluten-free option for Panzanella?

Yes, you can make a gluten-free version by using gluten-free bread. Ensure the bread is sturdy enough to hold up to the soaking process.

Can I prepare Panzanella in advance?

It’s best to prepare Panzanella fresh to maintain the texture of the bread. However, you can chop the vegetables and prepare the dressing ahead of time, then combine just before serving.

Nutrition

This traditional Panzanella is a nutritious option that offers a balance of carbohydrates, healthy fats, and fresh vegetables. A typical serving provides approximately:

  • Calories: 250
  • Fat: 15g
  • Carbohydrates: 26g
  • Protein: 4g
  • Fiber: 3g

Conclusion

Traditional Panzanella is more than just a salad; it’s a testament to the beauty of simple, fresh ingredients coming together to create something extraordinary. Whether you’re enjoying it as a light lunch, a side dish, or a main course with added protein, this Tuscan classic is sure to delight your taste buds and transport you to a sun-drenched Italian countryside. Share it with loved ones, and create your own cherished memories around the table. Enjoy!

Related update: Traditional Panzanella

Related update: Zucchini Ribbon Caper Salad

Red, White, and Blue Fruit Salsa | Made by Meaghan Moineau

Red, White, and Blue Fruit Salsa

Intro

There’s something undeniably nostalgic about summer gatherings. The aroma of freshly cut grass, children playing in the backyard, and the delightful chatter of family and friends create an atmosphere that’s hard to beat. One of my fondest memories is of July 4th celebrations at my grandmother’s house. The highlight for me was always the vibrant and refreshing fruit salsa she would make. Her recipe has been passed down to me, and today, I’m thrilled to share this Red, White, and Blue Fruit Salsa with you. It’s a dish that not only celebrates the colors of our flag but also captures the essence of those cherished summer days.

Why You’ll Love It

This Red, White, and Blue Fruit Salsa is a perfect blend of sweet and tangy flavors that will have your taste buds dancing. It’s incredibly easy to make, requiring just a handful of ingredients and minimal preparation time. Whether you’re hosting a summer barbecue, a patriotic holiday party, or simply craving a light and refreshing snack, this salsa is sure to impress. Plus, it’s a healthy alternative to traditional chips and dip, making it a hit with health-conscious guests.

Ingredients

  • 1 cup blueberries
  • 1 cup diced strawberries
  • 1/2 cup sweetened shredded coconut
  • 2 tablespoons lime juice
  • 2 tablespoons strawberry jam
  • Freedom Chips (to serve)

Instructions

  1. In a medium-sized bowl, combine the blueberries, diced strawberries, and sweetened shredded coconut. Gently mix them to ensure an even distribution.
  2. Add the lime juice and strawberry jam to the berry mixture. Stir well until all the ingredients are thoroughly combined.
  3. Cover the bowl with plastic wrap or a lid and refrigerate for at least an hour. This allows the flavors to meld together beautifully.
  4. Once chilled, serve the fruit salsa as an appetizer with Freedom Chips. Enjoy the burst of flavors and the delightful crunch of the chips.

Tips

For the best results, use fresh and ripe berries. Their natural sweetness will enhance the overall flavor of the salsa. If you want to add a bit of spice, consider sprinkling a pinch of chili powder or cayenne pepper into the mix for a subtle kick. Always taste the salsa before serving, as you may want to adjust the lime juice or jam to suit your personal preference.

Variations & Substitutions

Feel free to get creative with this recipe! You can substitute raspberries or blackberries for the blueberries if you prefer a different berry flavor. If you’re not a fan of coconut, try using finely chopped mint leaves instead for a refreshing twist. For a healthier option, use unsweetened shredded coconut. You can also experiment with different jams, such as raspberry or apricot, to change up the flavor profile.

Storage

Store any leftover salsa in an airtight container in the refrigerator for up to three days. Keep in mind that the berries might release some juice over time, so give the salsa a good stir before serving again. Unfortunately, this salsa does not freeze well due to the high water content of the fruit.

FAQ

Can I make this salsa ahead of time?

Absolutely! In fact, making it a day ahead can enhance the flavors even more. Just be sure to store it in the refrigerator and give it a good stir before serving.

What are Freedom Chips?

Freedom Chips are simply tortilla chips, but with a playful and patriotic twist. You can use any brand or make your own at home by cutting tortillas into your desired shape and baking or frying them until crispy.

Is there a way to make this salsa more savory?

Yes! You can add diced avocado, chopped cilantro, or a small amount of finely diced red onion to introduce savory elements to the salsa. These additions will complement the sweetness of the berries beautifully.

Nutrition

This fruit salsa is a nutritious choice, packed with vitamins and antioxidants from the fresh berries. It’s low in calories and contains healthy fats from the coconut. While the exact nutritional content will vary based on portion sizes, you can generally expect a serving to be low in fat and high in vitamin C, making it a guilt-free treat.

Conclusion

Red, White, and Blue Fruit Salsa is more than just a dish; it’s a celebration of summer and all the vibrant flavors it brings. Whether you’re reminiscing about past family gatherings or creating new memories, this salsa is sure to be a hit. Its simplicity, flexibility, and delightful taste make it a must-try for any occasion. So gather your loved ones, prepare this refreshing salsa, and let the festivities begin!

Related update: Red, White, and Blue Fruit Salsa

Related update: Italian Tomato and Mozzarella Caprese

Blackberry Pie With Lemon Verbena Whip Cream | Made by Meaghan Moineau

Blackberry Pie With Lemon Verbena Whip Cream

Intro

There’s something magical about the scent of a freshly baked pie wafting through the house. It brings back memories of summer afternoons spent at my grandmother’s kitchen, where the air was always filled with the sweet aroma of baked fruits and spices. Her blackberry pie was a family favorite, and over the years, I’ve added my own twist to it: a delightfully refreshing lemon verbena whip cream. This combination creates a delicious harmony of flavors, celebrating the tartness of blackberries with the gentle citrus notes of lemon verbena.

Why You’ll Love It

This blackberry pie with lemon verbena whip cream is a perfect dessert for any occasion, whether it’s a family gathering or a cozy weekend treat. Here’s why you’ll love it:

  • Flavorful Harmony: The tartness of blackberries complements the sweet and fragrant lemon verbena whip cream, creating a perfect balance of flavors.
  • Easy to Make: With simple, straightforward steps, this pie is accessible to both novice and experienced bakers.
  • Versatile: This pie is perfect for any occasion, from summer picnics to holiday dinners.
  • Nostalgic: It evokes the warmth and comfort of homemade desserts, bringing back cherished memories of family and tradition.

Ingredients

  • Fresh defrosted blackberries
  • Butter
  • Cinnamon
  • Pastry
  • Flour
  • Lemon verbena leaves
  • Nutmeg
  • Sugar
  • Fresh whipping cream

Instructions

  1. Preheat your oven to 450°F (232°C). Chill a mixing bowl in the freezer to prepare for the whip cream.
  2. Line a 9-inch pie pan with half of the pastry. Cover it and place it in the refrigerator to chill while you prepare the filling.
  3. In another mixing bowl, combine the blackberries, flour, cinnamon, nutmeg, and sugar. Stir gently until the blackberries are evenly coated.
  4. Spoon the blackberry mixture into the chilled pie shell. Cover it with the remaining pastry, crimping the edges to seal.
  5. Cut steam vents in the top crust to allow steam to escape during baking.
  6. Bake the pie in the preheated oven for 15 minutes, then reduce the oven temperature to 350°F (177°C) and continue baking for an additional 34 to 40 minutes, or until the crust is golden brown.
  7. While the pie is baking, prepare the lemon verbena whip cream. In a small saucepan, combine the cream and three lemon verbena leaves. Heat over medium-high heat until the cream is just simmering, then remove from heat and let steep for 5 minutes.
  8. Pour the cream and verbena leaves into a glass container and chill in the refrigerator for 20 minutes. Remove the verbena leaves from the cream.
  9. Pour the chilled cream into the mixing bowl you prepared earlier. Whip using an electric mixer until soft peaks form, adding sugar to taste.
  10. Once the pie has cooled slightly, serve slices with a generous dollop of lemon verbena-infused whip cream on the side.

Tips

  • Ensure your blackberries are fully defrosted and drained to prevent excess moisture in the pie.
  • Chill your pastry before baking to help maintain its shape and avoid a soggy crust.
  • Taste your whipped cream as you add sugar to achieve your preferred level of sweetness.

Variations & Substitutions

If you want to experiment with this recipe, here are some variations and substitutions you can try:

  • Fruits: Swap blackberries with raspberries or a mix of berries for a different flavor profile.
  • Herbs: If lemon verbena is unavailable, try using lemon zest or mint for a refreshing twist.
  • Crust: Use a graham cracker crust for a different texture and flavor.

Storage

Store any leftover pie in an airtight container in the refrigerator for up to three days. The lemon verbena whip cream should be stored separately in the refrigerator and is best used within two days. For longer storage, you can freeze the pie (without the whip cream) for up to two months. Thaw it in the refrigerator before serving.

FAQ

Can I use frozen blackberries?

Yes, you can use frozen blackberries if fresh ones are not available. Just make sure to defrost and drain them thoroughly to avoid excess moisture in your pie.

What can I use instead of lemon verbena?

If lemon verbena is hard to find, you can substitute it with lemon zest or a few mint leaves to infuse a similar refreshing flavor into your whipped cream.

How do I know when the pie is done?

The pie is done when the crust is golden brown and the filling is bubbling. If you’re unsure, insert a skewer to test if the filling has thickened.

Nutrition

This recipe is a delightful treat, but remember to enjoy it in moderation. The nutritional value will vary based on the size of the slices and the amount of whipped cream used. A typical serving with a dollop of whip cream contains approximately:

  • Calories: 350
  • Fat: 18g
  • Carbohydrates: 45g
  • Protein: 4g

Conclusion

This blackberry pie with lemon verbena whip cream is not just a dessert; it’s a celebration of flavors and memories. Whether you’re reliving the nostalgia of family gatherings or creating new traditions, this pie is sure to bring joy and warmth to your table. The balance of tart berries and fragrant whipped cream is a delightful treat for any palate. So gather your loved ones, serve up a slice, and enjoy the sweet taste of cherished memories and new beginnings.

Related update: Blackberry Pie With Lemon Verbena Whip Cream

Related update: Vanilla Pound Cake

Fresh Peach With Goat Cheese Side Salad | Made by Meaghan Moineau

Fresh Peach With Goat Cheese Side Salad

Intro

There’s something uniquely magical about the late summer months when peaches are at their peak. I remember as a child, eagerly visiting the local farmer’s market with my grandmother, who knew every vendor by name. The sweet fragrance of ripe peaches would envelop us as we wandered past the stands, sampling slices offered with a smile. Those warm afternoons spent in her sun-dappled kitchen inspired this Fresh Peach With Goat Cheese Side Salad recipe, which captures the essence of those cherished moments. This salad is a celebration of simplicity, where fresh ingredients shine in perfect harmony.

Why You’ll Love It

This Fresh Peach With Goat Cheese Side Salad is a delightful blend of sweet, tangy, and savory flavors that will captivate your taste buds. It’s a breeze to prepare, making it an ideal choice for busy weeknights or as a refreshing addition to your weekend brunch spread. The combination of juicy peaches, creamy goat cheese, and fragrant basil leaves drizzled with honey is both elegant and comforting. Whether you’re a seasoned chef or a kitchen newbie, this recipe is sure to impress with its vibrant colors and irresistible flavors.

Ingredients

  • 2 ripe peaches, sliced
  • 2 tablespoons honey
  • A pinch of salt
  • 1/4 cup fresh basil leaves, torn
  • 1/3 cup crumbled goat cheese

Instructions

  1. Place the sliced peaches in a medium-sized bowl.
  2. Drizzle the honey over the peaches and gently toss to coat them evenly.
  3. Sprinkle a pinch of salt over the honey-coated peaches.
  4. Gently fold in the torn basil leaves and crumbled goat cheese, mixing until well combined.
  5. Transfer the salad to a serving dish and enjoy immediately or chill for a few minutes to allow the flavors to meld.

Tips

For the best results, choose peaches that are ripe but still firm enough to hold their shape when sliced. If your peaches are very juicy, you might want to reduce the amount of honey to prevent the salad from becoming too sweet. Fresh basil adds a wonderful aroma, but you can also experiment with mint leaves for a refreshing twist. Remember, the quality of the ingredients is key—opt for a high-quality goat cheese to enhance the salad’s creamy texture.

Variations & Substitutions

This salad is wonderfully versatile, allowing you to tailor it to your taste preferences or dietary needs. If you’re not a fan of goat cheese, feta cheese makes an excellent substitute with its crumbly texture and tangy flavor. You can also swap out honey for agave syrup for a vegan-friendly option. For a heartier version, consider adding a handful of arugula or mixed greens to transform this side dish into a light main course. Feel free to add a sprinkle of toasted nuts, such as almonds or walnuts, for an added crunch.

Storage

While this salad is best enjoyed fresh, you can prepare it a few hours in advance if needed. Store it in an airtight container in the refrigerator for up to 24 hours. If you’re planning to make it ahead, consider adding the goat cheese just before serving to maintain its creamy texture. Be mindful that the peaches will release their juices over time, which may affect the salad’s consistency.

FAQ

Can I use canned peaches for this salad?

While fresh peaches are recommended for their flavor and texture, you can use canned peaches in a pinch. Be sure to drain them thoroughly and adjust the honey accordingly, as canned peaches are often packed in syrup.

Can I prepare this salad in advance for a party?

Yes, you can prepare the ingredients a few hours in advance and store them separately. Simply combine the peaches, honey, basil, and goat cheese just before serving to ensure the salad remains fresh and vibrant.

What can I serve with this salad?

This Fresh Peach With Goat Cheese Side Salad pairs beautifully with grilled chicken or fish, providing a delightful contrast of flavors. It’s also an excellent complement to a charcuterie board or as a refreshing side dish for a summer barbecue.

Nutrition

This salad is a nutritious option, featuring the natural sweetness of peaches, the protein-rich creaminess of goat cheese, and the antioxidant properties of fresh basil. Each serving is approximately 250 calories, making it a light yet satisfying addition to any meal. The honey provides a natural energy boost, while the peaches offer vitamins A and C, contributing to a balanced diet.

Conclusion

This Fresh Peach With Goat Cheese Side Salad is a testament to the beauty of simplicity, allowing each ingredient to shine through with every bite. It’s a dish that evokes nostalgia, celebrates the bounty of the season, and brings people together around the table. Whether you’re serving it to family, friends, or simply enjoying it yourself, this salad is sure to become a beloved favorite in your culinary repertoire. So, gather your ingredients, savor the process, and indulge in this delightful taste of summer.

Related update: Fresh Peach With Goat Cheese Side Salad

Related update: Arame Edamame Cucumber Salad

Tomato Cutlets | Made by Meaghan Moineau

Tomato Cutlets: A Savory Delight

Intro

Growing up, summers were synonymous with the sweet aroma of fresh tomatoes ripening on the vine in my grandmother’s garden. I vividly recall the warmth of the sun on my face as I plucked those vibrant, juicy beefsteak tomatoes, their fragrance wafting through the air, promising a delectable treat. One of my cherished memories is watching my grandmother transform these garden-fresh tomatoes into golden, crispy cutlets. Today, I am excited to share this cherished family recipe with you, bringing a taste of those sun-drenched summer days into your kitchen.

Why You’ll Love It

This Tomato Cutlets recipe is a delightful fusion of crispy textures and savory flavors, perfect for a light lunch or an elegant appetizer. Whether you’re a seasoned cook or a kitchen novice, you’ll appreciate the simplicity and versatility of this dish. The combination of fresh ingredients and easy preparation makes it a go-to recipe for any occasion. Plus, it’s a great way to enjoy the seasonal bounty of tomatoes and eggplants.

Ingredients

  • 2 baby eggplants, halved
  • 2 large beefsteak tomatoes, sliced
  • 1 cup Italian bread crumbs
  • 2 eggs, beaten
  • Juice of 1 lemon
  • 2 tablespoons olive oil
  • 2 tablespoons Italian fresh parsley, chopped
  • Salt and pepper to taste
  • 1/4 cup fresh Romano cheese, grated

Instructions

  1. Prepare your ingredients by slicing the beefsteak tomatoes and beating the eggs in a shallow bowl. Place the Italian bread crumbs in another shallow dish.
  2. Dip each tomato slice into the egg wash and then coat it with the bread crumbs. Repeat this process if you have extra egg wash and bread crumbs for a thicker crust.
  3. Heat a large frying pan over medium heat and add the olive oil. Once the oil is hot, carefully place the prepared tomato slices in the pan.
  4. Cook the tomato slices for about 3-4 minutes on each side, or until they achieve a nice golden color. Gently flip them halfway through cooking.
  5. After removing the tomato slices from the pan, add the halved baby eggplants. Sprinkle them with salt and pepper to taste.
  6. Sauté the eggplants on one side until they are golden, about 3-4 minutes, then turn and sauté the other side.
  7. Plate the tomato cutlets and eggplants, and finish with a garnish of chopped parsley, a squeeze of lemon juice, and a generous sprinkle of grated Romano cheese.

Tips

For the best results, use ripe, firm beefsteak tomatoes. The firmer the fruit, the better it will hold up during cooking. Additionally, ensure the oil is hot before frying to achieve that perfect golden crust. If you find the cutlets are browning too quickly, adjust the heat to medium-low to ensure even cooking.

Variations & Substitutions

If you prefer a gluten-free version, substitute the Italian bread crumbs with gluten-free bread crumbs. For a vegan twist, replace the eggs with a plant-based egg substitute or a mixture of water and flour to help the bread crumbs adhere to the tomatoes. You can also experiment with spices in the bread crumbs, such as garlic powder or paprika, for an extra kick of flavor.

Storage

These Tomato Cutlets are best enjoyed fresh to maintain their crispy texture. However, if you have leftovers, store them in an airtight container in the refrigerator for up to 2 days. Reheat them in a preheated oven at 350°F (175°C) for about 10 minutes to regain some of their crispiness.

FAQ

Can I use other types of tomatoes for this recipe?

Yes, you can use other types of tomatoes, such as Roma or heirloom. However, beefsteak tomatoes are preferred for their size and firm texture, which hold up well during frying.

What can I serve with Tomato Cutlets?

Tomato Cutlets pair beautifully with a fresh green salad or a side of pasta. They also make a great topping for a sandwich or a burger for a unique twist.

Can I prepare the cutlets in advance?

You can prepare the tomatoes and eggplants ahead of time and store them separately in the refrigerator. When you’re ready to serve, simply fry them up fresh for the best texture and flavor.

Nutrition

While specific nutritional values will vary based on portion sizes and exact brands used, these Tomato Cutlets are generally a good source of Vitamin C from the tomatoes and healthy fats from the olive oil. Using fresh ingredients ensures a wholesome and delicious dish without unnecessary additives.

Conclusion

There’s something magical about turning simple, fresh ingredients into a dish that delights the senses. These Tomato Cutlets not only bring a taste of summer to your table but also provide a comforting, nostalgic culinary experience. Whether you’re preparing them for family, friends, or simply treating yourself, this recipe is sure to become a beloved staple in your kitchen. Enjoy the warm, crispy goodness and the nostalgic flavors of this timeless dish.

Related update: Tomato Cutlets

Related update: Square Deviled Eggs

Barbecued Baby Back Pork Ribs and Bush’s Grillin’ Beans | Made by Meaghan Moineau

Barbecued Baby Back Pork Ribs and Bush’s Grillin’ Beans

Intro

Summertime barbecues hold a special place in my heart, evoking memories of family gatherings filled with laughter, the scent of smoky grills, and the anticipation of delicious food. Growing up, weekends meant one thing: a feast in the backyard. My dad would take charge of the grill, perfecting his signature barbecued baby back pork ribs, while my mom prepared her famous side of Bush’s Grillin’ Beans. These two dishes, when paired together, created a symphony of flavors that left everyone craving more. Today, I’m excited to share this cherished recipe with you, hoping it becomes a staple at your family gatherings as well.

Why You’ll Love It

This recipe for Barbecued Baby Back Pork Ribs and Bush’s Grillin’ Beans is a guaranteed crowd-pleaser. The ribs are marinated to perfection, resulting in a tender, juicy, and flavorful bite every time. The combination of spices and the tangy glaze provides a delightful contrast that complements the sweet and savory beans. Whether you’re hosting a large gathering or enjoying a quiet dinner with loved ones, this dish is sure to impress with its irresistible aroma and mouth-watering taste.

Ingredients

  • Rack of baby back pork ribs
  • Cooked black peppercorns
  • Brown sugar
  • Cider vinegar
  • Dried coriander
  • Garlic
  • Green onions
  • Ketchup
  • Molasses
  • Orange zest
  • Soy sauce

Instructions

  1. Before marinating the ribs, remove the white membrane on the underside of the ribs. Start the removal with a sharp knife, then use a paper towel to grab it and simply pull it off.
  2. In a bowl, combine cooked black peppercorns, brown sugar, cider vinegar, dried coriander, minced garlic, and soy sauce to create the marinade.
  3. Place the ribs in a large dish and pour the marinade over them. Make sure the ribs are thoroughly coated. Cover and refrigerate for at least 4 hours, preferably overnight for maximum flavor.
  4. Preheat your grill to medium heat. Remove the ribs from the marinade and let them come to room temperature while the grill heats.
  5. Place the ribs on the grill and cook for about 30-40 minutes, turning occasionally, until they are tender and have a nice char.
  6. While the ribs are grilling, prepare the glaze by mixing ketchup, molasses, and orange zest in a small saucepan over low heat. Stir until well combined and heated through.
  7. Once the ribs are cooked, brush them generously with the glaze and grill for an additional 5 minutes on each side.
  8. Remove the ribs from the grill and let them rest for a few minutes before slicing.
  9. Serve the ribs hot, garnished with chopped green onions, alongside a warm serving of Bush’s Grillin’ Beans.

Tips

For the best results, marinate the ribs overnight to ensure they absorb all the rich flavors. When grilling, keep a close eye on the ribs to prevent burning, and use a meat thermometer to ensure they reach an internal temperature of 145°F. Letting the ribs rest before slicing will keep them juicy and tender.

Variations & Substitutions

Feel free to experiment with the marinade by adding your favorite spices or herbs, such as smoked paprika or thyme. If you prefer a spicier kick, consider adding a dash of cayenne pepper. For a different side dish, try pairing the ribs with coleslaw or corn on the cob instead of beans.

Storage

Leftover ribs can be stored in an airtight container in the refrigerator for up to 4 days. To reheat, wrap the ribs in aluminum foil and warm them in a preheated oven at 300°F until heated through. The beans can also be stored in the refrigerator for up to 3 days and reheated on the stovetop or in the microwave.

FAQ

How do I remove the membrane from the ribs?

Use a sharp knife to gently lift one end of the white membrane on the underside of the ribs. Once you have a good grip, use a paper towel to grab the membrane and pull it off in one clean motion.

Can I cook these ribs in the oven instead of the grill?

Yes, you can bake the marinated ribs in a preheated oven at 300°F for about 2.5 to 3 hours, or until tender. Apply the glaze during the last 20 minutes of cooking.

What type of beans are best for this recipe?

I recommend using Bush’s Grillin’ Beans, which come in a variety of flavors such as Bourbon and Brown Sugar or Southern Pit Barbecue, to complement the ribs perfectly.

Nutrition

The nutritional information will vary based on portion sizes and specific ingredients used, but a typical serving of ribs with beans is a hearty meal packed with protein and flavor. Be mindful of the sugar content if adjusting the glaze to suit dietary preferences.

Conclusion

Barbecued Baby Back Pork Ribs and Bush’s Grillin’ Beans are more than just a dish; they’re a celebration of flavor and tradition. Whether you’re reminiscing about family gatherings or creating new memories, this recipe is sure to delight and satisfy. Gather your loved ones, fire up the grill, and enjoy the simple pleasures of a meal made with love. Happy grilling!

Related update: Barbecued Baby Back Pork Ribs and Bush’s Grillin’ Beans

Related update: Smoky Chicken Tacos

French Toast Croissants with Strawberries | Made by Meaghan Moineau

French Toast Croissants with Strawberries

Intro

There’s something magical about the aroma of freshly cooked French toast wafting through the kitchen. It takes me back to those lazy Sunday mornings at my grandmother’s house, where breakfast was an event to be savored. Instead of traditional bread, today we’re giving this classic breakfast staple a delightful twist by using croissants. The rich, buttery layers of croissants make them the perfect canvas for this sweet, eggy delight. Paired with fresh strawberries and a hint of orange, this dish elevates any breakfast or brunch spread.

Why You’ll Love It

This recipe combines the best of both worlds: the indulgence of a French pastry and the comforting familiarity of French toast. Here’s why you’ll fall in love with these French Toast Croissants with Strawberries:

  • Rich Flavor: The croissants’ buttery layers absorb the egg mixture beautifully, creating a rich and satisfying taste.
  • Easy to Make: With simple ingredients and straightforward instructions, this recipe is perfect for both beginners and seasoned cooks.
  • Versatile: Whether you’re making a special breakfast or a fancy brunch, this dish fits the bill.
  • Seasonal Freshness: The addition of fresh strawberries brings a burst of color and flavor, making it a perfect dish for spring and summer.

Ingredients

  • Butter
  • Split plain croissants
  • Eggs
  • Milk
  • Orange peel
  • Powdered sugar
  • Fresh strawberries

Instructions

  1. In a small mixer bowl, beat together all orange butter ingredients at medium speed, scraping the bowl often, until light and fluffy (about 1 to 2 minutes); set aside.
  2. In a pie pan, stir together milk, eggs, and 1 teaspoon of orange peel.
  3. In a 10-inch skillet or griddle, melt 2 tablespoons of butter over medium heat.
  4. Dip 4 croissant halves into the egg mixture, turning to coat both sides. Place croissant halves, cut side down, in the skillet.
  5. Cook, turning once, until golden brown (3 to 4 minutes on each side). Remove to a serving platter and keep warm.
  6. Repeat with the remaining 2 tablespoons of butter and 4 croissant halves.
  7. Dust croissant halves with powdered sugar and serve with orange butter and fresh strawberries.

Tips

  • Use Day-Old Croissants: Slightly stale croissants will absorb the egg mixture better without becoming too soggy.
  • Keep Warm: To keep the croissants warm while you finish cooking, place them in a preheated oven at a low temperature.
  • Don’t Overcrowd the Pan: Cook the croissants in batches if necessary to ensure even cooking.

Variations & Substitutions

If you’re looking to customize your French toast croissants, here are a few ideas:

  • Fruity Variations: Swap strawberries with blueberries, raspberries, or sliced bananas for a different flavor profile.
  • Nutty Addition: Sprinkle chopped nuts like almonds or pecans for added crunch.
  • Dairy-Free Option: Use almond milk or coconut milk instead of regular milk for a dairy-free version.

Storage

French Toast Croissants are best enjoyed fresh, but if you have leftovers, store them in an airtight container in the refrigerator for up to two days. Reheat in a preheated oven at 350°F until warmed through, or use a toaster oven for added crispiness.

FAQ

Can I make the orange butter ahead of time?

Yes, you can prepare the orange butter ahead of time and store it in the refrigerator. Just make sure to bring it to room temperature before serving so it spreads easily.

Can I freeze French Toast Croissants?

While it’s possible to freeze them, the texture might change slightly. If you choose to freeze, wrap each croissant tightly in plastic wrap and place in a freezer-safe bag. Thaw in the fridge overnight before reheating.

What can I serve with French Toast Croissants?

This dish pairs wonderfully with a side of crispy bacon or sausage. A refreshing fruit salad or a glass of freshly squeezed orange juice complements the meal beautifully.

Nutrition

While I don’t have exact nutritional information, this dish is indulgent and should be enjoyed as a treat. For lighter options, consider reducing the amount of butter or powdered sugar, or serving with a fresh fruit salad.

Conclusion

French Toast Croissants with Strawberries is a delightful twist on a classic breakfast favorite that promises to add a touch of elegance to your morning routine. Whether you’re enjoying a cozy family breakfast or hosting a brunch with friends, this dish is sure to impress. The combination of buttery croissants, sweet strawberries, and fragrant orange butter creates a symphony of flavors that’ll transport you straight to a Parisian café. So, grab your apron and treat yourself to this indulgent breakfast experience!

Related update: French Toast Croissants with Strawberries

Related update: Caramel ice cream

Related update: Banana Blueberry Pancakes

Cheesy Bacon Burger with Spicy Chipotle Aiolo Sauce | Made by Meaghan Moineau

Cheesy Bacon Burger with Spicy Chipotle Aioli Sauce

Intro

There’s something magical about the smell of burgers grilling on a warm summer evening. It takes me back to those lazy Sunday afternoons at my grandparents’ house, where the whole family gathered around the backyard grill. My grandfather, with his well-worn apron and his signature chef’s hat, was the burger maestro. He always said the secret to a perfect burger was a little “surprise” inside. Inspired by his culinary wisdom and my love for a little heat, I’ve created a burger that combines the creamy goodness of cheese with the smoky allure of turkey bacon, all wrapped up in a spicy, tantalizing aioli. This Cheesy Bacon Burger with Spicy Chipotle Aioli Sauce is my homage to those cherished memories, with a contemporary twist that will make your taste buds dance with delight.

Why You’ll Love It

This burger isn’t just another patty on a bun; it’s a flavor explosion waiting to happen. The juicy beef patty is stuffed with creamy Swiss cheese that melts to perfection as it grills. The turkey bacon adds a savory crunch, while the spicy chipotle aioli brings just the right amount of heat to keep things exciting. Served on a wholesome whole wheat bun, this burger balances indulgence with nutrition. Whether you’re cooking for a backyard barbecue or a cozy family dinner, this recipe is sure to impress.

Ingredients

  • 1 can of chipotle chiles in adobo sauce
  • 1/2 cup fat free mayonnaise
  • 2 cloves garlic, minced
  • 1 teaspoon garlic powder
  • 1/2 cup Greek yogurt
  • 1 green bell pepper, diced
  • 1 teaspoon ground cumin
  • 1 teaspoon black ground pepper
  • 1 pound lean ground beef
  • 1 tablespoon fresh lime juice
  • 1 onion, diced
  • 4 whole wedges of Laughing Cow Swiss cheese
  • 4 slices cooked turkey bacon
  • 4 whole wheat hamburger buns

Instructions

  1. In a pan, cook the turkey bacon according to the directions on the package. Once cooked, remove the bacon and set it aside.
  2. In the same pan, add the diced bell pepper and onion, cooking until tender, about 10 minutes.
  3. In a small bowl, combine the ground beef with garlic powder and black ground pepper. Mix well.
  4. Divide the beef mixture into eight equal pieces, about 2 ounces each. Flatten each piece into a patty.
  5. Place half a wedge of cheese onto four patties, then top with the remaining patties. Press the edges to seal the cheese inside.
  6. Grill the burgers until cooked through, about 5 minutes per side.
  7. To make the spicy chipotle aioli sauce, combine chipotle chiles, mayonnaise, minced garlic, Greek yogurt, ground cumin, and lime juice in a small bowl. Whisk until smooth.
  8. Assemble the burgers by placing each patty on a whole wheat bun. Top with turkey bacon, sautéed peppers and onions, and a generous dollop of the spicy chipotle aioli sauce.

Tips

For the best results, use a meat thermometer to ensure your burgers reach an internal temperature of 160°F. This ensures they’re cooked safely without being overdone. If you prefer a less spicy aioli, reduce the number of chipotle chiles or substitute with smoked paprika for a milder flavor.

Variations & Substitutions

If you’re looking to switch things up, try using ground turkey or chicken instead of beef for a lighter option. You can also swap out Swiss cheese for cheddar or pepper jack for an extra kick. For a gluten-free version, use gluten-free hamburger buns or serve the burgers wrapped in lettuce leaves for a low-carb alternative.

Storage

Store any leftover burgers in an airtight container in the refrigerator for up to three days. The spicy chipotle aioli can be stored separately in a sealed jar for up to a week. For longer storage, consider freezing the cooked patties without the buns or toppings.

FAQ

Can I make the burgers ahead of time?

Yes, you can prepare the patties in advance and store them in the refrigerator for up to 24 hours before grilling. This can help save time during meal prep.

What can I serve with these burgers?

These burgers pair well with a variety of sides, such as sweet potato fries, a fresh green salad, or grilled corn on the cob. For a truly indulgent meal, consider serving them with a creamy coleslaw or homemade potato chips.

Is there a vegetarian version of this recipe?

Absolutely! You can substitute the beef with a plant-based protein like black bean patties or a store-bought vegetarian burger. Use a plant-based cheese alternative and skip the turkey bacon for a delicious vegetarian option.

Nutrition

While this recipe is a flavorful indulgence, it aims to maintain a balance with healthier ingredients. Opting for lean ground beef and whole wheat buns increases the nutritional value, while Greek yogurt in the aioli sauce provides a protein boost with reduced fat content. Adjust portions to suit your dietary needs.

Conclusion

Our Cheesy Bacon Burger with Spicy Chipotle Aioli Sauce is more than just a meal; it’s an experience. With each bite, you’ll savor the melty cheese, the crisp turkey bacon, and the zesty aioli. Whether you’re creating new memories with friends and family or enjoying a quiet dinner for one, this burger promises to deliver satisfaction and joy. So fire up the grill, gather your ingredients, and get ready to enjoy a delightful taste journey!

Related update: Cheesy Bacon Burger with Spicy Chipotle Aiolo Sauce

Cheesy Bacon Burger with Spicy Chipotle Aiolo Sauce | Made by Meaghan Moineau

Cheesy Bacon Burger with Spicy Chipotle Aioli Sauce

Intro

There’s something about the sizzle of a burger on the grill that takes me back to summer evenings spent in my grandmother’s backyard. The air would be filled with the aroma of sizzling meat and the laughter of family members gathering around the picnic table. It was during those cherished gatherings that I learned the art of creating the perfect burger, one that would be etched in our hearts as a family tradition. Today, I am excited to share with you a modern twist on that classic memory – the Cheesy Bacon Burger with Spicy Chipotle Aioli Sauce. This recipe not only brings back those nostalgic moments but also adds a spicy kick that will surely become a new favorite in your home.

Why You’ll Love It

This Cheesy Bacon Burger is a delightful combination of flavors and textures that will make your taste buds dance with joy. The juicy beef patty encasing a creamy Swiss cheese center is topped with crispy turkey bacon, sautéed bell peppers, and onions, all nestled within a soft whole wheat bun. The real star, however, is the Spicy Chipotle Aioli Sauce, which adds a smoky and tangy kick to every bite. Whether you are hosting a backyard barbecue or simply craving a delicious homemade burger, this recipe is sure to impress.

Ingredients

  • Chipotle chiles in adobo
  • Fat-free mayonnaise
  • Garlic
  • Garlic powder
  • Greek yogurt
  • Green bell pepper
  • Ground cumin
  • Black ground pepper
  • Lean ground beef
  • Fresh lime juice
  • Onion
  • Whole wedges of Laughing Cow Swiss cheese
  • Cooked turkey bacon
  • Whole wheat hamburger buns

Instructions

  1. For the burgers: In a pan, cook turkey bacon according to the directions on the package. Once cooked, remove the bacon and set it aside.
  2. In the same pan, add bell pepper and onion and cook until tender, about 10 minutes.
  3. Add ground beef to a small bowl, along with garlic powder and ground pepper, and mix well.
  4. Divide the raw meat into 8 equal pieces (approximately 2oz each). Flatten each piece, place 1/2 a cheese wedge onto each piece of hamburger, and top with another piece of meat. Seal the edges to prevent the cheese from oozing out during cooking.
  5. Place the burgers on the grill and cook until done, about 5 minutes per side.
  6. Place the cooked burgers on buns and top with bacon, peppers & onions, and Spicy Chipotle Aioli Sauce.
  7. For the Spicy Chipotle Aioli Sauce: In a small bowl, whisk together chipotle chiles in adobo, fat-free mayonnaise, garlic, Greek yogurt, ground cumin, and fresh lime juice until combined. This makes 3/4 cup, or 12 tablespoons, of sauce.

Tips

To ensure your burgers are perfectly cooked, use a meat thermometer to check that the internal temperature reaches 160°F (71°C). If you prefer a milder sauce, reduce the amount of chipotle chiles. For an extra layer of flavor, toast your hamburger buns on the grill for a few minutes before assembling your burgers.

Variations & Substitutions

If you prefer a different cheese, cheddar or pepper jack would work wonderfully in this recipe. You can also substitute ground turkey for the beef if you want a leaner option. For a vegetarian twist, try using a plant-based burger patty and coconut bacon.

Storage

Store any leftover cooked burgers in an airtight container in the refrigerator for up to 3 days. The Spicy Chipotle Aioli Sauce can be stored in a separate container in the fridge for up to a week. Reheat the burgers in a pan or microwave before serving.

FAQ

Can I make the Spicy Chipotle Aioli Sauce in advance?

Absolutely! The sauce can be made a day or two in advance and stored in the refrigerator. This will allow the flavors to meld together even more, enhancing its delicious taste.

What is the best way to cook the burgers if I don’t have a grill?

If you don’t have a grill, you can cook the burgers in a skillet on the stovetop. Simply heat a little oil in the pan over medium-high heat and cook the burgers for about 5 minutes on each side, or until they reach the desired doneness.

Can I freeze the burgers?

Yes, you can freeze the uncooked burger patties. Place them on a baking sheet and freeze until solid, then transfer to a freezer-safe bag or container. They can be stored in the freezer for up to 3 months. Thaw in the refrigerator before cooking.

Nutrition

This Cheesy Bacon Burger recipe, when made with lean ground beef and turkey bacon, is a protein-packed meal. The use of Greek yogurt and fat-free mayonnaise in the aioli sauce also helps to keep the calorie count in check. As with any meal, moderation is key to maintaining a balanced diet.

Conclusion

The Cheesy Bacon Burger with Spicy Chipotle Aioli Sauce is more than just a meal; it’s a culinary experience that brings together the comfort of classic flavors with a modern twist. Whether you’re reminiscing about family gatherings or creating new memories, this burger is sure to be a hit with everyone. So fire up the grill, gather your loved ones, and savor the deliciousness of this mouthwatering creation!

Related update: Cheesy Bacon Burger with Spicy Chipotle Aiolo Sauce

Grilled Garlicky-Herbed Shrimp | Made by Meaghan Moineau

Grilled Garlicky-Herbed Shrimp

Intro

Growing up, summers meant endless family gatherings by the beach, where the air was filled with the tantalizing aroma of grilled seafood. My father, always at the helm of the grill, would prepare his signature shrimp dish. The combination of garlic, fresh herbs, and a hint of lemon always drew everyone to the table. Today, I’m excited to share a recipe that captures that nostalgia: Grilled Garlicky-Herbed Shrimp. It’s a dish that’s simple yet bursting with flavor, perfect for bringing a slice of summer to your table anytime.

Why You’ll Love It

This recipe is a celebration of bold flavors and simplicity. The garlicky-herb marinade infuses the shrimp with a delightful zest, while the grilling process adds a smoky finish that enhances each bite. It’s quick to prepare, requires minimal ingredients, and is versatile enough for both casual family dinners and elegant gatherings. Plus, it’s a healthy, protein-rich dish that complements a variety of sides.

Ingredients

  • 1 teaspoon chili pepper flakes
  • 1/4 cup extra virgin olive oil
  • 1/4 cup finely chopped coriander leaves
  • 4 cloves garlic, minced
  • 1 pound large shrimp, peeled and deveined
  • Zest of 1 lemon
  • 1/4 cup finely chopped parsley

Instructions

  1. In a large bowl, combine chili pepper flakes, olive oil, coriander leaves, garlic, lemon zest, and parsley.
  2. Add the shrimp to the bowl and toss to ensure each piece is thoroughly coated in the marinade.
  3. Cover the bowl with plastic wrap and refrigerate for at least 4 hours or overnight for maximum flavor infusion.
  4. Preheat your grill to medium heat. Once hot, place the shrimp on the grill.
  5. Cook the shrimp for about 5 minutes, turning once, until they turn pink and are slightly charred.
  6. Serve immediately, perhaps with a roasted red pepper salad for a Mediterranean twist.

Tips

For the best results, use fresh shrimp as they tend to absorb flavors better than frozen ones. If using wooden skewers, soak them in water for at least 30 minutes before grilling to prevent burning. Always keep an eye on the shrimp while grilling to avoid overcooking, which can make them tough.

Variations & Substitutions

Feel free to customize this recipe to your liking. You can substitute the coriander leaves with basil or cilantro for a different herby flavor. If you prefer a bit more heat, increase the amount of chili pepper flakes or add a dash of cayenne pepper. For a citrusy twist, add a splash of lime juice to the marinade.

Storage

Store any leftover grilled shrimp in an airtight container in the refrigerator for up to 2 days. Reheat them gently in a skillet over low heat to avoid overcooking. While it’s best to consume them fresh, you can freeze the marinated shrimp before grilling for up to 2 months.

FAQ

Can I use a grill pan instead of an outdoor grill?

Absolutely! A grill pan on the stovetop works perfectly fine. Just ensure it’s preheated before adding the shrimp, and cook them as you would on an outdoor grill.

Is it necessary to marinate the shrimp overnight?

While marinating overnight yields the best flavor, a minimum of 4 hours will still allow the shrimp to absorb the delicious garlicky-herb essence. If you’re short on time, even 1 hour can impart good flavor.

Nutrition

Each serving of Grilled Garlicky-Herbed Shrimp (approximately 4-5 shrimp) provides approximately:

  • Calories: 220
  • Protein: 25g
  • Fat: 12g
  • Carbohydrates: 3g
  • Fiber: 1g

This dish is high in protein and healthy fats, making it a nutritious choice for those seeking a balanced meal.

Conclusion

Grilled Garlicky-Herbed Shrimp is a dish that brings together the warmth of family gatherings and the vibrant flavors of the Mediterranean. It’s easy to prepare, incredibly flavorful, and sure to impress anyone who takes a bite. Whether you’re reminiscing about summer barbecues or simply looking to add a new favorite to your recipe repertoire, this shrimp dish is a delightful choice. Enjoy it with loved ones and create new memories around the table.

Related update: Grilled Garlicky-Herbed Shrimp

Related update: Cheesy Bacon Burger with Spicy Chipotle Aiolo Sauce

Zucchini & Basil Frittata | Made by Meaghan Moineau

Zucchini & Basil Frittata: A Delightful Breakfast or Brunch Dish

Intro

There’s something undeniably comforting about the aroma of a frittata wafting through the kitchen on a lazy Sunday morning. It takes me back to weekends spent with my grandmother, who had an uncanny ability to turn simple ingredients into magical meals. Her kitchen was a place of warmth, filled with laughter and the clatter of pots and pans. One of my favorite dishes that she made was a zucchini and basil frittata, a dish that seemed to capture the essence of summer in every bite. Today, I’m sharing this beloved recipe with you, hoping it brings as much joy to your table as it has to mine.

Why You’ll Love It

This Zucchini & Basil Frittata is a perfect blend of flavors and textures. The zucchini provides a tender, moist base, while fresh basil adds a burst of herby freshness. Cheddar cheese gives it a touch of richness, and green onions offer a hint of sharpness. It’s a dish that’s not only delicious but also incredibly versatile, making it perfect for breakfast, brunch, or even a light dinner. Plus, it’s a great way to use up any extra zucchini you might have on hand during the summer months.

Ingredients

  • 2 medium zucchini
  • 1/4 cup fresh basil, chopped
  • 1 cup cheddar cheese, shredded
  • 6 large eggs
  • 2 tablespoons grapeseed oil
  • 2 green onions, thinly sliced
  • Salt, to taste

Instructions

  1. Shred the zucchini using a box grater or a food processor.
  2. Place the shredded zucchini in a colander with a large bowl underneath. Sprinkle with a little salt and allow some water to seep out, about 20 minutes. You can squeeze some of the water out with your hands if you’re in a hurry. This step can be completed ahead of time, and the shredded zucchini can stay in your refrigerator overnight if you would like to do this recipe in stages.
  3. In a large mixing bowl, add the shredded zucchini, green onion, basil, cheddar cheese, and salt. Stir to combine.
  4. Crack the eggs in a separate bowl and beat them. Pour the egg mixture into the bowl with the veggies and stir to combine all ingredients.
  5. Preheat your oven to 350 degrees F.
  6. In a 10-inch cast iron skillet, heat 1 to 2 tablespoons of grapeseed oil (or olive oil). Spread the oil around, making sure the sides are nicely oiled as well.
  7. Heat to medium, then add the egg/zucchini mixture, ensuring the mixture is evenly distributed.
  8. Cook until the egg begins to set on the sides of the skillet, about 3 to 5 minutes.
  9. Use a potholder to place the skillet in the oven. Bake for 12 to 15 minutes until the center tests clean.

Tips

For the best results, make sure to thoroughly drain the zucchini to prevent the frittata from becoming too watery. If you’re in a rush, you can use a clean kitchen towel to squeeze out the excess moisture more quickly. Also, using a cast iron skillet not only helps with even cooking but also adds a beautiful rustic touch to your presentation.

Variations & Substitutions

Feel free to get creative with this recipe! You can substitute the cheddar cheese with feta or goat cheese for a tangier flavor. If you’re not a fan of basil, try using parsley or dill instead. For a bit of heat, add a pinch of red pepper flakes or a dash of hot sauce. This frittata is also a great way to use up other vegetables you have on hand, such as bell peppers or mushrooms.

Storage

This frittata can be stored in an airtight container in the refrigerator for up to three days. To reheat, simply pop it in the oven at 350 degrees F for about 10 minutes or until warmed through. Alternatively, you can reheat individual slices in the microwave for about 1 minute.

FAQ

Can I make this frittata ahead of time?

Yes, you can prepare the zucchini and store it in the refrigerator, then quickly assemble and bake the frittata when you’re ready to serve. The baked frittata also keeps well, making it a great make-ahead option for busy mornings.

Can I freeze the frittata?

While frittatas are best enjoyed fresh, you can freeze any leftovers. Simply wrap individual slices in plastic wrap and place them in a freezer-safe container. To reheat, bake in the oven at 350 degrees F until heated through, or microwave on a low setting.

What can I serve with this frittata?

This frittata pairs beautifully with a simple green salad or some crusty bread. If you’re serving it for brunch, consider adding a fruit salad or some roasted potatoes to round out the meal.

Nutrition

This zucchini and basil frittata is a nutritious option, packed with protein from the eggs and cheese, along with vitamins and minerals from the zucchini and basil. It’s a satisfying meal that will keep you fueled throughout the day.

Conclusion

The Zucchini & Basil Frittata is more than just a dish; it’s a celebration of simple, fresh flavors that come together to create something truly special. Whether you’re serving it for a leisurely weekend brunch or a quick weekday breakfast, it’s sure to become a favorite in your household. So, gather your ingredients, embrace the comforting process of cooking, and enjoy this delightful frittata with your loved ones. Bon appétit!

Related update: Zucchini & Basil Frittata

Related update: Grilled Garlicky-Herbed Shrimp

Crunchy Prawn Skewers With Lemony Avocado Dip | Made by Meaghan Moineau

Crunchy Prawn Skewers With Lemony Avocado Dip

Intro

There’s something undeniably special about grilling prawns on a warm summer evening. It takes me back to the seaside holidays of my childhood, where the salty ocean breeze mingled with the enticing aroma of seafood cooking on the grill. Those were the days when my family would gather around, sharing stories and laughter as we eagerly awaited the delicious feast. This recipe for Crunchy Prawn Skewers with Lemony Avocado Dip encapsulates that nostalgic experience, combining the crispy texture of breadcrumbs with the refreshing zest of lemon-infused avocado. It’s a dish that not only satisfies the palate but also warms the heart, making it perfect for any gathering, big or small.

Why You’ll Love It

These Crunchy Prawn Skewers are a delightful fusion of textures and flavors. The succulent prawns are coated in crispy breadcrumbs, delivering a satisfying crunch with every bite. The Lemony Avocado Dip adds a creamy, tangy contrast that elevates the dish to a whole new level. Whether you’re hosting a backyard barbecue or a simple dinner with friends, these skewers are a crowd-pleaser, offering a gourmet touch that’s surprisingly easy to achieve. Plus, they’re a fantastic way to enjoy seafood that’s both healthy and delicious.

Ingredients

  • Flesh of 1 ripe avocado
  • 2 tablespoons crème fraiche
  • Juice of 1 lemon
  • 1 cup breadcrumbs
  • Zest of 1 lemon
  • 12 large prawns, peeled and deveined
  • 2 tablespoons olive oil
  • 4 bamboo skewers

Instructions

  1. In a food processor, combine the flesh of the avocado, crème fraiche, and lemon juice. Blend until smooth. Season to taste with salt and pepper, and set aside.
  2. In a bowl, combine the breadcrumbs and lemon zest. Season well with salt and pepper.
  3. Coat the prawns evenly with olive oil, then toss them in the breadcrumb mixture until fully covered.
  4. Thread three prawns onto each bamboo skewer.
  5. Preheat the grill to medium-high heat. Grill the skewers for about 2 minutes on each side, or until the prawns are crisp and golden.
  6. Serve immediately with the Lemony Avocado Dip on the side.

Tips

To prevent the bamboo skewers from burning, soak them in cold water for at least an hour before using. This simple step ensures that your skewers remain intact and your prawns cook evenly.

Variations & Substitutions

Feel free to get creative with this recipe! If prawns aren’t available, you can substitute them with chicken or tofu for a different take on the skewers. For an extra kick, add a pinch of cayenne pepper or smoked paprika to the breadcrumb mixture. You can also swap out the crème fraiche for Greek yogurt if you prefer a tangier dip.

Storage

If you have leftovers, store the skewered prawns in an airtight container in the refrigerator for up to two days. The Lemony Avocado Dip is best consumed fresh but can be stored separately in an airtight container for up to one day. To enjoy again, reheat the skewers in the oven or on a skillet until warmed through.

FAQ

Can I prepare the skewers in advance?

Yes, you can prepare the skewers up to a day in advance. Simply coat the prawns in the breadcrumb mixture and store them in the refrigerator until ready to grill. This makes them a convenient option for entertaining, allowing you to focus on your guests.

Can I use frozen prawns?

Absolutely! If using frozen prawns, make sure to thaw them completely and pat them dry before proceeding with the recipe. This ensures that the breadcrumbs adhere properly and the prawns cook evenly.

Nutrition

This dish is not only delicious but also nutritious. Prawns are a great source of lean protein, while the avocado provides healthy fats and essential nutrients. Each skewer contains approximately 180 calories, 10 grams of protein, and 12 grams of healthy fats, making it a balanced option for any meal.

Conclusion

Crunchy Prawn Skewers with Lemony Avocado Dip is a recipe that brings people together, just as it did during my childhood seaside gatherings. The crispy, golden prawns paired with a refreshing dip create a symphony of flavors that will transport you to a sunny beach with each bite. Whether you’re hosting a party or simply enjoying a quiet dinner, this dish promises to deliver satisfaction and smiles all around. So fire up the grill and embrace the joy of cooking and sharing this delectable treat with your loved ones.

Related update: Crunchy Prawn Skewers With Lemony Avocado Dip

Related update: Crisp Winter Salad with Maple Gorgonzola Dressing