Vanilla Coconut Snowball Cupcakes | Made by Meaghan Moineau

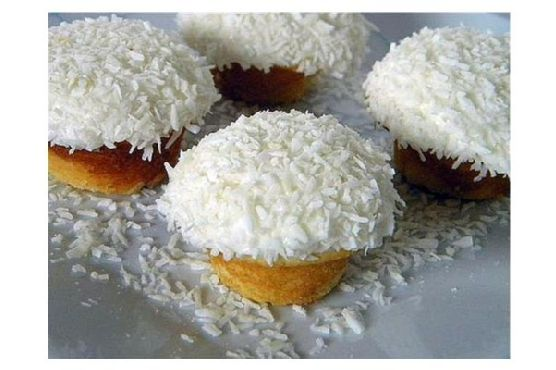
Last Tuesday, somewhere between the hustle of a long workday and the clamor of my kids’ animated dinner table debates, I felt that familiar urge to bake something comforting. It was the kind of chilly autumn evening that practically begs for a cozy, sweet treat — an edible hug, if you will. Enter these Vanilla Coconut Snowball Cupcakes. They’re the perfect blend of fluffy vanilla goodness and tropical coconut flair, transforming a regular weeknight into something a bit more special. The best part? They’re as easy as they are impressive, requiring only pantry staples and a little love. So, while I was elbow-deep in flour, and someone spilled milk all over the kitchen floor (of course), I realized these cupcakes were worth every bit of chaos. Jump to Recipe

What You’ll Need

Chances are, you’ve got most of these tucked away in your pantry or fridge already.

  • 1 1/2 cups **flour**
  • 1 1/2 teaspoons **baking powder**
  • 1/4 teaspoon **salt**
  • 1/2 cup **butter**, softened
  • 1 cup **sugar**
  • 1 teaspoon **vanilla extract**
  • 2 large **eggs**
  • 1/3 cup **regular milk**
  • 1/4 cup **sour cream**
  • 1 cup **unsweetened coconut flakes**
  • For the frosting:
    • 1/2 cup **butter**, softened
    • 1/4 cup **sour cream**
    • 1 teaspoon **vanilla**
    • 2-3 cups **confectioners’ sugar**
    • Additional **coconut flakes** for coating

How to Make Vanilla Coconut Snowball Cupcakes

  1. Preheat your oven to 350°F (175°C) and line a 12-cupcake pan with paper liners or grease it lightly if you’re all out of liners.
  2. In a small bowl, whisk together the flour, baking powder, and salt. Set this aside to get cozy with itself.
  3. In a large mixing bowl, beat the butter on medium-high speed until it’s creamy, about 2 minutes. This is where you’ll see magic starting to happen.
  4. Gradually add sugar to the butter, beating until the mix is light and fluffy — around 3 minutes. Don’t forget to scrape down the sides of the bowl midway.
  5. Beat in the vanilla extract, imagining the sweet fragrance wrapping around your senses.
  6. Add the eggs, one at a time, beating well between each addition. Your batter should now resemble a lovely, satiny mix.
  7. Alternately add the flour mixture and milk, starting and ending with the flour. Beat briefly after each addition just to combine.
  8. Stir in the sour cream and coconut, feeling the texture change as it all comes together.
  9. Fill the cupcake wells about 3/4 full. Pop them in the oven and let them bake for about 18 minutes or until a toothpick comes out clean.
  10. Transfer the pan to a wire rack for 5 minutes, then remove the cupcakes and let them cool completely on the rack.
  11. For the frosting, beat together the butter, sour cream, and vanilla until fluffy. Slowly add 2 cups of confectioners’ sugar, beating on low until combined. Increase speed and beat until light and fluffy, adding more sugar as needed.
  12. Fill a shallow bowl with coconut flakes. Frost each cooled cupcake and dip the tops into the coconut, pressing gently to adhere.

Cook’s Notes

Here are a few tidbits to keep in mind as you venture into cupcake bliss:

  • Room temperature ingredients are key for that perfect, smooth batter — so don’t skip this step.
  • The coconut flakes add a delightful texture and flavor, but if you’re not a fan, simply skip coating the tops. The cupcakes will still shine.
  • You can bake these a day ahead. Just keep them unfrosted and stored in an airtight container. Frost them before serving for that fresh, right-out-of-the-oven vibe.
  • Leftovers, if you have any, can be stored in the fridge for 3-4 days. Bring them to room temperature before indulging, as the flavors are best when not too cold.

Make It Your Own

  • **Nutty Twist:** Substitute the coconut flakes with toasted almonds or pecans for a delightful crunch.
  • **Chocolate Lovers’ Dream:** Swap out half the flour for cocoa powder, and add chocolate chips to the batter for a decadent treat.
  • **Lemon Coconut Delight:** Add the zest of one lemon to the batter and the frosting for a zingy, fresh take.
  • **Berry Bliss:** Gently fold in a handful of blueberries or raspberries into the batter for a burst of fruity goodness in every bite.

If you try these Vanilla Coconut Snowball Cupcakes, I’d love to hear how they turned out! Drop a comment below or tag me in your baking adventures. Happy baking, my friends! 🧁✨

Related update: Vanilla Coconut Snowball Cupcakes

Related update: Noodle Kugel with Pineapple-Gluten free, Dairy Free

Stuffed Pork Tenderloin with Marsala-Port Sauce | Made by Meaghan Moineau

Picture this: It’s a chilly Tuesday evening, and I’m staring at the contents of my fridge, wondering what in the world to make for dinner. My eyes land on a pork tenderloin, and I remember that bottle of Marsala that’s been collecting dust on the shelf. Suddenly, the idea of a Stuffed Pork Tenderloin with Marsala-Port Sauce sounds like the perfect blend of comforting yet impressive. It’s the kind of dish that feels a bit fancy but is deceptively easy to whip up. As the aroma of Marsala and sautéed onions fills the kitchen, I can’t help but feel a little proud of the culinary magic happening right at my stove.

Jump to Recipe

What You’ll Need

The beauty of this dish is in its simplicity and the likelihood that you already have most of these ingredients tucked away in your pantry or fridge. We’re talking about a few surprises that elevate the dish, like dried fruits and Marsala wine.

  • 1 pork tenderloin
  • 1 shallot, finely diced
  • 1 small yellow onion, diced
  • 8 oz mushrooms, chopped
  • 1/4 cup dried apricots
  • 1/4 cup raisins
  • 1/4 cup dried cranberries
  • 1/4 cup flat-leaf parsley, chopped
  • 1/2 cup Marsala wine
  • 1/2 cup Port wine
  • 2 tablespoons butter
  • 1/4 cup heavy cream
  • 2 tablespoons olive oil
  • Salt and pepper to taste

How to Make Stuffed Pork Tenderloin with Marsala-Port Sauce

  1. Preheat your oven to 450°F (230°C). The key to a crispy outside and juicy inside is starting with a hot oven.
  2. In a large skillet over medium heat, warm up 1 tablespoon of olive oil. Toss in the diced onions, shallots, and mushrooms. Cook these until the onions turn translucent, and your kitchen smells like heaven.
  3. Remove the skillet from heat. In a small food processor, combine the cooked onion mixture, dried apricots, raisins, cranberries, and parsley. Pulse until everything is minced and well combined. This mixture will be your delectable stuffing.
  4. Take the pork tenderloin and cut it in half crosswise. Butterfly each section carefully, ensuring not to cut all the way through. Season both sides generously with salt and pepper.
  5. Spread the stuffing over one side of each butterflied pork piece. Lay the other half of the meat on top and secure the edges with toothpicks. Don’t be shy with the salt and pepper here — it’s the secret to bringing out all those flavors.
  6. In the same skillet you used earlier, heat another teaspoon of olive oil. Sear the pork tenderloin on each side for about 3-5 minutes. You’re looking for a lovely golden crust.
  7. Transfer the pork to the oven and let it roast for 20 to 30 minutes, until there’s no pink and the juices run clear. Internal temperature should hit 145°F (63°C).
  8. Once done, remove the pork from the oven, place it on a dish, and tent it with aluminum foil to rest while you make the sauce.
  9. Pour off any fat from the skillet. Add the Marsala and Port wines, scraping up any browned bits with a spatula as you bring it to a boil. Let this bubble away until reduced to about 1/2 cup.
  10. Remove from heat and swirl in the butter and cream. You’ll know it’s perfect when the butter is completely melted and the sauce is just thick enough to coat the back of a spoon.
  11. Remove the toothpicks, slice the pork tenderloin into rounds, and drizzle with that luscious sauce. Serve immediately and prepare to wow your taste buds.

Cook’s Notes

When stuffing the tenderloin, ensure the filling is well minced so it stays snugly inside as it cooks. If you don’t have a small food processor, chopping everything by hand works too — just takes a little more elbow grease. I recommend letting the meat rest for at least 5 minutes before slicing; this keeps it juicy. In terms of leftovers, this dish keeps well in the fridge for up to 3 days. Reheat gently with a splash of water or stock to keep it moist.

Make It Your Own

  • Try swapping the pork for a boneless chicken breast. Just pound it to an even thickness and proceed with stuffing and cooking as directed.
  • For a vegetarian twist, replace the pork with large portobello mushrooms. Use the same stuffing and bake them until tender, about 15 minutes.
  • Substitute the Marsala for sherry or white wine if you prefer a different flavor profile.
  • Add a sprinkle of crushed pistachios or walnuts to the stuffing for a delightful crunch.

If you try this, I’d love to hear how it turns out — drop a comment or tag me on social media! Your kitchen adventures make my day. Happy cooking!

Related update: Stuffed Pork Tenderloin with Marsala-Port Sauce

Related update: Vegan Taco bowls with Cilantro Lime Cauliflower Rice

Vegetarian Bean and Pumpkin Chili | Made by Meaghan Moineau

One chilly autumn evening, I found myself staring into the pantry, craving something hearty and nourishing. There it was, hidden behind cans of beans and tomatoes—a lone can of pumpkin puree. It was like finding a forgotten treasure, and suddenly, the idea of Vegetarian Bean and Pumpkin Chili was born. This dish is perfect for those evenings when you want warmth and comfort without spending hours in the kitchen. The best part? It fills your home with an aroma that makes it feel like you’ve been simmering magic all day. Imagine a chili that’s rich, smoky, with a hint of sweetness from the pumpkin and the perfect amount of spice. It’s like a cozy sweater for your taste buds. Trust me, once you try this, it’ll become one of your weeknight go-tos.

Jump to Recipe

What You’ll Need

You might be surprised to find that you already have most of these ingredients hanging out in your pantry and fridge, just waiting to be turned into something fabulous.

  • Canned tomatoes
  • Canned pumpkin puree
  • 2 serrano chiles
  • 2 chipotle chiles in adobo
  • Vegetable stock – the unsung hero in making all the flavors meld together
  • Water
  • 1 onion, chopped
  • 3 cloves garlic, minced
  • 1 tsp cumin
  • 1 cinnamon stick
  • 1 tsp ground coriander
  • Salt to taste
  • 1 tbsp chili powder
  • Several dashes of Tabasco (or to your liking)
  • Your choice of beans, rinsed and soaked overnight
  • Optional garnishes: shredded cheese, cilantro, sour cream

How to Make Vegetarian Bean and Pumpkin Chili

  1. Start by giving your beans a good rinse and soak them in water overnight. This not only softens them but also makes them easier to digest.
  2. After soaking, rinse the beans once more and place them in your trusty slow cooker. This is where the magic happens with minimal effort.
  3. Add the canned tomatoes and pumpkin puree to the slow cooker, coating the beans in that vibrant, sunset-orange color.
  4. Stir in the chopped onion, minced garlic, serrano chiles, and chipotle chiles in adobo. These layers of flavor will start to build as they cook.
  5. Add the vegetable stock and a bit of water to ensure everything is comfortably covered and ready to soak up all those spices.
  6. Now for the spices: toss in cumin, the cinnamon stick, ground coriander, chili powder, and a pinch of salt. Stir gently until all ingredients are well mixed.
  7. Set the slow cooker on low and let it do its thing for about 8 hours. You’ll know it’s ready when the beans are tender and the kitchen smells warm and inviting.
  8. Before serving, give it a taste and adjust the seasonings as needed. A little more salt or a few more dashes of Tabasco might be just the kick it needs.
  9. Ladle the chili into bowls and top with your favorite garnishes. I love a sprinkle of shredded cheese, fresh cilantro, and a dollop of sour cream.

Cook’s Notes

When making this chili, the slow cooker is your best friend. You can put everything together in the morning and let it simmer all day. For a more intense flavor, roast the chiles beforehand or sauté the onions and garlic in a little olive oil before adding them to the slow cooker. If you’ve got leftovers, they’ll keep in the fridge for about 5 days and freeze beautifully for up to 3 months. Just reheat slowly on the stove to maintain that rich flavor. And hey, this chili actually tastes better the next day as the flavors have more time to mingle.

Make It Your Own

If you’re feeling adventurous or just want to switch things up, here are a few ideas to make this chili truly your own:

  • Swap the serrano chiles for jalapeños if you want a milder spice level.
  • Add a cup of corn kernels for a touch of sweetness and extra texture.
  • Replace the vegetable stock with mushroom broth for an earthy twist.
  • For a smoky kick, add a teaspoon of smoked paprika.

If you give this chili a try, I’d love to hear how it turns out! Drop a comment below or tag me in your cozy bowl photos. Enjoy every spoonful of this autumn-inspired goodness!

Related update: Vegetarian Bean and Pumpkin Chili

Related update: Wisconsin Beer Cheese Soup

Spiced Apple Cider | Made by Meaghan Moineau

Last Tuesday, as the autumn breeze swept through my kitchen window, I found myself craving something warm and cozy. I had just returned from a brisk walk, the kind that leaves your cheeks rosy and fingers tingling. That’s when the idea of spiced apple cider popped into my head. It’s the perfect drink to transition into the cooler months – comforting, aromatic, and surprisingly easy to whip up. There’s something magical about the way the spices blend with the apple juice, evoking a sense of nostalgia and warmth. Plus, it fills your home with the most inviting aroma. Trust me, this spiced apple cider is exactly what you need on a chilly day, especially if you’re looking for a quick pick-me-up or a delightful way to impress your guests without spending hours in the kitchen.

Jump to Recipe

What You’ll Need

Most of these ingredients are already sitting in your pantry, waiting to be transformed into a cozy beverage.

  • Allspice
  • Freshly apple juice
  • Cinnamon sticks
  • Ginger
  • Maple syrup
  • Nutmeg
  • Orange
  • Water

How to Make Spiced Apple Cider

  1. In a large non-reactive pot, combine all the ingredients. Give them a gentle stir to ensure everything is well-mixed.
  2. Bring the mixture to a boil over medium-high heat. You’ll notice the aroma of spices filling your kitchen — that’s when you know you’re on the right track.
  3. Let it boil for about 5 minutes, just enough for the flavors to start mingling and becoming friends.
  4. Cover the pot, reduce the heat, and let it simmer gently for 30-40 minutes. This is when the magic happens, and the flavors deepen into a warm hug in a mug.
  5. Next, line a colander with cheesecloth and strain the cider. This will give you a smooth, clear drink free of any spice bits.
  6. Serve it warm in your favorite mug. And if it’s been one of those days, feel free to spike it with a little dark rum for an extra kick.

Cook’s Notes

When making this cider, patience is your best friend. Allowing it to simmer means the spices have the chance to really infuse the apple juice, creating that perfect balance of flavor. If you’re planning ahead, you can make the cider in the morning and reheat it gently before serving. The flavors will actually become more pronounced over time.

  • Store any leftovers in the fridge for up to 4 days. Reheat gently on the stove or in the microwave.
  • Be cautious when boiling; too high heat can evaporate your cider down more than you’d like.

Make It Your Own

  • Swap the maple syrup with honey for a different layer of sweetness.
  • Add a splash of lemon juice for a hint of citrusy brightness.
  • Replace water with apple brandy for a stronger apple flavor and a boozy twist.
  • Introduce star anise for an extra depth of flavor, giving your cider a slightly licorice note.

If you try this, I’d love to hear how it turns out — drop a comment or tag me! Your kitchen adventures are what make sharing these recipes so rewarding.

Related update: Spiced Apple Cider

Roasted Garlic & Butternut Parmesan Soup | Made by Meaghan Moineau

It was one of those evenings where autumn seemed to have secretly slipped into the neighborhood overnight. The air felt crisp, and the leaves were giving their best dance moves, swirling to the ground with every gust of wind. I found myself craving something warm and reassuring, a cozy bowl of soup that would wrap around me like my favorite blanket. That’s when I remembered this Roasted Garlic & Butternut Parmesan Soup — a velvety concoction that feels fancy enough for any dinner party but is as easy as pie to whip up on a weekday. Not to mention, the house smells absolutely divine with the heady scent of roasted garlic and caramelized squash wafting from the kitchen. It’s like giving your taste buds a great big hug.

Jump to Recipe

What You’ll Need

Funny thing about this soup is its simplicity; you probably have most of these ingredients lounging in your kitchen already. Let’s get to it:

  • Butternut squash – the star of our show
  • Sweet onion – for that subtle, sweet depth
  • An entire head of garlic – because nobody ever said no to roasted garlic
  • Olive oil – a generous drizzle makes everything better
  • Sea salt – enhances all the flavors
  • Chicken stock – or vegetable for a vegetarian twist
  • Shredded romano cheese – for that salty, nutty finish
  • Whole milk – adds creaminess without overpowering

How to Make Roasted Garlic & Butternut Parmesan Soup

  1. Preheat your oven to 400°F (200°C). This is the perfect time to pour yourself a glass of wine, if you’re into that!
  2. In a large roasting pan, toss together the butternut squash and onion slices. Drizzle them generously with olive oil and a good sprinkle of sea salt. Trust me, the caramelization is what makes it magical.
  3. Take about 12 inches of parchment paper and place the whole head of garlic right in the center. Drizzle it with olive oil and sea salt, then wrap it tightly. Pop this little package in foil for a cozy wrap — think of it as a garlic spa treatment.
  4. Place the garlic package beside your roasting pan in the oven. Bake for about 45 minutes, or until the squash is tender and garlic is mushy. The aroma will be your timer.
  5. Once roasted to perfection, add the squash and onion (and all those lovely pan juices!) to a glass blender. Pour in chicken stock until you reach the desired consistency, and blend until smooth.
  6. Squeeze the mushy garlic from its skin directly into the blender, along with all the olive oil from its package. Blend again until everything is luxuriously smooth.
  7. Pour the mixture into a large saucepan. Stir in the shredded romano cheese and whole milk. Heat gently to a simmer — don’t rush this step; it’s where flavors meld.
  8. Let it simmer for about 10 minutes, allowing the flavors to deepen. Serve it up with an extra drizzle of olive oil and a sprinkle of romano cheese. Voilà, dinner is served!

Cook’s Notes

So here’s the thing — make sure your butternut squash is cubed evenly. It’ll roast better that way, and we want each piece to soak up that olive oil magic. You can prep the squash and onion the night before if you’re tight on time. As for storage, this soup keeps beautifully in the fridge for up to 3 days and freezes like a charm. Just be sure to reheat gently, stirring often to maintain that creamy texture. Oh, and if you don’t have a glass blender, a good immersion blender will do the trick just fine.

Make It Your Own

This soup is pretty versatile; here are a few fun twists:

  • Swap the chicken stock for vegetable stock to keep it vegetarian but still flavorful.
  • Replace romano cheese with aged cheddar for a sharper tang.
  • For a vegan version, substitute milk with coconut milk and the cheese with nutritional yeast.
  • Add a pinch of nutmeg or cinnamon for a warm, spicy note that complements the squash.

If you try this, I’d love to hear how it turns out — drop a comment or tag me! Happy cooking, and may your kitchen be filled with laughter and delicious aromas.

Related update: Roasted Garlic & Butternut Parmesan Soup

Related update: Vegetarian Bean and Pumpkin Chili

Sourdough Stuffing with Sage Sausage and Apples | Made by Meaghan Moineau

I found myself in a bit of a culinary pickle last Wednesday. You know those days when you’re just craving something hearty and flavorful, but the thought of spending hours in the kitchen makes you want to order takeout instead? Well, I was there — staring at my pantry with determination to whip up something that screams fall comfort but doesn’t require half my day. Enter the Sourdough Stuffing with Sage Sausage and Apples. This dish checks all the boxes: rich flavors from the sausage, a hint of sweetness from the apples, and earthy herbs that make your kitchen smell like an autumn hug. It’s surprisingly simple to make and perfect for a cozy weeknight dinner or an impressive side for a festive gathering.

Jump to Recipe

What You’ll Need

This dish is all about layers of flavor with ingredients you might already have around. The key players? Let’s just say **sourdough bread** and **sage sausage** are ready to steal the show.

  • 1 pound of **sage sausage**
  • 3 tablespoons of **butter**, divided
  • 2 shallots, finely chopped
  • 2 cloves of garlic, minced
  • 3 stalks of celery, diced
  • 1 **apple**, diced
  • 6 ounces of **portobello mushrooms**, diced
  • 1 teaspoon of **fresh thyme**
  • 1 tablespoon of **fresh sage**, chopped
  • 1/2 cup of **dry white wine**
  • 1 loaf of whole wheat sourdough bread, diced
  • 2 cups of **chicken broth**
  • Salt and pepper, to taste

How to Make Sourdough Stuffing with Sage Sausage and Apples

  1. In a large skillet over medium heat, cook the sausage until it’s no longer pink, breaking it up with a spoon as it cooks; this should take about 10 minutes. Once cooked, drain the fat and set the sausage aside.
  2. In the same skillet, melt 1 tablespoon of butter. Add the shallots, garlic, celery, apple, and mushrooms. Sauté until the veggies are tender and the mixture is fragrant, about 8 minutes. Sprinkle with thyme and sage, stirring to combine.
  3. Pour the wine over the vegetable mix, using a wooden spoon to scrape up any browned bits from the bottom of the pan. Let it simmer for about 2 minutes, allowing the alcohol to evaporate.
  4. In a large bowl, combine the cooked sausage with the vegetable mixture. Add the diced sourdough bread and 2 tablespoons of butter. Pour the chicken broth over everything, stirring well so the bread absorbs the broth evenly. You’ll want the bread to be moist but not overly soggy.
  5. Transfer the stuffing into a 9×13 inch casserole dish, spreading it out evenly. Cover with foil and bake in a preheated oven at 350°F (175°C) for 20 minutes.
  6. Remove the foil, dot the top of the stuffing with the remaining tablespoon of butter, and return to the oven. Bake uncovered for an additional 10 minutes, or until the top is golden and slightly crispy. Serve immediately for maximum coziness.

Cook’s Notes

Here’s the thing with stuffing — it’s forgiving. Just remember, dry bread is your friend, as it’ll soak up all those delicious juices. If your bread isn’t dry enough, you can pop it in the oven at a low temperature to dry it out before starting.

Leftovers? Absolutely! Store them in an airtight container in the fridge for up to three days. You can reheat in the oven or microwave, but add a splash of broth to avoid drying it out. This stuffing can also be made a day ahead; just assemble it as directed, cover, and keep it in the fridge. Pop it in the oven when you’re ready to serve.

Make It Your Own

  • Vegetarian Twist: Swap out the sausage for a plant-based alternative or use crispy cubes of tofu for a veggie-friendly option.
  • Gluten-Free Version: Use your favorite gluten-free bread instead of sourdough. The texture will be slightly different, but it’ll still taste amazing.
  • Nuts About Nuts: Add a handful of chopped walnuts or pecans for a bit of crunch and extra flavor depth.
  • Cheese Please: Sprinkle some grated Parmesan or Gruyère over the top just before the final bake for a cheesy crust.

If you try this, I’d love to hear how it turns out — drop a comment or tag me! Whether you’re serving it up for a holiday spread or just wanting to turn a regular dinner into something special, this stuffing is bound to become a favorite. Enjoy every bite!

Related update: Sourdough Stuffing with Sage Sausage and Apples

Related update: Cheesy Spinach Stuffed Shells

Fall Fruit Compote | Made by Meaghan Moineau

I recently found myself staring at a couple of Honeycrisp apples on my kitchen counter, feeling the first whispers of autumn in the air. You know the days when you can finally break out your sweaters but you still need sunglasses? That’s when my mind started tiptoeing towards something warm and cozy. I mean, what could be better than making a quick, delightful fall fruit compote that ties together all the best flavors of the season? The best part? You don’t need a culinary degree to whip this up. It’s a simple, heart-warming recipe that gives you that “kitchen hero” feeling without the sweat. Plus, it pairs perfectly with so many things, like crispy potato latkes or a dollop of ice cream.

Jump to Recipe

What You’ll Need

Trust me, chances are you already have most of this in your pantry or fridge. The real stars here are the cozy, autumnal ingredients that just sing when they’re together.

  • 2 tablespoons of butter
  • 2 cups of diced honeycrisp apples
  • 1 cup of diced pears
  • 1/2 cup of dried cherries
  • 1/4 cup of brown sugar
  • 1 tablespoon of apple cider vinegar
  • 1 cup of apple juice
  • 1 cinnamon stick

How to Make Fall Fruit Compote

  1. Start by melting the butter in a medium-sized saucepan over high heat. You’ll know it’s ready when it starts to smell nutty and divine.
  2. Once the butter is melted, toss in those diced apples, pears, dried cherries, vinegar, apple juice, brown sugar, and the cinnamon stick. Give it a good stir to coat everything in buttery goodness.
  3. Let it cook for about 5 minutes. You want the mixture to start bubbling, and the smell will be pure fall magic.
  4. Turn the heat down to medium and let it simmer for a few more minutes, just until the fruit is tender and the syrupy liquid has mostly reduced. If things start to stick, splash in a little more apple juice to keep it all juicy and lush.
  5. Once it’s all tender and gorgeous, you’re done! Serve warm and enjoy the fruit-laden spoonfuls of autumn joy.

Cook’s Notes

Let’s chat about some practical tidbits to make your compote experience as smooth as butter. First off, don’t forget that compote thickens as it cools, so don’t worry if it looks a little saucy at first. If you’re planning to serve it later, just warm it up slightly before serving to get back that perfect consistency. If you find yourself with leftovers, pop them in a sealed container in the fridge, and it will stay happy for about a week. This compote is perfect to make ahead of time, especially if you’re planning to dazzle some guests a day or two later.

Make It Your Own

Let’s play around with this compote base because, trust me, versatility is its middle name.

  • Swap out the apples for ripe peaches if they’re still in season. They add a lovely, juicy dimension.
  • Try cranberries instead of dried cherries for a tarter twist. A little zing never hurt anyone!
  • For a boozy touch, replace half the apple juice with a splash of bourbon or rum. It makes things just a little more grown-up.
  • Add a pinch of ground ginger or nutmeg for extra warmth and spice. Your taste buds will thank you.

If you give this autumnal delight a go, I’d love to hear how it turns out — drop a comment or tag me in your fall feasting pics! Happy cooking, friend!

Related update: Fall Fruit Compote

Related update: Chocolate Chip Peanut Butter Mallow Dessert Bars

Fall Farro Salad with Pomegranate, Walnut & Truffles | Made by Meaghan Moineau

Picture this: It’s a chilly autumn afternoon, and the sun is giving off that perfect golden hue that makes everything look like a scene from a cozy movie. I’m in my kitchen, wearing my favorite oversized sweater, and I’ve got a craving for something that’s nourishing but still feels like a treat. Enter my Fall Farro Salad with Pomegranate, Walnut & Truffles. This dish is like a warm hug in a bowl, combining nutty farro with the sweet burst of pomegranate seeds, the earthy depth of truffles, and the crunch of walnuts. It’s quick to put together yet tastes like you’ve been working on it for hours. Trust me, this is the kind of recipe that’ll make you feel like a culinary genius with minimal effort, perfect for a weeknight dinner or impressing friends over a weekend brunch.

Jump to Recipe

What You’ll Need

Most of these ingredients are pantry staples, so you might already find them hanging out in your kitchen. Here’s what you need:

  • 1 cup farro
  • 2 tablespoons extra virgin olive oil
  • 1/2 cup pomegranate seeds
  • 1/2 cup walnuts, roughly chopped
  • 1/2 head radicchio, thinly sliced
  • 1/4 cup parmesan, shaved into ribbons
  • 2 teaspoons truffle oil
  • 1 tablespoon balsamic vinegar
  • Salt and pepper, to taste

How to Make Fall Farro Salad with Pomegranate, Walnut & Truffles

  1. Start by cooking the farro. Bring a pot of cold water to a boil, and don’t forget a pinch of salt. Toss in the farro and let it cook until it’s al dente—about 20-35 minutes. You can throw in some vegetable scraps like a carrot or celery if you have them, for added flavor.
  2. While the farro is cooking, toast the walnuts in a dry pan over medium heat. Keep an eye on them and stir occasionally, until they are golden and fragrant. This should take about 5-7 minutes.
  3. In a large bowl, whisk together the extra virgin olive oil, balsamic vinegar, truffle oil, salt, and pepper. This dressing will bring everything together with a luxurious, earthy flavor.
  4. Once the farro is cooked, drain it and let it cool slightly. You want it warm but not piping hot.
  5. Add the farro to the bowl with the dressing, and toss until the grains are well coated.
  6. Gently fold in the radicchio, pomegranate seeds, and toasted walnuts. The radicchio should soften slightly but remain crisp.
  7. Finish by shaving parmesan over the top. A vegetable peeler works wonders here for creating beautiful, thin ribbons.
  8. Give it a final toss, taste, and tweak any seasoning if needed. Serve immediately and enjoy the medley of textures and flavors!

Cook’s Notes

Let’s chat about farro for a second. It’s an ancient grain, so it’s a bit chewy and wonderfully nutty, perfect for absorbing all the dressing goodness. Don’t skimp on toasting your walnuts; it makes a world of difference in flavor. Also, this salad is best enjoyed fresh, but if you do have leftovers, they’ll keep in the fridge for a day or two. Just know that the radicchio might lose some of its crispness.

Make It Your Own

Feel free to remix this salad with these variations:

  • Swap the farro for quinoa if you’re looking for a gluten-free option.
  • Substitute walnuts with pecans or almonds for a different nutty dimension.
  • Try adding grilled chicken or crispy tofu for extra protein.
  • Love cheese? Crumbled goat cheese can replace parmesan for a tangier kick.

If you try this, I’d love to hear how it turns out — drop a comment or tag me! Cooking is all about experimenting and finding what makes your taste buds sing, so have fun with it.

Related update: Fall Farro Salad with Pomegranate, Walnut & Truffles

Related update: Tomato Cucumber Salad

Oven Roasted Pears With Blackberry Sauce | Made by Meaghan Moineau

A few weekends ago, I found myself with a bowl of ripe pears staring back at me from the counter, practically begging to be transformed into something special. It was one of those blustery autumn afternoons where the leaves were doing their dance down the street, and all I wanted was a cozy dessert that felt both comforting and indulgent. Enter Oven Roasted Pears with Blackberry Sauce—a dish that marries the rich sweetness of roasted fruit with the tangy brightness of blackberries. It sounds fancy but is as easy as pie (actually, even easier since there’s no crust to wrestle with!). This little number is perfect for impressing your dinner guests or just treating yourself on a Tuesday night. Jump to Recipe

What You’ll Need

Chances are, you already have most of these hanging out in your pantry and fridge. This recipe is all about letting a few simple ingredients shine.

  • Pears (ripe but firm)
  • Unsalted butter
  • Blackberries (fresh and juicy)
  • Juice from a lemon
  • Powdered sugar
  • Confectioners sugar
  • Cream of tartar
  • Egg whites
  • Granulated sugar
  • Bittersweet chocolate

How to Make Oven Roasted Pears With Blackberry Sauce

  1. Preheat your oven to 450°F. Begin by peeling, coring, and quartering the pears. Melt the unsalted butter in a large casserole or baking dish over high heat. A 10-quart Dutch oven works perfectly for this.
  2. Once the butter is melted and sizzling, add the pear quarters. Cook them for about 10 minutes, stirring occasionally, until they’re golden brown all over. The aroma will be absolutely irresistible.
  3. Transfer your dish to the oven and let the pears roast for another 7 to 10 minutes. You’ll know they’re ready when a paring knife easily pierces through. Once done, take them out of the oven and let them cool to room temperature.
  4. As the pears cool, wash and dry the blackberries—my salad spinner is a lifesaver for this! Reserve a handful for garnishing later.
  5. In a food processor, blend 3 cups of blackberries with powdered sugar and lemon juice until smooth. Pour this vibrant sauce into a bowl and set aside.
  6. Now, for the meringue kisses! Preheat the oven to 275°F. Line a full-size sheet pan with a silpat mat or parchment paper lightly sprayed with cooking spray.
  7. In a food processor, give the granulated sugar a blitz for about a minute until it’s superfine. Transfer it to a bowl. Next, process the confectioners sugar and bittersweet chocolate together until the chocolate is reduced to tiny flecks.
  8. Using a mixer, beat the egg whites at a slow speed until they start to froth. Add the cream of tartar and crank up the speed to high, beating until stiff peaks form.
  9. Gradually add the superfine sugar, continuing to beat for another two minutes. Transfer this fluffy mixture to a pastry bag fitted with a star tip.
  10. Pipe out little meringue kisses onto the lined baking sheet, giving each a small peak by pushing the tip into the dollop and pulling away quickly.
  11. Place the meringues in the oven for an hour and a half. They’re done when they feel hard to the touch, perfectly dried out.
  12. To serve, spoon the blackberry sauce onto each plate, arrange 3 or 4 pear quarters on top, add a few meringue kisses, and garnish with those reserved whole blackberries.

Cook’s Notes

Here’s the thing, timing is everything with this dessert. You want the pears to still have a bit of bite, so don’t over-roast them. The meringue kisses can be made ahead of time and stored in an airtight container for up to a week. If you’re prepping the blackberry sauce ahead, keep it in the fridge for a day or two, but don’t add the lemon juice until just before serving to keep that bright flavor.

Make It Your Own

  • Swap the blackberries for raspberries for a different berry twist.
  • Add a splash of vanilla extract to the meringue mixture for a subtle aromatic boost.
  • For a dairy-free option, use coconut oil instead of butter when roasting the pears.
  • Garnish with some toasted chopped nuts (like hazelnuts or almonds) for a crunchy contrast.

If you try this recipe, I’d love to hear how it turns out—drop a comment below or tag me on social media with your delicious creations!

Related update: Oven Roasted Pears With Blackberry Sauce

Related update: Fall Fruit Compote

Roasted Butternut Squash and Sage Dip | Made by Meaghan Moineau

It was one of those chilly fall afternoons when the leaves were swirling outside, and my pantry was looking a bit sparse. I was craving something cozy but hadn’t done a proper grocery run. Luckily, I did have a few seasonal staples on hand, including a couple of butternut squashes that had been staring at me every time I opened the pantry door. A quick rummage through the fridge and spice rack, and voilà! This Roasted Butternut Squash and Sage Dip was born. It’s a creamy, savory dip with just a hint of sweetness from the roasted squash and an earthy touch from the sage. Perfect for those moments when you want to impress without the fuss. Plus, it makes your kitchen smell divine.

Jump to Recipe

What You’ll Need

The beauty of this dip is that it relies on simple, fresh ingredients that you might already have. The key is in the roasting, which brings out all the deep, wonderful flavors.

  • Two butternut squash
  • Olive oil
  • Fresh sage
  • Garlic powder
  • Fresh ground pepper
  • Sea salt
  • Onion
  • Garlic
  • Anchovy (trust me on this one!)
  • Goat cheese

How to Make Roasted Butternut Squash and Sage Dip

  1. Preheat your oven to 350 degrees. This is the perfect time to cozy up and let your kitchen get warm and inviting.
  2. In a big bowl, mix together some olive oil, fresh sage, a few dashes of salt, pepper, and garlic powder. Toss in the butternut squash cubes, making sure each piece is well-coated with the herby goodness.
  3. Spread the squash out on a large baking sheet. You want them in a single layer, so they roast up nice and caramelized. Bake for about 30 minutes, or until they are tender and golden at the edges.
  4. While the squash is doing its thing, sauté chopped onion, anchovy fillets, and garlic in a bit of extra virgin olive oil. Cook them until the onion is soft and the anchovy has melted into the mix. The aroma is heavenly.
  5. Once the squash is done, let it cool just enough to handle. This way, you’re not nuking your fingers when you move to the next step.
  6. In a food processor, combine the roasted squash, onion mixture, and about 1/4 cup of crumbled goat cheese. Blend until smooth and creamy. You may need to scrape down the sides a couple of times to get everything evenly mixed.
  7. Transfer the dip into a pretty bowl because presentation matters! Serve it up with pita wedges, breadsticks, or a colorful array of veggies.

Cook’s Notes

This dip is pretty forgiving and flexible, perfect for those “let’s wing it” cooking sessions. If you’re prepping in advance, you can roast the squash and make the sautéed onion mixture the day before. Just keep them in separate containers in the fridge and blend them up with the cheese when you’re ready to serve. It will keep well in the fridge for about 3 days, though it never lasts that long at my house! If the dip thickens too much after chilling, a splash of olive oil or a bit of warm water stirred in should bring it back to life.

Make It Your Own

This is where the fun begins—don’t be afraid to play around with this recipe!

  • Swap the goat cheese for feta if you want a saltier, tangier vibe.
  • For a vegan version, skip the anchovy and goat cheese, subbing in roasted red peppers for extra depth.
  • Add a pinch of red pepper flakes to the roasting mix for a bit of heat.
  • Use sweet potatoes instead of butternut squash for an earthier sweetness.

If you try this, I’d love to hear how it turns out—drop a comment or tag me! Nothing makes me happier than seeing all the delicious ways you bring these recipes to life. Enjoy!

Related update: Roasted Butternut Squash and Sage Dip

Related update: Breaded Shrimp and Spicy Mayo Appetizer

Osso Buco | Made by Meaghan Moineau

Picture this: It’s a chilly Tuesday evening, and I’m half buried under a mountain of to-do lists, emails, and the occasional existential question. Suddenly, the craving for something soul-warming hits me like a hug from the inside. Enter Osso Buco, the culinary equivalent of fuzzy socks and a roaring fireplace. It’s one of those dishes that sounds terribly fancy but is delightfully uncomplicated. Imagine tender veal shanks simmering in a rich, aromatic broth until they practically fall off the bone. And the best part? It’s mostly hands-off, making it perfect for those evenings when you’re juggling too many things but still want to treat yourself to something special. Let’s dive in, shall we?

Jump to Recipe

What You’ll Need

What makes this dish a winner? Chances are you already have most of these ingredients lounging in your pantry, waiting to be transformed into magic. Here’s what you’ll need:

  • Veal shanks – the star of the show
  • Flour – for dredging
  • Olive oil – to get that lovely golden crust
  • Garlic – because life is too short for bland food
  • Onion – for that aromatic base
  • Chicken stock – adds depth to the broth
  • Dry white wine – for a touch of acidity
  • Tomato sauce – for richness
  • Parsley – chopped, for freshness
  • Rind of lemon – adds a zesty finish
  • Bell pepper – optional, for a pop of color and sweetness

How to Make Osso Buco

  1. Start by patting your veal shanks dry with a paper towel. Dredge them in seasoned flour, shaking off the excess. Get your large pan heating with some olive oil.
  2. Once the oil is shimmering, sear the shanks until they’re golden and fragrant. You’re not cooking them through here, just giving them a beautiful crust.
  3. Add the chopped garlic and onion to the pan and let them mingle with the shanks for a minute, until the onion is translucent and fragrant.
  4. Now, pour in the boiling chicken stock, dry white wine, and tomato sauce. Watch as the liquid fizzes up and settles into a simmer.
  5. Cover the pan and let everything simmer for about 1 1/2 hours. This is where patience becomes a virtue, letting the meat become tender and the flavors meld into harmony.
  6. Just before serving, stir in the chopped parsley and grate the lemon rind over the top. The aroma will have you salivating in seconds.
  7. Serve your Osso Buco over a bed of saffron rice and savor the fruits of your minimal labor.

Cook’s Notes

Here’s the scoop on making this dish foolproof. Don’t skimp on the simmering time; it’s the secret to that melt-in-your-mouth texture. If your sauce isn’t thick enough towards the end, let it reduce uncovered for a few minutes. Leftovers? Lucky you! This dish tastes even better the next day. Store it in an airtight container in the fridge for up to three days. Reheat gently on the stove, adding a splash of stock or water if needed.

Make It Your Own

  • Chicken Osso Buco: Swap out the veal for chicken thighs if you’re looking for a more budget-friendly option. Adjust cooking time to ensure the chicken is tender.
  • Vegetarian Delight: Use thick slices of eggplant instead of veal and vegetable stock instead of chicken stock for a hearty vegetarian version.
  • Spice It Up: Add a pinch of red pepper flakes along with the garlic and onion for a little kick of heat.
  • Citrus Twist: Substitute the lemon rind with orange rind for a slightly sweeter, citrusy note.

If you try this, I’d love to hear how it turns out — drop a comment or tag me! I’m always eager to see your delicious creations and hear your takes on this classic dish. Happy cooking!

Related update: Osso Buco

Related update: Cauliflower, Brown Rice, and Vegetable Fried Rice

Kale and Roasted Sweet Potato Soup with Chicken Sausage | Made by Meaghan Moineau

It was one of those chilly Tuesday evenings when the weather outside felt like soup, but my pantry felt like a question mark. You know those nights, right? I stood there juggling the idea of ordering takeout, but something about my half-full fridge whispered potential. A couple of sweet potatoes and a bundle of kale caught my eye, and suddenly the idea of a warm, hearty soup started bubbling up in my mind. Enter this Kale and Roasted Sweet Potato Soup with Chicken Sausage — the ultimate weeknight comfort food. It’s got the coziness factor cranked up to eleven and requires nothing fancy, just real, wholesome ingredients that bring all the comfort without complicating your life.

Jump to Recipe

What You’ll Need

It’s one of those recipes where you might already have most things on hand, and if not, everything is effortlessly sourced. You’ll love how these simple ingredients come together into something so soul-satisfying.

  • 2 medium sweet potatoes, peeled and cubed
  • 1 large yellow onion, diced
  • 1 bunch of kale, roughly chopped
  • 8 oz mushrooms, sliced
  • 12 oz chicken sausage, sliced
  • 4 cups chicken stock
  • 3 cloves garlic, minced
  • 1 tsp dried thyme
  • 1 tsp ground coriander
  • 1/2 tsp chili flakes (adjust to taste)
  • Sea salt and freshly cracked black pepper to taste
  • 3 tbsp olive oil

How to Make Kale and Roasted Sweet Potato Soup with Chicken Sausage

  1. Preheat your oven to 400°F (200°C). Spread the cubed sweet potatoes in a baking pan and toss them with a sprinkle of salt, pepper, and a drizzle of olive oil. Roast for 20-25 minutes until they’re soft and starting to caramelize. The edges should be just turning golden.
  2. While the sweet potatoes are roasting, heat a generous splash of olive oil in a dutch oven over medium heat. Add the chicken sausage slices and cook them until they’re just starting to brown and the kitchen smells like heaven.
  3. Toss in the diced onion and sliced mushrooms. Cook for about 3-5 minutes until the onion is translucent and the mushrooms are soft and juicy.
  4. Stir in the minced garlic, thyme, coriander, a pinch of sea salt, and black pepper. Let it all mingle and meld for about a minute – the aroma should be irresistible by now.
  5. Pour in the chicken stock and bring everything to a gentle boil. Once it’s bubbling, lower the heat and let it simmer for about 5-10 minutes. This is where the flavors start to truly develop.
  6. Add the roasted sweet potatoes and chopped kale to the pot. Press the kale down with your spoon so it’s submerged in the broth. Cook for another 3-5 minutes until the kale is tender and vibrantly green.

Cook’s Notes

So, let’s talk about those sweet potatoes. Roasting them until they’re golden gives the soup a deeper, more robust flavor that’s totally worth the extra step. Plus, they hold their shape better than if you were to just boil them.

This soup keeps well in the fridge for about 3 days, which makes it perfect for meal prep. Just be aware that the kale might lose a bit of its texture, but it’ll still be tasty. For leftovers, gently reheat on the stove or in the microwave.

If you’re in a rush, you can skip the roasting and just simmer the sweet potatoes with the broth, but seriously, when you’ve got the time, roast them. Your taste buds will thank you.

Make It Your Own

  • Swap the chicken sausage with crispy tofu for a vegetarian version that’s every bit as delicious and hearty.
  • Replace kale with spinach if that’s what you’ve got, but add it closer to the end as it wilts much faster.
  • Add a cup of cooked quinoa or farro to make the soup even more filling – perfect for those extra chilly nights.
  • Spike the broth with a tablespoon of soy sauce for an umami boost that’ll have everyone asking for seconds.

If you try this, I’d love to hear how it turns out — drop a comment or tag me! Sharing these kitchen adventures with you means the world to me. Happy cooking, and may your soup be ever comforting!

Related update: Kale and Roasted Sweet Potato Soup with Chicken Sausage

Related update: Slow Cooker Chicken Taco Soup

Related update: Pan Seared Salmon

Rosemary Walnut Bread | Made by Meaghan Moineau

Picture this: It’s a chilly Saturday morning, the kind where the air feels sharp and the sky has that crisp blue tint that only autumn can deliver. The leaves have turned, and you’re wrapped up in your coziest sweater. A few weekends ago, I found myself in this exact scenario with a craving for something warm, hearty, and just a little bit special. Cue the Rosemary Walnut Bread! It’s the kind of bread that fills your kitchen with an aroma so enticing, you’ll want to bottle it as a candle. Plus, it’s a breeze to whip up, even if you’re still waking up from a glorious sleep-in. This recipe is a keeper for those who love a crusty loaf with the perfect hint of rosemary’s earthy magic and the crunch of walnuts.

Jump to Recipe

What You’ll Need

The beautiful thing about this Rosemary Walnut Bread is the simplicity of its ingredients — nothing fancy, yet it delivers big on flavor.

  • Cream cheese
  • Dry yeast
  • Eggs
  • Flour
  • Honey
  • Lemon zest
  • Milk
  • Olive oil
  • Rosemary
  • Salt
  • Walnuts

How to Make Rosemary Walnut Bread

  1. Start by combining the cream cheese, milk, salt, and honey in a medium mixing bowl. Sprinkle the dry yeast over the mixture and give it a gentle stir. Let it stand for about 5 minutes, allowing the yeast to activate — you’ll notice a frothy layer on top.
  2. Slowly stir in two cups of flour. The dough will start to come together. Cover the bowl with plastic wrap and tuck it into a warm spot (85°F is ideal) for about 15 minutes. During this time, the dough gets a chance to rest and begin to rise.
  3. Add the remaining flour, chopped walnuts, lemon zest, and chopped rosemary into the bowl. Crack in two eggs, and mix everything until the dough feels sticky and cohesive.
  4. Transfer the dough onto a floured surface and knead for a full 10 minutes. Think of this as your morning workout. The dough should feel smooth and elastic by the time you’re done.
  5. Rub a bit of olive oil onto the top of your dough and place it in a lightly oiled bowl. Cover with a damp cloth and let it rise for an hour until it doubles in size.
  6. Once the dough has risen, return it to the floured surface. Divide and shape it into two leaf-like loaves. This is your chance to get creative with your shaping skills!
  7. Make three diagonal slashes about half an inch deep across each loaf. These slashes will help the bread expand beautifully while baking.
  8. Brush the tops with a beaten egg for that irresistible golden crust, then let the loaves rise again for 30 minutes.
  9. Bake in a preheated 375°F oven for 40 minutes, until the loaves are golden and sound hollow when tapped on the bottom.
  10. Let the bread stand for about 20 minutes before slicing — if you can resist!

Cook’s Notes

Here are a few little nuggets of wisdom to help you along the way. If your kitchen runs cold, you can place the dough near the oven or a warm stove to help with rising. And when you’re kneading, don’t be afraid to add a sprinkle of flour if the dough feels too sticky. For storage, wrap your bread tightly in foil or a bread bag to keep it fresh for up to three days. It also freezes beautifully — just slice it, wrap it well, and pop it in the freezer.

Make It Your Own

  • Swap the walnuts for pecans if you fancy a different nutty flavor.
  • If rosemary isn’t your jam, try using thyme or sage for a unique herb twist.
  • Add a handful of dried cranberries for a sweet and tart combo that’s perfect for the holidays.
  • Experiment with whole wheat flour for a heartier loaf — just adjust the liquid slightly as it tends to absorb more moisture.

If you try this, I’d love to hear how it turns out — drop a comment or tag me! Happy baking, and may your kitchen be filled with warmth and the comforting scent of home-baked bread.

Related update: Rosemary Walnut Bread

Related update: Khachapuri

Chive and dill muffins | Made by Meaghan Moineau

One chilly autumn afternoon, I found myself digging through the fridge, searching for something — anything — that could transform into a warm, comforting snack. The day had that crisp edge that makes you want to cozy up with something fresh out of the oven. That’s when I spotted a lonely bunch of fresh chives and dill, remnants from last night’s dinner. An idea sparked, one that felt both adventurous and familiar: Chive and Dill Muffins. These little savory gems are the perfect answer to a craving for something cozy yet bright, offering a delightful mix of herbal freshness and subtle, buttery richness. And let’s be honest, they’re also a great way to justify eating a muffin at any time of day.

Jump to Recipe

What You’ll Need

Chances are you already have most of these ingredients lounging in your pantry, just waiting to become something delicious.

  • 1 cup all-purpose flour
  • 1/2 cup yellow cornmeal
  • 2 tablespoons sugar
  • 2 teaspoons baking powder
  • 1 teaspoon salt
  • 1/2 teaspoon baking soda
  • 1/4 teaspoon cayenne pepper
  • 1/4 cup fresh chives, chopped
  • 1/4 cup fresh dill, chopped
  • 1 cup plain yogurt
  • 2 large eggs
  • 1/2 cup (1 stick) unsalted butter, melted and slightly cooled

How to Make Chive and Dill Muffins

  1. Preheat your oven to 220°C (425°F). This high heat will give your muffins that beautiful rise and golden top.
  2. In a medium bowl, whisk together the flour, cornmeal, sugar, baking powder, salt, baking soda, and cayenne pepper. Once combined, gently stir in the chopped chives and dill, letting their fresh aroma fill your kitchen.
  3. In another medium bowl, whisk together the yogurt, eggs, and melted butter until smooth and creamy. The mixture should be a pale yellow, with small bubbles forming from the whisking.
  4. Add the yogurt mixture to the dry ingredients and stir just until blended. Be careful not to overmix; it’s okay if the batter is a bit lumpy. Those lumps will work themselves out during baking.
  5. Divide the batter among greased or silicone muffin cups, using about 1/3 cup batter for each. They should be about two-thirds full, giving them room to puff up beautifully.
  6. Bake in the preheated oven for 20 minutes, or until the muffins are puffed and golden. You’ll know they’re done when a toothpick inserted into the center comes out clean or with just a few crumbs attached.
  7. Let the muffins cool in their cups for a few minutes before removing. This brief wait allows them to set up perfectly. Serve warm for the best experience.

Cook’s Notes

Here’s where the magic happens — or at least where you avoid any potential hiccups. First, make sure your baking powder and soda are fresh; nothing’s worse than flat muffins. These muffins can be stored in an airtight container at room temperature for up to two days, but they’re best enjoyed fresh. If you want to make them ahead, you can freeze them for up to a month. Just thaw at room temperature and pop them in a warm oven for a few minutes to refresh their golden tops.

Make It Your Own

These muffins are already a little party of flavors, but if you’re feeling experimental, here are a few ideas:

  • Swap the chives for green onions for a milder flavor with a slight crunch.
  • Add 1/2 cup of grated cheddar cheese to the batter for an extra savory kick.
  • Mix in some finely chopped sun-dried tomatoes for a slightly sweet, tangy twist.
  • Replace the dill with fresh parsley and thyme for a different herbal profile.

If you try this, I’d love to hear how it turns out — drop a comment or tag me! Let’s swap stories about these delightful muffins and all their delicious variations.

Related update: Chive and dill muffins

Related update: Penne Arrabiata

Classic Pumpkin Pie | Made by Meaghan Moineau

Classic Pumpkin Pie | Made by Meaghan Moineau

Title: "A Slice of Nostalgia: The Timeless Allure of Classic Pumpkin Pie"


Description: Dive into the comforting embrace of fall with a Classic Pumpkin Pie recipe that not only tantalizes your taste buds but also warms your heart with a sprinkle of nostalgia.


---


As the crisp autumn air begins to weave its way through the trees, painting the landscape with hues of amber and gold, there's one classic dessert that captures the essence of the season like no other: Classic Pumpkin Pie. This timeless recipe combines the rich flavors of canned pumpkin, the warm spices of cinnamon, ginger, and nutmeg, and the creamy sweetness of condensed milk, all nestled within a tender, flaky pie crust. It's more than just a dessert; it's a culinary tradition that brings family and friends together around the table, year after year.


### Ingredients:


- 1 can of pumpkin


- 2 large eggs


- 1 teaspoon ground cinnamon


- 1/2 teaspoon ground ginger


- 1/4 teaspoon ground nutmeg


- 1/2 teaspoon salt


- 1 can sweetened condensed milk


- 1 unbaked pie crust


- Whipped cream for garnish


### Instructions:


1. **Preheat the Oven**: Begin by preheating your oven to 425 degrees F. This initial high temperature helps set the crust, ensuring it remains crisp and flaky.


2. **Mix the Filling**: In a medium bowl, whisk together the canned pumpkin, sweetened condensed milk, eggs, ground cinnamon, ginger, nutmeg, and salt. Stir until the mixture is smooth and well combined.


3. **Assemble the Pie**: Pour the pumpkin mixture into the unbaked pie crust, spreading it evenly with a spatula.


4. **Bake**: Place the pie in the oven and bake for 15 minutes. Then, reduce the oven temperature to 350 degrees F and continue baking for an additional 35 to 40 minutes. The pie is done when a knife inserted 1 inch from the crust comes out clean.


5. **Cool and Serve**: Allow the pie to cool completely before serving. Garnish with a generous dollop of whipped cream for the perfect finishing touch.


### Difficulty Rating: 4/10


### Classification: Dessert


**A Nostalgic Family Memory:**


Every Thanksgiving, as the fragrant aroma of pumpkin pie wafted through the house, it signaled the beginning of the holiday season for our family. I vividly remember my grandmother standing in her cozy kitchen, wearing her favorite apron, which was always dusted with a faint layer of flour. She would hum softly to herself as she whisked the pumpkin filling, a melody that echoed the warmth and love she poured into every dish she made.


Gathered around the dining table, with the pie taking center stage, we would share stories of the past and dreams for the future, laughter punctuating our conversations. As dessert was served, my grandmother would always insist on adding an extra swirl of whipped cream to each slice, a gesture that made every piece feel special.


This Classic Pumpkin Pie recipe is not just a dessert; it's a cherished tradition, a slice of nostalgia that connects us to our roots and reminds us of the simple joys of life. Whether you're a seasoned baker or a novice in the kitchen, this recipe offers a delightful journey back to those heartwarming moments that define the spirit of family gatherings.


As you take your first bite, may it transport you to a place of warmth, love, and cherished memories. Happy baking!

Read more about Appetizers

Read more about Main Dishes

Read more about Desserts

Baked Cinnamon Apple Wedges | Made by Meaghan Moineau

Baked Cinnamon Apple Wedges | Made by Meaghan Moineau

**Title: A Warm Hug in Every Bite: Baked Cinnamon Apple Wedges**


**Description:** Dive into the nostalgic flavors of fall with our Baked Cinnamon Apple Wedges. This simple yet flavorful dessert is perfect for cozy gatherings or a comforting treat at home. With just four ingredients, this easy-to-make dish brings back cherished family memories while delighting your taste buds.


---


As autumn leaves begin to fall and a crisp breeze fills the air, my thoughts often drift back to cozy family gatherings. One of my fondest memories is of my grandmother bustling around her warm kitchen, the welcoming scent of cinnamon and nutmeg weaving through the house like a comforting embrace. She had a knack for turning the simplest ingredients into something magical, and her Baked Cinnamon Apple Wedges were no exception.


Every autumn, she would gather the freshest apples from the local orchard, their skins glistening in shades of red and green. I remember sitting at the kitchen table, my feet barely touching the floor, as she meticulously cut each apple into perfect wedges. She would then drizzle them with rich maple syrup, sprinkle them with aromatic cinnamon and nutmeg, and slide them into the oven. The anticipation was almost too much to bear, as the sweet and spicy aroma filled the room, wrapping us in its warmth.


Just ten minutes later, the apples emerged from the oven, golden brown and tender, ready to be savored. Each bite was like a warm hug, the flavors perfectly balanced and reminiscent of everything wonderful about the season. We would gather around the table, sharing stories and laughter, the simple act of enjoying these baked apple wedges creating memories that would last a lifetime.


Now, as I prepare this dish for my own family, I am reminded not only of my grandmother's love but also of the joy found in sharing these timeless recipes. The Baked Cinnamon Apple Wedges are more than just a dessert; they are a connection to the past, a celebration of the present, and a tradition I hope to pass on.


**Recipe: Baked Cinnamon Apple Wedges**


**Ingredients:**


- 1 apple


- 1 tablespoon maple syrup


- 1 teaspoon ground cinnamon


- 1/4 teaspoon ground nutmeg


**Instructions:**


1. Preheat your oven to 180 degrees Celsius (356 degrees Fahrenheit).


2. Cut the apple into approximately 10-12 wedges.


3. In a bowl, mix the apple wedges with maple syrup, cinnamon, and nutmeg until evenly coated.


4. Arrange the apple wedges in a single layer in a small baking dish or on a baking tray.


5. Bake in the preheated oven for 10 minutes, or until the apples are golden brown and cooked through.


6. Serve warm and enjoy the comforting flavors.


**Difficulty Rating:** 2/10


**Classification:** Dessert


Whether you're looking to recreate cherished family memories or simply indulge in a deliciously easy dessert, these Baked Cinnamon Apple Wedges are sure to delight. With their enticing aroma and comforting taste, they capture the essence of fall in every bite. So gather your loved ones, share a story or two, and enjoy this warm hug from the oven.

Read more about Appetizers

Read more about Main Dishes

Read more about Desserts

Vegetarian Bean and Pumpkin Chili | Made by Meaghan Moineau

Vegetarian Bean and Pumpkin Chili | Made by Meaghan Moineau

**Title: Warming Hearts and Souls: Vegetarian Bean and Pumpkin Chili**


**Description:** Dive into a pot of comfort with this Vegetarian Bean and Pumpkin Chili. Infused with rich spices and heartwarming flavors, this dish is perfect for those chilly nights when you need a little nostalgia and nourishment. A combination of savory beans and seasonal pumpkin makes this a wholesome main dish that's sure to please everyone. Easy to prepare and packed with nutrients, it's a must-try for any home cook looking to spice up their fall menu.


---


As the leaves begin to change and a crisp chill fills the air, there's nothing quite like gathering around the table with family to enjoy a hearty meal. This Vegetarian Bean and Pumpkin Chili holds a special place in our family's heart, reminding us of autumn nights spent together in the warmth of our kitchen.


**Ingredients:**


- Canned tomatoes


- Canned pumpkin puree


- Serrano chiles


- Chipotle chiles in adobo


- Vegetable stock


- Water


- Onion


- Garlic


- Cumin


- Cinnamon stick


- Ground coriander


- Salt


- Chili powder


- Several dashes of Tabasco


- Shredded cheese (for garnish)


- Cilantro (for garnish)


- Sour cream (for garnish)


- Rinsed beans (soaked overnight)


**Instructions:**


1. Begin by rinsing the beans thoroughly. It's best to soak them overnight to ensure they cook evenly and achieve the perfect tenderness.


2. After rinsing the beans again, place them in your slow cooker.


3. Add the canned tomatoes, pumpkin puree, serrano and chipotle chiles, vegetable stock, water, chopped onion, minced garlic, cumin, cinnamon stick, ground coriander, salt, chili powder, and a few dashes of Tabasco.


4. Stir everything together well, ensuring all ingredients are evenly distributed.


5. Set your slow cooker to low and let it work its magic for 8 hours, or until the beans reach your desired tenderness.


6. Taste and adjust the seasoning if necessary.


7. Serve your chili hot, topped with shredded cheese, fresh cilantro, and a dollop of sour cream for added richness.


**A Nostalgic Family Memory:**


This dish always takes me back to my grandmother's kitchen, where the aroma of spices would greet us at the door. She would prepare this chili on the first cool weekend of fall, a tradition that marked the changing seasons. As the slow cooker bubbled away, we would gather around the table, sharing stories and laughter, the warmth of the chili mirroring the love and togetherness we felt. The addition of pumpkin was her special touch, a nod to her love for seasonal ingredients and a way to make each bowlful feel like a celebration of autumn.


Even now, as I prepare this dish in my own kitchen, I can hear her voice guiding me through each step, her hands showing me how to stir with care. This chili is more than just a meal; it is a reminder of the bonds we share and the comforting embrace of family traditions.


**Difficulty Rating:** 3/10


**Classification:** Main Dish


Embrace the cozy flavors of fall with this Vegetarian Bean and Pumpkin Chili, a simple yet satisfying main dish that brings warmth to your table and heart. Whether you're a seasoned cook or a kitchen novice, this recipe is as easy to prepare as it is delightful to eat. Enjoy the taste of nostalgia with each spoonful, and let it remind you of cherished family moments around a shared meal.

Read more about Appetizers

Read more about Main Dishes

Read more about Desserts

Roasted Pumpkin and Barley Risotto | Made by Meaghan Moineau

Roasted Pumpkin and Barley Risotto | Made by Meaghan Moineau

# Cozy Autumn Nights: Savoring Roasted Pumpkin and Barley Risotto


## A Hearty Dish That Warms the Soul


### Description:


Experience the flavors of fall with our Roasted Pumpkin and Barley Risotto, a comforting main dish that combines the rich, earthy taste of roasted pumpkin with the nutty texture of barley. This recipe is not only a feast for the taste buds but also a nostalgic journey that brings back fond family memories. Rated 6 out of 10 in difficulty, it’s a rewarding culinary challenge fit for any home chef eager to create something special.


---


### Ingredients:


- 1 cup barley


- 2 tablespoons butter


- 4 cups chicken stock


- 1 teaspoon cumin powder


- 1 teaspoon dried thyme


- Fresh mint leaves for garnish


- 2 cloves of garlic, minced


- 1 small piece of ginger, grated


- 1 diced onion


- 1 teaspoon oregano


- 1 teaspoon pink peppercorns


- 2 cups pumpkin puree


- Salt and pepper to taste


- 1/2 cup sour cream


- 1 tablespoon Worcestershire sauce


### Instructions:


1. **Prepare the Pumpkin:**


- Preheat your oven to 400°F (200°C).


- Cut the pumpkin, removing the seeds and strings.


- Place the pumpkin halves cut side down in a baking dish with 1/4 inch of water.


- Bake for 45 minutes or until the flesh is soft and cooked through.


- Scoop out the cooked flesh and puree it with a splash of milk until smooth.


2. **Sauté and Season:**


- In a large skillet, melt the butter over medium heat.


- Add the diced onions and minced garlic, cooking until translucent.


- Stir in the barley, toasting lightly for about 2 minutes.


- Season with salt, pepper, cumin, thyme, and oregano.


3. **Cook the Risotto:**


- Add 2 cups of chicken stock to the skillet.


- Cook, stirring occasionally, until the liquid is nearly absorbed.


- Stir in the pumpkin puree.


- Gradually add the remaining stock, 1/2 cup at a time, allowing each addition to be absorbed before adding more.


- Continue to cook until the barley becomes creamy and tender.


4. **Finish and Serve:**


- Remove from heat and stir in the sour cream and Worcestershire sauce.


- Serve immediately, garnished with fresh mint leaves and a dollop of pumpkin-sour cream.


### A Trip Down Memory Lane


As the aroma of roasted pumpkin fills the kitchen, I am transported back to my grandmother's cozy house on chilly autumn evenings. She would prepare this comforting risotto with love, her hands skillfully working the ingredients into a symphony of flavors. The warmth of the dish, combined with the laughter and stories shared around the dinner table, made each meal a cherished memory. My grandmother always knew how to turn simple ingredients into a dish that not only nourished our bodies but also our souls. This Roasted Pumpkin and Barley Risotto is more than just a meal; it’s a reminder of family, love, and the beauty of home-cooked food.


---


### Conclusion:


Whether you're looking to impress guests or simply indulge in a cozy night in, this Roasted Pumpkin and Barley Risotto is the perfect main dish. With its blend of spices and creamy texture, it captures the essence of fall while offering a heartwarming nod to family traditions. Enjoy the process of creating this delightful dish and savor the memories it may bring to your table.

Read more about Appetizers

Read more about Main Dishes

Read more about Desserts

Maple & Curry Acorn Squash | Made by Meaghan Moineau

Maple & Curry Acorn Squash | Made by Meaghan Moineau

**Title: Savory Nostalgia: The Warm Embrace of Maple & Curry Acorn Squash**


**Description:** Dive into the comforting embrace of fall with our Maple & Curry Acorn Squash recipe. This delightful dish captures the essence of autumn with its fragrant spices and sweet maple undertones, making it a perfect addition to your seasonal menu. Rated 3/10 in difficulty, this dish is an ideal appetizer to start your culinary journey into the heart of cozy family gatherings.


---


As the leaves began to turn and the air took on a crisp edge, my family would often gather in the kitchen, enveloped by the aroma of spices and the promise of a meal that hinted at the changing seasons. One such dish that holds a special place in my heart is our Maple & Curry Acorn Squash. This recipe is not just a delightful blend of flavors but also a tapestry of cherished memories, woven together by the laughter and love of those family gatherings.


**Ingredients:**


- 1 acorn squash


- 1 tablespoon curry powder


- 2 tablespoons maple syrup


- 2 tablespoons olive oil


- 1 teaspoon salt


**Instructions:**


1. Preheat your oven to 400°F (200°C). Line a baking sheet with parchment paper or a silicone mat to prevent sticking.


2. Rinse the outside of the acorn squash thoroughly. Carefully chop it in half and remove the seeds, discarding them or saving them for roasting later. Trim off the stem and slice the squash into one-inch wedges, using the natural grooves as a guide for even thickness.


3. In a medium-sized bowl, combine the sliced acorn squash with curry powder, maple syrup, olive oil, and salt. Stir until the squash is well-coated with the mixture, ensuring every slice is infused with the flavorful blend.


4. Arrange the squash wedges in a single layer on the prepared baking sheet, cut side down. Bake in the preheated oven for about 15 minutes.


5. Flip the squash slices over to ensure both sides achieve a beautiful, caramelized brown. Continue baking for another 10 to 15 minutes, or until the squash is tender and can be easily pierced with a fork.


**A Family Memory:**


Every year, as autumn painted our little town in hues of gold and crimson, my grandmother would invite us over for what we affectionately called 'Squash Sundays'. The kitchen was her domain, a place where magic happened. I remember sitting on the high stool, watching her deft hands work through the ingredients, explaining each step with a twinkle in her eye.


The Maple & Curry Acorn Squash was always a centerpiece, its rich aroma wafting through the house, mingling with laughter and stories from days gone by. As we gathered around the table, this simple yet flavorful dish became a symbol of togetherness, a reminder that food has the power to not only nourish our bodies but also our souls.


**Difficulty Rating: 3/10**


**Classification: Appetizer**


This recipe, with its straightforward steps and minimal ingredients, is a testament to the beauty of simplicity. Whether you're a seasoned cook or a novice in the kitchen, the Maple & Curry Acorn Squash is sure to bring warmth and nostalgia to your table, inviting everyone to pause, savor, and reminisce.

Read more about Appetizers

Read more about Main Dishes

Read more about Desserts