Ancient Grains Bread | Made by Meaghan Moineau

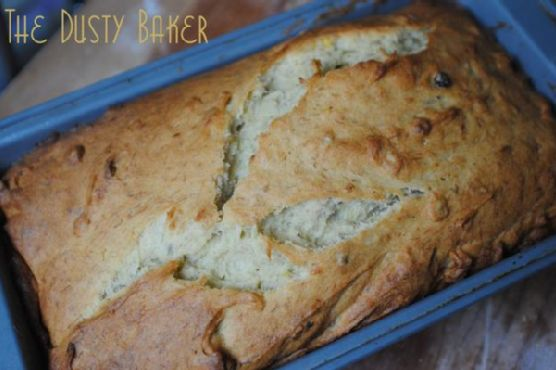
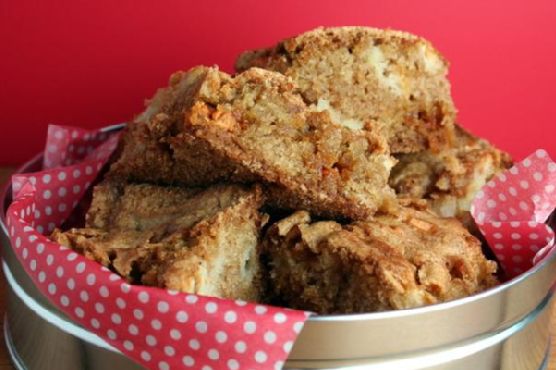
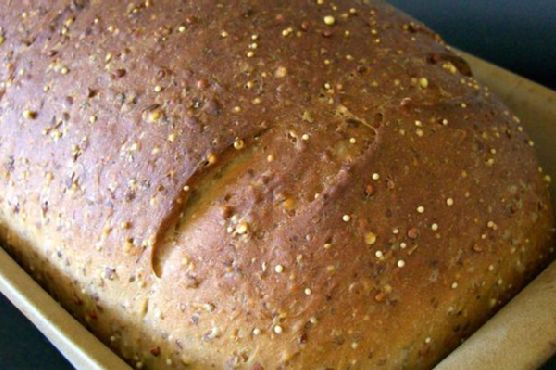
Ancient Grains Bread: A Taste of Tradition

Intro

There’s something incredibly comforting about the smell of freshly baked bread wafting through the house. It’s a scent that takes me back to my grandmother’s kitchen, where she would spend hours kneading dough by hand, humming softly to herself. Her bread was always a family favorite, packed with hearty grains and a touch of sweetness. Inspired by her timeless recipes, I’ve crafted this Ancient Grains Bread to bring a slice of that nostalgia to your own table. This bread, rich with history and flavor, combines the best of old-world grains with modern baking techniques for a loaf that is both wholesome and delicious.

Why You’ll Love It

This Ancient Grains Bread is not just a treat for the taste buds but also a wholesome addition to your diet. Packed with a variety of nutritious grains, this bread offers a delightful texture and a rich, earthy flavor. Each bite provides a satisfying chew, a hint of sweetness from the honey, and the comforting aroma of a well-baked loaf. Whether you’re making sandwiches, toast, or enjoying it plain with a pat of butter, this bread is versatile enough to complement any meal.

Ingredients

  • 2 teaspoons yeast
  • 2 cups all-purpose flour
  • 1 cup whole wheat flour
  • 1/4 cup rye flakes
  • 2 tablespoons ground flaxseed
  • 2 tablespoons amaranth grain
  • 2 tablespoons quinoa
  • 2 tablespoons soy flour
  • 1 tablespoon vital wheat gluten
  • 1/4 cup skim milk powder
  • 2 teaspoons salt
  • 1 1/2 cups warm water
  • 2 tablespoons honey

Instructions

  1. In a large bowl or stand mixer, whisk together the yeast, all-purpose flour, whole wheat flour, rye flakes, ground flaxseed, amaranth grain, quinoa, soy flour, vital wheat gluten, skim milk powder, and salt.
  2. Stir in the warm water and honey, mixing thoroughly to form a cohesive, fairly firm but workable dough.
  3. Turn the dough out onto a floured board or knead it with the dough hook for about 12 minutes until it becomes very elastic and smooth.
  4. Place the dough into a bowl, cover, and allow it to rest for 30 minutes.
  5. Roll the rested dough into a log shape and tuck it into a greased loaf pan.
  6. Cover the pan with a clean towel and allow the dough to rise for 50-60 minutes.
  7. Preheat your oven to 350°F (175°C).
  8. Slash the top of the loaf 2-3 times with a sharp knife or lame to allow the bread to expand properly in the oven.
  9. Bake the loaf for about 40 minutes until it is golden brown and sounds hollow when tapped on the bottom.
  10. Turn the bread out of the pan immediately and cool on a rack before slicing.

Tips

For the best results, make sure your water is warm, not hot, to activate the yeast without killing it. If you have time, let the dough rise in a warm, draft-free area. This will give the yeast the best environment to work its magic, resulting in a lighter loaf.

Variations & Substitutions

Feel free to experiment with this recipe by adding seeds like sunflower or pumpkin seeds for additional crunch and flavor. If you have dietary restrictions, you can substitute the honey with agave syrup or maple syrup. For a gluten-free version, replace the flours and vital wheat gluten with your favorite gluten-free blend, though be aware that the texture may vary.

Storage

Store your Ancient Grains Bread in an airtight container or wrapped in a clean kitchen towel at room temperature for up to 3 days. For longer storage, slice and freeze the bread, then toast slices directly from the freezer as needed.

FAQ

Can I make this recipe without a stand mixer?

Absolutely! While a stand mixer makes the process easier, you can knead the dough by hand. Just ensure you knead it long enough to achieve a smooth and elastic texture, which is key for a good rise.

What can I use if I don’t have rye flakes?

If you don’t have rye flakes on hand, you can substitute them with rolled oats or simply omit them from the recipe. The bread will still be delicious and hearty.

Nutrition

This bread is rich in fiber and protein thanks to the mix of ancient grains, making it a nutritious choice for your meals. Each slice provides a balance of carbohydrates, healthy fats, and plant-based proteins.

Conclusion

Baking this Ancient Grains Bread is like baking a piece of history. With each slice, you’ll enjoy a medley of flavors and textures that only ancient grains can offer. Whether you’re a seasoned baker or a newcomer to bread making, this recipe is straightforward and rewarding. Share it with loved ones and let it become a staple in your kitchen, just as it has in mine. Happy baking!

Related update: Ancient Grains Bread

Curious George’s Gluten-Free Banana Nut Bread | Made by Meaghan Moineau

Curious George’s Gluten-Free Banana Nut Bread

Intro

Welcome to my kitchen! Today, we’re diving into a recipe that’s as delightful as it sounds: Curious George’s Gluten-Free Banana Nut Bread. I remember as a child, curling up with a Curious George book while the warm, comforting aroma of banana bread wafted through the house. It’s one of those cherished memories that I hold dear. The smell, the taste, and the joy of a simple slice of banana bread brings such warmth and nostalgia. I’m thrilled to share this gluten-free version with you, perfect for those who need or choose to avoid gluten without sacrificing flavor or texture.

Why You’ll Love It

This banana nut bread is a game-changer for several reasons. First, it’s gluten-free, making it accessible to those with dietary restrictions while still being incredibly moist and flavorful. The combination of very browned bananas and a touch of lemon juice adds a tangy sweetness that’s simply irresistible. Plus, the ground walnuts offer a delightful crunch that compliments the soft, tender bread. Whether you’re enjoying it as a breakfast treat, a snack, or a dessert, this banana bread is sure to become a household favorite.

Ingredients

  • 1/4 cup shortening
  • 1/4 cup unsalted butter
  • 1 cup canned raw dried sugar
  • 3 very browned bananas, mashed
  • 1 tablespoon lemon juice
  • 2 large eggs
  • 2 cups gluten-free flour
  • 1 teaspoon baking powder
  • 1/2 teaspoon salt
  • 1 cup ground walnuts

Instructions

  1. Preheat your oven to 350°F (175°C). Grease a loaf pan and set aside.
  2. In a medium bowl, combine the gluten-free flour, baking powder, and salt. Set aside.
  3. In a large bowl, cream together the shortening, unsalted butter, and canned raw dried sugar until the mixture is light and fluffy.
  4. Add the mashed bananas, lemon juice, and eggs to the creamed mixture. Beat until all the ingredients are well incorporated.
  5. Gradually add the dry ingredients to the wet mixture, beating slowly until just combined.
  6. If using, spread the ground walnuts on a cookie sheet and toast in the oven for about 4 minutes, checking every minute, until they are slightly browned.
  7. Fold the toasted walnuts into the batter, stirring gently to distribute evenly.
  8. Pour the batter into the prepared loaf pan and flatten the top slightly with a spatula.
  9. Bake for 75 to 90 minutes or until the top is golden brown and the bread gives a little under your touch.
  10. Let the bread cool in the pan for about 10 minutes before transferring it to a wire rack to cool completely.

Tips

Here are some helpful tips to ensure your banana nut bread turns out perfectly every time:

  • Use very ripe bananas; the riper they are, the more natural sweetness they provide.
  • Check the bread around the 75-minute mark to avoid over-baking. A toothpick inserted in the center should come out clean.
  • Allow the bread to cool completely before slicing to prevent it from crumbling.

Variations & Substitutions

If you want to put your own twist on this classic recipe, consider these variations and substitutions:

  • Nut-Free Option: Omit the walnuts or replace them with chocolate chips for a sweet alternative.
  • Dairy-Free: Substitute the butter with a dairy-free alternative like coconut oil or a vegan butter spread.
  • Sugar Substitute: Use coconut sugar or a sugar substitute like erythritol for a lower glycemic index.

Storage

To keep your banana nut bread fresh, wrap it tightly in plastic wrap or store it in an airtight container. It can be kept at room temperature for up to 3 days. For longer storage, refrigerate it for up to a week or freeze it for up to 3 months. If freezing, slice the bread first for easy, single-serving portions.

FAQ

Can I use regular flour instead of gluten-free flour?

Yes, you can substitute regular all-purpose flour in equal amounts if you don’t need a gluten-free option. Just make sure to monitor the baking time, as it might vary slightly.

What can I use instead of butter?

If you’re looking for a dairy-free alternative, you can replace the butter with coconut oil or a vegan butter substitute. This will still give you a moist and delicious bread.

Nutrition

While I don’t have the exact nutrition breakdown for this recipe, it does contain healthy fats from walnuts and bananas, which are rich in potassium. Using a gluten-free flour blend ensures that those with gluten sensitivities can also enjoy a slice without concerns. As always, moderation is key!

Conclusion

There you have it—Curious George’s Gluten-Free Banana Nut Bread, a delightful and nostalgic treat that’s perfect for any occasion. Whether you’re enjoying a slice with a cup of coffee in the morning or as a cozy evening snack, this bread is sure to bring warmth and joy to your home. I hope this recipe becomes a beloved staple in your kitchen, just as it has in mine. Happy baking!

Related update: Curious George’s Gluten-Free Banana Nut Bread

Related update: Oven Roasted Pears With Blackberry Sauce

Related update: Chocolate Orange Madeleines

Related update: Butternut Squash Frittata

Triple Chocolate Whoppers | Made by Meaghan Moineau

Triple Chocolate Whoppers

Intro

There’s something magical about the aroma of freshly baked cookies wafting through the house, transporting us back to simpler times. My grandmother’s kitchen was a haven of warmth and delectable scents, and her Triple Chocolate Whoppers were the stars of many family gatherings. These cookies are an ode to those cherished memories, where the richness of chocolate intertwined with laughter and love. I recall sneaking into the kitchen, hoping to snag a warm cookie before they disappeared into the hands of eager family members. Now, I’m thrilled to share this recipe with you, ensuring that the legacy of these delightful treats continues to bring joy and sweetness to your home.

Why You’ll Love It

This recipe is a chocolate lover’s dream come true! The combination of semisweet baking chocolate, unsweetened chocolate chunks, and semisweet chocolate chips offers a deep and satisfying chocolate flavor that is hard to resist. The added espresso powder enhances the chocolate’s richness, while the pecans and walnuts provide a delightful crunch. These cookies are both gooey and chewy, with a perfect balance of sweet and savory. Perfect for any occasion, they are sure to impress your friends and family.

Ingredients

  • 4 ounces semisweet baking chocolate
  • 1 teaspoon baking powder
  • 1 cup brown sugar
  • 4 ounces unsweetened chocolate, chopped into chunks
  • 2 large eggs
  • 2 teaspoons espresso powder
  • 1/2 cup chopped pecans
  • 1/2 teaspoon sea salt
  • 1 cup semisweet chocolate chips
  • 3/4 cup unbleached all-purpose flour
  • 1/4 cup unsalted butter
  • 1 teaspoon vanilla extract
  • 1/2 cup chopped walnuts

Instructions

  1. Preheat your oven to 325 degrees F (163 degrees C). Lightly grease two baking sheets and set them aside.
  2. In a double boiler, combine the semisweet chocolate, unsweetened chocolate chunks, and butter. Melt the chocolate over low heat, stirring occasionally until just melted. Be careful not to burn the chocolate. Remove from heat and stir to blend the butter and chocolate. Set aside.
  3. In a large bowl, combine the eggs, espresso powder, and vanilla extract. Cream together using an electric mixer. Add the brown sugar and mix until creamy.
  4. In a separate bowl, sift together the flour, baking powder, and sea salt. Set aside.
  5. Add the melted chocolate and butter to the egg mixture and blend together using an electric mixer.
  6. Gently stir in the flour mixture by hand just until the dry ingredients are moist.
  7. Fold in the chopped nuts and chocolate chips into the dough gently. Note that the dough will be relatively soft.
  8. Drop large tablespoonfuls of the dough onto the greased baking sheets, leaving at least 3 inches of space between them. For uniform cookies, use a 2 oz. cookie or ice cream scoop.
  9. Bake immediately to prevent the chocolate from hardening, for 10 to 12 minutes. Rotate the pan halfway through the baking time. The cookies will still be very soft and sticky inside, but do not overcook them; they should remain chewy.
  10. Cool the cookies for 10 minutes on the baking sheets before gently transferring them to a baking rack to cool completely.

Tips

To achieve the best results, use high-quality chocolate for a richer flavor. If possible, allow the eggs and butter to reach room temperature before mixing; this helps in achieving a smooth batter. Be cautious not to over-mix the dough once the flour is added, as this can make the cookies tough. Finally, ensure that the cookies have enough space in between them on the baking sheet to spread evenly.

Variations & Substitutions

Feel free to get creative with these cookies! Substitute the pecans and walnuts with your favorite nuts or omit them altogether if you prefer a nut-free version. For an extra kick, consider adding a pinch of cayenne pepper to the dough. If you’re a fan of white chocolate, replace some of the semisweet chocolate chips with white chocolate chips for a delightful twist. For a gluten-free option, use a 1:1 gluten-free flour blend in place of the all-purpose flour.

Storage

Store your Triple Chocolate Whoppers in an airtight container, separating the layers with wax paper to prevent them from sticking together. They will stay fresh at room temperature for up to a week. For longer storage, freeze the cookies for up to three months. Thaw at room temperature before serving for best results.

FAQ

Can I use regular coffee instead of espresso powder?

While espresso powder intensifies the chocolate flavor, you can substitute it with instant coffee granules. The result will be similar, although the coffee flavor might be slightly less pronounced.

Can I make the dough ahead of time?

Yes, you can prepare the dough ahead of time. Store it in the refrigerator for up to two days. When you’re ready to bake, let the dough sit at room temperature for a few minutes before scooping and baking as directed.

What can I do if I don’t have a double boiler?

If you don’t have a double boiler, you can use a heatproof bowl set over a pot of simmering water, ensuring the bowl does not touch the water. Alternatively, you can melt the chocolate and butter in the microwave, stirring every 15-20 seconds to prevent burning.

Nutrition

Each cookie contains approximately 250 calories, 14g of fat, 30g of carbohydrates, 4g of protein, and 18g of sugar. Please note that these values are estimates and may vary based on specific ingredients used.

Conclusion

These Triple Chocolate Whoppers are a testament to timeless recipes that bring joy to every occasion. The rich chocolate flavor, combined with the perfect chewy texture, makes these cookies irresistible. Whether you’re baking for a family gathering, a special occasion, or simply because you’re craving something sweet, these cookies are sure to delight. I hope they bring as much happiness to your home as they have to mine. Happy baking!

Related update: Triple Chocolate Whoppers

Related update: Dulce De Leche Cheesecake

Related update: Cinnamon & Sugar Roasted Chickpeas

Dulce De Leche Cheesecake | Made by Meaghan Moineau

Dulce De Leche Cheesecake

Intro

There’s something magical about the moment when you take your first bite of a perfectly crafted cheesecake. For me, it brings back memories of sitting in my grandmother’s cozy kitchen, watching her create the most delightful desserts with her loving touch. Her signature Dulce De Leche Cheesecake was always a family favorite, and I’m thrilled to share this cherished recipe with you. It’s a creamy, indulgent treat that will transport you to a place of warmth and sweetness.

Why You’ll Love It

This Dulce De Leche Cheesecake is the epitome of comfort and indulgence. The rich, creamy texture paired with the sweet, caramel-like flavor of dulce de leche creates an irresistible dessert experience. Whether you’re serving it at a dinner party or enjoying a slice with your afternoon coffee, this cheesecake is sure to impress.

  • The combination of almond cookie crust and luscious filling is a match made in heaven.
  • It’s a make-ahead dessert, perfect for entertaining or a special occasion.
  • The recipe is straightforward, making it accessible even for novice bakers.
  • Each bite offers a perfect balance of sweetness and tanginess, thanks to a hint of lemon.

Ingredients

  • 200g almond cookies, crushed
  • 2 tablespoons cornstarch
  • 400g Philadelphia balance cream cheese
  • 1 cup dulce de leche
  • 3 large eggs
  • 1 tablespoon lemon juice
  • 1 teaspoon lemon zest
  • 1/4 teaspoon salt
  • 1/2 cup sugar
  • 100g unsalted butter, melted
  • 1/2 cup plain yogurt

Instructions

  1. Preheat your oven to 165°C (330°F) and grease a 24cm springform pan.
  2. In a mixing bowl, toss the crushed almond cookies with the melted butter until well combined. Reserve 1 tablespoon of the mixture for the topping.
  3. Press the remaining mixture into the bottom and 3cm up the sides of the prepared springform pan. Chill in the refrigerator until ready to use.
  4. In a large mixing bowl, beat the cream cheese and sugar with an electric mixer on medium speed until smooth and creamy.
  5. Add the yogurt and eggs, one at a time, beating until just blended after each addition.
  6. Stir in the cornstarch, dulce de leche, lemon juice, and zest until everything is well combined.
  7. Pour the cream cheese mixture into the prepared crust, smoothing the top with a spatula.
  8. Sprinkle the reserved cookie crumbs over the top of the cheesecake.
  9. Place the cheesecake in a larger baking pan and fill the outer pan with hot water, about halfway up the side of the springform pan, to create a water bath.
  10. Bake for 65 minutes or until the edges are set but the center still jiggles slightly.
  11. Turn the oven off and leave the cheesecake in the oven with the door ajar for 1 hour to cool gradually.
  12. Remove the cheesecake from the oven and let it cool completely on a wire rack.
  13. Chill the cheesecake in the refrigerator for at least 4 hours or overnight until firm.

Tips

  • Ensure all ingredients are at room temperature for a smoother batter.
  • To prevent cracks, avoid overmixing the batter and ensure a gradual cooling process.
  • Use a water bath to maintain even baking and prevent the cheesecake from drying out.

Variations & Substitutions

  • Crust: Substitute almond cookies with graham crackers or digestive biscuits for a different flavor.
  • Dulce De Leche: Swap with caramel sauce if preferred, but note that the flavor profile will change slightly.
  • Yogurt: Greek yogurt or sour cream can be used as substitutes for a creamier texture.

Storage

Store any leftover cheesecake in the refrigerator, covered, for up to 5 days. For longer storage, wrap individual slices tightly in plastic wrap and place them in an airtight container in the freezer for up to 2 months. Thaw in the refrigerator before serving.

FAQ

Can I make this cheesecake ahead of time?

Absolutely! This cheesecake is perfect for making ahead. Prepare and chill it the day before serving to allow the flavors to meld beautifully.

What is the best way to slice the cheesecake?

To achieve clean slices, use a sharp knife dipped in hot water and wiped dry between cuts. This prevents the filling from sticking to the knife.

How can I tell when the cheesecake is done baking?

The cheesecake is done when the edges are set, and the center jiggles slightly when gently shaken. It will continue to firm up as it cools.

Nutrition

Each serving of Dulce De Leche Cheesecake offers a delightful combination of flavors with approximately 420 calories, 25g fat, 40g carbohydrates, and 8g protein. Enjoy this treat in moderation as part of a balanced diet.

Conclusion

This Dulce De Leche Cheesecake is more than just a dessert; it’s a piece of nostalgia and a testament to the joy of sharing sweet moments with loved ones. Whether you’re a seasoned baker or trying your hand at cheesecake for the first time, this recipe promises to deliver a delightful experience with every bite. Serve it with love, and watch as it becomes a cherished favorite in your home, just as it has in mine. Enjoy!

Related update: Dulce De Leche Cheesecake

Related update: Creamsicle Cookies

Vanilla Cream Cakes, Easy and Fluffy Holiday Cakes | Made by Meaghan Moineau

Vanilla Cream Cakes: Easy and Fluffy Holiday Treats

Intro

There’s something magical about the holiday season that awakens the inner child in all of us. It’s a time when the air is filled with the sweet aroma of baked goods, and the kitchen becomes the heart of the home. Growing up, I remember my grandmother’s kitchen as a warm haven, especially during the holidays. She would bake her famous vanilla cream cakes, and the entire family would gather around the table, eagerly awaiting the first bite. These cakes were not just desserts; they were a symbol of love, warmth, and togetherness. Inspired by those cherished memories, I’m thrilled to share a recipe that brings a modern twist to my grandmother’s classic vanilla cream cakes. These fluffy, easy-to-make delights are perfect for any holiday gathering.

Why You’ll Love It

This recipe is a delightful combination of simplicity and indulgence. The vanilla cream cakes are light, fluffy, and melt in your mouth. They are perfect for those who want to enjoy a sweet treat without spending hours in the kitchen. The use of puff pastry not only simplifies the process but also adds a crisp, buttery texture that complements the creamy filling beautifully. Whether you’re hosting a holiday party or simply want to treat your family to something special, these cakes are sure to impress.

Ingredients

  • 500g puff pastry
  • 6 eggs
  • 200g sugar
  • 1 tablespoon rum
  • 6 liters whole milk
  • 1 packet vanilla sugar
  • 200g all-purpose flour
  • 250g heavy whipping cream
  • Powdered sugar for dusting

Instructions

  1. Preheat your oven to 200°C (390°F). Prepare a baking dish approximately 14 inches long, 10 inches wide, and 3.2 inches deep.
  2. Roll the puff pastry thinly to fit the size of your baking dish. You’ll need half for the bottom layer and half for the top layer of the cakes.
  3. Bake the pastry for 10-15 minutes until it turns golden brown. Allow the top layer to cool completely and leave the bottom layer in the baking dish.
  4. Separate the egg yolks from the whites, placing the whites in a large bowl.
  5. In a smaller bowl, combine egg yolks with sugar, vanilla sugar, and rum. Mix for 1-2 minutes, then add flour and 1/4 of the milk, mixing until smooth.
  6. Beat the egg whites until they reach a firm consistency. Gradually add sugar and continue beating until very firm.
  7. In a large pot, bring the remaining milk to a boil. Slowly add the egg yolk mixture, whisking constantly, and cook for 5 minutes until thick.
  8. Remove from heat and gradually pour the hot mixture into the egg whites, whisking constantly to achieve a thick consistency.
  9. Pour the mixture over the bottom layer of pastry in the baking dish, ensuring it fills every corner. Allow it to cool, preferably overnight in the refrigerator.
  10. Beat the heavy whipping cream with sugar until it forms stiff peaks. Spread over the cooled mixture.
  11. Cut the cooled top layer of pastry into 15 squares and place them on the whipped cream layer.
  12. Before serving, cut the cake into squares and dust with powdered sugar.

Tips

To ensure the perfect texture, make sure your egg whites are beaten to a very firm consistency. When combining the hot mixture with the egg whites, working with a partner can make the process easier. Don’t rush this step; it’s crucial for achieving the right consistency.

Variations & Substitutions

For a different flavor profile, consider adding a hint of almond extract to the creamy filling. You can also substitute the rum with an equal amount of your favorite liqueur or omit it entirely for a non-alcoholic version. If you’re looking for a gluten-free option, try using gluten-free puff pastry and flour.

Storage

These vanilla cream cakes are best enjoyed fresh but can be stored in an airtight container in the refrigerator for up to three days. The puff pastry may lose some of its crispness over time, but the flavors will remain delightful.

FAQ

Can I make these cakes in advance?

Yes, you can prepare the cake up to the whipped cream layer and store it in the refrigerator overnight. Add the top pastry layer and dust with powdered sugar just before serving.

What if I don’t have vanilla sugar?

If you don’t have vanilla sugar on hand, you can substitute it with an equal amount of regular sugar and add a teaspoon of vanilla extract to the egg yolk mixture.

Can I use a different type of milk?

Whole milk is recommended for the best texture and flavor, but you can use 2% milk if needed. Avoid using skim milk as it may not provide the desired creaminess.

Nutrition

Each serving of vanilla cream cake is rich in flavor and provides a delightful balance of carbohydrates, fats, and proteins. While these cakes are a treat, it’s important to enjoy them in moderation, especially if you’re mindful of your calorie intake during the holiday season.

Conclusion

Vanilla cream cakes are a wonderful way to bring a touch of nostalgia and warmth to your holiday celebrations. With their easy preparation and delightful taste, they are sure to become a favorite in your family, just as they were in mine. I hope this recipe brings you as much joy and togetherness as it has brought to my family over the years. Happy baking and happy holidays!

Related update: Vanilla Cream Cakes, Easy and Fluffy Holiday Cakes

Related update: Ginger Molasses Rounds

Wild Blueberry Lemon Muffins | Made by Meaghan Moineau

Wild Blueberry Lemon Muffins

Intro

There’s something inexplicably comforting about the aroma of freshly baked muffins wafting through the house. It takes me back to Sunday mornings in my grandmother’s cozy kitchen, where the sun would gently stream through the lace curtains, casting delicate patterns on the worn wooden table. Those mornings were filled with the chatter of family and the irresistible scent of golden-brown muffins cooling on the counter. Today, I’m thrilled to share a recipe that captures that warmth and nostalgia: Wild Blueberry Lemon Muffins. These muffins combine the tartness of lemons with the sweet burst of wild blueberries, creating a delightful treat that’s perfect for breakfast, brunch, or any moment in between.

Why You’ll Love It

These Wild Blueberry Lemon Muffins are the embodiment of simple pleasures. Each bite offers a perfect balance of sweetness and tartness, with the wild blueberries providing juicy pops of flavor. The muffins are moist, tender, and crowned with a tangy lemon glaze that elevates them from ordinary to extraordinary. Whether you’re hosting a brunch or looking for a delightful weekday breakfast, these muffins are sure to impress. Plus, they’re incredibly easy to make, requiring just a few staple ingredients and minimal effort.

Ingredients

  • 2 cups all-purpose flour
  • 2 teaspoons baking powder
  • 1/4 teaspoon salt
  • 1/2 cup unsalted butter, softened
  • 1 cup granulated sugar, plus 1/8 cup for lemon zest
  • 1 large egg
  • 1 cup buttermilk
  • 1 teaspoon vanilla extract
  • 1 tablespoon fresh lemon juice
  • 1 tablespoon lemon zest
  • 1 cup canned wild blueberries, drained
  • 1 cup powdered sugar

Instructions

  1. Preheat your oven to 375°F (190°C). Line 16 muffin cups with paper liners.
  2. Mash 1/8 cup of sugar with the lemon zest in a small bowl until the sugar is moistened and fragrant.
  3. In a medium-sized bowl, whisk together the flour, baking powder, and salt. Set aside.
  4. Using an electric mixer, beat 1 cup of sugar and the softened butter together in a large bowl until light and fluffy.
  5. Add the egg to the butter mixture, beating well after each addition.
  6. Mix in the buttermilk, vanilla extract, and lemon sugar gradually, ensuring each ingredient is fully incorporated.
  7. Slowly add the flour mixture to the wet ingredients, mixing until the batter is smooth and free of lumps.
  8. Fold in the wild blueberries gently with a large spatula, being careful not to crush them.
  9. Divide the batter equally among the prepared muffin tins, filling each about 3/4 full.
  10. Bake for about 35 minutes, or until a cake tester inserted into the center of a muffin comes out clean.
  11. Allow the muffins to cool in the pan for a few minutes before transferring them to a wire rack.
  12. Prepare the lemon glaze by combining the lemon juice, remaining lemon zest, and powdered sugar in a small bowl.
  13. Spoon about 1 tablespoon of glaze over each muffin, letting it drip down the sides.

Tips

For the best muffins, ensure your butter is at room temperature before you start. This allows it to incorporate more air, resulting in fluffier muffins. Also, when folding in the blueberries, do so gently to avoid breaking them and turning your batter purple. Finally, don’t skip the glaze—it’s what ties everything together with a delightful zing!

Variations & Substitutions

If you can’t find canned wild blueberries, fresh or frozen ones will work just as well. Just make sure to pat them dry if using frozen to avoid excess moisture. For a dairy-free version, substitute the buttermilk with almond milk mixed with a splash of lemon juice. You can also try adding a handful of chopped nuts, like almonds or walnuts, for some extra texture.

Storage

These muffins are best enjoyed fresh, but they can be stored in an airtight container at room temperature for up to three days. If you want to keep them longer, they freeze beautifully. Just wrap each muffin individually in plastic wrap and place them in a resealable plastic bag. They can be frozen for up to two months. To enjoy, simply thaw at room temperature or warm them in the oven for a few minutes.

FAQ

Can I use regular blueberries instead of wild blueberries?

Absolutely! Regular blueberries can be used as a substitute if wild blueberries aren’t available. Keep in mind that wild blueberries tend to be smaller and more intensely flavored, so you might notice a slight difference in taste and texture with regular blueberries.

How can I make my muffins rise higher?

To achieve higher rising muffins, make sure your baking powder is fresh. Additionally, starting with a higher oven temperature for the first 5 minutes of baking can create a burst of steam, which helps the muffins rise. Then, reduce the temperature to the specified 375°F for the remainder of the baking time.

Can I make these muffins gluten-free?

Yes, you can make these muffins gluten-free by using a gluten-free all-purpose flour blend. Ensure the blend contains xanthan gum or a similar binding agent, which helps mimic the texture of traditional flour.

Nutrition

Each muffin is approximately 210 calories, with 8g of fat, 32g of carbohydrates, and 2g of protein. The nutritional content can vary slightly based on ingredient brands and portion sizes.

Conclusion

These Wild Blueberry Lemon Muffins are more than just a treat; they’re a little piece of nostalgia wrapped in a paper liner. With their sunny lemon flavor and sweet blueberries, they’re sure to brighten any day. Whether you enjoy them with a cup of tea or as a grab-and-go breakfast, these muffins are a delightful reminder of the simple joys in life. I hope this recipe brings as much joy to your kitchen as it has to mine. Happy baking!

Related update: Wild Blueberry Lemon Muffins

Baked Caramel Custard | Made by Meaghan Moineau

Baked Caramel Custard: A Sweet Journey Back in Time

Intro

There’s something magical about the aroma of caramel wafting through the kitchen. It transports me back to my grandmother’s cozy home, where weekends were filled with warmth and the promise of something sweet baking in the oven. Her Baked Caramel Custard was a family favorite, a simple yet elegant dessert that graced our table on special occasions and ordinary days alike. Each spoonful was a creamy, dreamy reminder of home, love, and the art of simple cooking. Today, I invite you to join me on this nostalgic journey and create your own sweet memories with this timeless recipe.

Why You’ll Love It

This Baked Caramel Custard is a delightful dessert that blends the rich, buttery flavor of caramel with the smoothness of custard. It’s not only a treat for the palate but also a feast for the eyes with its glossy, amber top. This recipe is perfect for those who appreciate simple ingredients coming together to create something extraordinary. Whether you’re new to custard-making or a seasoned pro, this recipe is easy to follow and promises a dessert that’s as satisfying to make as it is to eat.

Ingredients

  • Egg substitute
  • 1 egg yolk
  • Evaporated skim milk
  • Port wine
  • Skim milk
  • Sugar plus
  • Sugar
  • Vanilla

Instructions

  1. Preheat the oven to 350°F (175°C).
  2. Scald the evaporated skim milk and skim milk together in a heavy saucepan. Remove from heat and set aside.
  3. In a skillet over medium heat, caramelize the sugar until it melts and turns a golden brown.
  4. Slowly add the milk mixture to the caramelized sugar, stirring constantly until the sugar dissolves completely.
  5. In a medium bowl, beat the egg substitute and egg yolk together until lemon-colored.
  6. Add the milk mixture, port wine, and vanilla to the eggs, stirring well to combine.
  7. Pour the custard mixture into 6 custard cups and place them in a baking dish.
  8. Add boiling water to the baking dish, ensuring the water reaches halfway up the sides of the cups.
  9. Bake in the preheated oven for 35 to 40 minutes, or until the custards are set.
  10. Remove the custard cups from the oven and chill completely in the refrigerator.
  11. Once chilled, place a dessert plate on top of each custard cup and invert to serve.

Tips

For the perfect caramel, keep a close eye on the sugar as it melts. It can go from golden to burnt very quickly, so be ready to remove it from the heat as soon as it reaches the desired color. Additionally, when adding the milk to the caramel, pour slowly to avoid splattering and ensure a smooth mixture.

Variations & Substitutions

If you’re looking to adapt this recipe, consider using almond milk in place of skim milk for a nutty flavor. For a boozy twist, swap out the port wine for a favorite liqueur. You can also add a pinch of sea salt to the caramel for a salted caramel version that balances sweet with savory.

Storage

Store any leftover custard in the refrigerator, covered, for up to three days. This dessert is best enjoyed chilled, so feel free to prepare it a day in advance for a fuss-free treat.

FAQ

Can I make this custard without the egg substitute?

Yes, you can replace the egg substitute with an additional egg yolk if you prefer a richer custard.

How do I know when the custard is set?

The custard is set when it jiggles slightly in the center but is firm around the edges. A knife inserted into the center should come out clean.

Nutrition

This recipe yields six servings, with each serving being approximately 1/2 cup. While specific nutritional values will vary depending on ingredient brands and substitutions, this custard is generally lower in fat due to the use of skim milk and egg substitutes. It’s a delightful indulgence that can fit into a balanced diet.

Conclusion

Baked Caramel Custard is more than just a dessert; it’s a comforting reminder of simpler times and the joy of creating something special from everyday ingredients. Whether you’re making it for a family gathering or a quiet night in, this recipe is sure to delight and impress. So grab your apron, preheat the oven, and let the sweet journey begin!

Related update: Baked Caramel Custard

Related update: Gluten Free Profiteroles

Related update: Wild Blueberry Lemon Muffins

Smoked Salmon and Mascarpone Calzone | Made by Meaghan Moineau

Smoked Salmon and Mascarpone Calzone

Intro

There’s something truly magical about the aroma of freshly baked calzones wafting through the kitchen. It instantly transports me back to my childhood, where Sunday afternoons were reserved for family cooking sessions. My grandmother, with her deft hands and infectious laughter, would guide us through the art of making the perfect calzone, each one stuffed with her secret ingredient—love. Today, I’m sharing a modern twist on this nostalgic favorite: the Smoked Salmon and Mascarpone Calzone. It’s a delightful fusion of creamy mascarpone, savory smoked salmon, and the delicate flavor of fresh chives and leeks, all encased in a perfectly golden crust.

Why You’ll Love It

This Smoked Salmon and Mascarpone Calzone is not just a dish; it’s an experience. Whether you’re a fan of traditional Italian cuisine or looking to try something new, this recipe offers a unique blend of flavors and textures that will captivate your taste buds. The richness of the mascarpone complements the smokiness of the salmon perfectly, while the leeks add a subtle sweetness that ties everything together. Plus, making calzones is a fun activity for the whole family, reminiscent of those cherished childhood memories.

Ingredients

  • Black pepper
  • Egg white
  • Extra virgin olive oil
  • Fresh chives
  • Kosher salt
  • Leek
  • Mascarpone
  • Pizza dough
  • Smoked salmon

Instructions

  1. Preheat your oven to 450°F and place the top rack in the lower third of your oven. Line a baking sheet with parchment paper for easier cleanup.
  2. Wash and pat dry the leek. Slice the leek lengthwise, then cut each half into long, very thin strips. Cut the strips into short pieces, about 2 inches long. Set aside.
  3. Divide the dough into two equal parts, and roll out each into a 10-inch circle. Gently spread a thin layer of mascarpone on the surface of the dough, leaving at least a 1-inch crust.
  4. In a small bowl, break up the smoked salmon using your fingers until it is fluffy. You want the filling of the calzone to be pretty even, or it will fall apart as you eat it.
  5. Divide the salmon between the two crusts, arranging it only on one side of the crust (in a half-moon shape), again leaving at least a 1-inch crust. Sprinkle the chives and leeks over the salmon, then lightly salt and pepper. Finally, drizzle with about 1 tsp of olive oil.
  6. Fold each calzone in half, making sure that the crusts line up. Using the tines of a fork, gently press down the edge all the way around the rounded side of the calzone to seal it. Make sure you get a tight seal; this will help the calzone puff up during baking.
  7. Brush the tops of each calzone with egg white. Bake at 450°F for about 15 minutes, or until golden brown and delicious.

Tips

Here are a few tips to ensure your calzones turn out perfectly:

  • Make sure your oven is fully preheated before baking to achieve the best crust.
  • If you’re short on time, store-bought pizza dough works just as well as homemade.
  • Ensure the seal is tight to prevent any filling from leaking out during baking.

Variations & Substitutions

This recipe is wonderfully versatile. Here are some variations and substitutions you can try:

  • Swap the smoked salmon for smoked trout or cooked shrimp for a different seafood twist.
  • Replace mascarpone with cream cheese for a tangier flavor.
  • Add capers or dill for an extra burst of flavor.

Storage

To store your calzones, allow them to cool completely, then wrap them tightly in foil or place them in an airtight container. They can be refrigerated for up to 3 days. To reheat, simply place them in an oven preheated to 350°F for 10-12 minutes or until warmed through.

FAQ

Can I make the calzone dough ahead of time?

Yes, you can make the dough ahead of time. Simply prepare the dough according to your recipe, then wrap it tightly in plastic wrap and store it in the refrigerator for up to 24 hours. Allow it to come to room temperature before rolling it out.

What can I serve with these calzones?

These calzones pair beautifully with a fresh green salad or a side of roasted vegetables. You can also serve them with a simple tomato sauce or a lemon-dill sauce for dipping.

Nutrition

While the exact nutritional content may vary depending on the specific brands and quantities used, each calzone is a good source of protein and healthy fats, thanks to the smoked salmon and mascarpone. For those watching their sodium intake, you may wish to use less kosher salt.

Conclusion

The Smoked Salmon and Mascarpone Calzone is more than just a meal; it’s a touchstone to cherished memories and a versatile recipe that can be adapted to suit any palate. Whether you’re making it for a special occasion or a casual family dinner, this calzone promises to deliver warmth, comfort, and plenty of flavor. Gather your loved ones, roll up your sleeves, and enjoy the delightful experience of making and sharing this delicious dish.

Related update: Smoked Salmon and Mascarpone Calzone

Cheesy Potato Corn Scones | Made by Meaghan Moineau

Cheesy Potato Corn Scones

Intro

There’s something undeniably comforting about the aroma of freshly baked scones wafting through the kitchen. It instantly takes me back to my grandmother’s cozy farmhouse, where every Sunday morning, she would whip up a batch of her famous scones. Her secret ingredient? Love, of course, but also a touch of creativity that transformed simple ingredients into something extraordinary. Today, I’m sharing a delightful twist on the classic scone recipe—Cheesy Potato Corn Scones. This recipe captures the essence of those cherished mornings with a modern, cheesy twist that will have you reaching for seconds.

Why You’ll Love It

These Cheesy Potato Corn Scones are a perfect blend of savory flavors and soft textures, making them an irresistible treat for any occasion. Whether you’re hosting a brunch, looking for a satisfying snack, or simply want to enjoy a warm, cheesy delight, these scones have got you covered. The addition of potato flakes gives them a unique lightness, while the cheddar cheese and cornmeal provide a rich, hearty flavor. Plus, they’re easy to make and guaranteed to impress your family and friends!

Ingredients

  • 1 cup water
  • 1/2 cup potato flakes
  • 1/3 cup diced unsalted butter
  • 1 1/2 cups all-purpose flour
  • 1/2 cup yellow cornmeal
  • 1 cup shredded cheddar cheese, divided
  • 1 tablespoon baking powder
  • 1 teaspoon salt
  • 1 tablespoon poppy seeds
  • 3/4 cup milk

Instructions

  1. Preheat your oven to 400°F (200°C). Lightly grease a baking sheet and set aside.
  2. In a small saucepan, bring the water just to a simmer; remove from heat.
  3. Stir in the potato flakes until they are moistened.
  4. Add the diced butter to the potato mixture and stir until it is fully incorporated.
  5. In a large bowl, combine the flour, cornmeal, 3/4 cup of the cheddar cheese, baking powder, salt, and poppy seeds.
  6. Stir in the potato mixture and milk until just combined.
  7. With floured hands, gently knead and fold the dough for five to six strokes, or until it comes together in one mass.
  8. Pat the dough lightly to flatten it into a 9-inch circle on the prepared baking sheet.
  9. Using a pizza cutter or a floured knife, cut the dough into eight wedges (do not separate).
  10. Sprinkle the edges with the remaining cheese.
  11. Bake in the preheated oven for about 25 minutes or until lightly browned.
  12. Gently pull or cut the scones to separate. Serve warm and enjoy!

Tips

For the best results, use cold butter and work quickly to keep it from melting before baking. If you notice the dough is too sticky while kneading, feel free to add a little more flour, a tablespoon at a time. Additionally, using freshly grated cheddar cheese will enhance the flavor and melt beautifully in the scones.

Variations & Substitutions

If you want to experiment with flavors, consider adding chopped fresh herbs like chives or rosemary to the dough. For a spicy kick, try mixing in some diced jalapeños. If you’re looking for a gluten-free option, substitute the all-purpose flour with a 1:1 gluten-free flour blend. You can also use any other type of cheese you prefer, such as mozzarella or gouda, to change up the taste.

Storage

These scones are best enjoyed fresh out of the oven, but they can be stored in an airtight container at room temperature for up to two days. To reheat, simply place them in a 350°F (175°C) oven for 5-10 minutes. For longer storage, freeze the scones in a single layer and then transfer them to a resealable freezer bag. They can be reheated straight from the freezer in the oven at 350°F (175°C) for about 15 minutes.

FAQ

Can I make the dough ahead of time?

Yes, you can prepare the dough up to a day in advance. Wrap it tightly in plastic wrap and store it in the refrigerator. When you’re ready to bake, simply shape, cut, and bake the scones as instructed.

Can I use real potatoes instead of potato flakes?

While potato flakes are convenient and help create a fluffy texture, you can use mashed potatoes as a substitute. Just ensure they are smooth and not too wet, and adjust the flour accordingly if the dough becomes too sticky.

Nutrition

Each serving of these Cheesy Potato Corn Scones is approximately 220 calories, with 12g of fat, 22g of carbohydrates, and 6g of protein. They are a delightful indulgence, offering a comforting balance of flavors and textures.

Conclusion

These Cheesy Potato Corn Scones are a testament to the magic that happens when simple ingredients come together with a touch of love and creativity. Whether you’re savoring them with a morning coffee, serving them at a brunch gathering, or enjoying them as a cozy snack, they are sure to bring warmth and joy to your table. I hope this recipe becomes a cherished addition to your collection, just as it has in mine. Happy baking!

Related update: Cheesy Potato Corn Scones

Apple Pie Bars | Made by Meaghan Moineau

Apple Pie Bars | Made by Meaghan Moineau

Title: Apple Pie Bars: A Nostalgic Twist on a Timeless Classic
Description: Dive into the heartwarming world of Apple Pie Bars, where the comforting flavors of spiced apples meet the delightful crunch of butterscotch chips. Perfect as a dessert, this recipe is not just about satisfying your sweet tooth; it's about reliving cherished family memories. Rated 5/10 in difficulty, this recipe is accessible to both novice and experienced bakers alike.

---


There's something inherently magical about the scent of cinnamon and nutmeg wafting through the air. It’s a spell that pulls you back to simpler times, to a kitchen filled with laughter and the gentle hum of an electric mixer. For me, this enchanting aroma is synonymous with Apple Pie Bars—a recipe that has been passed down through generations in our family.


Ingredients:

- McIntosh apples


- Baking powder


- Baking soda


- Butterscotch chips


- Eggs


- Flour


- Ground cinnamon


- Ground nutmeg


- Salt


- Sugar


- Vegetable oil


Instructions:

1. Preheat your oven to a cozy 350 degrees F. Prepare a 9 by 13-inch baking dish by giving it a generous coat of cooking spray.


2. In the bowl of an electric mixer, combine the oil, eggs, and sugar until they form a harmonious blend.


3. In a separate bowl, sift together the flour, baking powder, salt, baking soda, ground cinnamon, and ground nutmeg. Gradually add this dry mixture to the oil mixture, allowing the mixer to work its magic until everything is thoroughly combined. Be prepared for a thick, luscious batter.


4. Switch to a sturdy spoon and lovingly fold in the apple pieces. Transfer this mixture into your prepared baking dish, smoothing it out to create an even layer.


5. Gently sprinkle the butterscotch chips over the top, pressing them lightly into the batter.


6. Bake in the preheated oven for 45 minutes to an hour, until golden brown and just beginning to pull away from the edges of the pan.


7. Allow the bars to cool thoroughly before cutting them into delightful squares.


A Walk Down Memory Lane

I remember the first time I helped my grandmother make these Apple Pie Bars. I was barely tall enough to see over the kitchen counter, standing on a little wooden stool she had pulled out just for me. The kitchen was alive with activity, a symphony of clinking bowls and the whirring of our old mixer.


Every autumn, as the leaves turned to shades of amber and gold, my family would gather at my grandmother's house for our annual apple-picking adventure. We would come back with baskets brimming with McIntosh apples, their sweet-tart flavor perfectly suited for baking. My grandmother, the matriarch of our family, would lead the charge in transforming these apples into her famous Apple Pie Bars.


I recall the warmth of the kitchen, the stories shared across generations. My grandmother would tell tales of her own childhood, of how these bars were a staple at every family gathering. Each bite was a bridge to the past, a connection to family members who had long since passed, yet whose spirits lingered in every crumb.


Difficulty: 5/10
Classification: Dessert

Creating these Apple Pie Bars is more than just baking; it’s about creating memories. So, gather your loved ones, don an apron, and let the nostalgic aroma of apples and spices fill your home. These bars are a testament to the enduring power of family traditions and the simple joys of baking together.

Read more about Appetizers

Read more about Main Dishes

Read more about Desserts

Banana & Oreo Muffin | Made by Meaghan Moineau

Banana & Oreo Muffin | Made by Meaghan Moineau

Title: Nostalgia Baked Fresh: Banana & Oreo Muffins
Description: Dive into the delightful fusion of flavors with our Banana & Oreo Muffin recipe! This scrumptious dessert combines the moist sweetness of bananas with the beloved crunch of Oreo cookies, creating a treat that’s sure to bring back fond memories. Perfect as a comforting dessert, this easy-to-follow recipe will transport you back to cozy family gatherings, all while tantalizing your taste buds. Discover the joy of baking and sharing a piece of nostalgia with your loved ones.

---


Banana & Oreo Muffin Recipe


Difficulty: 3/10
Category: Dessert

Ingredients:

- 1/2 cup butter, softened

- 3/4 cup sugar


- 1 1/2 cups all-purpose flour


- 1 tsp baking powder


- 1/2 tsp baking soda


- 1 large egg


- 1/2 cup condensed milk


- 2 ripe bananas, mashed


- 1 tsp vanilla essence


- 1/2 tsp banana essence


- 10 Oreo cookies


Instructions:

1. Prepare the Dry Ingredients:

Sift the flour, baking powder, and baking soda together in a medium-sized bowl and set aside.


2. Crush the Oreos:

Remove the cream from the Oreo cookies. Place the cookies in a ziplock bag and crush them into fine crumbs using a rolling pin.


3. Cream the Butter and Sugar:

In a large mixing bowl, use an electric beater to cream the butter and sugar until the mixture is light and fluffy. This should take about 3 minutes on medium speed.


4. Add Wet Ingredients:

Beat in the egg, ensuring the mixture is well combined with no egg traces. Add the mashed bananas, vanilla essence, and condensed milk. Give it a quick whisk to blend it all together.


5. Combine with Dry Ingredients:

Lower the mixer speed and gradually add the flour mixture to the wet ingredients. Blend until the batter is smooth.


6. Incorporate Oreo Crumbs:

Gently fold the crushed Oreo crumbs into the batter until well combined.


7. Prepare for Baking:

Scoop the batter into prepared muffin cups, filling each about 3/4 full. Top with extra banana slices and Oreo cookie pieces for added flair.


8. Bake:

Preheat the oven to 180°C (350°F). Bake the muffins for 20-25 minutes or until a toothpick inserted into the center comes out clean.


---


A Whiff of Nostalgia


Growing up, Sunday afternoons were always a time for family gatherings at Grandma's house. The aroma of freshly baked goods would greet us as we walked through the door, an invisible hug that promised warmth and love. Among the spread of treats, her Banana & Oreo Muffins stood out, not just for their heavenly taste but for the laughter and stories shared around the kitchen table as we savored each bite.


I remember the first time I helped her bake these muffins. My small hands were clumsy, scattering flour and sugar across the countertop, but Grandma's patient guidance turned it into an adventure rather than a chore. As we crushed the Oreos, she would tell tales of her own childhood, painting vivid pictures of a time long past. Those afternoons taught me the power of food to bring people together, to forge connections across generations.


Today, as I bake these muffins in my own kitchen, the memories come flooding back. Each step of the recipe is a breadcrumb trail leading back to those cherished moments. Every bite is a reminder of the joy and love that flavored my childhood, and I hope it can bring a taste of that nostalgia to your home too.


---


Whether you're a seasoned baker or a beginner, this Banana & Oreo Muffin recipe is a delightful way to create new memories while honoring the old. Enjoy the process and the delicious results!

Read more about Appetizers

Read more about Main Dishes

Read more about Desserts

Cranberry Orange Biscotti | Made by Meaghan Moineau

Cranberry Orange Biscotti | Made by Meaghan Moineau

Title: "Cranberry Orange Biscotti: A Taste of Nostalgia and Citrus Delight"
Description: Dive into the delightful world of Cranberry Orange Biscotti, a perfect fusion of tart cranberries and zesty orange. This dessert not only serves as a delicious treat but also carries a nostalgic family memory, making it a cherished addition to any holiday gathering.

---


There's something magical about the aroma of freshly baked biscotti wafting through the house, especially when the flavors of cranberry and orange meld together in perfect harmony. This Cranberry Orange Biscotti recipe is more than just a delightful dessert; it's a journey back to cherished family memories and festive gatherings.


A Nostalgic Journey

Growing up, my grandmother's kitchen was the heart of every holiday season. The warmth of the oven and the vibrant scents of citrus and spices created an inviting atmosphere that drew everyone in. Every year, as the first cold snap of winter hinted at the approaching holidays, my grandmother would pull out her well-worn recipe card for Cranberry Orange Biscotti.


I remember sitting at the kitchen table, watching her expertly mix the ingredients—unsalted butter, sugar, and the zest of fresh oranges—while recounting stories of her childhood. She'd tell us how her mother, my great-grandmother, would bake these very biscotti during the festive season, using them as a means to bring the family together over laughter, stories, and the occasional cup of hot cocoa.


As a child, I was fascinated by the process. The transformation of simple ingredients like flour, whole wheat pastry flour, and baking powder into golden, slightly cracked logs seemed like magic. When she added the dried cranberries and pecans, I could hardly wait for the first taste. The tartness of the cranberries paired with the citrusy sweetness of the orange glaze was a combination that danced on the palate.


The Recipe

*Ingredients:*


- 1 tablespoon baking powder


- 1 cup confectioners' sugar


- 1 cup dried cranberries


- 3 large eggs


- 2 cups all-purpose flour


- 1/2 cup fresh orange juice


- 2 tablespoons orange zest


- 1 cup pecans, chopped


- 1/4 teaspoon salt


- 1 cup sugar


- 1/2 cup unsalted butter, softened


- 1 teaspoon vanilla extract


- 1 cup whole wheat pastry flour


*Instructions:*


1. Preheat the oven to 350°F (175°C), positioning racks in the upper and lower thirds. Line two baking sheets with parchment paper.


2. In a mixer, beat the butter and sugar until light. Add eggs one at a time, mixing well between each. Stir in orange zest and vanilla.


3. In a separate bowl, whisk together the flours, baking powder, and salt. Gradually add to the wet mixture, mixing until just combined. Fold in cranberries and pecans.


4. Transfer dough to a floured surface, divide into three pieces, and shape into 12-inch logs. Place on baking sheets.


5. Bake for 15-18 minutes, switching sheet positions halfway through. Let rest for 10 minutes. Reduce oven to 300°F (150°C).


6. Slice logs diagonally into 3/4-inch pieces. Lay slices on their sides and bake for 10-15 minutes until golden.


7. For the glaze, mix confectioners' sugar with orange juice to desired consistency. Drizzle over warm biscotti.


Difficulty: 6/10
Classification: Dessert

This biscotti is not just a treat but a tradition, a way to connect with loved ones both past and present. As I bake these biscotti today, I'm reminded of those cherished moments in my grandmother's kitchen, the stories shared, and the love that went into each batch. Every bite is a taste of nostalgia, bringing family and friends together, just as it always has.

Read more about Appetizers

Read more about Main Dishes

Read more about Desserts

Apple-Cheesecake Tart with Salted Caramel Glaze | Made by Meaghan Moineau

Apple-Cheesecake Tart with Salted Caramel Glaze | Made by Meaghan Moineau

Title: "Decadence Unveiled: Apple-Cheesecake Tart with Salted Caramel Glaze"
Description:

Dive into a world of flavors with our Apple-Cheesecake Tart, crowned with a luscious Salted Caramel Glaze. This dessert is a symphony of textures and tastes, perfect for impressing guests or simply indulging in a personal treat. With a difficulty rating of 7 out of 10, this recipe is an exciting culinary adventure for home bakers. Read on for a step-by-step guide and a heartwarming family story that brings this dish to life.


---


A Sweet Journey Down Memory Lane


There's something inherently magical about the aroma of apples and cinnamon wafting through the house. It takes me back to a quaint autumn afternoon at my grandmother's kitchen. Her house was always the gathering place for family celebrations, and the kitchen was its beating heart. I remember sitting on a high stool, eyes wide with anticipation, as she meticulously layered apple slices over her famous cheesecake tart.


Her hands moved with a practiced rhythm, each slice overlapping the last, creating a mesmerizing spiral. She would smile at me, her eyes twinkling with warmth, and hand me a bowl of freshly sliced apples to snack on. That day, she told me stories of her childhood, of apple orchards and family picnics, weaving a rich tapestry of memories that flavored each bite of her tart.


Years later, I find myself in my own kitchen, recreating my grandmother's masterpiece. As the tart bakes, my home fills with that same comforting aroma, and I am transported back to those cherished afternoons. This Apple-Cheesecake Tart with Salted Caramel Glaze is more than just a dessert; it's a tribute to family, love, and the timeless joy of sharing food and stories.


Recipe: Apple-Cheesecake Tart with Salted Caramel Glaze


Ingredients:

- Butter

- Double cream


- Egg


- Flour


- Granny Smith apples


- Ground almonds


- Ground cinnamon


- Lemon (juice)


- Plain full-fat cream cheese


- Raw sugar


- Sea salt


- Sugar


- Vanilla extract


Instructions:


Crust:

1. In a stand mixer or using a handheld electric whisk, cream together the butter, sugar, and vanilla extract until light and fluffy.


2. Gently fold in the flour and ground almonds by hand until combined into a crumbly mixture.


3. Press the mixture into a 25cm loose-bottomed tin or into smaller tins for individual servings.


Custard:

1. Cream together the cream cheese and sugar using your mixer.


2. Add the egg and vanilla extract, mixing until fully combined.


3. Pour the custard into the prepared, uncooked crust.


Apples:

1. Thinly slice the Granny Smith apples, ideally using a mandoline.


2. Toss the apple slices with sugar, ground cinnamon, and lemon juice, allowing them to soften for about 10 minutes.


3. Arrange the slices over the custard in overlapping layers, creating a spiral 'rose' pattern.


4. Cover with tin foil and bake at 190°C for 30 minutes to soften the apples.


5. Remove the foil and bake for an additional 15-25 minutes until the custard is puffed and the apple edges are lightly browned.


Glaze:

1. As the tart bakes, melt sugar in a saucepan over medium-high heat until golden.


2. Stir in butter and sea salt, then add the cream, stirring constantly until smooth.


3. Brush the glaze over the nearly finished tart and return to the oven for a few minutes until it bubbles gently.


4. Allow the tart to cool to room temperature before serving. It can be refrigerated for several days; store in the baking tin and wrap well.


Difficulty Rating: 7/10
Classification: Dessert

---


Whether you're creating new family traditions or reminiscing about cherished memories, this Apple-Cheesecake Tart with Salted Caramel Glaze is sure to become a beloved favorite. Enjoy every bite of this decadent treat, and may it bring warmth and joy to your kitchen.

Read more about Appetizers

Read more about Main Dishes

Read more about Desserts