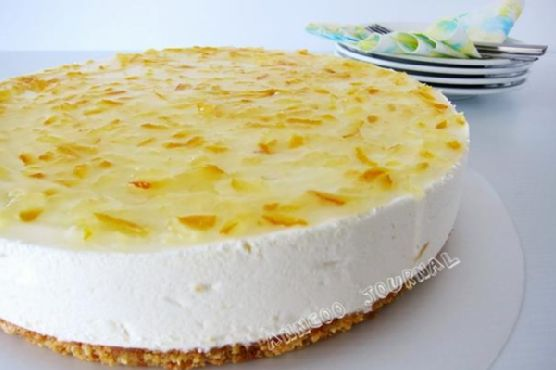
Korean Honey Citron Tea Cheesecake
Intro
There’s something magical about the blend of sweet and tangy flavors that transport you to cherished moments from the past. I remember my first taste of Korean honey citron tea, which was during a chilly winter visit to my grandmother’s home. She always had a stash of this golden, aromatic paste, ready to warm us up from the inside out. It wasn’t just a drink; it was a ritual, a comfort, a hug in a cup. Today, I’m bringing that warmth to you in the form of a cheesecake that combines the beloved flavors of honey citron tea with the creamy decadence of a classic dessert. This Korean Honey Citron Tea Cheesecake is my way of sharing a piece of my heritage and the cozy memories of my childhood with you.
Why You’ll Love It
This Korean Honey Citron Tea Cheesecake is a unique twist on a classic dessert that will surely captivate your taste buds. Here’s why it deserves a spot in your recipe repertoire:
- Remarkable Flavor: The fusion of sweet honey and zesty citron creates a refreshing yet indulgent taste.
- No-Bake Delight: Perfect for those warm days when you want a delicious dessert without turning on the oven.
- Textural Marvel: The creamy, smooth filling pairs beautifully with the crunchy biscuit base and the slightly set topping.
- Easy to Prepare: With simple instructions and ingredients, this cheesecake is a breeze to make, even for beginners.
Ingredients
- Butter
- Cream cheese
- Non-dairy topping cream
- Gelatin
- Korean honey citron tea paste
- Lemon juice
- Marie biscuits
- Fresh milk
- Sugar
- Water
Instructions
- Line a 23cm round pan with a removable base and set aside.
- Combine crushed digestive biscuit crumbs and melted butter in a mixing bowl. Press the biscuit crumbs onto the base of the prepared pan and refrigerate for later use.
- Measure water into a bowl and sprinkle in the gelatin (do not stir). Allow the gelatin to swell for a few minutes. Place the bowl over a pot of simmering hot water and stir until the gelatin melts. Remove from heat and let cool to room temperature.
- Whisk non-dairy topping cream until it reaches peak form (not too stiff), then set aside.
- In another mixing bowl, beat cream cheese and sugar until smooth. Gradually add milk until combined. Add lemon juice and honey citron tea paste, mixing well. Incorporate the gelatin solution and combine thoroughly.
- Gently fold in the whipped non-dairy topping cream using a hand whisk. Pour the cream cheese mixture into the prepared cake tin and refrigerate for at least 4 hours until set.
- For the topping, heat the gelatin using the same method as before. Stir in the honey citron tea paste, mix well, and leave to cool. Spread the honey citron tea paste thinly and evenly over the cheesecake.
- Refrigerate the cheesecake until ready to serve.
Tips
- Ensure your cream cheese is at room temperature before beating; this helps achieve a smoother texture.
- When melting the gelatin, be careful not to overheat it, as this can affect its setting properties.
- For an even more pronounced citrus flavor, consider adding a bit of lemon zest to the cream cheese mixture.
Variations & Substitutions
Feel free to make this recipe your own by trying out some of these variations:
- Use a different base: Swap marie biscuits for graham crackers or digestive cookies to change the texture and flavor of the crust.
- Dairy-free option: Substitute cream cheese and milk with their dairy-free alternatives for a lactose-friendly version.
- Extra flavor: Drizzle some additional honey on top before serving for an extra touch of sweetness.
Storage
Store the cheesecake in an airtight container in the refrigerator for up to 5 days. For longer storage, you can freeze the cheesecake for up to a month. Simply wrap it well in plastic wrap and aluminum foil before freezing. To serve, let it thaw in the refrigerator overnight.
FAQ
Can I use regular whipping cream instead of non-dairy topping cream?
Yes, regular whipping cream can be used as a substitute. Just make sure to whip it to soft peaks before incorporating it into the cheesecake mixture.
Where can I find Korean honey citron tea paste?
Korean honey citron tea paste is commonly found in Asian grocery stores or online. It’s a popular product, often used for making beverages, and its unique flavor makes it a great ingredient for both sweet and savory dishes.
Can I make this cheesecake in advance?
Absolutely! This cheesecake is perfect for making ahead of time. Prepare it a day in advance and let it set in the refrigerator overnight. This will also allow the flavors to meld beautifully.
Nutrition (approximation per serving)
- Calories: 350
- Fat: 22g
- Sugar: 20g
- Protein: 5g
- Carbohydrates: 30g
Conclusion
Bringing together the beloved flavors of Korean honey citron tea and the creamy indulgence of cheesecake, this recipe is sure to become a favorite in your home. It’s a dessert that invites warmth and nostalgia with every bite, perfect for sharing with friends and family. Whether served at a festive gathering or as a treat for yourself, this Korean Honey Citron Tea Cheesecake is a delightful way to add a touch of sweetness to your day. Enjoy the journey as you create and savor this memorable dessert!
Related update: Korean Honey Citron Tea Cheesecake
Related update: Delicious Triple Chocolate Bundt Cake
Related update: Dulce De Leche Cheesecake