Tex-Mex Burger | Made by Meaghan Moineau

Tex-Mex Burger

Intro

There’s something truly magical about a sizzling burger hot off the grill, bringing back memories of summer nights spent laughing and sharing stories with family and friends. Growing up, my family had a weekly tradition of gathering around the backyard grill, where my father would prepare his famous Tex-Mex burgers. The aroma of spices mingling with beef was irresistible, and the first bite was always a heavenly blend of flavors that danced on the palate. Now, I’m excited to share this beloved recipe with you, so you can create new memories with your loved ones, just as I have.

Why You’ll Love It

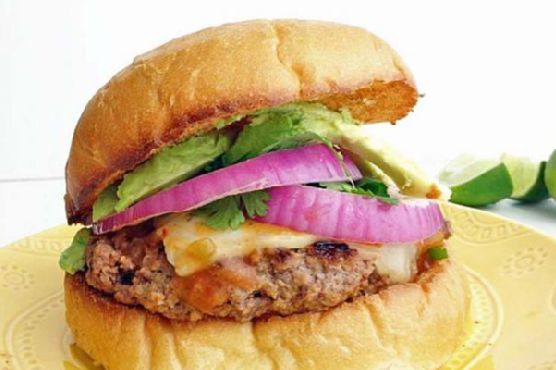
This Tex-Mex Burger is a flavor-packed twist on the classic American burger. It’s perfect for anyone who loves a bit of spice and a lot of flavor. The combination of cumin, chili powder, and paprika gives the beef a smoky, spicy depth, while the creamy avocado and pepper jack cheese add richness and a hint of heat. Topped with fresh cilantro and red onion, each bite is a delightful balance of textures and tastes. Whether you’re hosting a backyard barbecue or looking to switch up your weeknight dinner routine, this burger is sure to become a favorite!

Ingredients

  • 1 pound ground beef
  • 1/4 cup salsa
  • 1 teaspoon chili powder
  • 1 teaspoon cumin
  • 1/2 teaspoon paprika
  • 1/2 teaspoon salt
  • 1/4 teaspoon pepper
  • 4 slices pepper jack cheese
  • 1 avocado, sliced
  • 1/2 small red onion, thinly sliced
  • 1/4 cup fresh cilantro, chopped
  • 4 hamburger buns

Instructions

  1. Preheat your broiler to high. This will ensure your buns are perfectly toasted and ready to hold all the delicious fillings.
  2. In a large frying pan, heat to medium-high heat. This is where the magic happens, as the patties get their perfect sear.
  3. Make the patties: In a large bowl, combine ground beef, salsa, chili powder, cumin, paprika, salt, and pepper. Mix until the ingredients are evenly distributed. Be careful not to overwork the meat to maintain tenderness.
  4. Form the mixture into four equal-sized patties, making a slight indentation in the center of each to ensure even cooking.
  5. Place the patties in the heated frying pan. Cook for about 4-5 minutes on each side, or until they reach your desired level of doneness.
  6. During the last minute of cooking, place a slice of pepper jack cheese on each patty. Cover the pan briefly to allow the cheese to melt.
  7. While the patties are cooking, place the hamburger buns under the broiler for about 1 minute, or until they are lightly toasted.
  8. Assemble the burgers: Place each patty on the bottom half of a toasted bun. Top with avocado slices, red onion, and fresh cilantro. Finish with the top half of the bun.
  9. Serve immediately and enjoy the explosion of Tex-Mex flavors!

Tips

For the juiciest burgers, use ground beef with a higher fat content, like 80/20. If your patties shrink during cooking, it means they’re too compact; gently form them to avoid this. Toasting the buns adds a pleasant crunch and prevents them from getting soggy with the juicy toppings.

Variations & Substitutions

If you’re looking to customize your Tex-Mex Burger, consider these variations:

  • Protein Swap: Substitute the ground beef with ground turkey or chicken for a lighter version. Vegetarians can use black bean patties.
  • Cheese Options: Swap pepper jack for cheddar or Monterey Jack for a different cheesy experience.
  • Spice Level: Add a pinch of cayenne pepper for extra heat, or omit the chili powder for a milder taste.
  • Bun Alternatives: Use whole wheat buns or lettuce wraps for a low-carb option.

Storage

If you have leftovers, let the cooked patties cool to room temperature before storing them in an airtight container in the refrigerator for up to three days. To reheat, warm them in a skillet over medium heat or in the microwave, ensuring they’re thoroughly heated. Unfortunately, these burgers are best enjoyed fresh, so try to make just enough for your meal.

FAQ

Can I make the burger patties ahead of time?

Absolutely! You can prepare the patties and store them in the refrigerator for up to 24 hours before cooking. This can help save time during meal prep and allow the flavors to meld together even more.

What can I serve with Tex-Mex Burgers?

These burgers pair well with a variety of sides, such as crispy sweet potato fries, a fresh green salad, or classic coleslaw. For a true Tex-Mex experience, consider serving with a side of Mexican street corn or spicy black bean salad.

Nutrition

While exact nutritional values will vary based on portion sizes and specific ingredients used, each Tex-Mex Burger (including toppings and bun) is approximately 550 calories. This includes 35g of protein, 30g of fat, and 40g of carbohydrates. For a lighter version, consider using leaner meats and reducing the cheese and avocado portions.

Conclusion

There you have it — a delightful Tex-Mex Burger recipe that brings a touch of southwestern flair to your table. Whether you’re reliving cherished memories or creating new ones, this burger is sure to impress with its bold flavors and satisfying textures. I hope this recipe becomes a staple in your home, just as it has in mine. Enjoy the culinary journey, and happy cooking!

Related update: Tex-Mex Burger

Related update: Pan Seared Lamb Loin With Chimichurri & Roasted Trio Squash Salad With Goat Cheese and Pinenuts

Smoky Chicken Tacos | Made by Meaghan Moineau

Smoky Chicken Tacos

Intro

There’s something magical about gathering around the dinner table with loved ones, sharing a meal that brings both comfort and delight. I remember my grandmother’s kitchen, filled with the rich aroma of spices and the sizzle of something delicious on the stove. It was in her cozy kitchen that I first fell in love with the art of cooking, learning the beauty of simple ingredients transformed into something extraordinary.

Today, I’m excited to share a recipe that embodies that same warmth and joy: Smoky Chicken Tacos. This dish is a celebration of bold flavors and vibrant colors, a true fiesta on your plate. Whether you’re hosting a casual dinner or simply craving something deliciously satisfying, these tacos are sure to become a family favorite.

Why You’ll Love It

Smoky Chicken Tacos are not only incredibly tasty, but they’re also easy to make and perfect for any occasion. The combination of tender chicken, fresh veggies, and creamy toppings creates a delightful balance of textures and flavors. The smokiness from the spices pairs perfectly with the bright, zesty notes from the lime, making each bite a true taste experience. Plus, they’re customizable, so everyone can enjoy them just the way they like!

Ingredients

  • 4 skinless boneless chicken breasts
  • 2 tablespoons extra virgin olive oil (evoo)
  • 1 teaspoon chili powder
  • 1 teaspoon cumin
  • 1 teaspoon garlic powder
  • 1 teaspoon onion powder
  • Salt and pepper to taste
  • 2 limes (juice of one, extra for serving)
  • 8 corn tortillas
  • 2 cups shredded cabbage
  • 1 cup cooked corn
  • 1 red onion, thinly sliced
  • 1-2 jalapeno peppers, sliced
  • 2 roma tomatoes, diced
  • 1 avocado, sliced
  • Fresh cilantro, chopped
  • Salsa, for serving
  • Sour cream, for serving

Instructions

  1. Preheat your oven to 400 degrees Fahrenheit.
  2. In a small bowl, combine the chili powder, cumin, garlic powder, onion powder, salt, and pepper.
  3. Rub the chicken breasts with the extra virgin olive oil and coat evenly with the spice mixture on both sides.
  4. Place the seasoned chicken on a baking sheet and bake in the preheated oven for 20-25 minutes, or until cooked through and juices run clear.
  5. Once done, remove the chicken from the oven and squeeze the juice of one lime over the cooked chicken. Let it rest for a few minutes before slicing.
  6. While the chicken rests, warm the corn tortillas in a dry skillet over medium heat until pliable.
  7. Assemble the tacos by layering slices of chicken, shredded cabbage, cooked corn, red onion, jalapeno slices, roma tomatoes, and avocado in the corn tortillas.
  8. Garnish with fresh cilantro and an extra squeeze of lime juice.
  9. Serve with salsa and sour cream on the side. Enjoy!

Tips

For the juiciest chicken, let it rest for a few minutes after baking before slicing. This allows the juices to redistribute, ensuring each bite is moist and flavorful. Also, warming your tortillas properly can make a huge difference in the overall texture of your tacos, so don’t skip that step!

Variations & Substitutions

Feel free to customize these tacos to suit your taste. You can substitute chicken with beef or turkey for a different protein base. For a vegetarian option, swap the chicken for roasted vegetables or black beans. Add a handful of cheese if you like extra creaminess, or switch up the toppings with your favorite taco additions like pickled onions or hot sauce.

Storage

If you have leftovers, store the chicken and toppings separately in airtight containers in the refrigerator. They should keep well for up to three days. To reheat, warm the chicken in a skillet over medium heat until heated through, and enjoy assembling fresh tacos again!

FAQ

Can I use flour tortillas instead of corn tortillas?

Absolutely! While corn tortillas add a traditional touch and a slightly different texture, flour tortillas work just as well and are just as delicious.

What can I serve with these tacos?

These tacos pair wonderfully with a side of Mexican rice or a simple salad. You could also serve them with chips and guacamole for a complete Mexican meal experience.

How can I make these tacos spicier?

If you love heat, consider adding more jalapeno slices, a sprinkle of cayenne pepper in the spice mix, or a spicy salsa to your tacos.

Nutrition

Each serving of these smoky chicken tacos is packed with protein and fresh vegetables, making them a nutritious choice for any meal. Depending on the toppings and accompaniments, the calorie count can vary, but sticking with fresh, whole ingredients ensures a wholesome and balanced meal.

Conclusion

Smoky Chicken Tacos are more than just a meal; they’re a culinary experience that brings people together with every bite. Whether you’re reminiscing about family dinners past or creating new memories with friends and loved ones, these tacos are sure to bring joy and satisfaction to your table. So gather your ingredients, invite your favorite people, and savor the delightful flavors of this simple yet spectacular dish.

Related update: Smoky Chicken Tacos

Related update: Spinach and Gorgonzola Stuffed Flank Steak

The Secret to Easy Skillet Filet Mignon Steak Tacos | Made by Meaghan Moineau

The Secret to Easy Skillet Filet Mignon Steak Tacos

Intro

There’s something magical about a warm, cozy evening spent around the kitchen table with family and friends. Growing up, my mother used to make the most delightful tacos, and they were always the highlight of our gatherings. The aroma of sizzling steak and freshly heated tortillas would fill the house, drawing everyone to the kitchen. Inspired by those cherished family moments, I’ve crafted a recipe for easy skillet filet mignon steak tacos that brings a touch of elegance to the classic taco night.

This dish combines the luxury of filet mignon with the comforting flavors of traditional tacos. You’ll find that this recipe is not only easy to make but also incredibly satisfying, perfect for a cozy dinner or a festive gathering.

Why You’ll Love It

These filet mignon steak tacos are a delightful fusion of simplicity and sophistication. Here’s why they’ll become a favorite in your household:

  • Quick and Easy: With just a few steps, you can whip up a gourmet meal in under 30 minutes.
  • Flavorful and Tender: The filet mignon is cooked to perfection, offering a tender and juicy bite every time.
  • Customizable: Whether you prefer your tacos loaded or simple, you can easily adjust the toppings to suit your taste.
  • Perfect for Any Occasion: Whether it’s a weeknight dinner or a special event, these tacos are sure to impress.

Ingredients

  • Sour cream
  • Olive oil (extra virgin)
  • Filet mignon steaks
  • Guacamole
  • Cracked black pepper
  • Shredded cheddar cheese
  • White corn tortillas

Instructions

  1. Heat the skillet on medium to low heat.
  2. Rub the steaks with olive oil and season with cracked black pepper.
  3. Slowly cook the filets until they have reached your desired specifications. For medium doneness, cook for about 7 minutes on each side.
  4. Remove the filets from the heat and slice thinly and lengthwise.
  5. Use a clean skillet over medium heat to warm up the corn tortillas.
  6. Top the tortillas with steak, guacamole, sour cream, and shredded cheese.

Tips

To ensure your steak is perfectly cooked, use a meat thermometer. For medium doneness, aim for an internal temperature of 145°F (63°C). Let the steak rest for a few minutes before slicing to retain its juices.

Always warm your tortillas before serving. This not only enhances their flavor but also makes them more pliable, preventing them from breaking when you fold them.

Variations & Substitutions

Feel free to experiment with different toppings like fresh cilantro, diced tomatoes, or pickled onions for added flavor. If you prefer a different cheese, try using Monterey Jack or queso fresco for a unique twist.

If filet mignon isn’t available, you can substitute with sirloin or ribeye, although the cooking times may vary slightly.

Storage

Store any leftover steak in an airtight container in the refrigerator for up to 3 days. Reheat gently in a skillet to avoid overcooking. The tortillas and toppings should be stored separately to maintain freshness.

FAQ

Can I use a different type of tortilla?

Absolutely! While white corn tortillas provide a traditional touch, flour tortillas or even whole wheat options can be used as well. Just keep in mind the flavor and texture differences.

How can I make these tacos spicier?

Add a kick to your tacos by incorporating sliced jalapeños, a sprinkle of cayenne pepper, or a spicy salsa as a topping. Adjust the spice level to suit your taste preferences.

Nutrition

Each serving of these tacos is a balanced blend of protein, healthy fats, and carbs. The filet mignon offers a rich source of protein, while the olive oil provides heart-healthy fats. Remember to enjoy in moderation, especially if you’re watching your calorie intake.

Conclusion

These easy skillet filet mignon steak tacos are a delightful way to elevate your taco night with minimal effort. Whether you’re reminiscing about family gatherings or creating new memories, this recipe is sure to become a favorite. Enjoy the rich flavors and tender textures with each bite, and don’t forget to share the love with those around your table. Happy cooking!

Related update: The Secret to Easy Skillet Filet Mignon Steak Tacos

Related update: Pasta with Peas and Italian Sausage

Grilled Portabella and Poblano Tacos | Made by Meaghan Moineau

Grilled Portabella and Poblano Tacos

Intro

There’s something magical about the aroma of fresh ingredients sizzling on a grill. Every time I make these grilled portabella and poblano tacos, I’m transported back to a summer evening at my grandmother’s house. She would fire up the grill, and we’d gather around, eagerly awaiting the feast to come. The smoky scent of chiles and mushrooms would fill the air, mixing with laughter and stories shared as we enjoyed each other’s company. This recipe is a tribute to those cherished memories, and I hope it brings the same joy and warmth to your table as it always has to mine.

Why You’ll Love It

These grilled portabella and poblano tacos are a delightful twist on classic taco fare. They’re perfect for vegetarians and meat-lovers alike, offering a robust and smoky flavor that’s entirely satisfying. The combination of earthy portabellas and spicy poblanos, complemented by the freshness of pico de gallo and creamy guacamole, creates a symphony of tastes and textures. Plus, they’re easy to customize, making them a hit for family dinners or casual gatherings with friends.

Ingredients

  • Canola oil
  • Chipotle powder
  • Cilantro, chopped
  • Cilantro sprigs for garnish
  • Corn tortillas
  • 2 cloves garlic, minced
  • Guacamole
  • 2 tablespoons lime juice
  • Lime wedges for serving
  • Olive oil
  • 1 whole poblano chile
  • 2 whole portabella mushrooms
  • 1 red onion, roughly chopped
  • 2 diced roma tomatoes
  • Salt
  • Salt and pepper
  • Shredded cheddar cheese

Instructions

  1. Preheat a lightly oiled grill on medium-high heat.
  2. While the grill is heating up, prepare the pico de gallo. In a small mixing bowl, combine tomatoes, onion, cilantro, garlic, salt, and lime juice. Set aside.
  3. Next, prepare the grilled portabella filling. Remove the stems from the portabellas, and discard. Using a spoon, scrape out the dark gills from the underside of the mushroom caps.
  4. Lightly brush the portabellas and the onions on both sides with canola oil, and sprinkle generously with salt and pepper.
  5. Arrange the mushrooms, onion, and poblano on the hot grill, and cook for 5-6 minutes per side or until the mushrooms are softened and the onion is lightly charred. Remove from heat and transfer to a cutting board.
  6. Remove the stem and seeds from the poblano, and discard. Cut the poblano and the portabellas into thin strips, and roughly chop the onion. Transfer to a mixing bowl and toss with lime juice and chipotle powder until well coated.
  7. To assemble, arrange 2 tortillas per plate, and divide the mushroom filling evenly between them.
  8. Serve with pico de gallo and bowls of the different toppings so that everyone can garnish their tacos as they please.

Tips

  • Make sure your grill is preheated to ensure a good sear on the vegetables.
  • For a spicier kick, leave a few seeds in the poblano before grilling.
  • Use fresh tortillas if possible; they really make a difference in flavor and texture.

Variations & Substitutions

If you want to switch things up, try using different types of mushrooms like cremini or shiitake for a different flavor profile. You can also substitute the poblano with bell peppers for a milder taste. For a vegan version, skip the cheese or use a plant-based alternative.

Storage

These tacos are best enjoyed fresh, but if you have leftovers, store the grilled vegetable mixture in an airtight container in the refrigerator for up to 3 days. Reheat gently on the stovetop or in the microwave before serving. Assemble the tacos just before eating to keep the tortillas from becoming soggy.

FAQ

Can I make these tacos in advance?

Yes, you can prepare the pico de gallo and grill the vegetables ahead of time. Store them separately in the fridge and assemble the tacos just before serving for the best texture and flavor.

What can I serve with these tacos?

These tacos pair well with a side of Mexican rice, refried beans, or a light salad. A refreshing beverage like a margarita or agua fresca can also complement the meal beautifully.

Nutrition

While the exact nutritional content will vary based on specific brands and quantities used, these tacos are a great source of vitamins and fiber, thanks to the vegetables. They’re also relatively low in calories and can be made even healthier by using whole wheat tortillas and reducing the cheese.

Conclusion

Grilled portabella and poblano tacos are a delightful way to enjoy the vibrant flavors of summer grilling. Whether you’re recreating cherished family memories or starting new traditions, these tacos are sure to become a favorite. Gather your loved ones, fire up the grill, and savor the rich, smoky flavors of this delicious and versatile dish. Enjoy!

Related update: Grilled Portabella and Poblano Tacos

Related update: Baked Chicken Thighs with Satay Sauce and Tomato Salad

Smoky Chicken Tacos | Made by Meaghan Moineau

Smoky Chicken Tacos: A Flavorful Fiesta on Your Plate

Intro

Welcome to the delightful world of Smoky Chicken Tacos, a dish that promises to bring a burst of flavor to your dining table! These tacos are not just a meal; they are a journey to the heart of culinary simplicity and delight. I fondly remember my grandmother’s kitchen, where the aroma of spices and roasting chicken would fill the air, drawing everyone in from the furthest corners of the house. This recipe is a tribute to those cherished memories and a celebration of flavors that dance on your taste buds. Gather around, and let’s dive into this heartwarming culinary adventure together.

Why You’ll Love It

These Smoky Chicken Tacos are your ticket to a quick, delicious, and satisfying meal that checks all the boxes. They are:

  • Flavorful: The perfect blend of spices gives the chicken a smoky, savory taste that pairs beautifully with the freshness of the toppings.
  • Easy to Make: With simple ingredients and straightforward instructions, this recipe is ideal for both beginners and seasoned cooks.
  • Versatile: Customize these tacos with your favorite toppings to suit your taste preferences.
  • Healthy: Packed with protein and veggies, these tacos are a wholesome choice for any meal.

Ingredients

  • 2 skinless boneless chicken breasts
  • 1 tablespoon evoo (extra virgin olive oil)
  • 1 teaspoon chili powder
  • 1 teaspoon cumin
  • 1 teaspoon garlic powder
  • 1 teaspoon onion powder
  • Salt and pepper to taste
  • Juice of 1 lime, plus extra lime for serving
  • 8 corn tortillas
  • 1 cup shredded cabbage
  • 1 cup cooked corn
  • 2 roma tomatoes, diced
  • 1 red onion, finely chopped
  • 1 jalapeno pepper, sliced
  • 1 red fresh pepper, sliced
  • 1/2 cup cilantro, chopped
  • 1 avocado, sliced
  • Salsa, for serving
  • Sour cream, for serving

Instructions

  1. Preheat your oven to 400 degrees Fahrenheit (200 degrees Celsius).
  2. In a small bowl, mix together the chili powder, cumin, garlic powder, onion powder, salt, and pepper.
  3. Rub the chicken breasts with evoo and coat evenly with the spice mixture on both sides.
  4. Place the chicken on a baking sheet and bake in the preheated oven for 20-25 minutes, or until cooked through and the juices run clear.
  5. Once cooked, remove the chicken from the oven and let it rest for a few minutes before slicing into thin strips.
  6. Warm the corn tortillas in a dry skillet over medium heat for about 30 seconds on each side, or until pliable.
  7. Assemble the tacos by placing the sliced chicken onto each tortilla, and top with shredded cabbage, cooked corn, diced tomatoes, chopped red onion, sliced jalapeno, sliced red pepper, cilantro, and avocado.
  8. Drizzle with lime juice, and serve with salsa and sour cream on the side.

Tips

  • Marinate Longer: If you have time, let the chicken marinate in the spice mixture for up to an hour to enhance the flavors.
  • Even Cooking: Ensure your chicken breasts are of even thickness to promote even cooking.
  • Handling Heat: Adjust the amount of jalapeno to suit your heat preference.

Variations & Substitutions

Feel free to tweak this recipe to make it your own:

  • Protein Swap: Substitute chicken with beef, shrimp, or even tofu for a different protein option.
  • Spice Level: Use smoked paprika instead of chili powder for a milder taste.
  • Grain-Free: Use lettuce leaves instead of corn tortillas for a low-carb option.

Storage

If you have leftovers, store the chicken and vegetables separately in airtight containers in the refrigerator for up to 3 days. Reheat the chicken gently in a skillet or microwave before assembling your tacos. Keep the tortillas in a sealed bag at room temperature.

FAQ

Can I prepare the chicken ahead of time?

Absolutely! You can cook the chicken a day in advance. Just slice it when you’re ready to serve and reheat gently to maintain its juiciness.

What other toppings can I add?

These tacos are incredibly versatile. Consider adding cheese, pickled onions, or even a dollop of guacamole for an extra burst of flavor.

Nutrition

Each serving of Smoky Chicken Tacos is packed with approximately 300 calories, 20g of protein, 15g of fat, and 25g of carbohydrates. It’s a nourishing meal that keeps you fueled and satisfied.

Conclusion

There you have it, a delightful recipe for Smoky Chicken Tacos that brings warmth and flavor to your table. Whether you’re cooking for family, friends, or just yourself, these tacos are sure to be a hit. Enjoy the process, savor the flavors, and create new memories around a shared love for good food. Bon appétit!

Related update: Smoky Chicken Tacos

Related update: Chili Pie with Green Chile and Cheddar Cornbread Crust

Cilantro Lime Fish Tacos | Made by Meaghan Moineau

Cilantro Lime Fish Tacos | Made by Meaghan Moineau

A Family Feast: Cilantro Lime Fish Tacos That Bring Us Together


Discover the Zesty Delight of Cilantro Lime Fish Tacos


In the heart of our family gatherings, there's one dish that embodies both the zest of life and the warmth of togetherness — Cilantro Lime Fish Tacos. This dish is more than just a meal; it's a nostalgic journey to sunlit kitchens and laughter-filled tables, where the aroma of fresh cilantro and tangy lime dances in the air.


Difficulty: 3/10
Classification: Main Dish

The Ingredients of Joy


- 2 tablespoons olive oil


- 4 fresh tilapia fillets


- 1/4 cup flavor-concentrated seafood broth


- Juice of 2 limes


- 1/2 cup fresh cilantro leaves, chopped


- 8 fresh corn tortillas


- 1 cup shredded lettuce


- 1/2 cup red diced onions


- 1 cup chunky salsa


- 1/2 cup sour cream


Cooking Instructions


1. Heat and Sizzle: Begin by heating the olive oil in a 12-inch skillet over medium-high heat. The sizzle of oil is a prelude to the enticing flavors that are about to unfold.
2. Cook the Fish: Gently lay the fresh tilapia fillets into the skillet. Cook them for about 8 minutes, turning each fillet once halfway through, until they flake easily with a fork. The fish should be tender and infused with the aromatic oil.
3. Infuse with Flavor: Add the concentrated seafood broth, lime juice, and chopped cilantro to the skillet. Break the fish into large, succulent pieces with a spoon, ensuring they are well-coated with the zesty broth mixture.
4. Assemble the Tacos: Divide the flavorful fish mixture evenly among the corn tortillas. Top each taco with shredded lettuce, diced red onions, a dollop of sour cream, and a generous spoonful of chunky salsa.
5. Fold and Savor: Carefully fold the tortillas around the vibrant filling, creating a handheld feast ready to be devoured.

A Nostalgic Tale: The Heart of Our Family


As a child, I remember the weekends when our family kitchen transformed into a vibrant hub of activity. My grandmother, the matriarch of our culinary adventures, would orchestrate these gatherings with a sparkle in her eye and a spring in her step. Her Cilantro Lime Fish Tacos were the star of these occasions, a recipe passed down through generations, each iteration carrying a piece of our family’s heart.


We would gather around the kitchen island, each of us assigned a task — chopping cilantro, squeezing limes, or gently stirring the fish in the skillet. It was a symphony of flavors and laughter, where stories of the past mingled with dreams of the future. As we savored each bite of the tangy, fresh tacos, the world outside seemed to pause, leaving just us and the flavors that bound us together.


These tacos aren't just food; they are a canvas of memories, painted with the vibrant hues of family love and culinary tradition. Every bite takes me back to those cherished moments, reminding me of the joy that comes from sharing a meal with those you love.


Conclusion


Cilantro Lime Fish Tacos are more than just a main dish; they are an experience, a journey, a celebration of flavors that brings families closer. With a sprinkle of nostalgia and a zest of lime, they transform any meal into a cherished memory. Gather your loved ones, recreate this simple yet flavorful recipe, and let the magic of these tacos fill your hearts and homes.

Read more about Appetizers

Read more about Main Dishes

Read more about Desserts

Instant Pot Chicken Tacos | Made by Meaghan Moineau

Instant Pot Chicken Tacos | Made by Meaghan Moineau

Instant Pot Chicken Tacos: A Quick, Flavorful Feast for the Whole Family


Description


Discover the magic of Instant Pot Chicken Tacos, a delicious and easy meal that brings families together. With simple ingredients like chicken breasts, purple onion, and canned salsa, this dish transforms into a mouthwatering main course that's sure to please. Perfect for busy weeknights or a casual dinner party, these tacos capture the essence of home-cooked comfort food in a fraction of the time. Dive into this recipe and enjoy a taste of nostalgia with every bite.


A Nostalgic Family Memory


Growing up, Taco Tuesdays were a cherished tradition in our household. As the sun dipped below the horizon, casting a warm glow over our kitchen, my siblings and I would gather around the table, eagerly awaiting the sizzling sounds and tantalizing aromas that filled the air. Mom would always make her signature chicken tacos, a recipe passed down from her grandmother. The kitchen buzzed with laughter and stories as we chopped fresh onions and seasoned the chicken with care.


One particular Tuesday stands out in my memory. It was a chilly autumn evening, and the first hint of winter's bite was in the air. Mom had recently received an Instant Pot as a gift, and she was eager to try it out with our beloved taco recipe. We were skeptical at first—could this new gadget really recreate the flavors we held so dear?


As the Instant Pot worked its magic, we shared stories of past family adventures and dreamed of future ones. The smell of seasoned chicken and salsa wafted through the room, and our mouths watered in anticipation. When the timer finally beeped, signaling the end of the cooking process, we gathered around as Mom carefully lifted the lid.


The result was nothing short of spectacular. The chicken was tender and infused with the rich flavors of taco seasoning and salsa. As we bit into our tacos, the familiar taste of lime juice and savory chicken transported us back to a simpler time. That evening, we realized that while the method had changed, the heart of our family tradition remained unchanged.


Recipe


Ingredients


- 2 chicken breasts


- Black pepper


- 1 tablespoon taco seasoning


- 1 purple onion, sliced


- 1 cup canned salsa


- 2 tablespoons lime juice


Instructions


1. Season both sides of the chicken breasts with black pepper and taco seasoning.


2. Place the seasoned chicken into the bottom of the Instant Pot.


3. Top the chicken with sliced purple onion and canned salsa.


4. Secure the Instant Pot lid into the lock position.


5. Select the Poultry setting and set the timer for 12 minutes.


6. Once cooking is complete, allow the Instant Pot to naturally release pressure for 20 minutes.


7. Carefully remove the chicken from the Instant Pot and shred it using two forks.


8. Sprinkle the shredded chicken with lime juice for added zest.


9. Serve over rice or with warm tortillas for a delightful taco experience.


Difficulty Rating


This recipe is rated a 3 out of 10 for difficulty, making it an ideal choice for cooks of all skill levels. Its simplicity and efficiency make it a fantastic option for those new to using an Instant Pot or anyone looking for a quick, satisfying meal.


Classification


Instant Pot Chicken Tacos are classified as a Main Dish, perfect for family dinners or entertaining guests with minimal fuss.


---


Embrace the ease and flavor of Instant Pot Chicken Tacos, and create new family memories with this delightful dish. Whether you're a seasoned cook or just starting out, this recipe is sure to become a beloved staple in your culinary repertoire.

Read more about Appetizers

Read more about Main Dishes

Read more about Desserts

Nachos Grande | Made by Meaghan Moineau

Nachos Grande | Made by Meaghan Moineau

Title: Nachos Grande: A Flavorful Journey to Family Gatherings


Description:

Explore the vibrant, tantalizing flavors of Nachos Grande—a dish that not only brings a delightful burst of taste to your table but also serves as a nostalgic trip down memory lane. Perfect for gatherings, this crowd-pleaser is a sure way to impress your guests with its rich, spicy notes and mouth-watering cheese melt. Discover a beloved family recipe that's both heartwarming and satisfying.

---


Recipe: Nachos Grande


Ingredients:

- 1 can of tomatoes

- 1 cup of cheddar cheese, shredded


- 1 tablespoon chili powder


- 2 tablespoons corn oil


- 2 garlic cloves, minced


- 1 green bell pepper, chopped


- 1 green fresh chili, diced


- 1 teaspoon ground cumin


- 1 onion, chopped


- 1 teaspoon paprika, plus extra for garnish


- 1 can of refried beans


- 1 bag of tortilla chips


- 1/2 cup of water


Instructions:

1. Sauté the Veggies: Heat corn oil in a skillet over medium heat. Add chopped onion, green bell pepper, and minced garlic. Sauté gently, stirring occasionally for about 5 minutes, until the vegetables are softened but not browned.
2. Cook the Sauce: Add canned tomatoes and fresh green chili to the skillet. Continue to cook over medium heat for another 5 minutes, allowing most of the liquid to evaporate.
3. Spice it Up: Stir in chili powder and paprika, cooking for an additional 3 minutes to let the spices bloom.
4. Prepare the Beans: Add the refried beans, breaking them up with a fork. Pour in the water and cook, stirring occasionally, for 8-10 minutes until the mixture thickens.
5. Assemble and Bake: Spoon the bean mixture into the center of a baking dish. Arrange tortilla chips around the edge and sprinkle with ground cumin. Generously distribute the shredded cheddar cheese over the beans and chips.
6. Final Touch: Bake at 400°F (200°C) for 15-20 minutes, or until the cheese is irresistibly melted. Garnish with a lattice pattern of paprika for a splash of color and serve immediately.

---


A Nostalgic Family Memory:


Nachos Grande has always been more than just a dish in our family; it’s a cherished tradition. Every summer during our annual family reunion, the kitchen would come alive with the vibrant aroma of spices and sizzling vegetables. My grandmother, the heart of our family, would orchestrate this culinary symphony, inviting us to join her in the kitchen.


We would gather around the table in anticipation, as the tantalizing scent of melting cheddar wafted through the air. The Nachos Grande would emerge from the oven, cheese bubbling and edges crisp, a masterpiece of flavors waiting to be devoured. As we dug in, laughter and stories filled the room, and each bite seemed to carry a piece of our shared history. To this day, the taste of Nachos Grande brings me back to those joyful gatherings, a delicious reminder of the love and connection that binds us.


---


Difficulty Rating: 4/10

Classification: Appetizer


Creating Nachos Grande is both a simple and rewarding experience, making it an excellent choice for those looking to whip up a quick yet impressive appetizer. Its vibrant flavors and ease of preparation make it a staple for any get-together, ensuring your guests enjoy a meal that's as memorable as it is delicious.

Read more about Appetizers

Read more about Main Dishes

Read more about Desserts

Tex-Mex Burger | Made by Meaghan Moineau

Tex-Mex Burger | Made by Meaghan Moineau

# Savoring the Southwest: Crafting the Perfect Tex-Mex Burger


## A Nostalgic Culinary Journey


Growing up in the heart of Texas, my family and I would often gather in the backyard on warm summer evenings, the air buzzing with laughter and the smell of something delicious wafting from the grill. It was on these golden evenings that my mother introduced us to the Tex-Mex Burger—a dish that would become a family favorite and a symbol of our shared love for bold flavors and simple pleasures.


I remember the first time she made it. The sun was setting, casting an amber glow across our backyard. My siblings and I watched in awe as she skillfully mixed ground beef with salsa and a medley of spices. It was like watching a magician at work. When she handed each of us a burger, the first bite was transformative. The crispy exterior of the patty gave way to a juicy, flavorful core, perfectly balanced by the creamy avocado and the kick of pepper jack cheese.


## Crafting Your Own Tex-Mex Burger


### Ingredients:


- Ground beef


- Salsa


- Avocado


- Pepper jack cheese


- Hamburger buns


- Red onion


- Chili powder


- Cumin


- Paprika


- Cilantro


- Salt


- Pepper


### Instructions:


1. **Preheat the Broiler:** Begin by preheating your broiler. This will ensure a delightful crust on your patties.


2. **Prepare the Frying Pan:** Heat a large frying pan over medium-high heat. We want it hot enough to sear the burgers to perfection.


3. **Make the Patties:** In a large mixing bowl, combine the ground beef with salsa, chili powder, cumin, paprika, salt, and pepper. Mix until the ingredients are evenly distributed.


4. **Form the Patties:** Shape the mixture into patties, pressing slightly in the center for even cooking.


5. **Cook the Patties:** Place the patties in the hot frying pan. Cook each side for approximately 4-5 minutes, ensuring a nice crust forms.


6. **Melt the Cheese:** In the last minute of cooking, place a slice of pepper jack cheese on each patty. Allow it to melt beautifully over the patty.


7. **Assemble the Burger:** Toast the hamburger buns lightly, then layer each with a slice of avocado, a juicy patty, and a few slices of red onion. Garnish with fresh cilantro.


## A Flavorful Main Dish


The Tex-Mex Burger is more than just a meal; it’s a tribute to the culinary melding of robust Texan and vibrant Mexican flavors. With its harmonious blend of spices and fresh ingredients, it promises a taste of the Southwest in every bite.


### Difficulty Rating: 4/10


This dish is surprisingly easy to prepare, making it perfect for both novice cooks and seasoned chefs looking to spice up their culinary repertoire. As a Main Dish, it’s ideal for family dinners, backyard barbecues, or any occasion that calls for a hearty, flavorful meal.


## A Family Tradition


Even now, whenever we gather as a family, someone inevitably suggests we make those unforgettable Tex-Mex Burgers. They’ve become a beloved tradition, a culinary heirloom passed down through flavors and memories. As you embark on crafting your own Tex-Mex Burger, may you find the same joy and connection that this dish has brought to my family for generations. Happy cooking!

Read more about Appetizers

Read more about Main Dishes

Read more about Desserts