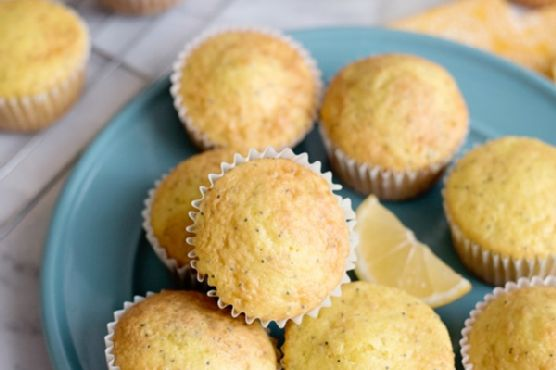
Lemon Poppy Seed Muffins
Intro
There’s something magical about the aroma of freshly baked muffins wafting through the house. It takes me back to lazy Sunday mornings at my grandmother’s house, where the kitchen was always bustling with activity. Her lemon poppy seed muffins were my favorite, a delightful treat that paired perfectly with a cup of tea. Today, I am excited to share this beloved recipe with you, hoping it brings as much joy to your home as it does to mine.
Why You’ll Love It
These Lemon Poppy Seed Muffins are a delightful combination of tangy lemon and the subtle nuttiness of poppy seeds. Perfect for breakfast, a snack, or even dessert, these muffins are incredibly easy to make and are sure to impress. They have a moist and tender crumb, thanks to the addition of lemon pudding mix and cake mix, making them a crowd-pleaser for any occasion. Plus, the bright lemon flavor is like a burst of sunshine in every bite!
Ingredients
- 2 large eggs
- 1 package lemon pudding mix
- 1 package lemon cake mix
- 2 tablespoons poppy seeds
- 1/2 cup vegetable oil
- 1 cup water
Instructions
- Preheat your oven to 350°F (175°C) and line two muffin tins with cupcake wrappers.
- In a large bowl, combine the eggs, lemon pudding mix, lemon cake mix, poppy seeds, and vegetable oil. Mix well until the ingredients are fully incorporated.
- Slowly add the water into the mixture, stirring continuously to ensure a smooth batter.
- Pour the batter into the prepared muffin tins, filling each liner about two-thirds full.
- Bake for 15-17 minutes, or until the muffins are a light golden brown on top and a toothpick inserted into the center comes out clean.
- Allow the muffins to cool in the pan for a few minutes before transferring them to a wire rack to cool completely.
Tips
For the best results, make sure your eggs are at room temperature before you begin. This helps the batter mix more evenly and results in a fluffier muffin. You can also add a teaspoon of lemon zest to the batter for an extra zing of lemon flavor. And don’t overmix the batter; it’s okay if it’s a bit lumpy. Overmixing can lead to dense muffins, and we want them to be light and airy!
Variations & Substitutions
If you want to switch things up, consider adding a handful of blueberries to the batter for a fruity twist. You can also substitute the vegetable oil with melted coconut oil for a subtle coconut flavor. For a gluten-free version, use a gluten-free lemon cake mix and pudding mix. Additionally, if you’re avoiding eggs, you can use a flax egg as a substitute. Simply mix one tablespoon of ground flaxseed with three tablespoons of water for each egg.
Storage
These muffins are best enjoyed fresh, but they can be stored in an airtight container at room temperature for up to three days. For longer storage, place them in a sealed container or freezer bag and freeze for up to two months. To enjoy, simply thaw them at room temperature or warm them in the oven for a few minutes before serving.
FAQ
Can I use fresh lemon juice instead of lemon pudding mix?
While fresh lemon juice adds a wonderful flavor, the lemon pudding mix is crucial for achieving the moist texture and rich flavor of these muffins. You can use fresh lemon juice in addition to the pudding mix for an extra burst of citrus.
How can I tell when the muffins are done?
The muffins are done when the tops are a light golden brown and a toothpick inserted into the center comes out clean. Be careful not to overbake them, as they can dry out quickly.
Is it necessary to use poppy seeds?
Poppy seeds add a lovely texture and a hint of nutty flavor to the muffins, but if you don’t have them on hand or prefer not to use them, you can omit them. The muffins will still be delicious without them!
Nutrition
Each muffin contains approximately 200 calories, 10 grams of fat, 28 grams of carbohydrates, and 3 grams of protein. These values may vary based on the specific ingredients and brands you use.
Conclusion
Baking these Lemon Poppy Seed Muffins is a wonderful way to bring the joy of homemade treats into your kitchen. With their bright and zesty flavor, they are sure to become a favorite in your household just like they are in mine. Whether you’re enjoying them with family on a lazy weekend morning or sharing them with friends over coffee, these muffins are a delightful treat that brings warmth and happiness with every bite. Happy baking!
Related update: Lemon Poppy Seed Muffins