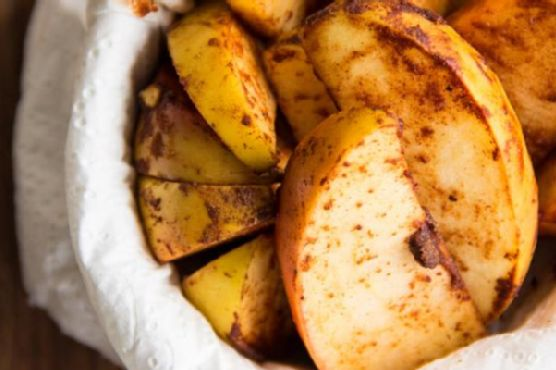
Baked Cinnamon Apple Wedges
Intro
There’s something undeniably comforting about the aroma of apples and cinnamon filling your home, a scent that transports you back to cozy autumn days spent with family. I remember as a child, my grandmother would make a similar dish on chilly afternoons. Her kitchen would be a haven of warmth and sweet spices, and I’d eagerly await the moment the timer would ding, signaling it was time to enjoy the fruits of her labor. Those baking sessions with her were more than just cooking; they were cherished memories filled with love and laughter. Today, I’m thrilled to share a modern twist on her classic recipe: Baked Cinnamon Apple Wedges. This dish is simple yet full of flavor, a delightful treat for any occasion.
Why You’ll Love It
This recipe for Baked Cinnamon Apple Wedges is a delightful combination of simplicity and taste. Here’s why you’ll adore it:
- Quick and Easy: With just four ingredients and minimal prep time, it’s perfect for those busy days when you crave something sweet yet uncomplicated.
- Healthy Indulgence: Using natural sweeteners like maple syrup and the inherent goodness of apples, it’s a guilt-free treat.
- Aromatic and Inviting: The scent of cinnamon and nutmeg baking in your oven creates a cozy and inviting atmosphere.
- Versatile Snack: Whether enjoyed warm or cold, these wedges make a perfect snack, dessert, or even a breakfast side.
Ingredients
- 1 apple, cut into about 10-12 wedges
- 2 tablespoons maple syrup
- 1 teaspoon ground cinnamon
- 1/4 teaspoon ground nutmeg
Instructions
- Preheat your oven to 180 degrees Celsius (350 degrees Fahrenheit).
- Cut the apple into about 10-12 wedges. Make sure they are evenly sliced to ensure uniform cooking.
- In a mixing bowl, combine the apple wedges with maple syrup, cinnamon, and nutmeg. Toss until the apples are well-coated.
- Place the apple wedges in a small baking dish or on a baking tray, ensuring they are in a single layer for even baking.
- Bake in the preheated oven for 10 minutes.
- The apples should emerge golden brown and cooked through. Serve them warm for the best experience.
Tips
- Choose the Right Apple: Opt for a firm apple variety like Honeycrisp or Granny Smith to maintain a pleasant texture after baking.
- Even Slices: Try to slice the apple wedges as uniformly as possible to ensure they all cook at the same rate.
- Adjust Sweetness: Feel free to adjust the amount of maple syrup to suit your taste preferences.
Variations & Substitutions
Feel free to experiment with this recipe to suit your preferences and dietary needs:
- Spice Blend: Add a pinch of ground ginger or cloves for an extra spice kick.
- Sweeteners: Honey or agave syrup can be used in place of maple syrup if you prefer.
- Toppings: Consider adding a sprinkle of chopped nuts or a drizzle of caramel sauce for added texture and flavor.
Storage
If you manage to have any leftovers, store them in an airtight container in the refrigerator for up to three days. To enjoy them warm again, reheat in the oven at a low temperature or use a microwave for a quick fix.
FAQ
Can I use other types of fruit with this recipe?
Absolutely! This recipe is quite versatile. Pears work wonderfully as a substitute for apples, offering a slightly different flavor profile but maintaining the same warm, comforting essence.
Is it possible to make this recipe vegan?
This recipe is already vegan, thanks to the use of maple syrup as a sweetener. Just be sure to use pure maple syrup without any added ingredients that might not align with a vegan diet.
Can I prepare this in advance?
Yes, you can slice the apples and coat them with the syrup and spices a few hours in advance. Keep them refrigerated until you’re ready to bake. This makes it convenient for planning ahead, especially if you’re entertaining guests.
Nutrition
Each serving of Baked Cinnamon Apple Wedges (assuming one apple serves two) is approximately:
- Calories: 95
- Carbohydrates: 25g
- Fiber: 3g
- Sugars: 18g
- Protein: 0.5g
- Fat: 0.2g
These values may vary slightly depending on the size of the apple and the exact measurements used.
Conclusion
Baked Cinnamon Apple Wedges are a testament to the beauty of simple, wholesome ingredients coming together to create something truly special. Whether you’re reminiscing about family moments from the past or creating new ones, this dish is sure to become a cherished favorite. The ease of preparation and the delightful aroma make it a go-to recipe for any occasion. So next time you’re in the mood for a cozy treat, give these apple wedges a try, and let your kitchen be filled with warmth and joy.
Related update: Baked Cinnamon Apple Wedges
Related update: Healthy Mint Brownies