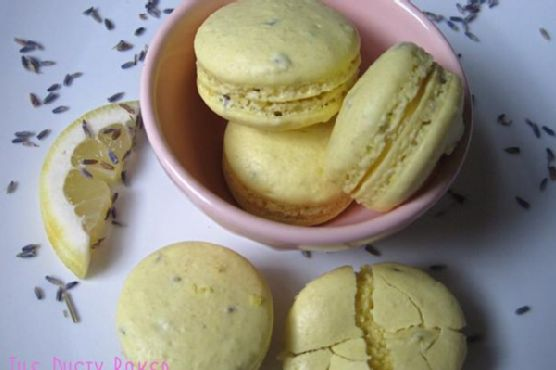
Lavender Tea With Lemon French Macarons
Intro
There’s something undeniably magical about French macarons. These delicate, airy confections have an exquisite texture that melts in your mouth. I remember the first time I tasted a macaron; it was a crisp autumn afternoon in Paris, and I was sitting in a quaint little café, watching the world go by. The macaron was lavender with a hint of lemon, and it was love at first bite. Ever since that day, I’ve been on a mission to recreate that perfect macaron, and I’m thrilled to share my Lavender Tea with Lemon French Macarons recipe with you.
Why You’ll Love It
This recipe captures the essence of a sunny afternoon spent in a fragrant, blooming garden. The floral notes of the lavender pair beautifully with the zesty lemon, creating a macaron that’s both refreshing and indulgent. Whether you’re hosting a tea party or simply treating yourself to a moment of bliss, these macarons are sure to impress.
Ingredients
- 1 cup almond flour
- 1/4 teaspoon cream of tartar
- 3 large egg whites
- 1 tablespoon dried lavender
- 1 tablespoon lemon zest
- 1 3/4 cup powdered sugar
- 1/4 cup white sugar
- Yellow food coloring
Instructions
- Pulse the almond flour and powdered sugar until blended, then sift twice to ensure all larger pieces of almond are separated out and the flour is blended well. Add the lemon zest and lavender to the flour mixture and set aside.
- Pulse the white sugar in a processor until very fine.
- In the large bowl of a standing mixer or by hand, start whipping the egg whites until foamy. Add a pinch of cream of tartar, and whip until soft peaks form.
- Reduce speed to low and add the fine white sugar one tablespoon at a time. When fully incorporated, increase speed to medium and then to high, and whip until stiff peaks form. Timing varies on this, and this is where practice makes perfect. Add your food coloring gel when almost completely done whipping.
- Sift 1/3 of the flour mixture into the egg whites and fold in completely. Repeat until all the flour is incorporated. You want to fold in until the batter is smooth, but still light.
- Spoon into a pastry bag fitted with a large tip. Pipe 1-inch rounds onto parchment-lined baking sheets, pulling the tip to the side to avoid leaving a peak mark.
- Tap the pan somewhat assertively on the counter to remove any trapped air and help the batter settle. Let sit for 30 minutes to 2 hours, until a shell forms on the top and a finger pressed lightly doesn’t leave a mark.
- Preheat your oven to around 300°F. Bake macarons in the fully preheated oven for 5 minutes, turn the pan, and bake for around 8 more minutes, or until the feet of the macaron are a bit sturdier than soft.
- Cool on sheets for two minutes, then remove to a rack to cool completely.
- Fill with prepared lemon curd and refrigerate to harden. Serve at room temperature with tea.
Tips
- Ensure that all your mixing bowls and utensils are clean and dry before starting. Any grease or moisture can prevent the egg whites from whipping properly.
- Practice makes perfect. Macarons can be finicky, so don’t be discouraged if your first batch isn’t perfect. Keep trying, and you’ll get the hang of it!
- Use a silicone baking mat or parchment paper to prevent the macarons from sticking to the baking sheet.
Variations & Substitutions
If you’re looking to switch things up, consider these variations:
- Flavor Variations: Swap the lemon zest and lavender for other flavors like orange zest and vanilla, or raspberry and rose.
- Nut-Free Option: Substitute the almond flour with sunflower seed flour for a nut-free version.
- Color Customization: Use different food coloring gels to create macarons in a rainbow of colors.
Storage
Macarons are best enjoyed fresh, but they can be stored in an airtight container in the refrigerator for up to 5 days. For longer storage, you can freeze them for up to a month. Just be sure to thaw them at room temperature before serving.
FAQ
Why are my macarons cracked?
Cracked macarons can be caused by under-mixing the batter or not allowing the shells to dry properly before baking. Make sure you fold the batter until it flows like lava, and let the shells rest until they form a skin on top.
How do I know when my egg whites are whipped enough?
The egg whites should be whipped until they form stiff peaks. When you lift the whisk, the peaks should stand straight up without drooping. Be careful not to over-whip, as this can cause the macarons to become dry.
Can I use liquid food coloring?
It’s best to use gel food coloring, as liquid food coloring can alter the consistency of the batter and affect the final texture of the macarons.
Nutrition
While these macarons are a delightful treat, it’s important to enjoy them in moderation. Each macaron is approximately 100 calories, with most of the calories coming from sugar and fat. They are naturally gluten-free, making them a great option for those with gluten sensitivities.
Conclusion
Baking macarons is both an art and a science, and it requires patience and practice. But once you master the technique, you’ll be able to create these delightful confections with ease. The combination of lavender and lemon in this recipe offers a unique twist on classic macarons, bringing a touch of elegance to any occasion. So, put on your apron, brew a pot of your favorite tea, and indulge in the simple pleasure of homemade macarons. Bon appétit!
Related update: Lavender Tea With Lemon French Macarons
Related update: Three Ingredient Frozen Pina Colada
Related update: Vegan Dirty Chai Pudding