HomeMade Hashbrowns with Spinach and Carrots | Made by Meaghan Moineau

HomeMade Hashbrowns with Spinach and Carrots | Made by Meaghan Moineau

Title: A Nostalgic Twist on a Classic: Homemade Hashbrowns with Spinach and Carrots


Description:

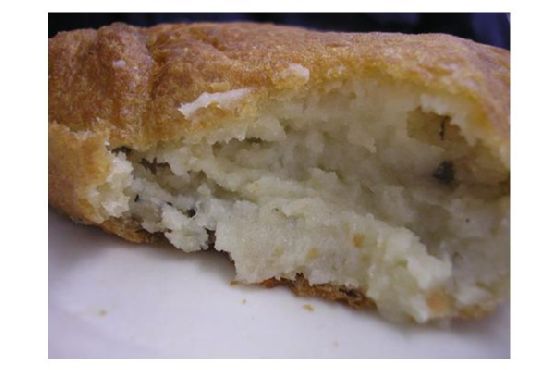
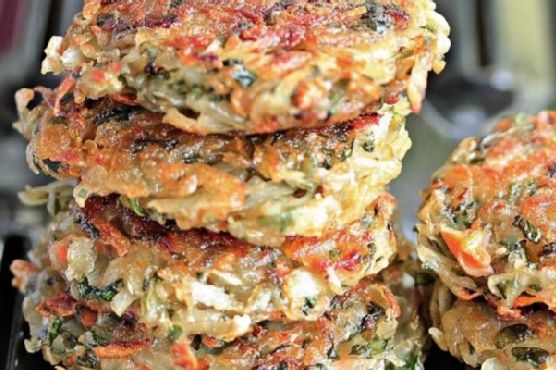
Dive into the comforting embrace of homemade hashbrowns, enhanced with the vibrant flavors of spinach and carrots. Perfect as an appetizer or a hearty main dish, this recipe brings back cherished family memories with every bite.

---


There’s something profoundly comforting about the sizzle of hashbrowns hitting a hot pan. The aroma alone evokes memories of Sunday brunches spent with family, where laughter was as abundant as the delicious food on the table. This recipe for Homemade Hashbrowns with Spinach and Carrots is not just a delightful twist on a classic; it's a journey back to those cherished moments.


Ingredients:

- 2 large potatoes, grated

- 1 cup fresh spinach leaves, chopped


- 1 medium onion, finely chopped


- 1 carrot, grated


- 1/2 teaspoon red chilli powder


- 2 tablespoons cornflour


- Salt, to taste


- Oil, for shallow frying


Instructions:

1. In a large bowl, combine the grated potatoes, chopped spinach, finely chopped onion, and grated carrot. Add 1/2 teaspoon of salt and mix well to ensure all the ingredients are well incorporated.

2. Squeeze the veggie mixture gently to remove all excess moisture. This step is crucial for achieving crispy hashbrowns.


3. Add red chilli powder and cornflour to the mixture. Adjust the salt by tasting, ensuring a perfect balance of flavors.


4. Form the mixture into small patties, pressing them firmly to hold their shape.


5. Heat oil in a pan over medium-high heat for shallow frying. Carefully place the patties into the hot pan, allowing them to brown for a few minutes on each side.


6. Once both sides are browned, reduce the heat to medium. Continue cooking until the hashbrowns are cooked through and crispy.


7. Serve hot and enjoy!


---


A Family Memory:


As a child, Sunday mornings were my favorite. The kitchen would come alive with the sounds and smells of breakfast being prepared. My grandmother was the mastermind behind these culinary experiences, and her hashbrowns were legendary. She would always add a little something extra to her recipes—whether it was a handful of fresh spinach from her garden or a dash of spice—which made each bite memorable.


One particular Sunday, I remember standing on a stool beside her, watching as she expertly mixed the ingredients and formed perfect patties. She handed me a small piece of dough, encouraging me to make my own. My creation was a lopsided attempt, but she placed it in the pan with the same care as the others.


Years later, I find myself recreating those mornings in my own kitchen. Each time I make these hashbrowns, I'm reminded of her gentle guidance and the warmth of family gatherings. It’s a simple dish, yet it carries the weight of tradition and the joy of shared meals.


Difficulty Rating: 4/10


This recipe is straightforward and perfect for both novice and seasoned cooks who appreciate the simplicity of a well-made dish.


Classification: Appetizer/Main Dish


Whether served as a starter or the main event, these hashbrowns with spinach and carrots are sure to become a beloved addition to your culinary repertoire. Enjoy them as a standalone dish or pair them with your favorite breakfast accompaniments.

Read more about Appetizers

Read more about Main Dishes

Read more about Desserts

Pork Carnitas Tacos | Made by Meaghan Moineau

Pork Carnitas Tacos | Made by Meaghan Moineau

Unforgettable Pork Carnitas Tacos: A Taste of Tradition and Togetherness


A Culinary Journey Down Memory Lane


There's something truly magical about the way food can evoke cherished memories and transport us back to special moments spent with loved ones. In our family, Pork Carnitas Tacos have always held a special place in our hearts. Not only is this dish a tantalizing blend of flavors and textures, but it also serves as a delicious reminder of countless family gatherings, where the kitchen buzzed with laughter and the air was filled with the irresistible aroma of simmering pork and fresh cilantro.


The Recipe: Pork Carnitas Tacos


Difficulty: 6/10
Category: Main Dish

Ingredients:

- 2 cups water

- 3 lbs lean pork butt


- 4 cloves garlic, minced


- Sea salt and ground pepper to taste


- 2 tablespoons olive oil


- 1 cup orange juice


- 1 cup milk


- Corn tortillas


- Salsa fresca


- 2 ripe avocados, sliced


- Fresh cilantro, chopped


- 1 onion, finely chopped


- 2 limes, sliced into wedges


Instructions:

1. Prepare the Pork:

In a large Dutch oven, combine the pork, garlic, sea salt, ground pepper, and water. Bring the mixture to a boil, then reduce the heat, cover, and let it simmer over medium-low heat for 45 minutes to one hour. This slow cooking process ensures the meat becomes tender and infused with the aromatic flavors of garlic and spices.


2. Shred and Brown the Pork:

Once cooked, drain the pork well. Allow it to cool until it's manageable, then shred the meat by hand or with the tines of a fork, discarding any remaining fat. Return the shredded pork to the Dutch oven, heating the olive oil over medium heat. Add the orange juice and milk, cooking until the liquid evaporates and the pork is beautifully browned. Season with additional salt and pepper to taste.


3. Prepare the Toppings:

Chop the onion and cilantro, and slice the avocado and limes. Place each in small individual bowls for an inviting serving presentation.


4. Assemble the Tacos:

Heat the corn tortillas in a dry frying pan to keep them warm and pliable. For each taco, stack two tortillas and layer them with warm carnitas. Top with chopped cilantro, onion, avocado slices, and a squeeze of fresh lime juice for that perfect burst of citrusy brightness.


A Nostalgic Family Memory


Growing up, weekends at Grandma's house were synonymous with the sizzle of carnitas on the stove. I remember sitting on a stool by the kitchen counter, watching in awe as she effortlessly transformed simple ingredients into a feast that brought us all together. The highlight of those afternoons was gathering around the table, each of us eagerly assembling our tacos, swapping stories, and savoring the rich, savory flavors that felt like a warm embrace.


Even as I recreate this dish today, I can almost hear the echoes of playful banter and feel the familial warmth that made those gatherings so special. Pork Carnitas Tacos are more than just a meal; they are a bridge to the past, a reminder of the joy that comes from shared moments and the love that binds us together.


Conclusion


Pork Carnitas Tacos are a delightful main dish that combines the heartiness of seasoned pork with the freshness of vibrant toppings. With a difficulty rating of 6/10, it's a recipe that balances simplicity with a touch of culinary finesse. Whether you're creating new memories or reliving cherished ones, these tacos promise to bring a touch of tradition and a whole lot of flavor to your table. So gather your loved ones, roll up your sleeves, and let the delicious journey begin!

Read more about Appetizers

Read more about Main Dishes

Read more about Desserts

Moroccan Chicken Pitas | Made by Meaghan Moineau

Moroccan Chicken Pitas | Made by Meaghan Moineau

Title: A Taste of Tradition: Moroccan Chicken Pitas
Description: Embark on a flavorful journey with our Moroccan Chicken Pitas, a recipe steeped in rich spices and cherished family memories. Discover how to create this enticing main dish that marries the vibrant flavors of Morocco with a personal touch of nostalgia.

---


A Culinary Adventure: Moroccan Chicken Pitas


When the aroma of paprika, coriander, and cinnamon fills the kitchen, it takes me back to sunny afternoons at my grandmother's house. Our family would gather around the backyard grill, eagerly awaiting the delicious spread that promised to transport us to the bustling souks of Marrakesh. Today, I'm thrilled to share with you our cherished family recipe for Moroccan Chicken Pitas—a dish that's as heartwarming as it is flavorful.


Ingredients:


- For the Chicken:

- Skinless boneless chicken breasts


- 1 teaspoon paprika


- 1 teaspoon coriander


- 1/2 teaspoon cinnamon


- 1 teaspoon cumin


- 1/4 teaspoon cayenne pepper


- 2 cloves garlic, minced


- 1 teaspoon ginger, grated


- Salt to taste


- 2 tablespoons olive oil


- Fresh Italian parsley, finely chopped


- For the Tabbouleh:

- 1 cup cooked quinoa


- 1 can diced petite tomatoes, drained


- 1 yellow onion, diced


- Juice of 1 lemon


- 1/2 cup diced Medjool dates


- 2 tablespoons olive oil


- Sea salt to taste


- For the Yogurt Sauce:

- 1 cup Greek yogurt


- 1/2 cucumber, diced


- Fresh mint, chopped


- Juice of 1 lemon


- Additional:

- Pita bread, halved and split open


Instructions:


1. Prepare the Chicken:

Combine paprika, coriander, cinnamon, cumin, cayenne pepper, garlic, ginger, and salt in a bowl. Mix well to create a fragrant spice blend. Place chicken breasts on a cutting board and pound to about 1/2 inch thick using a meat mallet. Generously rub the spice mixture over all sides of the chicken breasts. Cover and refrigerate for at least an hour to allow the flavors to meld.


2. Make the Tabbouleh:

In a large bowl, combine cooked quinoa, diced tomatoes, onion, lemon juice, Medjool dates, olive oil, and sea salt. Stir well to integrate all the ingredients. Adjust salt and oil to your liking. Cover and chill in the refrigerator while the chicken marinates.


3. Prepare the Yogurt Sauce:

In a separate bowl, combine Greek yogurt, diced cucumber, mint, and lemon juice. Stir to combine and refrigerate until ready to serve.


4. Grill the Chicken:

Preheat your grill to medium heat. Grill the marinated chicken breasts until fully cooked, about 16 minutes, ensuring some crispy edges form for added flavor. Once cooked, let them rest for a few minutes before slicing.


5. Assemble the Pitas:

Take the halved pita bread and fill each with slices of grilled chicken, a generous helping of tabbouleh, and a dollop of the refreshing yogurt sauce.


Nostalgic Family Story:


This dish always reminds me of family gatherings at my grandmother's home. She had a magical way of bringing everyone together with her cooking. I vividly remember my cousins and I playing in the garden while the adults chatted around the grill. The smell of the spices wafted through the air, creating an atmosphere of warmth and anticipation. My grandmother would always remind us that food is not just about nourishment—it's about connection and creating memories. These Moroccan Chicken Pitas are more than just a recipe; they are a piece of our family's history, a tradition we continue to savor and celebrate.


Recipe Difficulty: 6/10


Classification: Main Dish

---


Whether you're introducing your family to the vibrant flavors of Morocco or simply looking to add a new favorite to your meal rotation, these Moroccan Chicken Pitas promise an unforgettable dining experience. Enjoy the journey and create your own cherished memories with every bite.

Read more about Appetizers

Read more about Main Dishes

Read more about Desserts

Stuffed Chicken Breast | Made by Meaghan Moineau

Stuffed Chicken Breast | Made by Meaghan Moineau

Title: A Taste of Home: Cream Cheese and Green Onion Stuffed Chicken Breasts
Description: Discover the joy of cooking with our Stuffed Chicken Breast recipe, featuring a delectable blend of cream cheese and green onions. This easy-to-follow dish transports you back to cherished family gatherings and promises to delight your taste buds. Rated 3/10 in difficulty, it's the perfect main dish for any occasion.

---


Growing up, the kitchen was always the heart of our family home. Every Sunday, the tantalizing aroma of my mom's cooking would waft through the house, drawing us all together. One of her signature dishes was the Stuffed Chicken Breast, a recipe passed down from my grandmother. It was a family favorite, and each bite was infused with the warmth and love of countless shared meals.


Ingredients:

- Skinless, boneless chicken breasts


- Cream cheese


- Green onions, finely chopped


- Your favorite chicken seasoning


- Olive oil-based cooking spray


Instructions:

1. Begin by washing and patting dry the chicken breasts. My grandmother would always say that the secret to a great dish is in the preparation—handle each ingredient with care.


2. Carefully cut each chicken breast lengthwise, ensuring you don't cut all the way through. This was always my favorite part as a kid, watching my mom skillfully create pockets in the chicken for the delicious filling.


3. In a small bowl, mix together the cream cheese and chopped green onions. This creamy concoction brings back memories of laughter and storytelling around the kitchen counter as we prepared the filling.


4. Generously stuff each chicken breast with the cream cheese mixture, pressing firmly to close. I remember my mom teaching me to be patient and precise—skills that have served me well beyond the kitchen.


5. Once stuffed, spray the chicken breasts with olive oil-based cooking spray. This step ensures a beautiful, golden-brown exterior. My mom's kitchen always had an olive oil sprayer handy, a little trick she learned from her mother.


6. Now, rub the chicken with your favorite seasoning. This is where you can make the recipe your own. I still use the same blend my grandmother did—a mix of garlic powder, paprika, salt, and pepper. The smell of it brings me back to those cherished Sundays.


7. Bake the chicken in a preheated oven at 375°F (190°C) for about 25-30 minutes, or until the chicken is cooked through and the cheese is melted and bubbly.


Memories on a Plate:

As the chicken bakes, the house is filled with the comforting aroma of a meal that has stood the test of time. Sitting down to eat, I'm reminded of our family gathered around the table, sharing stories and laughter. Each bite of the Stuffed Chicken Breast is a trip down memory lane—a reminder of the love and joy that comes from sharing food with those you care about.


Difficulty and Classification:

With a difficulty rating of 3/10, this Stuffed Chicken Breast recipe is both simple and satisfying, making it an ideal main dish for any occasion. Whether you're cooking for family or friends, this dish is sure to become a beloved staple in your kitchen, just as it has been in mine.


So, gather your ingredients, and embark on a culinary journey that celebrates tradition, family, and the timeless pleasure of a home-cooked meal.

Read more about Appetizers

Read more about Main Dishes

Read more about Desserts

Roasted Beet and Radicchio Salad | Made by Meaghan Moineau

Roasted Beet and Radicchio Salad | Made by Meaghan Moineau

Title: A Taste of Tradition: Roasted Beet and Radicchio Salad


Description:

Explore the vibrant flavors and rich memories intertwined in our Roasted Beet and Radicchio Salad. This delightful dish combines earthy beets, crispy radicchio, and a tangy vinaigrette, topped with creamy queso fresco. Perfect as an appetizer with a difficulty rating of 4/10, it’s an easy yet impressive addition to any meal.

---


As the cool autumn breeze swept through the trees, painting the landscape with hues of gold and crimson, my family gathered in our cozy kitchen, a tradition that marked the heart of the harvest season. The star of our fall feasts often came in the form of a humble yet exquisite dish: the Roasted Beet and Radicchio Salad. The sight of vibrant beets roasting in the oven, their aroma mingling with the crisp scent of fresh radicchio, always signaled warmth and togetherness.


Ingredients:

- Beets

- Olive oil


- Radicchio


- Red onion


- Radishes


- Fresh mint leaves


- Queso fresco


- Red wine vinegar


- Honey


- Garlic clove


- Salt


- Pepper


Instructions:

1. Preheat your oven to 400°F. Trim the beets and place them in a baking dish. Drizzle with 1 tablespoon of olive oil, cover, and roast for 30-35 minutes, or until they are fork-tender.
2. Prepare the radicchio by cutting it into quarters, removing the core, and slicing into thin strips. Soak the radicchio in a bowl of ice water for 20-30 minutes to mellow its bitterness.
3. Slice the red onion and radishes very thinly. These add a crisp texture and peppery flavor that complement the earthy beets beautifully.
4. Whisk together 3 tablespoons of olive oil, red wine vinegar, honey, minced garlic, salt, and pepper in a small bowl, creating a simple yet flavorful vinaigrette.
5. Peel the cooled beets and cut them into thin wedges. Toss them with the radicchio, onions, radishes, and fresh mint in the vinaigrette.
6. Top your salad with crumbled queso fresco, adding a creamy and slightly tangy finish. Serve immediately to enjoy the fresh, vibrant flavors.

A Nostalgic Touch:

Every autumn, as we prepared this salad, my grandmother would regale us with tales of her childhood. She spoke of her mother’s bustling kitchen, the air filled with laughter and the scent of roasting beets. "It was a time when life was simpler," she’d say, her eyes twinkling with fondness. As we savored each bite of the salad, it was as if we were sharing not just a meal, but a piece of our family's history.

Difficulty Rating: 4/10

Classification: Appetizer


This Roasted Beet and Radicchio Salad is more than just a dish; it’s a cherished tradition, a blend of flavors that echo the love and warmth of family gatherings. Whether you’re looking to recreate a piece of nostalgia or introduce a new classic to your table, this salad is sure to delight both the eyes and the palate.

Read more about Appetizers

Read more about Main Dishes

Read more about Desserts

Raspberry Cheesecake Bars By Mommie Cooks | Made by Meaghan Moineau

Raspberry Cheesecake Bars By Mommie Cooks | Made by Meaghan Moineau

Title: Savoring Sweet Memories: Raspberry Cheesecake Bars That Transport You Home
Description: Dive into the delightful world of Raspberry Cheesecake Bars by Mommie Cooks. With a perfect blend of creamy cheesecake and tart raspberries atop a buttery shortbread crust, this dessert is a nostalgic journey back to family gatherings filled with laughter and love. Discover the recipe and relive cherished moments in every bite.

---


A Taste of Nostalgia: Raspberry Cheesecake Bars

There's something magical about family recipes. They have the power to transport us back to cherished moments, where the kitchen is filled with laughter, and the air is sweet with the aroma of love and warmth. One such recipe that holds a special place in my heart is the Raspberry Cheesecake Bars by Mommie Cooks. It's a dessert that not only delights the taste buds but also evokes fond memories of family gatherings and shared stories.


The Heartwarming Story Behind the Bars

Growing up, Sundays were reserved for family get-togethers at Grandma's house. The kitchen was a bustling hub of activity, with everyone pitching in to prepare a feast. Among the various dishes that adorned the table, my favorite was always the Raspberry Cheesecake Bars. Grandma would lovingly prepare them, her hands moving with the kind of grace that comes only from years of practice.


I remember sitting on the kitchen counter, eagerly watching as she creamed together butter and sugar, the sweet scent enveloping the room. As she added a hint of almond extract and the vibrant zest of lemon, Grandma would share stories from her childhood, tales of her own mother baking these very bars in a cozy kitchen in the heart of summer.


Crafting the Perfect Raspberry Cheesecake Bars

These bars start with a buttery shortbread crust that is both tender and flavorful. The key ingredients include a combination of butter, brown sugar, and white sugar, creamed together until light and fluffy. A touch of lemon zest and vanilla infuse the dough with a fragrant aroma, while an egg binds it all together.


After a quick chill in the fridge, the dough is pressed into a tart pan and baked until golden brown. The shortbread is then left to cool, creating the perfect foundation for the creamy cheesecake layer.


The cheesecake filling is a luscious blend of cream cheese, sweetened condensed milk, and heavy whipping cream, with a hint of vanilla and almond extract for depth. A swirl of vibrant raspberries, thickened with cornstarch and sweetened with a touch of sugar, adds a burst of tartness that beautifully complements the rich, creamy filling.


Difficulty and Classification

With a difficulty level of 6 out of 10, these Raspberry Cheesecake Bars are an approachable yet impressive dessert. They require some patience and attention to detail, but the end result is well worth the effort. Perfect as a dessert for any occasion, these bars are sure to impress your family and friends.


Conclusion

Every bite of these Raspberry Cheesecake Bars is a sweet reminder of family bonds and cherished moments. Whether you're making them for a special occasion or simply to indulge in a bit of nostalgia, this recipe is sure to become a beloved staple in your home. So gather your ingredients, invite your loved ones into the kitchen, and create new memories with this timeless dessert.

Read more about Appetizers

Read more about Main Dishes

Read more about Desserts

Coconut-Almond Crusted Tilapia | Made by Meaghan Moineau

Coconut-Almond Crusted Tilapia | Made by Meaghan Moineau

Title: Savor the Islands: Coconut-Almond Crusted Tilapia Recipe

Description: Dive into a culinary escape with our Coconut-Almond Crusted Tilapia, a dish that brings the tropical flavors of the islands right to your kitchen. This delightful main dish is not only simple to prepare but also offers a flavorful experience that will make your taste buds dance. Join us as we explore this recipe's step-by-step guide and share a heartwarming family memory that makes this dish truly special.


---


Coconut-Almond Crusted Tilapia: A Taste of the Tropics


There's something magical about the blend of coconut and almond that transports me back to my grandmother's cozy kitchen. Her little island home always bustled with the scents of tropical spices and fresh seafood, creating a warm haven of delectable aromas. Among her plethora of cherished recipes, the Coconut-Almond Crusted Tilapia stood out as a favorite for our family gatherings.


Ingredients:


- 4 white tilapia fillets


- 1 lemon, halved


- 1/2 cup coconut milk


- 1/2 cup almond flour


- 1/2 cup unsweetened shredded coconut


- Salt, to taste


- Black pepper, to taste


- 1/2 tsp ground ginger


- 1/2 tsp dried mint


- Oil for frying


Instructions:


1. Prep the Fish: Start by patting the tilapia fillets dry with paper towels. Sprinkle both sides of each fillet with a generous pinch of salt and black pepper.
2. Marinate: Squeeze the juice from half a lemon over the fillets and drizzle with coconut milk. Turn the fillets to ensure they're well-coated. Allow them to marinate at room temperature for 15 minutes.
3. Prepare the Breading: In a shallow bowl, combine almond flour, shredded coconut, a touch more salt and pepper, ground ginger, and dried mint. Mix well to create a fragrant breading mixture.
4. Cook the Fish: Heat oil in a large skillet over medium heat. Carefully lay the marinated fillets into the skillet. Cook until both sides are golden brown and the fish flakes easily with a fork—about 3-5 minutes per side for thin fillets, longer for thicker cuts.
5. Drain and Serve: Transfer the cooked fish to a stack of paper towels to drain and cool slightly. Serve immediately for best results, ideally alongside our Tropical Sweets & Reds Mash.

A Nostalgic Family Memory


Every summer, our family would gather at my grandmother's home, nestled by the sea. The highlight of these gatherings was always her Coconut-Almond Crusted Tilapia. I remember as a child, eagerly watching her in the kitchen, fascinated by how she gracefully turned simple ingredients into a meal that united us all. Each bite of the crispy, flavorful fish was a reminder of love, laughter, and shared moments—a tradition I now carry on in my own kitchen.


Difficulty Rating: 4/10


This delightful dish is relatively easy to prepare, making it perfect for both weeknight dinners and special occasions. With minimal ingredients and straightforward instructions, even novice cooks can successfully recreate this island-inspired delight.


Classification: Main Dish


Whether you're hosting a dinner party or looking for a new family favorite, this Coconut-Almond Crusted Tilapia is sure to impress. Pair it with a light salad or our Tropical Sweets & Reds Mash for a complete meal that celebrates the flavors of the tropics.


---


Bring a touch of island magic to your table with this Coconut-Almond Crusted Tilapia. It's more than just a dish—it's a journey to the heart of family traditions and the vibrant flavors of the sea.

Read more about Appetizers

Read more about Main Dishes

Read more about Desserts

Overnight Oatmeal | Made by Meaghan Moineau

Overnight Oatmeal | Made by Meaghan Moineau

Title: Waking Up to Warmth: The Joy of Overnight Oatmeal and Family Memories
Description: Discover the heartwarming simplicity of overnight oatmeal, a dish that cooks itself while you dream. This easy, nostalgic recipe combines dried cranberries, figs, and creamy half-and-half with hearty steel-cut oats to create a breakfast that feels like a warm hug. Perfect for busy mornings, this recipe will fill your home with comforting aromas and your heart with cherished memories.

---


Overnight Oatmeal: A Bowl of Memories and Morning Comfort

There’s something magical about waking up to the inviting aroma of a delicious breakfast ready to enjoy. Overnight oatmeal, with its rich blend of dried cranberries, figs, and creamy half-and-half, is more than just a meal—it's a memory. This recipe is simple enough for beginners and offers a delightful way to start your day. Rated at a mere 2 out of 10 in difficulty, this dish is classified as a Main Dish, making it an effortless yet satisfying breakfast option.


Ingredients:

- 1 cup dried cranberries


- 1 cup dried figs, chopped


- 2 cups half-and-half


- 1 cup steel-cut oats


- 4 cups water


Instructions:

1. In a crock-pot, combine all ingredients and set to low heat.


2. Cover and let cook for 8 to 9 hours.


3. Stir and remove to serving bowls.


This method works best if started before you go to bed. By morning, your oatmeal will be warm, creamy, and ready to serve, yielding four hearty servings.


A Nostalgic Family Memory

Growing up, breakfast was a cherished ritual in our household. I vividly remember the first time my grandmother introduced us to overnight oatmeal during one of our annual family reunions. Nestled in her cozy kitchen, she shared stories of how her own mother would prepare this simple yet nourishing meal. As she spoke, the crock-pot quietly worked its magic, filling the air with the warm, sweet scent of oats mingling with fruits.


Each morning of that reunion was a delightful surprise, waking up to the comforting smell of oatmeal that promised a day filled with laughter and love. We would gather around the table, bowls in hand, and delight in the creamy texture of the oats, the tangy burst of cranberries, and the subtle sweetness of figs. It was more than just breakfast; it was a time capsule that connected us across generations.


The beauty of this overnight oatmeal lies not only in its simplicity but in its ability to create a sense of nostalgia and togetherness. It’s a reminder that the best memories are often made around the breakfast table, where stories are shared, and bonds are strengthened.


Conclusion

In the hustle and bustle of modern life, it's comforting to know that some things remain timeless. Overnight oatmeal is one such treasure—easy to prepare, rich in flavor, and full of nostalgia. Whether you're looking to relive cherished family memories or create new ones with your own children, this recipe offers a heartwarming start to your day. So, set your crock-pot tonight and wake up to a bowl of comfort and joy.

Read more about Appetizers

Read more about Main Dishes

Read more about Desserts

Savory Carrot Souffle | Made by Meaghan Moineau

Savory Carrot Souffle | Made by Meaghan Moineau

Title: A Whisk of Nostalgia: Crafting the Perfect Savory Carrot Soufflé
Description: Dive into the heartwarming tale of a cherished family recipe that transforms humble carrots into an elegant Savory Carrot Soufflé. Discover the step-by-step process of creating this exquisite dish that promises to be the star of your dining table. With a difficulty rating of 7/10, this delightful dish serves as a sophisticated appetizer sure to impress your guests.

---


In the kitchen of my childhood home, the aroma of simmering carrots and the gentle hum of the mixer whisking egg whites is deeply etched into my memory. Every family gathering was an occasion for my grandmother to work her magic with her signature Savory Carrot Soufflé. The dish not only graced our table but also wrapped us in a warm embrace of nostalgia and familial love.


A Whisk Through Time

The recipe for this soufflé was passed down through generations, each adding their own little twist but always preserving its essence. I remember standing on a stool beside my grandmother, watching her skillfully blend the vibrant orange of the carrot puree with the creamy white sauce. Her stories of learning the recipe from her mother would fill the kitchen, much like the rich scent of nutmeg that lingered in the air.


Ingredients:

- 1 lb carrots, peeled and chopped


- 4 tablespoons butter


- 4 large eggs, separated


- 2 tablespoons flour


- 1 cup heavy cream


- 1 cup milk, divided


- 1/4 teaspoon ground nutmeg


- 1/2 cup grated parmesan cheese


- 1/2 teaspoon salt


Instructions:
1. Prepare the Carrots: Begin by cooking the carrots in a pot of salted boiling water until tender. Drain the water and blend the carrots with half a cup of milk until smooth. Set aside this vibrant carrot puree.
2. Craft the Bechamel Sauce: In a small saucepan, combine the remaining milk, heavy cream, flour, salt, butter, parmesan cheese, and nutmeg. Cook over medium heat, stirring continuously until the mixture reaches a thick consistency. Allow it to cool slightly.
3. Preheat and Prepare: Preheat your oven to 350 degrees Fahrenheit. While the oven warms up, whisk the egg whites in a clean, dry bowl until stiff peaks form. This step is crucial for achieving the soufflé's signature airy texture.
4. Combine and Conquer: Mix the carrot puree with the cooled white sauce. Gently add in the egg yolks one at a time, ensuring each is fully incorporated. Carefully fold in the stiff egg whites, using a spatula to maintain the mixture's lightness.
5. Bake to Perfection: Pour the soufflé mixture into pre-greased ramekins, setting them in a bain-marie (water bath) to ensure even cooking. Bake for approximately 1 hour, or until the soufflés have risen and developed a golden-brown crust.
A Dish to Delight

Classified as an appetizer, the Savory Carrot Soufflé is a sophisticated addition to any meal. With a difficulty rating of 7/10, it requires patience and a gentle hand, but the end result is undeniably rewarding.


As I pull the soufflé from the oven, I am transported back to those cherished family gatherings. This dish, with its delicate balance of flavors and textures, is more than a mere culinary delight—it's a testament to the enduring power of family traditions and the joy of sharing a lovingly prepared meal.


Whether you're honoring an old family recipe or starting a new tradition of your own, the Savory Carrot Soufflé is sure to leave a lasting impression. So gather your loved ones, dust off your ramekins, and let the comforting warmth of this dish fill your home and hearts.

Read more about Appetizers

Read more about Main Dishes

Read more about Desserts

Baharat Panko Crusted Albacore Tuna | Made by Meaghan Moineau

Baharat Panko Crusted Albacore Tuna | Made by Meaghan Moineau

Title: "A Taste of Tradition: Baharat Panko Crusted Albacore Tuna"
Description: Dive into the delightful fusion of flavors with Baharat Panko Crusted Albacore Tuna, a dish that marries the spicy warmth of Middle Eastern spices with the delicate freshness of albacore tuna. This recipe not only tantalizes the taste buds but also evokes cherished family memories of culinary traditions passed down through generations. Perfect as an appetizer or a main dish, this recipe is a 6 out of 10 in difficulty, making it an exciting challenge for home cooks.

---


A Taste of Tradition: Baharat Panko Crusted Albacore Tuna

Cooking has always been more than just a culinary exercise for my family—it's a way of preserving stories, traditions, and the essence of who we are. Growing up, the kitchen was the beating heart of our home. The gentle sizzle of oil, the rhythmic chopping of vegetables, and the aromatic symphony of spices were the background music to our family saga.


One dish that particularly stands out is the Baharat Panko Crusted Albacore Tuna. A creation born from the confluence of our diverse heritage, it has become a beloved staple at family gatherings. The combination of the exotic Baharat spice mix and the crispy panko crust always transports me back to those carefree days in my grandmother's kitchen.


Ingredients:

- Sashimi-grade albacore tuna


- Flour


- Coconut milk


- Wedge of lemon


- Panko


- Baharat spice mix


- Fleur de sel


- Black bell pepper


Instructions:

1. Begin by very gently cutting the albacore tuna in half, lengthwise, to ensure it fits comfortably in your pan. Remember, the key is not to push the knife through but to let it glide, using your free hand to stabilize the fish.


2. In a bowl, whisk together the coconut milk and lemon juice. This mixture will provide a subtle, tangy undertone that complements the spicy baharat.


3. In a separate bowl, mix the panko, baharat, fleur de sel, and pepper. This blend will give the tuna its signature crispy crust.


4. Place the flour in a third bowl, ready for dredging.


5. Season the tuna with fleur de sel and pepper, enhancing its natural flavors.


6. Dredge the seasoned tuna in flour, ensuring it's evenly coated.


7. Dip the floured tuna into the coconut milk and lemon mixture, allowing any excess to drip off.


8. Finally, coat the tuna finely with the panko mixture, pressing gently to ensure an even crust.


9. Heat oil in a pan over medium-high heat, and sear each side of the tuna until the panko turns golden brown. For a rare finish, a minute per side is all you need.


10. Once seared, place the tuna on a paper towel to absorb any excess oil and let it set for a few minutes.


Nostalgic Story:

Every bite of this dish takes me back to a particular summer evening when my grandmother first introduced us to it. We were gathered around the long oak table in her sun-dappled dining room, the air rich with laughter and the scent of spices. She recounted stories of her childhood in the Middle East, where Baharat was a staple in her family's kitchen. As we savored the crispy, succulent tuna, it felt like we were participating in a cherished ritual, connecting with our roots through taste and tradition.


Difficulty and Classification:

This recipe is rated a 6 out of 10 in difficulty. It requires some precision and care, especially when handling the delicate tuna and achieving the perfect sear. However, it is well worth the effort. Whether served as a sophisticated appetizer or a standout main dish, Baharat Panko Crusted Albacore Tuna is sure to impress and evoke a sense of nostalgia and warmth at any table.


Embrace the flavors, the memories, and the joy of sharing this dish with those you love. Happy cooking!

Read more about Appetizers

Read more about Main Dishes

Read more about Desserts

Knishes – Potato Filling | Made by Meaghan Moineau

Knishes - Potato Filling | Made by Meaghan Moineau

Title: A Taste of Heritage: Crafting the Perfect Potato Knishes
Description: Dive into the rich tapestry of family tradition with our potato-filled knishes recipe. Discover the secrets behind this savory delight, steeped in nostalgia and bursting with flavor. Whether you're a seasoned chef or a kitchen novice, this guide will walk you through each step to create a dish that's truly a piece of culinary history.

---


There's something magical about the smell of onions browning in a pan, mingling with the richness of chicken fat. It's a scent that transports me back to my grandmother's cozy kitchen, where the aroma signaled the beginning of a cherished tradition: making potato knishes. These savory pastries, with their golden crust and fluffy filling, were more than just food; they were a symbol of our family's heritage, lovingly passed down through generations.


Ingredients:

- Chicken fat (or butter, if you prefer)


- 1 egg


- 2 large onions, finely chopped


- Freshly ground black pepper, to taste


- 4 medium potatoes, peeled and boiled


- Salt, to taste


Instructions:
1. Brown the Onions: Begin by heating the chicken fat in a large skillet over medium heat. Add the finely chopped onions and sauté until they are golden brown and caramelized, releasing their sweet, savory aroma.
2. Prepare the Filling: In a large mixing bowl, combine the boiled potatoes with the browned onions. Add in the egg, salt, and pepper. Using a fork or potato masher, beat the mixture until it's light and fluffy, ensuring that the flavors meld together beautifully.
3. Assemble the Knishes: Roll out your dough (store-bought or homemade) on a lightly floured surface. Cut the dough into squares or circles, depending on your preference. Place a generous spoonful of the potato mixture in the center of each piece. Fold the dough over the filling, sealing the edges to form a pocket.

Growing up, making knishes was a family affair. My siblings and I would gather around the kitchen table, eagerly watching our grandmother as she worked her magic with the dough. Her hands moved with a practiced grace, folding and sealing each knish with a loving touch. As we got older, she entrusted us with the task, guiding our clumsy fingers until we, too, could craft the perfect pastry.


For us, knishes were more than just an appetizer; they were a bridge to our past. Each bite was a reminder of the stories our grandmother told us—tales of her childhood, of family gatherings long before we were born. The knishes connected us to those who came before, to the traditions that shaped our family.


Difficulty Rating: 5/10

Crafting these knishes is a delightful blend of art and comfort. With a medium difficulty level, this dish is accessible to both budding cooks and seasoned chefs. It falls under the category of an appetizer, serving as a perfect prelude to a hearty meal.


Today, as I prepare knishes in my own kitchen, I feel a profound sense of gratitude. Gratitude for the recipes handed down, for the memories etched in my heart, and for the opportunity to share this piece of my heritage with my children. As they savor these warm, flaky pastries, I hope they, too, will feel the love and history that each knish embodies.

Read more about Appetizers

Read more about Main Dishes

Read more about Desserts

Vegan Peanut Butter Chocolate Fudge | Made by Meaghan Moineau

Vegan Peanut Butter Chocolate Fudge | Made by Meaghan Moineau

Title: Indulge in Nostalgia with This Vegan Peanut Butter Chocolate Fudge
Description: Dive into a world of rich, creamy, and decadent flavors with our Vegan Peanut Butter Chocolate Fudge recipe. Perfect for those who crave a deliciously sweet treat without compromising on health, this dessert combines the classic flavors of peanut butter and chocolate with a nostalgic family twist. Easy to make and impossible to resist, this fudge is sure to become a staple in your vegan dessert repertoire.

---


A Nostalgic Bite: Family Memories Wrapped in Chocolate and Peanut Butter

Growing up, my grandmother's house was a treasure trove of delightful aromas and comforting treats. One of my fondest memories was the annual summer family reunions, where the kitchen would buzz with the laughter of cousins and the sound of clinking pots and pans. Amidst the chaos, my grandmother would always have a special treat waiting for us: her famous peanut butter chocolate fudge.


This fudge was a testament to her love and creativity, bringing together the timeless combination of chocolate and peanut butter that we all adored. She would enlist my help, and I remember vividly the joy of mixing ingredients by her side, sneaking little tastes when I thought she wasn't looking. The fudge, rich and velvety, would be the highlight of our dessert table, disappearing almost as quickly as it was laid out.


Inspired by those cherished memories, I've crafted a vegan version of this beloved treat, adding a modern twist with wholesome ingredients that don't compromise on flavor. This Vegan Peanut Butter Chocolate Fudge is a tribute not only to my grandmother's culinary genius but also to the warm, joyful moments we shared as a family.


Ingredients:

- 1 cup coconut butter


- 1 cup peanut butter


- 2 ripe bananas


- 1/2 cup cocoa powder


- 1/4 cup agave nectar


- 1 teaspoon vanilla extract


Instructions:

1. In a food processor, combine all the ingredients until smooth.


2. Carefully fold the mixture into a flat, sealable container.


3. Freeze for 1 hour or refrigerate overnight to set.


4. Optional: To make your own coconut butter, pulse shredded coconut in a food processor until smooth (about 8-12 minutes).


Difficulty Rating: 3/10

This recipe is as simple as it is delicious, perfect for novice cooks and seasoned chefs alike. With minimal steps and ingredients, it's an easy dessert that delivers maximum flavor with minimal effort.


Classification: Dessert

Whether you're looking for a sweet treat to end a meal or a nostalgic snack to enjoy with a cup of tea, this Vegan Peanut Butter Chocolate Fudge is the perfect dessert for any occasion.


Final Thoughts:

Recreating this fudge has not only allowed me to indulge in a delicious treat but also to revisit the cherished moments of my childhood. I hope this recipe brings a touch of nostalgia and joy to your kitchen, just as it has to mine. Enjoy every bite and the memories it inspires!

Read more about Appetizers

Read more about Main Dishes

Read more about Desserts

Chimichurri | Made by Meaghan Moineau

Chimichurri | Made by Meaghan Moineau

Title: A Taste of Tradition: The Vibrant Chimichurri Sauce
Description: Dive into the rich, flavorful world of Chimichurri, a sauce that brings vibrant color and zest to any dish. Perfect for steak, pork, or chicken, this easy-to-make condiment is sure to elevate your culinary creations. With ingredients like capers, cilantro, and red wine vinegar, Chimichurri is not just a sauce but a piece of culinary heritage that connects us to cherished family memories.

---


There’s something magical about the aroma of fresh herbs mingling with garlic and vinegar, creating a symphony of flavors that dance across your palate. This magic is Chimichurri—a bright, herbaceous sauce that brings a touch of South American flair to your dining table. Today, I want to share not only a recipe but a slice of my family's history, deeply intertwined with this vibrant concoction.


The Recipe: A Simple Symphony of Flavors
Creating Chimichurri is a straightforward process, making it accessible even to novice cooks. The ingredients are simple: capers, cilantro, garlic cloves, fresh ground black pepper, olive oil, parsley, red pepper flakes, red wine vinegar, and salt. Here’s how to bring them together:

1. In a medium mixing bowl, combine parsley, cilantro, and garlic. These three ingredients form the aromatic backbone of the sauce.


2. Add red wine vinegar, salt, red pepper flakes, and a generous amount of black pepper. Stir these into the herb mixture, allowing the heat and acidity to meld with the fresh greens.


3. Gradually pour in the olive oil, stirring to create a lush, emulsified sauce.


4. Allow the mixture to rest for 30 minutes. This crucial step lets the flavors deepen and meld into a cohesive whole.


Whether drizzled over a juicy steak, a succulent piece of pork, or a tender chicken breast, Chimichurri promises to transform your dish into a memorable experience.


Family Memories: A Connection to the Past

In our family, Chimichurri is more than just a sauce. It’s a bridge to our roots and a nostalgic reminder of long summer evenings spent in my grandmother’s backyard. Her garden was a treasure trove of fresh herbs, and the scent of freshly harvested parsley and cilantro would fill the air as we gathered around her tiny kitchen table.


I remember my grandmother, a woman of few words but abundant warmth, teaching me how to make Chimichurri. Her hands worked with the confidence of someone who had repeated the process countless times. As she mixed the ingredients, she’d share stories of her childhood in Argentina, where this sauce was a staple at every family gathering.


Making Chimichurri became a ritual for us, a way to honor our heritage and keep her stories alive. Each time I prepare this sauce, I’m transported back to those cherished moments, surrounded by family, laughter, and the irresistible aroma of fresh herbs.


Difficulty: 2/10 – Easy

With its simple steps and readily available ingredients, Chimichurri is an easy yet impressive addition to any cook’s repertoire. It’s classified as an appetizer, but its versatility extends far beyond, enhancing main dishes with its vibrant flavors.


Conclusion

Chimichurri is more than just a condiment; it’s a celebration of family, tradition, and the joy of sharing meals with loved ones. Easy to make and delightful to taste, this sauce is sure to become a staple in your kitchen, just as it has in mine. Whether you’re honoring family traditions or starting new ones, Chimichurri is a delicious way to connect with the past and savor the present.

Read more about Appetizers

Read more about Main Dishes

Read more about Desserts

Raw Carrot Cake | Made by Meaghan Moineau

Raw Carrot Cake | Made by Meaghan Moineau

Title: "A Wholesome Delight: Unveiling the Raw Carrot Cake of Memories"
Description: Dive into the aromatic world of our Raw Carrot Cake, where nostalgia meets a modern twist. With a medley of natural ingredients and warm spices, this dessert is both a healthy delight and a sentimental journey. Perfect for gatherings or a cozy afternoon indulgence, this recipe is sure to be a cherished addition to your collection.

---


A Wholesome Delight: Unveiling the Raw Carrot Cake of Memories


In the heart of every cherished family recipe lies a story that weaves together flavors and memories. Our Raw Carrot Cake is no exception. A dessert that is as rich in history as it is in taste, this cake brings together the vibrant sweetness of carrots and the wholesome goodness of dried fruits and nuts.


A Walk Down Memory Lane


I remember the first time I encountered this delightful creation. It was a cool autumn afternoon at my grandmother's house, the air filled with the fragrance of spices and laughter. My grandmother, with her gentle hands and warm smile, introduced me to her "surprise cake." As children, my siblings and I would gather around her kitchen, eagerly awaiting the moment when the mysterious dessert would be revealed.


"Is it really cake if it’s not baked?" we would ask, our young minds puzzled by the concept. With a twinkle in her eye, Grandma would assure us that this was, indeed, a cake—a special one that didn't need an oven to shine.


Ingredients that Speak of Comfort


- Carrots: The star of the show, bringing natural sweetness and moisture.
- Raisins & Dried Apricots: Offering a chewy texture and a burst of fruity flavor.
- Mixed Peel: Adding a zesty twist that complements the sweetness.
- Date Purée: Acting as a natural sweetener while binding the ingredients together.
- Almond Flour & Desiccated Coconut: Providing a nutty, rich base that forms the cake’s structure.
- Spices: Ginger, cinnamon, and cloves—each adding warmth and depth to the cake.

Crafting the Perfect Raw Carrot Cake


1. Blend Away: Start by pulsing the carrots, raisins, date purée, and spices in a blender until they form a cohesive mixture.
2. Mix in the Magic: Add chopped apricots and mixed peel, pulsing a couple of times for even distribution.
3. Form the Foundation: Transfer the mixture into a large bowl, incorporating almond flour and desiccated coconut. Mix until well combined.
4. Shape and Set: Press the mixture into a large cake pan and refrigerate uncovered until it sets.
5. Finishing Touches: Once set, cut into bite-sized squares and frost with whipped cream, or roll into balls and dust with desiccated coconut for a delightful treat.

Difficulty Rating: 4/10


This recipe is straightforward and requires no baking, making it accessible even for novice chefs. The most challenging aspect might be waiting for the cake to set in the refrigerator!


Classification: Dessert


Perfect as a sweet finale to a meal or as a indulgent snack, this Raw Carrot Cake is a versatile addition to any dessert table.


---


Every time I make this cake, it feels like a warm hug from the past, reminding me of those carefree days in my grandmother's kitchen. Whether you’re creating new memories with your loved ones or simply indulging in a moment of nostalgia, this Raw Carrot Cake is sure to bring joy and warmth to your heart and home.

Read more about Appetizers

Read more about Main Dishes

Read more about Desserts

Barbecued Shrimp & Grits | Made by Meaghan Moineau

Barbecued Shrimp & Grits | Made by Meaghan Moineau

Savoring Southern Comfort: Barbecued Shrimp & Grits


A Nostalgic Twist on a Southern Classic


Introduction


There’s something undeniably heartwarming about the rich, savory flavors of Southern cuisine. Among the myriad of dishes that capture the essence of Southern hospitality, Barbecued Shrimp & Grits stands out as a true classic. This dish not only tantalizes the taste buds with its delightful combination of textures and flavors but also evokes cherished memories of family gatherings and warm summer evenings. Today, I’m sharing a treasured recipe that brings together the smoky goodness of bacon, the creamy comfort of grits, and the tangy kick of barbecue sauce. Let’s dive into this delectable journey!


Ingredients


- Bacon


- Barbecue sauce


- Butter


- Garlic cloves


- Grits


- Raw shrimp


- Salt


- Scallions


- Sharp cheddar cheese


- Water


Instructions


1. Prepare the Bacon: Fry bacon until crisp, crumble, and set aside. The aroma of sizzling bacon is just the beginning of our culinary adventure.
2. Prep the Shrimp: Peel and devein the shrimp. For that smoky, char-grilled flavor, skewer and grill them for 2-3 minutes on each side, or until they turn a lovely shade of pink. Alternatively, you can fry them over medium heat for about 5-8 minutes total, until perfectly cooked.
3. Sauté the Garlic: In 1 tablespoon of butter, sauté minced garlic until fragrant. This will infuse the dish with a subtle, yet robust flavor.
4. Cook the Grits: Bring water to a boil and stir in the grits. Cover and let them cook for 5 minutes before reducing the heat to low. Stir in sharp cheddar cheese, the remaining butter, sautéed garlic, and a pinch of salt to create a creamy, dreamy base.
5. Toss the Shrimp: Coat the cooked shrimp in your favorite barbecue sauce for that signature tangy and sweet glaze.
6. Assemble the Dish: In a bowl, layer the creamy grits, barbecue shrimp, crispy bacon, and freshly sliced scallions. Serve it piping hot, with an optional drizzle of extra barbecue sauce for added flair.

Family Memory


Every summer, our family would gather at my grandparent’s old farmhouse, a place where time seemed to stand still amidst the rolling hills and sprawling oak trees. My grandmother, a true Southern belle, would prepare her famous Shrimp & Grits, a dish that was as much a part of our family tradition as the laughter and stories shared around the table.


I remember the anticipation building as the aroma of bacon and garlic wafted through the screen doors, signaling the feast that awaited us. My cousins and I would scamper around the porch, while the adults chattered and clinked glasses of sweet tea. As we finally settled down to eat, the first bite of creamy grits paired with the tangy barbecue shrimp would silence the room, if only momentarily, as we all savored the comforting flavors.


Even now, each time I prepare this dish, I’m transported back to those sun-drenched afternoons, surrounded by family, love, and the unmistakable taste of home.


Difficulty Rating


Difficulty: 5/10

This dish is perfect for home cooks looking to impress with minimal effort. It requires basic cooking techniques and simple ingredients that come together beautifully.


Classification


Category: Main Dish

Barbecued Shrimp & Grits is a hearty and satisfying main course that pays homage to the rich culinary heritage of the South. Whether you’re sharing it with family or enjoying a cozy dinner for two, this dish is sure to become a beloved favorite.


Conclusion


Barbecued Shrimp & Grits is more than just a meal; it's a celebration of flavors and memories that bring people together. I encourage you to try this recipe and create your own cherished moments with family and friends. After all, food is not just about nourishment, but also about creating connections and savoring life’s simple pleasures.

Read more about Appetizers

Read more about Main Dishes

Read more about Desserts

Lusciously Lemony Lentil Soup | Made by Meaghan Moineau

Lusciously Lemony Lentil Soup | Made by Meaghan Moineau

Title: Unveiling Comfort: Lusciously Lemony Lentil Soup
Description: Dive into a heartwarming culinary journey with our Lusciously Lemony Lentil Soup—a dish that's as nourishing as it is delicious. Infused with the zesty brightness of lemon and the warmth of cumin, this soup is perfect for those who crave a comforting yet refreshing meal. Whether you're a kitchen novice or a seasoned chef, this recipe is your ticket to creating a soul-soothing masterpiece.

---


In the hustle and bustle of modern life, few things offer the same solace as a warm bowl of soup. Today, we're exploring a family favorite that has graced our table for generations: Lusciously Lemony Lentil Soup. This dish not only warms the body but also the heart, being steeped in nostalgia and love.


A Whiff of Tradition

I remember the first time I tasted this soup. It was a chilly autumn evening at my grandmother's house, where the scent of cumin and lemon wafted through the air, mingling with the laughter and chatter of family. My grandmother, a culinary maestro in her own right, stirred the pot with a gentle hand, regaling us with tales of her own childhood.


She often spoke of how this simple yet flavorful dish brought her family together during lean times. The hearty lentils combined with aromatic spices and a bright hit of lemon provided a nourishing meal that was both economical and satisfying. It was, she said, a testament to the power of simplicity and the joy of shared meals.


Crafting the Soup: Step by Step

*Ingredients:*


- 2 tablespoons olive oil


- 1 large onion, chopped


- 3 cloves garlic, minced


- 2 tablespoons tomato paste


- 1 teaspoon cumin


- Salt and pepper, to taste


- 1/2 teaspoon chili powder


- 6 cups chicken or vegetable broth


- 3 carrots, diced


- 2 cups cooked lentils (or dried lentils, rinsed)


- 1/4 cup fresh lemon juice


- 1/4 cup chopped cilantro


*Instructions:*


1. Sauté the Aromatics: Heat the olive oil over medium-high heat. When the oil is hot, add the onion and garlic. Cook until they are soft and translucent, about 5 minutes.
2. Introduce the Spices: Stir in the tomato paste, cumin, salt, pepper, and chili powder. Cook for about 2 minutes until the spices are fragrant and well-integrated.
3. Simmer to Perfection: Pour in the broth, then add the diced carrots. Cover and let it simmer on medium-low heat until the carrots are tender, approximately 15 minutes.
4. Blend and Brighten: Add the cooked lentils and heat through. For a velvety texture, blend the soup using an emulsifier directly in the pot or transfer it in batches to a blender. Stir in the lemon juice and cilantro. Season with additional salt if needed.
5. Serve and Savor: Ladle the soup into bowls, garnish with extra cilantro if desired, and enjoy the comforting warmth.
A Dish to Cherish

This Lusciously Lemony Lentil Soup is not just a meal; it’s a cherished memory, a piece of family history served in a bowl. The lemon adds a zesty twist that elevates the earthiness of the lentils, while the spices create a rich, aromatic depth.


Difficulty Rating: 4/10

Classified as a Main Dish, this recipe is accessible to cooks of all levels, offering a perfect balance of ease and flavor. It’s an invitation to slow down, gather loved ones, and celebrate the timeless tradition of home-cooked meals. As you savor each spoonful, may this soup bring you as much joy and warmth as it has to our family over the years.

Read more about Appetizers

Read more about Main Dishes

Read more about Desserts

Honey Ginger Lemon Iced Tea | Made by Meaghan Moineau

Honey Ginger Lemon Iced Tea | Made by Meaghan Moineau

Title: Refreshing Nostalgia: Honey Ginger Lemon Iced Tea
Description: Dive into a world of flavors with our Honey Ginger Lemon Iced Tea, a refreshing beverage that bridges past and present. Infused with the warmth of ginger, the zest of lemon, and the sweetness of honey, this drink is perfect for hot summer days or cozy afternoons. Discover the simple pleasures of this delightful recipe and a heartwarming family memory that makes it even more special.

---


A Sip of Summer Memories: Honey Ginger Lemon Iced Tea

As the golden rays of the sun linger longer and the days grow warmer, there's nothing quite like a refreshing iced tea to quench your thirst and refresh your spirit. Our Honey Ginger Lemon Iced Tea is not just a drink; it's a journey through time, evoking cherished memories of sun-soaked days and family gatherings.


Ingredients:

- Fresh ginger


- One green tea bag


- Canned honey


- Freshly squeezed lemon juice


- Fresh mint leaves


Instructions:

1. Begin by bringing 1-2 cups of water to a gentle boil. Once ready, steep your green tea bag and let the rich flavors infuse. Once brewed, place the tea in the fridge to cool.


2. While the tea is chilling, take fresh ginger and blend it smoothly. Run the blended ginger through a sieve to extract just the juice, capturing its bold, spicy essence.


3. In a jug filled with ice, combine the cooled tea, ginger juice, a generous splash of lemon juice, and a drizzle of canned honey. Stir well to blend these vibrant flavors.


4. Add fresh mint leaves for an aromatic touch. Serve cold, and enjoy a sip of refreshing nostalgia.


Difficulty Rating: 3/10
Classification: Appetizer
A Nostalgic Family Memory:

Growing up, summers at my grandmother's house were a tapestry of vibrant colors and comforting aromas. Each afternoon, as the sun began its slow descent, she would prepare her signature iced tea—a concoction that seemed to capture the very essence of summer.


I remember sitting on the porch, a gentle breeze rustling through the trees, as Grandma served her Honey Ginger Lemon Iced Tea. Its taste was a delightful balance of sweetness and spice, with a hint of tartness from the lemons she handpicked from her garden. The mint leaves, freshly plucked, added an invigorating fragrance that lingered in the warm air.


Grandma would tell stories of her own childhood, of summers spent in the countryside, where time moved slower and life was simpler. As we listened, sipping our tea, it felt as though we were connected across generations, sharing more than just a family recipe but a slice of our heritage.


To this day, each time I prepare this iced tea, I am transported back to those sunny afternoons, enveloped in the warmth of family and the joy of simple pleasures. May this Honey Ginger Lemon Iced Tea bring you the same delight and nostalgia it has given me.


---


Conclusion:

Whether you're hosting a summer gathering or simply enjoying a quiet moment on your own, our Honey Ginger Lemon Iced Tea is sure to delight your taste buds and warm your heart. Its simple preparation and delightful flavors make it a perfect addition to any occasion. So, gather your ingredients, brew a batch, and take a sip down memory lane.

Read more about Appetizers

Read more about Main Dishes

Read more about Desserts

Roasted Fingerling Potatoes and Brussels Sprouts | Made by Meaghan Moineau

Roasted Fingerling Potatoes and Brussels Sprouts | Made by Meaghan Moineau

Title: "Family Gatherings and Flavorful Roasts: The Magic of Roasted Fingerling Potatoes and Brussels Sprouts"
Description: Discover the heartwarming flavors of Roasted Fingerling Potatoes and Brussels Sprouts, a dish that brings families together with its savory aroma and rich taste. Infused with crispy bacon, aromatic rosemary, and perfectly roasted vegetables, this recipe is a nostalgic journey back to family gatherings and cherished memories. Ideal as a main dish, it’s a simple yet impressive addition to any occasion.

---


A Nostalgic Family Favorite: Roasted Fingerling Potatoes and Brussels Sprouts

There's something truly magical about the aroma of a hearty roast wafting through the house. It’s a scent that immediately transports me back to my grandmother's kitchen, where family gatherings were a cacophony of laughter, storytelling, and the irresistible fragrance of roasting vegetables. One dish that always stood out was her Roasted Fingerling Potatoes and Brussels Sprouts, a delightful blend of crispy textures and savory flavors.


Ingredients:

- 1 pound fingerling potatoes, halved


- 1 pound Brussels sprouts, trimmed and halved


- 6 slices of bacon, chopped


- Several cloves of garlic, peeled and smashed


- 1 red onion, sliced


- A drizzle of olive oil


- Several sprigs of fresh rosemary


- A sprinkle of sea salt


Instructions:

1. Preheat the oven to 400°F (200°C).


2. In a large roasting pan, combine the fingerling potatoes, Brussels sprouts, bacon, garlic, and red onion.


3. Drizzle with olive oil and toss to ensure everything is evenly coated.


4. Tuck in the rosemary sprigs among the vegetables and sprinkle with sea salt for added flavor.


5. Roast in the preheated oven for 60-75 minutes, stirring halfway through to ensure even cooking and browning.


6. Serve hot and enjoy with family and friends.


As a child, I remember eagerly awaiting the moment when the kitchen timer would finally go off. My siblings and I would gather around the table, our eyes wide in anticipation as my grandmother brought out the beautifully roasted dish. Each bite was a symphony of flavors—the earthiness of the potatoes, the slight bitterness of the Brussels sprouts countered by the savory bacon, and the aromatic hints of rosemary and garlic.


This dish was a staple at our family gatherings, a testament to how simple ingredients can create something truly special. It was more than just a meal; it was a reminder of the love and warmth that defined our family. The laughter and stories shared around the dinner table remain some of my most treasured memories.


Difficulty Rating: 3/10
Classification: Main Dish

Whether you're looking to create new memories with your loved ones or simply enjoy a comforting, flavorful meal, this Roasted Fingerling Potatoes and Brussels Sprouts recipe is perfect for any occasion. Its simplicity makes it accessible for cooks of all skill levels, while its rich, rustic flavors are sure to delight everyone at the table.

Read more about Appetizers

Read more about Main Dishes

Read more about Desserts

Quick N’ Easy Basil Pesto | Made by Meaghan Moineau

Quick N' Easy Basil Pesto | Made by Meaghan Moineau

Title: Unleashing the Magic of Quick N' Easy Basil Pesto: A Journey Back to Family Traditions
Description: Dive into the world of vibrant flavors with our Quick N' Easy Basil Pesto recipe. Perfect for any meal, this pesto combines simplicity with nostalgia, transporting you to cherished family gatherings. Learn how to whip up this delightful dish in no time, and discover the heartwarming story behind its place in our family tradition.

---


There's something magical about the scent of fresh basil wafting through the kitchen. Its sweet, peppery aroma takes me back to sunlit afternoons spent in my grandmother's garden, where she would hand me a basket and ask me to pick the freshest basil leaves. These moments, filled with laughter and the promise of a delicious meal, laid the foundation for my love of cooking and family gatherings.


Quick N' Easy Basil Pesto Recipe


Ingredients:

- Fresh basil leaves

- Olive oil


- Pine nuts


- Garlic


- Parmesan cheese


Instructions:

1. In a food processor, alternate adding the fresh basil leaves, olive oil, pine nuts, garlic, and parmesan cheese until blended smooth.

2. If the pesto isn't the correct consistency, gradually add more olive oil until you achieve the desired texture.


3. Use the pesto within 24 hours or freeze scoops in plastic wrap-lined muffin cups for later use.


Difficulty: 2/10
Classification: Appetizer

Making pesto was always a family affair. I remember sitting on a high stool, barely able to reach the countertop, as my mother and grandmother orchestrated the creation of this vibrant green sauce. The rhythmic hum of the food processor was like a melody that signaled the beginning of something special. As I added each ingredient, I imagined myself as a chef in a bustling Italian kitchen, crafting a masterpiece that would bring my family together.


Pesto, with its rich history and versatility, has always been a staple in our family meals. Whether tossed with pasta, spread on a warm loaf of bread, or used as a dip with fresh vegetables, it never failed to transform a simple dish into something extraordinary. The secret, as my grandmother would say, is in the balance of flavors—each ingredient playing its part harmoniously.


The beauty of this Quick N' Easy Basil Pesto recipe lies not just in its simplicity, but in the memories it evokes. It's a reminder of the warmth of family, the joy of shared meals, and the timeless tradition of passing down recipes from one generation to the next. Every time I make it, I am transported back to those childhood afternoons, filled with love, laughter, and the irresistible aroma of fresh basil.


So, gather your ingredients, invite your loved ones into the kitchen, and create not just a dish, but a memory. With its ease and versatility, this pesto is sure to become a beloved addition to your family table, just as it has been to ours.

Read more about Appetizers

Read more about Main Dishes

Read more about Desserts

Bittersweet chocolate pudding | Made by Meaghan Moineau

Bittersweet chocolate pudding | Made by Meaghan Moineau

Title: Nostalgic Delights: The Bittersweet Chocolate Pudding That Transports You Back in Time
Description: Dive into the heartwarming world of bittersweet chocolate pudding, a dessert that not only tantalizes your taste buds but also evokes cherished family memories. Discover how this simple yet decadent treat, crafted from cocoa powder, cornstarch, and more, can become a staple in your family gatherings. Rated as a 4 out of 10 on the difficulty scale, this dessert is perfect for both novice cooks and seasoned chefs seeking a touch of nostalgia.

---


Nostalgic Delights: The Bittersweet Chocolate Pudding That Transports You Back in Time

There's something incredibly comforting about a rich, velvety bowl of bittersweet chocolate pudding. For many, it's more than just a dessert; it's a portal to cherished family memories and the warmth of home. As the aroma of cocoa and vanilla fills the kitchen, I'm instantly transported back to my grandmother's cozy kitchen, where the magic of pudding-making unfolded.


A Family Tradition

Every Sunday, after a hearty family dinner, my grandmother would bring out her well-worn saucepan, a trusted companion in countless culinary adventures. The recipe was simple—cocoa powder, cornstarch, egg, milk, salt, sugar, unsalted butter, and vanilla extract—but the result was nothing short of magical. As children, my siblings and I would gather around the stove, watching in awe as she expertly whisked the ingredients together.


The moment the milk mixture hit the saucepan, a sense of anticipation filled the air. We knew that soon, the kitchen would be filled with the intoxicating scent of chocolate. The gentle bubbling and thickening of the mixture were signals that the pudding was close to perfection. Once the butter and vanilla were stirred in, the mixture was lovingly poured into molds, each rinsed with cold water to ensure a smooth release.


The Art of Waiting

Chilling the pudding was perhaps the hardest part. As it rested in the refrigerator, we would impatiently count down the minutes, eagerly awaiting the moment we could indulge. But my grandmother always reminded us that patience was a virtue, especially when it came to creating something truly special.


A Bite of Bliss

Finally, the moment would arrive. The pudding, now perfectly set, was gracefully released from its mold onto a plate. The first spoonful was always the best—rich, creamy, and with just the right amount of bittersweet chocolate flavor. It was more than just a dessert; it was a taste of love, crafted with care and shared with family.


Crafting Your Own Memories
Creating your own bittersweet chocolate pudding is a rewarding experience, rated as a 4 out of 10 in difficulty. Whether you're a novice or an experienced cook, this dessert offers a delightful challenge and the opportunity to make your own cherished memories. Simply follow these steps:

1. In a medium saucepan, whisk together the cornstarch, cocoa powder, sugar, and salt.


2. In a separate bowl, combine the milk and egg.


3. Gradually pour the milk mixture into the saucepan, whisking until thoroughly mixed.


4. Heat the mixture over medium heat, stirring constantly until it boils. Cook for 1 minute, then remove from heat.


5. Stir in butter and vanilla extract.


6. Pour the pudding into molds rinsed with cold water and chill until set.


A Sweet Conclusion

Bittersweet chocolate pudding is more than just a dessert—it's an invitation to pause, savor, and celebrate the simple joys of life. Whether you enjoy it alone or share it with loved ones, this pudding is a testament to the power of food to create and evoke precious memories. So, gather your ingredients, embrace the process, and let this delightful dish transport you back to simpler times.

Read more about Appetizers

Read more about Main Dishes

Read more about Desserts