Hasselback Potatoes | Made by Meaghan Moineau

Hasselback Potatoes | Made by Meaghan Moineau

Title: "Golden Memories: The Timeless Joy of Hasselback Potatoes"
Description: Dive into the heartwarming world of Hasselback Potatoes, a delightful dish that combines simplicity with elegance. With a crisp exterior and a tender interior, this recipe is sure to become a family favorite. As you follow these easy steps, let the nostalgic aroma transport you to cherished family gatherings. Discover the magic of this classic side dish that pairs perfectly with any meal.

---


Golden Memories: The Timeless Joy of Hasselback Potatoes

In the tapestry of culinary traditions, few dishes evoke as much warmth and nostalgia as Hasselback Potatoes. This simple yet elegant side dish is more than just a feast for the taste buds; it's a journey back to cherished family gatherings, where the kitchen was the heart of the home. With its origins rooted in Swedish cuisine, the Hasselback Potato has transcended borders to become a beloved staple on dining tables worldwide.


Ingredients:

- 4 large potatoes


- 4 tablespoons of butter, melted


- 1/4 cup of breadcrumbs


- 1/4 cup of grated parmesan cheese


- Salt to taste


Instructions:
1. Preheat and Prep: Begin by preheating your oven to 425°F (220°C). As the warmth fills your kitchen, imagine the generations before you who relied on the comforting glow of an oven to create memorable meals.
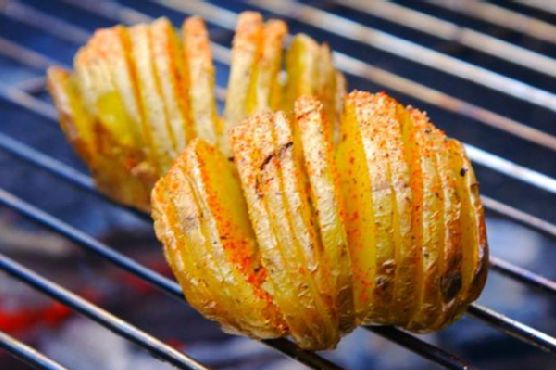
2. Slice with Care: Carefully slice each potato crosswise at 1/8-inch intervals, ensuring you cut to within 1/4 inch of the bottom. This technique creates the iconic fan-like appearance that makes Hasselback Potatoes so visually appealing. As you slice, recall family members gathered around the table, eagerly awaiting the feast to come.
3. Arrange and Drizzle: Arrange the potatoes in a buttered roasting pan. Drizzle 2 tablespoons of melted butter evenly over them and sprinkle with salt. Bake for 25 minutes, allowing the kitchen to fill with the rich aroma of butter and potatoes—a scent that has the power to bring back memories of home.
4. Add the Crunch: After the initial bake, sprinkle the potatoes with breadcrumbs and drizzle with the remaining melted butter. Return them to the oven for another 25 minutes. This step ensures a delightful crunch with every bite.
5. Cheesy Finish: Finally, sprinkle the potatoes with parmesan cheese, baste them with butter from the pan, and bake for an additional 5 minutes. As the cheese melts and turns golden, it adds a layer of savory goodness that is simply irresistible.
A Nostalgic Story:

Growing up, Sunday dinners were a sacred ritual in our family. The bustling kitchen was a symphony of clattering pots, the sizzle of butter, and the laughter of loved ones. Hasselback Potatoes were always a star of these gatherings. I vividly remember my grandmother standing by the old wooden counter, her hands deftly slicing the potatoes with precision. She would tell stories of her childhood, of Sundays spent in her mother’s kitchen, surrounded by the same comforting smells and sounds.


As we sat around the table, our plates piled high with golden Hasselbacks, I felt a deep connection to my heritage. Each bite was a taste of history, a thread that wove together generations. Even now, as I prepare Hasselback Potatoes for my own family, I am reminded of those cherished Sundays, the warmth of the kitchen, and the love that filled our home.


Difficulty Rating: 3/10
Classification: Side Dish

Hasselback Potatoes are a testament to the beauty of simplicity. With minimal ingredients and effortless preparation, this dish is perfect for both novice and seasoned cooks. Whether served as a side dish at a festive gathering or a quiet family dinner, Hasselback Potatoes bring a touch of elegance and a wealth of memories to any occasion. As you enjoy this timeless dish, may it fill your heart and home with warmth and joy.

Read more about Appetizers

Read more about Main Dishes

Read more about Desserts

Spicy Lump Crab and Avocado Salad | Made by Meaghan Moineau

Spicy Lump Crab and Avocado Salad | Made by Meaghan Moineau

Title: A Taste of Nostalgia: Spicy Lump Crab and Avocado Salad
Description: Dive into a flavorful fusion of tender lump crabmeat and creamy avocados with our Spicy Lump Crab and Avocado Salad. This dish, enriched with the zest of fresh lemon juice and a kick of sriracha, is a perfect blend of spice and freshness. Ideal for both a sophisticated appetizer and a light main dish, this recipe holds a special place in my heart, evoking cherished family gatherings by the sea.

---


A Taste of Nostalgia: Spicy Lump Crab and Avocado Salad

As the warm breeze carried the scent of the ocean, our family would gather at the seaside cottage every summer. The sound of waves crashing against the shore was the perfect backdrop for our family tradition—an indulgent feast featuring the Spicy Lump Crab and Avocado Salad. This dish, with its vibrant colors and tantalizing flavors, became a staple at our gatherings, etching unforgettable memories into our hearts.


The Essence of the Dish

Our Spicy Lump Crab and Avocado Salad is a delightful combination of succulent lump crabmeat, creamy avocados, and a spicy dressing that tantalizes the taste buds. The dish is a symphony of textures, with the smoothness of the avocado complementing the delicate sweetness of the crab. The addition of sriracha chile sauce adds a fiery kick, balanced by the tangy freshness of lemon juice.


Ingredients:

- 2 ripe avocados


- 1 red bell pepper, finely chopped


- Fresh parsley, chopped


- 1 tablespoon fresh lemon juice


- 1 pound lump crabmeat


- 2 tablespoons mayonnaise


- Salt and pepper, to taste


- 2 scallions, finely sliced


- 1 tablespoon sriracha chile sauce


- 1 teaspoon Worcestershire sauce


Instructions:
1. Prepare the Spicy Sauce: In a small bowl, combine the mayonnaise, sriracha chile sauce, Worcestershire sauce, lemon juice, salt, and pepper. Stir until well blended, and set aside to let the flavors meld.
2. Mix the Crab Salad: In a medium bowl, gently toss together the crabmeat, scallions, red bell pepper, and fresh parsley. Be careful to maintain the integrity of the crab lumps. Lightly fold in the spicy sauce, ensuring an even coating without breaking the crabmeat.
3. Prepare the Avocados: Slice the avocados in half and remove the pit. Trim a small section from the bottom of each half so they sit flat on a plate. Brush or pour lemon juice over the cut surfaces to prevent browning.
4. Assemble and Serve: Place the avocado halves on a serving plate and generously fill each center with the crab salad. Serve immediately for the freshest flavor.
A Family Memory

Every year, as we prepared this dish, my grandmother would recount the story of how she first learned the recipe from a local fisherman during her honeymoon. She spoke of the joy of discovering new flavors and the warmth of sharing food with loved ones. As we savored each bite, it felt like a tribute to her adventurous spirit and love for family gatherings.


The Spicy Lump Crab and Avocado Salad is more than just a dish; it's a bridge to cherished memories and a reminder of the simple joys in life.


Difficulty Rating: 4/10
Classification: Appetizer or Light Main Dish

This recipe is relatively easy to prepare, making it accessible even for novice cooks. Whether you serve it as an appetizer or a light main dish, it's guaranteed to be a hit, resonating with the warmth of familial love and the excitement of summer days by the sea.

Read more about Appetizers

Read more about Main Dishes

Read more about Desserts

Brown sugar & Spice Sugar cookie frogs | Made by Meaghan Moineau

Brown sugar & Spice Sugar cookie frogs | Made by Meaghan Moineau

Title: Sweet Memories in Every Bite: Brown Sugar & Spice Sugar Cookie Frogs
Description: Dive into the enchanting world of baking with our Brown Sugar & Spice Sugar Cookie Frogs. These delightful treats are more than just cookies; they’re a nostalgic journey back to cherished family gatherings. With a perfect blend of warm spices and a touch of sweetness, these cookies promise to bring warmth and joy to your kitchen. Whether you're a seasoned baker or a beginner, this recipe is sure to captivate your taste buds and your heart.

---


Brown Sugar & Spice Sugar Cookie Frogs: A Recipe Steeped in Family Tradition


Ingredients:


- Unbleached flour


- Baking powder


- Cinnamon


- Ginger


- Nutmeg


- Allspice


- Granulated sugar


- Light brown sugar


- Butter


- Egg


- Vanilla extract


Instructions:


1. Prepare Your Dry Ingredients: Begin by whisking together the flour, baking powder, cinnamon, ginger, nutmeg, and allspice. Set this aromatic mixture aside, letting the spices mingle and infuse their warmth.
2. Creaming Magic: In a separate bowl, cream the granulated sugar and light brown sugar with the butter until light and fluffy. The blend of sugars gives the cookies their distinct, rich flavor.
3. Incorporate Wet Ingredients: Add the egg and vanilla extract to the creamed mixture, mixing until well-blended. The vanilla adds a hint of sweet aroma that perfectly complements the spices.
4. Combine and Conquer: Gradually incorporate the flour mixture into the wet ingredients. Beat just until combined, ensuring to scrape down the bowl, especially the bottom. The dough will be thick; don't hesitate to knead in any stray bits of flour by hand.
5. Shaping Your Frogs: Roll the dough on a floured surface and cut into whimsical frog shapes. Place these playful figures on parchment-lined baking sheets, ready to hop into the oven.
6. Baking to Perfection: Bake in a preheated oven for 9-12 minutes, adjusting the time depending on the size of your cookie cutter. Let them sit on the sheet for a few minutes before transferring them to a cooling rack.

---


A Sweet Nostalgia: The Memory Behind the Recipe


Every time I bake these Brown Sugar & Spice Sugar Cookie Frogs, I am transported back to my grandmother's cozy kitchen. As a child, I’d watch in awe as she effortlessly transformed simple ingredients into magical treats. The aroma of spices wafting through the air was always the first sign that something special was underway.


Grandma had a particular fondness for frogs, often saying they brought good luck. She’d let me help cut out the frog shapes, my small hands struggling to keep the dough intact. We’d laugh at the misshapen ones, claiming they had extra character. Those afternoons filled with laughter and love are some of my most cherished memories.


These cookies were a staple at every family gathering, each bite a reminder of the warmth and joy that surrounded us. Even now, as I bake them for my own family, I feel a connection to those happy days, hoping to create similar memories for my little ones.


---


Difficulty: 3/10


Classification: Dessert


---


Whether you’re creating new memories or reliving old ones, these Brown Sugar & Spice Sugar Cookie Frogs are sure to bring smiles and sweetness to your home. Enjoy the process, savor the flavors, and let the nostalgia wash over you. Happy baking!

Read more about Appetizers

Read more about Main Dishes

Read more about Desserts

Whole Wheat Chocolate Chip Cookies | Made by Meaghan Moineau

Whole Wheat Chocolate Chip Cookies | Made by Meaghan Moineau

Title: Nostalgic Whispers of Warmth: Whole Wheat Chocolate Chip Cookies
Description: Discover the heartwarming joy of baking Whole Wheat Chocolate Chip Cookies with this delightful recipe that marries the rich flavors of dark brown and coconut sugars with the wholesome goodness of whole-wheat flour. These cookies are the epitome of comfort, perfect for a cozy afternoon treat or sharing with loved ones. Alongside the recipe, enjoy a nostalgic tale of family memories that brings a touch of warmth to every bite.

---


Whole Wheat Chocolate Chip Cookies Recipe
Difficulty: 4/10
Category: Dessert
Ingredients:

- 1 teaspoon baking powder


- 1 teaspoon baking soda


- 2 cups chocolate chips


- 1 cup coconut sugar


- 1 cup dark brown sugar


- 2 large eggs


- 1 teaspoon kosher salt


- 1 cup unsalted butter, softened


- 2 teaspoons vanilla extract


- 2 1/2 cups whole-wheat flour


Instructions:
1. Preparation: Begin by placing two racks in the upper and lower thirds of your oven and preheat it to 350°F. Line two baking sheets with parchment paper for easy cleanup.
2. Mix Dry Ingredients: Sift together the baking powder, baking soda, kosher salt, and whole-wheat flour into a large bowl. Pour back any remaining bits into the bowl to ensure no ingredient is left behind.
3. Cream Butter and Sugars: In a standing mixer fitted with a paddle attachment, combine the softened butter, coconut sugar, and dark brown sugar. Beat on low speed until the mixture is smooth and creamy, approximately 2 minutes. Scrape down the sides of the bowl with a spatula.
4. Add Eggs and Vanilla: Incorporate the eggs one at a time, mixing thoroughly after each addition. Stir in the vanilla extract until fully combined.
5. Combine Ingredients: Gradually add the dry ingredient mixture to the wet ingredients. Mix on low speed until just combined, about 30 seconds. Ensure all the flour is incorporated by scraping down the sides and bottom of the bowl.
6. Add Chocolate Chips: Pour in the chocolate chips and mix on low speed until evenly distributed throughout the dough.
7. Shape Cookies: Use a spatula to transfer the dough onto a work surface. Use your hands to fully incorporate all ingredients. Scoop mounds of dough, about 3 tablespoons each, onto the prepared baking sheets, allowing 3 inches of space between each cookie.
8. Bake: Bake the cookies for 16 to 20 minutes, rotating the sheets halfway through for even baking. The cookies should be a beautiful golden brown.
9. Cool and Enjoy: Transfer the cookies, still on the parchment, to a countertop to cool. For an extra touch, sprinkle a pinch of sea salt on top while they are still warm.

These cookies are best enjoyed warm from the oven, but they also freeze well for later indulgence. Simply warm in the microwave for 20-30 seconds to relive the freshly baked experience.


---


A Nostalgic Tale:

Growing up, Saturday afternoons were a sacred time in our family. My grandmother would gather us in her cozy kitchen, the air already fragrant with the anticipation of baking. Her secret to the best chocolate chip cookies was a pinch of love and the patience to let us kids measure out the ingredients with our clumsy hands. As we sifted flour and sneaked chocolate chips when she wasn't looking, stories of her childhood would fill the room, intertwining with our laughter.


These Whole Wheat Chocolate Chip Cookies hold a special place in my heart, as they remind me of those cherished afternoons. The wholesome earthiness of whole-wheat flour combined with the sweetness of chocolate chips is more than just a recipe; it’s a bridge to a simpler time when the world was as warm and inviting as a freshly baked cookie. Every bite takes me back to that kitchen, surrounded by family, where love was the main ingredient in every recipe.


Whether you are creating new memories or revisiting old ones, these cookies are sure to bring a sprinkle of nostalgia and a dollop of comfort to your day.

Read more about Appetizers

Read more about Main Dishes

Read more about Desserts

Homemade Apple Almond Granola Bars | Made by Meaghan Moineau

Homemade Apple Almond Granola Bars | Made by Meaghan Moineau

Title: Crunchy Nostalgia: Homemade Apple Almond Granola Bars
Description: Dive into the comforting embrace of Homemade Apple Almond Granola Bars, a delightful concoction of wholesome ingredients that bring back the warmth of family gatherings. Easy to make and irresistibly tasty, these bars are perfect for breakfast on-the-go or a guilt-free snack.

---


Homemade Apple Almond Granola Bars: A Family Tradition


Growing up, my family always had a knack for turning simple moments into cherished memories. Among these, Saturday mornings were special. The smell of freshly baked goods wafting through the house was our gentle wake-up call, drawing us out of our slumber and into the kitchen where the magic happened.


One of the most beloved recipes that graced our kitchen was the Homemade Apple Almond Granola Bars. These bars were more than just a treat; they were a symbol of togetherness and the perfect embodiment of autumn afternoons spent with family. The combination of rolled oats, sweet honey, and the crunch of almonds brought a comforting warmth that only a homemade recipe could provide.


Ingredients:


- 2 cups rolled oats


- 1/4 cup ground flax seed


- 1/4 cup oat bran


- 1/4 cup wheat bran


- 1/2 teaspoon salt


- 1 teaspoon baking powder


- 1 teaspoon ground cinnamon


- 1/4 cup sugar substitute


- 1/4 cup unsweetened coconut


- 1/2 cup non-fat milk


- 1/4 cup sweet honey


- 1 egg


- 1 teaspoon vanilla extract


- 1 apple, peeled and diced


- 1/2 cup almonds, chopped


Instructions:


1. Preheat your oven to 350°F (175°C) and spray a 9x13 pan with non-stick cooking spray.
2. Combine in a large bowl the oats, flax seed, oat bran, wheat bran, salt, baking powder, cinnamon, sugar substitute, and coconut. Mix until well combined.
3. Add the milk, honey, egg, and vanilla extract to the dry ingredients. Stir until everything is well incorporated.
4. Fold in the diced apple and chopped almonds, ensuring they are evenly distributed throughout the mixture.
5. Press the mixture firmly into the prepared pan, spreading it out evenly.
6. Bake for 15-20 minutes, or until the edges start to brown lightly.
7. Cool for 10 minutes before cutting into bars. Allow to cool completely before serving or storing.

These granola bars are a perfect example of how food can connect us to our roots and to each other. As we savored these bars, my siblings and I would reminisce about the little things that made our weekend mornings special—like the sound of crunching leaves outside or the laughter that filled the room as we enjoyed our breakfast together.


Difficulty: 3/10 - Easy


Classification: Dessert / Snack


Whether you're yearning for a quick snack or a healthy dessert option, these Homemade Apple Almond Granola Bars are sure to satisfy. They're not just a treat; they're a piece of nostalgia, a way to bring a little bit of my family's warmth into your own home.


So, gather your ingredients and invite your loved ones to the kitchen. Create new memories while indulging in the delightful flavors of this cherished family recipe. Enjoy the simple pleasure of homemade goodness, and perhaps, start a new tradition of your own.

Read more about Appetizers

Read more about Main Dishes

Read more about Desserts

Maple-Bacon Corn Muffins | Made by Meaghan Moineau

Maple-Bacon Corn Muffins | Made by Meaghan Moineau

Maple-Bacon Corn Muffins: A Sweet and Savory Delight


Description: Craving a unique twist on a classic comfort food? Our Maple-Bacon Corn Muffins combine the sweet allure of maple syrup with the smoky richness of bacon, creating a mouthwatering balance that captures the essence of home. Perfect as an appetizer or a brunch centerpiece, these muffins are sure to delight your taste buds and warm your heart.

---


A Nostalgic Journey: Family Memories of Maple-Bacon Corn Muffins


Growing up, Saturday mornings in our household were always special. The aroma of freshly brewed coffee would waft through the air, mingling with the irresistible scent of bacon sizzling on the stove. My siblings and I knew that it was time for our beloved family tradition—Maple-Bacon Corn Muffins. This dish holds a cherished place in our hearts, a recipe passed down from my grandmother who had a knack for combining flavors in the most delightful ways.


I remember the excitement of gathering in the kitchen, each of us assigned a task. My brother was in charge of chopping the bacon, my sister whisked the eggs and milk, and I was responsible for stirring the dry ingredients—a job I took very seriously. As we worked, stories flowed as freely as the maple syrup we eagerly poured into the mixture.


Once the muffins were in the oven, the anticipation was palpable. We'd peek through the oven window, watching the muffins rise and turn a perfect golden brown. When the timer chimed, we could hardly wait to liberate the muffins from their tin prisons. Served warm, the first bite was always the best—crispy bacon mingling with the soft, sweet cornmeal, underlined by the deep, rich flavor of maple.


Those mornings were a ritual, a time when our family came together, sharing not just food, but laughter, love, and stories. Even now, as I prepare this dish in my own kitchen, those memories flood back, adding an extra layer of warmth to each batch.


Today, I am thrilled to share this recipe with you, in hopes that it will bring a touch of nostalgia and a whole lot of flavor to your kitchen.


---


Ingredients


- Bacon


- Baking powder


- Butter (melted)


- Eggs


- Flour


- Maple syrup


- Milk


- Salt


- Sugar


- Yellow cornmeal


Instructions


1. Preheat your oven to 400°F.


2. Heat a skillet over medium-high heat. Chop the bacon and cook until slightly crispy. Remove with a slotted spoon and set the skillet aside.


3. In a large bowl, combine all dry ingredients: flour, cornmeal, baking powder, sugar, and salt.


4. Whisk in the milk and eggs until well combined.


5. Stir in the melted butter, maple syrup, and a cup of reserved bacon grease.


6. Add the bacon pieces back into the mixture and stir until evenly distributed.


7. Line a 12-cup muffin tin with muffin liners. Evenly divide the mixture among the liners.


8. Bake for 15 minutes until the muffins are golden brown.


9. Remove from the muffin tin and serve warm. Enjoy!


---


Difficulty: 4/10
Classification: Appetizer

These Maple-Bacon Corn Muffins are more than just a dish; they are a portal to cherished memories and a celebration of comforting flavors. Whether you're sharing them with family or enjoying a quiet morning alone, they promise to bring joy and warmth to any occasion.

Read more about Appetizers

Read more about Main Dishes

Read more about Desserts

chilli chicken | Made by Meaghan Moineau

chilli chicken | Made by Meaghan Moineau

Title: "Spicy Nostalgia: The Flavorful Journey of Chilli Chicken"
Description: Dive into the rich, aromatic world of Chilli Chicken—a dish that not only tantalizes your taste buds but also stirs heartwarming family memories. From the vibrant colors of bell peppers to the savory depth of soya sauce, learn how this dish has become a beloved staple at our family gatherings. Rated 6/10 in difficulty, this versatile delight can be served as an appetizer or a main dish. Discover a cherished family story intertwined with this recipe and find complete cooking instructions at Swasthi's Recipes.

---


Spicy Nostalgia: The Flavorful Journey of Chilli Chicken

There’s something magical about family recipes—they are time machines that transport you back to cherished moments, filled with warmth, laughter, and the comforting aroma of home-cooked meals. Chilli Chicken, with its spicy allure and vibrant colors, holds a special place in my heart, not just as a dish but as a treasured family memory.


A Burst of Flavors and Colors

The beauty of Chilli Chicken lies in its simplicity and the explosion of flavors it offers. The key ingredients—bell peppers, boneless chicken breast, and slit green chilies—create a colorful medley that is as pleasing to the eye as it is to the palate. The essential spices—red chili powder and pepper powder—bring a fiery kick, while garlic and onion add depth and aroma. The sticky, savory embrace of soya sauce, combined with the tangy notes of vinegar and the subtle sweetness of sugar, create a harmonious balance that is simply irresistible.


A Family Tradition

Every family gathering at our house was incomplete without a sizzling platter of Chilli Chicken. I vividly remember my grandmother bustling around the kitchen, her hands deftly working through the ingredients, her face lit with a loving smile. The air would fill with the intoxicating aroma of garlic sizzling in oil, mixing with the spicy scent of red chili powder. It was a sensory symphony that signaled the start of another memorable feast.


One particular instance stands out in my memory: a chilly winter evening when the entire family was gathered around the dining table, the warmth of laughter and stories enveloping us like a cozy blanket. My grandmother placed the dish in the center, and as the steam rose, so did our anticipation. With each bite of the tender chicken and crunchy bell peppers, we were transported to a world where flavors danced on our tongues and time seemed to stand still.


Creating Your Own Memories

While nostalgia adds a unique flavor to Chilli Chicken, creating your own memories with this dish is just as delightful. Rated 6/10 in difficulty, it’s accessible yet rewarding, making it perfect for a family dinner or a casual gathering with friends. Whether you choose to serve it as an appetizer or the main dish, Chilli Chicken promises to be the star of the meal.


For those looking to recreate this flavorful journey, detailed instructions can be found at Swasthi's Recipes. Embrace the joy of cooking as you experiment with the ingredients, perhaps adding your own twist to make it uniquely yours.


In the end, Chilli Chicken is more than just a dish; it's a connection to the past, a celebration of the present, and an invitation to create future memories. So, gather your loved ones, roll up your sleeves, and let the rich, spicy aroma of Chilli Chicken weave its magic into your family story.


---


Whether you're a seasoned cook or a culinary novice, Chilli Chicken is an adventure worth embarking on. So, why not dig in and let this dish become a delicious chapter in your own family’s story?

Read more about Appetizers

Read more about Main Dishes

Read more about Desserts

Sweet and Spicy Nuts | Made by Meaghan Moineau

Sweet and Spicy Nuts | Made by Meaghan Moineau

Title: Sweet and Spicy Nuts: A Family Tradition with a Fiery Twist
Description: Discover the delightful balance of sweet and spicy flavors in this easy-to-make Sweet and Spicy Nuts recipe. Perfect as an appetizer or a snack, this dish is sure to add a kick to your family gatherings. Reminisce with me as I share a cherished family memory tied to these delectable nuts. Difficulty: 3/10.

---


When I think of Sweet and Spicy Nuts, my mind drifts back to those delightful family gatherings at my grandmother's house. Tucked away in her cozy kitchen, the air was always filled with the comforting aroma of buttery spices, a scent that wrapped around us like a warm hug.


The recipe I'm about to share has become a staple in our family—a perfect blend of sweet and spicy that echoes the warmth of those cherished memories. It's a dish that brings smiles and a bit of nostalgia, as it reminds us of those lively conversations and laughter shared over a bowl of these flavorful nuts.


Sweet and Spicy Nuts Recipe
Ingredients:

- 2 tablespoons butter


- 1/2 teaspoon cayenne pepper


- 1/2 teaspoon ground cinnamon


- 1/2 teaspoon ground cumin


- 1/4 cup light brown sugar


- 2 cups mixed nuts (such as walnuts)


- 1 teaspoon salt


- 1 tablespoon water


Instructions:
1. Mix the Spices: In a small bowl, combine the ground cumin, cayenne pepper, ground cinnamon, and salt. Set aside for later use.
2. Toast the Nuts: Heat a dry skillet over medium heat. Add the mixed nuts and cook, stirring frequently, until they begin to toast, about 4 minutes. Transfer the nuts to a small bowl and set aside.
3. Create the Glaze: In the same hot skillet, add the butter, light brown sugar, water, and the spice mixture. Cook, stirring, until a smooth glaze forms, about 1 minute.
4. Coat the Nuts: Return the toasted nuts to the skillet. Toss them in the glaze, ensuring they are well-coated. Cook for an additional 1 to 2 minutes, or until the nuts are glazed and golden brown.
5. Cool and Store: Remove the skillet from the heat and transfer the glazed nuts to a baking sheet lined with aluminum foil. Use a fork to separate them. Allow the nuts to cool until the sugar hardens, about 10 minutes. Store in an airtight container.
A Nostalgic Note:

The tradition of making Sweet and Spicy Nuts started with my grandmother. She had a knack for turning simple ingredients into something magical. As kids, we would gather around her, eyes wide with anticipation, as she tossed the nuts in the sizzling glaze. The aroma was irresistible, and we eagerly waited for them to cool, often sneaking a few warm morsels when she wasn't looking.


These nuts have now become a symbol of our family's togetherness, a dish that travels with us through generations. Whether it's a holiday party or a casual Sunday afternoon, a bowl of Sweet and Spicy Nuts always makes its way to the table, sparking conversations and creating new memories.


Difficulty: 3/10
Category: Appetizer

---


Next time you're looking for a delightful appetizer to impress your guests or just a snack to enjoy on a cozy afternoon, give these Sweet and Spicy Nuts a try. They are sure to add a fiery twist to your gatherings and maybe even inspire a family tradition of your own.

Read more about Appetizers

Read more about Main Dishes

Read more about Desserts

Pink Grapefruit Slaw | Made by Meaghan Moineau

Pink Grapefruit Slaw | Made by Meaghan Moineau

Title: Refreshing Memories: The Joy of Pink Grapefruit Slaw
Description: Discover the vibrant flavors of Pink Grapefruit Slaw, a delightful mix of tangy and sweet that will transport you back to cherished family gatherings. This easy-to-make appetizer is perfect for adding a splash of color and nostalgia to your dining table.

---


A Nostalgic Journey with Pink Grapefruit Slaw

There’s something undeniably soothing about the familiar aroma of a dish that takes you back to simpler times—like the Pink Grapefruit Slaw my grandmother used to make during those long, sun-drenched summer afternoons. As a child, I remember eagerly watching her in the kitchen, marveling at how effortlessly she combined ingredients to create something magical.


The recipe was always a highlight at our family picnics, a beacon of freshness amidst the array of hearty dishes. My grandmother had a knack for infusing love into her cooking, and her Pink Grapefruit Slaw was no exception. The tangy sweetness of the grapefruit paired with the crunch of fresh cabbage and the subtle bite of red onion created a symphony of flavors that danced on our taste buds.


As the adults chatted and the children played, I would sneak into the kitchen to watch her skillfully zest the grapefruit, her hands moving with practiced precision. She would smile at me, her eyes twinkling with a secret only we shared—the joy of creating something beautiful together.


Recipe: Pink Grapefruit Slaw
Ingredients:

- Black pepper


- 1 pink grapefruit


- 2 cups green shredded cabbage


- 2 tablespoons light mayonnaise


- 1 small red onion, thinly sliced


- Salt


- 1-2 teaspoons sugar (to taste)


Instructions:

1. In a small bowl or measuring cup, combine 2 tablespoons of light mayonnaise, 3 tablespoons of fresh grapefruit juice (from just a segment or two), 1-2 teaspoons of sugar, 1 teaspoon of grapefruit zest, salt, and black pepper. Whisk the mixture until it's well blended.


2. In a large bowl, combine 2 cups of shredded green cabbage, the remaining sections of the pink grapefruit, and the thinly sliced red onion.


3. Pour the dressing over the cabbage mixture and toss everything together until it’s well coated.


4. Garnish with parsley if desired, and serve immediately to enjoy the flavors at their peak freshness.


Difficulty: 3/10
Classification: Appetizer

This Pink Grapefruit Slaw is a testament to the beauty of simple, fresh ingredients coming together to create a dish that’s both delicious and nostalgic. Whether you’re preparing it for a family gathering or a solo lunch, this slaw is sure to evoke fond memories and perhaps inspire new traditions for years to come.

Read more about Appetizers

Read more about Main Dishes

Read more about Desserts

Apple Pie Bars | Made by Meaghan Moineau

Apple Pie Bars | Made by Meaghan Moineau

Title: Apple Pie Bars: A Nostalgic Twist on a Timeless Classic
Description: Dive into the heartwarming world of Apple Pie Bars, where the comforting flavors of spiced apples meet the delightful crunch of butterscotch chips. Perfect as a dessert, this recipe is not just about satisfying your sweet tooth; it's about reliving cherished family memories. Rated 5/10 in difficulty, this recipe is accessible to both novice and experienced bakers alike.

---


There's something inherently magical about the scent of cinnamon and nutmeg wafting through the air. It’s a spell that pulls you back to simpler times, to a kitchen filled with laughter and the gentle hum of an electric mixer. For me, this enchanting aroma is synonymous with Apple Pie Bars—a recipe that has been passed down through generations in our family.


Ingredients:

- McIntosh apples


- Baking powder


- Baking soda


- Butterscotch chips


- Eggs


- Flour


- Ground cinnamon


- Ground nutmeg


- Salt


- Sugar


- Vegetable oil


Instructions:

1. Preheat your oven to a cozy 350 degrees F. Prepare a 9 by 13-inch baking dish by giving it a generous coat of cooking spray.


2. In the bowl of an electric mixer, combine the oil, eggs, and sugar until they form a harmonious blend.


3. In a separate bowl, sift together the flour, baking powder, salt, baking soda, ground cinnamon, and ground nutmeg. Gradually add this dry mixture to the oil mixture, allowing the mixer to work its magic until everything is thoroughly combined. Be prepared for a thick, luscious batter.


4. Switch to a sturdy spoon and lovingly fold in the apple pieces. Transfer this mixture into your prepared baking dish, smoothing it out to create an even layer.


5. Gently sprinkle the butterscotch chips over the top, pressing them lightly into the batter.


6. Bake in the preheated oven for 45 minutes to an hour, until golden brown and just beginning to pull away from the edges of the pan.


7. Allow the bars to cool thoroughly before cutting them into delightful squares.


A Walk Down Memory Lane

I remember the first time I helped my grandmother make these Apple Pie Bars. I was barely tall enough to see over the kitchen counter, standing on a little wooden stool she had pulled out just for me. The kitchen was alive with activity, a symphony of clinking bowls and the whirring of our old mixer.


Every autumn, as the leaves turned to shades of amber and gold, my family would gather at my grandmother's house for our annual apple-picking adventure. We would come back with baskets brimming with McIntosh apples, their sweet-tart flavor perfectly suited for baking. My grandmother, the matriarch of our family, would lead the charge in transforming these apples into her famous Apple Pie Bars.


I recall the warmth of the kitchen, the stories shared across generations. My grandmother would tell tales of her own childhood, of how these bars were a staple at every family gathering. Each bite was a bridge to the past, a connection to family members who had long since passed, yet whose spirits lingered in every crumb.


Difficulty: 5/10
Classification: Dessert

Creating these Apple Pie Bars is more than just baking; it’s about creating memories. So, gather your loved ones, don an apron, and let the nostalgic aroma of apples and spices fill your home. These bars are a testament to the enduring power of family traditions and the simple joys of baking together.

Read more about Appetizers

Read more about Main Dishes

Read more about Desserts

Pan Seared Lamb Loin With Chimichurri & Roasted Trio Squash Salad With Goat Cheese and Pinenuts | Made by Meaghan Moineau

Pan Seared Lamb Loin With Chimichurri & Roasted Trio Squash Salad With Goat Cheese and Pinenuts | Made by Meaghan Moineau

Title: Savoring Tradition: Pan-Seared Lamb Loin with Chimichurri & Roasted Trio Squash Salad
Description: Discover the rich flavors and comforting nostalgia of our Pan-Seared Lamb Loin with Chimichurri paired with a Roasted Trio Squash Salad adorned with Goat Cheese and Pine Nuts. This main dish not only tantalizes your taste buds but also carries the warmth of cherished family memories. Experience a culinary journey that brings together the zest of fresh herbs and the heartwarming glow of the holiday table.

---


When it comes to family gatherings, few dishes evoke the warmth and comfort of home like a beautifully prepared lamb loin. As the holiday season approaches, I find myself reminiscing about the countless family dinners centered around this delightful dish. The aroma of fresh herbs mingling with the rich, savory lamb was a staple at our holiday table, a tradition passed down through generations.


Ingredients:

- Cilantro


- Extra virgin olive oil


- Flat leaf parsley


- Garlic clove


- Black ground pepper


- Kosher salt and pepper


- Lamb loin chops


- Lemon


- Mint


- Pine nuts


- Red pepper flakes


- Shallot


Instructions:
1. Preheat Your Oven: Start by preheating your oven to 400°F, setting the stage for a dish that’s sure to impress.
2. Prepare the Chimichurri: In a large bowl, combine cilantro, flat leaf parsley, minced garlic, lemon juice, mint, and a hint of red pepper flakes. Blend with extra virgin olive oil until you achieve a smooth consistency. Season to taste with kosher salt and freshly ground black pepper.
3. Sear the Lamb: Heat a large, heavy-bottomed pan with a splash of olive oil until it begins to smoke. Season each side of the lamb loin chops with salt and pepper. Sear them for about 2 minutes per side to lock in those delicious juices.
4. Oven Finish: Transfer the seared lamb to the preheated oven.

- For rare, roast for 2-3 minutes.


- For medium rare, extend to 6-8 minutes.


- For medium, let it cook for 9-11 minutes.


- For well done, aim for 12-14 minutes.


Remember, the lamb continues to cook after it's out of the oven, so adjust your times accordingly.


5. Roasted Trio Squash Salad: As the lamb cooks, prepare a medley of roasted squash. Toss sliced squash with olive oil, salt, and pepper, then roast until tender. Finish with a sprinkle of goat cheese and toasted pine nuts for a delightful crunch.
A Nostalgic Twist:

This dish always brings me back to a particular winter evening at my grandmother's house. The fireplace crackled, casting a warm glow across the dining room. I remember watching her skillfully sear the lamb, her hands moving with the confidence of years of practice. As we sat around the table, the laughter of my cousins filled the room, and the scent of chimichurri and roasted squash wrapped us in a cozy embrace. These moments, filled with love and laughter, are the essence of why I cherish this dish.


Difficulty: 6/10
Classification: Main Dish

---


Whether you’re creating new memories or savoring the nostalgia of family traditions, this Pan-Seared Lamb Loin with Chimichurri and Roasted Trio Squash Salad is sure to become a beloved part of your culinary repertoire. Indulge in the symphony of flavors and share a meal that speaks the universal language of love and togetherness.

Read more about Appetizers

Read more about Main Dishes

Read more about Desserts

Cider-Braised Pork Shoulder With Caramelized Onion and Apple Confit | Made by Meaghan Moineau

Cider-Braised Pork Shoulder With Caramelized Onion and Apple Confit | Made by Meaghan Moineau

Title: A Taste of Autumn: Cider-Braised Pork Shoulder with Caramelized Onion and Apple Confit
Description:

Dive into the heartwarming flavors of fall with our Cider-Braised Pork Shoulder with Caramelized Onion and Apple Confit. This main dish, rated 7 out of 10 on the difficulty scale, beautifully marries the rich, savory notes of pork with the sweet, tangy essence of apples and onions. As you savor each bite, you'll be transported back to cherished family gatherings and the cozy warmth of a kitchen filled with laughter and love.


---


The Recipe for Nostalgia and Comfort

When the leaves start to turn and the air crisps with the promise of autumn, there's nothing quite like gathering around a table with loved ones to share a meal that encapsulates the essence of the season. Our Cider-Braised Pork Shoulder with Caramelized Onion and Apple Confit isn't just a dish; it's a journey back to those nostalgic family dinners that marked the change of seasons.


Ingredients:

- 1 tied pork shoulder


- Black salt and pepper, to taste


- Olive oil


- 2 large yellow onions, thinly sliced


- 1/4 cup Calvados brandy


- 2 Granny Smith apples, peeled and sliced


- 4 garlic cloves, minced


- 1 teaspoon fresh dried thyme


- 2 cups apple cider


- 1 cup chicken stock


- 2 tablespoons Dijon mustard


Instructions:
1. Preheat and Prepare:

Begin by preheating your oven to 400°F (200°C). Pat the pork shoulder dry with paper towels and generously season with black salt and pepper.


2. Sear the Pork:

Heat olive oil in a large ovenproof pot or Dutch oven over medium-high heat. Brown the pork on all sides, turning with tongs, for about 6-8 minutes per side to create a rich, savory crust. Transfer the pork to a plate.


3. Caramelize the Onions:

Pour off excess fat from the pot, leaving just enough to coat the bottom. Add the sliced onions and 1 teaspoon of salt. Sauté over medium heat, stirring occasionally, until the onions are soft and deeply golden brown, about 18-20 minutes.


4. Deglaze and Build Flavor:

Stir in the Calvados to deglaze the pan, scraping up any browned bits. Add the apple slices, minced garlic, and thyme, cooking for an additional 30 seconds until fragrant.


5. Braise the Pork:

Nestle the pork shoulder back into the pot, ensuring it's surrounded by the onion mixture. Pour in the apple cider and chicken stock. Cover the pot and place it in the oven, reducing the heat to 325°F (163°C). Braise until the pork is incredibly tender, about 2 1/2 to 3 hours.


6. Finish the Sauce:

Once cooked, transfer the pork to a cutting board and remove the kitchen strings. Boil the onion and apple mixture over high heat until the liquid is slightly reduced and thickened, about 2 minutes. Stir in the Dijon mustard and season to taste with additional salt and pepper.


7. Serve and Enjoy:

Slice the tender pork into serving pieces and arrange them on a platter or individual plates. Generously spoon the caramelized onion and apple confit over and around the meat, allowing the flavors to meld beautifully.


A Family Memory:

This dish always reminds me of the autumn evenings spent at my grandmother's house. The warmth of her kitchen, the aroma of apples and onions slowly caramelizing, and the sound of laughter echoing through the rooms. One particular fall, as the first snowflakes began to dance in the air, she taught me how to prepare this very dish. My small hands struggled to tie the pork, but her gentle guidance and the promise of a comforting meal kept me eager to learn. As we sat down to dinner, wrapped in the cozy embrace of family, I realized that this was more than just a recipe—it was a legacy of love and tradition.


Conclusion:

This Cider-Braised Pork Shoulder with Caramelized Onion and Apple Confit is more than a main dish; it's a celebration of the season and a testament to the power of food to bring us together. As you recreate this dish, may it fill your home with warmth and your heart with cherished memories.

Read more about Appetizers

Read more about Main Dishes

Read more about Desserts

Shrimp & Orzo | Made by Meaghan Moineau

Shrimp & Orzo | Made by Meaghan Moineau

Title: "Savoring Tradition: Shrimp & Orzo Delight with a Nostalgic Twist"
Description:

Embark on a culinary journey with our delectable Shrimp & Orzo recipe, a dish that beautifully marries the vibrant flavors of the Mediterranean with the comforting warmth of home-cooked meals. This main dish, rated a 7 out of 10 on the difficulty scale, is perfect for a cozy family dinner or a casual get-together with friends. Follow along as we not only guide you through creating this sumptuous dish but also share a cherished family memory that brings this recipe to life.


---


A Nostalgic Journey Through Shrimp & Orzo

Every family has a dish that stirs up a fond memory, and for mine, it’s the delightful Shrimp & Orzo. This dish isn’t just a meal; it’s a tapestry of flavors woven with the threads of family tradition and love.


I vividly remember the first time my grandmother introduced this recipe to our family table. It was a balmy summer evening, one of those nights where the air was thick with the scent of blooming jasmine and the distant sound of cicadas. Our family gathered in her sun-dappled kitchen, a place that felt like the heart of our home. The faint sizzle of olive oil hitting the hot Dutch oven announced the beginning of our culinary adventure.


As my grandmother stirred the diced onion and fennel bulb, she regaled us with stories from her childhood, tales of seaside summers where shrimp were abundant and laughter even more so. Those evenings were always special, the kitchen alive with laughter, the clinking of glasses, and the anticipation of yet another unforgettable meal.


---


Recipe: Shrimp & Orzo
Ingredients:

- 1 can diced tomatoes


- 1/2 cup dry white wine


- 1 fennel bulb, diced


- 1/2 cup crumbled feta cheese


- 2 tablespoons fresh parsley, divided


- 4 cloves of garlic, minced


- Lemon wedges for serving


- 2 cups low sodium chicken broth


- 2 tablespoons olive oil


- 1 diced onion


- 1 teaspoon dried oregano


- 1 1/2 cups orzo pasta


- 1/4 teaspoon crushed red pepper flakes


- Salt & pepper to taste


- 1 pound large shrimp, peeled and deveined


- 1/2 cup water


Instructions:

1. Preheat your oven to 400 degrees F. Season the shrimp with salt and pepper, then refrigerate until ready to use. Grease a 13x9-inch baking dish.


2. Heat the olive oil in a large Dutch oven over medium-high heat until shimmering. Add the onion, fennel bulb, and 1/2 teaspoon salt. Cook, stirring frequently, until the vegetables are softened and starting to brown around the edges, about 10 minutes.


3. Stir in the minced garlic and crushed red pepper flakes, and cook until the garlic becomes very fragrant, about 30 seconds.


4. Add the orzo to the vegetables, stirring to coat with oil. Continue cooking, stirring frequently, for about 4 minutes, until the orzo has a toasty aroma.


5. Pour in the white wine, cooking and stirring constantly, until the liquid evaporates, about 1 minute.


6. Add the chicken broth, water, and 1/4 teaspoon salt. Bring to a boil, then reduce the heat and simmer until the orzo is almost tender, about 12 minutes, stirring frequently to prevent sticking.


7. Remove from heat and stir in the shrimp, tomatoes, oregano, and 1 tablespoon of parsley.


8. Transfer the mixture to the prepared baking dish and sprinkle with feta cheese.


9. Bake for about 20 minutes, until the shrimp is cooked through and the feta is lightly browned.


10. Before serving, sprinkle with the remaining parsley and the reserved fennel fronds. Serve with lemon wedges.


---


Creating Shrimp & Orzo is more than just assembling ingredients; it's about reliving cherished memories and crafting new ones. Each bite is a tribute to family, tradition, and the joy of sharing a meal with the ones you love. So, gather around the table, share stories, and savor the exquisite flavors of this timeless dish.

Read more about Appetizers

Read more about Main Dishes

Read more about Desserts

Classic French Mussels | Made by Meaghan Moineau

Classic French Mussels | Made by Meaghan Moineau

Title: Unveiling the Elegance of Classic French Mussels: A Taste of Nostalgia
Description: Dive into the heart of French culinary tradition with our Classic French Mussels recipe. Perfectly blending delicate flavors and cultural richness, this dish offers a taste of nostalgia, transporting you to cherished family gatherings. With simple ingredients like dry white wine, fresh parsley, and garlic, this mussel recipe is a delightful appetizer rated 4 out of 10 in difficulty. Relish the harmony of taste and memory as you savor each bite.

---


There’s something inherently comforting about the ritual of preparing a beloved family dish. For me, Classic French Mussels brings back vivid memories of summer evenings spent at my grandmother’s quaint seaside cottage in Brittany, France. The air was always filled with the briny scent of the ocean, mingling with the aroma of garlic and shallots sizzling in olive oil—a sensory symphony that signaled the beginning of a cherished meal.


Ingredients:

- 2 lbs mussels


- 2 tablespoons olive oil


- 2 shallots, finely chopped


- 4 garlic cloves, minced


- 1 cup dry white wine


- 1/2 cup low-fat buttermilk


- 2 tablespoons unsalted light butter


- 1/4 cup fresh parsley, chopped


- Kosher salt to taste


Instructions:
1. Prepare the Mussels: Begin by scrubbing the mussels under cold water with a stiff brush. Discard any mussels that remain open or have broken shells. Soak them in cool, clean water for at least an hour to allow them to expel any sand.
2. Remove the Beards: Locate the small fibrous "beard" on each mussel and pull it out toward the hinge of the shell to avoid injuring the mussel.
3. Cook the Aromatics: In a large pot, heat the olive oil over medium-high heat. Add the shallots and garlic, cooking until soft and fragrant, approximately 5 minutes.
4. Combine Ingredients: Add the mussels to the pot, followed by the wine, buttermilk, butter, and parsley. Season generously with kosher salt. Stir well to combine all ingredients.
5. Steam the Mussels: Cover the pot and allow the mussels to cook for 10 to 15 minutes, or until they have opened and are cooked through.
6. Serve: Divide the mussels and the flavorful juices between two bowls. Serve immediately with crusty whole-grain bread to soak up the delectable sauce.

This dish, a testament to the simplicity and elegance of French cuisine, is the perfect appetizer for any occasion. It’s rated a 4 out of 10 in difficulty, making it accessible even for those new to cooking mussels.


As I watch the mussels gently open in the pot, I’m reminded of those magical evenings in Brittany, where laughter echoed around the dinner table, and the warmth of family togetherness was as nourishing as the meal itself. Today, I carry on this tradition, serving Classic French Mussels to my own family, creating new memories while honoring the old.


Savor the rich flavors and let this dish transport you to a place of warmth, love, and tradition. Bon appétit!

Read more about Appetizers

Read more about Main Dishes

Read more about Desserts

Big Batch Smoothie Bowl | Made by Meaghan Moineau

Big Batch Smoothie Bowl | Made by Meaghan Moineau

Title: Nourishing Nostalgia: The Big Batch Smoothie Bowl That Revives Family Memories
Description:

Step into a world where wholesome ingredients meet cherished family moments. Our Big Batch Smoothie Bowl is more than just a breakfast treat—it's a blend of flavors and memories, perfect for those who crave both nutrition and nostalgia.


---


The Big Batch Smoothie Bowl: A Wholesome Family Tradition

There's something magical about the clinking of spoons and the chatter of family gathered around the kitchen table. For me, the Big Batch Smoothie Bowl isn't just a delightful dish; it's a cherished family tradition that brings back vivid memories of sunlit mornings and joyous laughter.


Ingredients:

- Whey protein


- Frozen strawberries


- Frozen blueberries


- Bananas


- Pomegranate seeds


- Walnuts


- Pumpkin seeds


- Flaxseed


- Granola


Instructions:

1. Begin by blending the frozen strawberries and blueberries with creamy kefir and a scoop of whey protein. This step is best done ahead of time, allowing the mixture to rest until it reaches the perfect temperature—not too icy, just refreshingly cool.


2. Once your blend is ready, portion out each serving into inviting bowls. Top them with slices of ripe bananas, a generous sprinkle of pomegranate seeds, crunchy granola, and a dusting of ground walnuts and flaxseed. For an added burst of flavor and texture, scatter a few pumpkin seeds on top.


3. Gather your loved ones and savor each spoonful, enjoying not just the taste, but the moments shared together.


A Walk Down Memory Lane:

This smoothie bowl brings me back to summer mornings at my grandparents' house. I remember waking up to the aroma of ripe fruits and the soft hum of the blender. My grandmother would call us to the kitchen, her eyes twinkling with warmth and love.


As we sat around the table, each bowl was a masterpiece—vibrant colors of berries, the crunch of granola, and the subtle nuttiness of flaxseed. It wasn't just breakfast; it was a celebration of togetherness. My grandfather would share stories of his childhood, and we'd listen, captivated by tales of a simpler time.


Even now, as I prepare this dish for my own family, it's as if I'm honoring those memories, carrying forward a tradition that nourishes both body and soul. The Big Batch Smoothie Bowl is a testament to the power of food to connect generations, creating bonds that transcend time.


Difficulty Rating: 3/10

This recipe is as easy as it is delightful, with minimal preparation and maximum enjoyment.


Classification: Main Dish

While often enjoyed as a breakfast treat, the hearty ingredients make this smoothie bowl a satisfying main dish, perfect for starting the day on a healthy and happy note.


---


Embrace the blend of flavors and family memories with our Big Batch Smoothie Bowl. A dish that's as nourishing as it is nostalgic, allowing you to savor both the taste and the tradition, one spoonful at a time.

Read more about Appetizers

Read more about Main Dishes

Read more about Desserts

Corn Avocado Salsa | Made by Meaghan Moineau

Corn Avocado Salsa | Made by Meaghan Moineau

Title: A Taste of Summer: Corn Avocado Salsa with a Nostalgic Twist
Description: Dive into a vibrant blend of flavors with our Corn Avocado Salsa recipe. This appetizer is not only a feast for the senses but also a trip down memory lane, filled with family gatherings and summer nostalgia.

---


As the summer sun casts its golden glow over lush gardens and bustling farmers' markets, there's one dish that never fails to capture the essence of the season for me: Corn Avocado Salsa. This vibrant, flavorful appetizer is more than just a recipe; it's a cherished family tradition that brings back fond memories of sun-drenched days and laughter-filled evenings.


Ingredients:

- 1 ripe avocado


- 1 tablespoon balsamic vinegar


- 1 teaspoon cumin


- 1 can of frozen corn, drained


- 1 clove garlic, finely chopped


- 1 red bell pepper, finely chopped


- Olive oil spray


Instructions:

1. Preheat your oven to 375 degrees Fahrenheit.


2. Spread the drained corn evenly on a baking sheet and lightly spray with olive oil.


3. Roast the corn in the oven for about 8-10 minutes, ensuring it doesn't brown too much or burn. Once done, remove from heat and allow it to cool.


4. In a large bowl, combine the finely chopped red pepper and garlic.


5. Peel, coarsely chop the avocado, and add it to the bowl along with the cooled corn.


6. Sprinkle in the cumin and drizzle the balsamic vinegar over the mixture, blending well to ensure all ingredients are evenly coated.


Difficulty Rating: 3/10
Classification: Appetizer

---


The true magic of Corn Avocado Salsa lies not only in its exquisite taste but also in the memories it evokes. Every time I prepare this dish, I'm transported back to my grandmother's kitchen, where the aroma of roasting corn mingled with the laughter of cousins gathered around the table. Grandma always insisted on using the freshest ingredients, and her secret was roasting the corn just to the right point where it retained its sweetness without losing its crispness.


Our family would often gather in the backyard, surrounded by towering sunflowers and the melodious chirping of crickets. Grandma would bring out a large bowl of her famous salsa, and we'd snack on it with tortilla chips, savoring each bite as the sun dipped below the horizon. It was during these moments that I learned the importance of good food and even better company.


Today, I continue this tradition with my own family, and with every bite of Corn Avocado Salsa, I'm reminded of those warm, joyful gatherings. This recipe is more than just a culinary delight; it's an invitation to pause, savor, and create lasting memories with loved ones. So, as you prepare this dish, I hope it brings as much warmth and happiness to your table as it has to mine.


Whether you're hosting a summer barbecue or simply looking to indulge in a refreshing appetizer, Corn Avocado Salsa is sure to impress. Enjoy the blend of creamy avocado, sweet roasted corn, and the subtle kick of cumin, and let it transport you to your own cherished memories.

Read more about Appetizers

Read more about Main Dishes

Read more about Desserts

Penne with Goat Cheese and Basil | Made by Meaghan Moineau

Penne with Goat Cheese and Basil | Made by Meaghan Moineau

Title: A Taste of Home: Penne with Goat Cheese and Basil
Description: Dive into the delightful simplicity of Penne with Goat Cheese and Basil, a dish that promises to bring comfort and nostalgia to your dining table. This easy yet flavorful main dish is perfect for any occasion, whether you're a seasoned cook or a kitchen novice.

---


There's something magical about the aroma of fresh basil mingling with the creamy tang of goat cheese. It takes me back to warm summer evenings at my grandmother's house, where the air was always filled with laughter and the scent of herbs from her garden. This dish, Penne with Goat Cheese and Basil, is not only a nod to those cherished moments but also a testament to the power of simple ingredients to create something truly special.


Ingredients:

- Penne pasta


- Fresh basil leaves


- Goat cheese


- Olive oil


- Salt and pepper


Instructions:

1. Begin by cooking the penne pasta according to the package directions. The key is to achieve that perfect al dente texture, where each piece offers a slight bite yet is tender enough to soak up the flavors.


2. While the pasta cooks, take a generous bunch of basil leaves and arrange them in a neat stack. Roll them up tightly like a cigar and cut crosswise to create beautiful, fragrant ribbons using the classic chiffonade technique.


3. Once the pasta is cooked and drained, toss it with a drizzle of olive oil and crumbled goat cheese. Allow it to cool for a few minutes, letting the cheese melt slightly and coat the pasta in a creamy embrace.


4. Finally, add your basil chiffonade, a pinch of salt, and freshly cracked pepper. Toss everything together gently, ensuring each piece of penne is enveloped in the harmonious blend of flavors.


5. Serve immediately and savor each bite, perhaps with a glass of chilled white wine or a summery iced tea.


A Nostalgic Note:

This dish always takes me back to those family gatherings at grandma's. I remember the way she would wander through her garden, snipping fresh basil with a pair of well-used scissors, smiling as she handed me the fragrant leaves. We'd cook together, her guiding hands showing me the chiffonade technique, her voice blending with the sounds of the bustling kitchen. The simple act of preparing and sharing a meal was her way of teaching us about love and togetherness.


Difficulty Rating: 3/10
Classification: Main Dish

Whether you're looking to impress guests with minimal effort or simply want to treat yourself to a comforting meal, Penne with Goat Cheese and Basil is the perfect choice. Its simplicity is its strength, allowing the fresh, vibrant ingredients to shine. Give it a try, and perhaps you'll create a new memory of your own to cherish.

Read more about Appetizers

Read more about Main Dishes

Read more about Desserts

Roasted Strawberry Coconut Milk Ice Cream | Made by Meaghan Moineau

Roasted Strawberry Coconut Milk Ice Cream | Made by Meaghan Moineau

Title: Indulge in Nostalgia with Roasted Strawberry Coconut Milk Ice Cream
Description: Dive into a scoop of creamy nostalgia with our Roasted Strawberry Coconut Milk Ice Cream. This delightful dessert combines the lusciousness of coconut milk with the warm spice of cardamom and the sweet, tangy burst of roasted strawberries. Easy to make and even easier to enjoy, this ice cream is a perfect treat for any occasion.

---


Roasted Strawberry Coconut Milk Ice Cream


Difficulty: 4/10
Classification: Dessert

Ingredients:


- 1/2 cup raw cane sugar


- 2 cans full-fat coconut milk


- 1 teaspoon ground cardamom


- 1 pound strawberries


- 1 vanilla bean


Instructions:


1. Prepare the Coconut Milk Mixture: In a saucepan over medium heat, combine the coconut milk, 1/2 cup of raw cane sugar, and ground cardamom. Using a small knife, slice the vanilla bean lengthwise and scrape the seeds into the coconut milk mixture. Add the vanilla bean pod as well for extra flavor.
2. Roast the Strawberries: Preheat your oven to 375°F (190°C). Hull and slice the strawberries, then spread them out on a baking sheet lined with parchment paper. Sprinkle a tablespoon of raw cane sugar over the strawberries, and roast in the oven for about 20-25 minutes, or until the strawberries are soft and slightly caramelized.
3. Combine and Chill: Once the coconut milk mixture is warmed and the aroma is inviting, remove the vanilla bean pod. Allow the mixture to cool to room temperature. Once the strawberries have roasted, allow them to cool as well. Blend the roasted strawberries until smooth, then mix them into the coconut milk mixture. Chill the combined mixture in the refrigerator for at least 4 hours or overnight for best results.
4. Churn and Freeze: Pour the chilled mixture into an ice cream maker and churn according to the manufacturer's instructions. Once churned to a soft-serve consistency, transfer the ice cream to a lidded container and freeze for at least 2 hours, or until firm.
5. Serve and Enjoy: Scoop the ice cream into bowls or cones and enjoy the creamy, fruity flavors that bring back cherished memories.

---


A Sweet Memory


Growing up, summers at Grandma's house were synonymous with the delightful aroma of fresh strawberries roasting in the kitchen. Her kitchen was a haven of culinary wonders, but nothing could rival the excitement of homemade ice cream day. Grandma's secret ingredient was always a pinch of cardamom, which she claimed was a little bit of magic passed down from her mother.


The sweet, spicy aroma of cardamom wafting through the air was a signal that something extraordinary was happening. We'd gather around, eager to watch as she blended the roasted strawberries into the creamy coconut milk mixture, her hands deftly working the ice cream maker.


Those moments, spent with family, laughing and sharing stories while waiting for the ice cream to set, were the essence of summer. Each spoonful of ice cream was a taste of nostalgia, a reminder of the warmth and love that filled those sun-drenched days.


Now, as I recreate this recipe for my own family, I hope to pass on not just the flavors, but the cherished memories that come with it. This Roasted Strawberry Coconut Milk Ice Cream is more than just a dessert—it's a celebration of love, tradition, and the simple joys of life.


---


Indulge in this delightful dessert and let the flavors transport you to a place of warmth and nostalgia. Perfect for summer gatherings or a cozy evening treat, this ice cream is a delicious way to create new memories while honoring the old.

Read more about Appetizers

Read more about Main Dishes

Read more about Desserts

Chicken Piccata With Angel Hair Pasta | Made by Meaghan Moineau

Chicken Piccata With Angel Hair Pasta | Made by Meaghan Moineau

Zesty Chicken Piccata With Angel Hair Pasta: A Timeless Family Classic


Description


Discover the tangy and savory delight of Chicken Piccata with Angel Hair Pasta, a dish that balances bright citrus notes with the richness of a buttery sauce, all harmonized with tender chicken and delicate pasta. This main dish not only promises a burst of flavor but also serves as a nostalgic journey back to family gatherings marked by laughter, love, and unforgettable meals. Perfect for a weeknight dinner or a special occasion, this recipe is rated 6/10 in difficulty and will leave your taste buds dancing with joy.


---


A Walk Down Memory Lane


Growing up, Sunday dinners were a cherished tradition in our family. My grandmother would spend the afternoon bustling around the kitchen, her apron dusted with flour and a twinkle in her eye as she orchestrated the meal that would bring us all together. Chicken Piccata with Angel Hair Pasta was a staple, a dish that magically combined her Sicilian roots with a touch of modern flair.


I remember the way the kitchen smelled, the citrusy aroma of fresh lemons mingling with the savory scent of sautéed garlic and olive oil. As children, my cousins and I would gather around the table, eagerly awaiting the moment when she would place the steaming platter before us. Each bite was a revelation—the tangy capers popping against the tender chicken and the delicate strands of pasta soaking up the rich, buttery sauce.


Those evenings were filled with stories and laughter, the kind of moments that linger long after the plates have been cleared. To this day, every time I prepare this dish, I can almost hear my grandmother's gentle laughter and feel the warmth of those family gatherings. It's more than just a meal; it's a connection to the past, a way to keep those precious memories alive.


---


Ingredients


- 1 cup all-purpose flour


- 8 oz angel hair pasta


- 2 boneless chicken breasts


- 2 tablespoons capers


- 1 cup chicken broth


- Fresh basil, chopped


- 2 diced garlic cloves


- Black kosher salt and pepper to taste


- Zest and juice of 2 lemons


- 3 tablespoons olive oil, divided


- 1 teaspoon red chili flakes


- 2 diced Roma tomatoes


- 3 tablespoons unsalted butter


---


Instructions


1. Prepare the Chicken:

Place 1 cup of flour in a shallow dish. Using a sharp knife, slice each chicken breast in half. Cover each piece with wax paper and use a kitchen mallet to pound them to about ½ inch thick. Season the chicken generously with salt and pepper. Coat the chicken pieces in flour, shaking off any excess.


2. Cook the Chicken:

In a large skillet, heat 2 tablespoons of olive oil over medium heat. Add the chicken to the skillet and sauté each side until golden brown, about 3-4 minutes per side. Once cooked, transfer the chicken to a clean plate and cover with aluminum foil.


3. Boil the Pasta:

Begin boiling the angel hair pasta according to package instructions.


4. Make the Sauce:

Using the same skillet, add the remaining olive oil and sauté the garlic until aromatic, avoiding browning. Add red chili flakes, capers, lemon juice, lemon slices, zest, and chicken broth. Use a wooden spoon to scrape up any brown bits from the skillet. Increase heat to medium-high and allow the liquid to reduce by half.


5. Finish the Sauce:

In a small bowl, mash together 1 tablespoon of flour and the butter. Whisk into the reducing liquid, cooking for 1-2 minutes. Ensure the sauce is smooth and adjust seasoning with salt and pepper.


6. Combine Everything:

Drain the cooked pasta and toss it in the lemon caper sauce with tomatoes and basil, reserving a few spoonfuls of sauce. Adjust seasoning if needed.


7. Serve:

Plate the pasta and top each serving with a piece of chicken. Spoon the reserved lemon caper sauce over the chicken and pasta. Serve immediately.


---


Conclusion


Recreate this delicious Chicken Piccata with Angel Hair Pasta and transport yourself to a place where every meal becomes a memory worth savoring. Whether you're sharing it with family or enjoying a quiet evening at home, this dish promises to delight with its robust flavors and heartwarming nostalgia.

Read more about Appetizers

Read more about Main Dishes

Read more about Desserts

Broccoli Rabe and Breaded Veal Scallopini | Made by Meaghan Moineau

Broccoli Rabe and Breaded Veal Scallopini | Made by Meaghan Moineau

Title: "Savoring Heritage: Broccoli Rabe and Breaded Veal Scallopini"
Description:

Dive into the rich flavors of Broccoli Rabe and Breaded Veal Scallopini, a dish that marries tradition with taste. This main dish, rated 6 out of 10 in difficulty, offers a delightful culinary journey. Join us as we explore the steps to create this masterpiece, infused with a nostalgic family memory that brings warmth to every bite.


---


Broccoli Rabe and Breaded Veal Scallopini: A Taste of Tradition

In the heart of our family kitchen, where laughter mingled with the aroma of simmering dishes, Broccoli Rabe and Breaded Veal Scallopini took center stage. It was a dish that whispered stories of heritage, of Sundays spent around the table, and of the hands that lovingly prepared it. Today, I invite you to recreate this beloved recipe, a culinary heirloom that promises to enchant your taste buds and warm your soul.


Ingredients:

- Broccoli rabe


- Butter


- Egg


- Olive oil


- Salt and pepper


- Yellow onion


- Garlic clove


- Bread crumbs


- Veal scallopini


- Tomatoes


Instructions:
1. Prepare the Broccoli Rabe:

Begin by washing and steaming the broccoli rabe for a few minutes. This step can be done in a pressure cooker for efficiency. The vibrant greens are the perfect complement to the savory veal.


2. Sauté the Aromatics:

Thinly slice the yellow onion. Peel and halve the garlic clove, removing the stem. Heat 1-2 tablespoons of olive oil in a deep pan. Sauté the onion and garlic on medium heat until translucent, releasing their fragrant aroma.


3. Cook the Vegetables:

Add the steamed broccoli rabe to the pan, cover with a lid, and let it cook for a few more minutes. As the flavors meld together, cut the tomatoes into wedges and add them to the pan. Cook for several additional minutes, seasoning with salt and pepper to taste.


4. Prepare the Veal Scallopini:

Season each scallopini with salt and pepper. Dip them in beaten egg, ensuring an even coat. Follow by dipping them in bread crumbs, pressing down to cover evenly.


5. Pan Fry the Veal:

In another pan, melt a generous amount of butter. Pan fry the breaded veal scallopini over high heat, cooking for 1-2 minutes on each side. Add more butter before flipping, as the bread crumbs will absorb it, ensuring a golden, crispy finish.


A Nostalgic Family Memory:

As a child, Sundays meant gathering in my grandmother's cozy kitchen. The clatter of pots and pans was the soundtrack to our family stories, and Broccoli Rabe and Breaded Veal Scallopini was always the star of the meal. I remember my grandmother's skilled hands, dusted with flour, as she taught me the art of breading the veal, her stories weaving into the fabric of our family's culinary history. The dish was more than just food; it was a connection to our roots, a tapestry of flavors that told the story of our heritage.


Difficulty Rating: 6/10

This dish, while requiring attention to detail, is a rewarding culinary endeavor that even intermediate cooks can master. It stands proudly as a main dish, perfect for family gatherings or a special Sunday dinner.


Conclusion:

Broccoli Rabe and Breaded Veal Scallopini is more than just a recipe; it's a journey through time, a celebration of flavors that transcends generations. As you prepare this dish, may it bring you the same joy and nostalgia it has brought to our family table. Bon appétit!

Read more about Appetizers

Read more about Main Dishes

Read more about Desserts