Chicken with Grape Tomatoes and Mushrooms | Made by Meaghan Moineau

Chicken with Grape Tomatoes and Mushrooms | Made by Meaghan Moineau

**Title: Savoring Memories: Chicken with Grape Tomatoes and Mushrooms**


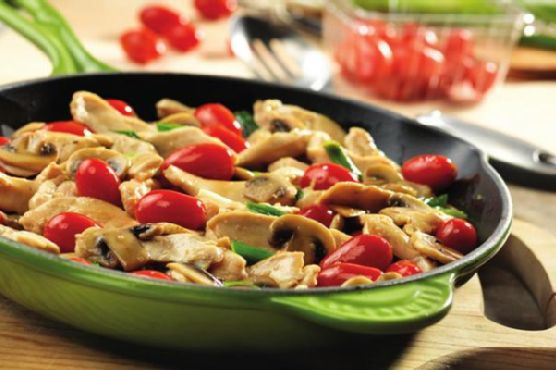
**Description:** Dive into a heartwarming blend of flavors with our Chicken with Grape Tomatoes and Mushrooms recipe. Perfect for a cozy family dinner, this dish brings together juicy chicken, fresh mushrooms, and vibrant grape tomatoes in a delightful medley. With a touch of nostalgia, we'll whisk you away to cherished family moments while guiding you through this simple, yet satisfying main dish.


---


When I think about comfort food that warms both the heart and soul, Chicken with Grape Tomatoes and Mushrooms immediately springs to mind. This dish is not only a delightful blend of flavors but also a tapestry of fond family memories woven into each bite.


**The Ingredients that Tell a Story**


- 2 tablespoons olive oil


- 4 skinless, boneless chicken breast halves


- 8 ounces fresh mushrooms, sliced


- 2 cloves garlic, minced


- 1 pint grape tomatoes, halved


- 4 green onions, sliced


- 1 packet concentrated chicken broth


- 1/2 cup water


**A Journey Down Memory Lane**


Growing up, Sunday dinners were the highlight of my week. Our family gathered around the kitchen, the heart of our home, where laughter mingled with the aroma of delicious meals being prepared. My grandmother, the matriarch of our household, had a knack for turning simple ingredients into something magical.


One of her masterpieces was the Chicken with Grape Tomatoes and Mushrooms. I vividly remember her standing over the stove, her deft hands moving with practiced ease as she cooked. The sizzle of olive oil in the skillet was the opening note of a symphony that promised a comforting meal. The chicken, seared to a golden brown, filled the kitchen with an enticing aroma that drew us all closer.


**Cooking Instructions**


1. Begin by heating 1 tablespoon of olive oil in a 12-inch skillet over medium-high heat. Place the chicken breasts in the skillet and cook until well browned, stirring often. Once browned, remove the chicken from the skillet and set aside.


2. Add the remaining tablespoon of oil to the skillet and reduce the heat to medium. Introduce the sliced mushrooms, allowing them to cook until tender, stirring occasionally.


3. Add the minced garlic, halved grape tomatoes, and sliced green onions to the skillet. Stir for about a minute, letting the flavors meld together.


4. Return the browned chicken to the skillet. Mix in the concentrated chicken broth and water, ensuring everything is well combined. Continue cooking until the chicken is thoroughly cooked and the flavors have infused into the dish.


**A Nostalgic Note**


Every time I prepare this dish, I am transported back to those Sundays in my grandmother's kitchen. The vibrant colors of the grape tomatoes and the earthy aroma of mushrooms are not just ingredients; they are reminders of the stories and laughter shared around our family table. It's amazing how food can connect us to our past, creating a bridge to cherished memories.


**Difficulty Rating: 4/10**


This recipe is accessible for cooks of all skill levels, making it a wonderful choice for a quick yet impressive main dish. Whether you're a seasoned chef or a kitchen novice, this dish promises a rewarding experience.


As you savor each bite of Chicken with Grape Tomatoes and Mushrooms, may it bring you as much warmth and joy as it has brought to my family over the years. Enjoy this delightful main dish, and may it inspire your own cherished memories around the table.

Read more about Appetizers

Read more about Main Dishes

Read more about Desserts

Sticky Toffee Pudding | Made by Meaghan Moineau

Sticky Toffee Pudding | Made by Meaghan Moineau

**Title: The Sweet Nostalgia of Sticky Toffee Pudding: A Family Tradition**


**Description:** Dive into the delightful warmth of Sticky Toffee Pudding, a classic dessert that bridges generations with its rich flavors and comforting texture. From its simple ingredients to its captivating taste, this recipe is a heartwarming reminder of family gatherings and cherished memories. Discover the story behind this beloved dessert and learn how to make it a staple in your own family traditions.


---


There’s something undeniably magical about Sticky Toffee Pudding. Its rich, gooey texture and sweet, caramelized aroma have the power to transport us back to simpler times. In my family, this dessert has always held a special place, particularly during the festive season.


**A Nostalgic Family Tradition**


Growing up, Sticky Toffee Pudding was the star of our holiday dinners. I remember my grandmother bustling in the kitchen, her apron dusted with flour, as she lovingly prepared this dessert. The moment the cake went into the oven, the house would fill with the heartwarming scent of dates and vanilla, a scent that signaled the start of our family’s festive celebrations.


One particular memory stands out vividly. It was a crisp winter evening, and snowflakes danced outside the window as my siblings and I gathered around the kitchen table, impatiently waiting for our grandmother to finish her culinary masterpiece. As she poured the rich toffee sauce over the freshly baked cake, she shared stories of how her own mother had made this dessert for her as a child. It was more than just a dish; it was a thread connecting our family through generations.


**Ingredients You'll Need:**


- 1 teaspoon plus 1 teaspoon baking powder


- 1 stick of butter (1/2 cup), softened


- 1/4 cup dark corn syrup


- 1 cup chopped dates


- 2 large eggs


- 1 1/2 cups all-purpose flour


- 1 cup heavy cream


- 3/4 cup light brown sugar


- 1/4 teaspoon salt


- 1 cup sugar


- 1 teaspoon vanilla extract


- 1 1/4 cups boiling water


**Instructions:**


1. Preheat your oven to 350 degrees Fahrenheit. Prepare the dates by placing them in a bowl, sprinkling them with 1 teaspoon of baking powder, and pouring boiling water over them. Stir slightly and let them soak until soft and cool.


2. In a separate bowl, combine the flour, the remaining teaspoon of baking powder, and salt. Set aside.


3. In a mixer, cream the butter and sugar until light and fluffy. Add the eggs, one at a time, mixing well after each addition. Beat in the corn syrup and vanilla extract.


4. Incorporate the date mixture and the flour mixture into the batter, mixing until just combined. Spread the batter into a greased 8-inch round or square cake pan, smoothing the top.


5. Bake in the preheated oven for 30-40 minutes, or until a tester inserted in the middle comes out with a few crumbs clinging.


6. While the cake is baking, prepare the toffee sauce. Melt the butter in a saucepan, then stir in the sugar until dissolved. Add the heavy cream and salt, simmering over medium heat until thickened and reduced to about 2 1/2 cups. Stir frequently to prevent overboiling.


7. Once the cake is done, remove it from the oven and invert it onto a plate to loosen it from the pan, then return it to the pan. Poke holes all over the cake with a skewer or fork.


8. Spoon about a cup of the sauce over the cake and leave it to soak for several hours or overnight for the best flavor. Once cooled, cover loosely with foil and refrigerate until ready to serve.


9. To serve, warm the cake gently in a low oven, if desired, but keep an eye on it to prevent burning the sauce. Invert the saucy cake onto a platter, pour about 1/2 cup more sauce over it, and let it soak in for a few minutes. Cut into wedges and serve with additional sauce on each slice.


**Difficulty Rating:** 6/10


**Classification:** Dessert


---


Sticky Toffee Pudding is more than just a dessert; it's a vessel of cherished memories and family bonds. Whether you're making it for the first time or continuing a beloved tradition, this recipe is sure to bring warmth and sweetness to your table. So gather your loved ones, share stories, and indulge in the nostalgic delight of Sticky Toffee Pudding.

Read more about Appetizers

Read more about Main Dishes

Read more about Desserts

BBQ” Style Chicken Thighs | Made by Meaghan Moineau

BBQ” Style Chicken Thighs | Made by Meaghan Moineau

**Title: "Savoring Memories: BBQ-Style Chicken Thighs That Transport You Back Home"**


**Description:** Dive into a world where the tantalizing aroma of BBQ-style chicken thighs meets cherished family memories. This easy-to-follow recipe promises to be a hit at your dinner table, blending rich flavors with sentimental nostalgia. Perfect as a main dish, this recipe is rated 3 out of 10 in difficulty, making it accessible for cooks at any level.


---


When I think of comfort food, my mind immediately drifts to the warm, inviting aroma of BBQ-style chicken thighs wafting through the kitchen. This dish is more than just a meal; it’s a cherished family tradition that brings us together, evoking laughter, love, and the essence of home.


**Ingredients You’ll Need:**


- Bone-in chicken thighs


- 1 cup ketchup


- 1/4 cup soy sauce


- 2 tablespoons Worcestershire sauce


- 2 tablespoons lemon juice


- 1/4 cup brown sugar


- 1 teaspoon garlic powder


- Salt and black pepper to taste


**Instructions:**


1. **Prepare the BBQ Sauce:** In a small bowl, combine ketchup, soy sauce, Worcestershire sauce, lemon juice, brown sugar, garlic powder, salt, and black pepper. Stir until the brown sugar is fully dissolved and the mixture is smooth.


2. **Prep the Chicken:** Clean the chicken thighs and pat them dry with a paper towel. This step is crucial to ensure the sauce adheres well to the chicken.


3. **Marinate:** Place the chicken thighs in a baking dish. Generously rub them all over with the prepared BBQ sauce, ensuring every nook and cranny is coated with the rich marinade.


4. **Bake:** Preheat your oven to 375°F (190°C). Bake the chicken thighs for 40-45 minutes or until the internal temperature reaches 165°F (75°C) and the skin is beautifully caramelized.


**A Nostalgic Family Memory:**


Growing up, Sunday afternoons were reserved for family gatherings. My grandmother's small kitchen would be filled with the comforting scent of these BBQ-style chicken thighs, a recipe passed down through generations. I remember watching her, apron dusted with flour, as she expertly mixed the ingredients, her hands moving with a rhythm that spoke of years of practice.


As the chicken baked, my siblings and I would gather around the table, setting it with plates and cutlery, the excitement of the impending feast palpable in the air. When the timer finally dinged, the chicken emerged from the oven, its skin a perfect balance of crispy and tender, glistening with the sticky, flavorful sauce.


Each bite was a symphony of flavors—sweet, tangy, and savory—transporting us to a place of warmth and comfort. Even now, every time I prepare this dish, I am reminded of those cherished Sundays, and I can’t help but smile, knowing that I am carrying on a beloved tradition.


**Difficulty Rating: 3/10**


**Classification: Main Dish**


This BBQ-style chicken thigh recipe is straightforward, requiring minimal ingredients and simple steps, making it an ideal choice for a quick weeknight dinner or a leisurely weekend meal. Whether you're a seasoned cook or a kitchen novice, this dish promises to deliver a taste of home that will leave everyone at the table smiling.


So, gather your loved ones, fire up the oven, and let this delicious recipe bring a piece of familial love and nostalgia to your plate.

Read more about Appetizers

Read more about Main Dishes

Read more about Desserts

Vegetarian Bean and Pumpkin Chili | Made by Meaghan Moineau

Vegetarian Bean and Pumpkin Chili | Made by Meaghan Moineau

**Title: Warming Hearts and Souls: Vegetarian Bean and Pumpkin Chili**


**Description:** Dive into a pot of comfort with this Vegetarian Bean and Pumpkin Chili. Infused with rich spices and heartwarming flavors, this dish is perfect for those chilly nights when you need a little nostalgia and nourishment. A combination of savory beans and seasonal pumpkin makes this a wholesome main dish that's sure to please everyone. Easy to prepare and packed with nutrients, it's a must-try for any home cook looking to spice up their fall menu.


---


As the leaves begin to change and a crisp chill fills the air, there's nothing quite like gathering around the table with family to enjoy a hearty meal. This Vegetarian Bean and Pumpkin Chili holds a special place in our family's heart, reminding us of autumn nights spent together in the warmth of our kitchen.


**Ingredients:**


- Canned tomatoes


- Canned pumpkin puree


- Serrano chiles


- Chipotle chiles in adobo


- Vegetable stock


- Water


- Onion


- Garlic


- Cumin


- Cinnamon stick


- Ground coriander


- Salt


- Chili powder


- Several dashes of Tabasco


- Shredded cheese (for garnish)


- Cilantro (for garnish)


- Sour cream (for garnish)


- Rinsed beans (soaked overnight)


**Instructions:**


1. Begin by rinsing the beans thoroughly. It's best to soak them overnight to ensure they cook evenly and achieve the perfect tenderness.


2. After rinsing the beans again, place them in your slow cooker.


3. Add the canned tomatoes, pumpkin puree, serrano and chipotle chiles, vegetable stock, water, chopped onion, minced garlic, cumin, cinnamon stick, ground coriander, salt, chili powder, and a few dashes of Tabasco.


4. Stir everything together well, ensuring all ingredients are evenly distributed.


5. Set your slow cooker to low and let it work its magic for 8 hours, or until the beans reach your desired tenderness.


6. Taste and adjust the seasoning if necessary.


7. Serve your chili hot, topped with shredded cheese, fresh cilantro, and a dollop of sour cream for added richness.


**A Nostalgic Family Memory:**


This dish always takes me back to my grandmother's kitchen, where the aroma of spices would greet us at the door. She would prepare this chili on the first cool weekend of fall, a tradition that marked the changing seasons. As the slow cooker bubbled away, we would gather around the table, sharing stories and laughter, the warmth of the chili mirroring the love and togetherness we felt. The addition of pumpkin was her special touch, a nod to her love for seasonal ingredients and a way to make each bowlful feel like a celebration of autumn.


Even now, as I prepare this dish in my own kitchen, I can hear her voice guiding me through each step, her hands showing me how to stir with care. This chili is more than just a meal; it is a reminder of the bonds we share and the comforting embrace of family traditions.


**Difficulty Rating:** 3/10


**Classification:** Main Dish


Embrace the cozy flavors of fall with this Vegetarian Bean and Pumpkin Chili, a simple yet satisfying main dish that brings warmth to your table and heart. Whether you're a seasoned cook or a kitchen novice, this recipe is as easy to prepare as it is delightful to eat. Enjoy the taste of nostalgia with each spoonful, and let it remind you of cherished family moments around a shared meal.

Read more about Appetizers

Read more about Main Dishes

Read more about Desserts

Protein Packed Carrot Muffins | Made by Meaghan Moineau

Protein Packed Carrot Muffins | Made by Meaghan Moineau

**Title: Protein-Packed Carrot Muffins: A Nostalgic Fusion of Flavor and Family**


**Description:** Dive into the delightful world of Protein Packed Carrot Muffins, a wholesome treat that combines the heartwarming nostalgia of family gatherings with the nutritious benefits of protein-rich ingredients. Perfect as a delicious dessert or a guilt-free snack, these muffins are sure to become a cherished staple in your kitchen. Discover the secret to their irresistible charm and learn how to make them at home with our easy-to-follow recipe.


---


In the realm of family recipes, there are a few that stand the test of time—those that not only fill our bellies but also warm our hearts with cherished memories. One such recipe in my family is the Protein Packed Carrot Muffins. This delightful fusion of flavor and nutrition transports me back to my grandmother's cozy kitchen, where the aroma of freshly baked goods always signaled a gathering filled with laughter and love.


**Ingredients:**


- 2 teaspoons Russian mulling spice


- 1 cup almond meal


- 1 teaspoon baking powder


- 1 teaspoon baking soda


- 1 cup grated carrots


- 1/2 cup desiccated coconut


- 1/4 cup coconut oil, melted


- 2 large eggs


- 1/4 cup fruit bits


- 2 tablespoons ground flaxseed


- Zest of 1 lemon


- 1/2 teaspoon salt


- 4 ounces tofu, crumbled


- 1 teaspoon vanilla extract


- 1/2 cup walnut pieces


- 1/4 cup whey powder


**Instructions:**


1. Preheat your oven to 350°F (175°C). Grease a muffin tin or line it with paper cups.


2. In a medium-sized bowl, mix the dry ingredients: Russian mulling spice, almond meal, baking powder, baking soda, desiccated coconut, ground flaxseed, salt, whey powder, and walnut pieces.


3. In a large bowl, combine the wet ingredients: melted coconut oil, eggs, vanilla extract, grated carrots, crumbled tofu, fruit bits, and lemon zest.


4. Gently fold the dry mixture into the wet ingredients, being careful not to overmix. This ensures the muffins remain tender and fluffy.


5. Pour the batter evenly into the prepared muffin tin. Bake for 20-25 minutes, or until a tester inserted into the center of a muffin comes out clean and dry.


6. Allow the muffins to cool slightly before serving. They can be stored in an airtight container and freeze beautifully for up to 2 months.


**A Nostalgic Tale:**


Every Sunday, my family gathered at my grandmother's house for a leisurely brunch. The highlight of these gatherings was always her famous carrot muffins. As a child, I would sit on the countertop, eagerly watching her magic unfold. She would regale us with stories of her childhood in the countryside, where she first learned the art of baking from her mother.


The secret to her muffins, she would say with a twinkle in her eye, was the perfect balance of spices and the love she kneaded into every batch. As the muffins baked, the kitchen filled with a warm, spicy aroma that was both comforting and invigorating. Those Sundays taught me the true essence of family—a blend of shared stories, laughter, and the simple joy of a homemade treat.


**Difficulty Rating:** 4/10


**Classification:** Dessert


These Protein Packed Carrot Muffins are more than just a treat; they are a testament to the power of food in bringing people together. Whether you're making them for a family gathering or as a personal indulgence, they promise to deliver a nostalgic taste of home with every bite.

Read more about Appetizers

Read more about Main Dishes

Read more about Desserts

Easy Key Lime Pie | Made by Meaghan Moineau

Easy Key Lime Pie | Made by Meaghan Moineau

**Title: A Slice of Sunshine: Easy Key Lime Pie Recipe with a Dash of Family Nostalgia**


**Description:** Dive into the zestful world of Key Lime Pie with our easy-to-follow recipe. Perfect for dessert lovers, this pie combines tangy lime flavors with a buttery graham cracker crust. Join us as we explore not just the steps to create this delightful treat, but also a cherished family memory that makes this pie a staple in our home.


---


### A Slice of Sunshine: Easy Key Lime Pie Recipe with a Dash of Family Nostalgia


When the sun is high and the days are long, there's nothing quite like the refreshing bite of a Key Lime Pie to bring a little bit of sunshine to your table. This Easy Key Lime Pie recipe is a breeze to make, and it brings back fond memories of summer afternoons spent in my grandmother's kitchen, surrounded by the laughter of family and the sweet aroma of limes.


**Ingredients:**


- 1/4 cup butter, melted


- 1/4 cup sugar


- 1 1/2 cups crushed graham crackers


- 3 egg yolks


- 1 can (14 ounces) sweetened condensed milk


- 1/2 cup lime juice


- 1/4 cup water


- Whipped cream for topping


- A few drops of green food coloring (optional)


**Instructions:**


**1. Prepare the Crust:**


Start by melting the butter in a small saucepan. Once melted, stir in 1/4 cup of sugar until it's well combined. Add the crushed graham crackers to the mixture and toss until everything is mixed thoroughly.


Spread this mixture evenly into a 9-inch pie plate, pressing it firmly onto the bottom and sides to create a solid crust. Chill the crust for 1 hour or until firm. For a more robust flavor, you can also bake it in a 375-degree oven for 4-5 minutes and then let it cool before filling.


**2. Create the Filling:**


In a medium bowl, beat the egg yolks using a whisk or fork until they are smooth. Gradually whisk in the sweetened condensed milk, ensuring a creamy consistency. Next, add the lime juice and water, stirring the mixture until it begins to thicken. For a touch of color, you can add a few drops of green food coloring.


**3. Assemble and Bake:**


Spoon the lime filling into the prepared crust, spreading it evenly. Bake the pie in a 350-degree oven for 25 minutes. Once baked, allow it to cool for 1 hour before transferring it to the refrigerator to chill for an additional 3-4 hours.


**4. Serve:**


Top your pie with a generous dollop of whipped cream just before serving. Each bite is a perfect balance of creamy sweetness and tangy lime, a true testament to its reputation as a classic dessert.


**A Family Memory:**


Growing up, our family gatherings were never complete without my grandmother's famous Key Lime Pie. Every summer, she would host a picnic in her backyard, a tradition that brought together cousins from near and far. I remember watching her in the kitchen, her hands deftly working through the recipe as she hummed along to her favorite tunes.


The moment the pie emerged from the oven, a sense of anticipation filled the room. We'd gather around the table, each slice bringing with it not just a burst of lime flavor, but a flood of memories. My grandmother would share stories of her childhood in Florida, where Key Limes grew in abundance and pies like these were a staple of every family event.


Those afternoons taught me that food is more than just sustenance; it’s a bridge to the past, a vessel of tradition and love. Now, every time I make this pie, I'm reminded of those cherished moments, making it more than just a dessert, but a slice of family history.


**Difficulty Rating:** 4/10


**Category:** Dessert


---


Embrace the sunshine in every bite with this Easy Key Lime Pie recipe. Whether you're creating new memories or reliving old ones, this pie is sure to become a beloved dessert in your home. Enjoy!

Read more about Appetizers

Read more about Main Dishes

Read more about Desserts

Cheesy Spinach Stuffed Shells | Made by Meaghan Moineau

Cheesy Spinach Stuffed Shells | Made by Meaghan Moineau

### Title: Delightfully Cheesy Spinach Stuffed Shells: A Comforting Family Classic


#### Description: Dive into the rich flavors of Cheesy Spinach Stuffed Shells, a wholesome and delicious main dish that brings families together. Discover the simple steps to create this comforting meal, and enjoy a nostalgic tale of family gatherings centered around this beloved recipe. Perfect for a cozy night in, this dish is sure to become a cherished favorite.


---


### Cheesy Spinach Stuffed Shells: A Wholesome Family Favorite


There's something undeniably comforting about a pan of cheesy, saucy stuffed shells fresh out of the oven. The aroma fills the kitchen, and suddenly, it feels as though every corner of the house is wrapped in a warm, loving embrace. This recipe for Cheesy Spinach Stuffed Shells is not just about the delightful combination of flavors, but it’s also about the memories it creates and the love it represents.


#### Ingredients:


- Jumbo shells


- Cooked frozen spinach


- Wheat germ


- Shredded parmesan cheese


- Pecans


- Shredded Mexican cheese


- Diced green onions


- Salt


- Dried basil


- Eggs


- Water


- Alfredo sauce


- Spaghetti sauce


#### Instructions:


1. **Prepare the Shells**: Begin by pre-boiling your jumbo shells in a large pot of salted water. Cook them for about 9 minutes, then drain them face down on a paper towel to remove excess moisture.


2. **Create the Filling**: While the shells cook, prepare the filling by microwaving the frozen spinach according to the package instructions, without adding water. Once thawed, mix in wheat germ, parmesan cheese, shredded Mexican cheese, chopped pecans, and diced green onions. Season with salt, pepper, and dried basil to taste. For a unique twist, a pinch of nutmeg can be added as well.


3. **Combine Ingredients**: Add in two eggs and a splash of water, mixing until the eggs are fully incorporated into the spinach mixture. Stuff each shell with this delicious filling.


4. **Assemble the Dish**: Grease an 8 x 8 (or 9 x 1) baking pan with cooking spray. Spread a layer of Alfredo sauce on the bottom, followed by spaghetti sauce. Arrange the stuffed shells over the sauce, then top with the remaining sauce.


5. **Bake and Serve**: Place the dish in a preheated 350-degree oven, uncovered, and bake for 30-35 minutes until the sauce is bubbly. Serve hot, and enjoy!


#### Nostalgic Family Memory:


I remember the first time my grandmother taught me how to make these Cheesy Spinach Stuffed Shells. It was a chilly Sunday afternoon, and the entire family was gathered at her cozy kitchen. The snow was gently falling outside, but inside, the warmth from the oven and the laughter shared over mixing bowls made the world feel just right.


Grandma had a way of making cooking feel like an art, and her love for family meals was evident in every dish she prepared. As we stuffed the shells together, she shared stories of her childhood and how her own mother would prepare this dish for family gatherings. It was a tradition passed down through generations, each shell filled with not just ingredients but with love and memories.


#### Difficulty: 4/10


#### Classification: Main Dish


This recipe for Cheesy Spinach Stuffed Shells is an easy-to-follow main dish perfect for a family dinner or a cozy night in. With its simple instructions and familiar flavors, it's a delightful way to bring everyone together around the dinner table. Whether you're creating new memories or reminiscing about old ones, this dish is sure to become a cherished part of your family's culinary tradition.

Read more about Appetizers

Read more about Main Dishes

Read more about Desserts

Almond Butter and Chocolate Squares | Made by Meaghan Moineau

Almond Butter and Chocolate Squares | Made by Meaghan Moineau

**Title: Nostalgic Indulgence: Almond Butter and Chocolate Squares**


**Description:** Dive into a world of delectable nostalgia with our Almond Butter and Chocolate Squares. This vegan dessert is not only a treat for your taste buds but also a heartwarming journey into cherished family memories.


---


There's something undeniably magical about the combination of almond butter and chocolate. It's as if they were destined to be together, creating a symphony of flavors that dance on your palate. Today, I invite you to join me on a journey down memory lane, as I share a recipe that's become a beloved tradition in my family: Almond Butter and Chocolate Squares.


**Ingredients:**


- Vegan butter


- Powdered sugar


- Vegan vanilla cookie crumbs


- Canned almond butter


- Dark vegan chocolate


**Instructions:**


1. Stir the melted vegan butter, powdered sugar, vegan vanilla cookie crumbs, and canned almond butter together until all of the ingredients are perfectly incorporated.


2. Line a 9 x 13-inch dish with foil, ensuring to drape the foil over the sides for easy removal once the bars set.


3. Press the mixture firmly into the bottom of the dish.


4. Melt the dark vegan chocolate in a double boiler and spread it generously over the almond butter mixture.


5. While the chocolate is still warm, cut the bars to desired sizes.


6. Allow the bars to set for at least an hour before serving.


**A Nostalgic Family Memory:**


As I prepare this delightful dessert, I'm transported back to my grandmother's cozy kitchen. The aroma of chocolate and almond wafting through the air always signaled a special occasion. My grandmother, a culinary enthusiast, believed that food was not just sustenance but a way to bring people together.


Every year, during the holiday season, our family would gather in her warm, welcoming home. The dining table would be laden with an array of dishes, but the Almond Butter and Chocolate Squares were always the highlight. I remember being a child, eagerly watching my grandmother as she skillfully prepared the mixture, her hands moving with practiced ease. She would let me spread the chocolate over the almond butter layer — a task I took very seriously, knowing it was the final touch to this culinary masterpiece.


The first bite was always the best: the rich, creamy almond butter mingling with the deep, luscious chocolate, creating a taste that lingered long after the squares were gone. These squares became a symbol of love and togetherness, a reminder of the warmth and joy that family brings.


**Difficulty Rating:** 3/10


**Classification:** Dessert


Incorporating this recipe into your repertoire not only guarantees a delicious treat but also an opportunity to create lasting memories with your loved ones. Whether you're a seasoned chef or a kitchen novice, this simple yet satisfying recipe is sure to become a favorite in your home. So, gather your ingredients, and let's create a dessert that's as rich in flavor as it is in family tradition.

Read more about Appetizers

Read more about Main Dishes

Read more about Desserts

Ginger Molasses Rounds | Made by Meaghan Moineau

Ginger Molasses Rounds | Made by Meaghan Moineau

**Title: The Timeless Delight of Ginger Molasses Rounds: A Nostalgic Treat**


**Description: Discover the sweet nostalgia of Ginger Molasses Rounds, a delicious dessert that brings warmth and memories to the heart and home. With a perfect blend of spices and a chewy texture, this recipe is simple yet rich with family tradition.**


---


### A Taste of Nostalgia: Ginger Molasses Rounds


As the autumn leaves begin to fall and the air grows crisp, there's nothing quite like the comforting aroma of freshly baked cookies wafting through the house. If there's one recipe that embodies the spirit of warmth and family togetherness, it's Ginger Molasses Rounds. These cookies, with their perfect chewiness and spice, have been a beloved tradition in my family for generations.


I vividly remember the first time I helped my grandmother bake these delightful rounds. Her kitchen, always a hub of laughter and the tantalizing scents of spices, was a place where magic happened. I was a curious child, always eager to learn, and my grandmother was a patient teacher. She would gently guide my small hands as I carefully measured out the ingredients — flour, salt, baking soda, and those aromatic spices: cinnamon and ground ginger. Each step was a lesson not just in baking, but in life, as she shared stories of her childhood and how her mother taught her the same recipe.


### The Recipe


#### Ingredients:


- 1 cup butter, softened


- 1 cup sugar


- 1 egg


- 1/4 cup molasses


- 2 cups all-purpose flour


- 2 teaspoons baking soda


- 1/4 teaspoon salt


- 1 teaspoon ground cinnamon


- 1 teaspoon ground ginger


- Additional granulated sugar for rolling


#### Instructions:


1. **Cream the Butter and Sugar:**


In a large bowl, cream together the butter and sugar until smooth and fluffy. This step is essential for that perfect cookie texture.


2. **Add Egg and Molasses:**


Beat in the egg and molasses until well combined. The molasses gives these cookies their rich color and deep flavor.


3. **Mix Dry Ingredients:**


In a separate bowl, whisk together the flour, baking soda, salt, cinnamon, and ground ginger. Gradually blend this dry mixture into the creamed ingredients.


4. **Shape and Roll:**


Shape the dough into small balls, about an inch in diameter. Roll each ball in additional granulated sugar to coat.


5. **Bake:**


Place the balls 2 inches apart on a baking sheet lined with parchment paper. Bake in a preheated 350-degree oven for 8-9 minutes, until the tops are just set and slightly cracked. Remember, they will be soft but will harden as they cool, achieving that perfect chewy texture.


### A Family Tradition


Each time I bake Ginger Molasses Rounds, I'm transported back to those cherished days in my grandmother's kitchen. The cookies not only serve as a sweet treat but as a reminder of the love and lessons passed down through generations. As my own children gather around, eager to help and hear stories of the past, I know this tradition will continue, weaving a tapestry of memories that will last a lifetime.


### Difficulty and Classification


Rated a 3 out of 10 on the difficulty scale, this recipe is both simple and rewarding, making it perfect for bakers of all levels. Classified as a dessert, these cookies are a delightful way to end a meal or share with friends and family over a cup of tea.


As you bake and enjoy these Ginger Molasses Rounds, may they bring warmth to your heart and home, just as they have to mine for so many years.

Read more about Appetizers

Read more about Main Dishes

Read more about Desserts

Rocky Road Rice Krispie Treats | Made by Meaghan Moineau

Rocky Road Rice Krispie Treats | Made by Meaghan Moineau

**Title: Decadent Rocky Road Rice Krispie Treats: A Nostalgic Twist on a Classic Dessert**


**Description:**


Indulge in the ultimate comfort treat with our Rocky Road Rice Krispie Treats, a delightful fusion of crunchy, chocolatey goodness with a nostalgic touch. Perfect for dessert enthusiasts, this recipe is a breeze to make and a joy to share. Dive into the story behind this family favorite and discover the simple steps to create your own batch of these rich, satisfying treats. Rated a 3/10 in difficulty, this dessert is ideal for both novice and seasoned cooks.


---


**Rocky Road Rice Krispie Treats: A Journey Down Memory Lane**


There's something undeniably magical about the combination of chocolate, marshmallows, and nuts, especially when it comes wrapped in the comforting embrace of a classic Rice Krispie treat. Our Rocky Road Rice Krispie Treats aren't just a dessert; they're a deliciously nostalgic experience that transports me back to the cherished days spent in my grandmother's cozy kitchen.


Growing up, every family gathering was a grand affair. The dining table, draped in a red checkered cloth, would be brimming with mouthwatering dishes. Yet, it was the dessert table that always captured our hearts. Among an array of sweet delights, my grandmother's Rocky Road Rice Krispie Treats held a special place. It wasn't just a treat; it was a tradition.


**Ingredients:**


- 3 tablespoons of butter


- 1 package (10 oz) chocolate vanilla swirl marshmallows


- 1 teaspoon almond extract


- 1 teaspoon vanilla extract


- 6 cups Rice Krispies cereal


- 1 1/3 cups almonds, roughly chopped


- 6 ounces bittersweet chocolate, melted


- 1/2 teaspoon kosher salt


**Instructions:**


1. In a large soup pot, melt the butter over medium heat. Add the chocolate vanilla swirl marshmallows, stirring continuously until completely melted and smooth.


2. Mix in the almond and vanilla extracts, allowing their fragrant aromas to fill the kitchen, reminiscent of those delightful family gatherings.


3. Remove from heat and quickly fold in the Rice Krispies cereal along with 1 cup of almonds. Stir until all ingredients are well combined, ensuring every bite is packed with flavor.


4. Transfer the mixture into a 9x13-inch dish sprayed with baking spray. With a spatula, gently flatten the mixture until smooth and even on top.


5. Drizzle the melted bittersweet chocolate over the prepared Rice Krispie layer. Sprinkle the remaining 1/3 cup of almonds on top, followed by a generous sprinkle of kosher salt for that perfect sweet-salty balance.


6. Allow the treats to cool completely. For best results, once they've reached room temperature, refrigerate for about an hour. This makes cutting into neat squares a breeze.


**A Sweet Tradition:**


As a child, I remember eagerly waiting for the treats to cool, the anticipation building with every passing minute. My cousins and I would sit around the kitchen island, our eyes glued to the fridge, ready to pounce as soon as my grandmother gave the nod. The first bite was always the best—a crunchy, chocolatey explosion that melted in our mouths, leaving a trail of sweet memories.


Even today, as I prepare these treats for my own family, I can't help but smile, reminiscing about those special moments. It's more than just a dessert; it's a celebration of family, love, and the simple joys of life.


**Difficulty Rating: 3/10**


**Classification: Dessert**


Creating these Rocky Road Rice Krispie Treats is an easy and rewarding experience, perfect for sharing with loved ones or indulging in a moment of nostalgia. Whether you're a culinary novice or a seasoned chef, this recipe promises to bring a smile to your face and a touch of sweetness to your day. Enjoy!

Read more about Appetizers

Read more about Main Dishes

Read more about Desserts

San Francisco Cioppino | Made by Meaghan Moineau

San Francisco Cioppino | Made by Meaghan Moineau

**Title: Dive into Flavor: The Unforgettable Experience of San Francisco Cioppino**


**Description: Discover the rich history and vibrant flavors of San Francisco Cioppino, a seafood lover's dream come true. This classic main dish, with its medley of fresh seafood and aromatic herbs, is as much a feast for the senses as it is a cherished family tradition. Join me as I share a nostalgic memory that makes this dish so special, and learn how to create this culinary masterpiece yourself.**


---


### A Taste of San Francisco: The Legacy of Cioppino


There's something magical about the way a dish can transport you back in time, bringing cherished memories to life with every bite. For me, San Francisco Cioppino is one such dish. A seafood stew with roots in the bustling ports of San Francisco, Cioppino is a symphony of flavors, blending fresh seafood with the aromatic essence of herbs and spices. It's a main dish that not only satisfies the palate but also warms the heart.


#### The Recipe


**Ingredients:**


- Fresh canned tomatoes


- Clams


- Dry white wine


- Cooked freshly Dungeness crabs


- White fresh fish


- Fresh basil


- Fresh parsley


- Garlic


- Black fresh ground pepper


- Olive oil


- Fresh oregano


- Raw shrimp


- Scallops


- Tomato paste


- Yellow onion


**Instructions:**


1. **Prepare the Crabs:** Remove the legs and claws from the crabs and break the body in half, reserving as much of the "crab butter" as possible (the yellow-colored center). Set crab pieces aside and force the crab butter through a sieve into a small bowl. Set aside.


2. **Cook the Clams:** Place the clams in a pan, add 1 cup of wine, and steam, covered, over medium heat for 5 minutes or until clams open. Remove clams and discard any that do not open. Strain the stock through a cheesecloth and reserve.


3. **Build the Base:** In an 8-quart saucepan, heat the oil. Add the onion and garlic and sauté over medium heat until soft, but not browned. Add tomatoes, tomato paste, and remaining 2 cups of wine, pepper, herbs, and clam stock. Partially cover and simmer for 20 minutes.


4. **Add the Seafood:** Add the fish, scallops, shrimp, crab, and crab butter. Simmer for approximately 5 minutes or until all seafood is cooked; do not stir or the fish will break apart.


5. **Finish and Serve:** Add the clams and heat for a scant 1 minute. Sprinkle with parsley and serve immediately from the pot.


#### A Nostalgic Memory


Every time I prepare Cioppino, I'm reminded of family gatherings at my grandparents' cozy home in San Francisco. My grandfather, a retired fisherman, would regale us with stories of the sea as he expertly prepared this dish, his hands moving deftly through the familiar motions. The kitchen would fill with the intoxicating aroma of simmering tomatoes and herbs, drawing everyone together. As we gathered around the table, the world seemed to slow down, and the warmth of family and tradition enveloped us, much like the rich flavors of the Cioppino itself.


#### Difficulty: 7/10


Creating Cioppino requires a bit of finesse, particularly in handling the seafood, but the reward is well worth the effort. With its deep, complex flavors and nostalgic charm, it stands as a testament to the culinary heritage of San Francisco and the enduring power of family traditions.


---


So, roll up your sleeves and dive into the rich, flavorful world of San Francisco Cioppino. Whether you're sharing it with family or enjoying it solo, this dish promises an unforgettable culinary journey.

Read more about Appetizers

Read more about Main Dishes

Read more about Desserts

Peppermint White Chocolate Fudge | Made by Meaghan Moineau

Peppermint White Chocolate Fudge | Made by Meaghan Moineau

**Title: Peppermint White Chocolate Fudge: A Sweet Trip Down Memory Lane**


**Description:** Dive into the world of festive flavors with our Peppermint White Chocolate Fudge recipe. Easy to make, yet rich in taste and tradition, this dessert is perfect for the holiday season. Discover how this delightful treat not only satisfies your sweet tooth but also brings back cherished family memories.


---


The holiday season is a time for family gatherings, laughter, and, of course, indulgent treats that bring warmth and joy to our hearts. One such treat that has always held a special place in my family's holiday tradition is the Peppermint White Chocolate Fudge. This dessert isn't just a delightful blend of flavors; it's a sweet reminder of the love and joy shared in my grandmother's kitchen.


**Ingredients:**


- 2 cups white chocolate chips


- 1 container of vanilla frosting


- Red food coloring


- 1 teaspoon peppermint flavoring


- Fresh peppermint candies, crushed


**Instructions:**


1. Begin by lining an 8x8 pan with plastic wrap or wax paper, ensuring easy removal of the fudge later.


2. In a large microwave-safe bowl, melt the white chocolate chips. Microwave them in 30-second intervals, stirring between each session to ensure a smooth consistency.


3. Once melted, add the container of vanilla frosting to the bowl. Stir until the mixture is well combined.


4. Incorporate the peppermint flavoring, stirring thoroughly to distribute the flavor evenly. If the mixture begins to stiffen, reheat it for an additional 10 seconds to maintain a pourable consistency.


5. Pour the mixture into the prepared pan, spreading it evenly.


6. Place 6-8 drops of red food coloring on the surface of the warm fudge. Using a toothpick or knife, swirl the color into the top of the fudge to create a marbled effect.


7. Sprinkle the crushed peppermint candies over the top, adding a festive crunch to each bite.


8. Cool the fudge in the refrigerator until it hardens. Once firm, cut into squares and enjoy!


**Nostalgic Story:**


Every Christmas Eve, my grandmother would gather all the grandchildren around her worn, wooden kitchen table, the air filled with the sweet scent of vanilla and peppermint. We were her little helpers, eagerly waiting to swirl the red food coloring into the smooth, white canvas of fudge. As she gently guided our hands, she'd recount stories from her childhood—tales of snowy holidays and simple joys that seemed to dance around us like the snowflakes outside.


The swirling of red into white became more than just a step in a recipe; it was a ritual, a moment where time seemed to stand still, capturing the essence of family togetherness. The finished product, adorned with crushed peppermint candies, was not just a treat we shared, but a memory we cherished.


**Difficulty: 2/10**


**Classification: Dessert**


This Peppermint White Chocolate Fudge is an easy-to-make dessert that brings a bit of holiday magic to your table. With simple ingredients and fond memories infused in every bite, it's sure to become a cherished tradition in your home as well. Whether you're creating new memories or reliving old ones, this fudge is a testament to the sweetness of family and festive cheer.

Read more about Appetizers

Read more about Main Dishes

Read more about Desserts

Stir Fried Cabbage and Tomatoes | Made by Meaghan Moineau

Stir Fried Cabbage and Tomatoes | Made by Meaghan Moineau

# A Taste of Home: Stir-Fried Cabbage and Tomatoes


## A Nostalgic Culinary Journey with a Simple Yet Flavorful Dish


### Introduction


In the realm of comfort food, simplicity often reigns supreme. Stir-Fried Cabbage and Tomatoes is one such dish that epitomizes the beauty of humble ingredients coming together to create something greater than the sum of its parts. This recipe, with its roots deeply embedded in family tradition, offers a quick, flavorful, and nutritious meal that can easily become a household favorite. Rated at a 3 out of 10 in difficulty, it’s perfect for both novice and seasoned cooks. Classified as a **Main Dish**, it pairs beautifully with steamed rice or crusty bread for a complete meal experience.


### Ingredients


- 1 head of Beijing cabbage, coarsely shredded


- 2-3 ripe tomatoes, rinsed and diced


- 3 cloves of garlic, minced


- Salt, to taste


- 1 teaspoon sugar


- 2 tablespoons ketchup


- 2-3 tablespoons water


- Vegetable oil, for sautéing


### Instructions


1. Begin by preparing your ingredients. Coarsely shred the cabbage and rinse it well under cold water. Drain thoroughly and set aside.


2. Rinse and dice the tomatoes, then set them aside.


3. Heat a wok over medium-high heat and add a splash of vegetable oil. Sauté the minced garlic until it becomes fragrant and lightly golden.


4. Add the shredded cabbage to the wok, stirring frequently. Cook until the cabbage softens, adding a splash of water if necessary to prevent sticking.


5. Incorporate the diced tomatoes into the wok, stirring to combine with the cabbage.


6. Season the mixture with salt, sugar, and ketchup. Add 2-3 tablespoons of water to help meld the flavors.


7. Continue to stir-fry until the tomatoes have softened and the flavors are well combined.


8. Serve immediately, savoring every bite of this nostalgic dish.


### A Walk Down Memory Lane


As I prepare this dish, I am transported back to my grandmother's cozy kitchen, where the aroma of garlic sizzling in a wok was a daily symphony. My grandmother, with her deft hands and warm smile, would often prepare Stir-Fried Cabbage and Tomatoes as a quick lunch during the long summer days. The simplicity of the ingredients belied the complex flavors that would emerge as she skillfully combined them.


I remember the stories she would share, tales of her own childhood and the vibrant markets where she learned to select the freshest produce. Each meal was a lesson in love, patience, and the art of cooking from the heart. As a child, watching her transform simple vegetables into a delightful meal was nothing short of magical.


This dish, with its balance of sweet and savory, carries the warmth of family gatherings and the joy of shared meals. It’s a reminder that the best recipes are more than just a list of ingredients and instructions—they're a bridge to cherished memories and a testament to the love passed down through generations.


### Conclusion


Whether you're seeking a quick and satisfying meal or a nostalgic journey through flavors, Stir-Fried Cabbage and Tomatoes is a dish that offers both. Its ease of preparation and delightful taste make it a staple in any kitchen. Try it for yourself, and perhaps it will become a beloved part of your own family's culinary traditions.

Read more about Appetizers

Read more about Main Dishes

Read more about Desserts

Arroz Con Pollo | Made by Meaghan Moineau

Arroz Con Pollo | Made by Meaghan Moineau

**Title: Aromatic Arroz Con Pollo: A Journey Through Flavors and Memories**


**Description:** Dive into the rich tapestry of flavors with our Arroz Con Pollo recipe, a comforting main dish that marries the savory allure of spices with the heartwarming essence of family tradition. Easy to prepare and brimming with nostalgic charm, this dish promises a culinary experience that will whisk you away to cherished moments of togetherness.


---


There’s something truly magical about the way certain dishes have the power to transport us back in time, evoking vivid memories of family gatherings and laughter-filled kitchens. Arroz Con Pollo is one such dish for me. Every time I prepare it, the fragrant aroma of cumin, coriander, and turmeric fills the air, and I am instantly reminded of Sunday afternoons spent in my grandmother’s bustling kitchen.


In our household, Sundays were reserved for family. We would gather around her large wooden table, eagerly awaiting the feast that was being lovingly prepared. My grandmother, the maestro of culinary delights, would start by melting butter in her favorite cast-iron pan, the one seasoned with years of family meals. The sizzle of garlic hitting the hot butter was our cue to gather closer, drawn by the promise of the flavors to come.


She would expertly season the chicken breasts with a sprinkle of cumin, coriander, and turmeric, infusing them with a symphony of aromatic spices. As the chicken browned, she’d add diced onions and vibrant bell peppers, their colors as lively as the stories we shared. In went the canned chiles and tomatoes, followed by a generous pour of chicken broth that tied all the ingredients together in a savory embrace.


But the magic truly happened when she added the rice. As it simmered, absorbing the rich broth and spices, we would set the table, stealing glances at the bubbling pot that promised comfort and warmth. The final touch was a blanket of shredded cheese, melting into a luscious topping that crowned the dish with creamy indulgence.


Each bite of Arroz Con Pollo was a celebration—a melody of spices, tender chicken, and perfectly cooked rice, all enveloped in the melted cheese. It was more than just a meal; it was a moment of connection, a reminder of the love that went into every pot my grandmother prepared.


Today, I continue to honor this tradition, crafting Arroz Con Pollo for my own family. As I follow the familiar steps, I feel a sense of continuity, of passing down the flavors and memories to the next generation. It's a hearty main dish that rates a 5 out of 10 in difficulty, making it accessible for home cooks of all skill levels.


Whether it’s a special occasion or a casual dinner, this dish remains a beloved staple, a testament to the power of food in bringing people together. So gather your loved ones, and let the rich flavors of Arroz Con Pollo create new memories that will last a lifetime.

Read more about Appetizers

Read more about Main Dishes

Read more about Desserts

Savory Olive & Goat Cheese Palmiers | Made by Meaghan Moineau

Savory Olive & Goat Cheese Palmiers | Made by Meaghan Moineau

**Title: A Taste of Nostalgia: Crafting Savory Olive & Goat Cheese Palmiers**


**Description:** Dive into the delightful world of Savory Olive & Goat Cheese Palmiers. This irresistible appetizer combines the perfect balance of flavors with a touch of nostalgia. Discover a cherished family memory and learn how to create this elegant dish with ease.


---


When I think back to the many family gatherings of my childhood, one dish always stands out in my memory: the delectable Savory Olive & Goat Cheese Palmiers. These delicate, flaky appetizers were a staple at our family reunions, bringing a taste of sophistication to our rustic backyard picnics. The aroma of baking puff pastry and the savory blend of olives and goat cheese would waft through the air, enticing us all to gather around the kitchen.


**Creating Savory Olive & Goat Cheese Palmiers**


**Ingredients:**


- Coarse salt


- Goat cheese


- Cooked olive tapenade


- Pine nuts


- Cooked puff pastry dough


**Instructions:**


1. **Thaw and Prepare:** Begin by allowing the puff pastry dough to thaw according to the package directions. This is a crucial step to ensure the dough is pliable and easy to work with.


2. **Roll Out the Dough:** Lightly flour a flat work surface to prevent sticking. Place one sheet of the dough on top of the other on the floured surface, and gently roll it out to a 9x12-inch shape that is about 1/4-inch thick. If you prefer, you can use each sheet of dough individually.


3. **Add the Filling:** Spread the olive tapenade evenly over the dough, followed by the crumbled goat cheese. The combination of these two ingredients creates a rich, savory flavor profile. Top it off with the toasted pine nuts for added crunch and nuttiness.


4. **Roll and Chill:** Start by rolling the short ends of the dough toward each other until they meet in the middle. Tightly wrap the rolled dough in plastic wrap and refrigerate for about 30 minutes. This helps the dough firm up, making it easier to slice.


5. **Bake to Perfection:** Preheat your oven to 425 degrees F and line a baking sheet with parchment paper or a silicone baking mat. Unwrap the chilled dough and use a serrated knife to slice the rolled dough into 1/4-inch slices. Arrange them on the baking sheet about 2 inches apart. Sprinkle the tops with coarse salt and bake for 12-14 minutes, or until they are just lightly golden. Serve warm for the best experience.


**A Family Memory:**


One summer, during our annual family reunion, my grandmother shared the story of how she first discovered this dish while traveling through France with my grandfather. They stumbled upon a quaint little bakery in Provence that sold the most delightful pastries. Inspired, she decided to recreate the palmiers with her own twist, incorporating her love for olives and goat cheese. That year, she taught me how to make them, and we spent a lovely afternoon in her sunlit kitchen, rolling dough and sharing stories of her adventures. To this day, each bite of these palmiers takes me back to that special summer and the warmth of my grandmother's love.


**Difficulty Rating:** 4/10


**Classification:** Appetizer


These Savory Olive & Goat Cheese Palmiers may seem sophisticated, but they are surprisingly easy to make. With minimal ingredients and a straightforward process, this appetizer is perfect for any occasion. Whether you're hosting a dinner party or simply want to indulge in a little nostalgia, these palmiers are sure to impress. Enjoy the timeless flavors and create new memories with this delightful dish.

Read more about Appetizers

Read more about Main Dishes

Read more about Desserts

Eggplant and Tomato Sauce | Made by Meaghan Moineau

Eggplant and Tomato Sauce | Made by Meaghan Moineau

# A Taste of Tradition: Eggplant and Tomato Sauce Pasta


## Description


Dive into a world of rich flavors and family traditions with our Eggplant and Tomato Sauce Pasta. This hearty main dish will transport you to a cozy Italian kitchen, where the aroma of simmering tomatoes and fresh basil fills the air. Not only is this recipe a delight for your taste buds, but it also holds a special place in my heart as it evokes cherished memories of family gatherings. Perfect for a comforting dinner, this dish combines the earthiness of eggplant with the tanginess of tomatoes and the umami of Romano cheese for a symphony of flavors that is sure to become a staple in your household.


### Ingredients:


- 1 medium eggplant, cut into cubes


- 1 can (28 oz) crushed tomatoes


- 1 red onion, sliced


- 3 cloves garlic, chopped


- 1 cup grape tomatoes, halved


- 2 tablespoons lemon juice


- Salt and freshly ground black pepper


- 1 red bell pepper, diced


- 1 teaspoon dried oregano


- A handful of fresh basil leaves


- 1/2 cup red wine


- Your favorite macaroni


- Fresh Romano cheese, grated


- 4 tablespoons olive oil


- Red pepper flakes (optional)


### Instructions:


1. **Prepare the Eggplant Mixture**: In a large bowl, combine the cubed eggplant, chopped garlic, sliced onion, and halved grape tomatoes. Add 2 tablespoons of olive oil, lemon juice, 1 teaspoon of salt, and a sprinkle of ground black pepper. Toss everything together until well coated.


2. **Sauté the Vegetables**: Heat a large frying pan over medium heat and add 2 tablespoons of olive oil. Once hot, add the eggplant mixture and sauté until the eggplant is softened, about 10-12 minutes.


3. **Simmer the Sauce**: Add the crushed tomatoes, diced red bell pepper, dried oregano, another 1 teaspoon of salt, and a dash of ground black pepper to the pan. Stir to combine. Pour in the red wine and let the sauce simmer on low heat for about 30-35 minutes, stirring occasionally. The longer it cooks, the deeper the flavors will develop.


4. **Cook the Macaroni**: While the sauce is simmering, prepare your favorite macaroni according to the package instructions. Drain and set aside.


5. **Toss the Pasta**: In a large bowl, drizzle a little olive oil and add a few dashes of red pepper flakes, dried oregano, and grated Romano cheese. Add the cooked macaroni and toss to coat.


6. **Combine and Serve**: Add the eggplant sauce to the macaroni and toss gently to combine. Finish with more grated Romano cheese and fresh basil leaves. Serve warm.


### Difficulty: 5/10


### Classification: Main Dish


---


## A Nostalgic Bite: Family Memories


Every time I prepare this Eggplant and Tomato Sauce, I'm transported back to my grandmother's kitchen. It was a place of warmth, where the walls echoed with laughter and the clinking of pots and pans. I vividly remember the summer afternoons spent at her house, where she would let me help her in the kitchen. My task was simple yet crucial: stirring the sauce as it simmered, releasing an aroma that enveloped the entire house.


My grandmother would tell stories of her childhood in Italy, where each ingredient was carefully selected from her family's garden. She taught me that cooking was an art, one that required patience and love. As we cooked together, she would share her wisdom, reminding me that the secret to a perfect dish was to cook with your heart.


This recipe is more than just a meal; it's a bridge to my heritage and a testament to the love passed down through generations. It's a reminder that the best dishes are those that bring people together, creating new memories while honoring the old.


Every bite of this Eggplant and Tomato Sauce Pasta is a tribute to my grandmother, a celebration of family, and a cherished tradition that I hope will continue for many generations to come.

Read more about Appetizers

Read more about Main Dishes

Read more about Desserts

Strawberry Cheesecake Chocolate Crepes | Made by Meaghan Moineau

Strawberry Cheesecake Chocolate Crepes | Made by Meaghan Moineau

**Title: Delighting in Decadence: A Nostalgic Journey with Strawberry Cheesecake Chocolate Crepes**


**Description: Uncover the blissful blend of strawberries, cream cheese, and chocolate in our Strawberry Cheesecake Chocolate Crepes. This dessert marries the richness of chocolate with the refreshing taste of strawberries, wrapped in a delicate crepe. Follow our step-by-step guide to recreate a family favorite and relive cherished memories.**


---


There's something inherently comforting about crepes. They're versatile, elegant, and carry a sense of nostalgia that transports me back to my childhood kitchen. It was a bustling place, a hub of aromas and laughter, where my family gathered to create and celebrate. Among the many dishes we cherished, the Strawberry Cheesecake Chocolate Crepes stood out—a testament to the magic that happens when simple ingredients come together to create something extraordinary.


**Ingredients:**


For the Strawberry Cream Cheese Filling:


- 1 cup cream cheese


- 1 cup diced strawberries


- 1 teaspoon vanilla extract


- 1 tablespoon lemon juice


- 2 tablespoons granulated sugar


For the Chocolate Crepes:


- 1 cup flour


- 1/4 cup granulated sugar


- 1/4 cup unsweetened cocoa powder


- 1/4 teaspoon kosher salt


- 3 eggs


- 1 1/2 cups milk


- 1/2 cup water


- 3 tablespoons unsalted butter, melted


- 1 teaspoon vanilla extract


**Instructions:**


**How to Make Strawberry Cream Cheese Filling:**


1. In a medium-sized mixing bowl, combine cream cheese, diced strawberries, vanilla extract, lemon juice, and granulated sugar.


2. Using a hand mixer, wooden spoon, or spatula, mix the ingredients until smooth. Set aside.


**How to Blend Chocolate Crepes Ingredients:**


1. Combine flour, sugar, cocoa powder, salt, and eggs in a food processor or blender.


2. If using a food processor, keep it running as you gradually add milk and water. Continue to pulse until well blended.


3. Pour in the melted butter and vanilla extract. Blend until smooth.


**How to Make Chocolate Crepes:**


1. Heat a crepe pan or an 8"-10" omelet pan over medium heat.


2. Pour 1/4 cup of batter into the middle of the pan and swirl to cover the bottom.


3. Cook the crepe for 2-3 minutes, or until the bottom is light brown and the edges are set.


4. Flip the crepe over and cook for an additional minute.


5. Transfer to a serving platter and repeat with the remaining batter.


**A Taste of Nostalgia:**


Every bite of these crepes takes me back to Sunday mornings at my grandmother's house. The kitchen was her domain, a place where she spun stories as easily as she did crepes. She'd regale us with tales of her youth, while we eagerly watched her pour the batter, her hands moving with practiced ease.


The scent of chocolate filled the air, mingling with the sweet tartness of strawberries. As we sat around the table, our family would savor each bite, conversations flowing as freely as the laughter. Those mornings were more than just about the food—they were about family, tradition, and the joy of shared experiences.


**Difficulty Rating: 6/10**


**Classification: Dessert**


Creating Strawberry Cheesecake Chocolate Crepes isn't just about following a recipe; it's about embracing a tradition, crafting memories, and delighting in the simple pleasures of life. So gather your loved ones, share stories, and let these crepes be the heart of your cherished family moments.

Read more about Appetizers

Read more about Main Dishes

Read more about Desserts

Excellent No Fail and Easy Keto Zucchini Lasagna | Made by Meaghan Moineau

Excellent No Fail and Easy Keto Zucchini Lasagna | Made by Meaghan Moineau

**Title: Savor the Simplicity: The No-Fail, Easy Keto Zucchini Lasagna Recipe**


**Description:** Dive into the comforting nostalgia of family dinners with our Excellent No-Fail and Easy Keto Zucchini Lasagna. This low-carb, nutrient-packed dish is not only a healthier alternative to traditional lasagna but also a delightful journey back to cherished family gatherings. With layers of savory flavors and creamy textures, this main dish promises to be a hit at your dinner table. Rated 3 out of 10 on the difficulty scale, it's perfect for both novice and experienced cooks looking to create something special without the hassle.


---


When I think back to my childhood, the kitchen was always the heart of our home. It was a place filled with laughter, warmth, and the tantalizing aroma of my grandma's cooking. One dish that stands out, evoking a flood of memories, is her famous zucchini lasagna. A healthier twist on the classic, she crafted this masterpiece long before keto became a household term.


I remember the excitement as I watched her expertly slice the zucchini, her hands steady with years of practice. She would hand me scraps of cheese to nibble on while regaling me with stories from her past—stories of growing up in a small town, where everyone knew everyone, and meals were a communal affair. Her zucchini lasagna wasn’t just food; it was a narrative that connected generations.


Now, inspired by her, I bring to you a rendition of this beloved family classic: the Excellent No-Fail and Easy Keto Zucchini Lasagna. It’s a dish that marries nostalgia with the modern-day quest for healthier living, and it’s surprisingly simple to make.


**Ingredients:**


- Fresh basil


- 1 medium bell pepper, diced


- 1 lb lean ground turkey


- 1 ½ cups shredded mozzarella cheese


- 1 medium onion, chopped


- ½ cup shredded parmesan


- Fresh parsley, chopped


- 1 medium red bell pepper, diced


- 1 cup ricotta cheese


- A pinch of sugar (optional)


- 2 cups tomato sauce


- ½ teaspoon white pepper


- 3 medium zucchinis, sliced lengthwise


**Instructions:**


1. **Prep the Zucchini:** Preheat your oven to 375°F. Slice the zucchinis lengthwise and lay them flat on a cookie sheet. Bake for 15 minutes to remove excess moisture—an essential step for avoiding a watery lasagna.


2. **Cook the Meat Sauce:** In a medium saucepan, sauté the onion and bell peppers until they are soft and fragrant. Add the ground turkey, cooking until browned. Stir in the tomato sauce, white pepper, and a pinch of sugar to balance the acidity. Let it simmer over low heat for 5 minutes.


3. **Prepare the Cheese Mixture:** In a bowl, combine ricotta cheese, shredded parmesan, and chopped basil. Mix well and set aside.


4. **Assemble the Lasagna:** In a 9x13 baking dish, begin with a layer of zucchini noodles. Spread a portion of the cheese mixture over the zucchini, followed by a layer of the savory meat sauce. Repeat these steps to form multiple layers, ending with a generous topping of mozzarella cheese.


5. **Bake to Perfection:** Cover the baking dish with foil and bake for 30 minutes. Remove the foil and bake for an additional 10 minutes to achieve a golden, bubbly top. Allow the lasagna to cool for 5 minutes before serving.


This zucchini lasagna is more than just a meal; it’s a tribute to the legacy of family gatherings and culinary traditions. Each bite is a reminder of those cozy nights spent around the table, sharing stories and laughter.


**Difficulty:** 3/10


**Classification:** Main Dish


Indulge in the wholesome goodness of this low-carb delight, and perhaps, like me, you’ll find yourself reminiscing about your own family’s cherished kitchen memories. Enjoy!

Read more about Appetizers

Read more about Main Dishes

Read more about Desserts

Spicy Salad with Kidney Beans, Cheddar, and Nuts | Made by Meaghan Moineau

Spicy Salad with Kidney Beans, Cheddar, and Nuts | Made by Meaghan Moineau

**Title: Zesty Delight: Spicy Salad with Kidney Beans, Cheddar, and Nuts**


**Description:** Dive into a symphony of flavors with our Spicy Salad featuring kidney beans, cheddar, and a medley of nuts. This vibrant dish is not just a treat for your taste buds but also a wholesome meal that can be whipped up in record time. Perfect for a quick lunch or a light dinner, this salad is both nutritious and satisfying, boasting a tantalizing mix of creamy, crunchy, and spicy elements. Join me as I share a cherished family memory that this delightful salad brings to mind.


---


**The Art of Quick and Healthy: Spicy Salad with Kidney Beans, Cheddar, and Nuts**


When it comes to preparing a meal that's both quick and nourishing, salads often take the spotlight. This Spicy Salad with Kidney Beans, Cheddar, and Nuts is a testament to how simple ingredients can come together to create a dish that's delicious and deeply satisfying. As a bonus, it's a meal that carries with it a personal story from my childhood that makes it even more special.


**Ingredients:**


- 1 cup cooked kidney beans, rinsed and drained


- 1/4 cup almonds


- 1 ripe avocado, sliced


- 2 tablespoons balsamic vinegar


- 1/2 cup cheddar cheese, torn into small pieces


- 4 cups mixed greens


- 2 tablespoons olive oil


- 1/4 cup salted roasted cashews


- 1/4 cup sundried tomatoes, cut into strips


- A dash of Tabasco


**Instructions:**


1. Begin by preparing your ingredients: Rinse and drain the kidney beans, cut the sundried tomatoes into strips, and tear the cheddar cheese into small, bite-sized pieces.


2. In a large salad bowl, lay down a bed of mixed greens. Top the greens with kidney beans, sundried tomatoes, cheddar cheese, almonds, and cashews.


3. In a small mixing bowl, combine olive oil, balsamic vinegar, and a dash of Tabasco sauce. Stir well to create a zesty dressing.


4. Drizzle the dressing over the salad, ensuring every ingredient gets a touch of that spicy, tangy goodness.


5. Give it a gentle toss, ensuring all the flavors meld together beautifully.


This salad is not just a wonderful mix of textures and flavors but also a slice of my family's culinary history. Growing up, Sundays were reserved for family picnics in our local park. My mother would pack a wicker basket with freshly prepared dishes, and this spicy salad was always a staple. I remember the vivid flavors of the kidney beans and cheddar mixing with the crunch of the nuts and the tangy kick from the Tabasco-laced dressing. It was the perfect meal to enjoy on a sunny afternoon, surrounded by laughter and the rustling of leaves.


**Difficulty:** 3/10


**Classification:** Main Dish


With its simple preparation and vibrant flavors, this salad is an excellent choice for anyone looking to enjoy a quick, healthy meal that's rich in protein and fiber. Whether you're reminiscing about family picnics or simply seeking a nutritious lunch option, this Spicy Salad with Kidney Beans, Cheddar, and Nuts is sure to become a favorite. Enjoy the journey of flavors and memories with every bite!

Read more about Appetizers

Read more about Main Dishes

Read more about Desserts

Mixed Berry Yogurt with Almonds | Made by Meaghan Moineau

Mixed Berry Yogurt with Almonds | Made by Meaghan Moineau

**Title: "A Symphony of Flavors: Mixed Berry Yogurt with Almonds"**


**Description:**


Discover the delightful fusion of flavors in our Mixed Berry Yogurt with Almonds recipe. This versatile dish, perfect for breakfast or dessert, combines the tangy sweetness of berries with the creamy richness of Greek yogurt and the satisfying crunch of almonds. Join us as we explore the endless variations this recipe offers and share a nostalgic family memory that makes this dish truly special.


---


**A Symphony of Flavors: Mixed Berry Yogurt with Almonds**


In the realm of culinary delights, there are few combinations as harmoniously balanced as our Mixed Berry Yogurt with Almonds. This dish, with its vibrant colors and tantalizing textures, transcends the boundaries of a typical breakfast or dessert. It invites you to indulge in its simplicity while offering endless opportunities for creative variations.


**Ingredients:**


- Frozen mixed berries


- Whole oats


- Plain Greek yogurt


- Whole almonds


**Instructions:**


This recipe is as flexible as it is delicious, allowing you to assemble it in a variety of ways. For an aesthetically pleasing presentation, layer the ingredients in a glass cup or bowl. Start with a layer of Greek yogurt, followed by a sprinkle of whole oats, a generous scoop of mixed berries, and a handful of whole almonds. Repeat the layers as desired.


**Variations:**


The beauty of this recipe lies in its adaptability. For a more indulgent dessert, consider using a creamier vanilla yogurt or drizzling a touch of maple syrup over the yogurt layer. Feel free to experiment with different kinds of nuts—toast them for an added depth of flavor and crunch. If you find yourself without berries, fear not; this dish works wonderfully with almost any fruit you have on hand.


**A Nostalgic Family Memory:**


As I prepare this dish, I'm transported back to lazy summer mornings at my grandmother's house. Her kitchen was always filled with the comforting aroma of freshly toasted nuts and the sweet tang of ripe berries. I remember sitting at her wooden table, watching as she effortlessly assembled this dish with whatever fruits she had picked from her garden that morning.


Each spoonful was a burst of flavor, a harmony of textures that seemed to capture the essence of those sunlit days. My grandmother would share stories of her childhood, tales of family gatherings and the joy of creating something delicious with simple, wholesome ingredients. This dish, for me, is a connection to those cherished moments—a reminder that the simplest recipes often hold the most profound memories.


**Difficulty Rating: 2/10**


**Classification: Breakfast/Dessert**


With its minimal preparation and endless customization options, this Mixed Berry Yogurt with Almonds is a delightful dish that anyone can create. Whether you're enjoying it as a nourishing breakfast or a satisfying dessert, may it bring warmth to your table and create memories that last a lifetime.

Read more about Appetizers

Read more about Main Dishes

Read more about Desserts