Baked Rigatoni | Made by Meaghan Moineau

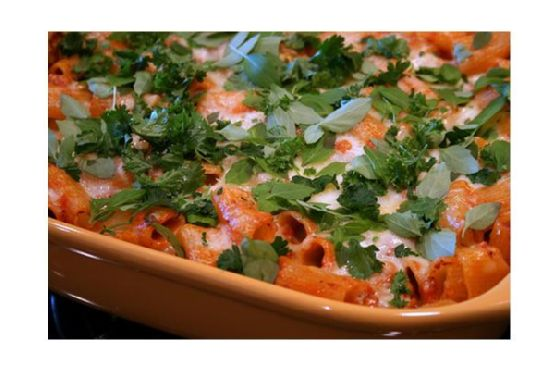
Baked Rigatoni: A Comforting Classic

Intro

There’s something incredibly soothing about a warm, cheesy pasta dish fresh out of the oven. For me, baked rigatoni isn’t just food; it’s a cherished memory. Growing up, my grandmother would make this delightful dish every Sunday. The smell of pasta sauce mingling with melted mozzarella would fill the house, drawing everyone to the kitchen. I remember sitting at the table, eagerly watching as she pulled the bubbling casserole from the oven, the cheese golden and inviting. Today, I’m excited to share this nostalgic recipe with you, hoping it brings the same warmth and comfort to your home as it did to mine.

Why You’ll Love It

Baked Rigatoni is the epitome of comfort food. It’s hearty, satisfying, and incredibly easy to prepare. Whether you’re cooking for a family dinner or preparing a meal for a crowd, this dish is a guaranteed hit. You’ll love how the flavors of the tomatoes, broccoli, and pasta sauce meld together beautifully. The addition of mozzarella cheese creates a gooey, cheesy top that’s irresistible to both adults and kids alike. Plus, it’s easily adaptable for those with dietary preferences or restrictions.

Ingredients

  • 1 package frozen broccoli flowerets
  • 1 teaspoon dried basil
  • 1 teaspoon fennel seeds
  • 1 jar pasta sauce
  • 1 pound rigatoni
  • 6 oz. shredded mozzarella cheese, divided
  • 1 can diced ready-cut tomatoes
  • 1 package frozen vegetable burger crumbles

Instructions

  1. Preheat your oven to 400°F (200°C).
  2. Cook the rigatoni according to the package directions until al dente. Drain and set aside.
  3. In a large 9×13-inch baking dish, combine the cooked pasta, pasta sauce, diced tomatoes, frozen broccoli, burger crumbles, dried basil, fennel seeds, and 4 oz. of the shredded mozzarella cheese.
  4. Mix everything together until well combined, ensuring the pasta is evenly coated with sauce.
  5. Sprinkle the remaining 2 oz. of mozzarella cheese over the top of the pasta mixture.
  6. Bake in the preheated oven for about 20 minutes, or until the cheese is melted and the dish is heated through.
  7. Remove from the oven and let it cool slightly before serving. Enjoy your hearty and delicious baked rigatoni!

Tips

Here are a few tips to ensure your Baked Rigatoni turns out perfectly every time:

  • Don’t overcook the pasta. It should be slightly firm as it will continue to cook in the oven.
  • Feel free to adjust the amount of cheese according to your preference. If you’re a cheese lover, add extra mozzarella or even some Parmesan for added flavor.
  • Using a high-quality pasta sauce can make a significant difference in the overall taste of the dish.

Variations & Substitutions

Baked Rigatoni is a versatile dish that can be customized to suit your tastes:

  • Protein Swap: Substitute the vegetable burger crumbles with cooked ground beef, chicken, or turkey for a meatier version.
  • Vegetable Additions: Consider adding other vegetables like bell peppers, mushrooms, or spinach for added nutrition and flavor.
  • Cheese Options: Experiment with different cheeses such as cheddar, gouda, or ricotta for a unique twist.
  • Gluten-Free: Use gluten-free pasta to make this recipe suitable for those with gluten intolerance.
  • Vegan: Use vegan cheese and ensure your pasta sauce is vegan-friendly to make this dish entirely plant-based.

Storage

Baked Rigatoni can be stored in the refrigerator for up to 3-4 days. Simply cover the baking dish with plastic wrap or transfer leftovers to an airtight container. To reheat, place the desired portion in the oven at 350°F (175°C) until heated through, or microwave it for a quicker option.

FAQ

Can I prepare Baked Rigatoni ahead of time?

Absolutely! You can assemble the dish, cover it tightly, and refrigerate for up to 24 hours before baking. This makes it a great option for meal prep or when you’re expecting guests.

Can I freeze Baked Rigatoni?

Yes, you can freeze Baked Rigatoni. After baking, allow it to cool completely, then wrap it tightly with aluminum foil or plastic wrap and place it in a freezer-safe container. It can be frozen for up to 2 months. To reheat, thaw in the refrigerator overnight and bake at 350°F (175°C) until heated through.

Nutrition

While the nutritional content can vary based on specific brands and quantities, a typical serving of Baked Rigatoni made with the ingredients listed above is estimated to provide:

  • Calories: Approximately 400-500 per serving
  • Protein: 20-25 grams
  • Carbohydrates: 60-70 grams
  • Fat: 10-15 grams
  • Fiber: 5-8 grams

This dish is not only filling but also offers a good source of protein and fiber, making it a balanced meal option.

Conclusion

Baked Rigatoni is more than just a meal; it’s a tradition, a comforting embrace on a plate. Whether you’re revisiting old memories or creating new ones, this dish is sure to become a staple in your home. With its simple preparation and delicious flavors, it’s a recipe you’ll turn to time and time again. Gather your loved ones, serve it hot from the oven, and relish the joy that comes with sharing a meal together. Happy cooking!

Related update: Baked Rigatoni

Related update: Miso Eggplant Gratin

Chorizo and Beef Quinoa Stuffed Pepper | Made by Meaghan Moineau

Chorizo and Beef Quinoa Stuffed Peppers

Intro

As a child, weekends at my grandmother’s house were filled with the rich aromas of spices and sizzling meats. Her kitchen was a haven where every dish told a story, and her stuffed peppers were a particular favorite of mine. Now, as an adult, I’ve taken her classic recipe and given it a modern twist with a blend of chorizo, beef, and quinoa. This recipe is my love letter to those cherished weekends, a fusion of tradition and innovation that will surely bring warmth and flavor to your dining table.

Why You’ll Love It

This Chorizo and Beef Quinoa Stuffed Pepper recipe is a delightful combination of savory, spicy, and satisfying. Packed with protein and fiber, it’s a nutritious meal that doesn’t compromise on taste. The combination of chorizo and lean ground beef offers a robust and hearty flavor profile, while quinoa adds a nutty texture and boosts the meal’s nutritional value. Whether you’re looking for a comforting weeknight dinner or an impressive dish to serve guests, these stuffed peppers are sure to become a favorite in your recipe repertoire.

Ingredients

  • Bell peppers (as many as you want to serve)
  • Cayenne pepper (to taste)
  • Chili powder (to taste)
  • Chorizo (1/2 pound)
  • Cumin (to taste)
  • Green onion tops (thinly sliced)
  • Mixed Monterey Jack and Cheddar cheese (shredded)
  • Lean ground beef (1/2 pound)
  • Quinoa (1 cup, uncooked)

Instructions

  1. Preheat your oven to 350°F (175°C).
  2. Bring a pot of water to a boil and cook the quinoa according to package instructions.
  3. In a separate skillet, brown the ground beef and chorizo over medium heat, breaking it up with a spoon as it cooks.
  4. Once the meat is fully cooked, drain off any excess fat and transfer the mixture to a medium mixing bowl.
  5. Once your quinoa is fully cooked, add it to the mixing bowl with the meat.
  6. Add the green onion tops, cumin, cayenne, chili powder, and a handful of the shredded cheese to the bowl. Mix everything together well.
  7. Prepare the bell peppers by cutting off the tops and removing the seeds and inner membranes.
  8. Stuff each bell pepper with the meat and quinoa mixture, pressing down gently to ensure they are filled completely.
  9. Sprinkle a little more cheese on top of each stuffed pepper.
  10. Place the stuffed peppers in a baking dish and bake in the preheated oven for about 10 minutes, or until the bell peppers have softened slightly and the cheese is melted and bubbly.
  11. Serve immediately and enjoy the warm, comforting flavors.

Tips

To make the most of this recipe, consider these tips:

  • Choose bell peppers that are similar in size for even cooking.
  • If you prefer a milder dish, adjust the amount of cayenne and chili powder to your taste.
  • Pre-cook the bell peppers for a few minutes if you like them softer.

Variations & Substitutions

This recipe is versatile and can be adapted in many ways:

  • For a vegetarian version, replace the meat with black beans and corn.
  • Use brown rice or couscous instead of quinoa for a different texture.
  • Swap the cheese for a dairy-free alternative to accommodate dietary restrictions.

Storage

Store any leftover stuffed peppers in an airtight container in the refrigerator for up to 3 days. To reheat, place them in a preheated oven at 350°F (175°C) for about 10 minutes or until heated through. You can also microwave them for a quicker option, though the texture of the peppers may be slightly softer.

FAQ

Can I freeze stuffed peppers?

Yes, you can freeze stuffed peppers! Prepare them as instructed but do not bake. Place them in a freezer-safe container, and they can be frozen for up to 3 months. When ready to eat, thaw in the refrigerator overnight and bake as directed.

What can I serve with stuffed peppers?

Stuffed peppers are a complete meal on their own, but you can serve them with a side salad, garlic bread, or steamed vegetables for a more rounded meal.

How can I make this dish spicier?

If you love spice, feel free to add more cayenne pepper or even some chopped jalapeños to the mixture. A dash of hot sauce mixed into the filling can also elevate the heat.

Nutrition

Each serving of Chorizo and Beef Quinoa Stuffed Peppers is approximately 350 calories, with 20g of protein, 15g of carbohydrates, and 22g of fat. These values may vary depending on specific ingredient brands and quantities used.

Conclusion

Chorizo and Beef Quinoa Stuffed Peppers are a delightful blend of hearty ingredients and bold flavors that are sure to satisfy. This recipe not only brings back fond memories of family gatherings but also offers a modern twist on a classic dish. Whether you’re feeding a crowd or meal-prepping for the week, these stuffed peppers are a delicious and nutritious choice that will leave everyone asking for seconds. Give them a try, and let the flavors transport you to a cozy kitchen filled with love and warmth.

Related update: Chorizo and Beef Quinoa Stuffed Pepper

Related update: 17 Bean White Chicken Chili

Pan Seared Lamb Loin With Chimichurri & Roasted Trio Squash Salad With Goat Cheese and Pinenuts | Made by Meaghan Moineau

Pan Seared Lamb Loin With Chimichurri & Roasted Trio Squash Salad With Goat Cheese and Pinenuts

Intro

Growing up, Sunday dinners were a special affair in our household. My grandmother would gather us around the table, and there was always an air of anticipation as we eagerly awaited the culinary delight she had prepared. One of my cherished memories is of her lamb dishes, which were always perfectly seasoned and cooked to tender perfection. Inspired by those cherished times, I’ve recreated a modern twist on her classic lamb recipe. This Pan Seared Lamb Loin with Chimichurri and Roasted Trio Squash Salad with Goat Cheese and Pinenuts brings together vibrant flavors and textures, just like those unforgettable Sunday dinners.

Why You’ll Love It

This recipe is a celebration of flavors and textures that will make your taste buds dance with joy. The juicy, tender lamb loin chops are perfectly complemented by the fresh and zesty chimichurri sauce, adding an aromatic flair to the dish. The roasted trio squash salad, with its creamy goat cheese and crunchy pinenuts, provides a delightful contrast in both flavor and texture. This meal is not only a feast for your palate but also a visual delight that will impress any dinner guest.

Ingredients

  • Cilantro
  • Extra virgin olive oil
  • Flat leaf parsley
  • Garlic clove
  • Black ground pepper
  • Kosher salt and pepper
  • Lamb loin chops
  • Lemon
  • Mint
  • Pinenuts
  • Red pepper flakes
  • Shallot

Instructions

  1. Preheat your oven to 400°F (200°C).
  2. For the Chimichurri, combine cilantro, parsley, garlic, lemon juice, olive oil, red pepper flakes, salt, and pepper in a large bowl. Mix well and set aside.
  3. Heat a large, heavy-bottomed pan with a drizzle of olive oil over medium-high heat.
  4. Sprinkle each side of the lamb loin chops evenly with kosher salt and freshly ground black pepper.
  5. Once the oil is hot and begins to smoke slightly, sear the lamb loin chops for approximately 2 minutes on each side.
  6. Transfer the seared lamb chops to the preheated oven. Cook according to your preference:
    • Rare: 2-3 minutes
    • Medium Rare: 6-8 minutes
    • Medium: 9-11 minutes
    • Well Done: 12-14 minutes
  7. Remove the lamb from the oven and let it rest, as it will continue to cook slightly during this time.
  8. Serve the lamb loin chops topped with the chimichurri sauce and accompanied by the roasted trio squash salad.

Tips

To ensure the lamb is cooked to your liking, use a meat thermometer. For rare, aim for an internal temperature of 125°F (51°C), for medium-rare, 135°F (57°C), and for medium, 145°F (63°C). Always allow the lamb to rest for a few minutes before serving to let the juices redistribute, ensuring tender and flavorful meat.

Variations & Substitutions

If you don’t have lamb loin chops on hand, this recipe works beautifully with beef steaks or pork chops as well. For a vegetarian twist, consider using portobello mushrooms as a meaty substitute. You can also customize the chimichurri by adding your favorite herbs or spices, such as oregano or cumin, for a unique flavor profile.

Storage

If you have leftovers, store the lamb and salad separately in airtight containers in the refrigerator. The lamb will keep well for up to 3 days. The chimichurri sauce can be stored in a sealed jar in the fridge for up to a week. When reheating the lamb, do so gently to avoid overcooking.

FAQ

Can I make the chimichurri sauce ahead of time?

Absolutely! Chimichurri can be made a day or two in advance. In fact, allowing it to sit for a few hours or overnight can enhance the flavors as the ingredients meld together. Just store it in an airtight container in the refrigerator.

What can I serve with this dish?

This dish pairs beautifully with a side of crusty bread to mop up any extra chimichurri sauce. You might also consider serving it with roasted potatoes or a simple green salad for a well-rounded meal.

Can I use dried herbs instead of fresh for the chimichurri?

While fresh herbs are recommended for the best flavor, you can use dried herbs in a pinch. Just remember that dried herbs are more concentrated, so use about one-third of the amount of fresh herbs called for in the recipe.

Nutrition

This dish is packed with nutritious ingredients. Lamb is an excellent source of high-quality protein, essential vitamins, and minerals such as iron and zinc. The chimichurri sauce provides healthy fats from olive oil and antioxidants from the fresh herbs. The trio squash salad adds fiber and vitamins A and C, while goat cheese offers calcium and healthy fats. Pinenuts contribute additional protein and healthy fats, making this meal a well-balanced and satisfying option.

Conclusion

There you have it – a delightful dish that brings together the warmth of tradition with the vibrancy of modern flavors. This Pan Seared Lamb Loin with Chimichurri and Roasted Trio Squash Salad is perfect for a special occasion or a comforting family dinner. Whether you’re reminiscing about cherished memories or creating new ones, this dish is sure to become a favorite in your home. Enjoy every bite!

Related update: Pan Seared Lamb Loin With Chimichurri & Roasted Trio Squash Salad With Goat Cheese and Pinenuts

Related update: Slow Cooker Red Beans and Rice

Easy Chicken with White Wine Sauce | Made by Meaghan Moineau

Easy Chicken with White Wine Sauce | Made by Meaghan Moineau

**Title: Savory Memories: Easy Chicken with White Wine Sauce**


**Description:**


Dive into the delicious simplicity of our Easy Chicken with White Wine Sauce, a dish that combines rich flavors with effortless preparation. This main dish captures the essence of home-cooked comfort, with a nostalgic story to warm your heart. Rated a 4 out of 10 in difficulty, it's perfect for both novice cooks and seasoned chefs looking for a quick yet satisfying meal.


---


### A Taste of Home: Easy Chicken with White Wine Sauce


When I was a child, Sunday dinners were a sacred ritual in our household. After a bustling week of school, work, and various activities, Sunday was our day of togetherness. My mother, with her adept culinary skills, would transform our modest kitchen into a haven of inviting aromas and comforting flavors. One dish that always graced our table was her Chicken with White Wine Sauce.


This dish was more than just a meal; it was a centerpiece for laughter, stories, and shared moments. I remember watching her as she heated olive oil in a skillet, her movements graceful and practiced. The sizzle of the chicken as it browned was music to our ears, signaling the start of our family feast.


### Ingredients:


- 2 skinless, boneless chicken breast halves


- 2 tablespoons olive oil


- 1 shallot, finely chopped


- 1 teaspoon fresh thyme leaves


- 1/2 cup dry white wine


- 1/4 cup flavor-concentrated chicken broth


### Instructions:


1. **Prepare the Chicken:** Heat the olive oil in a 10-inch skillet over medium heat. Gently place the chicken breasts in the skillet and brown them for about 10 minutes, ensuring they are golden on both sides. Once cooked, remove the chicken from the skillet and set aside.


2. **Create the Sauce:** Add the chopped shallot and fresh thyme leaves to the skillet. Cook and stir for 30 seconds, allowing the shallot to soften and release its sweet aroma.


3. **Add the Wine:** Pour in the dry white wine, letting it simmer for about 2 minutes until the liquid reduces by half. This step intensifies the flavors, creating a perfect balance of acidity and richness.


4. **Incorporate the Broth:** Stir in the flavor-concentrated chicken broth, combining it with the wine mixture for a robust sauce.


5. **Finish the Dish:** Return the chicken to the skillet, spooning the sauce over it. Let it cook for another 5 minutes, ensuring the chicken is cooked through and tender.


### A Nostalgic Note:


As the fragrant aroma of thyme and wine filled our home, we all gathered in anticipation. My siblings and I would set the table with care, knowing that soon we would be enveloped in the warmth of our family's love and the delectable taste of this cherished dish. Even now, making this Easy Chicken with White Wine Sauce brings back a flood of memories, each bite a reminder of those special Sunday dinners.


### Conclusion:


Our Easy Chicken with White Wine Sauce is more than just a recipe; it's an invitation to create your own family memories. With its straightforward preparation and savory flavor, it's an ideal main dish for any occasion. Whether you're looking to recreate a sense of nostalgia or craft new moments, this dish is sure to become a beloved staple in your culinary repertoire.


So, gather your loved ones around the table, and let this delightful chicken dish be the start of your own treasured memories.

Read more about Appetizers

Read more about Main Dishes

Read more about Desserts