Dump Cake | Made by Meaghan Moineau

Dump Cake: A Simple Treat for Every Occasion

Intro

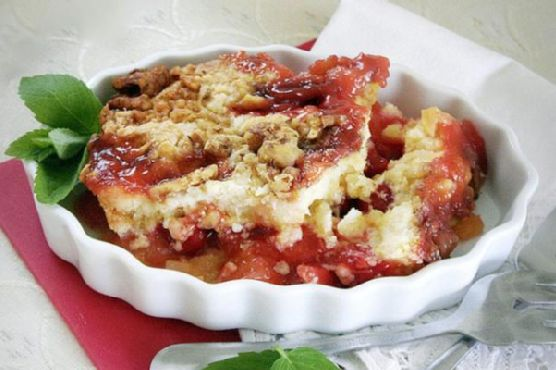
There’s something magical about recipes that stand the test of time, bringing comfort and joy with their simplicity. One such recipe that has graced countless family gatherings and potlucks is the humble Dump Cake. This delightful dessert holds a special place in my heart, as it was a staple at our family reunions. I remember my grandmother pulling it out of the oven, its sweet aroma filling the air, as we gathered around eagerly waiting for a slice. The best part? It’s so easy to make that even the littlest hands in the kitchen can help!

Why You’ll Love It

Dump Cake is a dessert that combines ease with flavor, making it an absolute favorite for those who love baking without the fuss. If you’re short on time or just not in the mood for a complicated recipe, this is for you. It’s versatile, requiring only a few ingredients that you probably already have in your pantry. The beauty of Dump Cake lies in its ability to be the star of any occasion, from casual get-togethers to festive celebrations.

Ingredients

  • 1 can (20 oz) of canned pineapple, undrained
  • 1 can (21 oz) of canned pie filling (cherry or your favorite choice)
  • 1 box (15.25 oz) of yellow or white cake mix
  • 1/2 cup (1 stick) of butter

Instructions

  1. Preheat your oven to 350°F (175°C).
  2. Spread the canned pineapple, with its juice, evenly in the bottom of a 9×13-inch baking pan.
  3. Cover the pineapple with the canned pie filling, spreading it to ensure even distribution.
  4. Sprinkle the dry cake mix evenly over the fruit layers. It’s important not to stir the layers.
  5. Cut the butter into small pieces and place them evenly over the top of the cake mix. This will create a delightful crust as it bakes.
  6. Bake in the preheated oven for 1 hour, or until the top is golden brown and bubbly.
  7. Allow it to cool slightly before serving. Enjoy it old school with a dollop of Cool Whip or freshly whipped cream.

Tips

For the best results, make sure the butter is distributed evenly to ensure the cake mix bakes up nice and crispy. You can also use a pastry cutter or two knives to cut the butter into smaller, more uniform pieces.

Variations & Substitutions

Dump Cake offers endless possibilities for customization:

  • Fruits: Swap out the pie filling for any flavor you prefer. Blueberry, apple, or peach pie filling all work beautifully.
  • Nuts: Sprinkle chopped nuts, such as pecans or walnuts, over the top before baking for added crunch.
  • Spices: Add a sprinkle of cinnamon or nutmeg to the cake mix for a warm, spiced flavor.
  • Butter: For a richer flavor, consider using browned butter.

Storage

If you have leftovers (which is rare!), store them in an airtight container in the refrigerator for up to 5 days. You can also freeze portions for up to 3 months. To reheat, simply warm it in the oven until heated through.

FAQ

Can I use fresh fruit instead of canned?

Yes, you can use fresh fruit, but you may need to add a bit of sugar or syrup to mimic the sweetness and moisture of canned fruit. Adjust the baking time as needed.

Is it necessary to use a specific type of cake mix?

No, you can use either yellow or white cake mix based on your preference. Even flavored cake mixes like lemon or spice can add a unique twist.

Nutrition

This recipe is a delightful treat meant to be enjoyed in moderation. On average, a serving of Dump Cake can contain around 300-350 calories, depending on the type of ingredients used. It’s a dessert that focuses more on comfort and flavor rather than being a low-calorie option.

Conclusion

Dump Cake is more than just a dessert; it’s a testament to the beauty of simple, heartfelt cooking. Whether you’re a seasoned baker or just starting out, this recipe is a wonderful addition to your repertoire. Its nostalgic charm and delightful taste make it a cherished favorite that can be passed down through generations. So gather your ingredients, invite some friends or family over, and enjoy the sweet simplicity that is Dump Cake. Happy baking!

Related update: Dump Cake

Related update: Classic Pumpkin Pie

Red Quinoa and Roasted Cauliflower Salad | Made by Meaghan Moineau

Red Quinoa and Roasted Cauliflower Salad

Intro

There’s something magical about the aroma of roasted cauliflower wafting through the kitchen. It transports me back to my grandmother’s cozy home, where the warmth of her cooking would fill every corner. She had a knack for taking simple ingredients and transforming them into something extraordinary. Inspired by her love for hearty, wholesome meals, I’ve created this Red Quinoa and Roasted Cauliflower Salad. It’s a dish that combines textures and flavors beautifully, making it a family favorite.

Why You’ll Love It

This salad is a delightful medley of nutty quinoa, sweet and chewy dried apricots, crunchy walnuts, and tangy feta cheese. The roasted cauliflower adds a savory depth, while the fresh green onions and parsley bring a burst of freshness. It’s a versatile dish that can be served warm or cold, making it perfect for any season. Whether you’re looking for a nutritious lunch, a side dish for dinner, or a potluck star, this salad fits the bill. Plus, it’s packed with protein, fiber, and healthy fats, ensuring you feel satisfied and nourished.

Ingredients

  • 1 head of cauliflower
  • 1 cup red quinoa
  • 1/2 cup walnuts, chopped
  • 1/2 cup dried apricots, chopped
  • 1/2 cup feta cheese, crumbled
  • 4 green onions, sliced
  • 1/4 cup fresh parsley, chopped
  • Salt and pepper to taste
  • Juice of 1/2 a lemon
  • 2 tablespoons olive oil

Instructions

  1. Cook the quinoa according to package directions. Set aside to cool slightly.
  2. Preheat the oven to 400°F (200°C).
  3. Cut the head of cauliflower into florets.
  4. Toss the cauliflower florets with olive oil, salt, and pepper. Arrange them on a baking sheet in a single layer.
  5. Roast the cauliflower in the preheated oven for 20 minutes or until tender and golden brown.
  6. Meanwhile, crumble the feta cheese and prepare the remaining ingredients: chop the walnuts, dried apricots, green onions, and parsley.
  7. In a large bowl, combine the cooked quinoa, roasted cauliflower, walnuts, apricots, feta cheese, green onions, and parsley.
  8. Drizzle with extra virgin olive oil and the juice from half a lemon. Toss to combine.
  9. Season with additional salt and pepper to taste.
  10. Serve immediately warm or chill in the refrigerator and serve cold.

Tips

For the best results, ensure your cauliflower florets are evenly coated in olive oil and spread out on the baking sheet to roast evenly. You can toast the walnuts for an extra layer of flavor. Simply place them in a dry skillet over medium heat, stirring frequently until fragrant. Be careful not to burn them! Finally, if you’re serving the salad cold, allow the flavors to meld by refrigerating it for at least an hour before serving.

Variations & Substitutions

This salad is highly adaptable to your preferences or dietary needs. You can swap the red quinoa for white or black quinoa, or even use farro or barley for a different grain base. If you’re not a fan of walnuts, try using almonds or pecans instead. For a vegan version, omit the feta cheese or replace it with a plant-based alternative. You can also add more veggies, like roasted cherry tomatoes or bell peppers, for extra color and nutrients.

Storage

This salad stores beautifully, making it an excellent option for meal prep. Place the salad in an airtight container and refrigerate for up to 4 days. If you’ve dressed the salad, the flavors will intensify over time, which many find delicious. However, if you prefer a fresher taste, consider storing the dressing separately and mixing it in just before serving.

FAQ

Can I make this salad ahead of time?

Absolutely! This salad is ideal for making ahead. Prepare all the components and combine them just before serving. This will keep the flavors vibrant and the textures perfect.

Is there a way to add more protein to this salad?

Yes, you can add grilled chicken, chickpeas, or tofu for additional protein. These options complement the existing flavors well and make the salad more filling.

What can I serve with this salad?

This salad is quite versatile and pairs well with grilled meats, such as chicken or fish. It’s also a great side dish for a barbecue or a potluck.

Nutrition

This Red Quinoa and Roasted Cauliflower Salad is not only delicious but also nutritious. It’s rich in plant-based protein from quinoa, healthy fats from walnuts and olive oil, and fiber from the cauliflower and dried apricots. It’s a well-rounded meal that will keep you energized and satisfied.

Conclusion

Whether you’re reminiscing about family meals or creating new memories, this Red Quinoa and Roasted Cauliflower Salad is a dish that brings people together. Its harmonious blend of flavors and textures makes it a standout choice for any occasion. I hope this recipe becomes a staple in your kitchen, just as it is in mine. Enjoy the journey of cooking and savor every bite!

Related update: Red Quinoa and Roasted Cauliflower Salad

Related update: Hush Puppies

Related update: Amaranth and Roast Veggie Salad