Crab Wontons | Made by Meaghan Moineau

Delicious Crab Wontons: A Fusion of Flavor and Elegance

Intro

There’s something magical about the aroma of crab wontons wafting through the kitchen. As a child, I would watch my grandmother expertly fold wonton wrappers, her fingers moving deftly with years of practiced ease. Each fold was a promise of deliciousness to come. Today, I’m excited to share a modern twist on this classic recipe, bringing back fond memories while creating new ones. Whether enjoyed as an appetizer or a delightful snack, these crab wontons are sure to become a favorite in your household.

Why You’ll Love It

Crab wontons are not just a treat for the taste buds but also a feast for the senses. Here are a few reasons why you’ll fall in love with this recipe:

  • Easy to Make: With simple ingredients and straightforward instructions, this recipe is accessible even for novice cooks.
  • Healthy Twist: By using fat-free cream cheese and reduced-fat mayonnaise, you can enjoy these wontons guilt-free.
  • Flavorful Fusion: The combination of crab, cream cheese, and savory seasonings creates a rich, satisfying taste.
  • Perfect for Any Occasion: Whether you’re hosting a dinner party or enjoying a quiet night in, these wontons are versatile enough to suit any event.

Ingredients

  • 1 can of white crabmeat, drained
  • 4 oz fat-free cream cheese, softened
  • 2 tablespoons reduced-fat mayonnaise
  • 1 tablespoon soy sauce
  • 1 clove garlic, minced
  • 1/2 teaspoon onion powder
  • Fresh ground pepper, to taste
  • 12 wonton wrappers

Instructions

  1. Preheat your oven to 350°F (175°C).
  2. Spray a mini muffin tin with nonstick cooking spray to prevent sticking.
  3. In a medium bowl, combine the crab meat, cream cheese, mayonnaise, soy sauce, garlic, onion powder, and fresh ground pepper. Mix until all ingredients are well incorporated.
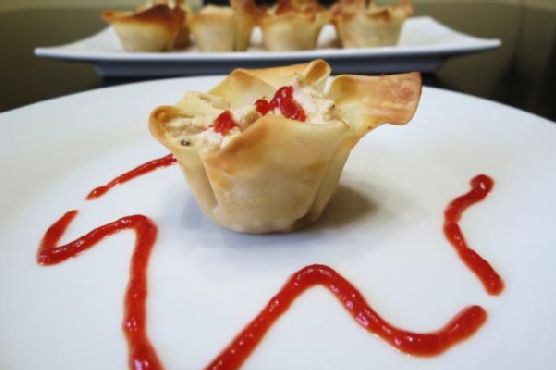
  4. Place one wonton wrapper in each of the 12 mini muffin cups. The edges of the wonton wrappers will extend beyond the cups and may need to be folded slightly to fit.
  5. Spoon the crab mixture into the center of each wonton cup, filling generously.
  6. Bake for 15 to 20 minutes, or until the edges of the wonton cups are golden brown and the filling is heated through.
  7. Remove from oven and let cool slightly before serving. Enjoy your delicious crab wontons!

Tips

To ensure the best results, consider these helpful tips:

  • Room Temperature Ingredients: Make sure the cream cheese is softened to room temperature for easier mixing.
  • Even Filling: Use a small cookie scoop or spoon to evenly distribute the crab mixture into the wonton cups.
  • Watch the Baking Time: Keep an eye on the wontons as they bake to avoid over-browning.

Variations & Substitutions

Feel free to customize your crab wontons with these variations:

  • Spicy Kick: Add a dash of hot sauce or a pinch of red pepper flakes to the crab mixture for some heat.
  • Cheesy Delight: Sprinkle a little grated Parmesan or mozzarella cheese on top of the crab mixture before baking.
  • Vegetarian Option: Substitute crab with finely chopped mushrooms or tofu for a vegetarian version.

Storage

If you have leftovers (which is rare!), store them in an airtight container in the refrigerator for up to 3 days. To reheat, place the wontons in a preheated oven at 350°F for about 5-7 minutes or until warmed through.

FAQ

Can I freeze crab wontons?

Yes, you can freeze them before baking. Arrange the filled wonton cups on a baking sheet, freeze until solid, then transfer to a freezer-safe bag. When ready to bake, add a few extra minutes to the baking time.

What can I serve with crab wontons?

Crab wontons pair well with a sweet chili sauce or soy sauce for dipping. They also complement a fresh side salad or a bowl of soup for a more substantial meal.

Nutrition

Each serving of crab wontons (2 pieces) contains approximately:

  • Calories: 120
  • Protein: 6g
  • Carbohydrates: 10g
  • Fat: 5g

Nutritional values are estimates and may vary based on specific products used.

Conclusion

These crab wontons are a delightful blend of savory flavors wrapped in a crispy wonton shell. Whether you’re reminiscing about family gatherings or creating new traditions, this recipe is sure to bring joy to your table. Easy to prepare and customize, crab wontons offer a touch of elegance to any occasion. Gather your loved ones, roll up your sleeves, and enjoy this delicious journey down memory lane. Happy cooking!

Related update: Crab Wontons

Related update: Baked Lemon~Lime Chicken Wings

Watching What I Eat: Peanut Butter Banana Oat Breakfast Cookies with Carob / Chocolate Chips | Made by Meaghan Moineau

Watching What I Eat: Peanut Butter Banana Oat Breakfast Cookies with Carob / Chocolate Chips

Intro

There’s something truly special about waking up to the aroma of freshly baked cookies wafting through the house. It takes me back to my childhood when weekend mornings were spent in the kitchen with my grandmother, mixing batter and eagerly awaiting the first batch to emerge from the oven. These Peanut Butter Banana Oat Breakfast Cookies are a delightful tribute to those cherished mornings, infused with the comforting flavors of creamy peanut butter and ripe bananas, with a modern twist of carob or chocolate chips for a hint of indulgence.

Why You’ll Love It

These breakfast cookies are not only delicious but also nutritious, making them the perfect start to your day. They are packed with wholesome ingredients like oats and bananas, providing a boost of energy and essential nutrients. Whether you’re rushing out the door or enjoying a leisurely morning, these cookies are a convenient and satisfying choice. Plus, they are incredibly easy to make, allowing even the busiest of us to enjoy a homemade treat.

Ingredients

  • 2 ripe bananas, mashed
  • 1/2 cup butter flavor shortening
  • 1 cup creamy peanut butter
  • 1/2 cup unsweetened applesauce
  • 1 teaspoon vanilla extract
  • 1/4 cup vanilla protein powder
  • 2 cups oatmeal
  • 1/2 cup nuts, chopped (optional)
  • 1/2 cup carob or chocolate chips (optional)

Instructions

  1. Preheat your oven to 350 degrees Fahrenheit (175 degrees Celsius).
  2. In a large bowl, mix the mashed bananas and peanut butter until completely combined.
  3. Add the applesauce, vanilla protein powder, and vanilla extract, then mix again until well combined.
  4. Stir in the oatmeal and nuts into the banana mixture until combined. If you want the carob or chocolate chips mixed throughout, add them now.
  5. Let the dough rest for 10 minutes to allow the oats to absorb some moisture.
  6. Drop spoonfuls of cookie dough onto a parchment paper-lined cookie sheet, flattening each into a circle. If you prefer, add the carob or chocolate chips on top now.
  7. Bake the cookies for 20-30 minutes, depending on your preference for a softer or firmer texture, until golden brown and done.
  8. Remove from the oven and let the cookies rest on the cookie sheet for 5 minutes before transferring them to a cooling rack.
  9. Optional: Use a pizza cutter or sharp knife to score the tops of the cookies while they are still warm for traditional fork tong marks.
  10. Once completely cool, store the cookies in a covered container and enjoy them with a cup of tea or your favorite morning beverage.

Tips

To ensure your cookies have the best texture, use ripe bananas as they mash easily and add natural sweetness. If you prefer a nut-free version, simply omit the nuts and consider adding sunflower seeds for a similar crunch. Adjust the baking time to find your perfect cookie texture, whether that’s soft and chewy or crispy and golden.

Variations & Substitutions

You can easily switch up this recipe based on your dietary preferences or available ingredients. Substitute the butter flavor shortening with coconut oil for a dairy-free version. For a nutty twist, swap creamy peanut butter with almond or cashew butter. If you’re short on vanilla protein powder, you can use an equal amount of almond flour or omit it entirely for a slightly different texture.

Storage

These breakfast cookies store beautifully, making them perfect for meal prep. Keep them in an airtight container at room temperature for up to 5 days or in the refrigerator for up to a week. For longer storage, freeze the cookies in a single layer on a baking sheet, then transfer them to an airtight container or freezer bag. They can be frozen for up to 3 months; simply thaw at room temperature or warm them in the oven before serving.

FAQ

Can I make these cookies gluten-free?

Yes, you can easily make these cookies gluten-free by using certified gluten-free oats. Ensure all other ingredients, especially the vanilla extract and protein powder, are also gluten-free.

What can I use instead of bananas?

If you don’t have bananas on hand or prefer not to use them, try substituting with an equal amount of pumpkin puree or sweet potato puree. Keep in mind that this will slightly alter the flavor and texture of the cookies.

Are these cookies suitable for vegans?

To make these cookies vegan, you can replace the butter flavor shortening with coconut oil and ensure your chocolate chips are dairy-free. Additionally, check that the protein powder is plant-based.

Nutrition

Each cookie is a powerhouse of nutrients, offering a good source of protein, healthy fats, and fiber. Bananas and oats provide essential vitamins and minerals, while the optional nuts add an extra boost of heart-healthy fats. Enjoy these cookies as part of a balanced breakfast or snack to keep you fueled throughout the day.

Conclusion

These Peanut Butter Banana Oat Breakfast Cookies are more than just a delicious treat; they are a delightful reminder of the joy found in simple, homemade pleasures. Whether you’re reminiscing about childhood memories or creating new ones with your loved ones, these cookies are sure to bring warmth and happiness to your morning routine. So, gather your ingredients, preheat your oven, and indulge in the comforting goodness of these wholesome breakfast cookies!

Related update: Watching What I Eat: Peanut Butter Banana Oat Breakfast Cookies with Carob / Chocolate Chips

Related update: Cheesy Potato Corn Scones

Watermelon Popsicles with Mint, Basil & Lime | Made by Meaghan Moineau

Watermelon Popsicles with Mint, Basil & Lime

Intro

The sweet, refreshing taste of watermelon always brings me back to the long, sun-drenched days of my childhood. I fondly remember those lazy summer afternoons spent in my grandmother’s backyard. There, under the shade of her old oak tree, we’d enjoy slices of watermelon, the juice dripping down our chins as we laughed and played. It was during one of those sunlit afternoons that my grandmother first introduced me to the magic of pairing watermelon with fresh herbs and a squeeze of lime. These Watermelon Popsicles with Mint, Basil & Lime are my modern twist on her timeless refreshment, perfect for savoring those sunlit memories and creating new ones.

Why You’ll Love It

This recipe is the epitome of summer in a bite. The watermelon provides a natural sweetness and hydrating base, while the basil and mint add a fragrant complexity that elevates the flavor profile. The lime juice introduces a tangy contrast, making each bite a refreshing explosion of taste. These popsicles are not only delicious but also incredibly easy to make. With just five simple ingredients and a blender, you can create a treat that will delight both kids and adults alike. Whether you’re lounging by the pool or hosting a summer barbecue, these popsicles are sure to be a crowd-pleaser.

Ingredients

  • 1/4 cup fresh basil leaves
  • Juice of 1 lime
  • 1/4 cup fresh mint leaves
  • Pinch of salt
  • 4 cups cubed watermelon flesh

Instructions

  1. In a blender, combine the basil leaves, lime juice, mint leaves, and a pinch of salt.
  2. Add the cubed watermelon flesh to the blender.
  3. Blend at the highest speed until the mixture is completely liquefied.
  4. Carefully pour the liquid into popsicle molds or an ice cube tray, leaving a little space at the top for expansion.
  5. Freeze for a minimum of 4 hours or until fully frozen.
  6. To serve, remove the popsicles from the molds and enjoy immediately.

Tips

For the best results, choose a ripe and juicy watermelon—one that feels heavy for its size and has a deep, uniform color. If you find the mixture is too sweet for your liking, you can add a bit more lime juice or a dash of apple cider vinegar to balance the flavors. To make unmolding easier, run the popsicle molds under warm water for a few seconds before releasing the treats.

Variations & Substitutions

Feel free to experiment with this recipe to suit your taste preferences. If you’re not a fan of basil, you can substitute it with additional mint for a more pronounced minty flavor. For a spicier kick, consider adding a thin slice of jalapeño to the blender. If you’re looking for a touch of sweetness, you can add a tablespoon of honey or agave syrup. For a tropical twist, try adding a cup of fresh pineapple chunks to the mix.

Storage

Store any leftover popsicles in the freezer for up to one month. To prevent ice crystals from forming, wrap each popsicle in parchment paper or store them in an airtight container. If using an ice cube tray, transfer the cubes to a zip-top bag once frozen, and remove as much air as possible before sealing.

FAQ

Can I use dried herbs instead of fresh?

While fresh herbs provide the best flavor, you can use dried herbs in a pinch. Use one-third of the amount specified for fresh herbs, as dried herbs are more concentrated in flavor. However, the texture and aroma may differ slightly.

Is it possible to make this recipe without a blender?

Yes, you can make this recipe without a blender by using a food processor or an immersion blender. If neither is available, finely chop the herbs and mash the watermelon with a fork or potato masher, then mix everything thoroughly. The texture will be less smooth but still delicious.

Nutrition

This recipe yields about 8 popsicles, depending on the size of your molds. Each popsicle is low in calories and provides a good source of hydration, thanks to the watermelon. The fresh herbs are packed with vitamins and antioxidants, while the lime juice offers a boost of vitamin C. It’s a guilt-free treat that you can enjoy any time!

Conclusion

Incorporating the fresh, vibrant flavors of summer, these Watermelon Popsicles with Mint, Basil & Lime are a simple yet exquisite treat for any occasion. Whether you’re reminiscing about the good old days or creating new memories, these popsicles are sure to bring a smile to your face and delight your taste buds. I hope this recipe becomes a cherished part of your summer traditions just as it has in mine. Enjoy the taste of summer, one delicious bite at a time!

Related update: Watermelon Popsicles with Mint, Basil & Lime

Related update: Lavender Tea With Lemon French Macarons

Chavrie Caramelized Red Onion Tarts | Made by Meaghan Moineau

Chavrie Caramelized Red Onion Tarts

Intro

There’s something truly magical about the combination of sweet and savory flavors, and these Chavrie Caramelized Red Onion Tarts capture that magic perfectly. I remember the first time I tasted these delightful bites at a family gathering. My grandmother had just pulled them from the oven, and the rich, comforting aroma filled her cozy kitchen, mingling with laughter and stories from loved ones. With one bite, I was transported: the creamy goat cheese, the sweet caramelized onions, and the hint of tangy red grape jelly created an unforgettable flavor experience. That memory is what I hope to share with you today through this recipe.

Why You’ll Love It

These tarts are not just delicious; they are also incredibly easy to make and versatile. Whether you’re hosting a dinner party, looking for a unique appetizer for a holiday gathering, or simply want a special treat for yourself, these tarts will impress. The balance of flavors is impeccable, with the creamy goat cheese pairing beautifully with the sweet and tangy onion mixture.

Ingredients

  • 1 tablespoon vegetable oil
  • 2 tablespoons unsalted butter
  • 2 large red onions, minced
  • 2 tablespoons sugar
  • 2 tablespoons red grape jelly
  • 2 tablespoons red wine vinegar
  • 4 ounces goat cheese
  • Prepared tart shells

Instructions

  1. Heat the vegetable oil and butter over medium heat in a heavy-gauge skillet.
  2. Add the minced onions and cook until they’re translucent, about 10 minutes.
  3. Stir in the sugar, red grape jelly, and red wine vinegar.
  4. Continue cooking the mixture until it reaches a syrupy consistency, about 15 minutes, stirring occasionally.
  5. Remove from heat and allow the mixture to cool to room temperature.
  6. Place the tart shells on a baking tray and spoon 1 tablespoon of the onion mixture into each shell.
  7. Top each tart with a dollop of goat cheese.
  8. Bake in a preheated oven at 350°F (175°C) for 10-15 minutes, or until the tarts are warmed through and the goat cheese is slightly melted.
  9. Serve warm and enjoy!

Tips

Caramelizing onions can be a delicate process. Make sure to keep the heat at medium to avoid burning them. Stir frequently and be patient; the sweet, rich flavor is worth the time. If your onions start to stick, add a splash of water to deglaze the pan and continue cooking.

Variations & Substitutions

If you’re looking to switch things up, consider adding a sprinkle of fresh thyme or rosemary to the onion mixture for an herbal touch. For a different flavor profile, try using fig jam instead of grape jelly. If you or your guests are not a fan of goat cheese, a creamy brie or a sharp cheddar could also work well in this recipe.

Storage

These tarts are best enjoyed fresh, but if you have leftovers, store them in an airtight container in the refrigerator for up to 3 days. Reheat them in the oven at 300°F (150°C) for about 10 minutes before serving to regain their crispness and warmth.

FAQ

Can I make these tarts ahead of time?

Absolutely! You can prepare the onion mixture a day in advance and store it in the refrigerator. Assemble the tarts just before you’re ready to bake them for the best results.

What type of tart shells should I use?

Pre-made tart shells are convenient and work well for this recipe. Look for ones made from puff pastry for a flaky, buttery crust. You can also use phyllo dough or even make your own tart shells if time permits.

Can I freeze these tarts?

Yes, you can freeze the baked tarts. Allow them to cool completely, then wrap them tightly in plastic wrap and store in a freezer-safe bag. Reheat them directly from the freezer in a 350°F (175°C) oven for about 15-20 minutes.

Nutrition

Each tart contains approximately 150 calories, 8 grams of fat, 12 grams of carbohydrates, and 4 grams of protein. They are a delightful indulgence, so enjoy them in moderation as part of a balanced diet.

Conclusion

Chavrie Caramelized Red Onion Tarts are a delightful addition to any occasion. With their rich, savory-sweet flavor and elegant presentation, they are sure to impress your family and friends. I hope this recipe brings a touch of warmth and nostalgia to your table, just as it did for me all those years ago in my grandmother’s kitchen. Happy cooking!

Related update: Chavrie Caramelized Red Onion Tarts

Related update: Baked Scallops With Parma Ham

Pizza bites with pumpkin | Made by Meaghan Moineau

Pizza Bites with Pumpkin: A Delicious Twist on a Classic Favorite

Intro

Growing up, pizza nights were a cherished tradition in our family. The excitement of choosing toppings and watching the dough rise in the oven created an atmosphere of warmth and joy. As the weather turns cooler and pumpkins begin to adorn doorsteps, I am reminded of those cozy evenings shared with loved ones. Today, I’m thrilled to bring you a unique twist on a classic favorite—Pizza Bites with Pumpkin. This recipe combines the rich, earthy flavors of pumpkin with the savory goodness of cheese, creating a delightful treat that transports me right back to those beloved family gatherings.

Why You’ll Love It

These pizza bites are a perfect blend of nostalgia and innovation. They’re bite-sized, making them ideal for parties, snacks, or even a fun family meal. The addition of pumpkin adds a subtle sweetness that pairs beautifully with the savory cheeses and herbs. You’ll love how quick and easy this recipe is, and your guests will adore the surprise ingredient that makes these bites stand out. They’re also a great way to sneak in some extra veggies, making them a hit with both kids and adults alike.

Ingredients

  • Pumpkin
  • Olive oil
  • Feta cheese
  • Mozzarella cheese
  • Eggs
  • Dried oregano
  • Parsley
  • Garlic

Instructions

  1. Using a food processor, chop the pumpkin until it resembles rice-like granules.
  2. In a hot pan, sauté the pumpkin with olive oil for about 3 minutes, then set aside to cool.
  3. In a mixing bowl, combine feta and mozzarella cheeses. Add the eggs one at a time, mixing to combine.
  4. Add the cooled pumpkin and spices to the cheese mixture. Mix well until everything is well blended.
  5. Evenly spoon the mixture into the greased muffin tin molds.
  6. Press pizza dough down evenly and firmly in each mold. This step is crucial to ensure the bites stick together.
  7. Place in the oven and bake for 30 minutes at 200°C (392°F).
  8. Remove the pizza bites from the oven and let them set in the pan for 5-10 minutes before removing to cool completely. This step is important to prevent them from breaking apart.

Tips

To make your pizza bites even more flavorful, try using fresh herbs instead of dried ones. Fresh parsley and oregano can elevate the taste significantly. You can also add a pinch of chili flakes if you fancy a bit of heat. Remember, pressing the dough down firmly is essential to help the bites maintain their shape. Be patient and let them cool properly before removing from the molds.

Variations & Substitutions

If you’re looking to mix things up, try substituting the pumpkin with sweet potato for a different flavor profile. For a dairy-free version, you can use a vegan cheese substitute. Additionally, feel free to experiment with other herbs and spices that you love. Basil or thyme can be great alternatives to oregano and parsley.

Storage

These pizza bites can be stored in an airtight container in the refrigerator for up to 3 days. They can also be frozen for up to a month. If freezing, place them in a single layer on a baking sheet first, then transfer to a freezer-safe container once frozen. To reheat, simply pop them in the oven until warmed through.

FAQ

Can I make these pizza bites ahead of time?

Absolutely! You can prepare the mixture a day in advance and store it in the refrigerator. When ready to bake, simply spoon the mixture into the muffin tin molds and follow the baking instructions.

What can I serve with pizza bites?

These pizza bites pair wonderfully with a fresh green salad or a bowl of tomato soup. They’re also delicious on their own as a snack or appetizer.

Can I use canned pumpkin?

While fresh pumpkin is recommended for the best texture and flavor, canned pumpkin can be used in a pinch. Just make sure it’s not the pumpkin pie filling, as that contains added sugars and spices.

Nutrition

While the exact nutritional content will vary based on specific ingredient brands and quantities used, a typical serving of these pumpkin pizza bites is packed with protein from the cheese and eggs, and essential vitamins from the pumpkin. They provide a balanced snack option with a moderate amount of carbohydrates and fats.

Conclusion

Pizza Bites with Pumpkin are a delightful twist on a classic dish, bringing warmth and comfort to any occasion. They capture the essence of fall with their unique flavor combination and are sure to become a favorite in your household. I hope this recipe brings you as much joy and nostalgia as it has brought me. Happy cooking!

Related update: Pizza bites with pumpkin

Related update: Chavrie Caramelized Red Onion Tarts

Bourbon Street Beignets | Made by Meaghan Moineau

Bourbon Street Beignets: A Taste of New Orleans

Intro

There’s something magical about the first bite of a warm beignet, dusted with a generous layer of powdered sugar. My first encounter with these delightful pastries was on a humid summer evening in New Orleans. The air was filled with the lively sounds of jazz, and the sweet aroma of these golden bites wafted through the streets. Every bite took me back to that bustling corner of the French Quarter, where laughter mingled with the sounds of trumpets and saxophones. Today, I’m thrilled to share with you a recipe that brings a piece of Bourbon Street right into your kitchen.

Why You’ll Love It

This Bourbon Street Beignets recipe is a love letter to New Orleans’ vibrant culinary scene. You’ll love the simplicity and authenticity of this recipe, which captures the essence of traditional beignets found in the heart of the French Quarter. The light, airy texture paired with the delicate sweetness of powdered sugar is an unbeatable combination. Plus, making these at home is a delightful way to bring a touch of Southern charm to your dessert table.

Ingredients

  • 1 egg
  • 3 1/2 cups flour, divided
  • 1 cup heavy cream
  • Vegetable oil, for frying
  • Powdered sugar, for dusting
  • 1/2 teaspoon salt
  • 2 tablespoons shortening
  • 1/4 cup sugar
  • 1 cup hot water
  • 1 package (or 2 1/4 teaspoons) active dry yeast

Instructions

  1. Dissolve the yeast in warm water according to package instructions and set aside.
  2. In a large bowl, combine sugar, shortening, salt, and hot water. Stir until the shortening is melted and the sugar is dissolved. Allow the mixture to cool to lukewarm.
  3. Add the heavy cream, egg, 3 cups of flour, and the yeast mixture to the sugar-shortening mix.
  4. Attach the bowl to a stand mixer with a dough hook. Turn to speed “2” and mix for 2 minutes.
  5. Add the remaining flour, 1/2 cup at a time, mixing until the dough clings to the hook and cleans the sides of the bowl, about 5 minutes longer.
  6. Place the dough on a lightly floured board and roll into a 10×24 inch rectangle.
  7. Using a sharp knife, cut the dough into 2-inch squares.
  8. In a large heavy saucepan or deep fat fryer, heat the oil to 360 degrees Fahrenheit.
  9. Fry the doughnuts, turning to brown on both sides, about 3 minutes.
  10. Drain on absorbent towels and sprinkle generously with powdered sugar while warm.

Tips

For the best results, ensure your water is warm but not too hot when dissolving the yeast, as excessively hot water can kill the yeast. When frying, maintain a consistent oil temperature to achieve that perfect golden brown color. A candy thermometer can be a helpful tool to ensure the oil stays at the right temperature.

Variations & Substitutions

If you’re feeling adventurous, try adding a splash of vanilla extract or a hint of nutmeg to the dough for additional depth of flavor. For a gluten-free version, substitute the all-purpose flour with a gluten-free flour blend, keeping in mind that the texture might vary slightly. You can also experiment with different toppings; a drizzle of chocolate or caramel sauce can add a decadent twist.

Storage

Beignets are best enjoyed fresh and warm, but if you have leftovers, store them in an airtight container at room temperature for up to 2 days. To reheat, pop them in a preheated oven at 350 degrees Fahrenheit for a few minutes until warmed through. Avoid the microwave, as it can make them tough.

FAQ

Can I make the dough ahead of time?

Yes, you can prepare the dough ahead of time. Once the dough is mixed and kneaded, cover it tightly with plastic wrap and store it in the refrigerator for up to 24 hours. Allow it to come to room temperature before rolling and cutting.

Why are my beignets greasy?

Greasy beignets are often a result of oil that’s not hot enough. Make sure your oil is at 360 degrees Fahrenheit before frying. If the temperature drops too low, the beignets will absorb more oil instead of cooking quickly on the outside.

Can I freeze beignets?

Yes, you can freeze beignets. After frying, allow them to cool completely, then place them in a single layer on a baking sheet and freeze until solid. Transfer to a freezer-safe bag or container. To reheat, bake in a preheated oven at 350 degrees Fahrenheit until heated through.

Nutrition

While beignets are a treat to be savored, it’s worth noting that they are an indulgent dessert. High in carbohydrates and sugar, they are best enjoyed in moderation. Pairing them with a cup of coffee can create a balanced experience, reminiscent of a New Orleans café.

Conclusion

Making Bourbon Street Beignets at home is a delightful adventure that brings the spirit of New Orleans right to your kitchen. With their crisp exterior and soft, airy center, these beignets are sure to become a family favorite. Whether you’re reminiscing about a past visit to the French Quarter or simply looking to enjoy a taste of the South, this recipe is your ticket to a sweet escape. So go ahead, dust off that powdered sugar, and let the good times roll!

Related update: Bourbon Street Beignets

Candied Spiced Pecans | Made by Meaghan Moineau

Candied Spiced Pecans: A Sweet and Savory Delight

Intro

There’s something magical about the aroma of spiced pecans wafting through the house, especially during the holiday season. As a child, I remember my grandmother making batches of these delightful treats for family gatherings. The warmth of the spices combined with the sweetness of the sugar created an irresistible snack that had everyone reaching for more. Today, I’m excited to share this cherished recipe with you, hoping it brings as much joy to your home as it has to ours.

Why You’ll Love It

These Candied Spiced Pecans are a perfect blend of sweet and spicy, offering a crunchy texture that is as satisfying as it is delicious. Whether you’re looking for a quick snack, a topping for salads, or a thoughtful homemade gift, these pecans fit the bill. The combination of spices like cinnamon, cloves, and nutmeg, along with a hint of maple, makes them an irresistible treat that captures the essence of comfort and warmth.

Ingredients

  • 1 tsp allspice
  • 1/2 cup brown sugar
  • 2 tbsp butter
  • 1 tsp cinnamon
  • 1/2 cup granulated sugar
  • 1/4 tsp ground cloves
  • 1 tsp maple extract
  • 1/4 tsp nutmeg
  • 2 cups pecans
  • 1/4 cup water

Instructions

  1. Preheat your oven to 300°F (150°C). Line a cookie sheet with tin foil and coat it with cooking spray. Set aside.
  2. In a shallow bowl, sift together the granulated sugar, cinnamon, allspice, cloves, and nutmeg. Set aside.
  3. In a small bowl, whisk together the maple extract, brown sugar, and water.
  4. Over medium heat, melt the butter in a skillet. Slowly whisk in the brown sugar mixture and bring it to a boil.
  5. Add the pecans to the skillet and stir to coat them thoroughly. Simmer for about 1-2 minutes until well-coated.
  6. Using a slotted spoon, transfer the pecans to the reserved sugar and spice bowl. Coat the pecans evenly with the sugar mixture.
  7. Place the pecans evenly on the prepared cookie sheet and bake for 15 minutes. Stir the pecans and bake for an additional 15 minutes.
  8. Let the pecans cool completely before serving or storing.

Tips

For the best results, make sure to use fresh pecans. Older nuts can lose their natural oils and flavor. Be sure to stir the pecans halfway through the baking process to ensure even coating and roasting. Lastly, allow them to cool completely before storing to maintain their crispiness.

Variations & Substitutions

If you’re looking to switch things up, you can easily substitute walnuts or almonds for the pecans. For a spicier kick, consider adding a pinch of cayenne pepper to the spice mix. If maple extract isn’t available, vanilla extract works as a great alternative, providing a subtly different flavor profile.

Storage

Store your candied spiced pecans in an airtight container at room temperature. They should stay fresh for up to two weeks. You can also freeze them for longer storage, just be sure to let them thaw completely before serving to retain their crisp texture.

FAQ

Can I use salted butter for this recipe?

Yes, you can use salted butter, but it will slightly alter the flavor profile by adding a hint of saltiness. If you prefer to keep the recipe sweet, stick with unsalted butter.

How do I prevent the pecans from sticking together?

Ensure that the pecans are spread out evenly on the baking sheet and stirred halfway through the baking process. This will help prevent clumping and ensure each nut is evenly coated and roasted.

Can I make these pecans in advance?

Absolutely! These candied spiced pecans are perfect for making ahead of time. Just store them in an airtight container as mentioned, and they’ll be ready for any occasion.

Nutrition

While these candied spiced pecans are a treat, they’re also packed with nutrients. Pecans are a great source of healthy fats, fiber, and protein. However, due to the sugar content, it’s best to enjoy them in moderation as part of a balanced diet.

Conclusion

These Candied Spiced Pecans are not just a treat; they’re a tradition that brings warmth and joy to any occasion. Easy to make and incredibly versatile, they’re sure to become a favorite in your home, just as they have in ours. I hope this recipe inspires you to create delicious memories with your loved ones. Enjoy!

Related update: Candied Spiced Pecans

Related update: Medenjaci – Croatian Honey Spice Cookies

Related update: Japanese Gyoza Pot Stickers

Croissants With Sesame Seeds (Kifli) | Made by Meaghan Moineau

Croissants With Sesame Seeds (Kifli)

Intro

There’s something undeniably magical about the aroma of freshly baked croissants wafting through the house. For me, it transports me back to the cozy kitchen of my grandmother’s home, where she would lovingly prepare these delicate pastries for our family gatherings. Her version, known as “Kifli,” was always adorned with a sprinkle of sesame seeds, adding a delightful crunch to each bite. I’m excited to share this cherished recipe with you, hoping it brings the same warmth and joy to your home as it has to mine over the years.

Why You’ll Love It

This recipe for Croissants With Sesame Seeds, or Kifli, is a delightful twist on traditional croissants. You’ll love how the sesame seeds add a subtle nutty flavor and extra texture. The process of making these croissants is a labor of love, but the result is a batch of soft, flaky pastries with a golden, crisp exterior. Whether you’re serving them for breakfast, brunch, or a special occasion, these croissants are sure to impress your family and friends.

Ingredients

  • 1 cup milk (lukewarm)
  • 1 tablespoon dry active yeast
  • 1 tablespoon sugar
  • 6 cups flour (plus 2 tablespoons for yeast mixture)
  • 1/2 teaspoon baking powder
  • 1 teaspoon salt
  • 1/2 cup vegetable oil
  • 4 eggs (separated, yolks for brushing)
  • 1 cup margarine (for baking sheet)
  • Sesame seeds (for topping)

Instructions

  1. In a large, deep mixing bowl, pour in the lukewarm milk. Stir in the sugar, 2 tablespoons of flour, and the yeast. Let stand for ten minutes until foamy.
  2. Add in the baking powder, salt, vegetable oil, egg whites, and 6 cups of flour. Stir with a wooden spoon until the mixture is well incorporated. You may need to use your hands towards the end to bring the dough together.
  3. Transfer the dough to a lightly floured surface and knead it for 10 minutes until smooth and elastic.
  4. Place the dough in a large bowl, cover it with a kitchen towel, and let it stand for one hour until it doubles in size.
  5. Preheat the oven to 375°F (190°C).
  6. Bring the dough back to your working area and knead it again for another 5 minutes to ensure all air bubbles are out.
  7. Form the dough into a log and cut it into 5 or 6 equal pieces. Keep the pieces you’re not working with covered.
  8. Take one piece and roll it out to a size as big as a medium pizza. With a knife, cut the rolled-out dough into 8 equal slices.
  9. Beginning at the widest point of each slice, roll it towards the narrowest point to form a croissant shape.
  10. Place the croissants on a lightly greased baking sheet. Repeat with the remaining dough pieces.
  11. In a small mixing bowl, whisk the 4 egg yolks and brush each croissant with the egg yolk mixture.
  12. Top each croissant with sesame seeds and place a few small pieces of margarine throughout the baking sheet.
  13. Bake for 15 to 20 minutes, or until the croissants are golden brown.
  14. Once baked, cover the croissants with a kitchen towel while they cool slightly. Serve immediately or store in an airtight container.

Tips

Here are some helpful tips to ensure your croissants turn out perfectly:

  • Ensure your milk is lukewarm, not too hot, to activate the yeast properly.
  • Kneading the dough properly is crucial for that perfect flaky texture. Don’t rush this step!
  • Covering the dough with a towel while it rises prevents it from drying out.
  • Brushing with egg yolk not only helps the sesame seeds stick but also gives the croissants a beautiful golden color.

Variations & Substitutions

Feel free to experiment with this recipe by trying different variations:

  • Cheese Kifli: Add a sprinkle of grated cheese inside the dough before rolling for a cheesy twist.
  • Sweet Kifli: Add a spoonful of jam or Nutella before rolling the dough for a sweet version.
  • Butter Substitute: If you prefer, you can use butter instead of margarine for a richer flavor in the baking sheet.

Storage

Store any leftover croissants in an airtight container at room temperature for up to two days. For longer storage, freeze them in a sealed bag for up to a month. To reheat, simply pop them in the oven at 350°F (175°C) for a few minutes until warm.

FAQ

Can I use instant yeast instead of active dry yeast?

Yes, you can substitute instant yeast for active dry yeast in this recipe. You can add it directly to the flour without the need to dissolve it first. Keep in mind that the rising time may be slightly shorter.

Why are my croissants not as flaky as expected?

Achieving the perfect flaky texture involves proper kneading and ensuring all air bubbles are eliminated during the second kneading. Make sure your dough is well kneaded and rolled out evenly to achieve the best results.

Can I make the dough ahead of time?

Yes, you can prepare the dough a day in advance. After the first rise, punch it down and refrigerate overnight in an airtight container. Allow it to come to room temperature before proceeding with the recipe.

Nutrition

While these croissants are a delightful indulgence, it’s good to be mindful of their nutritional content. Each croissant is approximately 250 calories, with a balance of carbohydrates, proteins, and fats. Enjoy them as part of a balanced diet!

Conclusion

Making these Croissants With Sesame Seeds (Kifli) is not just about creating a delicious pastry; it’s about crafting a moment of nostalgia and warmth. Whether you’re sharing them with loved ones or savoring them with a cup of coffee, these croissants are sure to become a beloved tradition in your home. Happy baking!

Related update: Croissants With Sesame Seeds (Kifli)

Related update: Valentine Hearts

Related update: Upside-Down Blueberry Puffs Brunch

Raspberry Thumbprint Wholewheat Scones With Macadamia Nuts | Made by Meaghan Moineau

Raspberry Thumbprint Wholewheat Scones With Macadamia Nuts

Intro

There’s something wonderfully nostalgic about baking. The aroma of freshly baked goods wafting through the house, the warmth of the oven, and the anticipation of tasting that first bite bring back fond memories of baking with my grandmother. She would always let me use my thumb to press little wells into the dough for the jam—a task I took very seriously as a child. Today, I’m thrilled to share a recipe that combines that nostalgic thumbprint technique with a deliciously wholesome twist. These Raspberry Thumbprint Wholewheat Scones with Macadamia Nuts are not only a delightful treat but also a nod to those cherished baking days.

Why You’ll Love It

This recipe is a delightful fusion of textures and flavors. The earthiness of wholewheat flour, the slight crunch from macadamia nuts, and the sweet-tart burst of raspberry jam come together in perfect harmony. These scones are not only delicious but also relatively simple to make, perfect for breakfast or an afternoon snack. Plus, they’re a great way to introduce whole grains into your diet without sacrificing flavor!

Ingredients

  • 1 cup flour
  • 1 cup whole-wheat flour
  • 1/2 cup rolled oats
  • 1/4 cup brown sugar
  • 1 tsp baking powder
  • 1/2 tsp baking soda
  • 1/4 tsp salt
  • 1/2 tsp ground cinnamon
  • 1/4 tsp ground allspice
  • 1/4 cup butter, chilled and cubed
  • 1/2 cup nonfat sour cream
  • 2 tsp vanilla extract, divided
  • 1/2 cup dried cranberries
  • 1/3 cup macadamia nuts, chopped
  • 1/4 cup powdered sugar
  • 2 tbsp low-fat milk
  • 1/4 cup raspberry jam

Instructions

  1. Preheat your oven to 400°F (200°C).
  2. Place the rolled oats in a food processor and process until finely ground.
  3. Add the flour, whole-wheat flour, brown sugar, baking powder, baking soda, salt, cinnamon, and allspice to the food processor. Pulse three times to combine.
  4. Add the chilled butter to the mixture and pulse five times until the mixture resembles coarse meal. Be careful not to over-process.
  5. Add 1 teaspoon of vanilla extract and the sour cream. Pulse three times or until just combined. Avoid over-mixing to prevent the dough from becoming too runny. Alternatively, you can transfer the mixture to a large bowl and combine with a spatula.
  6. Fold in the dried cranberries and chopped macadamia nuts using a spatula.
  7. Turn the dough out onto a lightly floured surface and knead lightly three times. Roll the dough to a 1/2-inch thickness and cut with a 2 1/2-inch biscuit cutter.
  8. Place the cut dough on a baking sheet. Use a small round spoon to press into the center of each scone to create a well for the raspberry jam.
  9. Mix the raspberry jam with the remaining 1 teaspoon of vanilla extract. Add 1/2 teaspoon of jam into each well, being careful not to overfill.
  10. Bake for 14 minutes or until the scones are golden brown. Remove from the baking sheet and transfer to a wire rack to cool.
  11. While the scones are cooling, prepare the glaze by combining the powdered sugar and milk. Stir with a whisk until smooth, then drizzle evenly over the cooled scones.

Tips

To ensure your scones are light and fluffy, handle the dough as little as possible. Over-mixing or over-kneading can result in tough scones. If you don’t have a biscuit cutter, a drinking glass will work in a pinch. Just make sure to flour the rim to prevent sticking.

Variations & Substitutions

If you’re looking to switch things up, try swapping the raspberry jam for your favorite flavor, such as apricot or strawberry. You can also substitute the macadamia nuts with almonds or walnuts for a different nutty flavor. For a vegan version, use plant-based butter and yogurt in place of the dairy ingredients.

Storage

These scones are best enjoyed fresh but can be stored in an airtight container at room temperature for up to two days. For longer storage, freeze the scones in a single layer, then transfer to a freezer-safe bag. Thaw at room temperature and reheat in the oven for a few minutes before serving.

FAQ

Can I make these scones gluten-free?

Yes, you can substitute the regular and whole-wheat flour with a gluten-free all-purpose flour blend. Make sure your oats are certified gluten-free as well.

What can I use instead of a food processor?

If you don’t have a food processor, you can manually mix the dry ingredients in a large bowl and cut in the butter using a pastry cutter or two knives. This will take a little more time but will achieve a similar texture.

Nutrition

Each scone provides a wholesome mix of carbohydrates, proteins, and healthy fats, making it a satisfying snack. While the exact nutritional values can vary, these scones are a good source of fiber, thanks to the whole-wheat flour and oats. They’re also lower in fat compared to traditional scones due to the use of nonfat sour cream instead of full-fat cream.

Conclusion

These Raspberry Thumbprint Wholewheat Scones with Macadamia Nuts are a delightful addition to any tea time or morning routine. They’re easy to make, yet taste like a special treat. Whether you’re enjoying them with a cup of coffee or sharing them with loved ones, these scones are sure to bring a touch of warmth and nostalgia to your day. So, roll up your sleeves and enjoy the process of creating these delicious scones—just like Grandma would have wanted.

Related update: Raspberry Thumbprint Wholewheat Scones With Macadamia Nuts

Related update: Blackberry Cobbler

Related update: Croissants With Sesame Seeds (Kifli)

Carrot Cake Snack Bites | Made by Meaghan Moineau

Carrot Cake Snack Bites

Intro

There’s something magical about the aroma of freshly baked carrot cake wafting through the kitchen. It takes me back to my grandmother’s cozy kitchen, where the warmth of her oven matched the warmth of her smile. She would let me lick the spoon, a sweet reward for helping her mix the batter. Those cherished memories inspired me to create these Carrot Cake Snack Bites, a healthy, no-bake version of a classic favorite that encapsulates nostalgia in every bite.

Why You’ll Love It

These Carrot Cake Snack Bites are a delightful fusion of wholesome ingredients and timeless flavors. They’re the perfect treat for anyone who craves the essence of carrot cake without the commitment of baking. Whether you’re looking for a quick snack, a guilt-free dessert, or a lunchbox addition, these bites have got you covered. They’re vegan, gluten-free, and packed with nutrients, making them a delicious and nourishing choice for everyone.

Ingredients

  • 1 cup shredded carrots
  • 1 teaspoon cinnamon
  • 1/2 cup shredded coconut
  • 1/2 teaspoon ground ginger
  • 1 cup pitted medjool dates
  • 1/2 cup sunflower seeds
  • 1/2 cup walnuts

Instructions

  1. In a food processor, blend all the snack bite ingredients together until the mixture is well combined and sticky.
  2. Scoop out tablespoons full of the batter and roll it into a ball using your hands.
  3. For additional crunch and flavor, roll the balls in sesame seeds, coconut, or chopped almonds, if desired.
  4. Store the snack bites in an airtight container in the refrigerator to keep them fresh.

Tips

For best results, ensure your dates are soft and moist. If they seem dry, soak them in warm water for 10 minutes before using. When rolling the bites, dampen your hands slightly to prevent the mixture from sticking. Experiment with different coatings for a variety of textures and flavors.

Variations & Substitutions

Feel free to customize these snack bites to suit your taste. Swap walnuts for pecans or almonds for a different nutty flavor, or replace sunflower seeds with pumpkin seeds for an autumn twist. Don’t have medjool dates? Try using dried apricots or figs as an alternative. Add a pinch of nutmeg or cardamom to enhance the spice profile.

Storage

Store your Carrot Cake Snack Bites in an airtight container in the refrigerator. They will stay fresh for up to a week. For longer storage, freeze them for up to three months. Simply thaw at room temperature for a few minutes before enjoying.

FAQ

Can I make these snack bites without a food processor?

Yes, you can make them without a food processor, although it will require a bit more effort. Finely chop the dates, nuts, and seeds, then mix everything together in a bowl until a sticky dough forms.

Are these snack bites suitable for a nut-free diet?

To make these bites nut-free, simply omit the walnuts and use additional sunflower seeds or pumpkin seeds instead. You can also explore using seeds like chia or flax for added nutrition.

Can I add protein powder to these snack bites?

Absolutely! Adding a scoop of your favorite protein powder can boost the nutritional value of these bites. Simply adjust the consistency by adding a bit of water or almond milk if needed.

Nutrition

Each Carrot Cake Snack Bite is packed with vitamins and minerals from the carrots, healthy fats from the nuts and seeds, and natural sweetness from the dates. They’re a great source of fiber, vitamin A, and plant-based protein, making them a balanced and wholesome snack option.

Conclusion

These Carrot Cake Snack Bites are more than just a treat—they’re a nostalgic nod to the comforting flavors of a beloved dessert, reimagined in a health-conscious form. Perfect for any time of the day, they’re sure to become a staple in your snack rotation. Whether you’re savoring them on a busy afternoon or sharing them with loved ones, these bites are a delicious reminder of the simple joys in life. Enjoy the taste of nostalgia with every bite!

Related update: Carrot Cake Snack Bites

5-Minute Rocky Road Fudge | Made by Meaghan Moineau

5-Minute Rocky Road Fudge: A Sweet Shortcut to Delight

Intro

There are few things in life as comforting as a bite of homemade fudge. The rich creaminess of chocolate combined with the nutty crunch of walnuts and the whimsical chew of mini-marshmallows creates a symphony of flavors and textures that can transport you to another time. When I was a child, my grandmother used to make a big batch of rocky road fudge every Christmas. The aroma would fill her cozy kitchen, mingling with the scent of pine from the tree, and the sound of laughter from family gathered around. Today, I’m excited to share a quicker version of this beloved treat—a recipe that takes just five minutes to prepare, yet captures all the nostalgia and warmth of those fond memories.

Why You’ll Love It

Not only does this rocky road fudge recipe bring the classic flavors you love, but it’s also incredibly easy to make. Here’s why you’ll fall head over heels for this quick confection:

  • Time-Saving: With just five minutes of prep time, this fudge is perfect for last-minute dessert needs or a quick treat.
  • Minimal Ingredients: You’ll only need a handful of pantry staples to whip this up.
  • No Stove Required: The microwave does all the heavy lifting, making this a convenient recipe that anyone can make.
  • Perfect for Gifting: Cut into squares, this fudge makes a delightful homemade gift, ideal for holidays or special occasions.

Ingredients

  • Semi-sweet chocolate chips
  • Canned sweetened condensed milk
  • Vanilla extract
  • Salt
  • Mini-marshmallows
  • Walnuts

Instructions

  1. Line a 13×9-inch pan with foil, lightly spray with cooking spray. Set aside.
  2. In a large, microwave-safe bowl, add chocolate chips and condensed milk. Microwave for about 40 seconds, or until the chips are just melted when you stir them. If needed, continue to microwave in 15-second increments until melted. Do not overcook.
  3. Immediately stir in vanilla and salt.
  4. Fold in the marshmallows and walnuts quickly.
  5. Spread and press fudge into the prepared pan swiftly. Refrigerate until completely cooled before cutting into squares.

Tips

To ensure that your fudge turns out perfectly every time, consider these helpful tips:

  • Microwave Caution: Be careful not to overcook the chocolate, as it can seize and become grainy. Stirring frequently helps prevent this.
  • Quick Mixing: Work swiftly when adding the marshmallows and nuts to prevent them from melting too much.
  • Even Spreading: Use a spatula to evenly spread the fudge in the pan, applying gentle pressure to ensure a smooth surface.

Variations & Substitutions

This rocky road fudge is incredibly versatile. Here are some fun ways to switch it up:

  • Nut Alternatives: Swap walnuts for pecans, almonds, or even a mix of your favorite nuts.
  • Chocolate Twist: Try using dark chocolate or milk chocolate chips for a different flavor profile.
  • Add-Ins: For added texture, consider including dried fruit like cranberries or raisins.
  • Vegan Option: Use vegan chocolate chips and a plant-based condensed milk alternative.

Storage

Store your rocky road fudge in an airtight container to maintain freshness. It will keep well in the refrigerator for up to two weeks. If you prefer a softer texture, you can also store it at room temperature for about a week. For long-term storage, consider freezing individual squares wrapped in parchment paper for up to three months. Thaw in the refrigerator before enjoying.

FAQ

Can I make this fudge without nuts?

Absolutely! If you have a nut allergy or simply prefer a nut-free version, you can omit the walnuts. The fudge will still be deliciously rich and satisfying.

How do I prevent the chocolate from seizing?

To prevent seizing, ensure that no water comes into contact with the chocolate. Use a dry, microwave-safe bowl and stir gently. Overheating can also cause seizing, so heat the mixture in short increments.

Is it okay to use flavored chocolate chips?

Yes, flavored chocolate chips, like mint or caramel, can add a unique twist to the traditional rocky road flavor. Experiment to find your favorite combination!

Nutrition

While this fudge is a treat, it’s always beneficial to be mindful of portion sizes. Each square of fudge (assuming 24 squares per batch) contains approximately:

  • Calories: 150
  • Fat: 8g
  • Carbohydrates: 20g
  • Protein: 2g

Remember, moderation is key, especially with such a rich and indulgent dessert.

Conclusion

Our 5-Minute Rocky Road Fudge is a delightful nod to a classic recipe, wrapped in the convenience of modern-day cooking. Whether you’re recreating cherished memories or building new ones, this recipe is sure to become a staple in your dessert repertoire. Easy to make and even easier to enjoy, it’s the perfect blend of tradition and simplicity. Gather your ingredients, take a trip down memory lane, and indulge in the sweet satisfaction of homemade fudge, all in just five minutes.

Related update: 5-Minute Rocky Road Fudge

Related update: Vanilla Cream Cakes, Easy and Fluffy Holiday Cakes

Red, White, and Blue Fruit Salsa | Made by Meaghan Moineau

Red, White, and Blue Fruit Salsa

Intro

There’s something undeniably nostalgic about summer gatherings. The aroma of freshly cut grass, children playing in the backyard, and the delightful chatter of family and friends create an atmosphere that’s hard to beat. One of my fondest memories is of July 4th celebrations at my grandmother’s house. The highlight for me was always the vibrant and refreshing fruit salsa she would make. Her recipe has been passed down to me, and today, I’m thrilled to share this Red, White, and Blue Fruit Salsa with you. It’s a dish that not only celebrates the colors of our flag but also captures the essence of those cherished summer days.

Why You’ll Love It

This Red, White, and Blue Fruit Salsa is a perfect blend of sweet and tangy flavors that will have your taste buds dancing. It’s incredibly easy to make, requiring just a handful of ingredients and minimal preparation time. Whether you’re hosting a summer barbecue, a patriotic holiday party, or simply craving a light and refreshing snack, this salsa is sure to impress. Plus, it’s a healthy alternative to traditional chips and dip, making it a hit with health-conscious guests.

Ingredients

  • 1 cup blueberries
  • 1 cup diced strawberries
  • 1/2 cup sweetened shredded coconut
  • 2 tablespoons lime juice
  • 2 tablespoons strawberry jam
  • Freedom Chips (to serve)

Instructions

  1. In a medium-sized bowl, combine the blueberries, diced strawberries, and sweetened shredded coconut. Gently mix them to ensure an even distribution.
  2. Add the lime juice and strawberry jam to the berry mixture. Stir well until all the ingredients are thoroughly combined.
  3. Cover the bowl with plastic wrap or a lid and refrigerate for at least an hour. This allows the flavors to meld together beautifully.
  4. Once chilled, serve the fruit salsa as an appetizer with Freedom Chips. Enjoy the burst of flavors and the delightful crunch of the chips.

Tips

For the best results, use fresh and ripe berries. Their natural sweetness will enhance the overall flavor of the salsa. If you want to add a bit of spice, consider sprinkling a pinch of chili powder or cayenne pepper into the mix for a subtle kick. Always taste the salsa before serving, as you may want to adjust the lime juice or jam to suit your personal preference.

Variations & Substitutions

Feel free to get creative with this recipe! You can substitute raspberries or blackberries for the blueberries if you prefer a different berry flavor. If you’re not a fan of coconut, try using finely chopped mint leaves instead for a refreshing twist. For a healthier option, use unsweetened shredded coconut. You can also experiment with different jams, such as raspberry or apricot, to change up the flavor profile.

Storage

Store any leftover salsa in an airtight container in the refrigerator for up to three days. Keep in mind that the berries might release some juice over time, so give the salsa a good stir before serving again. Unfortunately, this salsa does not freeze well due to the high water content of the fruit.

FAQ

Can I make this salsa ahead of time?

Absolutely! In fact, making it a day ahead can enhance the flavors even more. Just be sure to store it in the refrigerator and give it a good stir before serving.

What are Freedom Chips?

Freedom Chips are simply tortilla chips, but with a playful and patriotic twist. You can use any brand or make your own at home by cutting tortillas into your desired shape and baking or frying them until crispy.

Is there a way to make this salsa more savory?

Yes! You can add diced avocado, chopped cilantro, or a small amount of finely diced red onion to introduce savory elements to the salsa. These additions will complement the sweetness of the berries beautifully.

Nutrition

This fruit salsa is a nutritious choice, packed with vitamins and antioxidants from the fresh berries. It’s low in calories and contains healthy fats from the coconut. While the exact nutritional content will vary based on portion sizes, you can generally expect a serving to be low in fat and high in vitamin C, making it a guilt-free treat.

Conclusion

Red, White, and Blue Fruit Salsa is more than just a dish; it’s a celebration of summer and all the vibrant flavors it brings. Whether you’re reminiscing about past family gatherings or creating new memories, this salsa is sure to be a hit. Its simplicity, flexibility, and delightful taste make it a must-try for any occasion. So gather your loved ones, prepare this refreshing salsa, and let the festivities begin!

Related update: Red, White, and Blue Fruit Salsa

Related update: Italian Tomato and Mozzarella Caprese

Brown Sugar Sponge Cookie with Chocolate Covered Caramels | Made by Meaghan Moineau

Brown Sugar Sponge Cookie with Chocolate Covered Caramels

Intro

There’s something magical about the aroma of freshly baked cookies wafting through the house, evoking cherished memories of childhood. I remember my grandmother’s kitchen, a place filled with love, laughter, and the sweet scent of her famous cookies. One of my fondest memories is helping her bake her signature brown sugar sponge cookies, each topped with a chocolate-covered caramel that melted just perfectly in the oven. Today, I’m thrilled to share this beloved recipe with you all, hoping it brings as much joy to your home as it did to mine.

Why You’ll Love It

This recipe combines the light, airy texture of a sponge cookie with the irresistible decadence of chocolate-covered caramels. The result is a delightful treat that’s both sophisticated and comforting. These cookies are perfect for a cozy afternoon with a cup of tea or as a sweet surprise in a lunchbox. Not only are they delicious, but they’re also simple to make, requiring just a handful of ingredients that you likely already have in your pantry.

Ingredients

  • 1 cup all-purpose flour
  • 1 teaspoon baking powder
  • 1 cup dark brown sugar
  • 4 large eggs, separated
  • 1 teaspoon lemon zest
  • 1/4 teaspoon salt
  • 1 teaspoon vanilla extract
  • 25 Rolos, unwrapped

Instructions

  1. Preheat the oven to 375°F (190°C). Line baking sheets with parchment paper and spray with nonstick cooking spray.
  2. In the bowl of a stand mixer on medium speed, beat the egg whites until foamy. Add the baking powder, salt, and sugar, and continue beating on medium speed until stiff peaks form.
  3. In another bowl, combine egg yolks, vanilla, and lemon zest. Beat with a fork until thoroughly mixed.
  4. Fold the yolks into the egg white mixture just until combined. Be careful not to deflate the egg whites.
  5. Sift the flour over the egg mixture and fold in until the batter is smooth and light.
  6. Drop about 2 teaspoons of batter for each cookie about 2 inches apart onto the prepared baking sheets.
  7. Top each cookie with a Rolo in the center and press down lightly.
  8. Bake for 12 minutes or until golden. Cool on the sheets for 5 minutes, then move to racks to cool completely.

Tips

To ensure your cookies have the perfect texture, make sure to sift the flour before adding it to the egg mixture. This helps keep the batter light and airy. Also, be gentle when folding the ingredients together to avoid deflating the egg whites, which are key to the cookie’s sponge-like texture.

Variations & Substitutions

If you’re looking to switch things up, consider using different flavored caramels or chocolates as toppings. You could also try adding a pinch of cinnamon or nutmeg to the batter for a warm, spiced flavor. For a nutty twist, sprinkle chopped nuts over the cookies before baking.

Storage

These cookies are best enjoyed fresh but can be stored in an airtight container at room temperature for up to three days. If you want to keep them longer, freezing is an option. Place the cookies in a single layer in a freezer-safe container, separating layers with parchment paper to prevent sticking. Thaw at room temperature before serving.

FAQ

Can I make these cookies without a stand mixer?

Yes, you can use a hand mixer or even whisk the egg whites by hand, although it will take more time and effort to achieve stiff peaks. Just be patient and make sure the egg whites are properly beaten before proceeding with the recipe.

What can I do if I don’t have lemon zest?

If you don’t have lemon zest, you can substitute with a small amount of lemon extract or even a bit of orange zest for a different citrus note. Alternatively, you can leave it out altogether; the cookies will still be delicious.

How do I know when the cookies are done?

The cookies are done when they are golden brown on the edges and feel set to the touch. They should easily lift off the parchment paper without sticking. Be careful not to overbake them, as this can make them dry.

Nutrition

While these cookies are a delightful treat, they should be enjoyed in moderation. Each cookie contains approximately 100 calories, 5g of fat, 13g of carbohydrates, and 1g of protein. Keep these in mind if you’re monitoring your daily intake.

Conclusion

These brown sugar sponge cookies with chocolate-covered caramels are more than just a sweet treat—they’re a little piece of nostalgia wrapped up in a delicious package. Perfect for sharing with loved ones or enjoying as a personal indulgence, they bring warmth and joy with every bite. I hope this recipe becomes a cherished tradition in your home, just as it has in mine. Happy baking!

Related update: Brown Sugar Sponge Cookie with Chocolate Covered Caramels

Related update: Lemon Squares

Curry Leaves Potato Chips | Made by Meaghan Moineau

Curry Leaves Potato Chips

Intro

There’s something magical about the aroma of freshly fried snacks wafting through the house, a nostalgic scent that takes me back to my grandmother’s kitchen. I recall afternoons spent by her side, watching her deft hands transform humble ingredients into delightful treats. Among her many specialties, one stood out – her irresistible Curry Leaves Potato Chips. This recipe, a cherished family heirloom, combines the earthy goodness of potatoes with the aromatic punch of curry leaves, creating a snack that’s both comforting and exciting. Today, I’m excited to share this beloved recipe with you, hoping it brings the same warmth and joy to your home as it does to mine.

Why You’ll Love It

These Curry Leaves Potato Chips are a perfect blend of simplicity and flavor. They come together with minimal ingredients and effort, yet deliver a taste that’s anything but ordinary. The crispy, golden potatoes are seasoned to perfection with a hint of heat from the chili powder, while the fried curry leaves add an aromatic twist that elevates this snack to gourmet status. Whether you’re looking for a quick bite during movie night or a unique appetizer for a gathering, these chips are sure to impress both you and your guests.

Ingredients

  • Potatoes, peeled
  • Plain chili powder
  • Curry leaves
  • Salt
  • Oil for frying

Instructions

  1. Start by wiping or patting the peeled potatoes dry with a clean kitchen towel. This is crucial to ensure that the chips turn out crispy.
  2. Slice the potatoes thinly and evenly for consistent cooking. A mandoline slicer can be particularly useful here.
  3. In a large mixing bowl, toss the potato slices with a dash of chili powder and salt, making sure each slice is well-coated.
  4. Heat oil in a deep pan or fryer over medium heat. To check if the oil is ready, drop a small piece of potato into it; it should sizzle immediately.
  5. Fry the potato slices in batches, ensuring they are not overcrowded, which helps them cook evenly and become crunchy.
  6. Once the chips are golden and crispy, remove them with a slotted spoon and place them on a paper towel-lined plate to drain excess oil.
  7. In the same oil, carefully fry the curry leaves until they are crispy. This should only take a few seconds.
  8. Scoop out the fried curry leaves and generously sprinkle them over the potato chips.
  9. Gently crush the curry leaves over the chips and toss everything together to distribute the flavors evenly.

Tips

For the best results, ensure that the potato slices are as dry as possible before frying. This prevents the oil from splattering and helps achieve that coveted crunch. Adjust the amount of chili powder to suit your heat preference, and feel free to experiment with additional spices like garlic powder or paprika for a personalized touch.

Variations & Substitutions

If you’re looking to switch things up, consider using sweet potatoes instead of regular potatoes for a naturally sweeter chip that pairs beautifully with the savory curry leaves. Alternatively, you can substitute the curry leaves with rosemary or thyme for a different herbaceous note. For those avoiding fried foods, try baking the potato slices in the oven at 400°F (200°C) until crispy, though the texture will differ slightly from the fried version.

Storage

Store any leftover chips in an airtight container at room temperature. They should remain crispy for up to three days. If they begin to lose their crunch, a quick reheat in the oven at 350°F (175°C) can help restore their original texture.

FAQ

Can I use a different type of potato for this recipe?

Yes, you can. While russet potatoes are ideal for their starch content, which contributes to crispiness, you can experiment with other varieties like Yukon gold or red potatoes. Keep in mind that the texture and flavor may vary slightly.

How can I make this recipe healthier?

To make a healthier version, consider air-frying or baking the potato slices instead of deep-frying. You can also reduce the amount of salt and chili powder used, or substitute them with low-sodium and less spicy alternatives.

Nutrition

The nutritional value of these chips will depend on the amount of oil absorbed during frying, but generally, they are a source of carbohydrates from the potatoes, with added vitamins and minerals from the curry leaves. If you’re mindful of your oil intake, consider opting for a heart-healthy oil like olive or avocado oil.

Conclusion

Curry Leaves Potato Chips are more than just a snack; they’re a culinary journey that brings together flavors and memories from the past. As you savor each crispy bite, I hope you feel the same sense of nostalgia and joy that this recipe has brought to my family for generations. So, gather your loved ones, share the chips, and create new memories around this delightful and aromatic treat. Happy cooking!

Related update: Curry Leaves Potato Chips

Related update: Mashed Sweet Potatoes

Green Monster Ice Pops | Made by Meaghan Moineau

Green Monster Ice Pops: A Refreshing Summer Treat

Intro

There’s something magical about the first taste of an ice pop on a sweltering summer day. Growing up, my siblings and I would race to the ice cream truck, clutching our allowance tightly. Yet, there was a special kind of joy in making our own frozen treats at home. We’d gather in the kitchen, blending various fruits and juices, eager to see what delicious concoction we’d create. Today, I bring you a healthier twist on those childhood favorites with my Green Monster Ice Pops. Packed with nutritious ingredients, they’re as delightful as they are refreshing.

Why You’ll Love It

These Green Monster Ice Pops are not only a delicious way to cool down but also a sneaky way to pack in some greens. With the creaminess of avocado and the natural sweetness of mango and banana, these ice pops are a hit with both kids and adults alike. Whether you’re looking for a post-workout snack or a guilt-free dessert, these ice pops are sure to satisfy. Plus, they’re a fantastic way to use up any ripe fruit you have on hand!

Ingredients

  • Unsweetened almond milk
  • 1 ripe avocado, peeled and pitted
  • 1 cup baby spinach
  • 1 banana
  • 1 tablespoon honey
  • 1 cup fresh mango, diced

Instructions

  1. Place all ingredients into a blender and mix well until smooth and creamy.
  2. Taste the smoothie. If you find that it is not sweet enough, add 1 to 2 tablespoons of maple syrup or honey and blend again.
  3. Pour the smoothie mixture into the ice pop molds.
  4. Insert a wooden popsicle stick into each mold, leaving about a quarter of the stick above the mold.
  5. Place the molds into the freezer for 2-3 hours to let them freeze completely before serving.

Tips

For the creamiest texture, make sure your avocado is perfectly ripe. You can also soak your wooden sticks in water for about 10 minutes before inserting them into the molds to prevent them from floating up. If you’re in a hurry, refrigerate the smoothie mix for an hour before pouring it into the molds to reduce the freezing time.

Variations & Substitutions

Feel free to customize these ice pops to suit your taste! You can substitute the almond milk with coconut milk for a tropical twist. If avocados aren’t your thing, a half cup of Greek yogurt can provide similar creaminess. For an extra nutrient boost, toss in a tablespoon of chia seeds or flaxseeds.

Storage

Once frozen, you can remove the ice pops from the molds and store them in a resealable plastic bag or airtight container in the freezer. They’ll last for up to two weeks, though they’re so delicious they might not last that long!

FAQ

Can I use frozen spinach instead of fresh?

Yes, you can use frozen spinach. Just be sure to thaw and drain it thoroughly before blending to avoid excess water in your mixture.

What if I don’t have ice pop molds?

No worries! You can use small paper cups as an alternative. Simply cover them with foil and insert the popsicle stick through the foil. Once frozen, peel away the paper cup to enjoy your ice pop.

Nutrition

These ice pops are not only refreshing but also packed with nutrients. The avocado provides healthy fats, while spinach adds a dose of iron and fiber. Each pop contains approximately 120 calories, 5g of fat, 20g of carbohydrates, and 2g of protein, making them a balanced treat.

Conclusion

Green Monster Ice Pops are more than just a summer treat; they’re a delightful way to indulge in nostalgia while still honoring a healthy lifestyle. Whether you’re enjoying them by the poolside or serving them at a backyard barbecue, these pops are sure to be a hit. Gather your ingredients, blend away, and relish the vibrant flavors of summer with every bite!

Related update: Green Monster Ice Pops

Related update: Dump Cake

Carrot Cake Muffin Cookies | Made by Meaghan Moineau

Carrot Cake Muffin Cookies

Intro

There’s something truly comforting about the aroma of freshly baked goods wafting through the house. It takes me back to long Sunday afternoons spent in my grandmother’s kitchen, her laughter mingling with the sound of the mixer as she prepared her famous carrot cake. Inspired by those cherished memories, I’ve transformed that classic recipe into delightful Carrot Cake Muffin Cookies. These cookies capture the essence of a carrot cake but come in a convenient, delightful cookie form. Perfect for a cozy afternoon snack or a quick treat on the go, they’re sure to become a favorite in your household too.

Why You’ll Love It

Carrot Cake Muffin Cookies are the epitome of comfort food. They offer the wholesome goodness of a muffin with the convenience of a cookie. Here’s why you’ll adore them:

  • Flavorful: The perfect balance of sweet and spice, these cookies are brimming with the warm flavors of cinnamon and ginger.
  • Nutritious: Made with whole wheat pastry flour and packed with carrots, these cookies are a healthier treat option.
  • Versatile: Perfect for breakfast, a snack, or dessert. They’re a delicious way to satisfy your sweet tooth any time of the day.
  • Easy to Make: With simple ingredients and straightforward instructions, these cookies are a breeze to prepare.

Ingredients

  • 1/2 cup butter, softened
  • 1 cup packed brown sugar
  • 1/4 cup maple syrup
  • 1 teaspoon baking soda
  • 1 teaspoon ground cinnamon
  • 1/2 teaspoon ground ginger
  • 1/4 teaspoon salt
  • 1 large egg
  • 1/2 cup unsweetened applesauce
  • 1 teaspoon vanilla extract
  • 1 cup whole wheat pastry flour
  • 1 cup white whole wheat flour
  • 1 cup shredded carrots
  • 1/2 cup raisins
  • 1/2 cup chopped walnuts
  • Turbinado sugar for sprinkling

Instructions

  1. Preheat your oven to 350°F (175°C).
  2. In a large bowl, beat the softened butter with an electric mixer on medium speed for 30 seconds.
  3. Add the brown sugar, maple syrup, baking soda, cinnamon, ginger, and salt. Beat until combined.
  4. Beat in the egg, applesauce, and vanilla extract until well incorporated.
  5. Gradually beat in as much of the flour as you can with the mixer. Stir in any remaining flour using a spatula or wooden spoon.
  6. Fold in the shredded carrots, raisins, and walnuts just until combined.
  7. Drop dough by slightly rounded teaspoons 2 inches apart onto an ungreased cookie sheet.
  8. Sprinkle the tops with Turbinado sugar for extra crunch and sweetness.
  9. Bake for 8 to 10 minutes or until the edges are firm.
  10. Transfer the cookies to a wire rack and let them cool completely.

Tips

To ensure your Carrot Cake Muffin Cookies turn out perfectly each time, consider these helpful tips:

  • Grate the Carrots Finely: For the best texture, make sure to grate your carrots finely. This helps them blend seamlessly into the cookie dough.
  • Use Fresh Ingredients: Fresh spices and a good quality vanilla extract can make a significant difference in the flavor profile of your cookies.
  • Room Temperature Ingredients: Make sure your butter and egg are at room temperature to ensure even mixing.

Variations & Substitutions

One of the joys of baking is making a recipe your own. Here are some variations and substitutions you can try:

  • Gluten-Free Option: Substitute the whole wheat flours with a gluten-free flour blend to make these cookies gluten-free.
  • Nut-Free Version: Omit the walnuts if you have a nut allergy, or replace them with sunflower seeds for a similar crunch.
  • Extra Add-Ins: Add shredded coconut or a handful of dark chocolate chips for a different twist.

Storage

To keep your Carrot Cake Muffin Cookies fresh and delicious, store them in an airtight container at room temperature for up to one week. For longer storage, freeze the cookies in a single layer on a baking sheet, then transfer them to a freezer-safe bag or container. They can be frozen for up to three months. Thaw at room temperature before serving.

FAQ

Can I use regular flour instead of whole wheat flour?

Yes, you can substitute all-purpose flour for the whole wheat pastry flour and white whole wheat flour if you prefer. Keep in mind that using all-purpose flour may slightly alter the texture and nutritional profile of the cookies.

Can I omit the raisins or walnuts?

Absolutely! If you’re not a fan of raisins or walnuts, you can leave them out or replace them with another ingredient, such as dried cranberries or pecans, for a different flavor twist.

How do I know when the cookies are done?

The cookies are done when the edges are firm, and the tops have a light golden hue. They may appear slightly soft in the center, but they will firm up as they cool on the wire rack.

Nutrition

While these cookies are a treat, they’re also packed with wholesome ingredients that offer nutritional benefits. Carrots provide vitamin A, raisins add natural sweetness and fiber, and walnuts contribute healthy fats. Each cookie is a delightful way to indulge without guilt.

Conclusion

Carrot Cake Muffin Cookies are a delightful fusion of tradition and convenience, bringing the beloved flavors of carrot cake into a compact, portable form. Whether you’re enjoying them with your morning coffee or sharing them with friends and family, these cookies are sure to bring warmth and joy to any occasion. Just like my grandmother’s kitchen, let these cookies fill your home with sweet memories and the comforting aroma of love. Happy baking!

Related update: Carrot Cake Muffin Cookies

Related update: Green Monster Ice Pops

Related update: Pumpkin French Toast

Lemon Drop Jello Shots | Made by Meaghan Moineau

Lemon Drop Jello Shots: A Fun Twist on a Classic Drink

Intro

There’s something about the bright, zesty taste of lemons that instantly transports me back to my childhood summers. I remember the lemonade stands my friends and I used to set up at the end of our street, the sun blazing down as we eagerly served cool, refreshing drinks to our neighbors. Those carefree days inspired this grown-up version of a lemon treat: Lemon Drop Jello Shots. These little bursts of citrusy delight are perfect for gatherings or a fun night in, bringing a playful twist to a classic cocktail. Let me guide you through creating these delightful little shots that promise to be the star of your next party!

Why You’ll Love It

  • Refreshing and Fun: The tangy flavor of lemon paired with the smoothness of jello creates a delightful treat that’s as refreshing as it is fun.
  • Perfect for Parties: These jello shots are not only tasty but also visually appealing, making them a hit at any gathering.
  • Customizable: With simple substitutions and variations, you can easily tailor these shots to your taste preferences or dietary needs.

Ingredients

  • Lemons
  • Lemon jello
  • Sugar
  • Water
  • Fresh lemon juice
  • Lemon vodka

Instructions

  1. Prepare the Lemons: Begin by cutting the lemons in half and hollowing them out to create vessels. Juice the lemons first to make it easier to remove the pulp. Reserve the fresh lemon juice for later.
  2. Hollow Out the Lemons: Turn the lemon halves inside out and carefully remove the pith and membrane. This will ensure that the lemon shells can hold the jello mixture without leaking.
  3. Make the Jello: Follow the instructions on the lemon jello package. Typically, this involves dissolving the jello in boiling water. Substitute some of the water with the reserved fresh lemon juice for an extra citrusy kick.
  4. Add the Vodka: Once the jello is fully dissolved, stir in the lemon vodka. This is what gives the jello shots their signature punch.
  5. Prepare for Chilling: Place the hollowed-out lemon cups into the cups of a muffin pan. This will help them stay upright as the jello sets.
  6. Pour in the Jello Mixture: Carefully fill each lemon shell with the jello mixture. Allow them to chill in the refrigerator overnight to set completely.
  7. Serve and Enjoy: Use a sharp, straight-edge knife to cut the jello-filled lemon halves into wedges. Serve these delightful shots at your next gathering and enjoy!

Tips

  • Use a Muffin Pan: Placing the lemon cups in a muffin pan helps keep them stable while the jello sets.
  • Chill Overnight: For the best results, allow the jello shots to chill overnight in the refrigerator.
  • Sharp Knife for Cutting: Use a very sharp knife to cut the jello-filled lemon halves into wedges. This will help maintain clean edges and a neat presentation.

Variations & Substitutions

  • Non-Alcoholic Version: Simply omit the vodka and replace it with an equal amount of water or lemon-flavored soda for a kid-friendly version.
  • Flavor Twists: Try using lime or orange jello and corresponding citrus fruits for a different flavor profile.
  • Sugar-Free Option: Use sugar-free jello and sweeteners to create a lower-calorie version of these shots.

Storage

Store any leftover Lemon Drop Jello Shots in an airtight container in the refrigerator. They will keep for up to three days, maintaining their flavor and texture. Be sure to keep them chilled until you’re ready to serve them again.

FAQ

Can I prepare these jello shots in advance?

Absolutely! These jello shots can be made up to two days in advance. Just be sure to store them in an airtight container in the refrigerator to keep them fresh.

What type of vodka should I use?

Lemon vodka is recommended for this recipe to enhance the citrus flavor. However, regular vodka will also work if lemon vodka is not available.

How do I make the lemon shells without tearing them?

To prevent tearing, gently turn the lemon halves inside out after juicing them. Use a small spoon to carefully remove the pith and membrane, ensuring the outer peel remains intact.

Conclusion

Lemon Drop Jello Shots are a delightful addition to any party or casual gathering, offering a playful twist on a beloved cocktail. With their vibrant flavor and charming presentation, these shots are sure to impress your guests and bring a smile to their faces. Whether you’re reminiscing about childhood summers or simply looking for a fun treat, these jello shots are a must-try. Enjoy the burst of citrusy goodness and the joy they bring to any occasion!

Related update: Lemon Drop Jello Shots

Related update: Carrot Cake Muffin Cookies

Mixed Berry Yogurt with Almonds | Made by Meaghan Moineau

Mixed Berry Yogurt with Almonds

Intro

There’s something undeniably comforting about a morning routine, and for me, it often involves a peaceful moment by the window, a favorite book in hand, and a bowl of my beloved Mixed Berry Yogurt with Almonds. This recipe takes me back to my childhood summers spent at my grandmother’s house, where the mornings were filled with the sweet aroma of berries picked fresh from her garden. Today, I’ve found a way to capture that nostalgia in a simple, yet satisfying, dish that is perfect for breakfast or a healthy snack.

Why You’ll Love It

This Mixed Berry Yogurt with Almonds is more than just a treat for the taste buds; it’s a symphony of textures and flavors that delight the senses. You’ll love the way the creamy yogurt pairs with the juicy berries, while the crunch of whole almonds and whole oats adds a satisfying bite. It’s a nutrient-rich meal, packed with antioxidants, protein, and healthy fats, to keep you fueled and satisfied.

Ingredients

  • 1 cup frozen mixed berries
  • 1/2 cup whole oats
  • 1 cup plain Greek yogurt
  • 1/4 cup whole almonds

Instructions

  1. Begin by toasting the whole almonds in a skillet over medium heat until they are golden brown and aromatic, about 5 minutes. Set aside to cool.
  2. In a large glass cup or bowl, start layering the ingredients. First, place a layer of Greek yogurt at the bottom.
  3. Add a layer of whole oats over the yogurt for that hearty texture.
  4. Scatter a portion of the frozen mixed berries over the oats. The berries will slightly thaw and release their juices, making the dish deliciously sweet and colorful.
  5. Repeat the layers until all ingredients are used, finishing with a generous layer of Greek yogurt on top.
  6. Top with the toasted almonds just before serving to maintain their crunch.

Tips

To enhance the flavor of this dish, consider adding a pinch of cinnamon or a drizzle of honey between the layers. For the best texture, use thick Greek yogurt, which will hold up nicely against the juicy berries. If you prefer a softer crunch, you can soak the oats in a bit of milk or yogurt overnight.

Variations & Substitutions

This breakfast lends itself to endless variations. If you’re in the mood for something more decadent, especially if serving this as a dessert, use a creamier vanilla yogurt. You can also drizzle a bit of maple syrup on top of the yogurt for added sweetness. Any kind of nut will do, and toasting them will bring out their maximum crunch and flavor. If you don’t have berries on hand, this works well with just about any fruit. Try sliced bananas, peaches, or even a tropical mix with mango and pineapple for a summery twist.

Storage

This dish is best enjoyed fresh, but you can prepare it in advance. Store the yogurt, oats, and berries layered in an airtight container in the refrigerator for up to 3 days. Add the toasted almonds just before serving to maintain their crunch and prevent them from becoming soggy.

FAQ

Can I use fresh berries instead of frozen?

Absolutely! Fresh berries are a wonderful substitute and can add a lovely burst of flavor and freshness to your dish. Just be sure to rinse them thoroughly before use.

What can I use instead of Greek yogurt?

If Greek yogurt isn’t your preference, you can use regular yogurt, dairy-free yogurt, or even cottage cheese for a different texture. Just keep in mind that the consistency and taste will vary slightly depending on your choice.

Nutrition

This dish is not only delicious but also packed with health benefits. The mixed berries provide a rich source of antioxidants, the Greek yogurt offers a high protein content, and the almonds and oats add healthy fats and fiber, making it a well-rounded meal to start your day.

Conclusion

Mixed Berry Yogurt with Almonds is a delightful way to savor the simple pleasures of a well-balanced meal. Whether you enjoy it as a quick breakfast, a refreshing snack, or a light dessert, it’s a versatile recipe you’ll return to time and again. As you dig into your bowl, I hope you’re reminded of your own cherished memories, just as I am of those sunlit mornings at my grandmother’s table. Enjoy every spoonful!

Related update: Mixed Berry Yogurt with Almonds

Cacao-Pecan Shortbread Cookies | Made by Meaghan Moineau

Cacao-Pecan Shortbread Cookies: A Delectable Treat for Every Occasion

Intro

There’s something magical about the aroma of freshly baked cookies wafting through the house. It instantly transports me back to my grandmother’s kitchen, where we spent countless afternoons baking and laughing. She had a knack for turning simple ingredients into the most delightful treats, and her shortbread cookies were always my favorite. Inspired by her love for baking and my passion for unique flavors, I’ve crafted these Cacao-Pecan Shortbread Cookies. They combine the rich, nutty aroma of toasted pecans with the sophisticated bitterness of cacao nibs, creating a cookie that’s both nostalgic and modern.

Why You’ll Love It

These cookies are a wonderful blend of textures and flavors. The shortbread’s buttery, melt-in-your-mouth consistency is perfectly complemented by the crunchy pecans and the subtle chocolatey notes of the cacao nibs. Whether you’re enjoying them with a cup of coffee in the morning or as a sweet treat after dinner, these cookies are sure to impress. Plus, they’re incredibly easy to make, making them a perfect recipe for both novice and seasoned bakers alike.

Ingredients

  • 1 cup unsalted butter, softened
  • 1/2 cup cacao nibs
  • 1 cup confectioners’ sugar
  • 1 large egg
  • 2 cups all-purpose flour
  • 1/2 teaspoon kosher salt
  • 1 cup pecans, chopped
  • Seeds from 1 split vanilla bean
  • 1 teaspoon vanilla extract
  • 1/4 cup vanilla sugar
  • 1 tablespoon water

Instructions

  1. Preheat the oven to 350°F (175°C). Set the butter out to soften.
  2. Spread the chopped pecans on a rimmed baking sheet and toast for about 4-6 minutes, until lightly browned and fragrant. Let cool.
  3. In a large bowl, beat the softened butter, confectioners’ sugar, vanilla bean seeds, vanilla extract, and salt at medium speed until fluffy.
  4. Add the flour, mixing in half at a time. Beat at low speed until just incorporated. Stir in the pecans and cacao nibs and mix well.
  5. Transfer the dough to a work surface and roll into a 1 1/2-inch-thick log. Wrap the log in plastic or parchment paper and refrigerate for 1 hour, until chilled.
  6. Line two large baking sheets with parchment paper. Spread the vanilla sugar on a platter.
  7. Mix the egg and water together to create an egg wash. Brush the log with the egg wash and roll in the sugar. Slice the log into 1/2-inch-thick rounds and place them on the prepared baking sheets, about 1 inch apart.
  8. Bake the cookies for about 15 minutes, until the edges are golden. Rotate the baking sheets from top to bottom and front to back halfway through baking. Transfer the cookies to a wire rack and let stand until completely cooled.

Tips

For the best results, make sure your butter is at room temperature before you start baking. This will help the dough come together more easily. Additionally, chilling the dough is key to achieving the perfect shortbread texture, so don’t skip this step! Finally, if you don’t have vanilla sugar, you can make your own by mixing granulated sugar with vanilla bean seeds, or simply use regular sugar in its place.

Variations & Substitutions

If you’re feeling adventurous, try adding some orange zest to the dough for a citrusy twist. You can also substitute walnuts or almonds for the pecans if you prefer a different nut flavor. If cacao nibs are hard to come by, mini chocolate chips make a great alternative, adding a sweeter chocolate note to the cookies.

Storage

These cookies can be stored in an airtight container at room temperature for up to one week. For longer storage, consider freezing the unbaked dough log. When you’re ready to bake, simply slice and bake from frozen, adding a couple of extra minutes to the baking time.

FAQ

Can I make the dough ahead of time?

Yes, you can prepare the dough up to three days in advance. Just keep it wrapped in plastic or parchment paper in the refrigerator until you’re ready to bake.

Are these cookies gluten-free?

As written, this recipe is not gluten-free due to the all-purpose flour. However, you can try substituting a 1:1 gluten-free baking flour for a gluten-free version.

What can I use if I don’t have a vanilla bean?

If you don’t have a vanilla bean, you can increase the vanilla extract to 1 1/2 teaspoons for a similar flavor profile.

Nutrition

While these cookies are an indulgent treat, it’s worth noting that they contain heart-healthy fats from pecans and antioxidants from cacao nibs. Moderation is key, so enjoy a cookie or two with your favorite beverage!

Conclusion

Baking these Cacao-Pecan Shortbread Cookies is not just about creating a delicious treat; it’s about crafting moments and memories that last a lifetime. Whether you’re sharing them with family or enjoying them on your own, these cookies are sure to bring warmth and joy to your day. I hope you find as much comfort and delight in baking and savoring these cookies as I do. Happy baking!

Related update: Cacao-Pecan Shortbread Cookies

Related update: Fat Free Gingerbread Cookies

Japanese Gyoza Pot Stickers | Made by Meaghan Moineau

Japanese Gyoza Pot Stickers

Intro

There’s something truly magical about gathering around the kitchen table with loved ones, folding gyoza wrappers, and sharing stories. I remember as a child, watching my grandmother skillfully pleat the edges of these delightful Japanese pot stickers, her hands moving with a rhythm that spoke of years of practice. The savory aroma of sizzling gyoza would fill the room, creating an atmosphere of warmth and anticipation. Today, I share with you a recipe that brings back those cherished memories and allows you to create your own.

Why You’ll Love It

This Japanese Gyoza Pot Stickers recipe is a perfect blend of savory and umami flavors wrapped in a tender yet crispy shell. Not only are they incredibly delicious, but they’re also versatile and can be served as appetizers, snacks, or even a main course. The combination of seasoned ground beef with aromatic vegetables and the unique touch of chili sesame oil makes each bite an explosion of flavor. Plus, making them from scratch is a fun and rewarding experience that allows you to create a connection with this beloved Japanese tradition.

Ingredients

  • Black pepper, to taste
  • 1 cup cabbage, finely chopped
  • 1 teaspoon chili sesame oil
  • 1/4 cup dried mushrooms, soaked in warm water and chopped
  • 2 teaspoons grated ginger root
  • 3 to 4 green onions, finely chopped
  • 1 pound ground beef
  • 2 tablespoons salad oil
  • 1 teaspoon sesame oil
  • 2 tablespoons Kikkoman soy sauce
  • 1 tablespoon cooking wine
  • Gyoza wrappers

Instructions

  1. Chop the cabbage finely and place it in a colander. Pour boiling water over the cabbage, then let it cool until it’s comfortable to touch. Squeeze the cabbage well to remove excess water.
  2. In a large bowl, combine the cabbage, chopped green onions, chopped mushrooms, and grated ginger.
  3. In a separate bowl, mix the ground beef with cooking wine, soy sauce, sesame oil, and black pepper. Add the vegetable mixture to the beef and mix well.
  4. Place about 1 teaspoon of filling in the center of a gyoza wrapper. Fold the wrapper in half and pleat the edges to seal. If the edges do not stick, dampen the inside edge with a little water before pleating.
  5. Heat 2 tablespoons of salad oil in a pan over medium heat. Place the gyoza in the pan, flat side down.
  6. At the edge of the pan, carefully pour in a little water, up to 1/4 of the depth of the pot stickers. Cover the pan, reduce the heat to low, and let the gyoza simmer until all the water has evaporated.

Tips

For the best results, make sure not to overfill the gyoza wrappers as this can make sealing difficult and lead to bursting during cooking. When pleating the edges, use a firm but gentle touch to ensure they are securely sealed. Additionally, using a non-stick pan can help prevent sticking during the cooking process.

Variations & Substitutions

If you prefer a vegetarian version, simply replace the ground beef with finely chopped tofu or a plant-based meat substitute. You can also experiment with different vegetables such as carrots or bell peppers to add a unique twist. For a spicier kick, increase the amount of chili sesame oil or add a dash of hot sauce to the filling mixture.

Storage

To store leftover gyoza, let them cool to room temperature before placing them in an airtight container. They can be refrigerated for up to 3 days. For longer storage, consider freezing them in a single layer on a baking sheet before transferring to a freezer bag. Frozen gyoza can be cooked directly from the freezer, just increase the cooking time slightly.

FAQ

Can I make the gyoza filling in advance?

Absolutely! You can prepare the filling up to a day in advance and store it in the refrigerator. This can actually help the flavors meld together, resulting in a more flavorful filling.

What if I can’t find gyoza wrappers?

If gyoza wrappers are unavailable, you can use wonton wrappers as a substitute. They may be slightly thinner, so handle them with care when pleating and sealing.

How do I prevent the gyoza from sticking to the pan?

Ensure your pan is well-oiled and preheated before adding the gyoza. A non-stick pan can also help. If they do stick, allow them to cool briefly before gently loosening with a spatula.

Nutrition

This gyoza recipe offers a balanced combination of protein, vegetables, and healthy fats. Each serving (4-5 pot stickers) contains approximately 250 calories, 14g of protein, 20g of carbohydrates, and 12g of fat. Adjust the portion size based on your dietary needs and preferences.

Conclusion

Making Japanese Gyoza Pot Stickers at home is a delightful experience that brings the authentic flavors of Japan into your kitchen. Whether you’re recreating cherished family memories or starting new traditions, these pot stickers are sure to become a favorite. Enjoy the process of crafting each gyoza, savor the rich and complex flavors, and share them with those you love. Happy cooking!

Related update: Japanese Gyoza Pot Stickers

Related update: Spicy Black-Eyed Pea Curry with Swiss Chard and Roasted Eggplant

Related update: Curry Leaves Potato Chips