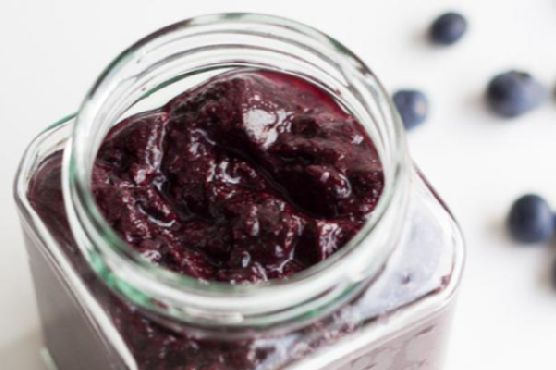
5-Minute Blueberry Chia Jam
Intro
There’s something magical about homemade jams that can instantly transport you back to the cozy kitchens of your childhood. I remember spending summer afternoons in my grandmother’s kitchen, surrounded by baskets of fresh berries picked from her garden. The sweet aroma of simmering fruits would fill the air as she stirred her pot of homemade jam, teaching me the art of patience and the joy of creating something truly delicious from scratch. Those cherished memories inspired me to create a quick and easy version of jam that fits perfectly into our busy lives today. Introducing: the 5-Minute Blueberry Chia Jam! This delightful recipe combines the natural sweetness of blueberries with the nutritional power of chia seeds, offering you a healthy and delicious spread in no time.
Why You’ll Love It
This 5-Minute Blueberry Chia Jam is not only quick and easy to make, but it is also packed with nutrients and flavor. Here are just a few reasons you’ll fall head over heels for this recipe:
- Time-Saving: It takes just five minutes to whip up this jam, making it perfect for busy mornings or last-minute brunches.
- Healthful Ingredients: Packed with antioxidants from blueberries and fiber from chia seeds, this jam is a nutritious addition to any meal.
- Versatile: Use it on toast, pancakes, yogurt, or even as a topping for desserts.
- Customizable Sweetness: You can adjust the sweetness to your liking with honey or maple syrup.
- No Cooking Required: That’s right, no need to slave over a hot stove!
Ingredients
- 1 cup fresh blueberries
- 2 tablespoons chia seeds
- 1-2 tablespoons honey or maple syrup (to taste)
- Water (as needed for blending)
Instructions
- Add all of the ingredients to your blender with just enough water to allow it to blend smoothly.
- Blend until the mixture reaches your desired consistency. You can make it smooth or leave some texture, as you prefer.
- Pour the jam into a glass jar or similar container.
- Seal the jar and store it in the fridge. The jam should last for around 4-5 days.
Tips
For the best results, use fresh, ripe blueberries. If fresh blueberries aren’t available, frozen ones can be a good substitute—just make sure to thaw them first. Adjust the sweetness based on the natural sweetness of your berries and your personal preference. You can add a dash of lemon juice for a slight tangy twist, which also helps preserve the vibrant color of the jam.
Variations & Substitutions
Feel free to get creative with this recipe! You can substitute blueberries with other berries like strawberries, raspberries, or blackberries. If you’re vegan or prefer a different sweetener, agave syrup or coconut sugar works well too. For a thicker jam, simply add more chia seeds, as they will absorb the liquid and thicken the mixture.
Storage
Store your 5-Minute Blueberry Chia Jam in a sealed glass jar in the refrigerator. It’s best consumed within 4-5 days for optimal freshness and flavor. If you want to make a larger batch, consider freezing smaller portions in ice cube trays. Once frozen, transfer the cubes to a zip-top bag. Simply thaw as needed and enjoy!
FAQ
Can I use a food processor instead of a blender?
Yes, you can use a food processor if you don’t have a blender. Just ensure that the blueberries break down enough to mix well with the chia seeds and sweetener. You might need to scrape down the sides a few times to achieve an even consistency.
What if my jam is too runny?
If your jam is too runny, add an additional tablespoon of chia seeds and let the mixture sit for a few minutes to thicken. Chia seeds absorb liquid and will help achieve a firmer texture.
Nutrition
Blueberries are a powerhouse of antioxidants, while chia seeds provide a healthy dose of omega-3 fatty acids, fiber, and protein. Using honey or maple syrup allows you to control the sweetness naturally. This jam is a nutrient-rich choice compared to traditional sugar-laden jams and is suitable for a variety of dietary preferences.
Conclusion
With its simplicity, health benefits, and delightful taste, this 5-Minute Blueberry Chia Jam is sure to become a staple in your kitchen. Whether you’re spreading it on your morning toast or offering it as a topping on your favorite dessert, this jam promises to bring a bit of sunshine to your day. So, why not take a few minutes to make a batch today and enjoy a taste of homemade goodness that’s both nostalgic and nourishing?
Related update: 5-Minute Blueberry Chia Jam
Related update: Homemade Muesli Breakfast Cereal