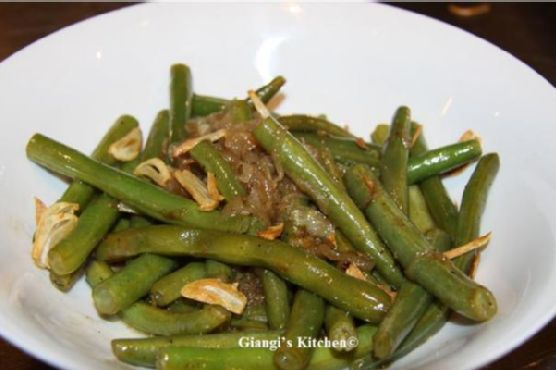
Green Beans with Garlic Chips
Intro
Welcome to a delightful culinary journey with our Green Beans with Garlic Chips recipe! This dish brings back cherished memories of family gatherings around the dinner table. I remember my grandmother preparing this recipe for special occasions, the aroma of garlic and onions wafting through the house, creating a warm and inviting atmosphere. It’s a simple yet elegant dish that has become a family favorite over the years. Now, I’m thrilled to share it with you, so you can create your own cherished memories with this flavorful side dish.
Why You’ll Love It
This Green Beans with Garlic Chips recipe is a delightful blend of simplicity and sophistication. You’ll love the contrasting textures of tender green beans and crispy garlic chips, while the combination of apple cider and white balsamic vinegar adds a tangy sweetness that perfectly complements the savory flavors. This dish is not only easy to prepare but also makes a stunning addition to any meal, whether it’s a weeknight dinner or a festive holiday feast.
Ingredients
- 2 tablespoons olive oil
- 4 garlic cloves, thinly sliced
- 1 pound trimmed green beans
- 2 tablespoons unsalted butter
- 1 yellow onion, thinly sliced
- Salt and pepper, to taste
- 1 tablespoon apple cider vinegar
- 1 tablespoon white balsamic vinegar
Instructions
- Heat the olive oil with the garlic in a heavy skillet over medium heat. Cook, stirring occasionally, until the garlic is golden. Remove the garlic from the skillet with a slotted spoon and transfer to a paper towel to drain.
- Add the unsalted butter to the oil in the skillet and heat over medium heat. Add the sliced onions, season with salt and pepper, and sauté until the onions are translucent and starting to turn golden, about 5-7 minutes.
- Add the trimmed green beans to the skillet and continue cooking, stirring occasionally, until the beans are tender but still crisp, about 8-10 minutes.
- Stir in the apple cider vinegar and white balsamic vinegar, and season with additional salt and pepper to taste.
- Transfer the beans to a serving dish and sprinkle with the crispy garlic chips before serving.
Tips
For the best flavor, choose fresh green beans that are bright in color and free from blemishes. When cooking the garlic, keep a close eye on it to prevent burning, as it can turn bitter quickly. If you prefer your beans with a bit more crunch, reduce the cooking time slightly. Lastly, be sure to taste and adjust the seasoning before serving to ensure the perfect balance of flavors.
Variations & Substitutions
If you’re looking to switch things up, consider adding a pinch of red pepper flakes for a spicy kick. You can also substitute shallots for the yellow onion for a milder flavor, or use sherry vinegar instead of white balsamic for a different tangy note. For a touch of sweetness, toss in a handful of toasted almonds or pine nuts just before serving.
Storage
Leftover Green Beans with Garlic Chips can be stored in an airtight container in the refrigerator for up to 3 days. To reheat, simply warm them in a skillet over medium heat until heated through. While the dish is best enjoyed fresh, the flavors will meld beautifully overnight, making it a great make-ahead option for busy days.
FAQ
Can I use frozen green beans for this recipe?
Yes, you can use frozen green beans if fresh ones aren’t available. Be sure to thaw and drain them well before adding to the skillet to avoid excess moisture, which can affect the texture of the dish.
What can I serve with Green Beans with Garlic Chips?
This dish pairs wonderfully with a variety of main courses. Try serving it alongside roasted chicken, grilled fish, or a hearty steak. It also complements vegetarian mains like mushroom risotto or lentil loaf beautifully.
How can I make this dish vegan?
To make this recipe vegan, simply replace the unsalted butter with your favorite plant-based butter or additional olive oil. The dish will retain its delicious flavor without any animal products.
Nutrition
This dish is not only delicious but also nutritious. Green beans are a great source of vitamins A, C, and K, as well as fiber and folate. Garlic adds an immune-boosting element, and the use of olive oil provides healthy monounsaturated fats. Overall, it’s a heart-healthy side dish that you can feel good about serving to your family.
Conclusion
Whether you’re preparing a cozy family meal or entertaining guests, Green Beans with Garlic Chips is a versatile and delightful choice. Its rich flavors, appealing textures, and simple preparation make it a go-to recipe in any kitchen. I hope you enjoy making and sharing this dish as much as I do. Let it be a part of your cherished culinary traditions, creating new memories with every bite. Enjoy!
Related update: Green Beans with Garlic Chips