Easy Turtle Pumpkin Pie | Made by Meaghan Moineau

Easy Turtle Pumpkin Pie | Made by Meaghan Moineau

Title: Indulge in Autumn Bliss: Easy Turtle Pumpkin Pie Recipe
Description: Dive into the comforting flavors of fall with our Easy Turtle Pumpkin Pie. This gluten-free dessert is a delightful blend of luscious pumpkin, velvety caramel, and crunchy pecans, all nestled in a rich chocolate cookie crust. Perfect for family gatherings or a cozy evening treat, this recipe promises to be a crowd-pleaser.

---


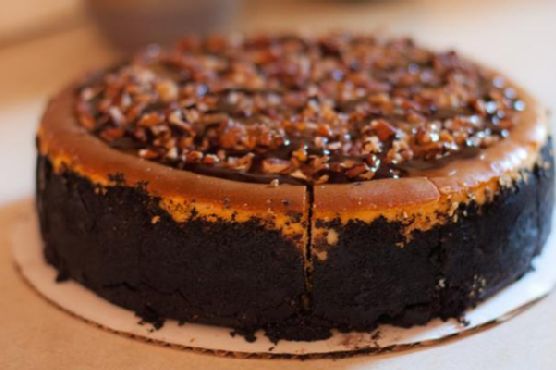
A Slice of Autumn: Easy Turtle Pumpkin Pie


There’s something about the crisp air of autumn that beckons for a cozy evening with family, wrapped in the warmth of shared stories and laughter. In my family, fall has always been synonymous with baking, particularly the sweet, lingering aroma of pumpkin pie wafting through the house. This tradition was lovingly passed down from my grandmother, whose kitchen was a haven of delectable treats and heartfelt memories.


One recipe that stands out in this cherished collection is the Easy Turtle Pumpkin Pie. It’s more than just a dessert; it’s a symbol of our family’s culinary lineage, adapted and refined over the years to suit our evolving tastes.


Ingredients:

- Crust:

- Gluten-free chocolate sandwich cookies


- Butter


- Filling:

- Heavy whipping cream


- Sugar


- Vanilla pudding mix


- Canned pumpkin puree


- Milk


- Cinnamon


- Toppings:

- Caramel sauce


- Pecans


Instructions:

1. Preheat your oven to 350°F (175°C). In a large mixing bowl or the bowl of a stand mixer, combine heavy whipping cream and sugar. Beat until stiff peaks form and set aside.
2. Crust Creation: In a food processor, pulse the gluten-free chocolate sandwich cookies and butter until finely ground. Press this mixture into a 9-inch pie plate and bake for 10 minutes. Once baked, set aside to cool.
3. Filling: In a large bowl, combine vanilla pudding mix, canned pumpkin puree, milk, and cinnamon. Stir until well combined. Gently fold in half of the whipped cream and pour the mixture into your prepared crust.
4. Toppings: Spread the remaining whipped cream over the pie. Drizzle with caramel sauce and sprinkle pecans generously on top.
5. Refrigerate for at least 1 hour, or prepare a day ahead and let it chill overnight for optimal flavor melding.

During our family gatherings, the unveiling of the Easy Turtle Pumpkin Pie was always a moment of excitement. The rich, chocolatey crust combined with the creamy pumpkin filling and the delightful crunch of pecans was a recipe for pure joy. My grandmother would often recount tales of her childhood, sharing anecdotes of how she first learned to make this pie, her stories intertwining with the sweet aroma of cinnamon and caramel.


The pie was a centerpiece, not just of our table, but of our conversations, sparking nostalgia and creating new memories simultaneously. Each bite was a reminder of the love and warmth that enveloped our family, especially during the cooler months.


Difficulty:

This recipe is straightforward and beginner-friendly, with a difficulty rating of 3 out of 10. Perfect for novice bakers or those short on time, it’s classified as a Dessert.

So, as the leaves turn and the days grow shorter, gather your loved ones, dust off your apron, and share in the magic of this Easy Turtle Pumpkin Pie. It’s more than just a dessert; it’s a tradition, a memory, and an invitation to savor the essence of fall.

Read more about Appetizers

Read more about Main Dishes

Read more about Desserts

Banana, Cranberry and Apple Bread | Made by Meaghan Moineau

Banana, Cranberry and Apple Bread | Made by Meaghan Moineau

Title: "Wholesome Nostalgia: Banana, Cranberry, and Apple Bread Recipe"
Description: Discover the heartwarming flavors of our Banana, Cranberry, and Apple Bread. This delightful dessert combines the sweetness of ripe bananas, the tartness of green apples, and the chewy texture of dried cranberries. Perfect for family gatherings or a cozy afternoon treat, this bread will surely evoke cherished memories.

---


There's something magical about stepping into a kitchen filled with the comforting aroma of freshly baked bread, especially when that bread is our Banana, Cranberry, and Apple Bread. This delightful dessert is not just a treat for the taste buds; it's a nostalgic journey back to the warm embrace of family traditions.


A Slice of Family History

Growing up, Sunday afternoons were a sacred time in my family. It was a day reserved for rest, laughter, and the comforting rituals that brought us together. My grandmother, the matriarch of our family, had a knack for creating delicious recipes that seemed to weave magic into our lives. One of her most beloved creations was her Banana, Cranberry, and Apple Bread.


I remember sitting on a stool in her cozy kitchen, watching her deftly combine ingredients, sharing stories of her childhood as she worked. Her voice was a melodic blend of wisdom and warmth, and her stories often revolved around her own mother, who had passed down this very recipe. It was a legacy, a thread of love that connected generations.


Ingredients

- 235g skinless bananas, mashed


- 125g dried cranberries


- 200g plain flour


- 140g sugar


- 1 green apple, grated


- 2 eggs


- 100g vegetable oil


- 1/2 cup milk


- 1 tsp vanilla extract


- 1 tsp baking powder


- 1/2 tsp baking soda


- 1/4 tsp salt


Instructions

1. Preheat your oven to 350°F (170°C). Line and grease a loaf pan with cooking spray to ensure easy removal.


2. In a large mixing bowl, combine the flour, baking powder, baking soda, salt, and sugar. Mix well and set aside.


3. In another mixing bowl, whisk together the eggs, milk, vegetable oil, and vanilla extract. Add the grated apple and mashed bananas to this mixture and stir until well combined.


4. Gradually add the dry ingredients to the wet mixture, stirring gently until just combined. Be careful not to overmix.


5. Fold in the dried cranberries, ensuring they are evenly distributed throughout the batter.


6. Pour the batter into the prepared loaf pan, smoothing the top with a spatula.


7. Bake for approximately 70 minutes, or until a skewer inserted into the bread comes out clean.


8. Allow the bread to cool in the pan for 10 minutes before transferring to a wire rack to cool completely.


A Timeless Treat

Every bite of this bread is a tribute to my grandmother's legacy. The sweetness of the bananas, the tartness of the apples, and the chewy texture of the cranberries create a harmonious blend of flavors that never fails to transport me back to those cherished Sunday afternoons.


Difficulty Rating: 4/10

This recipe is simple enough for beginners, yet it carries the elegance of a dessert that can grace any family gathering.


Classification: Dessert

Whether you're looking to recreate fond memories or start new traditions, this Banana, Cranberry, and Apple Bread is sure to delight. Gather your loved ones, share stories, and savor the sweet nostalgia baked into every slice.

Read more about Appetizers

Read more about Main Dishes

Read more about Desserts

Penne Pasta with Broccoli and Cheese | Made by Meaghan Moineau

Penne Pasta with Broccoli and Cheese | Made by Meaghan Moineau

Title: A Taste of Comfort: Penne Pasta with Broccoli and Cheese
Description: Dive into the comforting flavors of our Penne Pasta with Broccoli and Cheese. This delightful main dish combines the wholesome goodness of broccoli with the creamy richness of Parmesan cheese, all brought together with perfectly cooked penne pasta. Read on to discover a nostalgic family story connected to this delightful dish and learn how to easily recreate this beloved recipe at home.

---


There's something inherently comforting about a bowl of pasta, and my family's recipe for Penne Pasta with Broccoli and Cheese is no exception. This dish has been a staple in our home for as long as I can remember, serving as a warm embrace on chilly evenings or a quick weeknight meal that never fails to satisfy.


A Nostalgic Family Memory:

Growing up, Sunday dinners were a cherished tradition in our household. My grandmother, with her gentle hands and warm smile, would often prepare her signature Penne Pasta with Broccoli and Cheese. The aroma of garlic sautéing in the kitchen would fill the house, drawing us all together in eager anticipation.


One particular Sunday stands out in my memory. It was a blustery autumn evening, and the wind howled outside as leaves danced across the yard. Inside, the kitchen was a haven of warmth and coziness. I remember sitting at the table, eagerly watching my grandmother as she expertly stirred the bubbling skillet of broccoli and broth. She'd let me sprinkle the Parmesan cheese over the pasta, a task I took on with great pride, knowing it was the final touch to this much-loved dish.


As we gathered around the table, each spoonful of that creamy, cheesy pasta was like a hug from the inside. The simple ingredients, brought together with love and care, created a meal that was more than just sustenance; it was a connection to family, tradition, and home.


The Recipe:
Ingredients:

- 12 oz penne pasta


- 4 cups water


- 1 cup low sodium chicken broth


- 2 cups frozen broccoli florets


- 1 teaspoon dried basil leaves


- 1/2 teaspoon ground pepper


- 2 cloves garlic, minced


- 1/2 cup grated Parmesan cheese


Instructions:

1. In a large pot, bring the water to a boil. Add the penne pasta and cook until done, about 6 minutes. Drain and set aside.


2. Meanwhile, in a large skillet over medium heat, combine the chicken broth, basil, black pepper, garlic, and frozen broccoli florets. Bring to a boil.


3. Reduce the heat to low, cover, and cook until the broccoli is tender-crisp, about 5 minutes.


4. Add the cooked pasta to the broccoli mixture, tossing to coat evenly.


5. Sprinkle in the Parmesan cheese, stirring until the cheese is melted and everything is well combined.


6. Serve immediately and enjoy the comforting goodness of this dish.


With just a handful of ingredients and simple steps, this recipe is easy to prepare, making it perfect for busy weeknights or a cozy family dinner.


Nutritional Information (per serving):

- Calories: 235


- Fat: 2g


- Cholesterol: 5mg


- Sodium: 138mg


- Carbohydrates: 40.3g


- Fiber: 8.5g


- Sugar: 3.3g


- Protein: 12g


Difficulty Rating: 3/10 - This recipe is straightforward and beginner-friendly.
Classification: Main Dish

Whether it's a memory of a beloved family tradition or simply a new addition to your weekly meal rotation, Penne Pasta with Broccoli and Cheese is sure to become a favorite in your home. Enjoy the comforting taste of nostalgia and the joy of sharing a meal with loved ones.

Read more about Appetizers

Read more about Main Dishes

Read more about Desserts

Overnight Oatmeal | Made by Meaghan Moineau

Overnight Oatmeal | Made by Meaghan Moineau

Title: Waking Up to Warmth: The Joy of Overnight Oatmeal and Family Memories
Description: Discover the heartwarming simplicity of overnight oatmeal, a dish that cooks itself while you dream. This easy, nostalgic recipe combines dried cranberries, figs, and creamy half-and-half with hearty steel-cut oats to create a breakfast that feels like a warm hug. Perfect for busy mornings, this recipe will fill your home with comforting aromas and your heart with cherished memories.

---


Overnight Oatmeal: A Bowl of Memories and Morning Comfort

There’s something magical about waking up to the inviting aroma of a delicious breakfast ready to enjoy. Overnight oatmeal, with its rich blend of dried cranberries, figs, and creamy half-and-half, is more than just a meal—it's a memory. This recipe is simple enough for beginners and offers a delightful way to start your day. Rated at a mere 2 out of 10 in difficulty, this dish is classified as a Main Dish, making it an effortless yet satisfying breakfast option.


Ingredients:

- 1 cup dried cranberries


- 1 cup dried figs, chopped


- 2 cups half-and-half


- 1 cup steel-cut oats


- 4 cups water


Instructions:

1. In a crock-pot, combine all ingredients and set to low heat.


2. Cover and let cook for 8 to 9 hours.


3. Stir and remove to serving bowls.


This method works best if started before you go to bed. By morning, your oatmeal will be warm, creamy, and ready to serve, yielding four hearty servings.


A Nostalgic Family Memory

Growing up, breakfast was a cherished ritual in our household. I vividly remember the first time my grandmother introduced us to overnight oatmeal during one of our annual family reunions. Nestled in her cozy kitchen, she shared stories of how her own mother would prepare this simple yet nourishing meal. As she spoke, the crock-pot quietly worked its magic, filling the air with the warm, sweet scent of oats mingling with fruits.


Each morning of that reunion was a delightful surprise, waking up to the comforting smell of oatmeal that promised a day filled with laughter and love. We would gather around the table, bowls in hand, and delight in the creamy texture of the oats, the tangy burst of cranberries, and the subtle sweetness of figs. It was more than just breakfast; it was a time capsule that connected us across generations.


The beauty of this overnight oatmeal lies not only in its simplicity but in its ability to create a sense of nostalgia and togetherness. It’s a reminder that the best memories are often made around the breakfast table, where stories are shared, and bonds are strengthened.


Conclusion

In the hustle and bustle of modern life, it's comforting to know that some things remain timeless. Overnight oatmeal is one such treasure—easy to prepare, rich in flavor, and full of nostalgia. Whether you're looking to relive cherished family memories or create new ones with your own children, this recipe offers a heartwarming start to your day. So, set your crock-pot tonight and wake up to a bowl of comfort and joy.

Read more about Appetizers

Read more about Main Dishes

Read more about Desserts

Brown sugar & Spice Sugar cookie frogs | Made by Meaghan Moineau

Brown sugar & Spice Sugar cookie frogs | Made by Meaghan Moineau

Title: "Jump Into Flavor: Nostalgic Brown Sugar & Spice Sugar Cookie Frogs"
Description: Dive into the world of nostalgic baking with our delightful Brown Sugar & Spice Sugar Cookie Frogs. With a rich blend of spices and a hint of sweetness, these cookies are not just a treat for your taste buds but a journey back to cherished family memories. Perfect for those cozy afternoons when you crave something comforting and delicious. Discover the magic of these charming cookies and learn how to make them at home with our easy-to-follow recipe.

---


Jump Into Flavor: Nostalgic Brown Sugar & Spice Sugar Cookie Frogs

There's something incredibly heartwarming about baking cookies that have a story behind them. The aroma that fills the kitchen, the anticipation of that first bite, and the cherished memories that come flooding back. Our Brown Sugar & Spice Sugar Cookie Frogs are more than just a delightful dessert—they are a portal to nostalgic family gatherings and joyful moments.


A Whisk of Nostalgia:

Growing up, the kitchen was always the heart of our home, especially during the holidays. I vividly remember the laughter and chatter that filled the air as my grandmother and I rolled out cookie dough on the old wooden table. She had a particular fondness for whimsical cookie shapes, and every year, without fail, we would bake her famous "frog" cookies. It wasn't just about baking; it was about the stories she shared of her own childhood, the old family recipes passed down, and the love that went into every batch.


These Brown Sugar & Spice Sugar Cookie Frogs are a tribute to those precious moments. The rich, warming spices of cinnamon, ginger, nutmeg, and allspice, combined with the sweetness of brown sugar, create a flavor profile that's both comforting and irresistible. The subtle crunch of the sugar cookie pairs perfectly with a glass of milk or a cup of tea, making it an ideal treat for any time of day.


Recipe: Brown Sugar & Spice Sugar Cookie Frogs
Ingredients:

- 2 ¾ cups unbleached flour


- 1 teaspoon baking powder


- 1 teaspoon cinnamon


- ½ teaspoon ginger


- ½ teaspoon nutmeg


- ¼ teaspoon allspice


- ¾ cup granulated sugar


- ¾ cup light brown sugar


- 1 cup (2 sticks) butter, softened


- 1 egg


- 1 teaspoon vanilla extract


Instructions:

1. Preheat your oven to 350°F (175°C) and line your baking sheets with parchment paper.


2. In a large bowl, whisk together the flour, baking powder, cinnamon, ginger, nutmeg, and allspice. Set aside.


3. In a separate bowl, cream the granulated sugar, brown sugar, and butter until light and fluffy.


4. Add the egg and vanilla extract to the sugar mixture and mix until well-blended.


5. Gradually add the flour mixture, beating just until combined. Remember to scrape down the bowl to incorporate all ingredients. The dough will be quite thick, so you may need to knead in stray bits of flour by hand.


6. Roll the dough on a floured surface and cut into frog shapes (or any shape you desire).


7. Place the cookies on the prepared baking sheets and bake for 9-12 minutes, depending on the size of your cutter.


8. Allow the cookies to sit for a few minutes on the sheet, then transfer to a cooling rack.


Difficulty Rating: 4/10
Classification: Dessert

These cookies are a delightful way to bring a piece of childhood magic into your home, perfect for sharing with family and friends or enjoying a moment of sweet nostalgia on your own. Whether you're a seasoned baker or a beginner, the simplicity and charm of these cookies make them a joy to create and savor.


So, gather your ingredients, preheat your oven, and let the enchanting aroma of Brown Sugar & Spice Sugar Cookie Frogs fill your kitchen. Relive those cherished memories or create new ones with every delicious bite.

Read more about Appetizers

Read more about Main Dishes

Read more about Desserts

Brown sugar & Spice Sugar cookie frogs | Made by Meaghan Moineau

Brown sugar & Spice Sugar cookie frogs | Made by Meaghan Moineau

Title: Sweet Memories in Every Bite: Brown Sugar & Spice Sugar Cookie Frogs
Description: Dive into the enchanting world of baking with our Brown Sugar & Spice Sugar Cookie Frogs. These delightful treats are more than just cookies; they’re a nostalgic journey back to cherished family gatherings. With a perfect blend of warm spices and a touch of sweetness, these cookies promise to bring warmth and joy to your kitchen. Whether you're a seasoned baker or a beginner, this recipe is sure to captivate your taste buds and your heart.

---


Brown Sugar & Spice Sugar Cookie Frogs: A Recipe Steeped in Family Tradition


Ingredients:


- Unbleached flour


- Baking powder


- Cinnamon


- Ginger


- Nutmeg


- Allspice


- Granulated sugar


- Light brown sugar


- Butter


- Egg


- Vanilla extract


Instructions:


1. Prepare Your Dry Ingredients: Begin by whisking together the flour, baking powder, cinnamon, ginger, nutmeg, and allspice. Set this aromatic mixture aside, letting the spices mingle and infuse their warmth.
2. Creaming Magic: In a separate bowl, cream the granulated sugar and light brown sugar with the butter until light and fluffy. The blend of sugars gives the cookies their distinct, rich flavor.
3. Incorporate Wet Ingredients: Add the egg and vanilla extract to the creamed mixture, mixing until well-blended. The vanilla adds a hint of sweet aroma that perfectly complements the spices.
4. Combine and Conquer: Gradually incorporate the flour mixture into the wet ingredients. Beat just until combined, ensuring to scrape down the bowl, especially the bottom. The dough will be thick; don't hesitate to knead in any stray bits of flour by hand.
5. Shaping Your Frogs: Roll the dough on a floured surface and cut into whimsical frog shapes. Place these playful figures on parchment-lined baking sheets, ready to hop into the oven.
6. Baking to Perfection: Bake in a preheated oven for 9-12 minutes, adjusting the time depending on the size of your cookie cutter. Let them sit on the sheet for a few minutes before transferring them to a cooling rack.

---


A Sweet Nostalgia: The Memory Behind the Recipe


Every time I bake these Brown Sugar & Spice Sugar Cookie Frogs, I am transported back to my grandmother's cozy kitchen. As a child, I’d watch in awe as she effortlessly transformed simple ingredients into magical treats. The aroma of spices wafting through the air was always the first sign that something special was underway.


Grandma had a particular fondness for frogs, often saying they brought good luck. She’d let me help cut out the frog shapes, my small hands struggling to keep the dough intact. We’d laugh at the misshapen ones, claiming they had extra character. Those afternoons filled with laughter and love are some of my most cherished memories.


These cookies were a staple at every family gathering, each bite a reminder of the warmth and joy that surrounded us. Even now, as I bake them for my own family, I feel a connection to those happy days, hoping to create similar memories for my little ones.


---


Difficulty: 3/10


Classification: Dessert


---


Whether you’re creating new memories or reliving old ones, these Brown Sugar & Spice Sugar Cookie Frogs are sure to bring smiles and sweetness to your home. Enjoy the process, savor the flavors, and let the nostalgia wash over you. Happy baking!

Read more about Appetizers

Read more about Main Dishes

Read more about Desserts

Chicken Sausage, White Bean and Cabbage Soup | Made by Meaghan Moineau

Chicken Sausage, White Bean and Cabbage Soup | Made by Meaghan Moineau

Title: A Hearty Hug in a Bowl: Chicken Sausage, White Bean, and Cabbage Soup
Description: Discover the comforting flavors of our Chicken Sausage, White Bean, and Cabbage Soup—a perfect blend of savory and wholesome ingredients. This easy-to-make, one-pot wonder is ideal for chilly nights and family gatherings. With a touch of nostalgia and warmth in every spoonful, this recipe is a must-try for anyone seeking a delicious and nourishing meal.

---


As the leaves turn golden and the air gets crisp, there’s nothing quite like a steaming bowl of soup to bring warmth and comfort to your soul. Our Chicken Sausage, White Bean, and Cabbage Soup is more than just a dish—it's a heartfelt embrace, a reminder of cozy family dinners, and a delicious way to celebrate the flavors of the season.


Ingredients


- Olive oil


- 1 white onion, chopped


- 2 diced carrots


- Salt and black pepper to taste


- 3 cloves garlic, minced


- 1/2 teaspoon crushed red pepper flakes


- 1 pound Italian mild chicken sausage


- 6 cups low sodium vegetable stock


- 2 cans white beans, drained and rinsed


- 1 small green cabbage, thinly sliced


Instructions


1. Start with Sautéing: In a large pot, heat olive oil over medium heat. Add chopped onions and sauté until tender, about 8 minutes.
2. Add Vegetables: Toss in diced carrots and continue cooking for another 5 minutes. Season with salt, pepper, garlic, and red pepper flakes; cook for another minute.
3. Cook the Sausage: Remove the sausage from its casing and break it into small chunks in the pot. Toss with vegetables to brown the meat, cooking for another 8-10 minutes.
4. Simmer the Soup: Pour in the vegetable stock, enough to cover all ingredients, and bring to a gentle simmer.
5. Incorporate Beans and Cabbage: Add the white beans and cabbage, stirring to combine. Simmer, covered, until the cabbage is wilted but not mushy, about 10 minutes. Taste and adjust seasoning with more salt or pepper if needed.

A Nostalgic Note


This soup takes me back to my grandmother's kitchen, where I spent countless chilly afternoons enveloped in the warmth of her loving care. The aroma of sautéed onions and garlic would drift through the house, a sign that something truly special was being prepared. As a child, I loved watching her add each ingredient with precision and care, taking the time to let the flavors meld into something magical. Her secret ingredient wasn't in the spice rack but rather in the love and joy she infused into every meal. Each bite was a reminder of her nurturing spirit and the cherished family memories we created around her table.


Difficulty and Classification


Difficulty: 3/10 - This soup is straightforward and perfect for beginners and seasoned cooks alike, offering a hassle-free cooking experience.
Classification: Main Dish - Packed with protein and hearty vegetables, this soup is a fulfilling main dish that holds its own as a complete and satisfying meal.

Whether you're looking to recreate a piece of nostalgia or simply enjoy a flavorful and hearty meal, this Chicken Sausage, White Bean, and Cabbage Soup is sure to become a beloved favorite in your home. Gather your loved ones and savor the simple joys of cooking and sharing a meal together.

Read more about Appetizers

Read more about Main Dishes

Read more about Desserts

Ferrero Raffaello Coconut Candy Balls | Made by Meaghan Moineau

Ferrero Raffaello Coconut Candy Balls | Made by Meaghan Moineau

Title: "Sweet Nostalgia: Crafting Ferrero Raffaello Coconut Candy Balls"
Description: Dive into the world of sweet indulgence with our Ferrero Raffaello Coconut Candy Balls. This delightful dessert is a harmony of graham cracker crumbs and hazelnuts, enveloped in a blanket of coconut flakes. Perfect for family gatherings or a solo treat, these candy balls evoke cherished memories while tantalizing your taste buds. Join us as we share a heartfelt family story and guide you through this easy, yet rewarding recipe.

---


A Taste of Home: Ferrero Raffaello Coconut Candy Balls

There's a certain magic that food holds – the ability to transport us back in time, to rekindle memories we hold dear. For me, the creation of Ferrero Raffaello Coconut Candy Balls is a journey back to my grandmother's kitchen, a place where love was the secret ingredient in every recipe.


The Ingredients of Memory
To recreate this nostalgic treat, you'll need:

- 1 cup graham cracker crumbs


- 1 cup unsweetened shredded coconut flakes


- 1/2 cup finely chopped hazelnuts


- 1/2 cup powdered sugar


- 1/4 cup milk


- 1/4 cup melted butter


- Extra shredded coconut flakes for rolling


The simplicity of these ingredients belies the depth of flavor they produce. It's a reminder that sometimes, the most unassuming elements can create the most extraordinary experiences.


Crafting the Delight

In my grandmother's kitchen, the process of making these coconut candy balls was a family affair. We would gather around the large wooden table, the heart of the home, ready to create something special.


1. Combine the Basics: In a large mixing bowl, thoroughly blend the graham cracker crumbs, coconut flakes, chopped hazelnuts, and powdered sugar. The aroma of the hazelnuts would fill the room, creating a warm and inviting atmosphere.
2. Add Liquid Gold: Stir in the milk and melted butter, mixing until everything is well combined. This step always felt like a little piece of alchemy, transforming dry ingredients into a cohesive, tempting dough.
3. Chill and Shape: Cover the bowl and let it chill for an hour. This waiting period was always filled with anticipation, as my siblings and I would sneak peeks into the refrigerator, eager for the next step.
4. Roll and Coat: Once chilled, shape small bits of dough into balls and roll them in the extra coconut flakes. The tactile process of forming each ball was a therapeutic ritual, one that brought laughter and bonding.
5. Refrigerate and Savor: Place the candy balls in the refrigerator for at least two hours before serving. This final step was a test of patience, but it was always worth the wait. The cool, creamy texture paired with the crunch of hazelnuts and the sweetness of coconut was a reward like no other.
A Sweet Conclusion

Rated as a 3 out of 10 in difficulty, this dessert is perfect for beginners and seasoned cooks alike. It's more than just a treat; it's a gateway to cherished memories and an opportunity to create new ones. Whether you're presenting them as a dessert at a family gathering or indulging solo, these Ferrero Raffaello Coconut Candy Balls are a testament to the joys of simple pleasures and shared moments.


So, gather your loved ones, and let the tradition of creating and savoring these delightful coconut candy balls begin anew in your home. I promise, they'll bring as much joy to your heart as they do to your taste buds.

Read more about Appetizers

Read more about Main Dishes

Read more about Desserts

Bacon Wrapped Green Bean Bundles | Made by Meaghan Moineau

Bacon Wrapped Green Bean Bundles | Made by Meaghan Moineau

Title: Savoring Memories: The Irresistible Allure of Bacon Wrapped Green Bean Bundles
Description: Dive into a culinary journey that combines the comforting flavors of crispy bacon and tender green beans. This delightful appetizer, Bacon Wrapped Green Bean Bundles, not only promises to tantalize your taste buds but also evokes cherished family memories. Discover how this simple yet elegant dish can become a staple in your family gatherings.

---


A Nostalgic Culinary Adventure: Bacon Wrapped Green Bean Bundles


There’s something magical about the way certain dishes can transport us back to cherished moments in time. For me, Bacon Wrapped Green Bean Bundles are more than just an appetizer; they are a gateway to fond family memories and joyful gatherings around the dining table.


Ingredients:


- Fresh green beans


- Bacon


- Butter


- Brown sugar


- Fresh garlic


- Soy sauce


Instructions:


1. Preparation: Preheat your oven to 425°F (220°C). Grease a 10x15 inch baking dish and set it aside, setting the stage for a delightful culinary creation.
2. Assembly: Take 8 or 9 fresh green beans and wrap them with a strip of bacon, securing the bundle in the prepared dish. Repeat this process until all the green beans are lovingly embraced by bacon.
3. Flavor Infusion: In a small saucepan, melt butter and combine it with brown sugar, freshly minced garlic, and a splash of soy sauce. Stir well, letting the flavors meld into a luscious sauce.
4. Baking: Pour the sauce over your green bean bundles, ensuring each one is generously coated. Place the baking dish in the preheated oven and bake for 25 to 30 minutes, or until the bacon turns crispy and the green beans achieve a golden-brown hue.

A Family Memory


As a child, I remember visiting my grandmother’s house every Sunday for family dinner. The kitchen was always filled with the comforting aroma of home-cooked meals, a testament to her culinary skills. One particular evening stands out in my memory. My grandmother decided to try something new, a recipe she had found in a magazine: Bacon Wrapped Green Bean Bundles.


I watched in awe as she expertly wrapped each bundle, her hands moving with practiced ease. The anticipation grew as the scent of bacon mingled with the sweetness of brown sugar and the savory notes of garlic and soy sauce. When the bundles finally emerged from the oven, crispy and glistening, the entire family gathered around. The first bite was a revelation—salty, sweet, and utterly delicious. That evening, laughter and stories flowed as freely as the food, creating a tapestry of memories that I cherish to this day.


Difficulty: 3/10


This dish is rated as an easy, beginner-friendly appetizer. It requires minimal ingredients and preparation, making it perfect for cooks of all skill levels.


Appetizer Perfection


Bacon Wrapped Green Bean Bundles serve as an ideal appetizer, offering a delightful blend of flavors and textures that are sure to impress your guests. Whether you're hosting a holiday feast or a casual dinner party, this dish is bound to become a beloved favorite, much like it did in my family.


---


Incorporating this easy yet impressive appetizer into your culinary repertoire not only promises to delight your taste buds but also has the potential to create lasting memories for you and your loved ones. So, gather your ingredients, preheat your oven, and let the nostalgia-infused aroma of Bacon Wrapped Green Bean Bundles fill your kitchen and your heart.

Read more about Appetizers

Read more about Main Dishes

Read more about Desserts

Spinach Salad with Strawberry Vinaigrette | Made by Meaghan Moineau

Spinach Salad with Strawberry Vinaigrette | Made by Meaghan Moineau

**Title: A Taste of Spring: Spinach Salad with Strawberry Vinaigrette**


**Description: Discover a refreshing and vibrant salad that's as easy to make as it is delicious. Our Spinach Salad with Strawberry Vinaigrette is a delightful blend of fresh ingredients that promises to bring a burst of flavor to your table. Dive into a nostalgic story that makes this dish a cherished family favorite.**


---


**A Taste of Spring: Spinach Salad with Strawberry Vinaigrette**


When the first warm breeze of spring swept through our small town, it was always a signal for my family to gather in my grandmother's garden. Her backyard was a sanctuary of bursting colors, with rows of strawberries glistening like jewels under the sun and spinach leaves swaying gently in the breeze. Among the many dishes that graced our family table, none heralded the arrival of spring quite like our Spinach Salad with Strawberry Vinaigrette.


**Ingredients:**


- Fresh spinach leaves


- Strawberries, sliced


- Almonds, toasted


- Feta cheese, crumbled


- Cooked chicken, sliced


- Shallot, finely chopped


- Fresh thyme, finely chopped


- Ground pepper, to taste


**For the Strawberry Vinaigrette:**


- Strawberries, puréed


- Balsamic vinegar


- Dijon mustard


- Water


**Instructions:**


1. **Prepare the Vinaigrette:** In a small bowl, mix the puréed strawberries with balsamic vinegar, dijon mustard, and a splash of water. Whisk until smooth and set aside.


2. **Assemble the Salad:** On a large plate, layer the fresh spinach leaves. Top with sliced strawberries, toasted almonds, crumbled feta cheese, and cooked chicken.


3. **Add Flavor:** Sprinkle finely chopped shallot and fresh thyme over the salad. Season with ground pepper to taste.


4. **Drizzle and Serve:** Generously drizzle the strawberry vinaigrette over the salad. Serve immediately and enjoy a taste of spring.


**A Nostalgic Family Memory**


As children, my siblings and I would race barefoot through the garden, eager to pick the ripest strawberries. My grandmother would laugh at our stained fingers and delighted giggles as we tried to sneak a few berries into our mouths. Once the basket was full, she'd lead us to the kitchen, where we'd help her prepare this simple yet extraordinary salad.


Around the dinner table, stories of past springs would unfold, each tale more vibrant with the flavors of our meal. The combination of sweet strawberries, tangy vinaigrette, and savory chicken created a symphony on our plates, one that still resonates with me today.


**Difficulty: 2/10**


This recipe is delightfully easy, perfect for beginner cooks or anyone looking for a quick, nutritious meal.


**Classification: Main Dish**


Whether served as a light lunch or a refreshing dinner, this Spinach Salad with Strawberry Vinaigrette is a versatile main dish that embodies the essence of spring. Enjoy this dish with loved ones, and perhaps, create your own cherished memories around the table.

Read more about Appetizers

Read more about Main Dishes

Read more about Desserts

Captain America Shield Cookies | Made by Meaghan Moineau

Captain America Shield Cookies | Made by Meaghan Moineau

# Shielding Sweetness: Captain America Shield Cookies


**Description:** Unleash your inner superhero with these delightful and iconic Captain America Shield Cookies. Perfect for comic book fans and dessert lovers alike, these cookies not only capture the essence of a beloved superhero but also serve as a nostalgic treat that brings families together. With layers of vibrant fondant and a creamy buttercream finish, these cookies are bound to be the star of your next gathering.


---


## A Sweet Nostalgia: A Family Memory


Growing up, superhero movies were a staple in our household. Every summer, my siblings and I would gather around the TV, popcorn in hand, eagerly watching the latest superhero saga unfold. Captain America, with his unwavering sense of justice and iconic shield, was always a favorite. It wasn't just his strength or bravery that captivated us; it was the idea of protection and unity that resonated deeply.


One rainy afternoon, with no new comics to dive into, my mom came up with a brilliant idea to keep us entertained - baking Captain America Shield Cookies. As the aroma of freshly baked sugar cookies wafted through the air, our kitchen transformed into a workshop of creativity and laughter. My siblings and I took turns dipping the cookies in red candy melts, giggling as we tried to perfect the fondant stars.


The joy of creating these cookies was matched only by the delight of sharing them with family and friends. Each bite was a reminder of those cherished days, where superhero adventures and family bonds were seamlessly intertwined.


## Recipe


### Ingredients:


- Red candy melts


- Coconut oil


- Circular cookie cutters (various sizes)


- Star cookie cutter


- Cornstarch


- Blue cake fondant


- White cake fondant


- Pre-made sugar cookies


- Vanilla buttercream


### Instructions:


1. Line a baking sheet with wax paper.


2. Microwave the candy melts and coconut oil in 30-second intervals until completely melted, mixing thoroughly.


3. Using a fork, dip each sugar cookie into the melted candy and set it carefully on the lined baking sheet.


4. Allow to set in the refrigerator for about one hour.


5. Dust a clean working surface with cornstarch and roll out your fondant.


6. Cut your white fondant with the largest cookie cutter, then using the 1.5-inch cookie cutter, cut a hole in the middle.


7. Using the smallest circular cookie cutter, cut out blue fondant circles.


8. Cut star shapes from the white fondant and use buttercream to glue them onto your blue fondant circles.


9. Once the coated cookies are set, remove them from the fridge and start assembling. Using buttercream as the glue, place your large white circle, then the blue one (with the star).


10. Enjoy your superhero creation!


### Difficulty Rating:


**4/10** - This recipe is beginner-friendly and perfect for a fun family activity.


### Classification:


**Dessert**


---


Whether you're celebrating a superhero-themed party or simply indulging your sweet tooth, these Captain America Shield Cookies are more than just a treat. They're a delicious way to bring a slice of nostalgia and the spirit of heroism into your home. Assemble your team, don your aprons, and let the baking adventure begin!

Read more about Appetizers

Read more about Main Dishes

Read more about Desserts

Apple Persimmon Sauce | Made by Meaghan Moineau

Apple Persimmon Sauce | Made by Meaghan Moineau

**Title: A Taste of Autumn: Apple Persimmon Sauce for Cozy Gatherings**


**Description:** Dive into the comforting flavors of fall with our delightful Apple Persimmon Sauce. This easy-to-make recipe combines the rich sweetness of persimmons with the crisp, bright flavor of apples, creating a perfect accompaniment to your autumnal meals. Whether served as a dessert topping or a festive side dish, this sauce is sure to evoke warm memories of family gatherings. Join us as we explore the simple steps to creating this nostalgic treat and share a cherished family story that makes this dish truly special.


---


As the cool breeze of autumn begins to weave through the trees, there's nothing quite like the comforting aroma of simmering spices wafting through the kitchen. The scent of cinnamon and nutmeg mingling with sweet apples and ripe persimmons instantly transports me back to my grandmother's cozy kitchen. It was a place where every family member would eventually wander, drawn by the irresistible allure of her signature Apple Persimmon Sauce.


**The Recipe: Apple Persimmon Sauce**


**Ingredients:**


- 3 ripe persimmons, peeled and chopped


- 3 medium apples, peeled, cored, and chopped


- 1 teaspoon ground cinnamon


- 1/2 teaspoon nutmeg


- 1/2 cup water


- 1/4 cup dark brown sugar


- 2 tablespoons fresh lemon juice


**Instructions:**


1. **Combine Ingredients:** In a medium pot, combine the chopped persimmons, apples, cinnamon, nutmeg, water, dark brown sugar, and fresh lemon juice.


2. **Bring to a Boil:** Over medium-high heat, bring the mixture to a boil, stirring occasionally to ensure the sugar dissolves evenly.


3. **Simmer:** Once boiling, cover the pot and reduce the heat to medium-low. Allow the sauce to simmer for 25-30 minutes, stirring occasionally, until the fruit is soft and the flavors have melded beautifully.


4. **Mash:** Remove the pot from the heat and mash the mixture with a potato masher until it reaches your desired consistency. I always loved mine a bit chunky, reminding me of the rustic texture my grandmother favored.


5. **Store:** Transfer the sauce to an airtight container. It will keep in the fridge for up to two weeks or can be frozen for up to a year, preserving the essence of autumn for whenever you need a taste.


**A Nostalgic Family Memory**


Growing up, autumn was a magical time for our family. We would gather at my grandmother's home every Sunday afternoon for a hearty meal that always ended with her famous Apple Persimmon Sauce. I remember sitting at the kitchen table, watching her expertly peel and chop the fruits, her hands moving with a rhythm honed by years of practice. She would tell us stories of her own childhood, of apple-picking adventures and family traditions, as the sauce simmered gently on the stove.


One particular memory stands out: a chilly October day when the first snowflakes of the season danced through the air. As we sat around the table, wrapped in the warmth of family and the comforting aroma of the sauce, my grandmother shared tales of winters past. Her stories, much like her sauce, were a blend of sweet and spicy, warming us from the inside out.


**Difficulty Rating: 2/10**


This recipe is delightfully simple to make, with minimal preparation and cooking skills required. It’s a perfect project for a cozy afternoon at home, suitable even for beginner cooks.


**Classification: Dessert**


While this sauce pairs beautifully with roasted meats and can be served as a side dish, its sweet and spiced flavor profile makes it an ideal companion for desserts. Try it as a topping for vanilla ice cream, pancakes, or even as a filling for pies and pastries.


With every spoonful of this Apple Persimmon Sauce, you're not just tasting a delightful combination of autumn flavors; you're savoring a piece of family history, a nostalgic reminder of the love and warmth shared around the kitchen table. Whether you're creating new memories or reminiscing about old ones, this simple yet flavorful sauce is sure to become a cherished part of your seasonal gatherings.

Read more about Appetizers

Read more about Main Dishes

Read more about Desserts