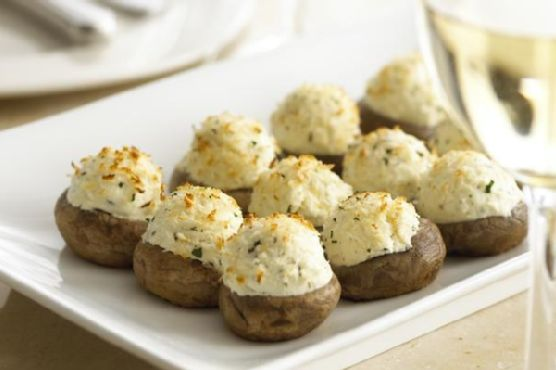
Alouette® Stuffed Mushroom Caps
Intro
There’s something magical about the aroma of mushrooms baking in the oven, taking me back to Sunday afternoons in my grandmother’s cozy kitchen. The warmth of the oven and the savory scent of garlic and herbs enveloped the room, signaling that a delicious treat was on the way. One of my all-time favorite appetizers that she would make were stuffed mushroom caps, a simple yet elegant dish that never failed to impress. Today, I’m excited to share a modern twist on her classic recipe: Alouette® Stuffed Mushroom Caps, combining the earthy flavor of mushrooms with the rich, creamy goodness of Alouette Spinach & Artichoke Spread.
Why You’ll Love It
- Quick and Easy: This recipe is perfect for both beginners and seasoned cooks looking for a fuss-free appetizer.
- Flavorful: The combination of Alouette Spinach & Artichoke Spread with seasoned bread crumbs creates a burst of flavor in every bite.
- Elegant Presentation: These stuffed mushroom caps look as good as they taste, making them ideal for dinner parties or family gatherings.
- Vegetarian-Friendly: A great option for vegetarians, these mushroom caps are both satisfying and indulgent.
Ingredients
- 1 cup seasoned bread crumbs
- 12 large mushroom caps, cleaned and stems removed
- 1 package (6 oz) Alouette Spinach & Artichoke Spread
Instructions
- Preheat your oven to 375°F (190°C).
- Place the cleaned mushroom caps hollow side up on a baking sheet.
- Fill each mushroom cap with about 1 teaspoon of Alouette Spinach & Artichoke Spread.
- Sprinkle the tops with seasoned bread crumbs.
- Bake in the preheated oven for 12-15 minutes, or until the mushrooms are tender and the tops are golden brown.
- Garnish with fresh herbs if desired and serve warm.
Tips
- Cleaning Mushrooms: Use a damp paper towel to gently wipe the surface of the mushrooms instead of washing them under water to prevent them from becoming soggy.
- Even Filling: Use a small spoon or a piping bag to fill the mushroom caps evenly with the Alouette spread.
- Perfect Baking: Keep an eye on the mushrooms in the oven to ensure they don’t overcook and become too soft.
Variations & Substitutions
- Different Cheese Spread: Try using Alouette Garlic & Herbs Spreadable Cheese for a different flavor profile.
- Additions: Consider adding chopped spinach or sun-dried tomatoes to the cheese spread for extra flavor and texture.
- Gluten-Free: Use gluten-free bread crumbs to make this recipe suitable for those with gluten sensitivities.
Storage
Store any leftover stuffed mushroom caps in an airtight container in the refrigerator for up to 3 days. To reheat, place them in a preheated oven at 350°F (175°C) for about 10 minutes or until warmed through. Avoid using the microwave as it may make the mushrooms soggy.
FAQ
Can I prepare these mushroom caps ahead of time?
Yes! You can prepare the mushroom caps and fill them with the cheese spread a day in advance. Store them in the refrigerator and sprinkle the bread crumbs just before baking to keep them crisp.
What other mushrooms can I use?
While large white button mushrooms are ideal for this recipe, you can also use cremini or portobello mushrooms for a deeper flavor. Just be sure to adjust the filling amount accordingly as these mushrooms may have larger cavities.
Can I freeze stuffed mushroom caps?
It is not recommended to freeze cooked mushroom caps as they can become watery upon reheating. However, you can freeze them before baking. Simply assemble the mushrooms, place them in a single layer on a baking sheet, and freeze until solid. Transfer to a freezer-safe container and store for up to one month. Bake directly from frozen, adding a few extra minutes to the baking time.
Nutrition
Each serving of Alouette® Stuffed Mushroom Caps (2 pieces) contains approximately:
- Calories: 120
- Protein: 4g
- Fat: 8g
- Carbohydrates: 10g
- Fiber: 1g
Conclusion
Alouette® Stuffed Mushroom Caps are a delightful appetizer that brings together the classic taste of stuffed mushrooms with the rich, creamy flavor of Alouette Spinach & Artichoke Spread. Perfect for any occasion, these mushroom caps are easy to make, packed with flavor, and sure to impress your guests. Whether you’re hosting a party or simply want to enjoy a special treat, this recipe is a must-try. So gather your ingredients, preheat your oven, and get ready to create a dish that will leave everyone asking for more!
Related update: Alouette® Stuffed Mushroom Caps