Blast Of Color Mexican Stuffed Bell Peppers | Made by Meaghan Moineau

Blast Of Color Mexican Stuffed Bell Peppers

Intro

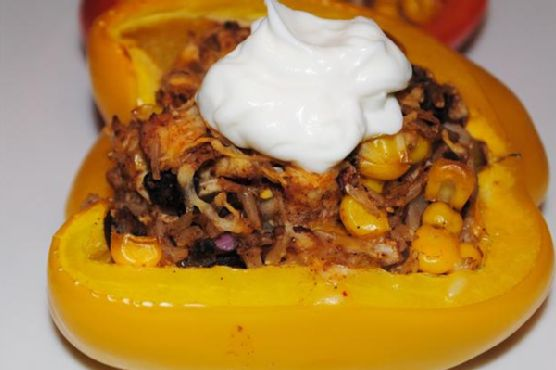
Welcome to a vibrant culinary journey where every bite is a delightful explosion of flavors! Our Blast Of Color Mexican Stuffed Bell Peppers are not just a feast for the palate but also a joy for the eyes. These stuffed peppers are a wonderful medley of hearty ingredients and bold spices, reminiscent of family gatherings where food was the centerpiece of laughter and love.

I remember the first time I had stuffed bell peppers at my grandmother’s house. The kitchen was filled with the warm, inviting smell of roasted peppers mingling with spices, and the table was surrounded by family eagerly awaiting the meal. Today, I bring you a modern twist to that classic memory with a Mexican flair, perfect for any occasion.

Why You’ll Love It

This recipe is not only delicious but also packed with nutrients, making it a perfect meal for both busy weeknights and leisurely weekends. Here’s why you’ll fall in love with these stuffed peppers:

  • Colorful and Nutritious: Each bell pepper is a rainbow of ingredients, offering a punch of vitamins and minerals.
  • Flavorful and Satisfying: The combination of rotisserie chicken, black beans, and fire-roasted green chiles creates a satisfying and savory filling.
  • Easy to Prepare: With just a few simple steps, you can create a meal that looks gourmet but comes together quickly.
  • Customizable: Easily tweak the ingredients to suit your taste or dietary needs.

Ingredients

  • 4 large bell peppers
  • 1 cup black beans, drained and rinsed
  • 2 cups rotisserie chicken breast, shredded
  • 1/2 cup fire roasted green diced chiles
  • 1 tablespoon chili seasoning
  • 1 cup cooked brown rice
  • 1 cup frozen corn kernels, thawed
  • 3 cloves garlic, minced
  • 1 cup low-fat shredded cheddar cheese, divided
  • 1/2 cup red onion, diced
  • 1 roma tomato, diced
  • 2 tablespoons sour light cream

Instructions

  1. Preheat your oven to 400 degrees Fahrenheit.
  2. In a large bowl, combine the cooked brown rice, shredded chicken, thawed corn, diced roma tomato, diced red onion, black beans, 1/2 cup of cheddar cheese, minced garlic, fire roasted green chiles, and chili seasoning.
  3. Line a baking dish with foil and spray it lightly with cooking spray to prevent sticking.
  4. Prepare the bell peppers by cutting off the tops and removing the seeds and membranes inside.
  5. Stuff each bell pepper with the chicken mixture, pressing it firmly into the pepper and mounding it slightly over the top.
  6. Top each stuffed pepper with 1/2 tablespoon of the remaining cheddar cheese.
  7. Place the stuffed peppers in the prepared baking dish and bake in the preheated oven for 30 to 40 minutes, or until the peppers are just tender.
  8. Once out of the oven, top each pepper with 1/2 tablespoon of sour cream before serving.

Tips

  • For uniform cooking, try to select bell peppers that are similar in size and shape.
  • If you prefer softer peppers, you can pre-cook them in the microwave for a couple of minutes before stuffing.
  • To add a bit more spice, consider adding a dash of cayenne pepper to the filling mixture.

Variations & Substitutions

One of the best things about this recipe is its versatility. Here are some variations and substitutions you might consider:

  • Vegetarian Option: Omit the chicken and increase the amount of black beans or add cooked quinoa for a plant-based version.
  • Cheese Choices: Swap the cheddar cheese for pepper jack or Monterey Jack for a different flavor profile.
  • Low Carb: Substitute cauliflower rice for the brown rice to reduce the carbohydrate content.

Storage

These stuffed peppers can be stored in an airtight container in the refrigerator for up to 3 days. To reheat, place them in a preheated oven at 350 degrees for about 10-15 minutes or until warmed through. Alternatively, you can use a microwave for a quicker option.

FAQ

Can I freeze stuffed bell peppers?

Yes, you can freeze these peppers! Once baked, allow them to cool completely, then wrap each pepper individually in plastic wrap and place them in a freezer-safe bag. They can be frozen for up to 3 months. To reheat, thaw them overnight in the refrigerator and bake as directed in the storage section.

What can I serve with stuffed bell peppers?

These stuffed peppers are a meal on their own, but you can serve them with a side salad, guacamole, or tortilla chips for added texture and flavor. A refreshing glass of iced tea or a citrusy margarita would also complement the meal nicely.

Nutrition

Each serving of these colorful stuffed peppers is not only packed with flavor but also with nutrition. Here’s a quick overview:

  • Calories: Approximately 280 per stuffed pepper
  • Protein: 25g
  • Carbohydrates: 35g
  • Fat: 7g
  • Fiber: 8g

Conclusion

Our Blast Of Color Mexican Stuffed Bell Peppers are more than just a meal; they are a celebration of flavors and memories. Whether you’re looking to impress at a dinner party or simply want a comforting meal for your family, these peppers are sure to be a hit. We hope this recipe brings as much joy to your table as it has to ours. Happy cooking!

Related update: Blast Of Color Mexican Stuffed Bell Peppers

Related update: Perfect fish cakes

Blast Of Color Mexican Stuffed Bell Peppers | Made by Meaghan Moineau

Blast Of Color Mexican Stuffed Bell Peppers

Intro

There’s something magical about the vibrant colors of fresh vegetables, especially when they’re stuffed with a delicious mix of spices and wholesome ingredients. Our Blast Of Color Mexican Stuffed Bell Peppers bring a rainbow of flavors to your table, reminiscent of the lively street markets of Mexico. As a child, I remember accompanying my grandmother to those bustling markets. The air was filled with the aroma of spices and roasted vegetables, and my eyes were captivated by the vivid displays of fresh produce. These stuffed peppers are a tribute to those cherished days, a perfect blend of tradition and modern convenience.

Why You’ll Love It

This recipe is not only visually stunning but also incredibly satisfying. Here’s why you’ll fall head over heels for these Mexican Stuffed Bell Peppers:

  • Nutritious and Balanced: Packed with protein from chicken and black beans, fiber from brown rice, and vitamins from fresh vegetables.
  • Easy to Prepare: With a few simple steps, you can create a dish that feels gourmet yet is perfect for a weeknight dinner.
  • Customizable: Easily adapt the recipe to fit your dietary needs or personal preferences.
  • Great for Meal Prep: These peppers can be made ahead and stored for quick lunches or dinners throughout the week.

Ingredients

  • 6 large bell peppers (any color)
  • 1 cup black beans, drained and rinsed
  • 1 cup shredded rotisserie chicken breast
  • 1 can (4 oz) fire roasted green diced chiles
  • 1 tablespoon chili seasoning
  • 1 cup cooked brown rice
  • 1 cup frozen corn kernels, thawed
  • 2 cloves garlic, minced
  • 1 cup low-fat shredded cheddar cheese, divided
  • 1/2 cup red onion, diced
  • 1 roma tomato, diced
  • 1/3 cup sour light cream

Instructions

  1. Preheat your oven to 400 degrees Fahrenheit (200 degrees Celsius).
  2. In a large bowl, combine the cooked brown rice, shredded chicken, thawed corn, diced tomato, diced onion, black beans, 1/2 cup of the shredded cheddar cheese, minced garlic, fire roasted green chiles, and chili seasoning. Mix well.
  3. Prepare a baking dish by lining it with foil and spraying it with cooking spray.
  4. Slice the tops off the bell peppers and remove the seeds and membranes. Stuff each bell pepper with the chicken mixture, pressing firmly to fill the cavity and mounding the mixture on top.
  5. Place the stuffed peppers in the prepared baking dish. Top each pepper with an additional 1/2 tablespoon of cheese.
  6. Bake in the preheated oven for 30 to 40 minutes, or until the peppers are just tender.
  7. Remove from the oven and top each pepper with 1/2 tablespoon of sour cream before serving.

Tips

  • If the tops of the peppers brown too quickly in the oven, cover them loosely with foil.
  • For an extra kick, consider adding a dash of hot sauce or a sprinkle of cayenne pepper to the filling mixture.
  • Ensure your rice is cool before mixing it with other ingredients to prevent the cheese from melting prematurely.

Variations & Substitutions

  • Vegetarian Option: Omit the chicken and add extra black beans or some cooked quinoa for added protein.
  • Cheese Substitute: Use a dairy-free cheese to make this recipe lactose-intolerant friendly.
  • Different Grains: Swap out brown rice for quinoa or farro for a different texture and flavor.

Storage

These stuffed peppers can be stored in an airtight container in the refrigerator for up to 3 days. To reheat, simply place them in a microwave-safe dish and heat for 2-3 minutes, or until warmed through. You can also freeze them for up to 2 months; thaw in the refrigerator overnight before reheating.

FAQ

Can I use fresh chiles instead of canned?

Absolutely! If you prefer using fresh chiles, simply roast them until charred, peel off the skin, and dice them before adding to the mixture.

Can I make these peppers spicier?

Yes, you can adjust the spice level to your liking by adding more chili seasoning or incorporating chopped jalapeños into the stuffing mix.

Is there a way to reduce the sodium content?

To reduce sodium, use low-sodium black beans and chicken, and opt for a no-salt-added chili seasoning. You can also rinse the canned beans to remove some of the sodium.

Nutrition

Each serving of these Mexican Stuffed Bell Peppers is approximately 250 calories, with 30g of protein, 10g of fat, and 20g of carbohydrates. They are a rich source of fiber, vitamins A and C, and calcium, making them a nutritious option for any meal.

Conclusion

Our Blast Of Color Mexican Stuffed Bell Peppers are a delightful way to bring vibrant flavors and colors to your dinner table. Whether you’re reminiscing about family traditions or simply looking for a delicious meal to share with loved ones, these peppers will not disappoint. We hope you enjoy making and savoring this recipe as much as we do. Happy cooking!

Related Recipes

Also try: Blast Of Color Mexican Stuffed Bell Peppers

Also try: Beans With Smoked Pork Hock

Roasted Beet Hummus | Made by Meaghan Moineau

Roasted Beet Hummus | Made by Meaghan Moineau

Title: A Vibrant Twist on Tradition: Roasted Beet Hummus
Description: Dive into the colorful world of Roasted Beet Hummus, a delightful fusion of earthy beets and creamy chickpeas. Discover a nostalgic family story that brings this dish to life, while learning how to create this flavorful appetizer in your own kitchen.

---


A Vibrant Twist on Tradition: Roasted Beet Hummus


In the heart of many family gatherings, food often takes center stage, binding loved ones together with its warmth and flavors. One dish that has become a beloved staple in my family is Roasted Beet Hummus. This vibrant, flavorful dip is more than just a treat for the taste buds—it's a journey down memory lane, rich with the colors and textures that make every get-together special.


A Family Memory: The Beetroot Legacy


Growing up, the sweet and earthy aroma of roasted beets often wafted through my grandmother's kitchen. She had an affinity for adding a pop of color to her dishes, and beets were her secret weapon. I remember sitting on a stool, watching her expertly peel and slice the beets, her hands stained a vivid magenta—a testament to her culinary expertise and love for vibrant, natural ingredients.


One summer, she decided to blend her love for traditional hummus with her beetroot obsession. The result was a stunning Roasted Beet Hummus that became an instant family favorite. I vividly recall the excitement and curiosity as she unveiled the bright pink dip, its color as bold as its flavor. We gathered around the table, dipping warm pita bread into the hummus, each bite a harmonious blend of earthy beets and creamy chickpeas, with a hint of lemon and garlic.


This dish quickly became a family tradition, gracing every gathering with its presence and reminding us of those joyful summer days. Even now, making Roasted Beet Hummus brings back memories of laughter, love, and the vibrant spirit of my grandmother.


The Recipe: Roasted Beet Hummus


Ingredients:

- 2 medium red roasted beets, peeled and chopped


- 1 can (15 oz) cooked chickpeas, drained and rinsed


- 2 cloves garlic, minced


- 1 teaspoon ground cumin


- Juice of 1 lemon


- 2 tablespoons tahini sesame seed paste


- 3 tablespoons olive oil (plus more for consistency)


- Salt to taste


Instructions:

1. In a food processor or blender, combine the roasted beets, garlic, cumin, lemon juice, tahini, and salt. Pulse until well blended.


2. Add the chickpeas and olive oil to the mixture. Pulse until just incorporated.


3. If the hummus is too thick, gradually add more olive oil, blending until you reach the desired consistency.


4. Serve with warm pita or flatbread, and enjoy a taste of tradition with a colorful twist.


Difficulty Rating: 3/10


This recipe is delightfully simple, making it accessible for even novice cooks while promising a delicious and visually stunning result. It's the perfect appetizer for any occasion, offering a unique twist on a classic favorite.


---


Roasted Beet Hummus is more than just a dish; it's a celebration of tradition, family, and the joy of sharing something beautiful and delicious with those you love. Whether you're creating new memories or reliving cherished ones, this vibrant hummus is sure to be a hit at your next gathering.

Read more about Appetizers

Read more about Main Dishes

Read more about Desserts

Roasted Beet Hummus | Made by Meaghan Moineau

Roasted Beet Hummus | Made by Meaghan Moineau

Title: A Vibrant Twist on a Classic: Roasted Beet Hummus
Description: Dive into the colorful world of roasted beet hummus, a delightful fusion of flavors that will elevate your appetizer game. This easy-to-make dish combines earthy beets with the creamy texture of traditional hummus, creating a visually stunning and deliciously nutritious treat. Join us as we explore how this vibrant dish became a beloved family favorite, and learn how you can bring this healthy appetizer to your own table.

---


Hummus has been a staple in my family's kitchen for as long as I can remember. Every family gathering, big or small, featured a bowl of this creamy, luscious dip. The traditional hummus, while delicious, took a vibrant turn one summer when my grandmother decided to add roasted beets to the mix. Little did we know, this experiment would become a cherished family tradition.


The summer of the beet hummus was one I’ll never forget. It was a particularly hot July, and my grandparents had invited the whole family over for a weekend barbecue. As we sat around the old wooden table in their backyard, my grandmother emerged from the kitchen with a bowl of hummus that was a vivid shade of magenta. Our eyes widened at the sight, curiosity piqued by this colorful concoction.


As we dipped warm pita bread into the hummus, the combination of flavors was unlike anything we had experienced before. The earthiness of the beets melded perfectly with the creamy chickpeas and tahini, while a hint of garlic and cumin added depth. A squeeze of fresh lemon juice provided a touch of brightness, making each bite refreshing yet satisfying.


From that day forward, roasted beet hummus became a staple at our family gatherings. Its vibrant color and unique flavor always sparked conversations and brought smiles to our faces. It was a dish that not only tasted wonderful but also held the power to bring us together, reminding us of that long, laughter-filled summer afternoon.


Recipe for Roasted Beet Hummus:
Ingredients:

- 2 medium-sized red roasted beets


- 1 can (15 oz) cooked chickpeas, drained and rinsed


- 2 cloves garlic, minced


- 1 teaspoon ground cumin


- Juice of 1 lemon


- 3 tablespoons olive oil (plus more as needed)


- 1 teaspoon salt (or to taste)


- 3 tablespoons tahini sesame seed paste


Instructions:

1. Begin by roasting your beets until they are tender. Once cooled, peel and chop them into smaller pieces.


2. Place the roasted beets, garlic, cumin, lemon juice, salt, and tahini in a food processor or blender. Pulse until well blended and smooth.


3. Add the cooked chickpeas and olive oil to the processor. Pulse until the mixture is just incorporated. If needed, add more olive oil to reach your desired consistency.


4. Taste and adjust seasoning as needed. If you prefer a thinner hummus, gradually add more olive oil while blending.


5. Serve your roasted beet hummus with warm pita or flatbread and enjoy the burst of flavors.


Difficulty Rating: 3/10
Classification: Appetizer

Roasted beet hummus is not only a feast for the eyes but also a nutritious and flavorful appetizer that’s easy to prepare. It's perfect for any gathering and is sure to become a favorite in your home, just as it did in ours. Whether you’re a seasoned cook or a kitchen novice, this dish is a delightful way to bring people together and create lasting memories.

Read more about Appetizers

Read more about Main Dishes

Read more about Desserts