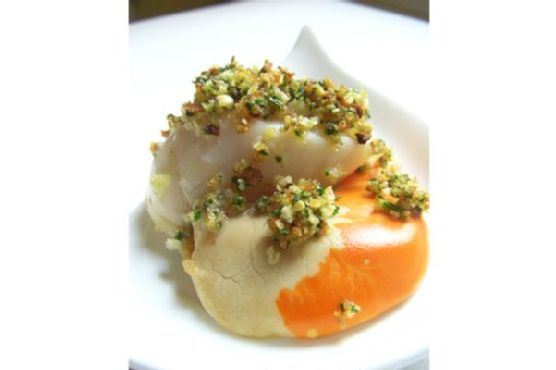
Baked Scallops With Parma Ham
Intro
There’s something incredibly nostalgic about the aroma of seafood baking in the oven. It instantly transports me back to my childhood summers spent by the coast, where every meal was a celebration of the ocean’s bounty. One dish that particularly stands out in my memory is Baked Scallops With Parma Ham. The combination of tender scallops and the savory, slightly salty Parma ham is nothing short of divine. This dish has become a cherished staple in my family, especially during festive gatherings when we want to serve something special yet uncomplicated.
Why You’ll Love It
This recipe is perfect for both novice cooks and seasoned culinary enthusiasts. Here’s why:
- Simple Ingredients: You don’t need a long list of exotic ingredients. Most items are pantry staples or easily available at your local market.
- Quick to Prepare: With just a few simple steps, this dish can be ready in under 30 minutes, making it ideal for last-minute entertaining.
- Elegant Presentation: The combination of golden-baked breadcrumbs and the rosy hue of Parma ham makes for a beautiful presentation that will impress your guests.
- Flavorful and Satisfying: The savory notes of Parma ham complement the delicate sweetness of scallops, while the breadcrumbs add a delightful crunch.
Ingredients
- Fresh big scallops
- Parma ham
- 1 garlic clove
- Dried breadcrumbs
- Parsley
- Olive oil
- 1 bell pepper
Instructions
- Preheat your oven to 410°F (210°C / T 7).
- In a food processor, combine the breadcrumbs, Parma ham, garlic clove, parsley, and 1 teaspoon of olive oil. Pulse until the mixture is finely chopped and well combined.
- Fold a piece of kitchen paper, pour 1 teaspoon of olive oil on it, and use it to grease an oven rack thoroughly.
- Place the fresh scallops on the greased rack, ensuring they are evenly spaced.
- Top each scallop with a generous spoonful of the Parma ham mixture.
- Drizzle a dash of olive oil over the top of the mixture to help it crisp up in the oven.
- Bake the scallops in the preheated oven for 8 minutes or until the topping is golden brown and the scallops are cooked through.
- Serve immediately, garnished with a few leaves of lamb’s lettuce or rocket if desired.
Tips
For the best results, use fresh, high-quality scallops. Ensure they are dry before topping with the Parma ham mixture to prevent them from becoming soggy. If you do not have a food processor, finely chop the ingredients by hand for a more rustic texture. Remember, the key to this dish’s success lies in its simplicity and the quality of its ingredients.
Variations & Substitutions
If Parma ham is not available, you can substitute it with prosciutto or another type of thinly sliced, cured ham. For an extra kick, add a pinch of red pepper flakes to the breadcrumb mixture. You can also experiment with herbs; basil or thyme can be excellent substitutes for parsley, offering a different yet delightful flavor profile.
Storage
While this dish is best enjoyed fresh, you can store any leftovers in an airtight container in the refrigerator for up to two days. To reheat, place the scallops in a preheated oven at 350°F (175°C) until warmed through. Avoid using a microwave, as it may cause the scallops to become rubbery.
FAQ
Can I use frozen scallops for this recipe?
Yes, you can use frozen scallops, but ensure they are completely thawed and patted dry before preparation to avoid excess moisture, which can affect the texture and cooking time.
What can I serve with baked scallops?
This dish pairs wonderfully with a light salad of mixed greens or a simple vegetable side such as sautéed asparagus or roasted bell peppers. The fresh, crisp textures complement the richness of the scallops perfectly.
Can I prepare the topping in advance?
Absolutely! You can prepare the breadcrumb mixture up to a day in advance and store it in the refrigerator. This makes it even more convenient if you’re planning to serve this dish at a dinner party.
Nutrition
This dish is a great source of lean protein, making it a healthy choice for a starter. Scallops are low in fat and calories, while the addition of olive oil provides heart-healthy fats. However, be mindful of portion sizes if you are watching your sodium intake, as cured meats like Parma ham can be high in salt.
Conclusion
Baked Scallops With Parma Ham is a dish that seamlessly blends elegance with simplicity. It’s a testament to the idea that sometimes less is more, allowing the natural flavors of the ingredients to shine. Whether you’re preparing for a quiet dinner at home or hosting a festive gathering, this recipe is sure to be a hit. I invite you to try it and perhaps create your own cherished memories around the dining table.
Related update: Baked Scallops With Parma Ham
Related update: Crab Wontons