Chocolate Peppermint Cookies
Intro
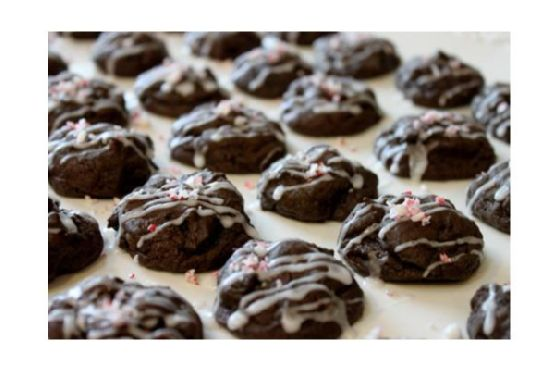
Chocolate Peppermint Cookies are a holiday favorite in my household, a tradition that brings back fond memories of festive gatherings and cozy winter evenings. I remember the first time I baked these delightful treats was with my grandmother, who had a knack for creating magic in the kitchen. The aroma of chocolate and peppermint swirling through the house signaled the beginning of holiday celebrations. As we sat around the fireplace, enjoying these cookies with a cup of hot cocoa, it felt like all was right with the world. Today, I’m excited to share this cherished recipe with you, so you too can create sweet memories with your loved ones.
Why You’ll Love It
These Chocolate Peppermint Cookies are the perfect blend of rich chocolate and refreshing peppermint. They are soft and chewy with a slight crunch on the outside, making them irresistible to both kids and adults. Whether you’re looking to impress at a holiday party or simply want to treat yourself, these cookies are sure to become a staple in your dessert repertoire. With their delightful glaze and festive flavor, they capture the essence of the holiday season in every bite.
Ingredients
- 1 teaspoon baking soda
- 1 cup confectioners sugar
- 2 large eggs
- 2 cups all-purpose flour
- 2 tablespoons half and half
- 1 cup light brown sugar
- 1 teaspoon peppermint extract
- 1/2 teaspoon salt
- 1 cup sweet semi chocolate chips
- 1 cup granulated sugar
- 1 cup unsalted butter, softened
- 1/2 cup unsweetened cocoa powder
- 1 teaspoon vanilla extract
Instructions
- Preheat your oven to 350 degrees F.
- In a medium bowl, sift together the flour, cocoa powder, baking soda, and salt. Set this aside.
- In a mixer, beat together the butter with the granulated and light brown sugars until fluffy, about 2 minutes.
- Add the eggs one at a time, beating until smooth after each addition and scraping the sides of the bowl as necessary.
- Add the vanilla extract and mix well.
- On a low speed, gradually beat in the flour mixture a little at a time until well combined.
- Gently fold in the chocolate chips with a spatula or wooden spoon.
- Drop teaspoons of the batter onto an ungreased cookie sheet, spacing them about 2 inches apart.
- Bake the cookies until just cracked on top, about 8 minutes, rotating the pan halfway through the cooking time.
- Remove from the oven and flatten the cookies slightly with a spatula. Allow them to cool completely on a wire rack.
- For the glaze, mix together the confectioners sugar, peppermint extract, and half and half in a small bowl until smooth.
- Transfer the glaze mixture to a medium resealable plastic bag and snip off a tiny bit of the corner.
- Drizzle the glaze over the cooled cookies and let them stand until set, about 10-20 minutes.
Tips
To ensure your cookies are perfectly soft and chewy, avoid overbaking. They should just be cracked on top when you take them out of the oven. Also, make sure your butter is at room temperature for easy mixing and a smooth batter. Using a cookie scoop can help in creating uniform cookies, ensuring even baking.
Variations & Substitutions
Feel free to experiment with this recipe to suit your preferences. If you prefer a stronger peppermint flavor, you can increase the peppermint extract in the glaze. For a different twist, try adding crushed candy canes on top of the glaze for extra crunch and color. You can also substitute white chocolate chips for the semi-sweet chocolate chips for a different flavor profile.
Storage
These cookies can be stored in an airtight container at room temperature for up to a week. If you want to enjoy them for longer, they freeze beautifully. Simply layer them between sheets of parchment paper in a freezer-safe container and they’ll keep for up to three months. Thaw at room temperature before serving.
FAQ
Can I use dark chocolate chips instead of semi-sweet?
Absolutely! Dark chocolate chips can provide a richer flavor and work wonderfully in this recipe. Adjust according to your taste preference.
Can I make the dough ahead of time?
Yes, you can prepare the dough in advance and refrigerate it for up to 48 hours. This can actually enhance the flavor as the ingredients have more time to meld together. Just be sure to let the dough come to room temperature before baking.
Nutrition
While these cookies are a treat and should be enjoyed in moderation, they do provide some nutritional value. Each cookie contains approximately 150 calories, 8g of fat, 20g of carbohydrates, and 2g of protein. The exact nutritional content can vary based on specific brands and measurements used.
Conclusion
I hope this Chocolate Peppermint Cookies recipe brings as much joy to your family as it does to mine. Whether you’re baking them for a holiday gathering or simply to indulge your sweet tooth, these cookies are sure to be a hit. With their perfect balance of chocolate and peppermint, they encapsulate the spirit of the season in every bite. Happy baking, and may your home be filled with warmth, love, and delicious cookies this holiday season!
Related update: Chocolate Peppermint Cookies
Related update: Dump Cake