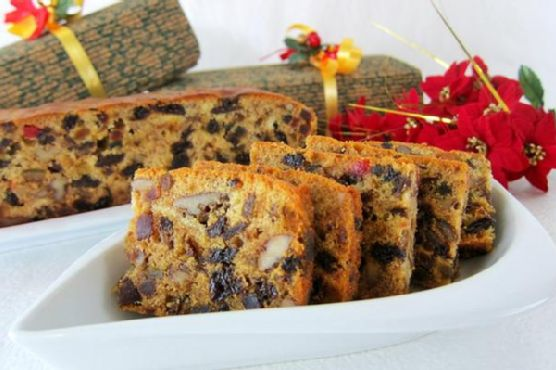
Christmas Fruit Cake | Made by Meaghan Moineau

It was one of those December weekends when the chill in the air nudges you to do something cozy and delicious. I found myself in the kitchen, rummaging for ideas to fill the house with the quintessential aroma of the holidays. That’s when I remembered the Christmas Fruit Cake — a recipe that’s not only indulgent and rich but also incredibly forgiving. This cake becomes the centerpiece of any celebration, and the best part? You can make it ahead, giving you more time to sip on that mulled wine while the cake matures into something truly spectacular.

Jump to Recipe

What You’ll Need

Before we dive into the holiday spirit, let’s gather the goods. What I adore about this recipe is that it often feels like a treasure hunt in your pantry. You might already have most of these ingredients, waiting to transform into something magical.

  • Butter – for that undeniable richness
  • Sugar – sweetens and balances the spices
  • Eggs – to give the cake structure
  • Plain flour – sifted with baking powder for a light crumb
  • Baking powder – keeps things lofty
  • Mixed spice – the heart of any Christmas bake
  • Dried mixed fruit – the star of the show
  • Pitted prunes – cut into pieces for extra moisture
  • Walnuts – chopped, adding a delightful crunch
  • Rum – because holiday cheer is essential
  • Orange juice – for a zesty kick
  • Orange zest – from one orange, to enhance the citrus notes
  • Vanilla extract – a warm, sweet background
  • Two layers of parchment paper – to line an 8″ square cake tin

How to Make Christmas Fruit Cake

Here’s where the magic happens. Each step is designed not just to guide you but to make you feel confident and capable.

  1. Start by lining your 8″ square cake tin with two layers of parchment paper. This ensures your cake doesn’t stick and makes for a smooth release.
  2. In a large bowl, mix the dried mixed fruit and pitted prunes with about 8 tablespoons of rum. Cover this mixture with cling wrap and let it sit overnight. This soak is where the fruits absorb all that boozy goodness.
  3. The following day, beat the butter and sugar together until light and fluffy. This should take on a pale yellow hue as air is incorporated.
  4. Slowly add in the rum, orange juice, orange zest, and vanilla extract. Mix until everything is well combined, and a sweet, citrusy aroma fills the air.
  5. Add the eggs one at a time, ensuring they are well incorporated before adding the next. Scrape down the sides of the bowl as you go.
  6. Take 1/4 of the flour and coat the soaked fruit mixture. This helps the fruit stay suspended while baking.
  7. Gradually add the remaining flour and mixed spice to the butter mixture. Mix until the batter comes together; it should be thick and fragrant.
  8. Fold in the fruit mixture and chopped walnuts using a rubber spatula. Pour the batter into the prepared cake tin and bang it on the table once to settle the contents evenly.
  9. Bake in a preheated oven at 160°C for about 1 1/2 hours. When the cake starts to turn brown after 30-40 minutes, cover it loosely with foil to prevent over-browning, and continue baking.
  10. As soon as you take the cake out of the oven, pour 3-4 tablespoons of rum over it. Let it cool, then turn it out from the tin. Wrap it in cling wrap and store in the fridge.
  11. For the next few days, pour 2-3 tablespoons of rum over the cake every three days until it’s time to serve or gift it. This keeps the cake moist and enhances the flavor.

Cook’s Notes

This cake is your holiday secret weapon. It’s forgiving if you need to make substitutions or if you forget to soak the fruit overnight. If you’re short on time, you can microwave the fruit and rum for a few seconds to help the process along. This cake stores beautifully in the fridge, wrapped tightly in cling wrap or foil. It actually tastes better as it sits, so don’t worry about making it a week or so ahead. Freezing is also an option; just make sure you bring it to room temperature and add a fresh splash of rum before serving.

Make It Your Own

While this cake is fantastic as is, sometimes a little twist is just what you need:

  • Swap the rum for brandy if you prefer a different kind of warmth.
  • Replace walnuts with pecans for a softer crunch.
  • Add in some shredded coconut with the fruit for a tropical flair.
  • Use dried cherries or cranberries instead of some of the mixed fruit for a tangy zip.

If you try this, I’d love to hear how it turns out — drop a comment or tag me on social media! Your holiday table just got a whole lot more festive. Happy baking!

Related update: Christmas Fruit Cake

Related update: Applesauce Cake
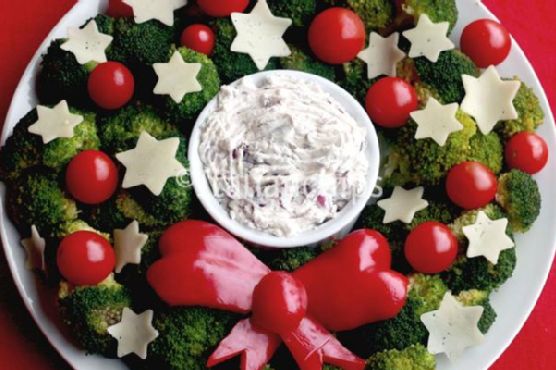
Vegetarian Christmas wreath | Made by Meaghan Moineau

Vegetarian Christmas wreath | Made by Meaghan Moineau

Title: A Festive Delight: Crafting a Vegetarian Christmas Wreath
Description: Embrace the holiday spirit with this delightful Vegetarian Christmas Wreath, a vibrant and healthy appetizer that elevates your festive table. Packed with fresh broccoli, juicy cherry tomatoes, and creamy cheese, this dish isn't just a feast for the eyes; it's a nostalgic journey back to cherished family gatherings. Discover the secrets to creating this culinary masterpiece and bring a touch of warmth and color to your Christmas celebrations.

---


As the holiday season approaches, many of us find ourselves reminiscing about the cherished memories and traditions that make this time of year so special. For me, one dish that encapsulates the joy of Christmas is the Vegetarian Christmas Wreath. Not only is it a visual masterpiece, but its fresh and savory flavors bring back memories of family gatherings filled with laughter and warmth.


A Nostalgic Journey

Every Christmas, my family would gather in my grandmother’s cozy kitchen, the heart of our home during the festive season. My grandmother, a culinary wizard in her own right, introduced us to the Vegetarian Christmas Wreath when I was a child. The dish became an instant favorite, not just for its vibrant colors and enticing flavors, but for the way it brought us all together. I recall the bustling kitchen, the aroma of fresh vegetables, and the joyous chatter as we eagerly awaited the unveiling of our family’s festive wreath.


Creating the Wreath:

To recreate this delightful appetizer, you'll need a handful of simple yet flavorful ingredients: fresh broccoli florets, juicy cherry tomatoes, creamy cheese, a crisp red bell pepper, tangy cream cheese, mayonnaise, dried dill, dried garlic, savory olives, and a fresh scallion for garnish.


1. Blanching the Broccoli: Start by washing the broccoli and cutting the florets into bite-sized pieces. Fill a large pan with water and bring it to a boil. Once boiling, add the broccoli florets. While they're cooking, prepare a bowl filled with ice water. After two minutes of boiling, swiftly transfer the broccoli to the ice water to preserve its vibrant green color.
2. Preparing the Dip: As the broccoli cools, combine the cream cheese, mayonnaise, dried dill, and dried garlic to create a creamy dip. Let it chill in the fridge for at least three hours to allow the flavors to meld beautifully.
3. Assembling the Wreath: On a large white plate, place a ramekin at the center for the dip. Arrange the broccoli florets around the ramekin to form the wreath, adding cherry tomatoes for bursts of color. Use star-shaped cookie cutters to slice the cheese into festive shapes, and strategically place them on the wreath. Finally, cut the red bell pepper into strips to craft a decorative ribbon, completing your edible masterpiece.
Buon Appetito!

Serving this dish is not merely about enjoying a delicious appetizer; it's about creating an experience that brings loved ones together, evoking fond memories and starting new traditions. Whether you're hosting a grand feast or a cozy family dinner, the Vegetarian Christmas Wreath is sure to impress and delight.


Difficulty Rating: 5/10
Classification: Appetizer

This dish requires a bit of preparation but is straightforward enough for cooks of all abilities. Its simplicity is part of its charm, allowing you to enjoy the creative process without stress.


As you gather with family and friends this holiday season, consider adding the Vegetarian Christmas Wreath to your menu. It's a dish that symbolizes togetherness, joy, and the spirit of Christmas, reminding us that the best ingredients in any recipe are love and laughter.

Read more about Appetizers

Read more about Main Dishes

Read more about Desserts

Divine Christmas Candy Cane Cookies | Made by Meaghan Moineau

Divine Christmas Candy Cane Cookies | Made by Meaghan Moineau

**Title: Celebrate the Holidays with Divine Christmas Candy Cane Cookies**


**Description:** Embrace the holiday spirit with our delightful Candy Cane Cookies, a heavenly treat that combines the minty freshness of peppermint with the sweetness of a buttery cookie. Perfect for sharing, these cookies will bring joy to every festive gathering. Follow our detailed guide to create these charming confections and discover the heartwarming family story behind this treasured recipe.


---


**A Sweet Holiday Tradition: Divine Christmas Candy Cane Cookies**


As the holiday season approaches, the aroma of freshly baked cookies fills the air, evoking cherished memories of family gatherings and festive celebrations. One such nostalgic treat that has become a staple in our household is the delightful Candy Cane Cookie. With its vibrant colors and refreshing peppermint flavor, this cookie is not just a dessert, but a symbol of holiday joy and togetherness.


**Recipe Overview**


**Ingredients:**


- 2 cups all-purpose flour


- 1 egg yolk


- Red food coloring


- 1 teaspoon peppermint extract


- 1/2 cup powdered sugar


- 1 cup unsalted butter, softened


- 1 teaspoon vanilla extract


**Instructions:**


1. **Creaming the Butter**: Begin by creaming the unsalted butter until it achieves a smooth, fluffy texture. Gradually add the powdered sugar, continuing to beat until the mixture is light and airy.


2. **Mixing the Wet Ingredients**: Incorporate the egg yolk, vanilla extract, and peppermint extract into the butter and sugar mixture, stirring until well combined.


3. **Incorporating the Dry Ingredients**: Add the all-purpose flour in two additions. First, add half of the flour, stirring until fully incorporated, then add the remaining flour. Mix until you attain a firm, smooth dough.


4. **Coloring the Dough**: Divide the dough into two equal portions. Add a few drops of red food coloring to one half, kneading until the color is evenly distributed.


5. **Chilling the Dough**: Wrap both dough balls in plastic wrap and refrigerate for about 30 minutes, allowing the dough to firm up.


6. **Shaping the Cookies**: Preheat your oven to 180°C (356°F). On a lightly floured surface, take a walnut-sized piece of red dough and a walnut-sized piece of white dough. Roll each into a 10-12 cm long rope. Place the ropes side by side and gently twist them together, pressing slightly to form a spiral. Shape by bending one end into a hook, creating the iconic candy cane shape.


7. **Baking**: Line the cookies on baking paper about 2 cm apart. Bake for approximately 10 minutes or until the edges start to brown. Once baked, let the cookies cool completely on a wire rack.


**A Cherished Family Memory**


Every Christmas, my grandmother would gather the family in her cozy kitchen, the heart of her home. With flour dusting the countertops and laughter echoing off the walls, we would embark on our annual cookie-baking adventure. The Candy Cane Cookies were always my favorite part. My siblings and I would compete to see who could create the most perfect twist, our hands sticky with dough and faces smeared with flour. As the cookies baked, the kitchen would be filled with the sweet scent of peppermint, wrapping us in a warm, festive embrace. To this day, the taste of these cookies transports me back to those precious moments, a reminder of the simple joys and loving bonds that define the holiday season.


**Difficulty Level: 5/10**


**Classification: Dessert**


Whether you’re continuing a family tradition or starting a new one, these Candy Cane Cookies are sure to bring a smile to everyone’s face. With their delightful appearance and delicious taste, they’re the perfect addition to your holiday dessert table. Happy baking, and may your holidays be filled with warmth and cheer!

Read more about Appetizers

Read more about Main Dishes

Read more about Desserts