Layered Poppy Seed Pastries | Made by Meaghan Moineau

On a particularly rainy Tuesday afternoon, as the water danced against my kitchen window, I found myself craving something both cozy and indulgent. I rummaged through the pantry, hoping for inspiration, and there it was: a can of poppy seed filling. That was all it took to set me on the path toward creating these Layered Poppy Seed Pastries. They’re the perfect blend of buttery layers and rich filling, a treat that feels special but isn’t overly complex to prepare. If you’re like me and love bringing a bit of warmth and comfort on a dreary day, this recipe is a must-try. These pastries are like edible hugs — perfect for impressing friends or just treating yourself.

Jump to Recipe

What You’ll Need

You’d be surprised how many of these ingredients are likely sitting right in your pantry. This recipe doesn’t require anything too exotic, but a few key ingredients really make it shine. Here’s what you’ll need:

  • Warm milk – for activating the yeast
  • Dry packet yeast – to give our pastries that lovely rise
  • Flour – the backbone of our pastry
  • Baking powder – adds an extra lift
  • Salt and a dash of sugar
  • Lemon zest – for a hint of brightness
  • Butter – because what’s a pastry without it?
  • Whole egg plus an extra yolk for richness
  • Vanilla extract – just a splash!
  • Canned poppy seed filling – the star of the show
  • Ground walnuts – for that nutty crunch
  • Water – just a splash to bring it all together

How to Make Layered Poppy Seed Pastries

  1. Start by mixing the warm milk, dash of sugar, and yeast in a small bowl until the yeast dissolves. Let it sit while you prep the rest.
  2. In a large mixing bowl, blend the flour, baking powder, salt, and lemon zest. Add the butter and mix until you see a crumbly texture forming.
  3. In a separate bowl, beat the whole egg and extra yolk with vanilla. Alternate adding this mixture and the yeast mixture to the flour blend, mixing until you have a cohesive dough.
  4. Transfer your dough to a floured board. Divide it into four parts and knead each into a flat disc. Wrap these in plastic wrap and pop them into the fridge for an hour.
  5. While the dough chills, spoon your poppy seed filling into a pastry bag. Mix the sugar and ground walnuts in another bowl and set aside.
  6. Roll each disc into a thin sheet to fit a 13×9-inch baking dish. If you have any trimmings, save them for another pastry adventure.
  7. Start layering: Place one layer of dough in the baking dish, spread half the poppy seed filling, cover with another dough layer, and sprinkle with the walnut mixture. Repeat once more and top with the final dough layer.
  8. Let the assembled pastry sit covered with a kitchen towel for 30 minutes, allowing it to rest and rise slightly.
  9. Brush the top with the egg yolk mixture for a lovely golden finish. Bake at 350°F for around 45 minutes, or until the top is golden brown and the aroma fills your kitchen.
  10. Once baked, while still hot, cut the pastry into 24 squares. Let them cool in the pan, basking in the glory of your creation.

Cook’s Notes

Always make sure your milk is warm but not hot to the touch, as too much heat can kill the yeast. These pastries freeze beautifully; just wrap them in plastic and then foil, and pop them into a resealable plastic bag. They defrost well and maintain their crispness, tricking everyone into thinking they’re freshly baked. And here’s a tip: when serving, consider making a few extra for your neighbors or friends. Sharing these could easily brighten someone’s day!

Make It Your Own

  • Swap out the poppy seed filling with a thick apricot jam for a fruity twist.
  • Replace the walnuts with pecans for a sweeter, buttery nut flavor.
  • For a citrusy kick, add orange zest instead of lemon zest.
  • Want a hint of spice? Add a teaspoon of cinnamon to the walnut mixture.

If you try this, I’d love to hear how it turns out — drop a comment or tag me! These pastries are a rainy day favorite, and I hope they’ll become a part of your kitchen adventures too. Enjoy every flaky, delicious bite!

Related update: Layered Poppy Seed Pastries

Related update: Brandy-Apple Mini Pies With Cornmeal Crust

Zucchini & Basil Frittata | Made by Meaghan Moineau

It was one of those Tuesday nights when the fridge was looking scarily empty, and yet, the thought of braving the grocery store felt like too much. That’s when I spotted the lone zucchini in the crisper drawer, looking like it might be the hero of dinner. With some eggs, a handful of basil, and a bit of cheese, this Zucchini & Basil Frittata came to life. It’s like an Italian hug in a skillet, perfect for a weeknight when you need something cozy but also have about 20 minutes of energy left in you. The beauty of this frittata is how it transforms humble ingredients into something that feels a bit more special.

Jump to Recipe

What You’ll Need

You probably have most of these on hand, which makes this recipe a lifesaver when you need a quick meal. Here’s what you’ll gather:

  • Zucchini
  • Salt
  • Green onions
  • Basil
  • Cheddar cheese
  • Eggs
  • Grapeseed oil (or olive oil)

How to Make Zucchini & Basil Frittata

  1. First, shred your zucchini using a box grater or food processor. Place the shredded zucchini into a colander set over a bowl. Sprinkle with a little salt and let it sit for about 20 minutes to draw out the water. If you’re short on time, give it a squeeze with your hands to speed up the process.
  2. In a large mixing bowl, combine the shredded zucchini, chopped green onions, fresh basil, and grated cheddar cheese. Season with a bit more salt and stir everything until it’s well mixed.
  3. Crack the eggs into a separate bowl and beat them until smooth. Pour the beaten eggs into the vegetable mixture and stir until everything is happily combined.
  4. Preheat your oven to 350°F (175°C). While it’s warming up, heat 1 to 2 tablespoons of grapeseed oil in a 10-inch cast iron skillet over medium heat, ensuring the bottom and sides are well-coated.
  5. Pour the egg and veggie mixture into the skillet, spreading it out evenly. Let it cook for about 3 to 5 minutes, until the edges start to set and cook.
  6. Carefully transfer the skillet to the preheated oven. Bake for 12 to 15 minutes, or until the center is set and a toothpick comes out clean.

Cook’s Notes

Let’s talk about getting the most out of your frittata. It’s crucial to get rid of excess water from the zucchini; otherwise, the frittata might end up watery. If you’re planning ahead, you can shred the zucchini the night before, which makes assembling the dish a breeze the next day. Leftovers can be stored in an airtight container in the fridge for up to three days. Reheat gently in a skillet or microwave when ready to enjoy again.

Make It Your Own

Feel free to get creative with this recipe! Here are some swap ideas:

  • Switch out the cheddar cheese for feta for a tangy twist.
  • Substitute basil with fresh dill or parsley for a different herbal note.
  • Add sliced cherry tomatoes for a burst of color and sweetness.
  • Replace the zucchini with shredded carrots or thinly sliced bell peppers if you’re out of zucchini.

If you try this, I’d love to hear how it turns out — drop a comment or tag me! Can’t wait to see your delicious frittatas!

Related update: Zucchini & Basil Frittata

Vegetarian Scotch Eggs | Made by Meaghan Moineau

Last Tuesday, I found myself in a bit of a culinary pickle. It was one of those chaotic weeknights where all I wanted was something comforting yet not too heavy. But, with my pantry looking a little uninspired, the options seemed limited. As I rummaged through my fridge, I spotted some fresh herbs and eggs. That’s when inspiration struck – Vegetarian Scotch Eggs. They’re not only a playful twist on a classic favorite, but they also satisfy that comforting craving without being overly indulgent. Plus, they’re surprisingly easy to whip up, even when you’re short on time. So, if you’re juggling a busy schedule but still want something delicious, this recipe is your golden ticket.

Jump to Recipe

What You’ll Need

If you’re like me, you probably have most of these ingredients already hanging out in your kitchen. Simple yet flavorful, these are the stars of our dish:

  • Fresh breadcrumbs
  • Fresh dessert spoon chives
  • 5 eggs (4 for boiling, 1 for coating)
  • Fresh dessert spoon flat-leaf parsley
  • Black salt and pepper
  • Vegetable oil

How to Make Vegetarian Scotch Eggs

  1. Preheat your oven to 325°F (170°C). This step is key to ensure our Scotch eggs are perfectly warm and crisp.
  2. Place 4 eggs in a medium-sized pan and cover them entirely with cold water. It’s like giving them a little bath before the magic happens.
  3. Bring the water to a gentle boil, then reduce the heat and let them simmer for exactly 4 minutes. We’re aiming for that slightly soft, golden center.
  4. Immediately transfer the eggs to a bowl of cold water. This stops the cooking process and makes them easier to peel. Trust me, your fingers will thank you.
  5. Peel the cooled eggs carefully. It’s like unwrapping a delicate little gift.
  6. In a small bowl, whisk the remaining egg until it’s all sunshine-y and smooth.
  7. Mix the chopped chives and parsley with the fresh breadcrumbs. Season with a pinch of black salt and pepper. Feel free to get a little generous here; seasoning is key.
  8. Gently roll each peeled egg in a bit of flour. This helps the coating stick like a dream.
  9. Dip the floured eggs in the whisked egg mixture, ensuring they’re well coated. Now, roll them in the herby breadcrumbs. This is where they get their magical cloak of flavor.
  10. Pour vegetable oil into a pan, about 2 inches deep, and heat it up. You’re looking for it to shimmer slightly – that’s when you know it’s ready.
  11. Carefully fry the coated eggs in the hot oil. Turn them occasionally to get an even golden color all around. This takes about 2-3 minutes. They’ll start to look irresistibly crunchy.
  12. Use a slotted spoon to remove the eggs from the oil and place them in an ovenproof dish. Pop them in the oven for another 3-4 minutes to make sure they’re heated through.

Cook’s Notes

Here’s the deal: the fresher your breadcrumbs, the better the crunch you’ll get. If you can make them at home, do it! And when it comes to frying, make sure your oil is hot enough before you lower in the eggs – a little test with a breadcrumb should tell you if it sizzles right. If the coating starts to brown too quickly, the oil is too hot. Just turn down the heat a bit.

Leftovers? Although these are best enjoyed fresh, you can store any extras in the fridge for up to two days. Just pop them in a preheated oven for about 10 minutes to heat them up again – they’ll be almost as delightful as the first time.

Make It Your Own

Here are some fun ways to switch things up and keep it interesting:

  • Spicy Kick: Add a teaspoon of crushed red pepper flakes to the breadcrumb mix for a little heat.
  • Cheesy Delight: Mix in some grated Parmesan or cheddar with the breadcrumbs for a cheesy crust.
  • Herb Lovers: Switch up the herbs – basil and dill can add a fresh twist.
  • Vegan Version: Use a flaxseed egg (1 tablespoon flaxseed meal + 2.5 tablespoons water) instead of a regular egg for the coating.

If you try this, I’d love to hear how it turns out — drop a comment or tag me! It’s always a joy to see how my favorite recipes are enjoyed by others. Happy cooking!

Related update: Vegetarian Scotch Eggs

Candy Cane Chocolate Marshmallows | Made by Meaghan Moineau

I was in the middle of a marathon of holiday movies when I realized my sweet tooth was acting up. You know that moment when the snow is falling on screen, and you just want something warm and chocolaty to match the vibe? That was me. But I didn’t want just another hot chocolate; I needed something extra special. Enter my Candy Cane Chocolate Marshmallows. These babies are the perfect combination of sweet, crunchy, and gooey goodness, and the best part? They’re super easy to make! Imagine enjoying these with friends, exchanging gifts, or just treating yourself on a chilly night—total bliss.

Jump to Recipe

What You’ll Need

Alright, here’s the good news: you probably have most of this stuff already lurking in your pantry. These marshmallows are all about the simple joys of the holiday season.

  • Candy canes – grab a few from your tree or stash!
  • Dark chocolate – for that rich, decadent coating.
  • Milk chocolate – adds a creamy sweetness.
  • Marshmallows – the stars of the show.

How to Make Candy Cane Chocolate Marshmallows

  1. First, let’s smash those candy canes! Place them in a zip-top bag and use the bottom of a glass or a mallet to crush them into small pieces. You want a mix of dust and tiny chunks.
  2. Now, set up a double boiler on your stove. If you don’t have one, just place a heatproof bowl over a pot of simmering water. Make sure the bowl doesn’t touch the water.
  3. Add the dark chocolate and milk chocolate to the bowl. Stir occasionally until the chocolate is fully melted and smooth. Inhale deeply—the smell is pure heaven.
  4. Grab a marshmallow, dip it halfway into the melted chocolate, spinning it slightly to get a good coat.
  5. Immediately dip the chocolate-covered marshmallow into the crushed candy canes. Press gently so the pieces stick to the chocolate, creating a crunchy layer.
  6. Place the marshmallows on a sheet of wax paper. Let them chill in the fridge for at least an hour, or until the chocolate hardens.

Cook’s Notes

Okay, a few tips from my kitchen to yours. First, make sure your chocolate doesn’t scorch; keep the heat low and steady. If you’re planning to make these ahead, they store beautifully in an airtight container for up to a week. Just keep them in a cool spot to prevent any accidental melting. Also, if you find your candy canes getting sticky, toss them back into the fridge for a bit—they’ll be easier to work with when they’re cool and crisp.

Make It Your Own

Here are some fun twists you can try:

  • Swap out the candy canes for crushed pretzels if you prefer a salty-sweet combo.
  • Use white chocolate instead of milk chocolate for a different flavor profile.
  • Roll the marshmallows in crushed nuts for extra crunch and a nutty flavor.
  • Add a sprinkle of sea salt on top of the chocolate layer for an elevated touch.

If you try this, I’d love to hear how it turns out—drop a comment or tag me in your photos! These little treats are sure to spread some holiday cheer in your home. Enjoy every bite!

Related update: Candy Cane Chocolate Marshmallows

Related update: Vegetarian Scotch Eggs

Related update: Frozen Mojito Pie

Banana in brown sugar ice cream | Made by Meaghan Moineau

It was one of those evenings when nothing seemed to go right. I had just returned from a long day at work, craving something sweet and indulgent. With a sneaky glance at my fruit basket, I realized I had a bunch of slightly overripe bananas begging to be used. That was my eureka moment: Banana in brown sugar ice cream. It’s one of those recipes that sounds super fancy but is actually a delightful twist on your average ice cream. Plus, it’s a fantastic way to transform humble bananas into a rich, creamy treat that’s perfect for any occasion. This recipe strikes the perfect balance between indulgent and comforting, and it’s seriously worth a try.

Jump to Recipe

What You’ll Need

Trust me, you won’t need a shopping cart full of ingredients for this one. Chances are you already have most of these on hand:

  • Bananas – The riper, the better!
  • Light brown sugar
  • Sour full-fat cream or coconut milk for a lighter twist
  • Dark rum
  • Vanilla extract
  • Lemon juice
  • A pinch of sea salt

How to Make Banana in brown sugar ice cream

  1. In a wide skillet or saucepan, heat the light brown sugar with one-quarter of the sour cream. Stir it gently until the mixture becomes smooth and bubbly, filling your kitchen with a caramel-like aroma.
  2. Add the bananas and a pinch of sea salt. Let them cook for about 5 minutes, stirring occasionally. You’re looking for soft, completely cooked-through bananas with a golden touch.
  3. Once the bananas are done, remove the skillet from heat and stir in the remaining sour cream, dark rum, and vanilla extract. Give it a taste, and if it’s a tad too sweet, a few drops of lemon juice will brighten it up.
  4. Pour everything into a blender or food processor, and puree until the mixture is utterly smooth.
  5. Chill it thoroughly for at least an hour, or if patience is a virtue you possess, let it sit overnight.
  6. When you’re ready, pour the chilled mixture into your ice cream maker and follow the manufacturer’s instructions. The anticipation is worth it!
  7. Before serving, let the ice cream sit out for 5-10 minutes, or longer if needed, to reach that perfect scooping consistency.

Cook’s Notes

Making this ice cream is a breeze, but here are a few tips to ensure it turns out perfectly:

  • If you choose sour cream, the mixture might curdle a bit while cooking. Don’t panic! It will all smooth out when blended.
  • This treat is best served in chilled glass or porcelain bowls to keep it from melting too quickly.
  • For effortless scooping, soak your ice cream spoon in boiling water, then dry it before using.
  • Store any leftovers (if there are any!) in an airtight container in the freezer. It’ll stay delicious for a week or two, though I doubt it will last that long.

Make It Your Own

Here are a few ideas to tweak this dessert to suit your fancy:

  • Swap the dark rum for bourbon for a slightly different boozy kick.
  • Add a handful of toasted pecans or walnuts after churning for a nutty crunch.
  • For a chocolatey twist, toss in some chocolate chips or a swirl of chocolate syrup during the final mixing.
  • Not a fan of bananas? Substitute with ripe peaches or mangoes for a tropical spin.

If you try this, I’d love to hear how it turns out — drop a comment or tag me! Let’s share the ice cream joy because we all need a little sweetness in our lives.

Related update: Banana in brown sugar ice cream

Related update: Traditional Banana Bread

Corn Avocado Salsa | Made by Meaghan Moineau

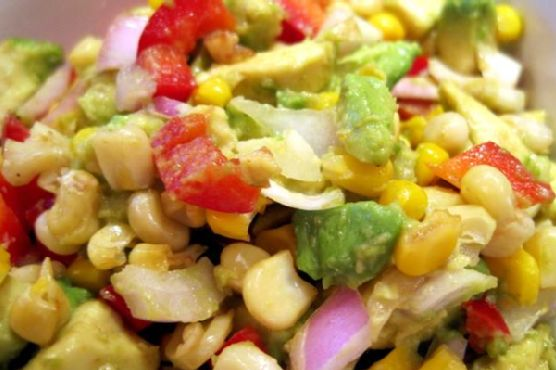
Picture this: It’s a balmy Tuesday evening, and after a long day at work, all you want is something fresh, quick, and a little fun to brighten up your dinner table. You’re standing in the kitchen, barefoot, with the warm breeze tickling your curtains, and that’s when you remember the bag of frozen corn tucked away in the freezer. And oh, the avocado sitting prettily on the counter, just begging to be used! That’s when the idea hits: Corn Avocado Salsa. It’s a dish that’s as vibrant as it is simple, packed with the kind of zesty flavors that say, “Hey, let’s pretend it’s summer all year round.” Plus, it’s the type of recipe that lets you feel like a pro without requiring a culinary degree. Let’s dive in!

Jump to Recipe

What You’ll Need

Here’s the beauty of this dish: It’s made with ingredients you likely already have. It’s about taking the humble and making it shine, and let’s be honest, who doesn’t love a recipe that doesn’t call for a grocery store run?

  • Avocado
  • Balsamic vinegar
  • Cumin
  • Canned frozen corn
  • Garlic
  • Red bell pepper

How to Make Corn Avocado Salsa

  1. Preheat your oven to 375 degrees. The perfect temperature to get that corn just right—golden and slightly crisp, without venturing into burnt territory.
  2. Spread the frozen corn flat on a baking sheet. Give it a light spritz of olive oil spray to help it roast up nicely.
  3. Roast the corn in the oven for about 8-10 minutes. Keep an eye on it; you’re looking for a nice golden hue, not the blackened crunch of forgotten popcorn.
  4. Once roasted, remove the corn from the heat and let it cool. It’s essential to let the corn relax a bit before mixing, or it’ll cook the avocado, turning your salsa into a mushy mess.
  5. While the corn is cooling, finely chop the red bell pepper and garlic. Mix these in a bowl, letting their flavors begin their tango.
  6. Peel and coarsely chop the avocado. Add this beauty to your bowl along with the cooled corn. Try not to mash it; we want chunks, not guac.
  7. Finally, sprinkle in cumin and drizzle in the balsamic vinegar. Blend well, but gently. You’re aiming for harmony in the bowl, not chaos.

Cook’s Notes

Let’s keep it real: Salsas are wonderfully forgiving, but there are still a few things to keep in mind. First off, make sure to give the corn enough time to cool—otherwise, your avocado may start to look more like a green smoothie. If you want to prep ahead, you can roast the corn and chop the veggies a day in advance. Just keep the avocado out until you’re ready to serve to maintain its gorgeous green color. Leftovers might be rare, but if you do have them, the salsa holds up okay for a day or two in the fridge. Just give it a good stir before serving.

Make It Your Own

Here are a few variations to keep your salsa adventures fresh:

  • Swap the red bell pepper for a jalapeño if you like a bit of heat. Just remember to deseed unless you’re feeling particularly daring.
  • Try adding some black beans for a heartier version. It makes for a great taco filler.
  • Throw in some chopped cilantro for an extra burst of freshness. It’s like a little green party in your mouth.
  • If you’re a citrus fan, squeeze in a bit of lime juice for a zesty twist. It pairs beautifully with the avocado.

If you try this, I’d love to hear how it turns out—drop a comment or tag me! Nothing makes my day more than seeing your creations and hearing your thoughts. Happy cooking, friends!

Related update: Corn Avocado Salsa

Related update: Egyptain Cauliflower Side Salad

Carrot and Coriander Soup | Made by Meaghan Moineau

Last Tuesday, as I stood in my kitchen, surrounded by an unexpected bounty of carrots I’d picked up on a whim, inspiration hit. Why not make a comforting soup that’s both vibrant and subtly spiced? With a hint of coriander and a splash of orange juice, this carrot and coriander soup is not just a feast for the eyes, but also a delightful dance of flavors perfect for a chilly weeknight. It’s impressively easy, too, so it’s a win-win. The kind of recipe that lets you unwind as it simmers, filling your kitchen with warmth and the promise of a cozy meal. Oh, and it’s lightning fast to whip up! Jump to Recipe

What You’ll Need

Chances are you already have most of these ingredients in your pantry. Here’s what you’ll need to bring this dish to life:

  • Carrots – peeled and ready to brighten up your evening
  • Onion – chopped finely; it’ll lend sweetness as it cooks
  • Olive oil – or butter, for that silky start
  • Ground coriander – the star of the show with its earthy flavor
  • Orange juice – to add a splash of freshness
  • Water – enough to let the veggies dance around in the pot
  • Salt – to taste, always
  • Pepper – for a hint of warmth
  • Fresh coriander – for that final, fragrant flourish

How to Make Carrot and Coriander Soup

  1. In a deep pot, heat the olive oil over medium heat. Toss in the chopped onions, stirring occasionally until they’re soft and translucent, and your kitchen smells like a dream.
  2. Add the peeled carrots to the pot and sauté them for a few minutes until they start to soften slightly and their sweetness gets a chance to shine.
  3. Pour in the water, season with salt and pepper, and cover the pot. Let it all simmer until the carrots are tender and flavorful, about 15-20 minutes.
  4. Stir in the orange juice and ground coriander. Let it cook for an additional 2 minutes, enough for the flavors to mingle and create magic.
  5. Carefully transfer the mixture to a blender and puree until smooth. You’ll want to do this in batches if your blender is on the smaller side.
  6. Return the pureed soup to the pot and give it a final taste test, adjusting the seasoning if needed. Serve hot, garnished with fresh coriander for a pop of color and extra zest.

Cook’s Notes

Here’s the stuff you really want to know: You can totally make this soup ahead of time. Just store it in an airtight container in the fridge for up to three days. When you’re ready to serve, simply reheat it on the stove until it’s piping hot. And a little secret — this soup freezes like a champ! Just skip the fresh coriander before freezing and add it only when serving.

Also, make sure your blender can handle hot liquids; you don’t want a carrot explosion! Let the soup cool a bit before blending, and never fill the blender more than halfway. Trust me on this one.

Make It Your Own

  • Swap the water for veggie broth to amp up the flavor profile.
  • Feeling indulgent? Stir in a splash of cream or coconut milk at the end for a richer texture.
  • Boost the spice by adding a pinch of cayenne or smoked paprika.
  • For a protein hit, toss in some cooked chickpeas when serving.

If you try this, I’d love to hear how it turns out — drop a comment or tag me! Whether you stick to the classic or put your own twist on it, this soup is sure to warm both your heart and your taste buds.

Related update: Carrot and Coriander Soup

Related update: Corn Avocado Salsa

Baked Sirloin Steak | Made by Meaghan Moineau

Last Tuesday, I was staring at a package of sirloin steak, contemplating my usual grill routine, when the weather made its own plans with a sudden downpour. With the rain hammering against the window, I pivoted to a cozy baking approach that turned out to be a game changer. Who knew that throwing sirloin in the oven could result in such tender, flavorful goodness? This Baked Sirloin Steak comes together with ingredients you likely already have lounging in your pantry, and the result is a melt-in-your-mouth, savory dish that’s perfect for any night of the week. Trust me, it’s a keeper when the grill isn’t an option, or you just want to switch things up a bit.

Jump to Recipe

What You’ll Need

This dish leans on the classics, with a few flavor boosters that make it special without any fuss. Chances are you already have most of this in your kitchen:

  • Butter
  • Ketchup
  • Lemon
  • Pepper
  • Salt
  • Water
  • White onions
  • Worcestershire sauce

How to Make Baked Sirloin Steak

  1. Preheat your oven to 425 degrees. You want it nice and hot to seal in all those juicy flavors.
  2. Rub both sides of the steak generously with butter. This not only adds flavor but helps in creating a wonderfully golden exterior.
  3. Place the buttered steak on a greased rack set in a shallow pan. The rack lets the heat circulate, cooking the steak evenly.
  4. Sprinkle the steak with salt and pepper. Be generous; these are your primary seasonings.
  5. Arrange thin slices of lemon directly on top of the steak. Trust me, this step is non-negotiable. The lemon adds a fresh zing that cuts through the richness.
  6. Top the lemon with slices of white onion. As it bakes, the onion softens and sweetens, melding beautifully with the lemon and steak.
  7. In a small bowl, mix together ketchup, Worcestershire sauce, and a splash of water. Pour this saucy goodness over the steak.
  8. Bake for 30 to 45 minutes, depending on how you like your steak. At 30 minutes, it should be medium-rare; extend the time for more doneness. Look for the sauce to be bubbling and the onions golden and fragrant.

Cook’s Notes

Don’t skip the rack inside the shallow pan setup; it’s essential for mimicking that grill-like air circulation. If you’re aiming for a specific doneness, a meat thermometer can be your best friend. For medium-rare, you’re looking for about 135 degrees. If you find yourself with leftovers (unlikely, but hey, it happens), slices of this steak make for killer sandwiches the next day. Just wrap them up tightly and store in the fridge for up to two days.

Make It Your Own

  • Swap the sirloin for a different cut of steak like ribeye or strip for a richer flavor.
  • Try using red onions instead of white for a milder sweetness and a pop of color.
  • Mix in a teaspoon of minced garlic with the butter for a subtle garlicky kick.
  • For a spicy twist, add a dash of hot sauce to the ketchup mixture before pouring it over the steak.

If you try this, I’d love to hear how it turns out — drop a comment or tag me! Your feedback means the world, and I’m always here for a kitchen chat. Enjoy your steak adventure!

Related update: Baked Sirloin Steak

Related update: Classic Macaroni and Cheese

Party Sausage Bites With Pine Nuts | Made by Meaghan Moineau

It was one of those busy Thursdays, teetering on the edge of the weekend, where my to-do list was as long as my arm, but I still had friends coming over to my place. I needed something quick, something that could impress without stress, and that’s when I remembered my go-to Party Sausage Bites With Pine Nuts. This little number is a gem; it’s like magic with how it comes together with little effort, yet packs a punch in flavor and charm. Perfect for those days when you need to juggle a hundred things but still want to treat your crew right. Plus, who doesn’t love a flaky, buttery bite filled with savory sausage goodness?

Jump to Recipe

What You’ll Need

If your pantry is anything like mine, you’re probably already stocked with most of these ingredients. Here’s what you’ll need:

  • 2 tablespoons butter
  • 1 medium onion, finely chopped
  • 3 garlic cloves, minced
  • 1 pound Italian mild sausage, casings removed
  • 1 teaspoon dry thyme
  • 1 teaspoon dry basil
  • 2 tablespoons fresh dill, chopped
  • 1/4 cup pine nuts
  • Salt, to taste
  • 2 sheets of frozen puff pastry, thawed
  • 1/4 cup parmesan, grated
  • 1 egg, beaten
  • Splash of water
  • 1 tablespoon sesame seeds

How to Make Party Sausage Bites With Pine Nuts

  1. In a skillet, melt the butter over medium heat. Add the chopped onion and minced garlic, and sauté for 5-6 minutes until everything smells heavenly and the onions look translucent.
  2. Take the skillet off the heat and let that mixture cool just enough so you can handle it without screaming.
  3. In a mixing bowl, combine the Italian sausage, cooled onion-garlic mix, thyme, basil, fresh dill, salt, and those lovely pine nuts. Mix until everything’s cozy and smooth.
  4. Lightly flour your kitchen counter and roll out the puff pastry into four strips, each about 3 inches wide and 12 inches long.
  5. Channel your inner artist and place the sausage mix along the center of each pastry strip, shaping it into a neat 1-inch roll. Go edge to edge with that sausage goodness!
  6. Sprinkle a little parmesan love on top of the sausage.
  7. Beat the egg with a splash of water to make an egg wash. Brush it along one long edge of the pastry. Fold the pastry over the filling and press to seal. Roll the whole thing gently to ensure it’s snug and happy.
  8. Do the same with the rest of the pastry and sausage mixture.
  9. Once all your rolls are ready, brush the egg wash generously over them and sprinkle sesame seeds as if it’s confetti at a party.
  10. Preheat your oven to 425°F (220°C). While it warms, cut each pastry roll into 12 cute little bites.
  11. Place the bites on a baking sheet, leaving a little room between each so they don’t fight for space while baking.
  12. Bake for about 20 minutes, or until they’re golden and crisp and your kitchen smells like an Italian bistro.
  13. Let them cool for a minute or two on the sheet before serving them warm to your guests—if they can resist snatching them immediately!

Cook’s Notes

Okay, let’s chat about the nitty-gritty. These bites can be prepped ahead of time. Just assemble them up to the cutting stage, cover them, and store them in the fridge until you’re ready to bake. If you have leftovers (not likely), store them in an airtight container in the fridge. They can be reheated in the oven to bring back some crunch. Watch out for overcooking the sausage filling; it can dry out if you’re not careful. And make sure your puff pastry stays cold until you need it—it’s a flaky game-changer.

Make It Your Own

Feeling creative? Here are some fun twists:

  • Swap the Italian sausage for spicy chorizo for a hit of heat.
  • Use feta instead of parmesan for a tangy kick.
  • Switch out the pine nuts for chopped pistachios if you’re feeling fancy.
  • Top with black sesame seeds instead of regular for a striking look.

If you try this, I’d love to hear how it turns out — drop a comment or snap a pic and tag me on social media. Let’s make our kitchens the happiest place to be!

Related update: Party Sausage Bites With Pine Nuts

Garlic & Spice Plantain Chips | Made by Meaghan Moineau

Last Tuesday, I found myself staring at a pair of plantains languishing on my counter, ripe and just waiting for their moment in the culinary sun. You know those evenings when you’re craving something salty, crunchy, and just a tad spicy, but the thought of another bowl of popcorn just seems so… meh? Enter: Garlic & Spice Plantain Chips. They come together ridiculously fast, are addictive in the best way, and bring the heat without sending you running for a glass of milk. They’re perfect for those late-evening cravings or to impress your friends at a casual get-together. Trust me, once you’ve made them, you’ll be hooked.

Jump to Recipe

What You’ll Need

These ingredients are simple yet punchy. Chances are, you already have most of these sitting in your pantry, just waiting to shine.

  • 2 plantains – Look for ones that are more yellow than green for that perfect balance of sweetness and starch.
  • 2 tablespoons olive oil – A good drizzle will coat the plantains perfectly.
  • 1 teaspoon garlic powder – This adds a savory depth without being overpowering.
  • 1 teaspoon paprika
  • ½ teaspoon cumin
  • ¼ teaspoon cayenne pepper – Adjust to your heat preference, but don’t skip it entirely. It’s the kick you didn’t know you needed.
  • Salt, to taste

How to Make Garlic & Spice Plantain Chips

  1. Preheat your oven to 400°F (205°C). This is the magic temperature where the plantains get crispy but not burnt.
  2. Line a baking sheet with parchment paper or silicone mats to ensure nothing sticks and cleanup is a breeze.
  3. Take each plantain and cut off both ends. Make a slit along the entire length of the plantain, and peel off the skin. Don’t worry if it gets a little messy.
  4. Slice the plantains into thin rounds. Aim for consistency, but don’t stress if they’re not perfect. It adds character!
  5. In a medium-sized bowl, toss the plantain slices with olive oil, garlic powder, paprika, cumin, cayenne pepper, and a good pinch of salt. Stir until every slice is well-coated with this aromatic mixture.
  6. Lay the plantain slices on the baking sheets in a single layer. Overlapping leads to chewy rather than crispy chips.
  7. Bake for 15-20 minutes, flipping them at around 8 or 9 minutes. They’re done when the edges turn a nice golden brown. I like to swap the baking sheets between the top and bottom racks halfway through for even crispiness.
  8. Remove from the oven and let them cool slightly before diving in. The cooling process is where they really crisp up.

Cook’s Notes

A few things I’ve learned along the way:

  • If your plantains are too green, they’ll be tough to peel and less sweet. Too ripe (almost black), and they’ll be overly sweet and not crisp up as much.
  • If you’re making a large batch, work in batches so every slice gets proper attention in the oven. Overcrowding is the enemy of crispy chips.
  • These chips are best enjoyed fresh, but if you need to store them, let them cool completely and keep in an airtight container. They’ll last for a couple of days, but who am I kidding—they never last that long in my house.

Make It Your Own

Here are a few ways to tweak the basic recipe and make it sing for your taste buds:

  • Sweet and Spicy: Add a teaspoon of brown sugar to the spice mix for a sweet heat combo.
  • Herbaceous Twist: Swap out the cumin for dried oregano or thyme for a herby hint.
  • Citrus Zing: A little lime zest added before baking can give these chips a fresh twist.
  • Cheesy Delight: Sprinkle some nutritional yeast for a cheesy flavor without the cheese.

If you give these a try, I’d love to hear how they turn out for you! Drop a comment or tag me in your crunchy chip moments. Enjoy every spicy, crispy bite!

Related update: Garlic & Spice Plantain Chips

Related update: Party Sausage Bites With Pine Nuts

Thai Coconut Curry Soup | Made by Meaghan Moineau

Picture this: It’s a rainy Tuesday evening, and my craving for something warm, spicy, and comforting kicks in. The kind of craving that hits you like a hug when you’ve had one of those long days. I glance around my kitchen and spot the usual suspects — a can of coconut milk, some soy sauce, and a lonely block of tofu that’s been waiting for its moment. It’s the perfect setup for my Thai Coconut Curry Soup. This soup is a game-changer. Quick to whip up, it’s one of those recipes that feels a touch exotic but is totally doable on a weeknight. It’s cozy, fragrant, and brings just the right amount of heat. Trust me, it’s the kind of dish you’ll be daydreaming about long after your bowl is empty.

Jump to Recipe

What You’ll Need

The beauty of this recipe is that it doesn’t require a mile-long list of specialty ingredients. Chances are you already have most of these in your pantry or fridge:

  • Canned light coconut milk
  • One can’s worth of water
  • Red curry paste
  • Fresh ginger paste
  • Fresh snow peas
  • String beans
  • Diced carrot
  • Fresh whole Thai basil leaves
  • Lime juice
  • Low sodium soy sauce
  • A few splashes of sesame oil
  • Chili powder
  • Tofu
  • Salt
  • Red bell pepper
  • Black pepper

How to Make Thai Coconut Curry Soup

  1. Start by bringing the coconut milk and a can’s worth of water just to a boil. You’ll know it’s ready when it’s steaming and about to bubble over, so keep an eye on it.
  2. Reduce the heat to a low simmer. Add in the red curry paste and fresh ginger paste. Give it a good whisk until both are well-incorporated, and your kitchen is filled with that heavenly aroma.
  3. Now, toss in the diced carrots and spices, except for the basil leaves. Cover and let them simmer until the carrots are almost soft. Keep them a bit firm — nobody likes a mushy carrot!
  4. Add the tofu. Cover your pot again and let it all simmer for a few more minutes. The tofu will soak up all those delicious flavors.
  5. Time to add the remaining ingredients — snow peas, string beans, lime juice, soy sauce, sesame oil, and chili powder. Cover again and simmer just until the beans turn bright green but stay crisp.
  6. Garnish with strips of red bell pepper and freshly ground black pepper. If you’re feeling indulgent, add a couple of tablespoons of coconut oil when you put in the tofu. That extra coconut flavor is truly amazing!

Cook’s Notes

When making this soup, remember that the texture of your vegetables matters. You want them crisp and vibrant, not overcooked. If you plan to make it ahead, stop cooking just before adding the snow peas and string beans, and finish it off when you’re ready to serve. Store leftovers in an airtight container in the fridge for up to three days. Reheat gently on the stovetop, adding a splash of water if the soup thickens too much.

Make It Your Own

  • Swap the tofu for crispy baked chicken if you’re not feeling the plant-based vibes.
  • Add a handful of shrimp in the last few minutes of cooking for a pescatarian twist.
  • Stir in a spoonful of peanut butter with the curry paste and ginger for a nutty depth of flavor.
  • Throw in a cup of cooked rice noodles at the end for a heartier meal.

If you try this, I’d love to hear how it turns out — drop a comment or tag me! I’m always excited to see your delicious creations. Happy cooking!

Related update: Thai Coconut Curry Soup

Related update: Lemon Chickpea & Tomato Stew

Pear Salad With Walnuts and Blue Cheese | Made by Meaghan Moineau

It was one of those fall evenings where the air turned crisp just a little too early for my liking. I found myself staring at a lonely pair of pears on my countertop, wondering how they’d somehow escaped the lunchbox routine all week. Inspired by the chill, a craving for something both comforting and refreshing struck me. This pear salad with walnuts and blue cheese was the answer — a perfect transitional dish that’s light yet satisfying. It’s what happens when you want to feel like you’re eating something fancy, minus the hassle. It’s filling enough for a lunch, or could be a lovely start to a cozy dinner.

Jump to Recipe

What You’ll Need

This salad is the definition of simple elegance, and chances are you already have most of these ingredients at home.

  • Pears – ripe but firm enough to hold their shape
  • Mixed salad leaves – I’m partial to using a mix that includes curly endive for that extra crunch
  • Walnuts – toasted lightly to bring out their nuttiness
  • Blue cheese – creamy and tangy, the star of the show
  • Lemon juice – for a zesty dressing that cuts through the richness
  • Safflower oil – mild and light, perfect for dressings
  • Walnut oil – adds a subtle nutty depth
  • Chives – delicate oniony flavor

How to Make Pear Salad With Walnuts and Blue Cheese

  1. Start by prepping your pears. Trim the base of each pear so they can stand upright like little soldiers on your cutting board. This will make slicing them easier and more stable.
  2. In individual salad bowls, arrange a generous handful of mixed salad leaves. Place one of your sliced pears on top of the greens in each bowl, making sure to fan them out for a bit of flair.
  3. Now, sprinkle a small handful of celery pieces into each bowl. The celery adds a delightful crunch and freshness to the salad.
  4. In a small bowl, combine the safflower oil, walnut oil, lemon juice, and a sprinkle of freshly chopped chives. Whisk together until the dressing is emulsified — you’ll know it’s ready when it’s slightly thick and all combined.
  5. Drizzle the dressing over each salad evenly. You want just enough to coat everything lightly without drowning it.
  6. Finish by scattering a healthy amount of crumbled blue cheese and toasted walnuts over each salad. These are your flavor bombs, so be generous!

Cook’s Notes

When it comes to choosing your pears, I recommend a variety like Bosc or Anjou for their firmness and sweetness. If your pears are too ripe, they’ll turn mushy in the salad. As for the blue cheese, any creamy variety works, but I find that a strong Roquefort can elevate the dish beautifully. To toast walnuts, simply spread them on a baking sheet and pop them in a 350°F (175°C) oven for about 5-7 minutes, or until they are golden and fragrant. Watch them closely because they can go from perfectly toasted to burnt in seconds! The salad is best served fresh, but you can store leftovers in an airtight container in the fridge for up to a day — just keep the dressing separate to avoid soggy greens.

Make It Your Own

  • Swap out the blue cheese for goat cheese if you’re not a fan of strong flavors. It adds a milder creaminess that is just as delightful.
  • Use pecans instead of walnuts for a slightly sweeter nutty touch.
  • If you’re looking for a bit more protein, add some grilled chicken or crispy tofu to make it a complete meal.
  • Drizzle a little balsamic glaze over the top for an added tangy sweetness that complements the pears beautifully.

If you try this, I’d love to hear how it turns out — drop a comment or tag me on Instagram! Your kitchen adventures make my day. Happy cooking!

Related update: Pear Salad With Walnuts and Blue Cheese

Related update: Fall Farro Salad with Pomegranate, Walnut & Truffles

Pear Salad With Walnuts and Blue Cheese | Made by Meaghan Moineau

Last Tuesday, I found myself staring into the fridge, the usual weeknight dilemma playing out: what to make that’s quick, refreshing, yet still feels like a treat? I’d been craving something that had all the comforting notes of fall but was light enough to not weigh me down. Enter the pear salad with walnuts and blue cheese, a concoction that seemed to tick every box. This salad is all about contrasts — the creaminess of the blue cheese against the crisp pears, the bitterness of endive softened by the sweet, nutty warmth of walnuts. It’s a symphony of flavors that feels like indulging without the next-day guilt. Ready to dive in? Trust me, it’s a keeper.

Jump to Recipe

What You’ll Need

This recipe doesn’t require a trip to a gourmet store. Odds are you already have most of these ingredients hanging out in your kitchen.

  • Pears – Choose ripe, but firm ones.
  • Mixed salad leaves – A blend with some curly endive adds a nice bitter touch.
  • Lemon juice – For a bright, tangy kick.
  • Blue cheese – Go for your fave, the funkier, the better.
  • Chives – Finely chopped for a fresh oniony hint.
  • Safflower oil – For a neutral base.
  • Walnut oil – Adds a toasty depth.
  • Walnuts – Toast these for that extra crunch.

How to Make Pear Salad With Walnuts and Blue Cheese

  1. Start by prepping the pears. Slice a thin piece off their bases so they can stand upright without toppling over. Trust me, this makes the plating look extra fancy.
  2. In individual bowls, artistically arrange the pears amidst the mixed salad leaves. Think of this as your blank canvas.
  3. Sprinkle the chopped chives over the leaves, letting them fall where they may — no need for precision here.
  4. In a small bowl, whisk together the lemon juice, safflower oil, and walnut oil. Aim for a smooth emulsion that coats the back of a spoon.
  5. Drizzle this dressing lovingly over your salads. You’ll want a nice, even coverage without drowning the ingredients.
  6. Finish by scattering a generous handful of blue cheese crumbles and toasted walnuts over each salad, letting them nestle into the greens.

Cook’s Notes

Okay, let’s talk about some things to keep in mind. Firstly, when choosing pears, Bartletts or Anjous are my go-to for their texture and sweet flavor. If they’re too ripe, they might collapse under the pressure of the salad fork, so aim for that sweet spot of just ripe.

Toasting the walnuts is a game-changer. Just a few minutes in a dry skillet until they’re golden and fragrant will make a world of difference. Store any leftovers in a sealed container in the fridge, but honestly, this salad is best enjoyed fresh.

If you’re prepping ahead, keep the dressing separate until you’re ready to serve. This keeps the greens from wilting and maintains that fresh, crisp bite.

Make It Your Own

  • Don’t love blue cheese? Swap it out for crumbled feta or goat cheese for a milder taste.
  • For a protein boost, add some grilled chicken or crispy tofu on top. It turns this salad into a complete meal.
  • Try swapping walnuts with pecans for a sweeter, softer crunch.
  • If you can’t find curly endive, arugula offers a peppery alternative that pairs wonderfully with the pears and cheese.

If you try this, I’d love to hear how it turns out — drop a comment or tag me! Whether you stick to the script or put your own twist on it, I hope it becomes a staple in your kitchen like it has in mine. Happy cooking!

Related update: Pear Salad With Walnuts and Blue Cheese

Related update: Pear Salad With Walnuts and Blue Cheese

Crunchy Prawn Skewers With Lemony Avocado Dip | Made by Meaghan Moineau

Picture this: it’s a Wednesday evening, and you just got home, eyes baggy from the day, craving something that feels like a mini-vacation but without the suitcase hassle. Enter Crunchy Prawn Skewers With Lemony Avocado Dip. These little beauties are my go-to when I need something fresh, quick, and so delightful it erases the mundane right off your plate. I love that they’re impressive enough to make my husband think I’ve been slaving away when really, it’s just a fun little dish that comes together quicker than you can say “takeout.” Plus, that avocado dip? Oh, it’s the zingy, creamy goodness that dreams are made of.

Jump to Recipe

What You’ll Need

I bet you already have most of these staples hanging around your kitchen. You might just need to grab some prawns on your way home.

  • Prawns – The star of the show, fresh or thawed from frozen.
  • Flesh of Avocado – Creamy and ripe, please.
  • Crème Fraiche – For that lush, smooth texture in the dip.
  • Lemon (juice) – Bright, zesty, and necessary.
  • Bread crumbs – I like the panko kind for extra crunch.
  • Olive oil – Just a splash to coat those prawns.
  • Bamboo skewers – Don’t let them set your kitchen on fire.

How to Make Crunchy Prawn Skewers With Lemony Avocado Dip

  1. Start by making the dip: throw the avocado flesh, crème fraiche, and lemon juice into a food processor. Blend until silky smooth. Taste, season, and set it aside.
  2. In a separate bowl, mix your breadcrumbs with a touch of lemon zest, and season generously. It should smell like a fresh, zesty day.
  3. Now, coat your prawns in a little olive oil. Give them a gentle massage, then toss them into the breadcrumb mixture, ensuring they’re well-coated.
  4. Thread three prawns onto each skewer. Trust me, this is easier than threading a needle.
  5. Time to grill! Place the skewers on a preheated grill for about 2 minutes on each side, until they’re golden and crisp. The smell should be irresistible by now.
  6. Serve immediately with that luscious avocado dip and watch them disappear quickly.

Cook’s Notes

I can’t stress enough the importance of soaking those bamboo skewers beforehand. Give them at least an hour in cold water, and you’ll avoid any unwelcome flare-ups. If you’re planning to make this dish ahead, prep the dip and breadcrumb mixture in advance, but hold off on breading the prawns until you’re ready to cook. Leftovers? Pop them in an airtight container in the fridge — the dip stays good for a couple of days, but the prawns are best enjoyed fresh while they’re crispy.

Make It Your Own

  • Instead of prawns, try using tofu cubes for a vegetarian twist. Just press them well to remove excess moisture before coating.
  • Add a pinch of smoked paprika to the breadcrumb mix for a smoky kick.
  • Swap the crème fraiche with Greek yogurt if you prefer a tangier dip.
  • For a little heat, toss a few chili flakes into the breadcrumb mixture.

If you try this, I’d love to hear how it turns out — drop a comment or tag me! Enjoy making these skewers and watch them become a weeknight favorite in no time!

Related update: Crunchy Prawn Skewers With Lemony Avocado Dip

Related update: Mini Zucchini Bites (Cuadritos De Calabacin)

My Drunken Fish Fillet | Made by Meaghan Moineau

Picture this: it’s a rainy Wednesday evening, and I’m staring at my fridge like it’s going to magically suggest what I should make for dinner. Ever have those moments when nothing feels right, but takeout seems too tragic? That’s when I stumbled upon the perfect antidote — My Drunken Fish Fillet. It’s this crispy, golden, comforting dish that feels like a hug on a plate, without the takeout guilt. The beer in the batter makes everything delightfully light and airy, and honestly, it’s low-key impressive when you pull it off. Plus, who doesn’t love cooking with wine and beer? The kitchen smells divine, and it’s as much fun to make as it is to devour.

Jump to Recipe

What You’ll Need

Okay, so let’s talk about the magic ingredient list. The cool part? You probably have a bunch of this stuff hanging out in your pantry already. Here’s the breakdown:

  • Fish – whatever fillet you’ve got; think tilapia or cod.
  • Salt – to season the fish and the batter.
  • White ground pepper – trust me, it adds just the right kick.
  • Rice wine – this is where the magic (and the name) starts.
  • Beer – pick something light, like a lager.
  • White eggs – you’ll need both the yolk and the whites, separately.
  • All-purpose flour – plus a little more for dusting if you’re feeling fancy.
  • Oil – for frying, of course.

How to Make My Drunken Fish Fillet

Let’s break this down step-by-step so you can nail it every time:

  1. Start by combining your beer, egg yolk, flour, and half a teaspoon of salt. Whisk it well until you’ve got a thick, smooth batter. Pop this into the fridge for a good hour. This rest is crucial for texture!
  2. Meanwhile, sprinkle your fish fillets with salt and white ground pepper. Give them a pat so they’re nicely coated. Then, splash on the rice wine and let them marinate for about 15 to 20 minutes. The fragrance alone will brighten your day!
  3. When you’re ready to fry, beat the egg whites until they’re soft and foamy. Gently fold these into your chilled batter. This is where the light, airy magic happens.
  4. Heat up your oil until it’s shimmering. Dip your marinated fish fillets into the batter, ensuring they’re fully enveloped in that luscious mix. Fry them three pieces at a time, so they’re not overcrowded. Cook until they’re a beautiful golden brown and oh-so-crispy.
  5. For a quick dip, mix Yamasa soy sauce with a bit of wasabi from the tube and a squeeze of lemon juice. Simple but absolute perfection.

Cook’s Notes

Here’s the tea on making this dish truly sing. First off, make sure your oil is hot enough before you start frying. You want that sizzle! If it’s too cool, the batter soaks up oil and gets greasy. You can make the batter ahead (up to a day), just keep it covered in the fridge because that chill time is key. Leftover fillets (if you have any!) can be reheated in an oven to crisp them back up — avoid the microwave unless you love soggy regrets.

Make It Your Own

Want to switch things up? Here are some variations that keep things exciting:

  • Swap the fish for crispy tofu. Just be sure to press the tofu well before marinating.
  • Go gluten-free by using a gluten-free flour blend in place of all-purpose flour.
  • Add a spicy twist by mixing a pinch of cayenne into the batter for a bit of heat.
  • Try an Asian twist with panko breadcrumbs mixed into the batter for extra crunch.

If you try this, I’d love to hear how it turns out — drop a comment or tag me! I’m always here for your kitchen triumphs and even the occasional mishap. Happy frying!

Related update: My Drunken Fish Fillet

Related update: Paella for Four; A Wonderful Spanish Mixed Seafood Stew

Related update: Crunchy Prawn Skewers With Lemony Avocado Dip

Moroccan Carrot Soup | Made by Meaghan Moineau

It was one of those chilly Tuesday evenings when the sun decided to call it quits early, and the only way to combat the creeping cold was with something warm and comforting. As I rummaged through my pantry, I stumbled upon a bag of carrots that had been waiting patiently for their turn to shine. It struck me right then — Moroccan Carrot Soup! A bowlful of this would feel like a cozy hug, yet it’s surprisingly easy to whip up on a weeknight when you’re not in the mood for fussing over a stove. This soup is perfect for those nights when you want something hearty but can’t be bothered with a long list of ingredients or complicated steps. Stick with me here, and you’ll be ladling this aromatic beauty in no time.

Jump to Recipe

What You’ll Need

Chances are, you already have most of this. It’s all about letting just a few ingredients shine.

  • 2 tablespoons of butter
  • 1 yellow onion, chopped
  • 6 cups of carrots, peeled and chopped
  • 4 cups of low sodium chicken stock
  • 1 tablespoon of cumin seeds
  • 1 tablespoon of honey
  • 1 tablespoon of fresh lemon juice
  • 1/4 teaspoon of allspice
  • Salt and pepper to taste
  • 1/2 cup of sour plain yogurt

How to Make Moroccan Carrot Soup

  1. In a large saucepan, melt the butter over medium-high heat. Once it’s bubbly and aromatic, toss in the chopped onion. Sauté for about 2 minutes until the onion starts turning translucent and your kitchen smells heavenly.
  2. Add the carrots and pour in the chicken stock. Bring this orange-hued mixture to a boil. Then, reduce the heat to low, cover the pot, and let it simmer. In about 20 minutes, the carrots should be tender enough to yield to a fork.
  3. Meanwhile, grab a small skillet and toast the cumin seeds over medium-high heat. Keep an eye on them, stirring occasionally, until they are golden and releasing their nutty aroma — about 4 to 5 minutes.
  4. Once toasted, finely grind the cumin seeds in a spice mill or with a mortar and pestle. The fresh grind makes a world of difference, trust me!
  5. Remove the soup from the heat. Carefully, in batches, purée it in a blender until it’s silky smooth. Return the blended soup to the saucepan.
  6. Whisk in the honey, lemon juice, and allspice, stirring until everything is well combined. Give it a taste and season with salt and pepper to your liking.
  7. To serve, ladle the soup into bowls. You can either sprinkle the ground cumin on top or, for an extra creamy finish, mix the cumin with sour cream and dollop that goodness right in the center of the soup. Enjoy!

Cook’s Notes

Let’s talk storage first: This soup keeps like a champ. Store it in an airtight container in the fridge, and you’ve got a delicious lunch or dinner for up to 4 days. If you’re meal prepping or just want to savor the flavors later, it freezes beautifully for up to 3 months. Just thaw and reheat gently on the stove.

Avoid the temptation to add the honey and lemon while it’s still boiling — you don’t want to lose those delicate flavors. And when blending the hot soup, please be cautious; do not overfill the blender as the steam can cause it to splatter. Patience is key here!

Make It Your Own

  • Spice it up: Add a pinch of cayenne pepper or a swirl of harissa for a bit of heat.
  • Veggie twist: Swap half of the carrots for sweet potatoes. It gives the soup an even richer texture.
  • Herbaceous hit: Stir in some fresh chopped cilantro or mint just before serving for a fresh burst of flavor.
  • Vegan swap: Use coconut oil instead of butter and vegetable broth in place of chicken stock. Skip the yogurt or use a plant-based alternative.

If you try this, I’d love to hear how it turns out — drop a comment or tag me! Happy cooking, and may your kitchen be filled with the warmth of this delightful Moroccan Carrot Soup.

Related update: Moroccan Carrot Soup

Related update: Spicy Lemongrass Soup

Bing’s Mango Salsa | Made by Meaghan Moineau

I remember the first time I tried to make Bing’s Mango Salsa. It was one of those sweltering summer days where the air conditioner is doing its best but you’re still considering just living in the fridge. I was craving something refreshing yet spicy to liven up my grilled chicken, and I had a bunch of mangoes sitting on the counter looking a bit too ripe. So, I dove into making this salsa, which turned out to be not only insanely delicious but also incredibly easy to whip up. It’s the kind of recipe you love because it makes you look like a culinary rock star with minimal effort—and it’s perfect for those last-minute BBQ invites. The combination of the sweet mangoes, zesty lime, and spicy chilis is like a little tropical vacation in a bowl. You know you need this in your life.

Jump to Recipe

What You’ll Need

The best part? Chances are you already have most of these ingredients, and they’re all about celebrating fresh, vibrant flavors.

  • Sweet mangoes — the star of the show, ripe but not mushy
  • Lime zest and juice — for that zesty punch
  • A handful of mint leaves — or swap with coriander if you’re feeling rebellious
  • 1-2 shallots or a small red onion — sliced paper-thin
  • Salt and black pepper — to taste
  • A sprinkle of sugar — just a pinch to balance things out
  • Fresh chili — dial up the heat as per your taste

How to Make Bing’s Mango Salsa

  1. Start by dicing the mangoes into small cubes, about 1.5cm each. This size is perfect for ensuring every bite is juicy and flavorful.
  2. Toss the mango cubes into a large mixing bowl and grate the zest of one lime over them. The fragrance will hit you immediately — heaven!
  3. Squeeze the juice from half a lime into the bowl. Stir well, and remember, a little more lime juice can be added later if needed.
  4. Finely chop a bunch of mint leaves (or coriander if you’re in that camp). Add these to the bowl and give it a good mix.
  5. Slice the shallots or red onion as thin as you can and mix them into the mango concoction. Stir after each addition, trust me, it’s magical.
  6. Season with 1/2 teaspoon of salt and black pepper. Add 1 teaspoon of sugar, then stir and taste. Adjust these to your liking — it should be a delightful balance of savory, sweet, and tangy.
  7. Finally, chop the chillis and add them cautiously. Mix well, and taste as you go to achieve your preferred spice level.
  8. Cover the bowl with cling wrap and let it chill in the fridge for at least 30 minutes. This chilling time lets the flavors meld beautifully.
  9. Keep it chilled until you’re ready to serve. It’s best enjoyed fresh!

Cook’s Notes

Here’s a few things I’ve learned along the way:

  • If you make this ahead of time, give it a good stir before serving as the juices tend to settle at the bottom.
  • Leftovers can be stored in the fridge for up to 2 days, but trust me, it rarely lasts that long!
  • Be mindful of the type of chili you use. Some can be much spicier than others, so add them slowly until you reach your desired heat level.
  • This salsa is versatile. While it’s heavenly with grilled chicken or fish, it also makes a fantastic topping for tacos or a dip with tortilla chips.

Make It Your Own

Want to switch things up? Here are some fun variations:

  • Swap the mint leaves with cilantro if you’re a fan of its bold flavor.
  • Try adding some diced avocado for an extra creamy texture.
  • Use pineapple or peach instead of mango for a different sweet twist.
  • If you’re not a fan of heat, replace chilis with bell peppers for a milder version.

If you try this, I’d love to hear how it turns out—drop a comment or tag me! Let’s keep the kitchen adventures going. 🍍🌶️

Related update: Bing's Mango Salsa

Pizza bites with pumpkin | Made by Meaghan Moineau

Picture this: it’s a chilly Tuesday evening, and I’m staring into my fridge, which is looking kind of bare except for a few odds and ends. Ever been there? Yeah, me too. But then, I spot a half-used can of pumpkin puree and some cheese. Suddenly, the idea hits me like a ton of bricks—Pizza Bites with Pumpkin! It’s the ultimate weeknight wonder, combining the cozy vibes of fall with the all-time favorite comfort food: pizza. These little bites are quick, comforting, and yes, they are bound to impress even the pickiest of eaters without much fuss. Plus, they’re made in a muffin tin, which automatically makes them adorable and somehow more delicious. Ready to give it a whirl? Grab your apron!

Jump to Recipe

What You’ll Need

The best part? You probably have most of these in your pantry already.

  • 1 cup of pumpkin
  • 2 tablespoons of olive oil
  • 1/2 cup of feta cheese
  • 1/2 cup of mozzarella
  • 2 eggs
  • 1 teaspoon of dried oregano
  • Fresh parsley, chopped, for garnish
  • 1 clove of garlic, minced
  • Your favorite pizza dough

How to Make Pizza Bites with Pumpkin

  1. Start by chopping the pumpkin into rice-sized bits using a food processor. This gives you the right texture for the bites.
  2. Heat up the olive oil in a pan over medium heat. Sauté the pumpkin for about 3 minutes, just until it starts to soften and turns a lovely golden hue. Set it aside to let it cool.
  3. In a mixing bowl, combine the feta and mozzarella cheeses. Crack in the eggs, one at a time, stirring after each addition until you have a smooth mixture.
  4. Add the cooled pumpkin and the minced garlic, along with the oregano and parsley. Mix everything until well combined. Your kitchen should start to smell amazing right about now!
  5. Grease a muffin tin and evenly spoon the mixture into each mold.
  6. Now, press the pizza dough down evenly and firmly into each mold. This step is crucial to ensure the bites stick together nicely.
  7. Bake in a preheated oven at 200°C (about 400°F) for 30 minutes, or until the tops are golden brown and the edges are slightly crisp.
  8. Once done, remove from the oven and let them cool in the pan for 5 to 10 minutes. Trust me, this waiting game is critical so they hold their shape when you take them out.

Cook’s Notes

Okay, let’s talk details. First, make sure to squeeze the pumpkin mixture firmly into the muffin tin. This ensures they hold their cute little bite shape once baked. And seriously, resist the urge to pop them out of the tin too soon. Letting them cool for about 5 to 10 minutes is like letting them gather their strength to hold together.

As for storage, these bites are best enjoyed fresh, but if you have leftovers (unlikely!), pop them in an airtight container in the fridge. Reheat them in the oven to retain that crisp factor.

Make It Your Own

  • Swap feta for goat cheese if you’re feeling fancy and want a tangy kick.
  • Looking for a veggie boost? Add some finely chopped spinach or kale to the mix.
  • For a meatier option, toss in some cooked bacon bits or pepperoni.
  • If you’re not a fan of pumpkin, butternut squash is a fantastic alternative.

If you try this, I’d love to hear how it turns out — drop a comment or tag me! Can’t wait to see your pumpkin pizza bite creations. Enjoy every cheesy, pumpkin-y bite!

Related update: Pizza bites with pumpkin

Related update: Bing's Mango Salsa

Maple & Curry Acorn Squash | Made by Meaghan Moineau

Picture this: It’s a chilly fall evening, and my kitchen still smells like the remnants of the apple pie I baked last weekend. I’m standing in front of the pantry, craving something that’s both cozy and a little unexpected. Ever had those moments where you stare at the ingredients you have and think, “This could either be a disaster or magic”? That was me a few weeks ago, reaching for an acorn squash, some curry powder, and a bottle of maple syrup that I had been saving for pancake Sundays. What came out of that experimental whirlwind was a dish that’s not only delicious but also has become my go-to when I need to impress with minimal effort. It’s sweet, spicy, and roasted to perfection—ideal for spicing up a weeknight or wowing guests without breaking a sweat.

Jump to Recipe

What You’ll Need

This recipe is delightfully simple, and chances are you already have most of these on hand. Here’s what you’ll need:

  • Acorn squash – pick one that’s firm and heavy for its size.
  • Curry powder – this is where the magic happens, so use your favorite blend.
  • Maple syrup – pure, not the pancake kind, for that rich, caramelized finish.
  • Olive oil – for that perfect roast.
  • Salt – to taste and to enhance all those flavors.

How to Make Maple & Curry Acorn Squash

  1. Preheat your oven to 400°F (200°C) and line a baking sheet with parchment paper or a silicone mat. This makes cleanup a breeze and prevents any sticky situations.
  2. Give the acorn squash a good rinse, especially if you plan to eat the skin (which, trust me, you’ll want to after it’s all roasted and crispy).
  3. Carefully, chop the squash in half and scoop out the seeds. You can use a spoon or an ice cream scoop for this—whichever feels less like wrestling and more like a gentle sweep.
  4. Slice the squash into one-inch wedges, using the natural grooves as your guide. Not only does this make the pieces look pretty, but it also ensures even cooking.
  5. In a medium bowl, toss the squash wedges with curry powder, maple syrup, olive oil, and salt. Stir until each piece is glistening with the mixture, and you’re tempted to lick your fingers.
  6. Arrange the wedges on the prepared baking sheet, cut side down. This helps them get that beautiful golden-brown finish on the edges.
  7. Bake for 15 minutes, then flip them over with a spatula so both sides get equal love and attention. Bake for another 10 to 15 minutes until they’re tender and can be easily pierced with a fork.

Cook’s Notes

When it comes to choosing the right acorn squash, look for one that feels heavy for its size and has a deep green skin. A few orange patches are okay and can even be a sign of ripeness. If you’re prepping ahead, you can slice the squash a day in advance and keep it in the fridge. Once roasted, these wedges keep well covered in the fridge for up to three days. Just pop them in the oven to reheat and crisp them back up. Be cautious not to over-bake; the squash should be tender but not mushy, and the edges should be caramelized but not burnt.

Make It Your Own

  • Switch up the squash: Don’t have acorn squash? Butternut or delicata squash work beautifully too.
  • Spice it up: Add a pinch of cayenne pepper to the mix for a spicy kick.
  • Play with herbs: Sprinkle some fresh rosemary or thyme over the top before baking for an aromatic twist.
  • Sweeten the deal: Drizzle a bit more maple syrup on top right before serving for an extra glossy finish.

If you try this, I’d love to hear how it turns out — drop a comment or tag me! Seriously, nothing makes my day more than seeing someone else enjoy something I whipped up in my kitchen. Happy cooking, and remember, kitchen experiments are just recipes in disguise!

Related update: Maple & Curry Acorn Squash

Related update: Pizza bites with pumpkin

Eggplant pizzette | Made by Meaghan Moineau

So, there I was last Tuesday, staring into the fridge, wondering what to make for dinner that wouldn’t take an eternity. You know those days when all you want is something delicious but quick enough that you won’t be stuck in the kitchen all night? Enter: Eggplant pizzette. It’s that magical intersection of pizza cravings and veggie goodness. Plus, it’s one of those recipes that looks fancy enough to impress but is secretly super simple to throw together. Trust me, once you smell that cheese bubbling away, you’re going to thank yourself for making these little guys.

Jump to Recipe

What You’ll Need

Let’s talk about the ingredient list — it’s mercifully short and sweet. Chances are, you already have most of this at home, especially if you’re a basil hoarder like me.

  • Round eggplant – the base for our pizzette
  • Tomatoes – fresh or canned, your choice!
  • Swiss cheese – for that perfect melty goodness
  • Fresh basil leaves
  • Oregano leaves
  • Olive oil

How to Make Eggplant pizzette

  1. Preheat your oven to 230°C. Trust me, getting this right from the start saves you from impatiently watching the oven later.
  2. Grab your round eggplant and slice it into rounds, about half an inch thick. You want them thin enough to cook quickly but thick enough to hold all that topping.
  3. Place the eggplant rounds on a non-stick pan greased with olive oil. A light coating will do; no one wants oily pizzette.
  4. Bake the eggplant in the oven for about 10 minutes. You’ll know it’s ready for the next step when the edges start looking golden and slightly crispy.
  5. Carefully remove the pan from the oven — the eggplant stays, so it keeps warm and toasty.
  6. Spoon a generous amount of chopped tomatoes onto each eggplant round. If you’re using canned, make sure they’re well-drained to avoid sogginess.
  7. Sprinkle fresh basil and oregano leaves over the tomatoes. The aroma will start to hit you about now, and it’s divine.
  8. Top everything with grated Swiss cheese. Go ahead and be generous here; a good layer ensures that melty, bubbly finish.
  9. Pop the pan back in the oven for another 5 minutes. Keep an eye out — you want that cheese to turn a lovely golden brown.
  10. Remove from the oven and let them cool for a minute or two. These are fab served warm or even cooled down a bit as a snack.

Cook’s Notes

Alright, a few things to keep in mind. First, if you slice the eggplant too thin, it might turn into a mushy mess, so aim for that half-inch thickness. If you’re worried about bitterness, sprinkle a bit of salt on the eggplant slices and let them sit for 10 minutes before rinsing and patting dry. Also, feel free to adjust the herbs based on what you have—dried oregano works if fresh isn’t available. These pizzette can be stored in the fridge for up to two days, though they’re best enjoyed fresh.

Make It Your Own

Want to switch things up? Here are some ideas:

  • Swap the Swiss cheese for mozzarella for a more classic pizza flavor.
  • Add a layer of pesto under the tomatoes for an herbaceous kick.
  • Use zucchini slices instead of eggplant if you prefer a different base.
  • Try adding thin slices of pepperoni or mushrooms for extra toppings.

If you try this, I’d love to hear how it turns out — drop a comment or tag me! Happy cooking, and may your kitchen adventures be as tasty as they are fun!

Related update: Eggplant pizzette

Related update: Maple & Curry Acorn Squash