
I remember that Tuesday evening vividly. I was in the middle of cleaning out the fridge, fully intent on just hitting the local takeout joint because it was one of those days. But as I eyed the half-used butternut squash and the bell pepper looking to escape a tragic fate, the idea hit—frittata! This isn’t just any frittata though; it’s a Butternut Squash Frittata with a twist of creamy goat cheese magic. It’s one of those dishes that seems way fancier than it is, perfect for impressing your in-laws or just treating yourself on a weekday night. Plus, it’s a one-dish wonder, which means minimal cleanup. Score!
Jump to Recipe
What You’ll Need
Before we dive in, let me assure you—this ingredient list is pretty forgiving and likely not going to send you on a scavenger hunt. You might find that most of these items are already nestled in your pantry or fridge.
- Butternut squash (cubed, about 1 cup — the star of this show!)
- Goat cheese (crumbled, because who doesn’t love a creamy surprise?)
- Liquid egg substitute (about 1 cup – healthier but still delicious!)
- Non-fat milk (1/4 cup, keeps it light)
- Bell pepper (diced, adds a pop of color and crunch)
- Cooking spray (for non-sticky business)
How to Make Butternut Squash Frittata
- Preheat your oven to 350°F. You know how it is; the oven needs to be ready to play its part.
- Grab a 10 oz oven-safe dish and give it a good spray with cooking spray. We want a frittata, not a sticky mess.
- Add the cubed butternut squash to the dish. Spread them out so they have their own space to roast to perfection.
- In a measuring cup, mix together the liquid egg substitute and non-fat milk. Stir until they’re well acquainted.
- Pour the egg mixture over the butternut squash in the dish. Make sure it covers the squash evenly.
- Sprinkle your diced bell pepper over the top. The colors are already making this dish look like a masterpiece.
- Finish by topping it all with the crumbled goat cheese. This is where the magic happens.
- Place the dish in the preheated oven and bake for 30-35 minutes. You’ll know it’s done when the middle is slightly firm and the edges are a golden beauty.
- Let it cool for a few minutes before slicing in. Patience is a virtue, and it lets the flavors settle.
Cook’s Notes
Don’t worry if your butternut squash isn’t perfectly uniform in size—imperfection is charming. If you’re looking to prep ahead, you can cube the squash and dice the bell pepper the night before. The frittata keeps well in the fridge for about 2-3 days, making it a great make-ahead option. Leftovers are perfect for a quick breakfast the next day — just reheat gently in the microwave or enjoy it at room temperature. One common conundrum is over-baking. Remember, the center should be just set; it’ll continue cooking a bit even after you take it out of the oven.
Make It Your Own
- Swap the goat cheese for feta if you’re craving something a bit brinier.
- If you’re out of butternut squash, try using sweet potatoes for a different kind of sweet earthiness.
- Add a handful of fresh spinach for a pop of green and an extra nutrient boost.
- For a little heat, sprinkle in some red pepper flakes before baking.
If you try this, I’d love to hear how it turns out — drop a comment or tag me! The kitchen is all about sharing experiences and flavors, and I’m excited to see what you come up with. Happy cooking!
Goes Well With
If you want to round out the meal, here’s what I’d pair it with over on meaghanmoineau.com:
Related update: Butternut Squash Frittata

Last Tuesday was one of those days. You know the kind where you open the fridge, stare blankly, and wonder if a meal will magically appear. It was chilly outside, the kind of weather that makes you crave something warm and comforting. That’s when the idea of a Chorizo and Egg Bake hit me — a dish that’s just the right balance of hearty and spicy. It’s perfect for those nights when you want something delicious without spending hours in the kitchen. Plus, there’s something incredibly comforting about the way chorizo sizzles in the oven, filling the house with its smoky aroma. Let’s dive in and get this bake going, shall we?
Jump to Recipe
What You’ll Need
This is one of those recipes where you might already have most of the ingredients sitting in your pantry or fridge. It’s all about those bold flavors that come together effortlessly.
- 6 large eggs
- 1 cup of grated cheddar cheese
- 250g of smoked chorizo sausage, sliced
- 1 medium onion, diced
- 2 cloves of garlic, minced
- 1 can of red and green chilli, chopped
- Salt and pepper to taste
How to Make Chorizo and Egg Bake
- Start by preheating your oven to 170°C (that’s about 340°F for my friends across the pond). This gives you just the right amount of time to prep everything.
- In a large bowl, crack your eggs and whisk them until they’re a vibrant, sunny yellow. This is your base, so make sure it’s well-combined.
- Add in the grated cheddar cheese, diced onion, sliced chorizo, minced garlic, and chopped chilli. The mix will be colorful and smell divine already.
- Season generously with salt and pepper, then give it a good stir to make sure everything is evenly distributed.
- Lightly grease a baking dish with a bit of oil or butter. This helps prevent sticking and makes cleanup a breeze.
- Pour your egg mixture into the dish, spreading it out so that it’s even on top. Trust me, you want every bite to have a bit of everything.
- Pop it in the preheated oven and bake for about 20 minutes. You’ll know it’s done when the edges are golden, and the center is set yet slightly jiggly. Keep an eye out for that cheesy bubbling action.
Cook’s Notes
This bake is pretty forgiving, but here are some tips to make it truly perfect:
- If your chorizo is particularly oily, you might want to cook it for a couple of minutes in a pan to render out some of that fat before adding it to the egg mixture.
- This dish keeps well in the fridge for up to three days. Just cover it well to prevent it from drying out. Reheat gently in the oven, or if you’re lazy like me, the microwave works too!
- If you’re making it ahead for a brunch or gathering, you can prep everything the night before and just pop it in the oven the next day.
Make It Your Own
- Spice it up: Add some extra sliced jalapeños or a dash of hot sauce if you like things fiery.
- Herby twist: Toss in some fresh basil or rosemary for a fragrant touch.
- Cheese swap: Try Monterey Jack or even a bit of feta for a different cheesy vibe.
- Vegetarian version: Swap the chorizo for crispy tofu or some sautéed mushrooms.
If you try this, I’d love to hear how it turns out — drop a comment or tag me! Cooking is all about sharing those little triumphs in the kitchen, right? Enjoy every savory, cheesy bite!
Goes Well With
If you want to round out the meal, here’s what I’d pair it with over on meaghanmoineau.com:
Related update: Chorizo and egg bake
Related update: Pancakes
Related update: Butternut Squash Frittata

Picture this: It’s a crisp spring morning, the kind where the sun is just starting to warm the earth, and you’re craving something fresh yet comforting for breakfast. You peep into your fridge, and there they are — gorgeous green asparagus spears and a tub of tzatziki begging to be used. Enter the Greek Inspired Spring Omelet, a dish that feels like a mini-vacation on a plate, promising both simplicity and flair. This omelet is just the thing for when you want something light and packed with flavor, without spending ages in the kitchen. Whether you’re impressing brunch guests or sneaking in a quick solo breakfast, this recipe is a winner.
Jump to Recipe
What You’ll Need
Honestly, this ingredient list is a love letter to spring. You’ll likely find most of these staples in your fridge or pantry, making it not just delicious but convenient.
- Asparagus spears (because who can resist their crunch?)
- Egg whites (keeping things light and fluffy)
- Feta cheese (the tangy star of the show)
- Diced green onions (for a bit of zing)
- Salt and pepper (to taste, because you know your buds better than anyone)
- Tzatziki (our creamy secret weapon)
- Yellow and red diced cherry tomatoes (for a burst of color and sweetness)
How to Make Greek Inspired Spring Omelet
- Start by grabbing a medium skillet, and toss in your asparagus spears. Sauté them until they become tender and vibrant green, which should take about 7 minutes. This is when your kitchen starts smelling spring-fresh.
- Set the asparagus aside and let them cool off a bit. Meanwhile, in a small bowl, combine your egg whites with a good dollop of tzatziki. Stir until they’re well acquainted.
- Now, spray a non-stick skillet with cooking spray and bring it to medium heat. Pour your egg white mixture into the skillet and watch it spread like a satisfying blanket over the pan. Cook until the edges are firm and the surface turns white, about 2 minutes.
- Carefully slide the cooked omelet onto a waiting plate. Pile your sautéed asparagus, diced cherry tomatoes, green onions, and a crumble of feta right in the middle. It’s like you’re giving your omelet a delicious core.
- Fold the omelet into thirds, gently covering your vibrant fillings. This is when it starts to look like something out of a café menu.
- Serve it up hot, with an extra side of tzatziki because why not? Season with salt and pepper to your liking, and dig in!
Cook’s Notes
Let’s talk omelet mastery and leftover magic. First, when sautéing your asparagus, keep an eye to avoid overcooking; you want them vibrant, not mushy. If your omelet sticks to the pan, it’s likely because the pan wasn’t hot enough or lacked a proper coating of cooking spray.
Make-ahead tip: You can prep the veggies the night before to save time in the morning. As for leftovers, though this omelet is best fresh, you can store it in the fridge for up to two days. Just reheat it gently in the microwave or a warm skillet.
Make It Your Own
Variety is the spice of life, so let’s play with this recipe a bit.
- Swap the asparagus for zucchini ribbons if you’re feeling adventurous and want more veggie variety.
- Not a fan of feta? Try using crumbled goat cheese instead for a creamier texture.
- If you’re craving more protein, add diced cooked chicken breast for an extra hearty omelet.
- For a vegetarian twist with a nutty flavor, replace tzatziki with a pesto spread.
If you try this omelet, I’d love to hear how it turns out — drop a comment or tag me on social media! This recipe is like a breath of fresh spring air, and I hope it brings a little sunshine to your plate. Enjoy!
Goes Well With
If you want to round out the meal, here’s what I’d pair it with over on meaghanmoineau.com:
Related update: Greek Inspired Spring Omelet
Related update: Chorizo and egg bake

It was one of those Wednesday evenings where the clock seemed to sprint from 5 to 7 PM in the blink of an eye. My stomach was grumbling louder than my Spotify playlist, and all I could think about was something delicious yet uncomplicated. The kind of meal that makes you feel like a culinary wizard without actually breaking a sweat. Enter stage left: the Vegetable Tart with Goat Cheese. This tart is my secret weapon, perfect for when I want something that looks as good as it tastes with minimal fuss. It’s a colorful showstopper that tastes like you planned it all week, but shhhh… it’s our little secret!
Jump to Recipe
What You’ll Need
Trust me, if your pantry and fridge are anything like mine, you’re already halfway there. This tart comes together with just a few key stars and supporting players.
- Puff pastry (the freezer-friendly hero of this dish)
- Frozen spinach
- Mushrooms
- Red bell pepper
- Goat cheese (the creamy crown jewel)
- Salt and pepper
How to Make Vegetable Tart With Goat Cheese
- Preheat your oven to 350°F. This is the first step to turning your kitchen into a cozy haven.
- Grab your puff pastry from the freezer and roll it out onto a cookie sheet, keeping the parchment paper underneath to prevent any sticky situations.
- Spread the frozen spinach evenly over the pastry, but leave about an inch of edge untouched. This creates a beautiful border that puffs up like magic.
- Layer the mushrooms on top of the spinach. They’ll release their juices, adding depth to the flavor party.
- Next, scatter the red bell pepper slices over the mushrooms. This vibrant red layer will make your tart pop, both visually and taste-wise.
- Finally, sprinkle crumbled goat cheese over the top. As it bakes, it will melt into creamy pockets of tangy goodness.
- Season with a sprinkle of salt and a few cracks of fresh pepper to taste.
- Bake in the preheated oven for 15-20 minutes, or until the edges of the tart are golden brown and the cheese is bubbly and slightly caramelized.
Cook’s Notes
Alright, here’s the inside scoop: always make sure your puff pastry is still cold when you start rolling it out, as it puffs better. If your mushrooms seem a bit too wet after slicing, give them a quick pat with a paper towel to avoid sogginess. This tart is best enjoyed fresh out of the oven, but if you do have leftovers, store them in an airtight container in the fridge and reheat them in the oven to maintain that crispy crust. If you’re planning ahead, all the veggies can be prepped a day in advance, making the assembly a breeze when you’re ready to bake.
Make It Your Own
This tart is a blank canvas for your culinary whims. Here are some ideas to get those wheels turning:
- Switch the spinach for kale for a heartier texture.
- Love a bit of heat? Add sliced jalapeños on top for a spicy kick.
- Not a fan of goat cheese? No problem. Try it with feta cheese instead for a milder flavor.
- For a sweet twist, caramelize some onions and layer them under the spinach.
If you try this, I’d love to hear how it turns out — drop a comment or tag me! This is a dish that invites creativity, so feel free to experiment and make it truly yours. Happy cooking, friends!
Goes Well With
If you want to round out the meal, here’s what I’d pair it with over on meaghanmoineau.com:
Related update: Vegetable Tart With Goat Cheese
Related update: Penne Arrabiata

Okay, so picture this: It’s a lazy Sunday morning, and I’m still in my pajama pants, hair doing its own thing, craving something that’s going to make me feel like I have my life together. But I definitely do not have my life together right now. I glance over at my kitchen counter, and there’s a basket of mulberries just sitting there, giving me the “use me or lose me” eyes. Rhubarb stalks are peeking out from the fridge door like they’re trying to escape to find their life purpose. And that’s when it hit me: Dutch Babies with Mulberry-Rhubarb Compote. This recipe is one of those magical ones where you get to feel fancy without actually doing anything fancy. It’s not just about the taste—though, trust me, it’s a hug on a plate—but it’s also about how it looks like you put in way more effort than you actually did. Plus, it gets me extra points with anyone who’s lucky enough to be around when it comes out of the oven.
Jump to Recipe
What You’ll Need
This recipe is all about using what you probably already have in your kitchen, with a couple of stars that make it shine.
- Butter
- Cornstarch
- Eggs
- Flour
- Milk
- Mint leaves
- Mulberries
- Orange juice
- Rhubarb
- Salt
- Sugar
- Vanilla sugar
How to Make Dutch Babies With Mulberry-Rhubarb Compote
- First, let’s tackle the compote. Pulse the rhubarb in a food processor about 5-6 times until it’s diced but not mushy. Then give the mulberries a quick 3-4 pulses until they’re nicely chopped.
- In a saucepan, combine the diced rhubarb, chopped mulberries, orange juice, sugar, salt, and cornstarch. Let this mixture simmer over medium heat for about 10-15 minutes, stirring occasionally. You’ll know it’s done when it smells like a fruity dream and is slightly thickened.
- Once off the heat, stir in the fresh mint leaves. This is where the magic happens, trust me. Set it aside—it’ll thicken a bit more as it cools.
- Now, preheat your oven to 375°F. This is the perfect time to grab a coffee and do a little dance because it’s all happening!
- In a blender, throw in the flour, sugar, salt, milk, and eggs. Blend for a solid 10 seconds to get everything nice and smooth. Then, add 2 tablespoons of melted butter and give it another quick blitz.
- Brush the remaining 4 tablespoons of melted butter into a 24-cup muffin tin, ensuring every nook and cranny is coated. This is what gives the Dutch babies their golden crispiness.
- Pour the batter slowly into each muffin cup, filling about halfway. Pop them into the oven and bake for 12-14 minutes until the edges are golden brown and the centers are all puffed up and proud.
- Remove those Dutch babies immediately from the muffin tins to avoid any sticking issues, and top generously with your mulberry-rhubarb compote. Serve them up while they’re still warm and watch them disappear!
Cook’s Notes
These Dutch babies are best eaten fresh out of the oven, but if you have leftovers (ha, as if!), they can be stored in an airtight container in the fridge for up to two days. Just reheat them in the oven for a few minutes to regain some of that crispiness.
When making the compote, keep an eye on the heat. You want a gentle simmer, not a vigorous boil, to avoid turning everything into a fruit soup.
- If you’re short on mulberries, you can easily swap in another berry. Blackberries or blueberries work wonders here.
- For a richer flavor, try browning the butter before you add it to the muffin tins—trust me, it’s a game-changer.
- If you’re feeling adventurous, add a dash of cinnamon or nutmeg to the batter for a warm spice twist.
Make It Your Own
- Swap the mulberries for blackberries if you’re feeling a bit wild, or raspberries for a nice tart kick.
- Want a savory version? Skip the compote and serve with a dollop of crème fraîche and smoked salmon.
- No rhubarb? No problem! Substitute with an equal amount of strawberries for a sweeter compote.
- For a nutty twist, add a tablespoon of almond extract to the batter and top with slivered almonds before baking.
If you try this, I’d love to hear how it turns out—drop a comment or tag me on social media! I’m always excited to see your creations and hear your tweaks. Happy baking!
Goes Well With
If you want to round out the meal, here’s what I’d pair it with over on meaghanmoineau.com:
Related update: Greek Inspired Spring Omelet

It was one of those rainy Tuesday evenings where the thought of venturing outside for groceries felt as appealing as stepping into a cold shower. I rummaged through my fridge, crossing my fingers for inspiration, and stumbled upon a collection of humble ingredients: eggs, a half-used loaf of bread, some mushrooms teetering on the edge of usable, and a pack of bacon bits. And thus, the Figure Friendly Mushroom and Bacon Strata was born. This dish is a lifesaver — it’s like the comforting embrace of a breakfast-for-dinner vibe but dressed up enough to impress even the picky eaters. Whether you’re in the mood for a cozy brunch or a quick weeknight dinner, this strata offers that magic mix of minimal effort and maximum flavor.
Jump to Recipe
What You’ll Need
This recipe is wonderful because chances are you already have most of these ingredients lurking in your kitchen. Here’s what you’ll need:
- Eggs (whole and whites)
- Low fat milk
- Bread (preferably a little stale)
- Onion
- Red bell pepper
- Yellow bell pepper
- Mushrooms (the more, the merrier)
- Fresh basil
- Bacon bits
- Olive oil
- Cheese (pick your favorite kind for a magical melt)
How to Make Figure Friendly Mushroom and Bacon Strata
- Heat a non-stick skillet over medium heat. Toss in the olive oil, and when it’s shimmering, add the chopped onion and bell peppers. Sauté them for about 5 minutes until they’re soft and starting to get a bit of color.
- Next, add the mushrooms. Stir them around for another 5 minutes until they release their juices and start to brown. The kitchen will smell amazing by now, just wait.
- Grab a baking dish and give it a good spray with cooking spray. Add your bread cubes, spreading them out so they’re in an even layer.
- Pour the sautéed veggie and mushroom mixture over the bread cubes. Add fresh basil, a sprinkle of salt, and a dash of pepper to suit your taste preferences. Scatter those bacon bits and generous handfuls of cheese over the top.
- In a separate bowl, whip together the eggs and low-fat milk until they’re well combined. Pour this eggy goodness over the bread mixture in the dish. Pop it in the fridge for at least an hour or up to overnight — it needs time for the bread to soak up all the flavors.
- When you’re ready to bake, preheat your oven to 350°F. Cover the dish with foil and bake for 20 minutes.
- Remove the foil and let it bake for another 10 minutes until it’s puffed, golden, and lightly browned. The edges might bubble a bit — this is your cue!
Cook’s Notes
Here’s the scoop: the longer you let the strata sit before baking, the better the flavors meld. If you’re a planner, make it the night before. This dish also freezes well, so consider doubling the recipe and saving one for a rainy day. Just pop it in a sealed container and it’ll keep for about a month. Also, be mindful when adding salt since the bacon bits are pretty savory on their own.
Make It Your Own
Want to riff on this recipe and make it your own? Here are some ideas:
- Swap the bacon bits for crispy tofu to keep it vegetarian without losing the savory punch.
- For a bit of a kick, add some chopped jalapeños to the veggie mix.
- Try using whole grain bread for a nuttier flavor and extra fiber.
- Switch out basil for fresh thyme or rosemary for an earthy twist.
If you give this Figure Friendly Mushroom and Bacon Strata a whirl, I’d love to hear how it turns out for you! Drop a comment below or tag me in your mouthwatering brunch photos. Let’s keep the kitchen adventures rolling!
Goes Well With
If you want to round out the meal, here’s what I’d pair it with over on meaghanmoineau.com:
Related update: Figure Friendly Mushroom and Bacon Strata
Related update: Knockwurst with sauerkraut

It was one of those evenings when the fridge seemed to have its own agenda. You know, the kind where you open the door, and despite it being packed, you can’t find the makings of a straightforward dinner. I spotted some forlorn leeks and a half-full bottle of porter leftover from the weekend, and inspiration hit me like a bolt of lightning. Enter my Cheese and Leek Strata—a dish that’s an absolute game-changer for those nights when you don’t want to keep oscillating between the fridge and the pantry. This strata is comfort in a casserole, layered with flavors and textures that promise to turn your evening around. It’s like a savory bread pudding, but with a cheesy, leeky twist. Perfect for brunch or a cozy dinner, it’s a make-ahead marvel that gives you more time to curl up on the couch with a good book or Netflix series.
Jump to Recipe
What You’ll Need
With ingredients you likely have lurking around your kitchen, this dish won’t require a mad dash to the grocery store. Here’s the lowdown:
- 6 large eggs
- 2 cups milk
- 1/2 cup porter (or any dark beer)
- 1 garlic clove, minced
- Salt and pepper, to taste
- 1 loaf sourdough bread, cut into cubes
- 1 large leek, thinly sliced
- 1 red bell pepper, diced
- 1 cup shredded cheddar cheese
- 1 cup shredded Swiss cheese
How to Make Cheese and Leek Strata
- Preheat your oven to 350 degrees Fahrenheit. As it warms, the kitchen fills with a cozy promise of what’s to come.
- In a large mixing bowl, combine the eggs, milk, porter, minced garlic, and a generous pinch of salt and pepper. Beat this mixture well until it’s beautifully blended, creamy and slightly frothy.
- Grease a 2.5-quart round baking dish. Place half of the sourdough bread cubes at the bottom, forming the first layer of your strata.
- Sprinkle half of the sliced leeks and diced red bell pepper over the bread layer. The veggies should look like colorful confetti scattered across the bread.
- Top this veggie layer with half of the Swiss and cheddar cheeses, letting it snow over the vibrant layer beneath.
- Repeat the layering process with the remaining ingredients—bread, leeks, bell pepper, and cheeses—ending with a delightful blanket of cheddar cheese on top.
- Pour the egg mixture evenly over the entire dish, ensuring the liquid seeps through to all corners.
- Cover the dish tightly with foil or plastic wrap and weigh it down with a slightly smaller baking dish. This step helps everything meld together beautifully.
- Refrigerate for at least 2 hours or, even better, overnight. This waiting period lets the flavors mingle and intensify.
- When you’re ready to bake, remove the cover and place it in the oven for about 40 minutes. The strata is done when the center is set and the top is golden and enticingly fragrant.
- Serve warm, and let the compliments roll in!
Cook’s Notes
You’ll want to give this strata time in the fridge. Trust me, it makes all the difference in flavor and texture. If you’re strapped for time, a minimum of 2 hours will do, but overnight is optimal. If you have leftovers, they store beautifully in the fridge for up to three days. Just reheat them gently in the oven. Be sure to use a crusty sourdough—it holds up better against the liquid soaking. And if you find the center isn’t setting after 40 minutes, give it another 5-10 minutes until it’s firm.
Make It Your Own
- Swap the cheddar cheese for some sharp Gruyère if you’re feeling fancy.
- Not a fan of leeks? Try using caramelized onions for a sweeter touch.
- Give it a meaty twist by adding cooked bacon or sausage between the layers.
- For a spicy kick, toss in some jalapeños alongside the bell peppers.
If you try this, I’d love to hear how it turns out—drop a comment or tag me! Happy cooking, and may your fridge always surprise you in the best possible way.
Related update: Cheese and Leek Strata
Related update: Chorizo and Beef Quinoa Stuffed Pepper
Related update: Figure Friendly Mushroom and Bacon Strata

Okay, so picture this: it’s a dreary Tuesday morning, and I’m dragging myself into the kitchen with one eye barely open, the other desperately seeking caffeine. The thought of another bland bowl of oatmeal is honestly more than I can handle. Enter: Tropical Breakfast Quinoa. This dish has become my sunshine in a bowl — it’s like a mini-vacation for your taste buds, without the hassle of airport security. It’s quick to whip up, comforting in all the right ways, and just fancy enough that you feel like you’ve got your life together (at least until lunch). Whether you’re rushing off to work or settling down for a lazy Sunday brunch, this vibrant breakfast will transport you to a sunny beach with every bite. No passport required!
Jump to Recipe
What You’ll Need
This recipe is basically a tropical party for your pantry. Chances are you already have most of this hanging around.
- 2 cups of cooked quinoa
- 1 cup of light coconut milk
- 1/2 cup of crushed pineapple (canned or fresh)
- 1/2 teaspoon of cinnamon
- 2 tablespoons of maple syrup
- 1/4 cup of toasted coconut
- 1/4 cup of chopped pecans
- 1/2 cup of sliced strawberries
- A drizzle of balsamic vinegar (trust me, it works!)
How to Make Tropical Breakfast Quinoa
- Start by grabbing a medium-sized pot and tossing in your cooked quinoa, coconut milk, crushed pineapple, cinnamon, and maple syrup. Give it a good stir until everything is well combined and all the flavors are mingling like guests at a really great party.
- Turn up the heat until the mixture reaches a gentle boil. Then, reduce the heat to a simmer. Let it cook for about 5 minutes, stirring occasionally. You’ll know it’s ready when your kitchen smells like a tropical paradise and the mixture has thickened just a bit.
- Once your quinoa is ready, grab a bowl and spoon in a generous serving of the warm, tropical mixture.
- Top it off with a sprinkle of toasted coconut and chopped pecans for some crunch. Add a handful of sliced strawberries for freshness, and finish with a surprising drizzle of balsamic vinegar. The vinegar might sound weird, but it ties everything together with a subtle tang that just works.
Cook’s Notes
Here’s the deal with this recipe: it’s super forgiving. Don’t stress if your pineapple is fresh or canned; either works. The key is just to make sure your quinoa is cooked ahead of time. If you’re not a morning person, like me, make the quinoa the night before and save yourself some hassle. Leftovers can be stored in the fridge and reheated gently on the stove with a splash more coconut milk. Just remember, the strawberries and balsamic drizzle are best added fresh, right before serving to keep things vibrant and pretty.
Make It Your Own
- Nut Swap: If pecans aren’t your jam, try almonds or walnuts for a different crunch.
- Fruit Fiesta: Swap out the strawberries for mango or kiwi for an even more tropical twist.
- Sweet Tooth: Add a dollop of Greek yogurt or a scoop of vanilla ice cream (yes, for breakfast) if you’re feeling indulgent.
- Spice It Up: Add a pinch of nutmeg or cardamom for a bit of extra warmth and depth.
If you try this, I’d love to hear how it turns out — drop a comment or tag me in your breakfast masterpiece! Catch you in the kitchen. 😊
Related update: Tropical Breakfast Quinoa
Related update: Neoguri (Spicy Seafood Ramen)
Related update: Cheese and Leek Strata
Related update: Easy Weekday Breakfast Muffins

It was one of those Tuesday nights when the fridge was looking scarily empty, and yet, the thought of braving the grocery store felt like too much. That’s when I spotted the lone zucchini in the crisper drawer, looking like it might be the hero of dinner. With some eggs, a handful of basil, and a bit of cheese, this Zucchini & Basil Frittata came to life. It’s like an Italian hug in a skillet, perfect for a weeknight when you need something cozy but also have about 20 minutes of energy left in you. The beauty of this frittata is how it transforms humble ingredients into something that feels a bit more special.
Jump to Recipe
What You’ll Need
You probably have most of these on hand, which makes this recipe a lifesaver when you need a quick meal. Here’s what you’ll gather:
- Zucchini
- Salt
- Green onions
- Basil
- Cheddar cheese
- Eggs
- Grapeseed oil (or olive oil)
How to Make Zucchini & Basil Frittata
- First, shred your zucchini using a box grater or food processor. Place the shredded zucchini into a colander set over a bowl. Sprinkle with a little salt and let it sit for about 20 minutes to draw out the water. If you’re short on time, give it a squeeze with your hands to speed up the process.
- In a large mixing bowl, combine the shredded zucchini, chopped green onions, fresh basil, and grated cheddar cheese. Season with a bit more salt and stir everything until it’s well mixed.
- Crack the eggs into a separate bowl and beat them until smooth. Pour the beaten eggs into the vegetable mixture and stir until everything is happily combined.
- Preheat your oven to 350°F (175°C). While it’s warming up, heat 1 to 2 tablespoons of grapeseed oil in a 10-inch cast iron skillet over medium heat, ensuring the bottom and sides are well-coated.
- Pour the egg and veggie mixture into the skillet, spreading it out evenly. Let it cook for about 3 to 5 minutes, until the edges start to set and cook.
- Carefully transfer the skillet to the preheated oven. Bake for 12 to 15 minutes, or until the center is set and a toothpick comes out clean.
Cook’s Notes
Let’s talk about getting the most out of your frittata. It’s crucial to get rid of excess water from the zucchini; otherwise, the frittata might end up watery. If you’re planning ahead, you can shred the zucchini the night before, which makes assembling the dish a breeze the next day. Leftovers can be stored in an airtight container in the fridge for up to three days. Reheat gently in a skillet or microwave when ready to enjoy again.
Make It Your Own
Feel free to get creative with this recipe! Here are some swap ideas:
- Switch out the cheddar cheese for feta for a tangy twist.
- Substitute basil with fresh dill or parsley for a different herbal note.
- Add sliced cherry tomatoes for a burst of color and sweetness.
- Replace the zucchini with shredded carrots or thinly sliced bell peppers if you’re out of zucchini.
If you try this, I’d love to hear how it turns out — drop a comment or tag me! Can’t wait to see your delicious frittatas!
Related update: Zucchini & Basil Frittata

It was one of those lazy Sunday mornings when I found myself staring into the abyss of my fridge, hoping for some culinary inspiration to jump out and bite me. The chill of early spring was still hanging in the air, and I was craving something that felt both cozy and a bit indulgent. That’s when I noticed I had a couple of avocados sitting on the counter, at that perfect stage of ripeness where they practically beg to be eaten. A quick scan of the fridge and pantry revealed the usual suspects: eggs, bacon, and a trusty bag of frozen hash browns. And just like that, the idea for Avocado Nests was born. This dish is incredibly satisfying, combining the creamy richness of avocados with the savory crunch of bacon and hash browns. It’s a little bit of everything you love about brunch, with a fun twist.
Jump to Recipe
What You’ll Need
So, here’s the deal: you’re likely just a few steps away from a deliciously satisfying meal, because most of these ingredients are staples you probably have on hand.
- Avocados — perfectly ripe, because isn’t that always the goal?
- Hardboiled Eggs — get these ready before you start.
- Frozen Hash Browns — because who has time to grate potatoes on a Sunday morning?
- Bacon — smoky, crispy, and just the right touch of indulgence.
- Mayonnaise — or cream cheese if you’re feeling fancy.
- Salt and pepper — the dynamic duo of seasoning.
How to Make Avocado Nests
- First, cook your frozen hash browns according to the package directions. You want them golden and crispy but not too dark. The smell of them browning should fill your kitchen with that warm, inviting aroma.
- While those are cooking, cut your bacon into thin strips. You can either bake them in the oven or fry them up in a pan until they reach your desired crispiness. A little sizzle and a waft of that smoky scent, and you know they’re ready.
- Next up, time to make some deviled eggs. Pop out those egg yolks and mix them with a spoonful of mayonnaise or cream cheese until smooth. Season with a sprinkle of salt and pepper before scooping the mixture back into the egg white halves.
- Take your avocados and carefully cut them in half. Remove the seed and peel them gently. You’re aiming for a seamless, intact avocado half here.
- Layer the cooked hash browns onto a serving plate and sprinkle with the crispy bacon pieces. This is your flavorful nest bed, inviting those avocados to rest.
- Finally, nestle a deviled egg half into the seed cavity of each avocado half. Place the filled avocados onto the bed of hash browns and bacon. Voilà, your Avocado Nests are ready to enjoy!
Cook’s Notes
Okay, real talk: the key to nailing this dish is timing. Get those hash browns and bacon going first so you can focus on prepping the other ingredients. If you’re planning to make this ahead of time, keep the elements separate until you’re ready to serve — nobody likes soggy hash browns. Leftovers can be stored in an airtight container in the fridge for a day or two, and they make for a surprisingly good next-day lunch. Just reheat the hash browns and bacon separately for the best texture.
Make It Your Own
Here are a few fun twists to make these Avocado Nests even more personal:
- Swap the bacon for crispy tofu if you’re aiming for a vegetarian version. Just season it well!
- Mix in a bit of hot sauce or Sriracha into the egg yolk mixture for a spicy kick.
- Use sweet potato hash browns instead for a slightly sweeter, more complex flavor profile.
- Jump out of the brunch box and add a sprinkle of feta or blue cheese crumbles for an extra punch of flavor.
If you try this, I’d love to hear how it turns out — drop a comment or tag me on social media! There’s nothing better than sharing a little homemade magic. Enjoy your cozy brunch adventure!
Related update: Avocado Nests
Related update: Chia Seed Pudding

Okay, picture this: It’s a lazy Sunday morning, and the sun is peeking through the kitchen window, but you’re still in your pajamas and not quite ready to embrace the day. You crave something sweet but are not in the mood for a mess of bowls and measuring cups. Enter Blueberry Almond Crescent Rolls, the savior for those who want to feel fancy without the fuss. These little guys are like a bakery treat you can whip up faster than you can say “brunch,” and I promise, they’ll make your kitchen smell like a dream. Plus, they’re guaranteed to impress anyone lounging around in their PJs with you! 🍇🥐
Jump to Recipe
What You’ll Need
This is one of those recipes where you might peek into your pantry and realize you’ve got most of it already. Here’s the lineup:
- 1 can of regular crescent rolls
- 1/4 cup blueberry jam
- 4 ounces cream cheese, softened
- 1/2 cup confectioner’s sugar, divided
- 1/4 teaspoon almond extract, divided
- 1 tablespoon flour
- Pinch of sea salt
- 1 egg
- 1 tablespoon water
- 1 tablespoon milk
- 2 tablespoons turbinado sugar
How to Make Blueberry Almond Crescent Rolls
- Preheat your oven to 375 degrees F. Line a large baking sheet with parchment paper or a silicone baking mat. Trust me, it’s worth it for easy cleanup!
- In the bowl of your stand mixer with the paddle attachment—or just a handheld mixer if you’re like me and can’t be bothered—mix together the cream cheese, blueberry jam, 2 tablespoons of confectioner’s sugar, flour, sea salt, and 1/4 teaspoon of almond extract. Blend until smooth, which should take about 30 seconds.
- Spread your crescent roll wedges out on a clean work surface. You know the drill: take a generous tablespoon of that heavenly cream cheese mixture and plop it on the wide end of each wedge.
- Roll ’em up! Start from the wide end and roll until the narrow end is snug underneath. Nestle them onto your prepared baking sheet.
- Whisk the egg and water together to create an egg wash, then brush it over your crescent rolls. Don’t skip this step—it gives them that gorgeous golden glow.
- Sprinkle with turbinado sugar. This stuff is like edible glitter, trust me.
- Bake for 13-15 minutes, or until they’re puffed and golden. The anticipation will build as your kitchen fills with the scent of warm blueberries and almond.
- While they cool slightly on a wire rack, prepare the glaze. In a medium bowl, combine the remaining 1/2 cup of confectioner’s sugar, remaining 1/4 teaspoon of almond extract, and milk. Whisk until smooth. Taste and add a pinch of sea salt if it’s too sweet for your liking.
- Drizzle that silky glaze over your crescent rolls and serve immediately. Enjoy the blissful combo of flaky, sweet, and creamy!
Cook’s Notes
- Don’t overfill the crescent rolls. It may be tempting, but too much filling can cause a messy overflow.
- If you don’t have turbinado sugar, regular sugar works in a pinch, though it won’t have the same crunch.
- The rolls are best enjoyed fresh but can be stored in an airtight container at room temperature for up to two days.
- For make-ahead magic, prepare the cream cheese filling a day in advance and store it covered in the fridge. Let it come to room temp before using.
Make It Your Own
- Swap the blueberry jam for raspberry or strawberry if that’s more your jam (pun intended!).
- Add a dash of cinnamon to the cream cheese mixture for an extra layer of flavor.
- Use orange marmalade and replace the almond extract with vanilla for a citrusy twist.
- Feeling nutty? Add a sprinkle of chopped almonds inside or on top for added crunch.
If you try this, I’d love to hear how it turns out—drop a comment or tag me! Let’s make every breakfast feel like a special occasion, one crescent roll at a time. 🌟
Related update: Blueberry Almond Crescent Rolls
Related update: Neiman Marcus Oatmeal Chocolate Chip Cookies
Related update: Soft Croatian corn bread – proja
Related update: Avocado Nests

I was having one of those hectic weeks—work deadlines piling up, laundry mountain growing taller by the minute—and all I wanted was a moment of pure joy. Enter my savior: these Wild Blueberry Lemon Muffins. A burst of tart lemon and sweet summer blueberries wrapped up in a soft, buttery muffin. They’re the perfect blend of comforting and feel-good indulgence, but super easy to put together. The best part? They make your kitchen smell like heaven and taste even better! Whether you’re whipping them up for a weekend brunch or a quick weekday treat, these muffins are a little slice of bliss.
Jump to Recipe
What You’ll Need
You’re going to love how most of these ingredients are probably already sitting in your pantry or fridge. Here’s what you need:
- 2 1/2 cups all-purpose flour
- 2 1/2 teaspoons baking powder
- 1/2 teaspoon salt
- 1 cup granulated sugar
- 1/2 cup unsalted butter, softened
- 1 large egg
- 1/2 cup buttermilk
- 1 teaspoon vanilla extract
- 1 tablespoon fresh lemon juice
- 1 tablespoon lemon zest
- 1/8 cup sugar (for mashing with lemon zest)
- 1 can wild blueberries, drained
- 1/2 cup powdered sugar (for glaze)
How to Make Wild Blueberry Lemon Muffins
- Start by preheating your oven to 375°F (190°C). Line 16 muffin cups with paper liners to make cleanup a breeze.
- In a small bowl, mash 1/8 cup sugar with the lemon zest until the sugar is moistened and fragrant. This will amp up the lemony goodness.
- In a medium-sized bowl, whisk together the flour, baking powder, and salt. This dry mix is the backbone of your muffins.
- Using an electric mixer, cream the cup of sugar and butter together until light and fluffy, about 3 minutes. Add the egg, buttermilk, vanilla, and the fragrant lemon sugar, beating each in one at a time.
- Slowly incorporate the flour mixture into the wet ingredients. The batter should be smooth and inviting at this point.
- Gently fold in the wild blueberries with a large spatula. Try not to crush them—you’re aiming for bursts of berry goodness!
- Divide the batter equally into the prepared muffin tins, filling each about 3/4 full. This leaves room for them to rise beautifully.
- Bake in the preheated oven for about 35 minutes, or until a cake tester comes out clean and muffins are golden.
- Let the muffins cool for a few minutes in the pan before transferring them to a wire rack.
- While the muffins cool, whip up your glaze by combining the lemon juice, zest, and powdered sugar. Stir until smooth.
- Spoon about 1 tablespoon of glaze over each muffin, allowing it to drizzle down the sides for that enticing sweet-tangy finish.
Cook’s Notes
If you can, use wild blueberries—they have a more intense flavor and smaller size, making them perfect for muffins. Make sure to drain them well before adding to the batter to keep it from getting too wet. Store your muffins in an airtight container; they stay fresh on the counter for up to three days or can be frozen for up to a month. If you want to prepare ahead, mix the dry ingredients the night before to save time.
Make It Your Own
- Swap canned wild blueberries for fresh ones if they’re in season for a less sugary taste.
- Replace the lemon with orange zest and juice for a citrusy twist.
- Use almond extract instead of vanilla for a nutty undertone.
- Try adding a teaspoon of poppy seeds to the batter for an extra crunch.
If you try this, I’d love to hear how it turns out—drop a comment or tag me on social media! Happy baking, and may your week be as sweet as these muffins.
Related update: Wild Blueberry Lemon Muffins
Related update: Penne Arrabiata
Related update: Fast Tiramisu
Related update: Blueberry Almond Crescent Rolls

Picture this: it’s a lazy Sunday morning, and the sun’s just lazily peeking through your kitchen window. I was in my coziest pajamas, craving something warm and sweet that didn’t involve leaving the house. Enter these Jumbo Blueberry Muffins. They’re like a giant hug in muffin form—a bit of a show-off with their size, but oh so easy to whip up. With a crunchy lemon-sugar topping and bursting with blueberries, they’re the hero of any breakfast spread or spontaneous brunch. Plus, they’re quick enough to make on a weekday morning when you’re feeling a bit extra. Ready to bake? Let’s dive in.
Jump to Recipe
What You’ll Need
You probably have most of this stuff lounging in your pantry. Here’s what you’ll need:
- 2 cups all-purpose flour
- 2 teaspoons baking powder
- 1/2 teaspoon salt
- 1/3 cup granulated sugar + 1 cup separate
- 2 large eggs
- 1/4 cup unsalted butter, melted
- 1/4 cup vegetable oil
- 1 cup buttermilk
- 1 teaspoon vanilla extract
- Zest of one fresh lemon
- 1 1/2 cups fresh blueberries
How to Make Jumbo Blueberry Muffins
- Preheat your oven to 425°F (220°C). Give a 6-cup large-sized muffin tin a light spritz of cooking spray, and set it aside.
- In a small bowl, combine the lemon zest and 1/3 cup of sugar. Use a fork to mix them thoroughly, creating a fragrant lemon-sugar mixture.
- Grab a large bowl and whisk together the flour, baking powder, and salt. Try to distribute everything evenly—it’ll make for a fluffier muffin.
- In another medium bowl, whisk the remaining 1 cup of sugar with the eggs. Go at it for about 45 seconds until the mixture is thick and homogeneous.
- Slowly pour in the melted butter and oil, then whisk in the buttermilk and vanilla extract. The mixture should be smooth and creamy.
- Add the liquid ingredients and the blueberries to the dry ingredients. Gently fold everything together until just combined. Resist the urge to over-mix!
- Fill the muffin tins with the batter, right up to the top. Sprinkle the tops generously with the lemon-sugar mixture for a crunchy finish.
- Bake the muffins at 425°F for 5 minutes. Then, lower the heat to 375°F and bake for another 25 minutes. Remember to rotate the pan halfway through to ensure even baking.
- The muffins are done when a toothpick inserted near the center comes out with just a few crumbs attached. Let them cool in the pan for about 5 minutes before transferring them to a wire rack to cool completely.
Cook’s Notes
Here’s the scoop: the key to these muffins is not over-mixing the batter. Too much mixing leads to tough muffins, and nobody wants that. These muffins are best enjoyed fresh, but if you’re making them ahead, they stay good in an airtight container at room temperature for up to three days. You can also freeze them! Just wrap them tightly in plastic wrap and pop them in a freezer bag. They’ll last for about three months, and all you have to do is let them thaw at room temp or give them a quick zap in the microwave.
Make It Your Own
Feel like experimenting? Here are a few variations:
- Mixed Berry Muffins: Swap half of the blueberries with raspberries or chopped strawberries.
- Nutty Twist: Add a handful of chopped walnuts or almonds to the batter for some crunch.
- Citrus Punch: Substitute the lemon zest with orange zest for a different citrusy flavor.
- Chocolate Indulgence: Replace some of the blueberries with chocolate chips for a sweet surprise.
So, are you ready to go jumbo? If you try this, I’d love to hear how it turns out—drop a comment or tag me! Let’s make your kitchen smell like a bakery, one muffin at a time. Happy baking! 💙
Related update: Jumbo Blueberry Muffins
Related update: Wild Blueberry Lemon Muffins
Related update: Home made organic maple granola with fresh fruit
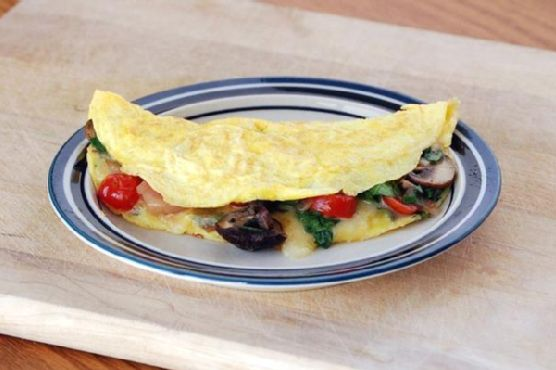
I was deep in the throes of a Tuesday night quandary—hungry but not wanting to commit to a full-on kitchen escapade. You know those nights, right? The ones where takeout seems like the easy choice, but your inner voice whispers (or maybe shouts), “Use the groceries you bought!” It was on one such evening that I whipped up this Loaded Veggie Omelet. It’s the kind of recipe that feels like a mini victory; quick to make yet hearty enough to satisfy. Perfect for when you want something impressive without the fuss. Plus, who wants a mountain of dishes? Not me.
Jump to Recipe
What You’ll Need
This isn’t one of those recipes where you’ll be chasing obscure ingredients. Chances are you already have most of this:
- Shallot
- Garlic
- Mushrooms
- Cherry tomatoes
- Fresh basil
- Fresh spinach
- Eggs whisked
- White cheese
- Drizzle of olive oil
How to Make Loaded Veggie Omelet
- Start by preheating your oven to warm or 170 degrees. This will keep your first omelet cozy while you prepare the second one. Trust me, it’s worth it.
- Heat a small sauté pan over medium. Drizzle it with just enough olive oil to give your veggies a glistening hug.
- Add the shallot and garlic first. Sauté them until they’re golden and fragrant—your kitchen should smell amazing by now.
- Toss in the mushrooms and let them soften. They’ll release their juices, which is exactly what we want.
- Now, add the cherry tomatoes and fresh spinach. Give everything a good stir and then remove the pan from the heat. The spinach should just start to wilt.
- In a small omelet or sauté pan, pour in a layer of your whisked eggs. As the egg begins to set, gently run a spatula around the edges. This keeps it from sticking and makes folding easier.
- When the egg is almost fully cooked—think slightly runny on top—layer half of the basil, cheese, and your sautéed veggie mix onto one side of the egg.
- Gently fold the other side of the egg over the filling. Use your spatula to help if needed. Slide the omelet onto a small oven-safe plate and keep it warm in the oven.
- Repeat the process for the second omelet, then serve both while they’re still warm.
Cook’s Notes
Cooking omelets is more of an art than a science, and a few tips can make all the difference.
- If you’re not a fan of runny eggs, let them cook a bit longer before adding the filling. The key is to keep it soft enough to fold.
- Store leftovers in an airtight container in the fridge. They make a delightful breakfast next day, just reheat in a pan to revive some freshness.
- Use a non-stick pan to make your life easier, especially if you’re new to making omelets. It’s all about the slide!
- If you want to make these ahead, prepare the veggie mix and store it separately. When you’re ready to eat, whip up those eggs and you’re set.
Make It Your Own
Here’s where you get to play chef. These variations keep things exciting:
- Swap the mushrooms for crispy tofu for an extra protein punch.
- If you’re a cheese enthusiast, try using feta instead of white cheese for a tangy twist.
- Give it a spicy kick by adding a dash of red pepper flakes or a few jalapeño slices.
- Not a fan of spinach? Substitute with arugula for a peppery note.
I hope this Loaded Veggie Omelet becomes your go-to for those nights when you need a quick, satisfying meal. If you try this, I’d love to hear how it turns out — drop a comment or tag me! Here’s to cozy, tasty evenings in.
Related update: Loaded Veggie Omelet
Related update: Jumbo Blueberry Muffins
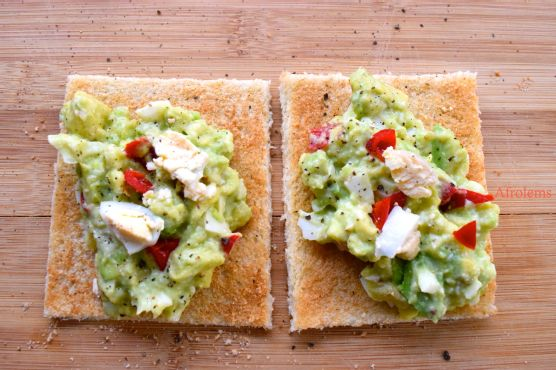
There’s something about a Saturday morning when I’m craving something simple yet satisfying, and this avocado egg salad hits just the right spot. Last week, I found myself staring into the fridge, half-awake and in dire need of coffee, when I realized I had everything I needed for a quick, hearty brunch. This recipe is a lifesaver for lazy mornings or when you just need something nourishing but don’t want to spend an hour in the kitchen. With creamy avocado and the perfect hint of spice from the scotch bonnet pepper, it’s a fresh take on a classic. Plus, you can have it ready in under 30 minutes. Trust me, you’ll want to keep coming back to this one.
Jump to Recipe
What You’ll Need
Chances are you already have most of this in your pantry or fridge, making it a breeze to whip up without a grocery run.
- 4 large eggs
- 1 ripe avocado pear
- 1 lemon
- 1/2 teaspoon black pepper
- 1 small seasoning cube
- 1 small scotch bonnet pepper
- 4 slices of whole wheat bread
How to Make Avocado Egg Salad
- Boil your eggs in a pot of water for about 10 minutes until they’re hard-boiled. Once cooked, immerse them in cold water to cool. This makes peeling a breeze.
- While the eggs cool, peel your avocado and mash it in a large bowl until smooth but with a few chunks for texture.
- Cut your lemon in half and squirt the juice over the mashed avocado. This keeps it from browning and adds a nice tangy kick.
- Once the eggs are cool, peel and chop them into bite-sized pieces, then add them to the avocado mixture.
- In a small bowl, mix the black pepper, crumbled seasoning cube, and finely chopped scotch bonnet pepper. Adjust pepper to taste if you’re not into too much heat.
- Add the spice mixture to your avocado and egg and gently combine until everything is well mixed.
- Toast your whole wheat bread until crisp and golden. The aroma alone will make your mouth water.
- Roll over the toasted bread with a rolling pin, cut the edges off for a neat presentation, and serve with a generous helping of the avocado egg salad on top.
Cook’s Notes
Here are a few nuggets of wisdom to keep in mind while making this dish:
- If your avocados are slightly underripe, you can microwave them for 30 seconds to soften.
- Scotch bonnet peppers pack a punch, so handle them carefully if you’re not a heat enthusiast. You can always start with half and add more to taste.
- This salad can be made a few hours ahead of time. Just cover it tightly with plastic wrap to keep the avocado from browning.
- Leftovers can be stored in an airtight container in the fridge for a day, although it’s best enjoyed fresh.
Make It Your Own
- Swap the whole wheat bread for a crusty baguette or sourdough for a different texture.
- Replace the scotch bonnet with jalapeños if you prefer a milder heat.
- Add a handful of cherry tomatoes, halved, for a burst of freshness.
- Mix in a spoonful of Greek yogurt for a creamier texture and a hint of tang.
If you try this, I’d love to hear how it turns out — drop a comment or tag me! Enjoy your meal, and remember, the best recipes are those you make your own.
Related update: Avocado Egg Salad
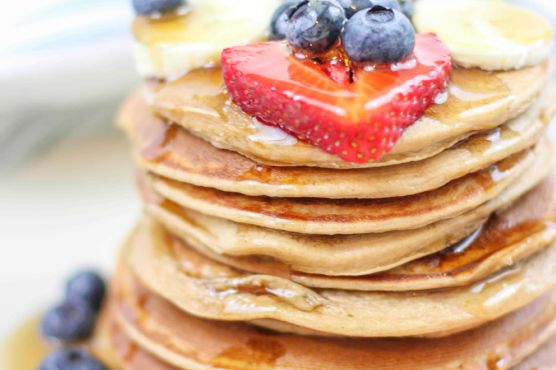
You know those mornings when you hit the snooze button one too many times, and suddenly you’re in a mad dash, wishing breakfast would magically appear? Yep, been there! That’s exactly how I stumbled upon these Simple Protein Pancakes. I was running late for a Saturday brunch with friends, craving something hearty yet wholesome. What I love about this recipe is how it comes together in a flash—just a quick blend, pour, and flip—but the end result feels like a treat. It’s perfect for lazy weekend mornings or even a speedy weekday breakfast when you need something filling yet fuss-free. Bonus: they’re nutritious and satisfyingly delicious, so you won’t even feel guilty drizzling on a bit of maple syrup. Jump to Recipe
What You’ll Need
This recipe is a pantry rescue mission! Chances are you already have most of these ingredients on hand, which means fewer grocery runs and more relaxed mornings.
- 1 banana, ripe and full of natural sweetness
- 2 eggs, because binding is key
- 1/2 cup of oats, to keep you energized
- 1/4 cup of greek yogurt, adds creaminess and protein
- 1/2 cup of almond milk, or your favorite plant-based alternative
- 1 scoop of Premier Protein powder, vanilla flavored for that extra protein punch
- 1 teaspoon of vanilla extract, pure magic in a bottle
- 1 teaspoon of baking powder, for a bit of lift
How to Make Simple Protein Pancakes
- Start by gathering all your ingredients. Toss the banana, eggs, oats, greek yogurt, almond milk, Premier Protein powder, vanilla extract, and baking powder into a blender. Blend for about a minute until you get a smooth, well-mixed batter.
- Let the pancake mixture sit for a couple of minutes. This allows the batter to thicken slightly, thanks to the oats soaking up some liquid.
- Meanwhile, heat your skillet over medium-high heat. You want it nice and hot before you pour the batter, so those pancakes get that delightful golden crust.
- Pour small amounts of batter onto the hot skillet. Watch for those small bubbles along the edges, your cue that it’s time to flip. This usually takes about 2 minutes.
- Flip the pancakes carefully and let them cook for another minute or two on the other side until they’re golden and cooked through.
- Stack the pancakes high, and top with your favorite fruits, nuts, or a drizzle of maple syrup for that breakfast bliss.
Cook’s Notes
These pancakes are forgiving, so don’t stress if your banana is more green than yellow. Just add a smidge of honey or maple syrup to the batter for sweetness. If you’re planning ahead, the batter can be made the night before and kept in the fridge. Just give it a good stir before using. Leftovers (if any!) keep well in the fridge for a couple of days and reheat beautifully in a toaster for a quick breakfast. Avoid over-blending to keep the batter from getting too thin.
Make It Your Own
- Swap the almond milk for coconut milk to add a tropical twist.
- If you’re out of oats, try using whole wheat flour for a similar hearty texture.
- For a chocolatey version, add a tablespoon of cocoa powder and a handful of chocolate chips—your inner child will thank you!
- Switch out the banana for half a cup of pumpkin puree and a dash of cinnamon for a fall-inspired flavor.
If you try this, I’d love to hear how it turns out—drop a comment or tag me! These pancakes have become a staple in my morning routine, and I hope they bring a little joy to your table, too. Happy flipping!
Related update: Simple Protein Pancakes
Related update: Blueberry, Chocolate & Cocao Superfood Pancakes – Gluten-Free/Paleo/Vegan
Related update: Avocado Egg Salad

Picture this: It’s a dreary Wednesday morning, and my cravings for something sweet yet comforting are through the roof. I rummage through my pantry, and lo and behold, a bag of coconut flour winks at me from the back. My mind immediately darts to these heavenly Coconut Flour Pancakes with Blueberry Honey Compote. They’re a delightful balance of fluffy and fruity, perfect for when you need a little breakfast pick-me-up. Plus, they’re naturally gluten-free, so no need to worry about that! These pancakes are like a warm hug on a chilly day and are surprisingly easy to whip up. If you’re in the mood for a quick, fuss-free breakfast that’ll impress even the sleepiest of taste buds, you’ve got to try this.
Jump to Recipe
What You’ll Need
This ingredient list is straightforward and (almost) guaranteed to be stocked in your kitchen. The flavor comes from simple, wholesome ingredients and a touch of creativity.
- Coconut flour – the star of the show, bringing that fluffy texture
- Coconut milk – adds creaminess and enhances the coconut flavor
- Eggs – for structure and richness
- Honey
- Olive oil
- Baking powder
- Salt
- Frozen blueberries – juiciness and a pop of color
- Agave nectar
- Cinnamon
How to Make Coconut Flour Pancakes with Blueberry Honey Compote
- Start with the compote. In a small saucepan over low heat, add the frozen blueberries and agave nectar, then cover with a lid. If using fresh blueberries, throw in a tablespoon of water. After about 3 minutes, peek under the lid — once those juices start seeping out, add the cinnamon and stir it all up. Cover again and let it do its thing for another 10 to 15 minutes. You’ll know it’s ready when the juices become syrupy, and the berries are plump and hot. For a thicker syrup, mash the blueberries with a fork as they cook. Once perfect, remove from heat and keep covered to stay warm.
- While the compote simmers, prep the pancake batter. In a mixing bowl, combine all the wet ingredients and give them a good mix. Toss in the coconut flour, baking powder, and salt, then mix until smooth. The batter should be thick, so let it sit for about 5 minutes to thicken further.
- Heat a large skillet on medium-low and spread a little butter evenly over it. Spoon out about a third of the batter, shaping it into a pancake on the skillet. Coconut flour pancakes are a bit more stubborn, so you’ll need to shape them. If the edges of your pancakes start to spread too much, add a teaspoon of coconut flour to your batter.
- Repeat the last step for the remaining batter, ensuring each pancake has enough space to flip. Let them sit on the skillet for about 7 to 10 minutes. They’re ready to flip when the edges look set. Carefully slide a large spatula under each pancake and gently flip — be gentle as these beauties are fragile!
- Cook the pancakes for an additional 2 to 3 minutes on the other side. Once they’re golden and divine, remove them from the heat. Top the pancakes with your blueberry compote and a dusting of confectioners sugar. For an extra touch of sweetness, drizzle with agave nectar, honey, or pure maple syrup.
Cook’s Notes
Okay, let’s talk practicalities. Coconut flour is a bit finicky because it absorbs liquid like a sponge. So, if your batter is too runny, just add a teaspoon of coconut flour until you’re happy with the consistency. These pancakes can be made ahead of time — simply store them in an airtight container in the fridge for up to three days. Reheat in a skillet or microwave for a quick breakfast. Leftover compote? Drizzle it over yogurt or oatmeal for a sweet twist!
Make It Your Own
- Berry Swap: No blueberries on hand? Swap them out for raspberries or blackberries for a different flavor profile.
- Nutty Addition: Add a handful of chopped nuts into the batter for some crunch and extra protein.
- Chocolate Dream: Toss in a few dark chocolate chips to the batter for an indulgent touch.
- Spice It Up: Add a pinch of ground ginger or cardamom to the blueberry compote for a spicy kick.
If you try this, I’d love to hear how it turns out — drop a comment or tag me! These pancakes are a constant morning delight in my home, and I can’t wait for you to experience the joy they bring. Happy flipping!
Related update: Coconut Flour Pancakes with Blueberry Honey Compote
Related update: Simple Protein Pancakes

Picture this: it’s a lazy Saturday morning, and I’ve got the whole day stretched out ahead of me. No rush, no plans, just that perfect kind of weekend vibe that begs for a cozy breakfast. Enter: my Simple Whole Wheat Crepes. The first time I whipped these up, I was honestly just trying to avoid a trip to the grocery store. But now, they’ve become a staple. Quick to make, with a texture that’s both tender and slightly nutty, these crepes are fancy enough for brunch but easy enough for a weekday breakfast with the kiddos.
Jump to Recipe
What You’ll Need
These crepes come together with ingredients you probably already have lurking in your fridge and pantry. No need for a special trip to the store—unless you’re out of eggs, in which case, let’s talk.
- 2 tablespoons butter, melted
- 2 eggs
- 1 tablespoon maple syrup
- 1 ½ cups milk
- ½ teaspoon sea salt
- 1 cup white whole wheat flour
How to Make Simple Whole Wheat Crepes
- In your blender, combine the melted butter, eggs, maple syrup, milk, sea salt, and flour. Blend until the mixture is smooth and the batter is thin.
- Let the batter sit for at least 30 minutes. This is the perfect moment to sip your coffee slowly, or, if you’re me, lose yourself in a podcast.
- When ready to cook, heat your crêpe pan over medium heat. If you don’t have a crêpe pan, an electric crêpe maker works perfectly too. Either way, it’s all about that golden brown finish!
- Pour a small amount of batter onto the hot surface, swirling it around to evenly coat the pan. Cook until the edges start to lift and lightly brown, about 1 to 2 minutes.
- Flip the crêpe and cook for another 30 seconds to a minute until done to your liking. Repeat with the remaining batter, keeping finished crêpes warm in a low oven, if needed.
Cook’s Notes
Here’s a little secret: letting the batter rest is where the magic happens. This rest time allows the flour to fully hydrate and gives the gluten a chance to relax, resulting in the tenderest crepes. If you’re super organized or just love a breakfast shortcut, mix the batter the night before and let it hang out in the fridge. Just give it a quick stir before cooking. Store leftover crepes in an airtight container in the fridge for up to three days. You can also freeze them by placing wax paper between each crepe to prevent sticking, and pop them in a zip-top bag.
Make It Your Own
- Sweet Twist: Add a teaspoon of vanilla extract and a sprinkle of cinnamon to the batter for a warm, cozy flavor.
- Savory Spin: Omit the maple syrup and add chopped fresh herbs like chives or parsley to the batter.
- Gluten-Free Option: Swap the white whole wheat flour for a gluten-free flour blend. Just make sure it’s one meant for baking!
- Dairy-Free Delight: Use almond milk or another plant-based milk, and substitute the butter with coconut oil or a dairy-free butter substitute.
If you try this, I’d love to hear how it turns out—drop a comment or tag me! Let’s keep the breakfast magic alive, one crepe at a time. 🥞💛
Related update: Simple Whole Wheat Crepes
Related update: Coconut Flour Pancakes with Blueberry Honey Compote

It was one of those chaotic Tuesday mornings when everything seemed to be on fast forward. The email inbox was overflowing, the laundry was giving me side-eye, and breakfast needed to be something more inspiring than a bowl of cereal. Enter Strawberry Shortcake Pancakes. They’re like a breakfast dessert that feels a little indulgent but is grounded enough in wholesome ingredients to keep the weekday guilt at bay. These pancakes are the perfect blend of light and fluffy, with a burst of strawberry goodness that just screams “summer.” Whether you’re trying to impress your brunch guests or just need a pick-me-up to tackle the day, this dish has got you covered. Plus, it’s quick enough to throw together before that first Zoom call.
Jump to Recipe
What You’ll Need
You’d be surprised at how many of these ingredients are already sitting in your pantry, just waiting to be transformed into something fabulous.
- Greek yogurt
- Egg whites
- Whole-wheat flour
- Baking soda
- Almond extract
- Sugar
- Salt
- Dried freeze strawberries
- Fresh strawberries
- Sugar
- Fat-free whip cream
How to Make Strawberry Shortcake Pancakes
- In a small bowl, mix together the Greek yogurt, egg whites, and a splash of almond extract. The aroma of the almond extract will make you want to dive right in, but resist—it’s worth the wait.
- In another bowl, whisk together the whole-wheat flour, baking soda, sugar, and salt. This mixture should feel light and airy, the foundation of pancake perfection.
- Combine the wet and dry ingredients, whisking until just mixed. You want a smooth batter, but don’t overdo it. Stir in the dried strawberries—these little gems will add an unexpected pop of flavor in every bite.
- In a small saucepan, cook the fresh strawberries with a teaspoon of sugar over medium heat. Stir occasionally until they’re thawed and juicy, about 5-7 minutes. The kitchen will start to smell like a strawberry field and you’ll feel like a domestic goddess.
- Meanwhile, heat a skillet over medium heat and lightly coat with cooking spray. Pour 1/4 cup of batter onto the skillet. Once you see bubbles forming on the surface, it’s time to flip—aim for about 1-2 minutes per side. Flatten the batter slightly with a spatula for even cooking.
- Top your stacks with that luscious strawberry sauce, a drizzle of maple syrup, and a generous dollop of fat-free whip cream. You’ve just created a masterpiece in about 20 minutes.
Cook’s Notes
Let’s get real: even a pro can end up with a few duds in the bunch. If your pancakes are sticking, lower the heat a notch. If you’re prepping for the week, these pancakes freeze like a dream. Just make sure they’re cool before you stack them between sheets of parchment paper and seal them up for the freezer. Need a quick breakfast fix later? Pop them in the toaster to reheat!
Make It Your Own
If you’re feeling adventurous, here are a few tweaks to personalize your pancakes:
- Swap the almond extract with vanilla extract for a more classic flavor profile.
- Make it tropical with dried mango instead of strawberries and top with coconut whip.
- Add a handful of mini chocolate chips to the batter for a sweet surprise.
- For a nutty twist, toss in some crushed almonds or walnuts for added crunch.
If you try this, I’d love to hear how it turns out—drop a comment or tag me in your pancake selfies! There’s nothing better than sharing a bit of kitchen magic. Enjoy!
Related update: Strawberry Shortcake Pancakes
Related update: Chicken with Grape Tomatoes and Mushrooms
Related update: Apple Pie Smoothie
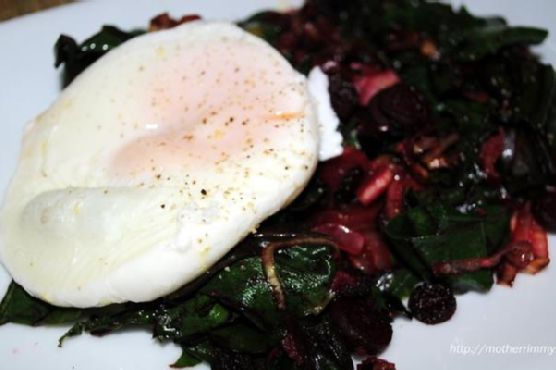
Picture this: it’s a lazy Sunday morning, and the sun’s rays are just starting to peek through your kitchen window. You’re in the mood for something special, something that feels like a treat but won’t have you slaving away in the kitchen. Enter my Beet Greens and Poached Eggs recipe. It’s one of those dishes that looks impressive but is surprisingly easy to whip up. The combination of fresh, vibrant beet greens and perfectly poached eggs is both comforting and elegant — a win-win! Plus, it’s a great way to use up those pesky beet greens that always seem to end up forgotten in the fridge. Whether you’re treating yourself or impressing a loved one, this dish will hit the spot.
Jump to Recipe
What You’ll Need
We’re keeping this simple and fresh. Chances are, you already have most of these on hand, and if not, they’re worth the grocery run.
- Eggs – go for the freshest ones you can find.
- Vinegar – just a splash for the poaching water.
- Water – enough to fill a skillet for poaching.
- Coconut oil – gives the greens a lovely depth.
- Leek – thinly sliced for a subtle oniony flavor.
- Baby beet greens – the star of the show, chopped.
- Garlic – minced for that irresistible aroma.
- Lemon (juice) – for a bright hit of acidity.
- Shredded Parmesan cheese – because cheese makes everything better.
How to Make Beet Greens and Poached Eggs
- Heat a small skillet over medium-low heat and add about 2 inches of water. Wait until tiny bubbles start to gently rise to the surface. This is your cue to add a pinch of salt and a splash of vinegar.
- Carefully crack the eggs into the water, one at a time, slowly sliding each into its own corner of the pan. Cover the skillet and allow to simmer gently for 8 to 10 minutes. You’re aiming for whites that are set with yolks still runny — that’s the magic moment.
- While the eggs are poaching, heat a large nonstick skillet over medium heat and add the coconut oil. Once the oil has melted and filled the kitchen with its nutty aroma, toss in the sliced leeks and beets.
- Cook the leeks and beets for about 5 to 8 minutes, stirring occasionally, until they’re tender and their natural sweetness is coaxed out.
- Add the minced garlic, letting it do its aromatic dance for about a minute before introducing the chopped baby beet greens. Stir everything together for another two minutes, then remove from heat. Toss in a splash of lemon juice and keep stirring gently until the greens are just wilted.
- Divide the greens mixture between two plates. When the eggs are ready, carefully lift them out with a slotted spoon, letting the excess water drain away, and place one egg on each pile of greens.
- Finish each plate with a tablespoon of shredded Parmesan cheese, letting it melt slightly from the heat of the eggs. Serve immediately and enjoy the glorious marriage of flavors and textures.
Cook’s Notes
A few quick tips to make your cooking experience smoother than a perfectly poached egg. When poaching, don’t rush the process. Patience is key, and those few extra minutes will make all the difference. If your skillet lid doesn’t fit perfectly, that’s okay — just do your best to cover the pan. As for leftovers, good luck having any! But if you do, store the greens and eggs separately in the fridge and reheat gently. The greens are quite forgiving, but reheating poached eggs is a delicate dance — a quick dip in hot water can do the trick if needed.
Make It Your Own
This dish is a canvas ripe for personalization. Here are some variations to get you started:
- Switch up the greens: Try swapping beet greens for Swiss chard or spinach for a slightly different flavor profile.
- Add some heat: Sprinkle a pinch of red pepper flakes over the greens for a little kick.
- Mix up the cheese: Replace Parmesan with crumbled feta for a tangy twist.
- Protein boost: Top with crispy bacon bits or slices of smoked salmon for added texture and flavor.
If you give this recipe a try, I’d love to hear how it turns out for you! Drop a comment below or tag me in your kitchen adventures. Happy cooking, friends!
Related update: Beet Greens and Poached Eggs
Related update: Strawberry Shortcake Pancakes