Lemon Scented Polenta Pancakes with Blueberry Thyme Syrup | Made by Meaghan Moineau

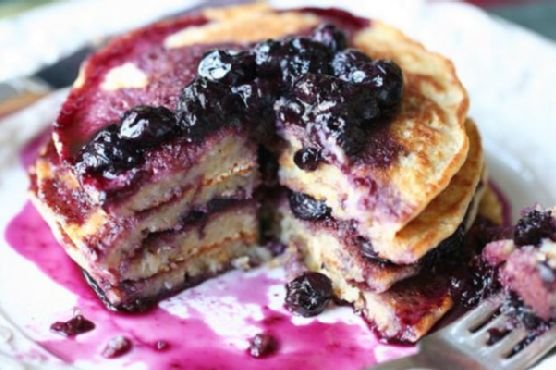
Picture this: it’s a lazy Sunday morning, and the sunlight is peeking through the kitchen window just enough to gently nudge me from my cozy corner on the couch. That’s when the craving hits—something vibrant and refreshing yet comforting to kickstart the day. Enter Lemon Scented Polenta Pancakes with Blueberry Thyme Syrup. This whimsical twist on the classic pancake is my answer to those mornings where you need a dish that feels special but isn’t a hassle to whip up. With the zing of lemon and the earthy sweetness of blueberry thyme syrup, this dish is an absolute keeper. It’s just fancy enough to impress anyone who stumbles into your kitchen but easy enough to make you wonder why you don’t do this every weekend.

Jump to Recipe

What You’ll Need

This recipe is one of those magical ones where you probably have most of the stuff lounging in your pantry, waiting to be turned into something fabulous. Here’s what you’ll need:

  • All-purpose flour
  • Baking powder
  • Fresh blueberries
  • Butter
  • Cornmeal
  • Egg
  • Fresh thyme
  • Honey
  • Lemon zest
  • Maple syrup
  • Milk
  • Salt
  • Vanilla extract
  • Water

How to Make Lemon Scented Polenta Pancakes with Blueberry Thyme Syrup

  1. Start by making the syrup. Combine the syrup ingredients: blueberries, maple syrup, and thyme sprigs in a small saucepan. Bring this mixture to a gentle boil. Once boiling, reduce the heat and let it simmer. The blueberries will soften and the thyme will infuse its earthy aroma. Remember to remove the thyme sprigs just before serving.
  2. For the pancakes, grab a medium saucepan and combine the cornmeal with cold water. Bring this to a boil, whisking constantly so it’s smooth and not lumpy. Reduce the heat and let it simmer until thickened, about 4 to 5 minutes. It should have the consistency of a thick porridge.
  3. In a small bowl, whisk together the milk, egg, honey, and a splash of vanilla extract. Add this to the thickened cornmeal, transforming it into a creamy polenta custard.
  4. In your largest mixing bowl, whisk together the all-purpose flour, baking powder, salt, and lemon zest. Make a well in the center of the dry ingredients and pour your polenta custard into the middle. Stir until everything is just combined; over-mixing is a no-go!
  5. Heat up a large griddle or non-stick pan and give it a good brush of butter. Ladle enough batter onto the griddle for 4-inch pancakes. If the batter seems too thick, a splash more milk will help it along.
  6. Cook the pancakes over moderate heat until bubbles form on the surface and the edges look a touch dry. This is your cue to flip them. Cook until the other side is beautifully golden and the pancakes have a little puff to them, about 2 minutes more.
  7. Transfer these golden beauties to warm plates and repeat with the remaining batter. Drench them in the warm blueberry syrup, and you’re set for a morning of deliciousness.

Cook’s Notes

Let’s talk about a few things to keep in mind as you embark on this pancake adventure. First, the syrup is the star—don’t skimp on the thyme unless you’re not a fan of its unique flavor! This syrup can be stored in an airtight container in the fridge for up to a week and reheated gently on the stove. As for the pancakes, if you’ve got leftovers (which is doubtful), they freeze well. Layer parchment paper between them and pop them in a zip-top bag for freezer storage. Defrost in the toaster on a low setting for a quick breakfast. Also, if you’re making these ahead of time, keep them warm in a low oven while you finish up the batch.

Make It Your Own

This recipe is wonderful as is, but who doesn’t love a little culinary improvisation? Here are a few ideas to make these pancakes truly yours:

  • Swap the blueberries for raspberries or blackberries if that’s what you have on hand or prefer.
  • Add a tablespoon of poppy seeds to the pancake batter for a delightful crunch that complements the lemon zest.
  • If you’re dairy-free, use almond milk and vegan butter without sacrificing any of the flavor.
  • For a nutty twist, replace half of the cornmeal with almond flour.

If you try this, I’d love to hear how it turns out—drop a comment or tag me! There’s nothing quite like seeing your creations and hearing how these pancakes brightened your day. Enjoy, my friends!

Related update: Lemon Scented Polenta Pancakes with Blueberry Thyme Syrup

Related update: Superbowl Chili

Related update: Baked Apple Pancake
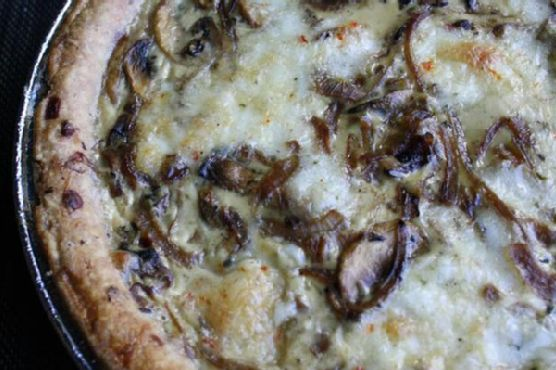
Caramelised Onion and Mushroom Quiche | Made by Meaghan Moineau

The other day, I found myself staring into the depths of my fridge, battling that familiar weeknight dilemma: what to make for dinner that feels both comforting and a little bit special. The answer came subtly as I caught sight of a lone pie shell resting on the bottom shelf. Voilà — Caramelised Onion and Mushroom Quiche! It’s the kind of dish that fills your kitchen with the most irresistible aroma, promising warmth and satisfaction in every bite. Plus, it’s a breeze to pull together with ingredients you probably already have lounging in your pantry and fridge. Let me tell you, this quiche is your new best friend for those hectic days when you crave something homemade but without the fuss.

Jump to Recipe

What You’ll Need

This ingredient list is delightfully straightforward, and chances are you already have most of these at home. Here’s what you’ll need to whip up this delicious quiche:

  • A pre-made nine-inch pie shell
  • 2 tablespoons of olive oil
  • 2 large white onions, thinly sliced
  • 2 cloves of garlic, minced
  • 1/2 teaspoon of dried chilli flakes
  • 8 ounces of mushrooms, sliced
  • 1 teaspoon of dried thyme
  • 3 eggs
  • 1 cup of half and half cream
  • 1 cup of grated havarti cheese
  • Salt and pepper, to taste

How to Make Caramelised Onion and Mushroom Quiche

  1. Preheat your oven to 400°F. Take your nine-inch pie shell and dock it with a fork to prevent it from puffing up. Slide it into the oven and let it bake for 10 to 15 minutes until it’s lightly golden.
  2. While the pie shell is crisping up, heat the olive oil in a large skillet over medium-high heat. Add the onions, garlic, and chilli flakes. Stir occasionally and let them cook until the onions are rich, brown, and caramelised, about 10 minutes.
  3. Next, toss the mushrooms into the skillet. Keep the heat on high and let the mushrooms caramelise as well, which should take around 5 minutes. The mushrooms will soak up all those lovely flavors. Once they’re ready, remove the skillet from the heat and stir in the thyme, salt, and pepper.
  4. In a large mixing bowl, beat the eggs together with the half and half cream. Stir in half of the grated havarti cheese. Combine this mixture with the onion-mushroom blend, mixing thoroughly until everything is well integrated.
  5. Place the pre-baked pie shell on a cookie tray — this is your shield against any unexpected spills. Pour the filling into the pie shell, spreading it evenly. Sprinkle the remaining cheese over the top.
  6. Reduce the oven temperature to 375°F. Bake the quiche until the filling is set — it will be firm to the touch and have a gorgeous golden hue. This should take about 25 to 30 minutes. Serve warm and get ready for those taste buds to rejoice!

Cook’s Notes

Cooking can sometimes be a bit unpredictable, so here are a few tips to ensure your quiche turns out perfect every time. First, make sure those onions are well caramelised; they should be a deep golden brown. This adds depth and sweetness to the quiche. Don’t rush the process — good things take time! Also, remember to taste your filling before adding it to the shell to adjust the seasoning. If you want to make this ahead, you can prepare the filling and bake the pie shell a day before; just assemble and bake right before serving. Leftovers (if any!) can be stored in the fridge and reheated gently in the oven.

Make It Your Own

This quiche is wonderfully versatile. Here’s how you can mix it up:

  • Swap the mushrooms for crispy tofu if you’re looking for a vegetarian protein boost.
  • Use Swiss cheese or even cheddar if you prefer a sharper flavor profile.
  • Throw in some baby spinach with the mushrooms for extra greens.
  • Substitute the dried thyme with fresh basil for a different herbal note.

If you try this, I’d love to hear how it turns out — drop a comment or tag me on social media! Cooking is all about experimenting and most importantly, enjoying every step of the way. Can’t wait to hear from you!

Related update: Caramelised Onion and Mushroom Quiche

Fall Farro Salad with Pomegranate, Walnut & Truffles | Made by Meaghan Moineau

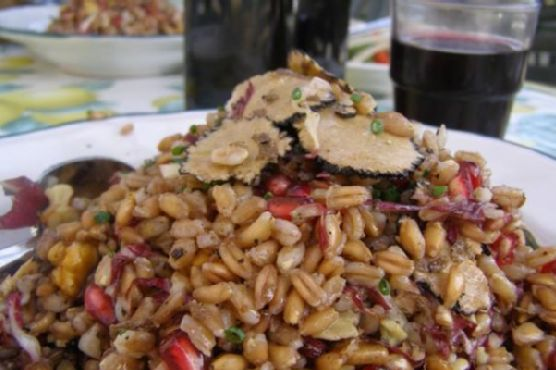
Picture this: It’s a chilly autumn afternoon, and the sun is giving off that perfect golden hue that makes everything look like a scene from a cozy movie. I’m in my kitchen, wearing my favorite oversized sweater, and I’ve got a craving for something that’s nourishing but still feels like a treat. Enter my Fall Farro Salad with Pomegranate, Walnut & Truffles. This dish is like a warm hug in a bowl, combining nutty farro with the sweet burst of pomegranate seeds, the earthy depth of truffles, and the crunch of walnuts. It’s quick to put together yet tastes like you’ve been working on it for hours. Trust me, this is the kind of recipe that’ll make you feel like a culinary genius with minimal effort, perfect for a weeknight dinner or impressing friends over a weekend brunch.

Jump to Recipe

What You’ll Need

Most of these ingredients are pantry staples, so you might already find them hanging out in your kitchen. Here’s what you need:

  • 1 cup farro
  • 2 tablespoons extra virgin olive oil
  • 1/2 cup pomegranate seeds
  • 1/2 cup walnuts, roughly chopped
  • 1/2 head radicchio, thinly sliced
  • 1/4 cup parmesan, shaved into ribbons
  • 2 teaspoons truffle oil
  • 1 tablespoon balsamic vinegar
  • Salt and pepper, to taste

How to Make Fall Farro Salad with Pomegranate, Walnut & Truffles

  1. Start by cooking the farro. Bring a pot of cold water to a boil, and don’t forget a pinch of salt. Toss in the farro and let it cook until it’s al dente—about 20-35 minutes. You can throw in some vegetable scraps like a carrot or celery if you have them, for added flavor.
  2. While the farro is cooking, toast the walnuts in a dry pan over medium heat. Keep an eye on them and stir occasionally, until they are golden and fragrant. This should take about 5-7 minutes.
  3. In a large bowl, whisk together the extra virgin olive oil, balsamic vinegar, truffle oil, salt, and pepper. This dressing will bring everything together with a luxurious, earthy flavor.
  4. Once the farro is cooked, drain it and let it cool slightly. You want it warm but not piping hot.
  5. Add the farro to the bowl with the dressing, and toss until the grains are well coated.
  6. Gently fold in the radicchio, pomegranate seeds, and toasted walnuts. The radicchio should soften slightly but remain crisp.
  7. Finish by shaving parmesan over the top. A vegetable peeler works wonders here for creating beautiful, thin ribbons.
  8. Give it a final toss, taste, and tweak any seasoning if needed. Serve immediately and enjoy the medley of textures and flavors!

Cook’s Notes

Let’s chat about farro for a second. It’s an ancient grain, so it’s a bit chewy and wonderfully nutty, perfect for absorbing all the dressing goodness. Don’t skimp on toasting your walnuts; it makes a world of difference in flavor. Also, this salad is best enjoyed fresh, but if you do have leftovers, they’ll keep in the fridge for a day or two. Just know that the radicchio might lose some of its crispness.

Make It Your Own

Feel free to remix this salad with these variations:

  • Swap the farro for quinoa if you’re looking for a gluten-free option.
  • Substitute walnuts with pecans or almonds for a different nutty dimension.
  • Try adding grilled chicken or crispy tofu for extra protein.
  • Love cheese? Crumbled goat cheese can replace parmesan for a tangier kick.

If you try this, I’d love to hear how it turns out — drop a comment or tag me! Cooking is all about experimenting and finding what makes your taste buds sing, so have fun with it.

Related update: Fall Farro Salad with Pomegranate, Walnut & Truffles

Related update: Tomato Cucumber Salad

Mini Spinach and Feta Quiches | Made by Meaghan Moineau

So there I was, staring at the contents of my fridge, wondering how I could whip up something that felt more like a brunch celebration and less like a “what’s-left-in-the-fridge” scramble. It was one of those days when you crave something cozy yet impressive, especially when your best friend calls and says she’s popping over in half an hour. Enter: Mini Spinach and Feta Quiches. They’re this magical combination of simplicity and elegance, bursting with savory flavors and just the right amount of cheese. Plus, they bake up quickly, so you can spend more time chatting and less time cooking. Trust me, these little quiches are worth every moment spent waiting for them to puff up in the oven. Perfect for a casual get-together or a solo treat with a cup of coffee.

Jump to Recipe

What You’ll Need

What’s great about these quiches is that they’re made with ingredients you probably have on hand or are easy to grab on a quick grocery run. Here’s the lineup:

  • Eggs – because what is a quiche without eggs?
  • Half-and-half – for that creamy, luscious texture.
  • Garlic – a subtle kick with lots of flavor.
  • Frozen spinach – convenient and just right for this dish.
  • Onion – for a touch of sweetness and depth.
  • Basil – fresh and aromatic, a lovely herbaceous note.
  • Low-fat shredded cheddar cheese – because cheese is life.
  • Feta cheese – tangy, crumbly, and oh-so-delicious.
  • Salt and pepper – essential for balancing flavors.

How to Make Mini Spinach and Feta Quiches

  1. Preheat your oven to 375°F (190°C). This is your time to collect your thoughts and maybe sip on some coffee, knowing deliciousness is coming soon.
  2. Set a large skillet over medium heat and coat it well with olive oil spray. Wait until the oil shimmers like a little lake under the sun.
  3. Add the garlic. Stir it around for about 30 seconds, just until it releases that irresistible aroma. No burnt garlic here!
  4. Add the chopped onion with a sprinkle of salt and pepper. Turn the heat up slightly to medium-high and cook, stirring often, until the onion turns a light golden brown.
  5. Now, fold in the spinach, chopped basil, and another pinch of salt and pepper. Lower the heat to medium and let it all mingle for about 10 to 15 minutes, stirring occasionally. Taste and adjust the seasoning if needed.
  6. Meanwhile, in a large bowl, whisk together the eggs, feta cheese, half-and-half, some more salt and pepper. Make sure it’s well blended, like a team of flavors ready to win.
  7. Spray your mini muffin pans generously with more olive oil spray. You don’t want any quiches sticking around here when it’s time to serve.
  8. Distribute the spinach mixture evenly among the muffin cups, about a tablespoon each. Follow this up with a tablespoon of the egg mixture in each cup.
  9. Bake in your preheated oven for 15 minutes, until the edges start to set and the tops look a little puffy.
  10. Pull out the pans and sprinkle each quiche with a touch of reserved shredded cheddar. Pop them back in the oven for about 5 more minutes, until the cheese on top is a beautiful golden brown.
  11. Let them cool slightly before serving. They’re delightful warm or at room temperature, with the flavors singing together perfectly.

Cook’s Notes

These quiches are ultra flexible, which is what I love most about them. You can make them a day ahead if you’re planning for a brunch or party. Just store them in an airtight container in the fridge and reheat gently in the oven or microwave. They stay good for about 3 days, though they rarely last that long at my house!

  • Don’t overfill the muffin cups. The filling puffs up a bit during baking, so leave a little space to avoid spillage.
  • If you’re chopping onions and they make you cry, try chilling them in the fridge for a bit beforehand. It helps, promise!

Make It Your Own

  • Protein Punch: Swap out the spinach for sautéed mushrooms and add some cooked, crumbled bacon for a heartier bite.
  • Spice it Up: Sprinkle a little smoked paprika or cayenne into the egg mixture for an unexpected kick.
  • Go Green: Use kale or Swiss chard instead of spinach for a different leafy green vibe.
  • Cheese Swap: Try sharp cheddar or even a nutty Gruyère if you’re out of feta. It’ll change the flavor profile in the best way.

If you try this, I’d absolutely love to hear how it turns out — drop a comment or tag me! May your kitchen be filled with the aroma of baking goodness and the satisfaction of a job deliciously done. 🍴✨

Related update: Mini Spinach and Feta Quiches

Bailey’s Irish Cream Crepes With Creme | Made by Meaghan Moineau

Bailey’s Irish Cream Crepes With Creme

Intro

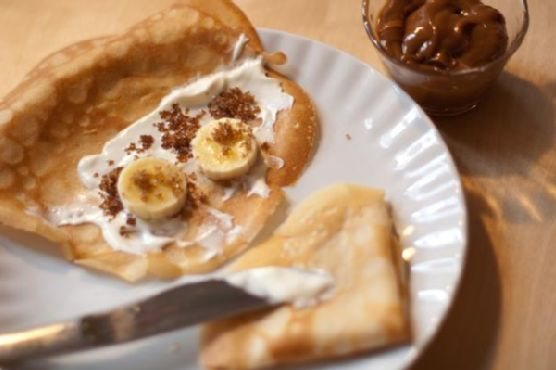
There’s something magical about crepes that transports me back to Sunday mornings at my grandmother’s house. As a child, I would eagerly watch her expertly flip those delicate pancakes, the smell of butter and sugar wafting through the air. Today, I’m excited to share a twist on that nostalgic favorite with a recipe that infuses the classic crepe with the rich, indulgent flavors of Bailey’s Irish Cream, bananas, and a hint of brown sugar. These Bailey’s Irish Cream Crepes With Creme are perfect for a leisurely breakfast or a sophisticated brunch with friends. Let’s dive into the recipe and create new memories around the table.

Why You’ll Love It

This recipe is not just about delicious crepes; it’s about creating an experience. You’ll love the warm, nutty aroma of browned butter combined with the creamy, smooth notes of Bailey’s Irish Cream. The addition of fresh bananas and creme fraiche elevates these crepes to a new level of indulgence. Whether you’re a seasoned cook or a beginner, this recipe is approachable and guaranteed to impress your family and friends. Plus, these crepes are versatile and can be dressed up or down depending on the occasion.

Ingredients

  • Bananas
  • Brown sugar
  • Browned butter
  • Sour creme fraiche
  • Eggs
  • Bailey’s Irish Cream
  • Milk
  • Salt
  • Sugar

Instructions

  1. Brown your butter by adding slices of butter to a heavy-bottomed saucepan. Once melted, whisk it frequently until you see small brown specks begin to form at the bottom of the pan. The butter should have a nutty aroma. Remove it from the pan to prevent further cooking.
  2. Mix the browned butter with the flour, salt, sugar, eggs, milk, and Bailey’s Irish Cream. Using an immersion blender, blend the mixture until completely smooth.
  3. Let the mixture rest for 1/2 hour to allow the flavors to meld and the batter to thicken slightly.
  4. Butter a non-stick frying pan and heat over medium heat.
  5. Using a ladle, spoon in the batter and quickly pick up the pan and swish it around so that the entire pan bottom is covered with a very thin layer of batter.
  6. When the underside is golden, use your fingers or a spatula to flip the crepe over to cook the other side.
  7. Serve with sliced bananas, creme fraiche (or sour cream), and brown sugar. For an extra treat, have Dulce de Leche on the table!

Tips

Here are some tips to ensure your crepes turn out perfectly:

  • Letting the batter rest is crucial for a smooth texture. It allows the flour to fully absorb the liquid and results in more tender crepes.
  • Use a non-stick pan to make flipping the crepes easier. If you don’t have one, ensure your pan is well-buttered.
  • Keep your pan at a medium heat to prevent burning. If the crepes are cooking too quickly or slowly, adjust the heat accordingly.

Variations & Substitutions

Feel free to get creative with this recipe. Here are some variations and substitutions you can try:

  • Filling: Swap out the bananas for strawberries or raspberries for a different fruity flavor.
  • Alcohol: If you prefer a non-alcoholic version, replace the Bailey’s Irish Cream with vanilla extract and a bit more milk.
  • Dairy-Free: Use coconut cream instead of creme fraiche and almond milk in place of regular milk for a dairy-free option.

Storage

These crepes are best enjoyed fresh, but if you have leftovers, here’s how to store them:

  • Let the crepes cool completely before stacking them with parchment paper in between each crepe.
  • Wrap the stack tightly in plastic wrap or store them in an airtight container.
  • They can be refrigerated for up to 3 days. To reheat, gently warm them in a non-stick pan over low heat.

FAQ

Can I make the batter ahead of time?

Yes, you can prepare the batter up to 24 hours in advance. Store it in the refrigerator and give it a good stir before cooking the crepes.

How do I prevent my crepes from tearing?

Ensure your pan is properly heated and buttered before adding the batter. Also, handle the crepes gently when flipping. If they’re tearing, they may be too thick; try using less batter for each crepe.

Can I freeze the crepes?

Yes, you can freeze the crepes. Allow them to cool completely, then stack them with parchment paper in between each crepe, and store them in a freezer-safe bag. They can be frozen for up to 2 months. Thaw in the refrigerator before reheating.

Nutrition

This recipe is a delightful indulgence, perfect for special occasions. While it’s not low in calories, it offers a good balance of carbohydrates, fats, and proteins. The addition of bananas provides potassium and a natural sweetness, while the Bailey’s Irish Cream adds a unique flavor profile without the need for additional sugars.

Conclusion

Bailey’s Irish Cream Crepes With Creme are a delightful way to elevate any breakfast or brunch occasion. With their rich, nutty flavor and creamy toppings, they are sure to become a new family favorite. Whether you’re making them for a special celebration or simply to indulge yourself, these crepes will fill your home with warmth and delicious aromas. Try them out and create lasting memories around the table, just like I did all those years ago. Enjoy!

Related update: Bailey’s Irish Cream Crepes With Creme

Related update: Ginger Snap and Pumpkin Ice Cream Sandwiches

Related update: Chia Seed Pudding

Related update: Mini Spinach and Feta Quiches

Baked Eggs and Bacon Cream In Spinach Fettuccine Nests | Made by Meaghan Moineau

Baked Eggs and Bacon Cream In Spinach Fettuccine Nests

Intro

There’s something incredibly comforting about a dish that combines the richness of cream, the salty crispiness of bacon, and the smooth, silky texture of perfectly cooked pasta. This recipe for Baked Eggs and Bacon Cream in Spinach Fettuccine Nests is one that I hold dear to my heart. It reminds me of lazy Sunday mornings in my grandmother’s kitchen, where the aroma of sizzling bacon and freshly baked bread filled the air. My grandmother, with her gentle hands and warm smile, would let me help with the pasta, showing me how to shape the nests just right. It’s a memory I cherish, and every time I make this dish, I feel like I’m back in her cozy kitchen, enveloped in her love.

Why You’ll Love It

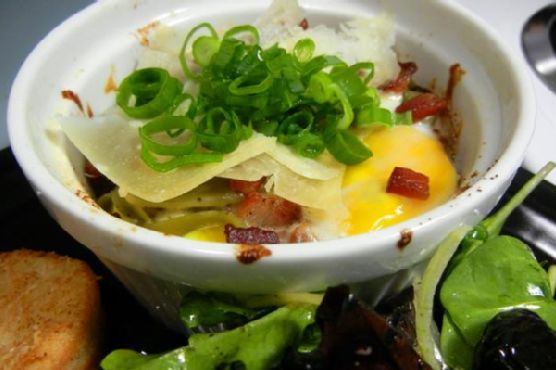
This dish is a celebration of flavors and textures. The creamy sauce, enriched with Parmigiano-Reggiano, wraps around the spinach fettuccine like a warm hug, while the crisp bacon adds a delightful crunch. The pièce de résistance is the whole egg nestled in the center, its yolk just waiting to be broken and mixed into the pasta. It’s elegant enough for a dinner party yet comforting enough for a quiet night in. Plus, it’s a one-dish wonder that’s easy to prepare and sure to impress!

Ingredients

  • Bacon
  • Butter
  • Parmigiano-Reggiano
  • Heavy cream
  • Fresh eggs
  • Nests of spinach fettuccine
  • Salt and pepper
  • Scallions

Instructions

  1. Chop the bacon into small cubes and fry until crispy. Set aside 3/4 of the bacon for the sauce, reserving a few pieces for garnish.
  2. Boil the spinach fettuccine nests in salted water for 10 minutes until slightly undercooked. Reserve a tablespoon of pasta water.
  3. Melt butter in a wok over high heat. Add the heavy cream and bring to a simmer.
  4. Stir in 3/4 of the shredded Parmigiano-Reggiano, salt, and pepper. Simmer until the sauce thickens and is smooth.
  5. Add 3/4 of the cooked bacon to the sauce and blend well.
  6. Transfer the pasta to the sauce using tongs and a meshed spoon. Toss well, adding a bit of reserved pasta water to keep the sauce wet.
  7. Divide the pasta and sauce evenly into two buttered ceramic ramekins.
  8. Sprinkle the remaining bacon over the pasta and nestle a whole egg in the center of each dish.
  9. Bake in a preheated oven at 350°F for 15 minutes, until the egg whites are set but the yolks remain runny.
  10. Garnish with the reserved bacon and shaved Parmigiano-Reggiano before serving.

Tips

For the best results, use fresh eggs and high-quality bacon. If you prefer a spicier kick, add a pinch of red pepper flakes to the sauce. Also, make sure to keep an eye on the eggs while baking to achieve the perfect runny yolk.

Variations & Substitutions

If you’re looking for a lighter version, you can substitute half-and-half for the heavy cream. For a vegetarian option, replace the bacon with sautéed mushrooms or sun-dried tomatoes. You could also use whole wheat fettuccine instead of spinach for a different flavor profile.

Storage

While this dish is best enjoyed fresh, you can store leftovers in an airtight container in the fridge for up to two days. To reheat, place the nests in a preheated oven at 350°F until warmed through.

FAQ

Can I make this dish ahead of time?

Yes, you can prepare the pasta and sauce ahead of time and assemble the nests just before baking. Keep the components separate in the fridge and bring them to room temperature before assembling and baking.

What can I serve with this dish?

A simple green salad with a light vinaigrette complements the rich flavors of the pasta nests beautifully. Additionally, you can serve some crusty bread on the side to soak up the delicious sauce.

Conclusion

Baked Eggs and Bacon Cream in Spinach Fettuccine Nests is more than just a meal; it’s an experience. It combines the best of comfort food with an elegant presentation, making it perfect for both casual and special occasions. With each bite, you’re transported to a place of warmth and satisfaction, much like the cherished memories of my grandmother’s kitchen. I hope this recipe brings the same joy to your home as it does to mine, and that it becomes a favorite in your culinary repertoire. Enjoy!

Related update: Baked Eggs and Bacon Cream In Spinach Fettuccine Nests

Related update: Cajun Seafood and Andouille Sausage Gumbo