
Last Tuesday was one of those days where I felt the chill creeping into my bones, even with a sweatshirt on, and I found myself craving something warm and comforting. But, of course, it was one of those crazy-busy weeknights where the thought of spending hours in the kitchen was less than appealing. So, I rummaged through my fridge and pantry and stumbled upon some broccoli and cheese, which sparked the idea for a cozy Broccoli with Cheese Soup. What I love about this recipe is how it’s both soul-hugging and surprisingly straightforward to whip up. Plus, if you’re anything like me, the idea of gooey, melty cheese is a total win every time.
Jump to Recipe
What You’ll Need
It’s one of those recipes where you might not even have to make a grocery run. Simple ingredients come together to make something magical.
- Broccoli florets
- Flour
- Whole milk
- Feta cheese
- Swiss cheese
- Garlic powder
- Salt
- Ground pepper
- Onions
- Carrots
- Butter
- Chicken broth
How to Make Broccoli with Cheese Soup
- Melt the butter in a large pot over medium heat and add chopped onions and carrots. Sauté for 5-6 minutes, stirring often, until the veggies are tender and the onions are translucent.
- Pour in 1 cup of chicken broth and increase the heat to bring it all to a gentle boil.
- Add the broccoli florets, cover the pot, and let it cook for about 5-6 minutes, or until the broccoli is tender and bright green.
- Using a spoon, break the broccoli florets into smaller pieces directly in the pot. This gives the soup a chunky, rustic texture.
- Lower the heat and add the remaining chicken broth. No need to rush, let it slowly merge with the flavors.
- In a small bowl, whisk together flour and whole milk until smooth. Then, pour this mixture into the pot, stirring it in gently.
- Add garlic powder, salt, and pepper to taste. Keep stirring as you let the soup cook for another 5-6 minutes until it thickens nicely.
- Reduce the heat to low and gradually add the feta and swiss cheese, a handful at a time. Stir constantly for about 10 minutes until the soup becomes a smooth, creamy delight. If it gets too thick, just add a bit more chicken stock. Remember: don’t let it boil!
Cook’s Notes
If you’re making this ahead, the soup can be stored in an airtight container in the fridge for up to three days. Just remember to reheat it gently on the stove, adding a splash of chicken stock if it’s thickened up too much overnight. A common mistake is letting the soup boil after adding the cheese, which can lead to a grainy texture. Keep the heat low and gentle.
Make It Your Own
- Swap the broccoli for cauliflower if you want a milder flavor.
- For a bit of spice, add a pinch of crushed red pepper flakes when you add the garlic powder.
- If you’re looking for a protein boost, toss in some leftover rotisserie chicken before serving.
- For a vegetarian twist, use vegetable broth instead of chicken broth.
If you try this, I’d love to hear how it turns out — drop a comment or tag me on social media! There’s nothing better than sharing a bowl of warmth and comfort, especially when it’s this easy to make. Happy cooking, my friends!
Goes Well With
If you want to round out the meal, here’s what I’d pair it with over on meaghanmoineau.com:
Related update: Broccoli with cheese soup

It was one of those Wednesdays where everything felt like a whirlwind—meetings running late, kids needing help with homework, and of course, the never-ending question: what’s for dinner? I found myself staring into the fridge, a bit like a zombie, until my eyes landed on a pack of boneless pork chops and some cauliflower. That’s when it hit me! I could whip up something quick, comforting, and a little bit impressive: Chili Chops with Cauliflower Salad. This dish is a lifesaver because it’s packed with flavor but doesn’t require hours in the kitchen. Think tangy, spicy, cheesy chops paired with a fresh, zesty cauliflower salad. It’s the kind of meal that feels like a treat but is totally doable on a busy weeknight.
Jump to Recipe
What You’ll Need
Chances are you already have most of this on hand, but here’s what you’ll need to create this delicious meal:
- Boneless pork chops
- Salt and pepper
- Oil (for cooking)
- Italian canned tomatoes
- Green diced chilies
- Cumin
- Swiss cheese
- Cream cheese
- Cauliflower
- Mayonnaise
- Fresh lemon juice
- Dried tarragon
- Red and green bell pepper
- Salt
- Fresh parsley
How to Make Chili Chops with Cauliflower Salad
- Start by seasoning your boneless pork chops generously with salt and pepper. Trust me, this step makes all the difference.
- In a nonstick skillet, heat a splash of oil over medium-high heat. Once hot, add the chops and brown them for about 2 minutes per side. You’re looking for a nice golden crust.
- While those are browning, mix together the Italian canned tomatoes, green diced chilies, and a good pinch of cumin in a bowl.
- Pour this vibrant, tangy mixture over the chops in the skillet. Reduce the heat to low, cover the skillet, and let everything simmer for about 5 minutes, or until the chops are cooked through.
- In a separate bowl, combine the Swiss cheese and cream cheese. Divide this cheesy mixture over each chop in the skillet, cover, and let it melt for about a minute.
- For the cauliflower salad, bring a large pot of salted water to a boil. Toss in your cauliflower florets and cook until they are tender-crisp, about 5 to 10 minutes.
- Once cooked, drain the cauliflower and give it a quick rinse under cold water to stop the cooking process.
- In a large bowl, whisk together mayonnaise, lemon juice, and dried tarragon. Add in the cauliflower, red and green bell pepper, a bit of jalapeno for kick, salt, and a sprinkle of pepper. Mix until everything is well-coated.
- Chill the salad for at least 30 minutes, so the flavors can blend beautifully. Just before serving, garnish with fresh parsley for a pop of color and freshness.
Cook’s Notes
Don’t rush the searing of those chops; a good crust adds a ton of flavor. If you’re in a time crunch, you can cook the cauliflower in the microwave for 15 minutes as an alternative method. This salad is perfect for making ahead—store it in an airtight container and it will be good for up to 24 hours in the fridge. Just sprinkle the parsley on top right before serving to keep it fresh and vibrant.
Make It Your Own
- Swap the boneless pork chops for chicken breasts if that’s what you’ve got. Just adjust the cooking time as needed.
- If you’re not a fan of Swiss cheese, mozzarella makes a gooey, delightful alternative.
- Spice up the salad by adding some crispy bacon bits or toasted almonds for crunch.
- For a dairy-free version, use a plant-based cheese that melts well and skip the cream cheese.
If you try this out, I’d love to hear how it turns out—drop a comment or tag me! Happy cooking, friends!
Goes Well With
If you want to round out the meal, here’s what I’d pair it with over on meaghanmoineau.com:
Related update: Chili chops with cauliflower salad
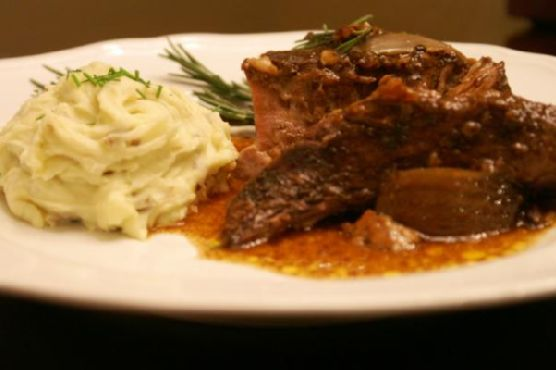
It was one of those lazy Sundays, where the sky threatened rain and my to-do list was as long as my arm. I wanted something that felt like a warm hug in a bowl, but the idea of spending my afternoon tied to the stove was as appealing as, well, spending my afternoon tied to the stove. That’s when my slow-cooker came to the rescue. I decided to try my hand at a No Fuss Sunday Slow-Cooker Balsamic Pot Roast. This dish is a lifesaver on days when you want your kitchen to smell like you’ve been working hard, but really, the slow-cooker is doing all the heavy lifting. Plus, it’s one of those dishes where the payoff is far greater than the effort you put in.
Jump to Recipe
What You’ll Need
The beauty of this pot roast is that you probably have most of these ingredients hanging out in your pantry or fridge. Simple, wholesome, and minimally fussy — just how I like it.
- Boneless beef chuck roast
- 1 onion (I like using a mix of red and white if I have them)
- Low sodium beef broth
- Balsamic vinegar
- Tomato paste
- Cooking tapioca (this helps thicken the sauce without any effort on your part)
- 3 garlic cloves, minced
- Italian seasoning
- Salt and pepper
How to Make No Fuss Sunday Slow-Cooker Balsamic Pot Roast
- Start by laying your onion slices at the bottom of the slow-cooker. They create a flavorful bed for the roast. I went with half a red onion and half a white because that’s what I had, and it added a nice depth of flavor.
- Place the boneless beef chuck roast directly on top of the onions. Season it generously with salt and pepper, massaging the seasonings into the meat.
- In a small bowl, whisk together the beef broth, balsamic vinegar, tomato paste, cooking tapioca, minced garlic, and Italian seasoning. Pour this aromatic mixture over the seasoned meat, letting it cascade over the sides.
- Cover the slow-cooker with its lid. Set it on low and let it work its magic for 8-10 hours. If you’re in a hurry, you can set it on high for 4-5 hours. Trust me, patience is rewarded with tenderness here.
- Resist the urge to check on it. Every time you lift the lid, you lose that precious heat. Though, if you’re like me and find your lid has somehow fallen in creating a constant leak, don’t panic, it’s likely to still turn out just fine.
- Once the roast is tender and practically falling apart, transfer it carefully to a serving dish. The onions and juices left in the slow-cooker double up as a gravy. Pour this delicious liquid into a gravy boat for serving.
- Plate it up and enjoy the moment of finally savoring a meal that smells as good as it tastes.
Cook’s Notes
The secret to this dish is to really let the slow-cooker do the work for you. If you want, you can sear the roast before placing it in the slow-cooker for an added depth of flavor, but I find it’s perfectly delicious without. Store any leftovers in an airtight container in the fridge for up to three days. Reheat gently over the stove or in the microwave with a splash of water or broth to keep it moist.
Make It Your Own
- Swap the beef for a pork shoulder for a slightly different, but equally tender experience.
- Add a handful of baby carrots and halved potatoes to the slow-cooker for a complete one-pot meal.
- For a little heat, toss in a pinch of red pepper flakes with the broth mixture.
- Replace the balsamic vinegar with red wine vinegar for a slightly tangier sauce.
If you try this, I’d love to hear how it turns out — drop a comment or tag me on social media! Whether it’s a rainy Sunday or not, this dish is bound to make your day a little cozier. Happy cooking!
Goes Well With
If you want to round out the meal, here’s what I’d pair it with over on meaghanmoineau.com:
Related update: No Fuss Sunday Slow-Cooker Balsamic Pot Roast
Related update: Chili chops with cauliflower salad
On a chilly Tuesday evening last fall, I found myself craving something that would warm both my kitchen and my soul. The weather outside was doing that indecisive dance between autumn and winter, and I needed more than just a hot cup of tea to satisfy my hunger. Enter: Paella. This Spanish mixed seafood stew is my go-to for those nights when I want to feel like I’m treating myself to something special without the fuss of a complicated recipe. The beauty of this dish lies in its simplicity—using a single pan to create layers of flavor that taste like you’ve been cooking all day, even though it’s ready in about an hour. Paella takes what could be an ordinary weeknight and turns it into a culinary adventure. Trust me, you’re going to want to keep this one in your recipe rotation.
Jump to Recipe
What You’ll Need
Chances are you already have most of these ingredients lounging in your pantry or fridge. But it’s the combination of a few key players that really make this dish sing.
- Smoky paprika
- Dried oregano
- Kosher salt
- Black pepper
- Chicken wings
- Littleneck clams
- Solid chorizo sausage
- Shrimp
- Extra virgin olive oil
- White diced onion
- Diced garlic
- Italian parsley leaves
- Whole .5 oz tomatoes
- Canned Spanish short grain rice
- Water
- Saffron
- Salt and pepper
- Green peas
- Lemon wedges
How to Make Paella for Four; A Wonderful Spanish Mixed Seafood Stew
- First, let’s make our spice mix. Combine smoky paprika, dried oregano, kosher salt, and black pepper in a small bowl. Rub this all over the chicken wings, then pop them in the fridge for an hour to let those flavors sink in.
- As your chicken’s marinating, let’s prep the other ingredients. Slice your chorizo sausage into rounds and get your seafood ready. Let the chicken sit out for 30 minutes before you start cooking to take the chill off.
- Grab a 12-inch All-Clad stainless steel pan (or whatever large pan you have) and heat half of the olive oil over medium-high heat. Brown the chorizo rounds until they’re golden and fragrant, then take them out and set them aside.
- In the same pan, add the remaining oil. Toss in the chicken wings and brown them on all sides. Remove the chicken from the pan and keep it aside with the sausage.
- Now, reduce the heat to medium and add diced onions, garlic, and parsley to the pan. Stir it around for 2 to 3 minutes until the aroma fills your kitchen. Add crushed and drained tomatoes, cooking for about 3 minutes to let the flavors meld. This is your sofrito!
- Pour in the canned Spanish short-grain rice and stir, coating every grain with the delicious sofrito. This should take about 2 minutes.
- Return the browned chorizo and chicken to the pan. Pour in hot water, bring everything to a gentle simmer, and let it all cook for about 5 minutes, stirring occasionally to make sure everything is evenly distributed.
- Place the littleneck clams strategically wherever you’d like them to shine in the finished dish. No more stirring from this point on!
- After 5 minutes, nestle the shrimp in the pan, tails up, because presentation matters. Let it all cook for about 10 minutes or until the clams have opened, the shrimp have turned a lovely pink, and the rice is fluffy and just moist enough.
- For the pièce de résistance, check for the socarrat. With a fork, feel the bottom of your dish. If it hasn’t formed yet, turn the heat up for 30 to 45 seconds until you get that perfect crispy layer. Serve immediately and enjoy your masterpiece!
Cook’s Notes
Cooking paella is more art than science, so don’t worry if it doesn’t look perfect. The key to a good paella is not to stir it once you’ve added the clams to allow that beautiful socarrat crust to form. If you’re new to saffron, go easy on it—too much can overpower the dish. Leftovers? Store them in an airtight container and they’ll last up to two days in the fridge. When reheating, do it gently on the stove with a splash of water to bring it back to life.
Make It Your Own
- Swap the chicken wings for crispy skin-on chicken thighs for a richer flavor.
- If clams aren’t your thing, mussels make an excellent alternative.
- Vegetarian? Skip the seafood and add in some grilled bell peppers and artichokes for a hearty twist.
- For a spicier kick, add a pinch of red chili flakes when you brown the chorizo.
If you try this, I’d love to hear how it turns out—drop a comment or tag me! Whether it becomes a weeknight staple or a weekend treat, I hope this paella brings a bit of Spanish sunshine into your home. Enjoy!
Goes Well With
If you want to round out the meal, here’s what I’d pair it with over on meaghanmoineau.com:
Related update: Paella for Four; A Wonderful Spanish Mixed Seafood Stew
Related update: No Fuss Sunday Slow-Cooker Balsamic Pot Roast
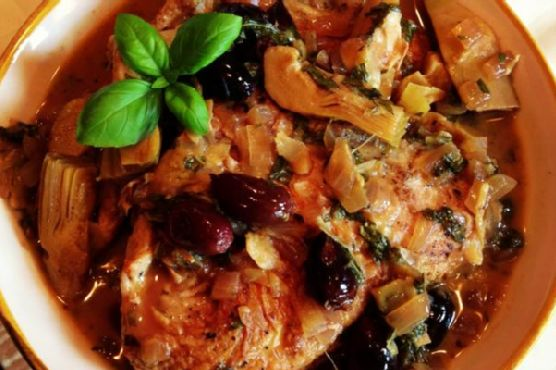
The other night, I found myself staring into my pantry, hoping for some sort of culinary miracle to occur. You know those moments — all you really want is something that’s comforting yet feels just a tad fancier than your usual weeknight fare. Enter: Braised Chicken with Artichoke Hearts & Olives. It was one of those evenings where I wanted the kind of meal that could transport me straight to a sun-drenched Mediterranean patio, glass of wine in hand. Luckily, this dish does exactly that and without sending me into a grocery store frenzy. Plus, it’s deceptively easy, which is always a win in my book. Jump to Recipe
What You’ll Need
Don’t worry about hunting down specialty items; chances are you already have most of this lying around. Here’s what you’ll need:
- Skinless boneless chicken breasts
- Olive oil
- Salt & pepper
- 1 red onion
- White wine
- Artichoke hearts (canned or jarred are perfect!)
- Kalamata olives
- Chicken broth
- Juice of 1 lemon
- Fresh basil
How to Make Braised Chicken with Artichoke Hearts & Olives
- Start by lovingly seasoning your chicken breasts with a generous pinch of salt and pepper. Trust me, this makes a world of difference.
- Heat a large sauté pan over medium-low heat and add a couple of drizzles of olive oil. You’re aiming for a gentle sizzle when the chicken hits the pan.
- Place the chicken skin-side down in the pan. Let them cook until golden brown and your kitchen smells irresistible—about 5 minutes. Flip them over and cook for another couple of minutes. Remove them from the pan and set aside.
- If your pan looks a little parched, add a small drizzle of olive oil, then toss in the chopped red onion. Sauté until they become slightly softened and just start to caramelize.
- Carefully pour in the white wine, then use a spatula to scrape up all those delicious browned bits stuck to the bottom. Let the wine reduce by about half—your cue is when the aroma is rich and inviting.
- Stir in the artichoke hearts and olives, followed by the chicken broth. Nestle the chicken back into the pan, ensuring it’s surrounded by all those incredible flavors.
- Cover the pan and let it all simmer for about 20 minutes. This is when you get to kick back with a glass of that leftover wine.
- Once the chicken is cooked through, remove it from the pan again. Add in the lemon juice and fresh basil to the sauce and let it simmer for another 5 minutes, allowing the flavors to meld together beautifully.
- Finally, pour that fabulous sauce over the chicken, and you’re ready to serve. Enjoy the wafting aroma of your Mediterranean escape!
Cook’s Notes
- If you find your chicken isn’t browning well, it might need a little extra time without moving in the pan. Patience is key!
- This dish is fabulous for leftovers. Store it in an airtight container in the fridge, and it should be good for up to three days.
- Reheat gently on the stove, adding a splash of chicken broth if the sauce has thickened too much in the fridge.
- Don’t rush the simmering phase; it’s where all the magic happens, infusing the chicken with deep, savory flavors.
Make It Your Own
- Swap the chicken for some crispy tofu if you’re in the mood for a vegetarian delight, adjusting the simmer time as needed.
- If you love a little heat, throw in a pinch of red pepper flakes when sautéing the onions.
- No white wine? No problem! Use a splash of apple cider vinegar for a tangy twist.
- Feel free to add in some cherry tomatoes for a pop of color and sweetness.
If you try this, I’d love to hear how it turns out — drop a comment or tag me! I hope this becomes one of those go-to recipes that you turn to whenever you need a bit of culinary sunshine.
Goes Well With
If you want to round out the meal, here’s what I’d pair it with over on meaghanmoineau.com:
Related update: Braised Chicken with Artichoke Hearts & Olives

So, last Thursday, I was staring into my fridge, contemplating the age-old dilemma of what to whip up for dinner. It was that kind of day where you just want something that’s quick but also feels like you’re treating yourself — you know what I mean? That’s when I stumbled upon some boneless pork chops and a lonely cauliflower that needed some love. The result? Chili chops with cauliflower salad. It’s a dish that’s not only comforting and satisfying but also surprisingly simple to make. Perfect for those weeknight dinners when you want something a bit special without spending hours in the kitchen.
Jump to Recipe
What You’ll Need
This recipe is all about balance and bold flavors, using some pantry staples and fresh ingredients that you probably have on hand!
- Boneless pork chops
- Salt and pepper
- Oil
- Italian canned tomatoes
- Green diced chilies
- Cumin
- Cauliflower
- Mayonnaise
- Fresh lemon juice
- Dried tarragon
- Jalapeño, for a little heat
- Fresh parsley
- Red green bell pepper
- Salt and pepper, again for seasoning
- Cream cheese
- Swiss cheese
How to Make Chili Chops with Cauliflower Salad
- Season those pork chops generously with salt and pepper. Heat your nonstick skillet over medium-high heat, add a splash of oil, and brown the chops for about 2 minutes per side. They should be golden and slightly crisp around the edges.
- In a bowl, combine the Italian canned tomatoes, green diced chilies, and cumin. Stir until it smells like a fiesta in a bowl. Pour this mixture over the browned chops.
- Reduce the heat to low, cover the skillet, and let those chops simmer for about 5 minutes or until they’re cooked through to perfection. You’ll know they’re done when they’re firm but juicy.
- While the chops are simmering, mix together your cream cheese and Swiss cheese in a small bowl. Once the chops are ready, divide this cheese mixture over them, cover, and let it melt for about a minute.
- For the cauliflower salad, bring a large pot of salted water to a boil. Toss in the cauliflower and cook until tender-crisp, somewhere between 5 to 10 minutes. Drain and give them a quick rinse under cold water.
- In a large bowl, whisk together the mayonnaise, fresh lemon juice, and dried tarragon. Add the cauliflower, a bit of jalapeño for some kick, salt, and pepper. Mix until every floret is lovingly coated in the dressing.
- Chill the cauliflower salad for at least 30 minutes so the flavors can mingle. Just before serving, sprinkle with fresh parsley for a pop of color and flavor.
Cook’s Notes
When browning the chops, make sure the skillet is hot enough to give them a nice sear without overcooking. This will lock in the juices, keeping them tender. If you’re making this ahead, the chop mixture and cauliflower salad can be stored separately in airtight containers in the fridge. The salad actually tastes even better after a day, so feel free to prepare it in advance. However, don’t leave it in the fridge for more than 24 hours to keep it fresh and crisp.
Make It Your Own
- Swap the pork chops for chicken breasts or thighs if you’re in the mood for chicken. Adjust the cooking time as needed.
- Try adding a dash of smoked paprika to the tomato-chili mixture for a smoky depth.
- If you’re dairy-free, substitute the cream cheese and Swiss cheese with your favorite plant-based cheeses.
- Spice up the cauliflower salad with some diced red onion or bell pepper for extra crunch and flavor.
If you try this, I’d love to hear how it turns out — drop a comment or tag me! Whether it’s a hit or a learning experience, let’s chat about it! 🍽️
Goes Well With
If you want to round out the meal, here’s what I’d pair it with over on meaghanmoineau.com:
Related update: Chili chops with cauliflower salad
Related update: Braised Chicken with Artichoke Hearts & Olives
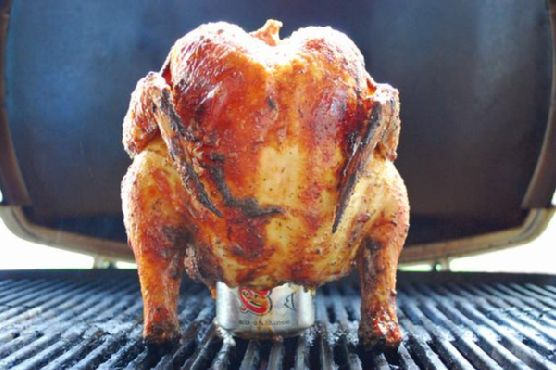
It was one of those sultry summer evenings when the sun just refused to set, and my friends and I were sprawled across the backyard, glasses in hand, lazily debating the merits of white versus red wine with a barbecue. Then it hit me — what if we just combined our beverages with the barbecue? Thus began the culinary experiment that led to this delightful Boozy BBQ Chicken, a dish that’s as much fun to say as it is to make. The recipe is a little bit cheeky, a tad messy, but oh-so-worth it for the juicy, flavorful chicken and those irresistible veggie kebabs. It’s perfect for impressing guests while keeping it casual.
Jump to Recipe
What You’ll Need
So here’s the deal, most of these ingredients are probably chilling in your kitchen already. The stars of this show are the bold flavors — think zesty orange, **canned fruity beer**, and a dash of **Tabasco** for a kick.
- 1 whole chicken
- 1 can of **fruity beer**
- 1/2 cup **white wine**
- 1/4 cup **low sodium soy sauce**
- 1/4 cup **low-fat Italian Newman’s Own salad dressing**
- 1 tablespoon **dijon mustard**
- 1 tablespoon **molasses**
- 1 teaspoon **Tabasco sauce**
- 2 tablespoons **olive oil**
- 2 cloves of **fresh garlic**, minced
- 1 tablespoon **fresh ginger**, grated
- 1 teaspoon **salt**
- 1 teaspoon **fresh ground pepper**
- 1 **orange**, halved
- 1 **lemon**, halved
- 1 **green bell pepper**
- 1 **red bell pepper**
- 1 **red onion**
- 1 cup **bite-sized mushrooms**
- 1 cup **cherry tomatoes**
- 1 cup **broccoli florets**
- 1 cup slow cook **brown rice**
- 2 cups **water**
- **Wooden skewers**
How to Make Boozy Bbq Chicken
- Chop your orange, bell peppers, onion, and broccoli into hefty, bite-sized chunks (at least 1″ thick) and toss into a large dish. Add in the mushrooms and cherry tomatoes.
- In a small bowl, whisk together the soy sauce, olive oil, molasses, Tabasco sauce, garlic, ginger, salt, and pepper. Pour this marinade over the veggies, stirring to coat them well. Cover and refrigerate while you prep the chicken.
- Fire up your outdoor grill to medium heat. Grab the chicken, rinse it well, and pat it dry with a paper towel — then toss that towel!
- In a separate bowl, mix the dijon mustard with a pinch of salt and pepper. Brush this mustard mix all over the chicken, getting into all those nooks and crannies.
- Now, for the fun part. When your beer can is half-empty (or half-full, depending on your outlook), refill it with the salad dressing and the juice from half of the lemon. It’s a boozy stand for your chicken!
- Set the beer can on a disposable baking sheet. Carefully lower the chicken onto the can, standing it upright. Place this masterpiece on the preheated grill.
- Cover and let it cook for about an hour. This is the perfect time to relax and maybe start on a second beer or that remaining white wine.
- Meanwhile, get the rice going. In a medium saucepan, add the rice, water, and a generous splash of your current drink (about 1/4 cup should do). Bring to a boil, then reduce to low, cover, and simmer for 25-30 minutes.
- Back to our veggie friends. Pull them out from the fridge and start threading them onto the skewers, distributing the veggies equally among 6-8 skewers.
- Check your rice: it’s ready when the liquid is absorbed but before it sticks to the pan. Turn off the heat and let it sit.
- By now, your chicken should be about done. Carefully check by slicing in and ensuring the meat has transformed from pink to white. Remove it from the grill and let it cool for at least 15 minutes — you don’t want to scorch your fingers!
- Throw those veggie skewers directly onto the grill. Flip them after about 5 minutes to ensure even grilling, and let them cook for another 5-8 minutes, until the veggies are al dente.
- Once everything’s cooked, turn off the grill and remove everything from heat. Serve the rice in a dish and the chicken with the skewers on a platter. Squeeze the remaining lemon juice over the chicken for a fresh zing. Let everyone serve themselves, grab a drink, and enjoy!
Cook’s Notes
This Boozy BBQ Chicken is forgivingly flexible. If you’re preparing in advance, marinate the veggies the night before to let those flavors get cozy. Leftovers (if there are any) will keep in the fridge for about 3 days, making a delightful cold lunch the next day. When grilling, remember that patience is your friend. Letting the chicken rest after grilling ensures it stays juicy and doesn’t dry out when you cut into it.
Make It Your Own
- Swap the chicken for crispy tofu for a vegetarian spin. Marinate it well to soak up all those flavors.
- Use pineapple chunks in place of mushrooms for a sweeter, tropical twist.
- Trade the slow cook brown rice for a quick-cooking quinoa if you’re short on time.
- For a spicier kick, add some sliced jalapeños to the veggie skewers.
If you try this, I’d love to hear how it turns out — drop a comment or tag me! Let’s keep the backyard barbecue vibes going, no matter the season. Cheers to good food and great company!
Goes Well With
If you want to round out the meal, here’s what I’d pair it with over on meaghanmoineau.com:
Related update: Boozy Bbq Chicken
Related update: Classic Macaroni and Cheese
Related update: Chili chops with cauliflower salad

There I was, standing in front of the fridge, craving something warm and comforting after a particularly hectic day. My brain was fuzzy, and my patience was thin. I needed something easy but satisfying — a culinary hug, if you will. Enter my Creamy Chicken Orzo Soup. It’s the kind of dish that comes together with minimal effort but delivers maximum comfort. Think of it as your trusty sidekick for those chilly evenings where you can’t be bothered with anything too complicated. In just under an hour, with a few pantry staples and a couple of fresh veggies, you’ll have a steaming pot of soul-soothing goodness.
Jump to Recipe
What You’ll Need
Here’s the kicker: you probably have a lot of this stuff already hanging around in your kitchen. We’re talking simple, straightforward ingredients that come together in the best way.
- 2 tablespoons of olive oil
- 2 stalks of celery, chopped
- 1 cup of chopped baby carrots
- 1 medium onion, diced
- 1 teaspoon of kosher salt
- 1/2 teaspoon of freshly ground black pepper
- 1 can of Swanson Premium Chicken, drained
- 1 can of Swanson Chicken Broth
- 2 cans of warm water
- 1 teaspoon of poultry seasoning
- 1 cup of orzo pasta
- 1 can of Cream of Chicken Condensed Soup
How to Make Creamy Chicken Orzo Soup
- In a large pot over medium heat, add the olive oil, then toss in the celery, carrots, and onion. Sauté these veggies for about 10 minutes until they’re tender and your kitchen smells like a cozy dream.
- Next, add the drained chicken to the pot. Give it a good stir, combining it with the softened vegetables.
- Season everything with kosher salt and black pepper, stirring to blend the flavors together.
- Increase the heat to medium-high and add the chicken broth along with 2 cans of warm water. Stir, and let the soup come to a gentle simmer.
- After about 15 minutes of simmering, add the uncooked orzo and poultry seasoning. Stir to make sure nothing sticks.
- Let the soup simmer for another 20 minutes, stirring occasionally. The orzo will swell and absorb all that delicious broth.
- Finally, stir in the cream of chicken condensed soup. Mix until the broth is creamy and everything looks inviting. Serve hot and enjoy!
Cook’s Notes
So, let’s talk pro tips. First off, be sure to keep an eye on your soup while the orzo is cooking. It likes to soak up the liquid, so give it a stir every now and then to prevent sticking. If the soup gets too thick, don’t panic — just splash in a bit more water or broth until you reach your desired consistency. Leftovers? Store them in an airtight container in the fridge, and they’ll be good for up to three days. When reheating, just add a bit of water to loosen things up. Trust me, this soup gets even better the next day.
Make It Your Own
Here are a few ways to switch things up if you’re feeling adventurous or just need to accommodate what’s in your pantry:
- Swap the chicken for crispy tofu for a vegetarian twist. Just fry up some tofu cubes until golden before adding them to the soup.
- Out of orzo? Use rice instead. It’ll give a slightly different texture but still be delicious.
- Add a handful of fresh spinach or kale at the end for some extra greens. Just stir them in until wilted.
- For a spicy kick, toss in a pinch of red pepper flakes when adding the poultry seasoning.
Whether you’re curling up on the couch or dishing up for family dinner, this soup is a winner. If you try this, I’d love to hear how it turns out — drop a comment or tag me!
Goes Well With
If you want to round out the meal, here’s what I’d pair it with over on meaghanmoineau.com:
Related update: Creamy Chicken Orzo Soup
Related update: Broccoli with cheese soup

It was one of those frantic Tuesday evenings, where work emails kept piling up and the clock was ticking closer to dinner time. You know the drill, right? Everyone’s hunger levels are rising, and you need something that feels like it took way more effort than it really did. Enter the “Blast Of Color Mexican Stuffed Bell Peppers,” because when you need to impress yourself and your family without breaking a sweat, these are your go-to. They’re vibrant, packed with flavor, and surprise — actually pretty easy! Plus, it’s likely that you have most of these ingredients lounging around in your kitchen already.
Jump to Recipe
What You’ll Need
I love this dish because it’s as easy as a quick fridge and pantry raid. Chances are you already have most of this:
- Bell peppers – the canvas for your culinary masterpiece.
- Black beans – for a hearty boost of protein.
- Rotisserie chicken breast – a weeknight lifesaver.
- Fire roasted green diced chile – for that smoky kick.
- Chili seasoning – because flavor is everything.
- Cooked brown rice – the glue that holds it all together.
- Frozen corn kernels – add a touch of sweetness.
- Garlic – because when isn’t garlic a good idea?
- Low fat shredded cheddar cheese – gooey goodness.
- Red diced onion – for a little zing.
- Roma tomato – because every fiesta needs a fresh twist.
- Sour light cream – the final creamy touch.
How to Make Blast Of Color Mexican Stuffed Bell Peppers
- Start by preheating your oven to 400 degrees. While it warms up, envision the colorful feast you’re about to create.
- In a large bowl, mix together the cooked brown rice, shredded rotisserie chicken, frozen corn, diced roma tomato, chopped red onion, black beans, 1/2 cup of cheddar cheese, minced garlic, diced green chile, and a sprinkle of chili seasoning. Stir until everything is looking speckled and colorful.
- Line a baking dish with foil (trust me, this makes cleanup a breeze) and give it a light spray with cooking spray.
- Grab those gorgeous bell peppers. Slice off the tops, remove the seeds, and stuff them generously with your chicken mixture. You want to really pack it in, then mound a little extra on top for good measure.
- Place your stuffed peppers into the prepared dish, and top each with 1/2 tablespoon of shredded cheese. As it bakes, this will melt into a deliciously golden crust.
- Bake for 30-40 minutes. Keep an eye on them — you’ll know they’re ready when the peppers are tender and the cheese is bubbling and golden.
- Once out of the oven, let them cool just slightly, then finish with a dollop of sour cream on each. It’s the creamy cherry on top!
Cook’s Notes
A couple of things to keep in mind: make sure your rice is cooked and cooled slightly before you start mixing — hot rice can make things a bit messy. If you find yourself with leftovers (not likely!), store them in an airtight container in the fridge. They make fantastic lunches and will last for about 3 days. Reheat them in the oven to keep them from getting soggy. If you’re planning ahead, you can make the stuffing mixture up to a day in advance, just cover and refrigerate until you’re ready to assemble the peppers.
Make It Your Own
Feeling adventurous? Here are some ideas to shake things up a bit:
- Swap the chicken for crispy tofu for a vegetarian twist that’s just as hearty.
- Try using quinoa instead of brown rice for a nutty flavor and a protein boost.
- Want it spicier? Add diced jalapeños or a splash of hot sauce to the stuffing mix.
- For a twist on the cheese, use pepper jack for an extra kick.
If you try this, I’d love to hear how it turns out — drop a comment or tag me! Happy cooking, and may your dinner be as colorful and delightful as these peppers.
Goes Well With
If you want to round out the meal, here’s what I’d pair it with over on meaghanmoineau.com:
Related update: Blast Of Color Mexican Stuffed Bell Peppers
Related update: Pesto & Yogurt Pasta

Picture this: It’s a chaotic Wednesday evening. You’ve just returned from work, and the last thing you want to do is spend hours in the kitchen. But, you crave something comforting and satisfying; something that feels like a hug on a plate. That’s when my go-to BBQ Chicken recipe swoops in to save the day! This dish is the epitome of easy yet impressive cooking. With minimal ingredients that you probably already have in your pantry, you’ll whip up a dinner that’ll have everyone licking their fingers and asking for seconds. Trust me, the blend of sweet, tangy, and smoky flavors makes it a must-try. Plus, your kitchen will smell absolutely amazing!
Jump to Recipe
What You’ll Need
One of the best things about this recipe is how simple the ingredient list is. Chances are you already have most of these lying around, just waiting to be turned into something magical.
- Brown sugar
- Catsup
- Chicken pieces (your choice of cuts)
- Dry mustard
- Soy sauce
- Worcestershire sauce
How to Make Bbq Chicken
- Start by combining the brown sugar, catsup, dry mustard, soy sauce, and Worcestershire sauce in a bowl. Stir until the mixture is smooth and the sugar has dissolved. This is your luscious BBQ sauce.
- Preheat your broiler. Trust me, this high heat is where the magic happens, caramelizing the sauce onto the chicken.
- Place your chicken pieces on a broiler pan or a baking sheet lined with foil. Baste the chicken generously with half of the sauce, making sure every piece is well-coated.
- Broil for 20 minutes. You’ll know it’s time to flip when the edges of the chicken start to bubble and caramelize. It’ll smell irresistible!
- Turn the chicken pieces over and baste with the remaining sauce. Return to the broiler for another 20 minutes, until the chicken is cooked through, and the sauce is sticky and slightly charred.
Cook’s Notes
This recipe is pretty forgiving, but here are some tips to nail it every time. First, make sure your chicken pieces are of similar size for even cooking. If they’re too large, they might need a bit more time to cook through. Also, keep a close eye on the chicken while it’s broiling—things can go from perfectly caramelized to burnt quickly under such high heat. If you’re prepping ahead, you can make the sauce a day in advance and store it in the fridge. Once cooked, leftovers can be stored in an airtight container in the fridge for up to three days. Simply reheat in the oven or microwave, although the broiler will help crisp it back up a bit!
Make It Your Own
- Swap the chicken for crispy tofu for a vegetarian twist. Follow the same broiling steps for a delicious result.
- Add a teaspoon of smoked paprika to the sauce for an extra smoky flavor boost.
- Use honey instead of brown sugar for a different kind of sweetness and a slightly stickier sauce.
- For a spicy kick, mix in some hot sauce or a pinch of cayenne pepper to the sauce.
If you try this, I’d love to hear how it turns out — drop a comment or tag me! Your kitchen adventures are always inspiring, and who knows, you might even teach me a new twist on this classic!
Goes Well With
If you want to round out the meal, here’s what I’d pair it with over on meaghanmoineau.com:
Related update: Bbq Chicken
Related update: Blast Of Color Mexican Stuffed Bell Peppers
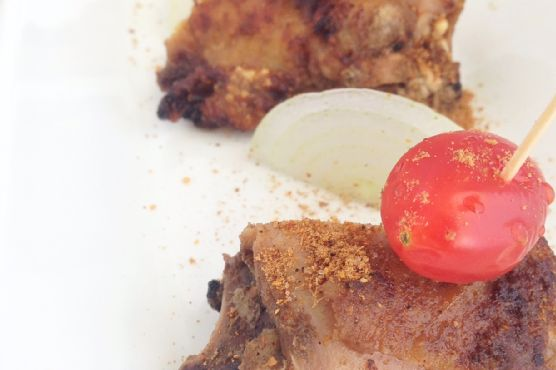
On a particularly rushed Tuesday evening, I found myself staring at a pack of chicken thighs in the fridge and a very hungry family pacing the kitchen. With the usual takeout feeling mundane and uninspiring, I remembered a burst of flavor from a trip to Nigeria—Chicken Suya. Imagine spicy, smoky goodness, and you’re halfway there. This dish is a game-changer: the kind that feels impressive enough for company but is straightforward enough for a frantic weeknight. The spice mix does all the heavy lifting, and the oven takes care of the rest. By the time the chicken is sizzling and golden, you’ll be salivating from the aromas filling your kitchen.
Jump to Recipe
What You’ll Need
Just a handful of ingredients stand between you and this flavor-packed delight. You might even have most of these at hand already. Here’s what you’ll need:
- Suya spice
- Chicken (thighs, drumsticks, whatever you prefer)
- Chilli powder
- Cooking spoon of groundnut oil
- Seasoning cubes
- Onions and tomatoes
- Salt
How to Make Chicken Suya
- Preheat your oven to a blistering 500°F. This high heat is crucial for that perfect charred exterior.
- While the oven is heating, wash your chicken pieces and pat them dry. In a large bowl, coat them generously with the Suya spice, chilli powder, seasoning cubes, and a pinch of salt. The chicken should have a nice reddish hue from the spices.
- Drizzle a cooking spoon of groundnut oil over the spiced chicken, ensuring each piece is glistening. The oil helps achieve a beautiful crispy skin.
- Arrange the chicken pieces on a baking tray in a single layer. Pop them into the preheated oven.
- Grill for about 40 minutes, flipping the chicken halfway through. You’ll know it’s ready when the edges start to brown and the aroma becomes irresistible.
- While the chicken is grilling, slice the onions and tomatoes. These will serve as a fresh garnish to complement the spicy chicken.
- Once cooked, serve the chicken hot, garnished with the fresh onions and tomatoes, and a sprinkle of extra Suya spice for good measure.
Cook’s Notes
Don’t be tempted to skimp on the Suya spice; it’s the soul of the dish! If you’re making this for the first time, keep an eye on the chicken as it grills. Oven temperatures can vary, and you want that perfect balance of cooked-through and crispy edges. If you have leftovers (a big “if” because it’s that good!), store them in an airtight container in the fridge. They make for a fabulous cold lunch, or you can rewarm them in a low oven. This dish can be made ahead up to the point of grilling; just marinate the chicken with the spices and store it in the fridge for up to 24 hours.
Make It Your Own
- Swap the chicken for crispy tofu for a vegetarian version. Just press the tofu first to remove excess moisture.
- Add a squeeze of lime before serving for an extra zing that cuts through the richness.
- For a milder version, dial back on the chilli powder and let the Suya spice shine on its own.
- Love it extra spicy? Add some chopped fresh chili alongside the onions and tomatoes for garnish.
If you try this, I’d love to hear how it turns out—drop a comment or tag me! Whether it’s for a bustling weeknight or a special gathering, Chicken Suya is bound to become a favorite in your home too. Enjoy every spicy, juicy bite!
Goes Well With
If you want to round out the meal, here’s what I’d pair it with over on meaghanmoineau.com:
Related update: Chicken Suya
Related update: Bbq Chicken
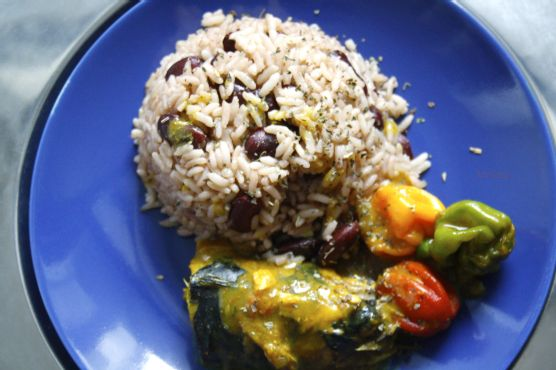
Picture this: It’s midweek, you’ve had one of those days where your to-do list seems to grow faster than you can cross things off, and the last thing you want to do is spend ages in the kitchen. You need something that hits that perfect balance — satisfying, flavorful, but not labor-intensive. Enter Rice and Peas with Coconut Curry Mackerel. This dish has become my trusty sidekick, swooping in to save dinner time with its creamy, spicy goodness. It’s like a little escape to the islands without even leaving your kitchen. Trust me, you’ll want to bookmark this one.
Jump to Recipe
What You’ll Need
So, let’s talk ingredients. The magic here is that you probably already have most of these hanging out in your pantry. We’re talking about a few key players that bring this dish together with minimal fuss.
- Coconut milk – This is your creamy base.
- Seasoning cubes – For that umami punch.
- Curry powder – Your spice hero here.
- Garlic – Essential for that savory depth.
- Mackerel – Fresh or canned, your call.
- A bulb of onion – Adds sweetness and texture.
- Red kidney beans – Packed with protein.
- Rice – The heart of the dish.
- Scotch bonnet peppers – For some fiery personality.
- Corn starch – Thickens the sauce to perfection.
How to Make Rice and Peas with Coconut Curry Mackerel
Ready to dive in? Let’s get cooking.
- Start by pouring 1 cup of coconut milk into a pot along with 1 seasoning cube. Bring it to a gentle boil; you’ll know it’s ready when the aroma starts to fill your kitchen.
- Add your rice and red kidney beans to the pot. Pour in 2 cups of water, give it a good stir, and let it all come to a boil, then reduce to low heat. Let it simmer until the rice and peas are tender and have soaked up the creamy coconut goodness.
- In another pot, combine the rest of the coconut milk, curry powder, and a bit of water. Give it a stir, then add your mackerel. Allow it to come to a boil, then reduce to medium heat.
- Toss in the chopped onion, scotch bonnet peppers, and minced garlic. Stir everything together and let it simmer. You’ll start to smell a wonderful mix of spices and sweetness.
- Once the fish is cooked through, sprinkle in the corn starch to thicken the sauce. Let it simmer for another 4 minutes on low heat until the sauce is rich and velvety.
- Serve the mackerel curry over your coconut-infused rice and peas. Enjoy the symphony of flavors!
Cook’s Notes
This dish is quite forgiving, which is perfect for those days when your mind is elsewhere. Just a few things to keep in mind:
– If you’re using canned mackerel, remember to reduce the salt since it usually comes pre-seasoned.
– The scotch bonnet peppers pack heat, so adjust to your spice tolerance. You can always start with half a pepper and add more if you’re feeling brave.
– Leftovers hold up well in the fridge for a couple of days. Just reheat gently and maybe add a splash of water or coconut milk to loosen up the sauce.
– If you like your beans a bit firmer, you can add them later in the cooking process.
Make It Your Own
Feeling adventurous or need to accommodate what’s in your pantry? Here are a few swaps and variations:
- Swap the mackerel for crispy tofu for a plant-based twist. Just sauté the tofu before adding it to the curry.
- Use quinoa instead of rice for a protein boost. Adjust the cooking time and liquid accordingly.
- Throw in some green peas along with the kidney beans for extra color and sweetness.
- If you’re not a fan of too much heat, try jalapeños instead of scotch bonnets for a milder kick.
If you try this, I’d love to hear how it turns out — drop a comment or tag me! Here’s to stress-free dinners and delicious moments. 🍽️
Goes Well With
If you want to round out the meal, here’s what I’d pair it with over on meaghanmoineau.com:
Related update: Rice and Peas with Coconut Curry Mackerel
Related update: Chicken Suya
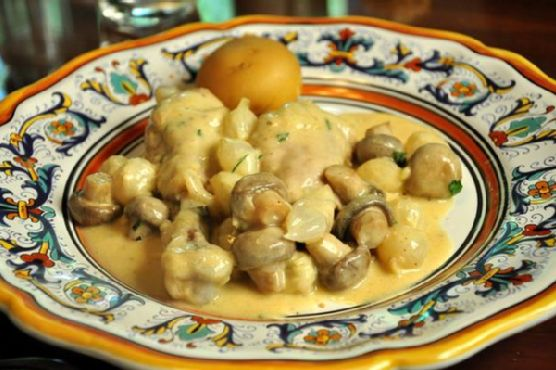
The other night, I found myself staring at a pack of chicken breasts in the fridge and a yawning canyon of culinary inspiration. It was one of those weeknights where time feels slippery, and your brain is too foggy to invent something elaborate. That’s when the idea of Chicken with White Wine Tarragon Cream Sauce popped into my mind like a light bulb moment. It’s one of those recipes that’s not only quick to whip up but also manages to feel like a warm hug wrapped in culinary sophistication. Seriously, it has that perfect balance of being simple enough for a Tuesday but impressive enough to trick your taste buds into thinking it’s a Saturday dinner party. The white wine and tarragon add a touch of elegance without requiring a culinary degree to execute.
Jump to Recipe
What You’ll Need
I bet you can already find most of these hidden gems in your pantry. That’s the beauty of this recipe — it transforms basic ingredients into a dish worthy of savoring.
- Butter
- Fresh mushrooms
- Onion
- Fresh garlic
- Skinless boneless chicken breasts
- White wine
- Worcestershire sauce
- Sour cream
- Tarragon
How to Make Chicken with White Wine Tarragon Cream Sauce
- In a large skillet, melt a pad of butter over medium heat. Add sliced onions, fresh mushrooms, and a few cloves of minced garlic. Sauté until everything turns lightly brown and the kitchen smells like you’ve summoned a chef’s ghost.
- Slide in the chicken breasts, turning the heat to medium-high. Cook for about 10 minutes, flipping halfway through, until the chicken is done — it should be firm, with no pink when you cut into it.
- Once done, remove the chicken and let it rest on a platter. Now for the fun part: pour in the white wine and watch it sizzle. Cook for about 2 minutes to let the alcohol burn off. You’ll know it’s ready when the sharp scent mellows into something deliciously fruity.
- Add a splash of Worcestershire sauce and a generous dollop of sour cream. Stir until everything is silky smooth and well combined. Taste and adjust — a little more Worcestershire never hurt anyone.
- Pour the luscious sauce over the resting chicken, and finish with a sprinkle of tarragon. Serve immediately, preferably with something to soak up all that sauce like biscuits, pasta, or rice.
Cook’s Notes
This dish is all about timing and layering flavors. Don’t rush the onions and mushrooms; they need time to caramelize and develop that beautiful golden brown color. If you find yourself with leftover sauce (lucky you!), it stores beautifully in the fridge for about 3 days. Just reheat gently on the stove with a splash of water or broth to loosen it up. And if you’re planning ahead, you can prep the sauce components in advance and store them separately, then just cook the chicken fresh when you’re ready.
Make It Your Own
If you’re feeling adventurous or simply need to adapt based on what you have, here are some swap ideas:
- Swap the chicken for crispy tofu if you’re going the vegetarian route. Just press and pan-fry tofu slices until golden before following the same steps.
- Try using shallots instead of onion for a slightly sweeter and more delicate flavor.
- Substitute the white wine with chicken broth if you’re avoiding alcohol. It adds a nice depth without the kick.
- For a lemony twist, add a squeeze of fresh lemon juice right before serving for a bright, citrusy finish.
If you try this, I’d love to hear how it turns out — drop a comment or tag me! Cooking should be fun and forgiving, so don’t stress if it doesn’t turn out perfect the first time. Each attempt is a step closer to making it your own. Happy cooking!
Goes Well With
If you want to round out the meal, here’s what I’d pair it with over on meaghanmoineau.com:
Related update: Chicken with White Wine Tarragon Cream Sauce
Related update: Rice and Peas with Coconut Curry Mackerel
Picture this: It’s a Tuesday, and the week’s already feeling like a never-ending to-do list. After a day full of meetings that could’ve been emails, I found myself craving something cozy but a tad bit fancy for dinner. Enter Bruschetta Stuffed Potatoes. I stumbled upon this idea when I had a bunch of potatoes and a fresh batch of basil that needed to be used before I found them looking sad in the back of the fridge. These potatoes are your best weeknight friend—they’re comforting, satisfyingly crispy, and the kind of dish that makes you feel like a kitchen wizard without breaking a sweat. Plus, who doesn’t love a good bruschetta twist?
Jump to Recipe
What You’ll Need
It’s likely you’ve already got most of this in your pantry, and if not, the list is short enough for a quick grocery run.
- 4 large dried baking potatoes
- Olive oil
- 1 small red onion, finely chopped
- 2 cups diced tomato
- 3 cloves garlic, minced
- Fresh basil, chopped
- 1 cup shredded mozzarella cheese
- 1/2 cup cultured dairy (sour cream or Greek yogurt work great)
- Butter
- Sea salt & freshly ground pepper
How to Make Bruschetta Stuffed Potatoes
- Preheat your oven to 350°F (175°C). While you wait, give your potatoes a good scrub. Generously coat their skins with olive oil to ensure they get that irresistible crispy finish.
- Place the potatoes directly on the oven rack and bake for 1 to 1 1/2 hours, or until they’re tender when poked with a fork. This is your chance to catch up on that series you’ve been meaning to binge!
- While the potatoes are doing their thing, toss together the red onion, diced tomatoes, garlic, fresh basil, and mozzarella cheese in a small bowl. The mixture should smell like a summer garden—just divine. Set it aside.
- Once your potatoes are tender, carefully cut a small slice off the top of each one. Scoop out the soft, fluffy flesh and transfer it into a large bowl. Be gentle so you don’t tear the skins—those are going back in the oven.
- Place the empty potato shells back on a baking sheet and turn the oven down to 150°F (65°C) to keep them warm.
- In the bowl with the potato flesh, add the cultured dairy, a pat of butter, and a splash more olive oil. Mash it all together until smooth and creamy. The mixture should be velvety with a slight sheen from the butter.
- Fold the bruschetta mixture into your mashed potatoes. The cheese will start to melt a little, binding everything together. Season with sea salt and freshly ground pepper to taste.
- Spoon the mixture back into the potato shells, mounding it high. Pop them in the oven just to warm through—if you don’t reheat them too much, the enzymes in the dairy will keep it tasting fresh and tangy.
Cook’s Notes
You’ll want to use baking potatoes like russets as they have the perfect consistency for this recipe. Don’t skimp on the olive oil when coating your potato skins—it’s the secret to getting that perfect crisp. Leftovers (if any!) can be stored in the fridge for up to two days. Just reheat them in the oven to maintain texture. If you’re making these ahead, you can prepare the bruschetta and potato filling separately and stuff the potatoes just before serving.
Make It Your Own
- Caprese Style: Swap the mozzarella for fresh buffalo mozzarella and add a drizzle of balsamic glaze just before serving.
- Spicy Kick: Add a diced jalapeño to the bruschetta mixture for some heat. You can also sprinkle some red pepper flakes on top.
- Mediterranean Twist: Incorporate some chopped olives and a sprinkle of feta cheese into your bruschetta mix for a Greek-inspired flavor.
- Vegan Version: Use vegan cheese and a plant-based yogurt instead of dairy. A touch of nutritional yeast can mimic the buttery flavor.
If you try this, I’d love to hear how it turns out—drop a comment or tag me! These Bruschetta Stuffed Potatoes have become a staple in my kitchen, and I hope they find a spot in yours too. Enjoy every delicious bite!
Goes Well With
If you want to round out the meal, here’s what I’d pair it with over on meaghanmoineau.com:
Related update: Bruschetta Stuffed Potatoes

There I was, staring into my pantry, feeling that familiar weeknight panic when dinner feels like a riddle wrapped in a mystery inside an enigma. The wind was howling outside, a sure sign that life demanded something warm and comforting. And then my eyes landed on a bottle of Marsala wine and a bag of onions that had seen better days. That’s when it hit me: French Onion Marsala Soup. It’s like a classic French onion soup but with a hint of Italian flair thanks to the Marsala. Imagine the deep, caramelized onions mingling with the rich, sweet notes of the wine. It’s as if France and Italy had a cozy dinner together and decided to share. This dish is perfect for those chilly evenings when you crave something satisfying yet sophisticated.
Jump to Recipe
What You’ll Need
The beauty of this soup is its simplicity. Chances are you already have most of this on hand. Here’s what you need to gather:
- 2 tablespoons of butter
- 1 tablespoon of olive oil
- 6 large onions, thinly sliced
- 4 cups of canned beef broth
- 1 cup of Marsala wine
- 1 teaspoon of dried thyme
- Salt and pepper to taste
- 1 teaspoon of sugar
- A handful of Texas toast croutons
- 4 slices of provolone cheese
- 1 cup of diced Swiss cheese
- 1/2 cup of grated Parmesan cheese
How to Make French Onion Marsala Soup
- Start by melting the butter with the olive oil in a large pot over medium heat. You’re looking for a little sizzle but not a full-on fry. Add the onions and stir them continually. Your goal is to achieve that beautiful translucency, where they look like they’re almost see-through but with a hint of golden edges.
- Once your onions are ready, pour in the beef broth, Marsala wine, and add the thyme. Let that mixture simmer for 30 minutes. This is where the magic happens, and your kitchen starts smelling irresistible.
- Time to sweeten the deal! Add the sugar and season with salt and pepper. Be judicious with the salt, as the cheese and beef broth bring their own saltiness to the party.
- Ladle the soup into oven-safe bowls. Now for the fun part—place a handful of croutons in each bowl. Sprinkle on some Parmesan and Swiss cheese, then lay two slices of provolone on top, letting them drape over the sides of the bowl.
- Carefully set the bowls on a cookie sheet (just in case of overflow) and broil in a preheated oven until the cheese bubbles and turns a glorious golden brown. This will only take a few minutes, so keep a close eye to avoid burning.
Cook’s Notes
You’ll want to take your time caramelizing those onions; it’s the bedrock of flavor in this dish, so resist cranking up the heat in impatience. If you’re making this ahead, stop just before you top the soup with croutons and cheese. Store the soup in the fridge for up to three days, then reheat and finish under the broiler. Leftovers can be kept for another day or two, although the onions may soften further, making the soup even more flavorful.
Make It Your Own
- Not a fan of provolone? Swap it out for Gruyère to up that gooey, nutty goodness.
- For a vegetarian twist, use vegetable broth instead of beef broth and maybe a splash of balsamic vinegar for depth.
- Want a bit more texture? Add some sautéed mushrooms along with the onions for an earthy touch.
- If you’re gluten-free, forgo the croutons and add a thick slice of gluten-free bread right before broiling.
Well, there you have it! If you give this French Onion Marsala Soup a try, I’d absolutely love to hear how it turns out for you. Drop a comment below or tag me on your cozy kitchen creations!
Goes Well With
If you want to round out the meal, here’s what I’d pair it with over on meaghanmoineau.com:
Related update: French Onion Marsala Soup
Related update: Bruschetta Stuffed Potatoes
Related update: Creamy Tomato Soup
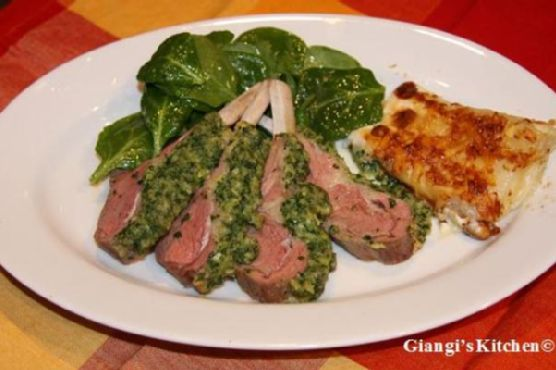
Picture this: it’s a chilly Tuesday evening, and I’m standing in my kitchen with a glass of red wine in hand, staring at an impressive rack of lamb that I impulsively bought at the market earlier that day. The weather is turning cooler, and I’m craving something warming and a little bit fancy to shake off the day. This Rack of Lamb with Parsley recipe is just what I need — it’s elegant but not overly complicated, perfect for a weeknight when you want to feel like you’re dining out but prefer the comfort of your fuzzy socks. Plus, the smell of garlic, herbs, and roasting lamb wafting through the house? Pure magic.
Jump to Recipe
What You’ll Need
So here’s the deal: this recipe doesn’t require an endless shopping list. You’ve likely got almost everything you need already. The magic lies in simple, quality ingredients.
- Rack of lamb – the star of the show!
- Peanut oil
- Salt
- Fresh pepper
- Dijon mustard – adds a lovely tang.
- White bread – for the crumb topping.
- Parsley – fresh is a must here.
- Green garlic clove – because garlic is life.
- Shallot
- Herbes de province – a blend of thyme is perfect.
- Unsalted butter – melt it and mix it!
How to Make Rack of Lamb With Parsley
- Preheat your oven to 400°F (about 200°C). This is the first step to making your kitchen smell amazing.
- Brush the rack of lamb with peanut oil, then sprinkle generously with salt and fresh pepper. The oil helps the skin get that irresistible crispiness.
- Place the lamb in a roasting pan and slide it into the oven for 12 minutes. You’ll know it’s ready for the next step when the edges begin to brown.
- Remove the lamb from the oven, and coat it with a thin layer of Dijon mustard. This will add a tangy depth to the flavors.
- Reduce the oven temperature to 350°F (around 175°C) — don’t skip this step, or you’ll risk overcooking!
- In a bowl, combine the breadcrumbs, fresh parsley, finely chopped shallot, minced green garlic clove, herbes de province, and melted butter. Mix until it’s a cohesive, fragrant topping.
- Spread this parsley-breadcrumb mixture generously over the mustard-coated lamb. Pat it down gently to adhere.
- Return the lamb to the now cooler oven and roast for another 15 minutes. The topping will become golden and aromatic.
- Remove from the oven and let the lamb rest for at least 10 minutes. This resting period ensures a juicy, medium-rare finish.
- Slice the rack into individual chops and serve. Enjoy the triumph of a dish that looks as good as it smells!
Cook’s Notes
Leaving the lamb to rest after roasting is non-negotiable. It locks in the juices and makes your effort so worth it. If you’re making this ahead, you can prep the breadcrumb topping earlier in the day and store it in the fridge until you’re ready to assemble. Got leftovers? Rare, I know! But if you do, store them in an airtight container in the fridge for up to two days. They’re delightful the next day, sliced cold over a salad or gently reheated.
Make It Your Own
- Swap the peanut oil for olive oil if that’s what you’ve got — it adds a nice Mediterranean flair.
- If you can’t find green garlic, regular garlic works just fine, though it’ll be a bit stronger.
- Try adding a bit of lemon zest to the breadcrumb mixture for a fresh, citrusy note.
- Substitute herbes de province with Italian seasoning if you prefer its flavor profile.
If you try this, I’d love to hear how it turns out — drop a comment or tag me in your kitchen adventures! Your feedback makes my day and inspires my next culinary escapade. Happy cooking!
Goes Well With
If you want to round out the meal, here’s what I’d pair it with over on meaghanmoineau.com:
Related update: Rack of Lamb With Parsley

I was standing in my kitchen, staring at the fridge, with that all-too-familiar feeling creeping in — dinner indecision. It was one of those chilly autumn evenings where you just want something hearty and satisfying but don’t want to spend hours slaving away. And then, like a beacon of light, I spotted the knockwurst I’d picked up on a whim. A quick rummage through the pantry revealed a can of sauerkraut, and inspiration struck! This dish is a delightful mash-up of tangy, savory, and just the right amount of sweetness. It’s the perfect one-pot wonder for those nights when you want something cozy and impressive without the fuss.
Jump to Recipe
What You’ll Need
You might be pleasantly surprised to find out that you probably have a lot of these ingredients already hanging around in your pantry and fridge. Here’s what you’ll need:
- 1 medium onion, chopped
- 1 cup beer (your choice, but I love a good lager for this)
- 1/2 cup water
- 2 tablespoons cornstarch
- 1 tablespoon brown mustard
- 1 tablespoon molasses
- 1 teaspoon caraway seed
- 1/2 teaspoon ground allspice
- 1/4 teaspoon pepper
- 1 medium rutabaga, peeled and diced
- 1 pound cooked knockwurst, sliced
- 2 cooking apples, cored and cut into wedges
- 1 can (about 14 ounces) sauerkraut, drained and rinsed
- Butter for frying
How to Make Knockwurst with Sauerkraut
- Start by buttering a medium frying pan and heating it up over medium heat. Add the knockwurst slices and cook them until they’re beautifully browned and crispy on the edges, about 10-12 minutes.
- While the knockwurst is cooking, rinse and drain your sauerkraut well. This step is key to ensuring it’s not overly salty.
- In a large pot, add a bit more butter and the chopped onion. Sauté until the onion is tender and translucent but not browned.
- Pour in the beer, letting it bubble up and sizzle for a minute. The aroma is going to be amazing!
- In a separate 2-cup glass measure, combine the water, cornstarch, brown mustard, molasses, caraway seed, allspice, and pepper. Stir this mixture into your pot with the onions and beer, and continue cooking and stirring until the sauce is thick and bubbly.
- Add the diced rutabaga to the pot. Cover and let it cook for about 15 minutes, or until the rutabaga starts to soften.
- Now, stir in the browned knockwurst, apple wedges, and the well-drained sauerkraut. Cover and cook for another 15-20 minutes. You’ll know it’s done when the apples are tender and everything’s melded together in saucy harmony.
Cook’s Notes
Let’s talk about some tips to make sure your Knockwurst with Sauerkraut turns out just right. First off, make sure to really rinse that sauerkraut. Skipping this step can lead to an overly salty dish. Also, don’t rush the thickening process — let the sauce come to a full bubble before you add the rutabaga. It helps everything blend together perfectly. If you’re planning ahead, you can make the base sauce with the onion and beer a day in advance. Just store it in the fridge and pick up from step 6 when you’re ready to finish off dinner. Leftovers? Store them in an airtight container for up to three days. Reheat gently on the stove or microwave.
Make It Your Own
Feel free to put your own spin on this classic. Here are a few ideas to get you started:
- Swap the knockwurst for a hearty veggie sausage if you’re going for a vegetarian version.
- Try using sweet potatoes instead of rutabaga for an extra hint of sweetness.
- Add a spoonful of horseradish to the sauce for a little kick.
- Use pear wedges in place of apples for a twist on the fruit component.
If you try this, I’d love to hear how it turns out — drop a comment or tag me! Whether you stick to the script or make it your own, I hope this dish brings some warmth and joy to your table.
Goes Well With
If you want to round out the meal, here’s what I’d pair it with over on meaghanmoineau.com:
Related update: Knockwurst with sauerkraut
Related update: Rack of Lamb With Parsley

It was one of those rainy Tuesday evenings where the thought of venturing outside for groceries felt as appealing as stepping into a cold shower. I rummaged through my fridge, crossing my fingers for inspiration, and stumbled upon a collection of humble ingredients: eggs, a half-used loaf of bread, some mushrooms teetering on the edge of usable, and a pack of bacon bits. And thus, the Figure Friendly Mushroom and Bacon Strata was born. This dish is a lifesaver — it’s like the comforting embrace of a breakfast-for-dinner vibe but dressed up enough to impress even the picky eaters. Whether you’re in the mood for a cozy brunch or a quick weeknight dinner, this strata offers that magic mix of minimal effort and maximum flavor.
Jump to Recipe
What You’ll Need
This recipe is wonderful because chances are you already have most of these ingredients lurking in your kitchen. Here’s what you’ll need:
- Eggs (whole and whites)
- Low fat milk
- Bread (preferably a little stale)
- Onion
- Red bell pepper
- Yellow bell pepper
- Mushrooms (the more, the merrier)
- Fresh basil
- Bacon bits
- Olive oil
- Cheese (pick your favorite kind for a magical melt)
How to Make Figure Friendly Mushroom and Bacon Strata
- Heat a non-stick skillet over medium heat. Toss in the olive oil, and when it’s shimmering, add the chopped onion and bell peppers. Sauté them for about 5 minutes until they’re soft and starting to get a bit of color.
- Next, add the mushrooms. Stir them around for another 5 minutes until they release their juices and start to brown. The kitchen will smell amazing by now, just wait.
- Grab a baking dish and give it a good spray with cooking spray. Add your bread cubes, spreading them out so they’re in an even layer.
- Pour the sautéed veggie and mushroom mixture over the bread cubes. Add fresh basil, a sprinkle of salt, and a dash of pepper to suit your taste preferences. Scatter those bacon bits and generous handfuls of cheese over the top.
- In a separate bowl, whip together the eggs and low-fat milk until they’re well combined. Pour this eggy goodness over the bread mixture in the dish. Pop it in the fridge for at least an hour or up to overnight — it needs time for the bread to soak up all the flavors.
- When you’re ready to bake, preheat your oven to 350°F. Cover the dish with foil and bake for 20 minutes.
- Remove the foil and let it bake for another 10 minutes until it’s puffed, golden, and lightly browned. The edges might bubble a bit — this is your cue!
Cook’s Notes
Here’s the scoop: the longer you let the strata sit before baking, the better the flavors meld. If you’re a planner, make it the night before. This dish also freezes well, so consider doubling the recipe and saving one for a rainy day. Just pop it in a sealed container and it’ll keep for about a month. Also, be mindful when adding salt since the bacon bits are pretty savory on their own.
Make It Your Own
Want to riff on this recipe and make it your own? Here are some ideas:
- Swap the bacon bits for crispy tofu to keep it vegetarian without losing the savory punch.
- For a bit of a kick, add some chopped jalapeños to the veggie mix.
- Try using whole grain bread for a nuttier flavor and extra fiber.
- Switch out basil for fresh thyme or rosemary for an earthy twist.
If you give this Figure Friendly Mushroom and Bacon Strata a whirl, I’d love to hear how it turns out for you! Drop a comment below or tag me in your mouthwatering brunch photos. Let’s keep the kitchen adventures rolling!
Goes Well With
If you want to round out the meal, here’s what I’d pair it with over on meaghanmoineau.com:
Related update: Figure Friendly Mushroom and Bacon Strata
Related update: Knockwurst with sauerkraut

Have you ever had one of those days where you’re staring blankly into your pantry at 6 PM, hoping dinner might somehow magically prepare itself? I had one of those days last week, feeling uninspired and ready to resort to a bowl of cereal. But then, tucked away behind the canned beans, I spotted a tube of polenta. That’s when the idea hit me—Cheddar Polenta with Sun-dried Tomatoes & Shrimp. It’s one of those dishes that sounds fancy but is secretly really easy to whip up. Plus, it’s comforting enough to chase away the end-of-day grumbles without demanding hours of your evening. Warm, cheesy polenta topped with juicy shrimp and tangy sun-dried tomatoes? Perfect for those nights when you want your food to taste like it took a lot more effort than it actually did.
Jump to Recipe
What You’ll Need
This dish is like a kitchen scavenger hunt with a delicious prize at the end. You might already have most of these sitting in your pantry or fridge:
- 1 tube of precooked polenta
- 1 cup shredded cheddar cheese
- 1 medium red onion, sliced
- 12 large shrimp, peeled and deveined
- 1/2 cup sun-dried tomatoes, julienned
- 2 tablespoons olive oil
- 1 teaspoon garlic powder
- 1 tablespoon chopped chives
- Juice of 1 lemon
- Salt and pepper to taste
How to Make Cheddar Polenta with Sun-dried Tomatoes & Shrimp
- Slice the polenta into rounds and cook according to the package directions. As you approach the end of cooking, sprinkle in the shredded cheddar cheese, allowing it to melt slowly. Stir until the cheese is fully incorporated and the polenta is creamy.
- While the polenta cooks, heat olive oil in a skillet over medium heat. Add the sliced red onion and sauté until they turn translucent, filling your kitchen with their sweet aroma.
- Add the sun-dried tomatoes to the skillet. Let them soften and release their flavors for about 2-3 minutes, stirring occasionally.
- Toss in the shrimp. Cook, stirring frequently, until they turn pink and are firm to the touch. This should take about 3-4 minutes.
- Season the mixture generously with salt, pepper, and garlic powder. Stir everything together to ensure the flavors meld beautifully. Remove from heat.
- Plate the creamy polenta and top it with the shrimp and sun-dried tomato mixture. Drizzle with fresh lemon juice and finish with a sprinkle of chopped chives. Serve warm and enjoy every bite!
Cook’s Notes
A couple of things to keep in mind: be gentle when stirring the polenta. You want it creamy but not overworked. If you find it thickening too much as the cheese melts, feel free to add a splash of milk or water to loosen it up. When it comes to shrimp, don’t overcook them — they should be just pink and tender. If you’re preparing this in advance, the polenta can be cooked and refrigerated up to a day ahead; simply reheat gently with a bit of water or milk to restore its creamy texture. The shrimp and tomato topping is best enjoyed fresh, but trust me, leftovers taste just as delightful.
Make It Your Own
Here’s the fun part—playing with the flavors and making this dish uniquely yours:
- Swap the shrimp for crispy tofu for a vegetarian twist.
- Add a handful of fresh spinach to the skillet with the sun-dried tomatoes for some extra greens.
- Kick up the heat by adding a pinch of red pepper flakes when sautéing the onions.
- Try using a sharp white cheddar or a smoked cheese for a different flavor profile.
If you give this recipe a spin, I’d love to hear how it turns out—drop a comment or tag me in your delicious creations! Whatever tweaks you make, I hope this dish brings you warmth and satisfaction, just like it did for me on that otherwise uninspired evening.
Goes Well With
If you want to round out the meal, here’s what I’d pair it with over on meaghanmoineau.com:
Related update: Cheddar Polenta with Sun-dried Tomatoes & Shrimp

One chilly Tuesday evening, I found myself rummaging through the pantry, desperate for something that would warm the soul and fill the bellies of my family. You know those days when the weather outside is just plain miserable, and you need a hug in a bowl? Enter: my Chicken Stew For The Soul. It’s not just any stew—it’s packed with cozy spices and creamy coconut milk, making it both comforting and slightly exotic. Plus, it’s a one-pot wonder, which means less time scrubbing dishes and more time savoring every bite. Honestly, it might just be the ultimate excuse to whip out those spices you’ve got tucked away in the back of your cupboard.
Jump to Recipe
What You’ll Need
This recipe keeps things straightforward with ingredients you probably have at home, except for maybe a couple of spice stars. No need for a fancy shop run!
- Chicken – the heart of the stew
- Mustard seeds
- Cinnamon stick, broken
- Cardamoms
- Ginger-garlic paste
- Sliced onion
- Curry leaves
- Green chillies
- Ground coriander
- Red ground chilli
- Ground turmeric
- Cubed potatoes
- Coconut milk
- Garam masala
- Salt
- Lemon juice
- Chopped fresh coriander
How to Make Chicken Stew For The Soul
- Sliced onions, slit the chillies, and cube those potatoes like a pro. Keep them aside for later.
- In a heavy-bottomed pan (or pressure cooker for speed demons), heat some oil. Toss in mustard seeds until they splutter with joy.
- Add the cinnamon stick and cardamoms. Stir until the air is filled with their warm, inviting aroma.
- Now, throw in the onions, curry leaves, and green chillies. Sauté until the onions are soft and fragrant.
- Introduce the ground coriander to the party, followed by the marinated chicken. Stir well so the chicken gets to know its new spicy friends.
- Cover and let the magic happen. When the chicken is halfway through its transformation, add the cubed potatoes.
- Once the chicken is nearly done, stir in the garam masala, salt, and coconut milk. Let it all simmer until everything is cooked to perfection.
- Turn off the heat, sprinkle with fresh coriander, and let the lemon juice add a zing. And remember, stir it with love!
- Serve hot, preferably with freshly made appams or any bread that’s handy. Don’t forget to savor the aroma before diving in!
Cook’s Notes
Ah, the little things that make a difference! First off, make sure your spices are fresh. If they’ve been lurking in the cupboard since last year, they might need replacing. When stirring the spices and chicken, be patient and let them mingle—it’s where the flavor magic happens. This stew is forgiving, so if you accidentally over-simmer, it only gets better. Leftovers? Yes, please! They’ll taste even richer the next day. Store in an airtight container in the fridge for up to three days or freeze for later.
Make It Your Own
Here are a few variations to keep things interesting:
- Swap the chicken for crispy tofu if you’re going plant-based. Trust me; the spices still shine through.
- If you’re out of coconut milk, try almond milk for a nutty twist, though it won’t be as creamy.
- Add a handful of spinach or kale at the end for a pop of color and nutrition.
- Up the lemon juice for a tangier finish, balancing the creaminess of the coconut milk.
If you try this, I’d love to hear how it turns out—drop a comment or tag me! Your kitchen adventures fuel my culinary soul!
Goes Well With
If you want to round out the meal, here’s what I’d pair it with over on meaghanmoineau.com:
Related update: Chicken Stew For The Soul