
Let’s talk about the time I ambitiously decided to make enchiladas on a Wednesday night after one too many hours of doom-scrolling through Instagram. You know the ones—cheesy, gooey, and utterly comforting. I could already taste the spicy tang of green chilies, imagining it would somehow transform my week. Spoiler: it did. This Enchiladas Verdes recipe is not only a delicious weeknight hero but also a dish that’s forgiving enough for any kitchen mishaps. Didn’t roll the tortillas tight enough? No worries; it’s all going to melt together in a cheesy, saucy hug anyway. And trust me, the result is so satisfying, you’ll forget about that midweek slump. Jump to Recipe
What You’ll Need
What’s fantastic about this dish is you might already have most of the ingredients lounging around in your kitchen. If not, the list is simple and straightforward.
- Skinless boneless chicken breast or a quick swap with a store-bought rotisserie chicken.
- Green Anaheim chili peppers – these are the stars of the show.
- Canola oil
- Flour
- White diced onion
- White corn tortillas
- White shredded cheese
- Queso fresco
- Sour crema
- Salt
- Water
- Suero or buttermilk (canned buttermilk works, too)
How to Make Enchiladas Verdes (Green Enchiladas)
- Preheat your broiler and get those green chili peppers ready for roasting. Choose firm, meaty peppers—no wrinkles, please!
- Rinse the peppers and lay them on a foil-lined cookie sheet. Slide them under the broiler and keep an eye on them. Within minutes, you’ll see the skin begin to blister and turn black.
- Flip the peppers after about 5 minutes to get all sides evenly blistered. Once done, pop them into a plastic bag and cover with a towel, letting them cool. This makes peeling off the blackened skin a breeze.
- For the sauce, blend those roasted peppers, flour, and half of your suero or buttermilk until smooth and creamy. Pour this mixture into a skillet over medium-low heat.
- As it warms, gradually stir in more suero or buttermilk. Season with salt—around 2 teaspoons usually does the trick. If it’s too spicy for your taste, add crema. Too thick? Dribble in some water.
- Now, the chicken. Either boil your chicken breasts in a pot until done or just shred a rotisserie chicken. The choice is yours.
- For stacked style enchiladas, fry your tortillas in hot oil just until they’re soft, then drain. Dip each in the sauce before layering on plates with chicken, cheese, and onion. Go for three layers per serving.
- If you prefer oven-baked, preheat to 350°F. Spread sauce at the bottom of your baking dish, fry and fill the tortillas, then roll them up seam down in the dish.
- Drench with more sauce and sprinkle with crumbled queso fresco. Bake until everything’s gloriously warm, about 15 minutes.
- Serve with a dollop of sour crema and get ready to conquer the rest of your week!
Cook’s Notes
Here are a few tips I’ve picked up along the way:
- These enchiladas are flexible with make-ahead options. Prepare the sauce and chicken in advance, then just assemble when you’re ready.
- Store leftovers in an airtight container in the fridge for up to three days. Reheat in the oven for best results.
- Don’t skip the roasting of peppers, as it’s essential for that smoky flavor. If you find peeling them tricky, let them steam longer in the plastic bag.
Make It Your Own
- For a vegetarian spin, swap out chicken with crispy tofu or sautéed mushrooms.
- Mix in some black beans with the chicken for added texture and protein.
- Try using a mix of different cheeses like mozzarella for an extra gooey factor.
- Add avocado or cilantro as a fresh topping before serving.
If you try this, I’d love to hear how it turns out—drop a comment or tag me on social media! Enjoy your cozy, midweek escape with these Enchiladas Verdes.
Related update: Enchiladas Verdes (Green Enchiladas)
Related update: Baked Sirloin Steak

So, picture this: It’s a Tuesday evening, and I’m standing in my kitchen feeling utterly uninspired. You know those days when you’ve got a fridge full of nothing and everything? Yeah, that was me. The weather hinted at the first signs of fall, and my lazy bones craved something cozy yet bright—something that would wrap me up like a warm blanket but not put me in a food coma. Enter this Lemon Chickpea & Tomato Stew. It’s the kind of dish that checks all the boxes: fast (you’ll have it on the table in under an hour), flavorful (hello, lemon zest), and so satisfying you’d think it took all day. Trust me, once you make it, your taste buds will thank you, and you might just find a new weeknight staple.
Jump to Recipe
What You’ll Need
This stew is a pantry hero—you probably have most of the ingredients hiding in your kitchen already.
- 2 tablespoons of olive oil
- 1 large shallot, chopped
- 3 garlic cloves, minced
- 2 cans of chickpeas, drained and rinsed
- 1 jalapeno chili, sliced
- 1 teaspoon of dried oregano
- 2 bay leaves, broken
- 1/2 teaspoon of crushed red pepper
- Salt & pepper to taste
- 4 cups of chicken broth
- Zest and juice of 1 fresh lemon
- 1 cup of dried oven tomatoes
- 2 cups of fresh spinach, loosely packed
How to Make Lemon Chickpea & Tomato Stew
- In a large saucepan, heat the olive oil over medium heat. You’ll know it’s ready when the oil starts shimmering like a mirage.
- Add the shallot and garlic, stirring them into the warm oil until they soften and become fragrant, about 5 minutes.
- Toss in the chickpeas, jalapeno, oregano, bay leaves, and crushed red pepper. Season with salt and pepper. Stir frequently, letting those chickpeas get a little crispy and golden, about 5-7 minutes. Keep an eye out—they might try to escape the pan!
- Pour in the chicken broth, lemon zest, and lemon juice. Bring everything to a happy boil, then reduce the heat and let it simmer until the broth is reduced by half, around 20 minutes.
- Stir in the oven-dried tomatoes, garlic, and spinach. Simmer for another 5 minutes, just until the spinach wilts into the stew. Goodbye, bay leaves—you’ve done your job, so remove them.
- Give it one last taste for seasoning, adjust if necessary, and serve hot with warm crusty bread to soak up every last drop.
Cook’s Notes
First things first, don’t rush the browning of your chickpeas. That’s where a lot of the flavor magic happens. If you can, make sure the broth you’re using is low-sodium so you can control the salt levels. This stew is even better the next day, so feel free to make it ahead and store it in the fridge for up to 3 days. Just reheat it gently on the stovetop. If it’s a bit too thick, splash in a little extra broth or water.
Make It Your Own
- Vegetarian version: Swap the chicken broth for vegetable broth, and you’re good to go.
- Spicy kick: Double the jalapeno if you’re feeling bold. You can also add a dash of cayenne.
- Protein boost: Stir in some cooked shredded chicken or crispy tofu just before serving.
- Herbal twist: Add fresh basil or cilantro at the end for an extra layer of flavor.
And there you have it! If you try this, I’d love to hear how it turns out—drop a comment or tag me. Enjoy your cozy bowl of goodness!
Related update: Lemon Chickpea & Tomato Stew
Related update: Enchiladas Verdes (Green Enchiladas)
Related update: Carrot and Coriander Soup
Related update: Cauliflower Chickpea Stew

Picture this: It’s a rainy Tuesday evening, and my craving for something warm, spicy, and comforting kicks in. The kind of craving that hits you like a hug when you’ve had one of those long days. I glance around my kitchen and spot the usual suspects — a can of coconut milk, some soy sauce, and a lonely block of tofu that’s been waiting for its moment. It’s the perfect setup for my Thai Coconut Curry Soup. This soup is a game-changer. Quick to whip up, it’s one of those recipes that feels a touch exotic but is totally doable on a weeknight. It’s cozy, fragrant, and brings just the right amount of heat. Trust me, it’s the kind of dish you’ll be daydreaming about long after your bowl is empty.
Jump to Recipe
What You’ll Need
The beauty of this recipe is that it doesn’t require a mile-long list of specialty ingredients. Chances are you already have most of these in your pantry or fridge:
- Canned light coconut milk
- One can’s worth of water
- Red curry paste
- Fresh ginger paste
- Fresh snow peas
- String beans
- Diced carrot
- Fresh whole Thai basil leaves
- Lime juice
- Low sodium soy sauce
- A few splashes of sesame oil
- Chili powder
- Tofu
- Salt
- Red bell pepper
- Black pepper
How to Make Thai Coconut Curry Soup
- Start by bringing the coconut milk and a can’s worth of water just to a boil. You’ll know it’s ready when it’s steaming and about to bubble over, so keep an eye on it.
- Reduce the heat to a low simmer. Add in the red curry paste and fresh ginger paste. Give it a good whisk until both are well-incorporated, and your kitchen is filled with that heavenly aroma.
- Now, toss in the diced carrots and spices, except for the basil leaves. Cover and let them simmer until the carrots are almost soft. Keep them a bit firm — nobody likes a mushy carrot!
- Add the tofu. Cover your pot again and let it all simmer for a few more minutes. The tofu will soak up all those delicious flavors.
- Time to add the remaining ingredients — snow peas, string beans, lime juice, soy sauce, sesame oil, and chili powder. Cover again and simmer just until the beans turn bright green but stay crisp.
- Garnish with strips of red bell pepper and freshly ground black pepper. If you’re feeling indulgent, add a couple of tablespoons of coconut oil when you put in the tofu. That extra coconut flavor is truly amazing!
Cook’s Notes
When making this soup, remember that the texture of your vegetables matters. You want them crisp and vibrant, not overcooked. If you plan to make it ahead, stop cooking just before adding the snow peas and string beans, and finish it off when you’re ready to serve. Store leftovers in an airtight container in the fridge for up to three days. Reheat gently on the stovetop, adding a splash of water if the soup thickens too much.
Make It Your Own
- Swap the tofu for crispy baked chicken if you’re not feeling the plant-based vibes.
- Add a handful of shrimp in the last few minutes of cooking for a pescatarian twist.
- Stir in a spoonful of peanut butter with the curry paste and ginger for a nutty depth of flavor.
- Throw in a cup of cooked rice noodles at the end for a heartier meal.
If you try this, I’d love to hear how it turns out — drop a comment or tag me! I’m always excited to see your delicious creations. Happy cooking!
Related update: Thai Coconut Curry Soup
Related update: Lemon Chickpea & Tomato Stew

Picture this: It’s a random Tuesday evening, and I’m staring down a fridge that looks like a ghost town. There’s a near-empty bottle of white wine, a few lonely sage leaves, and some beef flank steaks that I really need to use up. That’s when the idea hit me — Meat rolls with prosciutto and sage. With a quick rustle through my pantry, I realized I had everything I needed. This dish is the ultimate hero for those nights when you crave something comforting yet deceptively fancy. You know what I mean? It comes together faster than you’d think, with the sage giving it an unexpected pop of earthy goodness. And guess what? It only looks fussy.
Jump to Recipe
What You’ll Need
You might find that you’ve got most of this hanging around already. No need for a special trip to the store, which is a win in my book.
- Beef flank steaks – Perfect for rolling and full of flavor.
- Similar seasoning (like Vegeta Natur) – Just a sprinkle for a bit of zing.
- Prosciutto – Salty, savory goodness that wraps the steak in love.
- Sage leaves – The secret ingredient that makes this dish sing.
- Corn starch – Magic thickener for the sauce.
- White wine – Adds a splash of sophistication.
- Olive oil – For that sauté start.
- Butter – Because everything’s better with butter.
- Black bell pepper – Freshly cracked for a bit of heat.
How to Make Meat rolls with prosciutto and sage
- First things first, wash and dry those beef flank steaks. Then, get a bit of a workout by flattening them out. This helps them roll up nice and tight.
- Grab your seasoning of choice and rub one side of each steak — you’re giving it a flavor boost.
- Lay a piece of prosciutto and a sage leaf on the other side of the steak. The prosciutto should cover the whole side like a cozy blanket.
- Time to roll! Start at one end and roll the steak up tightly. Secure it with wooden or metal toothpicks. Channel your inner sculptor here.
- In a bowl, whisk the corn starch into the white wine until it’s all mixed up and smooth. This will be your secret sauce.
- Heat up a mix of olive oil and butter in a pan. Once it’s hot, add the rolls and sauté them on all sides until golden brown. Your kitchen will smell amazing right about now.
- Pour in the wine mixture and season with freshly cracked black bell pepper. Give everything a stir.
- Cover the pan and let the rolls simmer on low heat for about 20 minutes. They should become tender and soak up all those flavors.
- Remove the toothpicks before serving. Trust me, no one likes a surprise toothpick in their dinner.
Cook’s Notes
Make sure to flatten those steaks evenly, or they’ll be tricky to roll. You want them to cook evenly, too. If you’re not into sage, a bit of rosemary can be a lovely swap, though the sage really adds something special here. Don’t rush the simmering stage — that’s when all the magic happens and the flavors meld together. Leftovers can be kept in an airtight container in the fridge for up to three days. A quick reheat, and they’re just as delicious.
Make It Your Own
- Swap the beef flank steaks for chicken breast if you’re feeling poultry instead of red meat.
- If you’re not a fan of prosciutto, try using thinly sliced turkey or ham for a different twist.
- For a non-alcoholic version, substitute the white wine with chicken or vegetable broth. You won’t miss a thing!
- Add a sprinkle of crushed red pepper flakes for some heat if you’re feeling spicy.
If you try this, I’d love to hear how it turns out — drop a comment or tag me! Happy cooking, and remember, it’s all about having fun in the kitchen.
Related update: Meat rolls with prosciutto and sage

Last Thursday, I found myself staring into the fridge, hoping for inspiration to strike before my toddler demanded dinner. It was one of those days where you need something kinda fancy to feel like an adult—but it also had to be easy enough to not cause a breakdown. Enter: Wildwood Ovens Bourbon Apple Glazed Cedar Plank Salmon. This dish is the answer to those chaotic moments when you want to impress yourself and anyone lucky enough to be at the table. It’s a little sweet, a little smoky, and totally doable on a weeknight. The cedar plank makes it taste like it came from a restaurant, but really you just soaked a piece of wood and turned on the grill. Magic, right?
Jump to Recipe
What You’ll Need
The beauty here is that the ingredient list is straightforward, and there’s a good chance you’ve got most of this hiding in your pantry. A quick run to the store, and you’ll be ready to rock this impressive dish.
- Apple juice
- Brown sugar
- Cedar plank (make sure it’s food-safe!)
- 3-4 garlic cloves, minced
- 1 tsp kosher salt
- Freshly cracked black pepper
- Salmon filet (about 1.5-2 lbs is perfect)
- Bourbon whiskey
How to Make Wildwood Ovens Bourbon Apple Glazed Cedar Plank Salmon
- Start by soaking your cedar plank in water for at least 2 hours. This step is crucial to prevent any unplanned flare-ups and to infuse that lovely woody flavor into your salmon.
- Rinse the salmon under cold water and gently pat it dry with paper towels. This is essential as it helps the seasoning stick better and gives you a nice crisp finish.
- Grab a medium saucepan and set it over medium-high heat. Carefully pour in the bourbon—remember, no free-pouring from the bottle, unless you enjoy spontaneous kitchen pyrotechnics.
- Once the alcohol is reduced and you’ve got just a little left at the bottom of the pan, add in the apple juice, brown sugar, and minced garlic. Keep it on the heat until it’s reduced to about a third of its original volume. You’re looking for something just thinner than syrup.
- Season the salmon generously with salt and freshly cracked black pepper on both sides. Brush the skin side with a bit of olive oil.
- Place the seasoned salmon, skin side down, on the soaked cedar plank. Then, transfer the plank to a medium-high grill or a wood-fired oven preheated to 500°F, positioning it close to the fire for that authentic flavor.
- Using a probe thermometer, start checking the internal temperature of the salmon after about 10 minutes, and then every 5 minutes thereafter. Once it hits at least 100°F, brush on the apple glaze—every few minutes. This layering helps build up that gorgeous, sticky finish.
- Continue cooking until the salmon reaches your desired doneness; I aim for around 135°F for that perfect, juicy flakiness.
Cook’s Notes
Here are some extra tips for nailing this dish every time:
- Make sure your cedar plank is fully submerged while soaking, maybe putting a can or something on top to keep it under water.
- Don’t skimp on the glaze. The more layers you add, the richer the flavor.
- Leftovers (if you have any) can be kept in an airtight container in the fridge for a couple of days. Flake it over a salad for a quick next-day meal!
Make It Your Own
- Swap the bourbon for brandy if you prefer a slightly sweeter glaze.
- For a spicier kick, add a pinch of chili flakes to the glaze.
- No salmon? Try this glaze on chicken breasts or even tofu—just adjust the cooking time accordingly.
- Top with fresh herbs like dill or parsley for a pop of color and flavor right before serving.
If you try this, I’d love to hear how it turns out—drop a comment or tag me on social media! It’s always a win when we can turn a potential kitchen meltdown into a tasty triumph.
Related update: Wildwood Ovens Bourbon Apple Glazed Cedar Plank Salmon
Related update: Meat rolls with prosciutto and sage

It was one of those chilly evenings when I was ransacking through my pantry and fridge, desperately trying to piece together something warm and spicy. You know the feeling, right? When you want something cozy but you’re in no mood to go out for groceries. That’s when this Spicy Lemongrass Soup was born. It’s a comforting bowl that’s surprisingly easy to whip up with just a few special ingredients, like the invigorating lemongrass and bold red dried peppers. The process might seem like a little kitchen adventure, but I promise, it’s one worth embarking on.
Jump to Recipe
What You’ll Need
If you’re anything like me, you’ll be thrilled to find that you probably have most of the ingredients already lounging in your kitchen. The stars of the show are these bold, aromatic components that bring a delightful zing to this dish.
- Fresh lemongrass – gives it that unmistakable citrusy aroma
- Red dried peppers – these pack the punch
- Ginger – fresh is best for that sharp, spicy edge
- Garlic – because when is garlic not invited?
- Vegetable broth – the canvas for all those flavors
- Canned fresh coconut milk – if you can find it, it’s game-changing
- Tofu cubes – protein power
- Snow peas – for a bit of crunch and color
- Mushrooms – umami goodness
- Rice noodles – the slurp factor
- Lime (juice) – the zesty finish
How to Make Spicy Lemongrass Soup
- Start by chopping the lemongrass into 2-inch pieces. Slice each piece down the center. This will release the oils that give the soup its signature fragrance.
- In a large soup pot, combine the lemongrass, vegetable broth, coconut milk, garlic, and ginger. Bring it to a boil over medium-high heat. You’ll know it’s ready when the aroma makes you want to dive right in.
- Once boiling, reduce the heat to low and let it simmer for 30 minutes. The broth should become a golden, aromatic bath of deliciousness.
- After simmering, strain the broth through a cheesecloth to remove the lemongrass stalks. Trust me, they’re not the chewable kind!
- Return the strained broth to a simmer. Add the tofu, mushrooms, snow peas, and rice noodles. Stir them gently so they mingle and absorb all that flavor.
- Squeeze in the lime juice whenever the mood strikes—early on for a tangy infusion, or at the end for a fresh kick. I like a bit at the start and a bit at the end.
- Simmer until the noodles are soft and the snow peas still have a slight crunch. You’ll see the edges of the pot starting to bubble as the aroma fills the room.
- Serve hot, garnishing with a sprinkle of grated ginger or some fresh scallions if you have them.
Cook’s Notes
Oh, the lemongrass! It’s the heart and soul but remember, it’s not meant to be chewed. Straining it out is crucial unless you enjoy a mouthful of fibrous stalks. This soup can be prepped a day ahead; just store the broth separately and add the noodles when reheating. Leftovers? They keep well in the fridge for a couple of days, but the noodles will get softer, so maybe add those fresh if you’re planning a day-two soup fest.
Make It Your Own
- Swap the tofu for crispy tofu or even shredded cooked chicken for a different texture.
- Throw in some sliced bell peppers for extra color and crunch.
- Use zucchini noodles instead of rice noodles for a lighter, veggie-packed version.
- If you love heat, add an extra handful of red dried peppers or a dash of chili oil on top before serving.
So, there you have it! If you try this Spicy Lemongrass Soup, I’d love to hear how it turns out—drop a comment below or tag me on social media. Happy cooking, my kitchen adventurers!
Related update: Spicy Lemongrass Soup
Related update: Thai Coconut Curry Soup

Last Tuesday evening, I was standing in my kitchen, staring into the fridge like it was an oracle with all the answers to my dinner dilemmas. It had been a long day, and I needed to whip up something that felt like a reward for surviving it. That’s when I spotted the pack of pork chops tucked away on the bottom shelf, right beside a wedge of Gruyère cheese that had almost been forgotten. The idea of Cheese Pork Chops was born, and let me tell you, this dish is a midweek savior. It’s got that special touch of comfort with gooey cheese and rich mustard cream, yet it’s simple enough to throw together while you’re half-distracted by a podcast or the kids’ homework.
Jump to Recipe
What You’ll Need
This is one of those recipes where you might just have everything you need already. It’s all about bold flavors with just a handful of ingredients.
- 2 tablespoons olive oil
- 2 tablespoons unsalted butter
- 4 pork chops (about 1 inch thick)
- Salt and pepper, to taste
- 1/2 cup heavy cream
- 2 tablespoons dijon mustard
- 1 cup shredded Gruyère cheese
How to Make Cheese Pork Chops
- Heat a heavy-bottom skillet over medium-high heat. Add the olive oil and butter, swirling them together until the butter melts and starts to slightly foam.
- Carefully place the pork chops in the skillet. Sauté for about 3 minutes on each side, letting them develop a lovely golden crust.
- Reduce the heat to medium. Cook the pork chops for an additional 5 to 6 minutes per side, until they’re just cooked through. Sprinkle with salt and pepper to taste. Remember, the juices should run clear when you test them.
- While the chops finish cooking, preheat your broiler. In a small bowl, whisk together the heavy cream, dijon mustard, and shredded Gruyère cheese until well combined.
- Transfer the cooked pork chops to an ovenproof dish. Spread the cheese-cream mixture generously over each chop.
- Place the dish under the preheated broiler for about 5 minutes. Keep a close eye on them—the cheese should be bubbly and slightly browned.
Cook’s Notes
One of the best things about this dish is how forgiving it is. If your chops are a bit thicker or thinner, just adjust cooking time accordingly. You want them juicy, not dry.
If you’re making this ahead of time, you can prepare the cheese mixture in advance and even sear the chops the night before. Just store them separately in the fridge and bring to room temperature before broiling.
Got leftovers? Lucky you! They’re fabulous sliced thin and tossed into a salad, or reheated gently in the microwave for a next-day lunch that will make your coworkers jealous.
Make It Your Own
- Spice it up: Add a teaspoon of chili flakes to the cheese mixture for a spicy kick.
- Herbaceous twist: Mix a tablespoon of chopped fresh herbs like thyme or rosemary into the cheese mixture.
- Cheese swap: Try shredded sharp cheddar or even blue cheese for a different flavor profile.
- Dijon alternative: Experiment with whole grain mustard for a bit more texture and tang.
If you try this, I’d love to hear how it turns out — drop a comment or tag me in your cheesy creations! Happy cooking, friends!
Related update: Cheese Pork Chops

Picture this: it’s a rainy Wednesday evening, and I’m staring at my fridge like it’s going to magically suggest what I should make for dinner. Ever have those moments when nothing feels right, but takeout seems too tragic? That’s when I stumbled upon the perfect antidote — My Drunken Fish Fillet. It’s this crispy, golden, comforting dish that feels like a hug on a plate, without the takeout guilt. The beer in the batter makes everything delightfully light and airy, and honestly, it’s low-key impressive when you pull it off. Plus, who doesn’t love cooking with wine and beer? The kitchen smells divine, and it’s as much fun to make as it is to devour.
Jump to Recipe
What You’ll Need
Okay, so let’s talk about the magic ingredient list. The cool part? You probably have a bunch of this stuff hanging out in your pantry already. Here’s the breakdown:
- Fish – whatever fillet you’ve got; think tilapia or cod.
- Salt – to season the fish and the batter.
- White ground pepper – trust me, it adds just the right kick.
- Rice wine – this is where the magic (and the name) starts.
- Beer – pick something light, like a lager.
- White eggs – you’ll need both the yolk and the whites, separately.
- All-purpose flour – plus a little more for dusting if you’re feeling fancy.
- Oil – for frying, of course.
How to Make My Drunken Fish Fillet
Let’s break this down step-by-step so you can nail it every time:
- Start by combining your beer, egg yolk, flour, and half a teaspoon of salt. Whisk it well until you’ve got a thick, smooth batter. Pop this into the fridge for a good hour. This rest is crucial for texture!
- Meanwhile, sprinkle your fish fillets with salt and white ground pepper. Give them a pat so they’re nicely coated. Then, splash on the rice wine and let them marinate for about 15 to 20 minutes. The fragrance alone will brighten your day!
- When you’re ready to fry, beat the egg whites until they’re soft and foamy. Gently fold these into your chilled batter. This is where the light, airy magic happens.
- Heat up your oil until it’s shimmering. Dip your marinated fish fillets into the batter, ensuring they’re fully enveloped in that luscious mix. Fry them three pieces at a time, so they’re not overcrowded. Cook until they’re a beautiful golden brown and oh-so-crispy.
- For a quick dip, mix Yamasa soy sauce with a bit of wasabi from the tube and a squeeze of lemon juice. Simple but absolute perfection.
Cook’s Notes
Here’s the tea on making this dish truly sing. First off, make sure your oil is hot enough before you start frying. You want that sizzle! If it’s too cool, the batter soaks up oil and gets greasy. You can make the batter ahead (up to a day), just keep it covered in the fridge because that chill time is key. Leftover fillets (if you have any!) can be reheated in an oven to crisp them back up — avoid the microwave unless you love soggy regrets.
Make It Your Own
Want to switch things up? Here are some variations that keep things exciting:
- Swap the fish for crispy tofu. Just be sure to press the tofu well before marinating.
- Go gluten-free by using a gluten-free flour blend in place of all-purpose flour.
- Add a spicy twist by mixing a pinch of cayenne into the batter for a bit of heat.
- Try an Asian twist with panko breadcrumbs mixed into the batter for extra crunch.
If you try this, I’d love to hear how it turns out — drop a comment or tag me! I’m always here for your kitchen triumphs and even the occasional mishap. Happy frying!
Related update: My Drunken Fish Fillet
Related update: Paella for Four; A Wonderful Spanish Mixed Seafood Stew
Related update: Crunchy Prawn Skewers With Lemony Avocado Dip

Picture this: It’s a hectic Wednesday evening, and you’ve just walked through the door, shoes off, contemplating what to make for dinner. The fridge hums with half-empty bottles of condiments, and there’s a lone pack of pork chops staring back at you. This is the moment you realize the magic of Bruschetta Style Pork & Pasta. It’s the perfect blend of comforting pasta and savory pork, all wrapped in the tangy-sweet goodness of bruschetta flavors. It’s one of those dishes that feels fancy enough to impress but is wonderfully simple to throw together, ideal for those mid-week dinners when time is not on your side.
Jump to Recipe
What You’ll Need
This recipe is a lifesaver because chances are you already have most of the ingredients hanging around your kitchen. Here’s what you’ll need to whip up this delight:
- One package of bow tie pasta
- Freshly grated parmigiano reggiano
- A jar of Recipe Makers Chicken Bruschetta Pasta sauce
- 4-6 pork chops
How to Make What to make for dinner tonight?? Bruschetta Style Pork & Pasta
- First, give those pork chops a good wash and rinse. Pat them dry, then plop them into your skillet. You’ll want to cut them into bite-sized pieces so they cook quickly and soak up all those delicious flavors.
- Add half of the Basil Garlic simmer sauce from your Bruschetta Pasta kit into the skillet with the pork. You’ll know it’s working its magic when the kitchen starts to fill with a seriously drool-worthy aroma.
- Meanwhile, bring a pot of water to a boil and get your bow tie pasta cooking. Aim for al dente—that perfect balance of tender but still with a bit of bite.
- Once your pasta is done, drained, and ready, toss it into the skillet with the pork. Pour in the rest of the Basil Garlic Simmering Sauce, giving everything a nice mix so the pasta is well-coated.
- Now for the pièce de résistance: top the whole thing with the Chunky Bruschetta Finishing Sauce. Sprinkle generously with Parmesan, then cover the skillet. Let it all cook on low heat for 2 to 3 minutes, just until everything’s heated through and the cheese melts into gooey perfection.
Cook’s Notes
Here’s the deal: when cutting your pork, keep the pieces uniform in size to ensure even cooking. You want them golden but not overcooked. If you’re making this ahead, stop just before adding the Parmesan and Finishing Sauce. Store it in the fridge, and when you’re ready to eat, layer on the sauce and cheese, then heat through. Leftovers? They’re a dream. Just store them in an airtight container, and they’ll be good for up to three days. Reheat gently on the stove or in the microwave with a splash of water to keep everything from drying out.
Make It Your Own
Here are some ways you can switch things up:
- Swap the pork for crispy tofu for a vegetarian twist. Just pan-fry the tofu until golden before adding the sauces.
- Use zoodles or spaghetti squash instead of bow tie pasta for a low-carb version.
- Add a handful of fresh spinach to the skillet before serving for a pop of color and extra nutrients.
- For a spicy kick, toss in some red pepper flakes along with the Parmesan.
If you try this, I’d love to hear how it turns out—drop a comment or tag me! Cooking should be fun, stress-free, and delicious, so let’s make that happen. Happy cooking, friends!
Related update: What to make for dinner tonight?? Bruschetta Style Pork & Pasta

There was this one Thursday evening when I felt the chill in the air turning my fingers just a bit numb, and I craved something that felt like a warm hug. I was rifling through my pantry, hoping to discover a forgotten treasure, when I stumbled upon a jar of sauerkraut and a pack of knockwurst sitting in the fridge. Suddenly, inspiration struck. This dish is the epitome of comfort food — cozy, hearty, and surprisingly easy to throw together with a few pantry staples. The combination of savory knockwurst and tangy sauerkraut, all tied together with a hint of sweetness from molasses and the earthy warmth of spices, truly hits the spot on those brisk evenings when you just need a little extra comfort.
Jump to Recipe
What You’ll Need
This recipe is all about layering flavors with a minimal ingredient list — you’ll likely find many of these in your pantry already!
- 1 tablespoon butter
- 1 medium onion, chopped
- 1 cup beer
- 1 cup water
- 1 tablespoon cornstarch
- 2 tablespoons brown mustard
- 1 tablespoon molasses
- 1 teaspoon caraway seed
- 1/4 teaspoon ground allspice
- 1/4 teaspoon ground black pepper
- 1 medium rutabaga, peeled and chopped
- 1 pound cooked knockwurst
- 2 cooking apples, peeled, cored, and cut into wedges
- 1 can (about 14 ounces) sauerkraut
How to Make Knockwurst with Sauerkraut
- In a medium frying pan, melt the butter over medium heat. Add the knockwurst and cook, turning occasionally, until they’re browned and the edges are just starting to crisp — about 10-12 minutes.
- Meanwhile, drain the sauerkraut in a colander, rinse it under cold water, and let it drain again thoroughly. This step is crucial to avoid an overly sour dish.
- In a large pot, sauté the chopped onion over medium heat until the pieces are tender and translucent, but not browned. You’ll know it’s ready when the kitchen fills with that sweet, savory onion aroma.
- Pour in the beer and let it come to a gentle simmer. Meanwhile, in a separate bowl or measuring cup, mix together the water, cornstarch, brown mustard, molasses, caraway seed, ground allspice, and black pepper until smooth.
- Stir this mixture into the onion and beer in the pot. Cook and stir consistently until the sauce thickens and becomes bubbly. You’ll see it start to coat the back of a spoon — that’s when you know it’s ready for the next step.
- Add the chopped rutabaga to the pot, cover with a lid, and let it simmer for 15 minutes, allowing the rutabaga to become just tender.
- Finally, stir in the browned knockwurst, apple wedges, and sauerkraut. Cover the pot again and let everything simmer together for another 15 to 20 minutes, until the apples have softened and the flavors have melded beautifully.
Cook’s Notes
- When browning the knockwurst, be patient and let them get a nice brown crust. It adds a lovely depth of flavor that you don’t want to miss.
- The molasses adds a touch of sweetness but doesn’t overpower. If you prefer slightly less sweetness, you can reduce the amount to 1 teaspoon.
- This dish can be made ahead and actually tastes better the next day as the flavors have more time to develop. Simply store it in an airtight container in the fridge for up to 3 days. Reheat on the stove over low heat until warmed through.
Make It Your Own
- For a vegetarian twist, swap the knockwurst with crispy tofu cubes. You’ll get that savory satisfaction without the meat.
- Use sweet potatoes in place of rutabaga for a sweeter, more colorful dish.
- Add a handful of chopped kale or spinach at the end for a burst of color and nutrients.
- If you’re a spice lover, a pinch of red pepper flakes will add a nice kick.
If you try this recipe, I’d love to hear how it turns out for you! Drop a comment below or tag me in your culinary adventures. Enjoy every bite of this cozy, delicious meal!
Related update: Knockwurst with sauerkraut
Related update: What to make for dinner tonight?? Bruschetta Style Pork & Pasta

There I was, standing in my tiny kitchen on a Tuesday afternoon, staring at a leg of lamb I’d ambitiously bought during my last grocery run. It was one of those moments where you think, “What have I gotten myself into?” But then inspiration hit me like a delicious lightning bolt: Yogurt Marinated Lamb Skewers. It’s one of those recipes that sounds fancy enough to impress a dinner guest but is secretly simple enough for a weeknight. The magic is all in the marinade, full of spices that soak into the lamb, turning it tender and flavorful. So if you’re looking to impress someone (or just yourself), keep reading.
Jump to Recipe
What You’ll Need
I’m willing to bet you’ve already got most of this stuff hanging out in your pantry. The marinade is what truly makes this dish shine, infusing the lamb with a fragrant mix of spices and creamy yogurt.
- Vegetable oil
- Cumin
- Leg of lamb
- Nutmeg
- Paprika
- Plain yogurt
- Salt
- Turmeric
How to Make Yogurt Marinated Lamb Skewers
- Start by boning the leg of lamb, if it isn’t already done, and cut it into 1-inch cubes. This size is perfect for skewers and ensures even cooking.
- In a large bowl, combine the vegetable oil, cumin, nutmeg, paprika, plain yogurt, salt, and turmeric. Mix until everything is nicely blended and the mixture is aromatic.
- Add the lamb cubes to the marinade. Toss them until they’re well-coated. Cover the bowl and pop it into the refrigerator overnight. This is where the magic happens, as the lamb soaks up all those wonderful flavors.
- The next day, thread the marinated lamb cubes onto skewers. If you’re using wooden skewers, don’t forget to soak them in water for at least 30 minutes to prevent burning.
- Grill the skewers over charcoal, which gives them that beautiful smoky flavor. Cook them for about 7 minutes on each side, until they’re a rich, golden-brown and fragrant.
Cook’s Notes
So, here’s the thing: patience is key! Letting the lamb marinate overnight is what makes it so tender and flavorful. If you’re in a rush, a few hours will do, but try not to skimp on marinating time. As for grilling, charcoal gives the best flavor, but a grill pan on the stovetop works in a pinch. Once cooked, these skewers are best enjoyed fresh, but any leftovers can be stored in an airtight container in the fridge for up to three days. Reheat them gently to avoid drying out the meat.
Make It Your Own
Want to put your own spin on these skewers? Here are some ideas:
- Swap out the lamb for chicken thighs if you’re looking for a more budget-friendly option.
- Add a little lemon juice to the marinade for a citrusy kick that pairs beautifully with the spices.
- Try tossing in some fresh herbs like mint or cilantro at the end for a fresh pop of flavor.
- For a vegetarian twist, use crispy tofu instead of lamb, letting it marinate just as you would the meat.
If you give these Yogurt Marinated Lamb Skewers a go, I’d love to hear how they turned out for you. Drop a comment or tag me on social media. Let’s make deliciousness together!
Related update: Yogurt Marinated Lamb Skewers
Related update: Knockwurst with sauerkraut
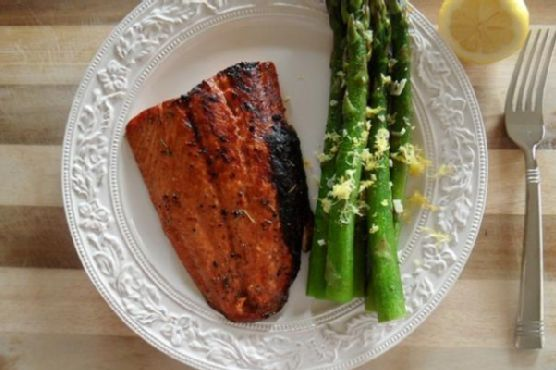
Picture this: It’s Tuesday evening, and you just got home from a day that felt longer than it had any right to be. You’re staring into the fridge, willing it to offer up some inspiration. Then, like a beacon of hope, you spot a lonely salmon fillet tucked behind last night’s leftovers. A lightbulb moment strikes: Balsamic & Honey Glazed Salmon with Lemony Asparagus. Deliciously sweet and tangy salmon, paired with asparagus that’s just the right amount of zesty. It’s the perfect blend of “fancy enough for company” and “easy enough for a weeknight.” This dish is a favorite because it’s quick yet feels special, and it hits all the right notes from tangy to savory. Trust me, your taste buds will thank you.
Jump to Recipe
What You’ll Need
You probably have most of these at home already, with maybe just a quick spice cabinet dive for a few aromatics. Here’s the lineup for this easy-peasy dinner:
- Salmon fillet
- Balsamic vinegar
- Apple cider vinegar
- Honey
- Dried dill
- Herbs de Provence
- Salt and pepper
- Grapeseed oil
- Lemon (juice and zest)
- Asparagus
- Garlic
- Vegetable stock
How to Make Balsamic & Honey Glazed Salmon with Lemony Asparagus
- In a small mixing bowl or blender, throw together all the balsamic marinade ingredients except the lemon juice: balsamic vinegar, apple cider vinegar, 1 tablespoon grapeseed oil, honey, dried dill, herbs de Provence, salt, and pepper. Whisk or blend until the mixture loses its vinegar-and-oil identity crisis.
- Lay the salmon fillet in a cozy little baking dish — I usually opt for a small casserole dish. Pour your freshly mingled marinade over the salmon, letting it settle in for at least 15 minutes. If patience is your virtue, up to 24 hours in the fridge is even better.
- Crank your oven to high broil. Just before the salmon gets its turn in the oven spotlight, drizzle the lemon juice over the top for that extra zing.
- Slide the salmon onto the top rack and broil for 10 to 12 minutes. You’re looking for glazed, browned, and a sizzle that says, “Dinner is almost ready!”
- While the salmon works its magic, prep your asparagus. Wash and trim off the tough ends — about an inch and a half will do. Lay them in a large skillet, as if sunbathing.
- Drizzle grapeseed oil over the asparagus, and use your hands to ensure every stalk gets some love. Sprinkle with salt and pepper, then sauté over medium heat for about 5 minutes.
- Add 2 tablespoons of vegetable stock, cover, and let them steam for 4 minutes. Lift the lid, introduce the minced garlic, and cover again. Let cook for another 3 to 5 minutes, just until tender but with a little bite.
- Finish with a flourish of freshly grated lemon zest over the asparagus, adding a citrusy brightness that ties the whole dish together.
Cook’s Notes
Let’s talk salmon: It should flake easily with a fork when it’s done. If you’re new to broiling, remember that it’s super quick and can go from perfect to overdone in a flash. As for leftovers (if there are any!), this dish reheats beautifully. Store the salmon and asparagus separately in airtight containers for up to two days. Reheat gently, so you don’t dry out that beautiful fish. If you’re meal prepping, the marinade is a fantastic make-ahead step. Whip it up and keep it in the fridge for when inspiration (or hunger) strikes.
Make It Your Own
Here are a few ways to switch things up:
- Swap salmon for crispy tofu if you’re going plant-based. Marinate and bake it the same way for a protein-packed treat.
- Try maple syrup instead of honey for a deeper, earthier sweetness.
- Substitute broccoli for asparagus if that’s more your jam — just adjust the cooking time to keep it crisp-tender.
- Add a sprinkle of red pepper flakes to the marinade for a little heat if you like things spicy.
Hey, if you try this, I’d love to hear how it turns out for you! Drop a comment below or tag me in your delicious photos. Happy cooking!
Related update: Balsamic & Honey Glazed Salmon with Lemony Asparagus
Related update: Yogurt Marinated Lamb Skewers

Last Tuesday night, I found myself elbow-deep in a fridge raid, eyeing a pack of chicken drumsticks that had been giving me the side-eye all week. It was one of those evenings where time was not on my side. I needed something quick, but I also craved something that felt a little special. That zingy, sweet, and sticky combination of balsamic vinegar and honey popped into my mind like a lightbulb moment, and let me tell you, it did not disappoint. These Balsamic-Honey Chicken Drumsticks are not only ridiculously easy to throw together but they make your kitchen smell like you’ve been cooking for hours. You know that feeling when a dish makes you look like a kitchen wizard with minimal effort? Yeah, this is one of those recipes. Bonus: The leftovers are a gift that keeps on giving.
Jump to Recipe
What You’ll Need
Let’s be real, the magic here lies in a few pantry staples that you probably already have lurking in your cupboards. Here’s your shopping list:
- Chicken drumsticks
- Balsamic vinegar
- Honey
- Brown sugar
- Soy sauce
- Rosemary sprigs
- Garlic cloves
- Sesame seeds
- Fresh flat-leaf parsley
How to Make Balsamic-Honey Chicken Drumsticks
- Grab a large, resealable plastic bag and toss in the balsamic vinegar, honey, brown sugar, soy sauce, rosemary, and garlic cloves. Now, shake it like a Polaroid picture until the honey and sugar dissolve. You’ll know it’s ready when it’s all shiny and smooth.
- Add the chicken drumsticks to the bag. Try to squeeze out as much air as you can before sealing it up. Give the drumsticks a little massage to make sure they’re all cozy in the marinade. Let them chill in the fridge for about two hours. Trust me, the wait is worth it.
- Preheat your oven to a toasty 450°F. Line a baking sheet with foil — it makes clean-up a breeze later. Lay out the marinated drumsticks, making sure they have some space to breathe.
- Bake the drumsticks for 30 to 35 minutes. You’re looking for that gorgeous caramelized skin, dark in spots, with the smell wafting through your home.
- While the drumsticks are in the oven, pour the leftover marinade into a small saucepan. Bring it to a bubbly boil, then simmer on low until it thickens up, about 15 minutes. This is your golden glaze.
- Once the drumsticks are out of the oven, brush them with the boiled marinade. It’s like giving them a glossy topcoat. Arrange them on a serving platter and sprinkle with sesame seeds and parsley. Voilà!
Cook’s Notes
A few words of wisdom from my kitchen to yours: If you accidentally leave the drumsticks to marinate a bit longer than two hours, it’s no biggie. It’s all about that flavor infusion. Just don’t go beyond 24 hours. This dish is perfect for making ahead; just stop before baking and keep the marinated chicken in the fridge until you’re ready to cook. Leftovers can be stored in an airtight container in the fridge for up to three days. Reheat them in the oven to keep that skin crispy.
Make It Your Own
- Swap the drumsticks for chicken thighs or wings — adjust cooking time accordingly.
- If you’re avoiding soy, coconut aminos make a great substitute.
- Not a fan of rosemary? Try thyme or oregano for a different aromatic twist.
- For a vegetarian option, replace the chicken with crispy tofu squares.
If you try this, I’d love to hear how it turns out — drop a comment or tag me! Whether it’s a weeknight dinner or an impromptu gathering, I promise these drumsticks will steal the show. Happy cooking!
Related update: Balsamic-Honey Chicken Drumsticks
Related update: Balsamic & Honey Glazed Salmon with Lemony Asparagus

Picture this: It’s a chilly Tuesday evening, and I’ve just walked in from a day that felt three years long. My stomach is grumbling louder than my thoughts, and the last thing I want is a kitchen marathon. That’s when my trusty Crock-Pot and this Asian-Style Country Ribs with Black Bean Garlic Sauce recipe save the day. It’s one of those magical dishes that feels like a warm hug—comforting and flavorful yet deceptively simple. I swear, the first time I made it, I was convinced it was a culinary miracle. Not only does it take just 10 minutes to prep, but the result is rich and complex, like you’ve been slaving away for hours. Seriously, if you can operate a can opener, you can make this. Jump to Recipe
What You’ll Need
You’ll love how this recipe leans on pantry staples, with just a couple of special ingredients that pack a punch. Chances are you already have most of this. Here’s what you’ll need:
- Boneless pork ribs
- Cooked black bean garlic sauce from a jar
- Low sodium soy sauce
- Chicken stock
- Dark sesame oil
- Fresh garlic
- Ginger root
- Honey
- Black coarsely cracked pepper
- Cornstarch
- Green scallions
How to Make Crock-Pot: Asian-Style Country Ribs with Black Bean Garlic Sauce
- Begin by mincing your fresh garlic and ginger root. Trust me, the aroma is going to be your first reward.
- In a small bowl, mix together the black bean garlic sauce, low sodium soy sauce, chicken stock, dark sesame oil, honey, and the minced garlic and ginger. This is your magic potion.
- Place your boneless pork ribs into the Crock-Pot. Pour the sauce mixture over them, ensuring each rib is drenched in deliciousness.
- Add cracked black pepper over the top. It will give a subtle heat that ties everything together.
- Set your Crock-Pot on low and let it work its magic for 5 to 6 hours. You’ll know it’s ready when the meat is tender and falling apart.
- In the last 15 minutes of cooking, whisk together cornstarch with a bit of cold water. Stir it into the sauce in the Crock-Pot to thicken it slightly.
- Just before serving, sprinkle sliced green scallions over the top. They’ll add a fresh crunch and a pop of color.
Cook’s Notes
Okay, a couple of things to keep in mind: Don’t let the ribs go past the 6-hour mark, or you’ll end up with mushy meat instead of that perfect fall-apart texture. If you’re juggling tasks, you can prep everything the night before, store it in the fridge, and just dump it all into the Crock-Pot in the morning.
Leftovers are gold! Store them in an airtight container, and they’ll keep in the fridge for up to three days. Just reheat slowly on the stovetop or microwave. If the sauce thickens too much, a splash of chicken stock will do the trick.
Make It Your Own
- Swap the pork for chicken thighs: They cook beautifully in the sauce and stay juicy.
- Add a kick with Sriracha: Mix a tablespoon into the sauce for some heat.
- Go vegetarian with tofu: Use firm tofu, cut into large cubes, and reduce cooking time to 3 hours.
- Try a citrus twist: Add a tablespoon of orange zest to the sauce for a fresh, zesty note.
If you try this, I’d love to hear how it turns out—drop a comment or tag me! Your kitchen deserves this kind of effortless magic, and so do you.
Related update: Crock-Pot: Asian-Style Country Ribs with Black Bean Garlic Sauce
Related update: Balsamic-Honey Chicken Drumsticks

Picture this: It’s a Wednesday night, and I have exactly 45 minutes to whip up something that feels a little fancy but won’t leave me with a mountain of dishes. That’s when I remember my trusty cream cheese stuffed chicken breasts. It’s the kind of meal that sounds like it took hours, but really, it’s a bit of kitchen magic that you can pull together with everyday ingredients. And let’s be honest, who doesn’t love a good creamy-cheesy-bacon combo? The first time I made it, I almost skipped the tarragon — but trust me, it’s the game-changer that makes this dish sing.
Jump to Recipe
What You’ll Need
This list is pretty much pantry-basics-plus-bacon. You might even have everything you need already, minus a quick trip to the fridge:
- Skinless boneless chicken breasts
- Cream cheese
- Bacon
- Olive oil or unsalted butter
- Diced onion
- Garlic
- Salt
- Black pepper
- Fresh tarragon
How to Make Cream Cheese Stuffed Chicken Breasts
- Preheat your oven to 350°F. This is your moment to take a deep breath and envision the golden deliciousness to come.
- In a small skillet, warm the butter or olive oil over medium-low heat. Add the diced onions and let them sweat it out until they’re soft and translucent, about 5 minutes. Toss in the garlic and stir for another minute until it’s fragrant enough to make you weak in the knees.
- While that cools, grab another skillet and give the bacon a gentle sauté over low heat. You want it soft and a little bit rendered, not crispy. Paper towel it up and let it chill.
- Place the chicken breasts between two sheets of waxed paper, and give them a good, even pounding to about 1/4-inch thickness. Channel your inner zen and season them with salt and pepper.
- Combine the cooled onion-garlic mix with the cream cheese. Spread a generous dollop of this goodness in the center of each chicken breast.
- Roll or fold the chicken around the cream cheese mixture. Tuck the ends under and secure these delightful little packages with toothpicks. Don’t worry if they look a bit rustic, that’s part of the charm.
- Sprinkle fresh tarragon over the rolled chicken. Wrap each piece with bacon, giving them a cozy little blanket.
- Place your chicken rolls in an 8×11 baking dish and drizzle with melted butter. Pop them in the oven for 25 to 30 minutes. They’re done when the chicken is cooked through, the bacon is browned, and the cream cheese is irresistibly melty.
- Serve immediately and watch them disappear. Seriously, they’re magic.
Cook’s Notes
A few things to keep in mind while you’re chef-ing it up:
– Make sure the onions and garlic are cool before mixing them with the cream cheese. Otherwise, things might get a bit too melty too soon.
– If you’re making this ahead, you can assemble the chicken rolls and keep them in the fridge for a few hours. Just bake them right before you’re ready to eat.
– Leftovers? Store them in an airtight container in the fridge for up to two days. Reheat gently in the oven to keep that bacon crisp.
Make It Your Own
Here’s where you can get a little playful:
- Swap the chicken for crispy tofu for a vegetarian twist that still brings all the creamy-bacon vibes (yep, vegetarian bacon exists!).
- Add some chopped spinach to the cream cheese mixture for a pop of color and a little extra nutrition.
- Try prosciutto instead of bacon for a slightly saltier, more gourmet flavor.
- Experiment with herbs — basil or rosemary could take this dish in a deliciously different direction.
If you try this, I’d love to hear how it turns out — drop a comment or tag me! Your kitchen adventures are what make this all so fun. Happy cooking!
Related update: Cream Cheese Stuffed Chicken Breasts
Related update: Crock-Pot: Asian-Style Country Ribs with Black Bean Garlic Sauce
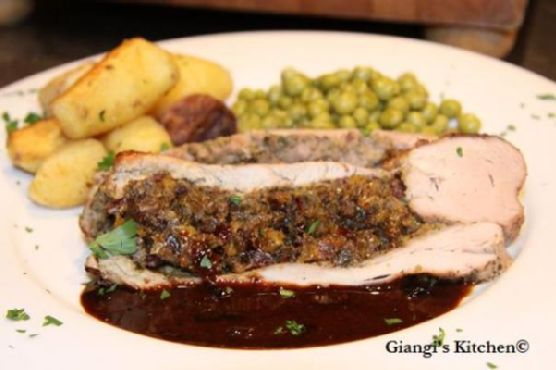
The other night, I found myself aimlessly scrolling through my pantry, wanting something that felt both fancy and comforting. You know those days when takeout just won’t do, but you don’t want to slave away in the kitchen either? Well, that was me. I stumbled on this Stuffed Pork Tenderloin with Marsala-Port Sauce recipe, and let me tell you, it hit every craving. It’s one of those dishes that sounds impressive (trust me, it is), but it’s actually pretty straightforward. Plus, talk about using up those dried fruits that have been lingering in the cupboard! Juicy pork, rich sauce, and a stuffing that makes you feel like you’re indulging at a fancy restaurant—all without breaking a sweat.
Jump to Recipe
What You’ll Need
The magic of this recipe lies in its simplicity—most of these ingredients might already be lounging in your kitchen. It’s all about those pantry staples coming together in the most delightful way. Check it out:
- 1 shallot, finely chopped
- 1 yellow onion, diced
- 1 cup mushrooms, chopped
- 1/4 cup dried apricots
- 1/4 cup raisins
- 1/4 cup dried cranberries
- 1/4 cup flat leaf parsley, chopped
- 2 pounds pork tenderloin
- 1/2 cup Marsala wine
- 1/2 cup Port wine
- 2 tablespoons butter
- 1/4 cup heavy cream
- 2 tablespoons olive oil
- Salt and pepper to taste
How to Make Stuffed Pork Tenderloin with Marsala-Port Sauce
- Preheat your oven to 450°F (230°C). This is crucial to get that perfect sear and juicy interior.
- Warm 1 tablespoon of olive oil in a large skillet over medium heat. Toss in the onions, shallots, and mushrooms. Stir occasionally until the onions are translucent and everything smells mouthwateringly fragrant.
- Remove the skillet from heat. In a small food processor, combine the cooked onion mixture with the dried apricots, raisins, cranberries, and parsley. Pulse just enough to achieve a minced, well-combined filling.
- Cut the pork tenderloin in half crosswise. Butterfly each section, being careful not to cut all the way through the meat. Generously season both sides with salt and pepper.
- Spread the onion-mushroom mixture onto one side of each butterflied section. Place the other half over the mixture, sealing the edges with toothpicks. Give both sides another generous seasoning with salt and pepper.
- In the same skillet, warm another teaspoon of olive oil over medium heat. Carefully sear the pork tenderloin on each side for 3-5 minutes until it’s gorgeously brown.
- Transfer the skillet to your hot oven. Roast for 20-30 minutes, or until the juices run clear. This is your cue that the pork is perfectly cooked.
- Remove from the oven, transferring the pork to a dish. Cover it with foil to let it rest and lock in those juicy flavors.
- Discard any excess fat or stubborn bits in the skillet. Pour in the Marsala and Port wines. Bring to a boil, gently scraping up those flavorful browned bits from the bottom.
- Pour in any juices from the resting pork, reducing the sauce until it measures about 1/2 cup. Remove from heat and swirl in the butter and cream until melted and luxurious.
- Remove the toothpicks from the pork, slice it crosswise, and plate it up. Drizzle that divine sauce over the top or serve it on the side for dipping.
Cook’s Notes
Let’s chat practicalities! This dish is perfect for a special dinner, but it can definitely be prepped ahead. You can assemble the pork with the stuffing a day before—just wrap it up tightly and refrigerate, then bring it to room temperature before cooking. Keep an eye on your sauce; don’t let it reduce too much, or you’ll end up with something more akin to caramel than sauce. Leftovers? They’re even better the next day. Store them in an airtight container in the fridge for up to three days. Reheat gently, so the pork doesn’t dry out.
Make It Your Own
You can totally switch things up depending on what you’ve got lying around or what you’re in the mood for. Here are a few ideas:
- Swap the pork for chicken breast if you’re feeling poultry. Just adjust the cooking time accordingly.
- No Marsala? A dry sherry or even a splash of brandy can stand in beautifully.
- Try adding some crushed walnuts to the stuffing for a crunchy surprise.
- If dried fruit isn’t your thing, substitute with chopped apples for a fresh twist.
If you give this a whirl, let me know how it turns out! Drop a comment or tag me in your culinary creations. I can’t wait to hear what you think. Enjoy every flavorful bite!
Related update: Stuffed Pork Tenderloin with Marsala-Port Sauce
Related update: Cream Cheese Stuffed Chicken Breasts

It was one of those chilly Tuesday evenings when my fridge looked more like a barren land than a source of inspiration. I had a long day, and there was no way I was going out again. As I rummaged through the scant produce and pantry items, the idea of a comforting pot of soup materialized like magic. That’s when Moosewood Lentil Soup came to the rescue. It’s the kind of recipe where simplicity meets warmth, and it rewards you with a bowl of deliciousness that feels like a hug from the inside. Plus, everything you need is probably already sitting in your kitchen, waiting to transform into something fabulous.
Jump to Recipe
What You’ll Need
The beauty of this recipe is its accessibility. Chances are you already have most of this list on hand, just waiting for their moment in the spotlight. Here’s what you’ll need:
- Lentils
- Water
- Grapeseed oil (or butter, if you’re feeling indulgent)
- Onion
- Celery
- Carrots
- Garlic
- Salt
- Black pepper
- Dried herbs (your choice!)
- Fresh lemon juice
- Brown sugar
- Red wine vinegar
- Tomatoes
How to Make Moosewood Lentil Soup
- Start by placing the lentils and water in a soup pot or Dutch oven. Bring it to a boil, then lower the heat to a simmer. Let the lentils cook until they’re mushy; this should take about 45 minutes. Keep an eye on the pot and add more water as needed until you get your favorite soup consistency.
- While the lentils are doing their thing, heat some oil in a medium-sized skillet. Add in the chopped onion, celery, and carrots. Sauté over medium heat for about 10 minutes; you’ll know it’s ready when the veggies are soft and the kitchen smells heavenly.
- Add the minced garlic, along with some salt, pepper, and any dried herbs you fancy. Keep sautéing for another 5 minutes to let all those flavors meld and get cozy.
- Transfer your aromatic veggie mixture into the pot with the lentils. Stir in the lemon juice and a touch of brown sugar. If you’re in the mood, add a splash of red wine vinegar.
- Taste your creation to adjust the seasonings. Let the soup simmer for at least another 15 minutes. This is where the magic happens as all the flavors marry together beautifully.
- Serve your soup piping hot, with a drizzle of vinegar on each serving and a sprinkle of minced scallions or parsley if you’re feeling fancy.
Cook’s Notes
Here’s the deal: this soup is forgiving. If you find the lentils have soaked up more water than anticipated, just add a bit more to reach the consistency you love. It’s not an exact science. For those who adore a bit of heat, a pinch of red pepper flakes does wonders. The soup keeps well in an airtight container in the fridge for up to 5 days, making it perfect for meal prep. It also freezes beautifully, so don’t hesitate to make a double batch.
Make It Your Own
- Swap the lentils for split peas or even chickpeas for a different texture and flavor.
- Substitute the grapeseed oil with olive oil for a richer taste.
- Add spinach or kale in the last few minutes of cooking for an extra boost of greens.
- Replace the red wine vinegar with apple cider vinegar for a slightly sweeter tang.
If you try this, I’d love to hear how it turns out—drop a comment or tag me! Whether it warms you up on a cold night or becomes your go-to comfort dish, this Moosewood Lentil Soup is sure to find a special place in your recipe repertoire. Happy cooking, friends!
Related update: Moosewood Lentil Soup
Related update: Homemade Broccoli Cheddar Soup

Last Tuesday, I found myself standing in front of the fridge, aimlessly scrolling through takeout options on my phone. It was one of those evenings, you know? The kind where the day just takes a toll, and the thought of cooking seems exhausting. But as I eyed a bunch of asparagus that was just on the brink of wilting, I decided to make something quick yet comforting. Chimichurri Skirt Steak with Grilled Asparagus it was! This dish is a flavor bomb — the kind of meal that feels like a mini celebration, but really comes together with minimal fuss. Plus, the chimichurri sauce? It’s like a magic potion that instantly elevates anything you drizzle it on.
Jump to Recipe
What You’ll Need
The beauty of this dish is in its simplicity. Chances are, you already have most of what you’ll need in your kitchen. Here’s what you’ll be grabbing:
- Skirt steaks – about 1.5 pounds
- Flat leaf parsley – a generous handful
- Fresh mint leaves – a small handful
- Fresh oregano leaves – a small handful
- Garlic cloves – 4 to 5, because more is more
- Shallot – 1 medium-sized
- Red wine vinegar – a splash for that tangy kick
- Olive oil – enough to get things silky
- Lemon juice – a squeeze
- Kosher salt
- Black freshly cracked pepper
- Chili pepper flakes – optional, for a bit of heat
- Green or white asparagus – a bundle, ready for grilling
How to Make Chimichurri Skirt Steak with Grilled Asparagus
- First, let’s tackle the chimichurri sauce. Place all the ingredients except for the olive oil — parsley, mint, oregano, garlic, shallot, red wine vinegar, lemon juice, salt, pepper, and a pinch of chili flakes — in a food processor. Pulse until everything is well chopped.
- With the processor running, slowly drizzle in the olive oil until you have a smooth, vibrant green sauce. Remember to reserve half of this for serving.
- Season both sides of the skirt steaks with salt and pepper. Generously spoon the remaining chimichurri sauce over the steaks, making sure they’re well coated. Let them marinate for at least 30 minutes or even overnight in the fridge if you have the time.
- While your steaks are soaking in all that flavor, pre-heat your grill to a cozy 350-400°F.
- In a large resealable plastic bag, toss your asparagus with a glug of olive oil, a clove of minced garlic, and a sprinkle of salt and pepper. Shake it like you’re in a dance-off to ensure everything’s coated, then place the asparagus in a grill basket.
- When the grill is hot, place the steak and the basket of asparagus directly over the flames. Turn the asparagus occasionally, basting with the garlic oil for about 10 minutes, until tender.
- Grill the steaks to your liking — about 5 to 8 minutes per side should do it for medium-rare. Let them rest for 10 minutes before slicing against the grain into long, juicy strips.
- Finally, spoon the reserved chimichurri sauce over the steak slices and serve with the beautifully grilled asparagus. Enjoy the symphony of flavors!
Cook’s Notes
This dish is seriously forgiving. If you don’t have a food processor, no worries — a blender or some good knife skills will get you there. Just chop everything finely and mix. Resting the steak after grilling is key — it lets the juices redistribute, so your meat isn’t dry.
- If you’re marinating overnight, let the steaks come to room temperature before grilling for even cooking.
- Leftover chimichurri can be stored in the fridge for up to a week and is perfect for drizzling over roasted veggies or mixing into scrambled eggs.
Make It Your Own
- Swap the skirt steak with a flank steak for a slightly leaner option. Just keep an eye on the cooking time.
- If mint isn’t your thing, use cilantro instead — it adds a nice, fresh twist.
- For a vegetarian version, use thick slices of portobello mushrooms in place of the steak.
- Mix it up with rainbow carrots instead of asparagus for a colorful plate.
If you try this, I’d love to hear how it turns out — drop a comment or tag me in your photos! Cooking is all about sharing the love, and I can’t wait to see your take on this dish. Happy grilling!
Related update: Chimichurri Skirt Steak with Grilled Asparagus

The first time I attempted to make tamales, it was a classic case of my eyes being bigger than my expertise. I had this craving for something hearty yet comforting, and tamales seemed like the perfect challenge. Spoiler alert: the kitchen looked like a masa massacre by the end of it. But with a little patience and practice, these Beef, Poblano & Cheese Tamales have become my go-to for impressing friends without losing my mind in the process. They’re just the right mix of savory and spicy, with a cheesy twist that keeps you coming back for more. Plus, the aroma that fills your kitchen is like a warm hug from a friend you haven’t seen in ages.
Jump to Recipe
What You’ll Need
You might already have most of these staples in your pantry. And if you don’t, trust me, it’ll be worth the grocery run.
- Dried corn husks
- Dried California chili pods
- Ground beef
- Shredded mozzarella cheese
- Diced poblano pepper
- Garlic, minced
- Olive oil
- Goya seasoning
- Salt
- Chili powder
How to Make Beef, Poblano & Cheese Tamales
- Start by soaking the corn husks in hot water in a large bowl. They need to be pliable, so give them at least 20 minutes.
- In a large saucepan, bring 4 cups of water to a boil. Remove any string-like bits from the chili pods and throw them into the boiling water with half a packet of Goya seasoning. Cover it up and let it all simmer for about 20 minutes.
- Once the chili pods have softened, blend them with 2 cups of the chili stock until you get a smooth sauce. Drain the rest of the stock from the saucepan, but keep it handy.
- Put the saucepan back on medium heat. When any leftover stock evaporates, add a splash of olive oil, then toss in the onion and beef. Break apart the beef as it cooks.
- Season the beef with a packet of Goya seasoning and chili powder, then let it cook for about 5 minutes until it gets a bit brown.
- Pour in the chili sauce, followed by the garlic and about 2 teaspoons of salt. Add the diced poblano pepper now for the best flavor. Turn the heat down to medium-low, partially cover the pan, and let it simmer for an hour. The sauce should thicken nicely.
- While the beef is simmering, make the corn masa mix. In a large bowl, combine the instant corn masa mix, water, baking powder, salt, and olive oil. Mix until it’s spongy.
- Now for assembly: spread the masa mix thinly on the right side of a corn husk, leaving about 2 inches at the left edge clear. Spoon about 2 tablespoons of the meat mixture and a sprinkle of cheese onto the masa. Roll it up starting with the right-hand side, and fold the left flap over.
- If you’ve got a double boiler, great! If not, a metal colander in a large pot will do. Arrange the tamales so they’re snug but not squashed.
- Boil 2 cups of water in the pot (or about 1 inch high), then reduce the heat and add the tamales. Place a towel between the colander and lid to keep the steam in. Let them steam for 30 minutes.
Cook’s Notes
Soaking the corn husks longer is better than less, so patience pays off here. When blending the chili pods, you might have to stop and scrape the sides of the blender to get a smooth sauce. And hey, don’t stress if your masa isn’t perfectly even when you spread it — it’s homemade charm we’re going for, not factory precision.
Leftovers? Store them in an airtight container in the fridge; they’ll last up to a week. Reheat them by steaming again or even in the microwave wrapped in a damp paper towel to keep them from drying out. You can also freeze them for up to three months, just make sure they’re cool before you pack them up.
Make It Your Own
- Swap the ground beef for shredded chicken or even pulled pork for a different protein punch.
- Try smoked gouda or Monterey Jack instead of mozzarella for a unique cheesy twist.
- If you’re a veggie lover, add in some sautéed mushrooms or zucchini with the poblano for extra texture.
- For a spicy kick, mix in some diced jalapeños or serrano peppers when you add the poblano.
And there you have it! If you try this, I’d love to hear how it turns out — drop a comment or tag me! These tamales are a labor of love, but trust me, they are totally worth it. Enjoy every bite!
Related update: Beef, Poblano & Cheese Tamales
Related update: Chimichurri Skirt Steak with Grilled Asparagus

It was one of those weeks where everything felt like a mad dash. The kind where your to-do list is longer than your patience, and the only thing you’re craving is something that feels like a warm hug on a plate. Enter: Moroccan Spiced Chicken Under A Brick. It sounds fancy, right? But trust me, it’s deceptively simple and perfect for when you want to impress without the stress. Plus, there’s something deeply satisfying about the way the flavors meld together, transporting you somewhere far more exotic than your messy kitchen. This dish is all about that crispy skin and bold, aromatic spices. You’ll see why it’s become a favorite weeknight escape for me.
Jump to Recipe
What You’ll Need
Let’s talk about the ingredient list. It’s one of those recipes where you’re likely to have most items already. And the ones you don’t? Well, they’re worth the trip to the store because they pack a punch.
- Whole chicken
- 3-4 garlic cloves
- Fresh cilantro leaves
- Sea salt
- Lemon zest
- Saffron threads
- Olive oil
- Paprika
- Ground cumin
- Black pepper
- Cayenne (if you like a little heat)
How to Make Moroccan Spiced Chicken Under A Brick
- First, grab your mortar and pestle. Combine the garlic, a handful of cilantro leaves, one teaspoon of salt, lemon zest, and a pinch of saffron. Smash it all into a fragrant paste. It should smell like a garden in full bloom.
- Stir in about 3 tablespoons of olive oil until everything is beautifully combined. This is your flavor-packed paste of dreams.
- Take your chicken and rub it all over with the paste. Don’t be shy — get it everywhere, even between the skin and breast meat. This is where the magic happens.
- Place the chicken on a tray or platter, skin side up, and cover it loosely with plastic wrap. Refrigerate for at least 2 hours. If you’ve got the time, let it go up to 6 hours. This step lets the flavors really sink in.
- About 30 minutes before you’re ready to roast, take the chicken out of the fridge. Let it come to room temperature; this helps it cook evenly.
- Preheat your oven to 450°F (230°C). While it heats, place a heavy pan (like cast iron) on top of the chicken to press it down. This is the “brick” part — it ensures that golden crispy skin you’re after.
- Roast the chicken for about 35-45 minutes. You’ll know it’s done when the skin is a deep, enticing golden brown, and the kitchen smells like you’ve been transported to the heart of a Moroccan spice market.
Cook’s Notes
Let’s keep it real: the saffron might be a splurge, but it’s worth it for that unique, earthy aroma. If you don’t have a mortar and pestle, a small food processor will do in a pinch. Just don’t overblend — we want a paste, not a smoothie! Store any leftovers in an airtight container in the fridge for up to 3 days. Reheat gently in the oven to keep that skin crisp. Pro tip: You can make the paste the day before, which is a real time-saver on a busy day.
Make It Your Own
- Swap the chicken for crispy tofu for a vegetarian take. Just press the tofu to remove excess water before marinating.
- Out of cilantro? Try parsley or even mint for a different herbaceous twist.
- If saffron’s not your thing, a pinch of turmeric will give you that lovely color and an earthy flavor.
- Want more heat? Double up on the cayenne or add a bit of smoked paprika for a smoky kick.
If you try this, I’d love to hear how it turns out — drop a comment or tag me! Cooking is all about sharing and experimenting, so let me know how you make this dish your own. Enjoy every bite!
Related update: Moroccan Spiced Chicken Under A Brick
Related update: Beef, Poblano & Cheese Tamales